Table of Contents
Executive Summary ...3
Introduction ...3
Top Reasons To Do This Project ...3
Before You Get Started...3
Understanding the Big Picture of Inventory Management ...4
The Physical Picture ...5
The FileMaker Picture ...5
Your Inventory Management System ...6
Start with a mission and a plan ...6
Step 1: Write a mission statement ...6
Step 2: Develop a plan ...6
Use what you have—the Business Productivity Kit ...6
Step 1: Adding Inventory ...7
Manual data entry ...7
Importing ...8
Step 2: Adding Serial Numbers ... 13
Step 3: Adding Contacts ... 14
Step 4: Creating Sales Orders ... 14
Step 5: Reports—Inventory and Catalog ... 15
Make it better with line items Step 1: Creating a new table ... 16
Step 2: Formatting the line items layout ... 18
Step 3: Connecting the new table to Sales Orders ... 21
Step 4: Connecting the new table to Inventory and reports ... 33
Make it better with Tooltips Step 1: Adding a Tooltip to the Sales Orders ... 36
Make it better with labels Step 1: Creating a label layout ... 37
Step 2: Adding a script for printing ... 42
Conclusion ... 43
FileMaker Pro resources ... 44
Executive Summary
FileMaker Pro gives you the tools you need to thoroughly manage your inventory. This document walks you through the steps to create an inventory management system quickly and easily, working with the Business Productivity Kit from FileMaker, Inc.
The concepts of inventory are defined, and the inventory components of the Business Productivity Kit (BPK) are introduced. Line items are added to sales orders in the BPK for more accurate reporting. Tooltips are added to help users understand inventory levels. Labels are added, with a barcode font applied to assist with sales and inventory.
Introduction
Inventory management is the key to maximizing your profit and your customers’ satisfaction. FileMaker Pro makes it easy to keep track of products and inventory, with unique identification numbers for each product, the ability to see how many products have been moved, and flexible methods for collecting information on deliveries, sales, and inventory. FileMaker Pro accepts data entry from the keyboard and mouse, as well as barcode scanners and spreadsheets, allowing you to enter information your way. By keeping track of products as they come in and go out, FileMaker Pro can help you order on time, manage the amount of inventory on hand, get the right products to each customer, and understand which products sell best. This FileMaker DIY describes how to implement a successful inventory management system step-by-step.
Top Reasons to Read this Guide
By spending a short time with this informative guide, you will learn how to: • Take control of your inventory
• Connect your products to sales orders and customers. • Generate timely reports of product sales
• Enter product information quickly and accurately by importing data from other files or by scanning with barcodes
• Print consistent and attractive labels for products
What FileMaker can do for you and your business
• Organize products, vendors, and customers• Track deliveries and sales
• Report inventory levels, percentages, and trends • Remind you when to order products
• Flex with your changing needs
How FileMaker does it
• Creates unique IDs for each product, even each unit • Prints labels and barcodes
• Displays orders and sales for each product
• Reports by product, location, user, date range, price range—actually any criteria you have
Before you get started
1. Install FileMaker Pro 8 or 8 Advanced, or FileMaker Pro 8.5 or 8.5 Advanced, . 2. Download and install the Business Productivity Kit from http://www.filemaker.com.
The minimum system requirements for FileMaker Pro 8.5 are shown in Table 1. Macintosh
• Macintosh computer with a PowerPC G3, G4, or G5 processor • Apple computers with Intel processors
• 256MB of RAM
• CD or DVD drive and hard disk drive • Mac OS X 10.3.9 or Mac OS X 10.4 Windows
• Pentium III 500MHz or higher • 256MB of RAM
• CD or DVD drive and hard disk drive
• SVGA (800 x 600) or higher resolution video adapter and display • Windows 2000 (Service Pack 4), Windows XP (Service Pack 2) Table 1: FileMaker Pro 8.5 system requirements
You can also request a free 30-day trial copy of FileMaker Pro 8.5 at http://www.filemakertrial.com/ bpk. After you have submitted your details, you will be redirected to a download page. You can also download the FileMaker Business Productivity Solution database files. These files are fully working business database templates which you can either start to use immediately, or customize for your own business needs. The files are also a great source for design ideas which you can apply in designing your own database. We will be using these files to demonstrate how easily a database can be adapted for your specific shipping requirements. You can also request a copy of FileMaker Pro 8.5 and the Business Productivity Solution files in other languages, from your regional FileMaker Web site. FileMaker International’s Web sites and distributors are listed at http://www.filemaker.com/company/ intl/index.html.
Install FileMaker Pro on your computer and expand the contents of the compressed Zip or SIT file that contains the Business Productivity Solution files. Save the expanded folder to your desktop or another preferred location.
Understanding the Big Picture of Inventory Management
Inventory management can be as simple as a list of products that you sell, with a count of products that you have sold. And it can be as complex as that same list accounting for units that have been ordered, are on hand, are committed to future orders, and have been sold and removed from inventory. Add to that the possibility of multiple warehouses, multiple pricing levels for different types of customers, and multiple vendors supplying similar products. That can be quite a handful!
No matter how complex your system is, inventory management shares these terms and concepts: • Inventory is—an accounting of every product on hand
• Inventory is not—your product catalog or actual sales
• Inventory is connected to the rest of your business in these ways:
- Your product catalog is a collection of products that you have sold, may sell, or do sell. - Your products on-hand arrive because of orders from vendors.
- Sales are products that you did have on hand, and have sold. - Physical inventory is what you have on hand, ready to sell.
- The difference between what has been delivered and what has been sold should match physical inventory.
- If these don’t match, adjustments can account for retired items that have spoiled, disappeared, or are broken and unsellable. Adjustments can also account for mistakes in inventory counts, invoicing, and ordering.
The Physical Picture
Think of your inventory management project as a cube. Each side represents the aspects of your inventory listed above. Within the cube, each side is connected or related to the other sides. For instance, one side is your catalog. One side is vendors. Another side is the products ordered and delivered from vendors. And still another side is a physical inventory.
Now imagine that each side is transparent, allowing you to look into the center of the cube. This way, no matter which side you look at, you can see through to the other sides. For example, from the catalog side, you can see the number of products sold as well as the inventory on hand. From the vendors side, you can see the products that you normally order from that vendor, as well as the orders you have placed with them. And from the physical inventory side, you can see the product ID from the catalog.
Image 1: The physical picture The FileMaker Picture
And now picture this as a FileMaker solution. Piece of cake, right? In all seriousness, this is exactly how your FileMaker inventory management system works—tables of products, customers, and sales, all related to one another.
The Business Productivity Kit (BPK) incorporates these tables, as well as the inventory management concepts listed above. In order to make it even more functional with tools like line items, inventory controls, and Tooltips, we will develop a plan, and then look at how to use the BPK and how to add the new tools.
Your Inventory Management System
Start with a Mission and a PlanStep : Write a mission statement
A new project has the best chance of succeeding if it starts with a plan. Interview your client, whether the client is you or a company with many users, and write a mission statement. A mission statement or description of the final project gives you a guide for a plan. For your inventory management system, your statement might start like this: “This system keeps track of our product inventory.”
Depending on how much detail you are looking for, your statement might go on to say, “In order to understand how products are selling, this system also keeps track of orders to vendors and sales to customers, and gives us the opportunity to make adjustments for retired items.”
Keep this statement as simple as possible. Leave the details for the next step, the plan. Do keep in mind as you write the statement what you don’t want the system to do—for instance, if you don’t want to keep track of orders to vendors, don’t include that in the statement.
Step : Develop a plan
This part is actually easy, after you have written a mission statement. The mission of your inventory system drives the structure of your plan. First, based on the mission statement, make a list of the tables and fields you will need. Here’s a guide: Nouns, such as “products” and “sales,” are tables. Adjectives or descriptive nouns, such as “quantity” and “date sold,” are fields. You will also need a list of the types of people who will use the system, their level of access, the layouts required for each person to do their job well, and the elements on those layouts (such as navigation buttons and information).
Next, review this list to see if you already have any of these tables, fields, layouts, etc. Most of what you need probably already exists in the Business Productivity Kit. In the next section, we will add some elements that are not in the BPK, such as line items for more accurate inventory calculations, product labels, and reports.
One subject we will not cover is security, or the levels of access. See the FileMaker Resources section at the end of this document for information on FileMaker security.
Use What You Have—The Business Productivity Kit
It’s time to start working with the Business Productivity Kit.Launch FileMaker Pro on your computer and using the Open File dialog box, locate and open the folder called BPS_1.0, which contains the Business Productivity Solution files. Open the file called bps_ _Main_Menu. This file will open the associated FileMaker files that make up the Business Productivity Solution.
A dialog box may appear as the file opens advising you that the date and time formats for the file are different from your computer’s system settings. You can dismiss this message by clicking either the ‘System’s Setting’, or ‘File’s Setting’ buttons.
The Business Productivity Solution Main Menu window will appear, as shown in Figure 1.
Figure 1: The Business Productivity Solution Main Menu window
In order to see how the inventory system works, we need to add records to the Inventory, Contacts, and Sales Orders modules.
Step : Adding Inventory
FileMaker Pro accepts data in many ways. You can type it in manually. You can import from one
FileMaker table to another. You can import from another FileMaker File. And you can import from other types of files, such as Excel. When FileMaker is hosted to the Web, you can also add data through a web browser.
To add data manually to the Inventory table, open the Business Productivity Kit. Next, click on Inventory on the Home page. This brings you to a detail view of one piece of inventory.
1. Create a new inventory record by clicking the New icon toward the top left of the layout. You can also create a new record by choosing Records menu> New Record. Or you can create a new record by using the key combination Control+N on Windows or Command+N on Macintosh. 2. Enter the product name, description, etc.
3. Move to the next field by hitting your tab key.
4. When you are finished entering data, you can create another new record or return to the Home page.
Figure 2: The Inventory Window in the Business Productivity Solution To add data to the Inventory table by importing:
1. In Inventory, choose File menu> Import Records> File…
2. Navigate to the file to be imported.
3. If the file is not available, click the “Show” drop-down (Macintosh) or “Files of type” drop-down (Windows) at the bottom of the dialog, and change the type to All Available or All Files.
4. Select the file and click Open.
5. The Import Field Mapping dialog gives you the opportunity to map fields from your file into the Inventory table. Slide fields on the right up or down to match fields on the left.
6. Be sure that an arrow matches fields you want to import. To turn on an arrow, click between the two fields.
7. To see how your data will match the Inventory fields, use the double arrows at the bottom left of the match window to browse records in your file.
Figure 4: The Import Field Mapping dialog 8. Leave the other options as is.
9. Click Import.
10. The Import Options dialog gives you the option to allow FileMaker to automatically assign serial numbers and other types of information. In this case, check the box to “Perform auto-enter options while importing.” Leave the next choice as is.
11. Click Import.
12. FileMaker will display an Import Summary to tell you how many records were imported or skipped. Click OK to exit this dialog.
Figure 5: The Import Options dialog
Figure 6: The Import Summary dialog
If you want any or all of these new items to be included in the catalog, the Catalog Item field must contain a value. In this solution, the Catalog Item field is formatted with a script to toggle the value between empty and 1. If you have imported many records, it will be tedious to go to each record to change that field. To change Catalog Item in all the records in the found set:
1. In Inventory, go into Layout mode.
2. Select the Catalog Item field (not the title), which is the checkbox below Reorder Level.
3. Choose Edit menu> Duplicate. (Because this field has a script attached to it, the field will simply duplicate. If the field had no script attached to it, the Specify Field dialog would appear, requiring you to accept the same field or select another.)
4. Double click on the new field, and select Do Nothing at the top left of the Button Setup dialog. 5. Click OK.
6. Double click on the new field again, and change “Display as:” to Edit Box. 7. Click OK.
8. Move the field to the right of the original field.
9. Change the color of the text in the new field to black by choosing Format menu> Text Color and selecting black.
10. Go into Browse mode.
11. If the current record does not have an “x” in the original Catalog Item field, click the field to add the “x.”
12. Now click into the new Catalog Item field.
13. Choose Inventory menu> Replace Field Contents (in a FileMaker solution that does not use custom menus, choose Records menu> Replace Field Contents).
14. Read the Replace Field Contents dialog—it describes what it is about to do. 15. Click Replace.
16. Return to Layout mode.
17. Select the new Catalog Item field and delete it, leaving the original checkbox. 18. Return to Browse mode.
A note about menus: The BPK uses custom menus to display menus and menu items related to the table and layout you are working in. In the Inventory area, the Inventory menu corresponds to the Records menu in a solution that uses the standard menu set. All new FileMaker solutions start with the standard menu set installed. For more information on creating and installing custom menus, see the FileMaker Help system.
You can also import pictures of products. The following method brings in pictures with no Description, Manufacturer, etc. After import, be sure to visit each record to fill in that data. To add pictures to the Inventory table by importing:
19. In Inventory, choose File menu> Import Records> Folder…
20. Click the Specify button to navigate to the folder to be imported, and click Choose. 21. Leave the “File Type as Picture and movie files” selected.
22. To reduce the size of the BPK, leave the box checked next to “Import only a reference to each picture file.”
23. Click Continue.
Figure 7: The Import Field Mapping dialog with fields mapped correctly 25. Click Import.
26. The Import Options dialog gives you the option to allow FileMaker to automatically assign serial numbers and other types of information. In this case, check the box to “Perform auto-enter options while importing.” Leave the next choice as is.
27. Click Import.
28. FileMaker will display an Import Summary to tell you how many records were imported or skipped. Click OK to exit this dialog.
29. Again, this method brings in pictures with no Description, Manufacturer, etc. Be sure to visit each record to fill in that data.
Your new records are now the found set. If the fields were not matched correctly, you can delete the found set by choosing Inventory menu> Delete All Products and click Delete All. The next time you choose File menu> Import Records> File… or Folder…, you will have the opportunity to change the field mapping.
Thinking ahead… If you are going to import products or pictures on a regular basis, create a script and store the field mapping in an Import Records step.
Step : Adding Serial Numbers
Because this is a relational database, there must be a value in the Product ID field in order for other parts of the database to relate to Inventory. If you checked the box to “Perform auto-enter options” when you imported records, you can skip this section.
If you unchecked the box to ”Perform auto-enter options on import,” you can create serial numbers automatically. Be careful! This procedure, using the Replace Field Contents menu item, is irreversible. Be sure to go one step at a time:
1. In Inventory, enter Layout mode.
2. Add the Product ID field to the layout by selecting the Weight field and choosing Edit menu> Duplicate (Control+d or Command+d).
3. Select Product ID from the Specify Field dialog. 4. Click OK.
5. Move the field and title down and arrange them to align with the fields and titles above. For finer control, use the arrow keys on your keyboard to move the objects one pixel at a time in any direction.
6. The Weight field has a number format which is not appropriate for the Product ID field. Right-click or Control-click on the Product ID field, and choose Number Format.
7. Check the box to “Leave data formatted as entered.” 8. Click OK to dismiss the Number Format dialog.
9. Format the Product ID title to match the other titles by selecting it and choosing Format menu> Size> 11 pt.
10. Remove the bold formatting by choosing Format menu> Style> Plain Text (Control+Shift+P). (If a dialog asks ‘Save changes with this layout?,’ you may choose to check the box to save layout changes automatically. If you do not check this box, you will encounter this dialog each time you make a change in Layout mode and then go to another mode. Either way, click Save to continue.) 11. Add a colon to the title by double clicking the title and typing a colon at the end.
12. If needed, resize the title by grabbing the left corner at the top or bottom, and dragging to the left a few pixels.
13. When you are satisfied with the format and placement, enter Browse mode. 14. Click into the Product ID field.
15. Choose Inventory menu> Replace Field Contents (in a FileMaker solution that does not use custom menus, choose Records menu> Replace Field Contents).
16. Read the Replace Field Contents dialog—it describes what it is about to do. 17. Check the radio button to “Replace with serial numbers.”
18. The “Initial Value” can start at 1 if you know that no other Product IDs have been set. Otherwise, start the initial value higher than existing Product IDs. You can also use text in initial values. For instance, combine letters and numbers to create a code.
19. Leave “Increment by” at 1, or use a different value, such as a decimal.
a. For example, with the Initial value set to 00001, and Increment by set to 1, the first record will have a serial number of 00001, the second record will have a serial number of 00002, etc. b. With the initial value set to INV1.0 and the Increment by set to 1, the first record will have a
serial number of INV1.0, the second record will have a serial number of INV1.1, the third record will have a serial number of INV1.2, and so forth.
20. Click Replace. Step : Adding Contacts
Just as you can add data manually or import data into the Inventory table, you can add data the same way to the Contacts table.
At this point, go ahead and add a few contacts manually, or import a file. For contacts, you might use a file exported from your contact list in Outlook Express or Entourage or Apple’s Address Book. See the documentation for those programs to learn how to export a tab or comma delimited list.
Step : Creating Sales Orders
Wouldn’t it be lovely if you could import sales orders as easily as you can import inventory and contacts? Luckily, you don’t have to do all the data entry yourself, because the BPK is designed to use the inventory and contacts you have already entered.
To create a new sales order:
1. From Home, go to the Sales Orders section. 2. Click New to create a new record.
3. The sales date is entered automatically. To change the date, you can enter a new date, or click the icon in the field to display a drop-down calendar.
4. In the Bill To: field, start typing the name of one of your contacts. FileMaker will suggest names from the Contacts table.
a. To accept a name, tab to the next field, or exit the record by clicking outside all fields or hitting the Enter key (not the return key).
b. Alternatively, click the icon in the field to see a drop-down list of contacts.
c. Once you select a name, the Email, Company, Address, City, State, and Zip fields will fill in automatically, if that data exists.
5. If a contact is not in the list, enter the data manually.
6. To make the Ship To information match the Bill To information, click the arrow between them. Now you can modify information on either side.
7. Enter the status and ship dates. Again, you can type the data, or click the icon in the field for a drop-down list and calendar.
8. To add a product, click in the Serial Number field. You will see a drop-down list of all Product IDs and the product name.
9. Click a product to select it.
11. Fill in the Quantity (and Description and Price if needed).
12. Click the “Check Stock” link to compare the quantity in the sales order to the quantity on hand. If there is not enough stock on hand, the quantity field will turn red.
13. Fill in Notes, Terms, F.O.B., and other fields as needed. 14. Congratulations—you have created a sales order!
Figure 8: The Sales Orders in the Business Productivity Solution Step : Reports—Inventory and Catalog
Now that you have created a sales order, you have added a dimension to your inventory—sales. Let’s go back to Inventory to look at an inventory report.
1. From Home, click the Inventory link.
2. At the top right, next to View Reports, click the Inventory button.
3. This report is a list of all products in the Inventory table, with the serial numbers, amount in stock (which is in red if the amount in stock is lower than the reorder level), and the reorder level. 4. Click Continue to return to Inventory.
5. Next, click the Product Catalog button.
6. This report is a list of the same products, but formatted as a catalog. The product name is formatted as a title, fields are grouped to be easy to read, and any pictures are displayed along the right side.
Make it better with line items
Line items are the products you assign to a sales order. In the BPK, the line items are contained in fields native to the Sales Orders table. The Serial Number, Description, Quantity, Price, and Amount fields are formatted to display as repeating fields. On the Sales Order layout, Serial Number is a single field, with four repetitions. Description, Quantity, Price, and Amount are also single fields with four repetitions. Because of this, you can add up to four products to a sales order.
But what if you want to add more products to a sales order? You could increase the number of repetitions, but what if you wanted to add still more? To handle an unknown number of line items, we need to change the sales order. Instead of repeating fields, the line items will be records in a new table called Line Items. This new table will take the place of the repeating fields. It will gives us the ability to add an unlimited number of products to a sales order, and it will give us more flexibility for reporting on individual sales orders and products.
In this section, we will create a new table. Next, we will format the new layout for the table, connect the table to the sales order and other tables in the solution, and create a product sales report.
Step : Creating a new table
1. In the Sales Order layout, choose File menu> Define> Database… (Shift+Control+D or Shift+Command+D).
2. Click on the Tables tab at the top of the dialog.
3. Highlight the name of the table in the Table Name field at the bottom left of the dialog. 4. Type “Line Items” and click Create.
5. Click the Fields tab at the top of the dialog.
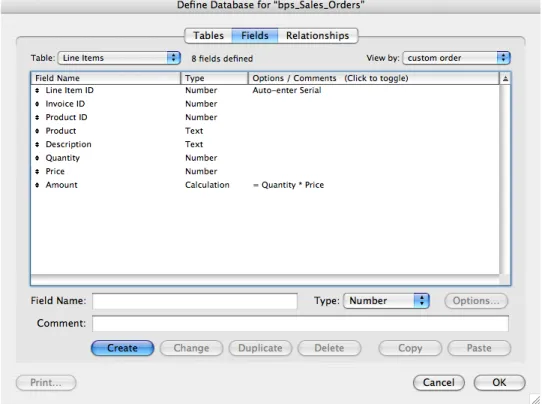
6. Create the fields shown in Figure 9. Be sure to make Line Item ID a serial number by creating the field, then selection Options, and checking the box for “Serial number.” The Amount field is a calculation. When you create that field, you will have the opportunity to choose the Quantity and Price fields from a list of all fields, and the opportunity to add an asterisk (which means to multiply in the FileMaker dialog) between the two.
Figure 9: Fields in the new Line Items table
A note about field names: One of the most useful aspects of FileMaker Pro is the freedom to name fields, tables, and scripts, etc. almost anything you want. The downside to this freedom is inconsistent fields names, or names that use characters that FileMaker Pro may not work well with (for example, # and $ at the beginning of field names). A consistent field naming scheme will help you work with fields more efficiently. It is more important to actually have a naming scheme that works for you, than it is to adopt one developed by someone else. FileMaker, Inc. has developed a guide for naming conventions, which you can find it at http://filemaker.com/downloads/pdf/FMDev_ConvNov05.pdf.
Another alternative is to use only the 26 letters of the alphabet, with no spaces. Also, name all ID fields “ID” plus a descriptive name. In the case of this new Line Items table, change Line Item ID to IDLineItem, change Sales Order ID to IDInvoice, and change the name of Serial Number to IDProduct. Also, sort the fields by Field Name. In Figure 10, you can see how much easier it is to pick out the ID fields.
Figure 10: Fields renamed and sorted alphabetically in the new Line Items table
Because Product ID is native to the Inventory table, and Invoice ID is native to the Sales Order table, you might want to go to those tables and rename those fields as well. As you can see, this can be an intricate process when you are working with an established program. When you are starting from scratch, you can implement your own naming convention a little more easily. Again, it is more important to actually have a naming scheme that works for you than it is to adopt one developed by someone else.
Step : Formatting the line items layout
When you create a new table, FileMaker automatically creates a new table occurrence in the
Relationships graph, and creates a new layout with the same name as the new table. Let’s format the new layout, and then we will connect the new table occurrence to other tables in the solution. 1. Click OK to exit the Define Database dialog.
2. Navigate to the Line Items layout by choosing the layout drop-down at the top of the status area. 3. At this point the layout consists of the fields in the table. We need to arrange the fields so that they
are easier to read. We will use Table View to accomplish this. a. Go into Layout mode.
b. Choose Layouts menu> Layout Setup…
c. Click the Views tab.
e. Under Header and Parts, check the box to “Include header part.”
f. Note the other boxes that are checked by default: Resizable columns, Reorderable columns, and Sort data when selecting column. These will come in handy in a few moments.
g. Click OK and OK to exit the dialogs.
4. We also need to add navigation to return to the sales order and the home area. We will copy the navigation from the Form View and paste it in the new Line Items layout.
a. Navigate to the Form View layout.
b. In Layout mode, select and copy the entire section at the top, from the black background down to the red bar. In Figure 11, all of the elements are selected. Note: The easiest way to select all of the objects is to click and drag, starting about a quarter inch below and to the right of the red bar.
Figure 11: Highlighting elements on the Sales Order c. Copy the selection (Command+C or Control+C). d. Navigate to the Line Items layout.
e. Enlarge the header about 2 inches by clicking and dragging the dotted line between the header and the body.
f. Click at the top left of the header section—when you paste, this will force the selection to center the items as close to the top and left of the header as possible. (In reality, the selection will be centered on the last place you clicked. If the selection is too tall or too wide to fit, it will be aligned against the top and/or left edges of the layout.)
g. If you haven’t already, paste (Command+V or Control+V). If you need to move what you just pasted, move it before deselecting.
h. Resize the header to fit up against the red bar.
i. Select the Text tool from the Status Area. Highlight Sales Orders in the top left, and change the name to Line Items.
j. Select the Pointer tool from the Status Area, or hit the Enter key on your keyboard (not Return). This will toggle your cursor or pointer back to the Text tool.
k. Remove these items: New, Delete, Print Invoice, Email Invoice, View Reports, Sales Invoice, Sales Numbers, and the white lines between those items.
l. Double click on Shipments. This brings up the Button Setup Dialog.
m. Click Specify… and change the script to Go to List Layout, which is near the top. n. Click OK to exit the dialog, and click OK again to exit the Button Setup dialog. o. Select the Text tool from the Status Area.
p. Click in Shipments, highlight the entire word, and type Sales Orders. q. Finally, select all of the fields by clicking and dragging around them.
r. Align the text left by choosing Format menu> Align text> Left, or by using the kcy combination Control or Command + [ (left bracket).
5. Now change the view in Browse mode. a. Go into Browse mode.
b. Select View menu> View as Table.
6. To rearrange the order of the fields, click and drag them. You can also resize the columns and you can sort the list by selecting a column. These are all choices regulated by the Table View Properties dialog in Layout Setup, which we visited a few steps earlier.
Figure 12: The new Line Items layout in Table View, with 10 test records 7. Click the Sales Order button to return to Sales Orders.
8. Add a link to the new Line Items layout:
a. Enter Layout mode. Slide View Reports to the left 1.5 inches—the most accurate way is to use the Object Size dialog.
i. Choose View menu> Object Size. ii. Select View Reports.
iii. You can toggle the default measurement in the Object Size dialog among pixels, inches, and centimeters by clicking the current measurement indicator to the right of any of the fields in the Object Size dialog. This also affects the graphic and text rulers.
iv. Change the default measurement to inches.
v. Change the top value by entering a number that is 1.5 incheds less than the current measurement.
b. Select Sales Invoice and the white bar to the right at the same time, and duplicate them—in this case, the most accurate way is to start to drag them to the left, and then hold the Option or Control key (which will duplicate the objects) AND hold the Shift key (which will keep them aligned as you drag.
c. When the objects are in place, release your mouse first. Otherwise, the objects will not be duplicated or may end up in the wrong place.
d. Adjust the placement of the new objects if needed. e. Select the Text tool from the Status Area.
f. Click in the new Sales Invoice link, highlight the entire word, and type Line Items. g. Select the Pointer tool from the Status Area.
h. Double click on Line Items. This will bring up the Button Setup dialog.
i. Rather than use Perform Script, select Go to Layout and choose Line Items from the Specify drop down.
j. Click OK to exit the dialog.
k. Enter Browse mode and test your new button.
Thinking ahead… Add the new button and white bar to the Sales Order form. Be sure to slide View Reports 1.5 inches to the left first.
Figure 13: The Sales Order list, with the new button to go to Line Items Step : Connecting the new table to Sales Orders
To convert the sales order line items from repeating fields to related fields, we need to create a
relationship between the sales order table occurrence and the line items table occurrence. Remember that FileMaker automatically creates a table occurrence when you create a new table.
1. Choose File menu> Define> Database…
2. Select the Relationships tab at the top of the dialog.
3. If you need to, resize the dialog so that you can see all of the table occurrences.
4. We need to connect the Line Items table occurrence to both Sales Orders and Inventory. FileMaker makes it easy to create a relationship and then modify it to use the fields you need. To create a relationship between the Sales Order table occurrence and the Line Items table occurrence:
a. Click and drag from any field in the Sales Order table occurrence to any field in the Line Items table occurrence.
b. Double click the new relationship line.
c. Change the field on the left, in Sales Orders, to Invoice ID (if you have already renamed this field, choose the new name).
d. Change the field on the right, in Line Items, to IDInvoice. e. Click Change.
f. On the right side, under Line Items, check the box to “Allow creation of records in this table via this relationship.”
g. If you would like to sort records in this relationship, check “Sort records” and choose which fields to sort.
h. Click OK to exit the dialog.
5. To create a relationship between the Inventory table occurrence and the Line Items table occurrence:
a. Click and drag from any field in the Inventory table occurrence to any field in the Line Items table occurrence.
b. This is actually a trick step, because you should get an error message which asks you to name a new table occurrence. This is because you cannot create more than one relationship between table occurrences which already have a relationship. In this case, Inventory is already related to Line Items via the Sales Orders table occurrence. Click Cancel to exit this dialog.
c. To solve this relationship conflict, remove the relationship between Sales Orders and
Inventory—click once on the relationship line and click the trash can icon at the bottom left of the dialog, or hit the Delete or Backspace key on your keyboard.
d. Click the small button at the top right corner of the Inventory table occurrence, to show the list of fields in that table.
e. Now click and drag from any field in the Inventory table occurrence to any field in the Line Items table occurrence.
f. Double click the new relationship line.
g. Change the field on the left, in Inventory, to Product ID (if you have already renamed this field, choose the new name).
h. Change the field on the right, in Line Items, to IDProduct. i. Click Change.
Figure 14: The Relationships Graph with the new Line Items table occurrence, related to Sales Orders and Inventory. Also, this graph was tidied up using the Arrange tools below the graph.
Now that you have a relationship, it is time to change one more thing about the fields in the Line Items table. We need to auto-enter the description and price of inventory items, based on the IDProduct field.
a. If you are not already in Define Database, choose File menu> Define> Database. b. Select the Fields tab at the top.
c. If necessary, select the Line Items table from the drop-down list at the top left.
d. Edit the Description field by double-clicking it, or by selecting it and clicking the Options button.
e. Check the box for “Looked-up value.”
f. From “Look up from related table,” choose Inventory. g. Choose the Description field.
h. Click OK to exit the Lookup dialog, and click OK to exit the Options dialog.
i. Next, edit the Price field by double-clicking it, or by selecting it and clicking the Options button. j. Check the box for “Looked-up value.”
k. From “Look up from related table,” choose Inventory. l. Choose the Price field.
m. Click OK to exit the Lookup dialog, and click OK to exit the Options dialog.
n. Next, edit the Product field by double-clicking it, or by selecting it and clicking the Options button.
o. Check the box for “Looked-up value.”
p. From “Look up from related table,” choose Inventory. q. Choose the Product Name field.
r. Click OK to exit the Lookup dialog, and click OK to exit the Options dialog. s. Finally, click OK to exit Define Database.
Figure 15: Setting the Lookup for Description in Line Items
6. With the relationships in place, and with fields formatted to auto-enter the description, price, and product, it is time to add a portal to the Sales Order layout. A portal is a window on a layout to records based on a relationship. In this case, we are going to use the relationship to Line Items to create and show line items related to the Sales Order.
a. Navigate to the Form View layout. b. Enter Layout mode.
c. Duplicate this layout by choosing Layouts menu> Duplicate Layout. This is a safety measure so that you can restore the layout or parts of it if you need to.
d. Navigate back to the Form View layout. It is important to make changes to this layout, rather than the copy. This layout is already connected to the Home page via navigation buttons. e. Maximize the size of the window by clicking the Maximize button at the top left (Macintosh)
or top right (Windows) corner of the window. The keyboard shortcut is Shift+Command+Z or Shift+Control+Z.
f. Enlarge the body 2 to 3 inches by clicking and dragging the bottom of the body part.
Body tag on your layout. The height of that part is now displayed in the bottom field of the Object Size dialog.
ii. Change the height of the body by changing the value in that bottom field and then hitting Return or Enter to exit the Object Size dialog.
iii. Also, you can toggle the default measurement among pixels, inches, and centimeters by clicking the current measurement indicator to the right of any of the fields in the Object Size dialog. This also affects the graphic and text rulers.
g. Select the five fields that make up the line items on the Sales Order. See Figure 16 for the selection.
Figure 16: Selected fields representing line items in Sales Orders
h. Drag the selected items down below all other objects on the layout. While dragging, you can keep the objects in line by holding the Shift key. Be sure to release your mouse button before the Shift key, or your objects may not stay aligned with their original position.
i. Now it’s time to create a portal: Select the Portal tool from the tools palette in the Status Area (the gray bar along the left side of the layout).
Figure 17: The Portal tool
j. Click and drag a rectangle, starting at the top left of where line items used to be, and end at the bottom right.
k. In the Portal Setup dialog, select Line Items from the “Show related records from:” drop down. l. If you would like your line items to sort in an order other than the order established in the
relationship (or creation order by default), check the “Sort portal records” box and choose your sort order.
m. Check the box to “Allow deletion of portal records.” n. Check the box to “Show vertical scroll bar.”
o. Click OK to exit the dialog.
p. In the Add Fields to Portal dialog, move a field by double-clicking it, or by selecting it and clicking Move. Move the fields named IDProduct, Product, Quantity, Price, and Amount. q. Click OK to exit the dialog.
r. Your layout should now look similar to Figure 18:
Figure 18: The new portal to Line Items, with the old repeating fields at the bottom of the layout. 7. With the portal on the layout, you can now format the fields to match the rest of the layout.
a. To format the fields in the portal correctly, use the Format Painter:
i. If the Standard toolbar is not showing, choose View menu> Toolbars> Standard. ii. Click on any of the old repeating fields.
iii. Double-click on the Format Painter in the Standard toolbar (the Format Painter looks like a paint brush).
iv. Click on each one of the fields in the new portal.
v. To cancel the Format Painter, hit Escape on your keyboard, or select a tool from the Status Area.
vi. To format a single object, click once on an object with the correct formatting, click once on the Format Painter, and click on the object to be formatted. This way, you can use the Format Painter on one object at a time.
b. If you used the Format Painter, your fields are almost perfect. Change the alignment of Price and Amount by selecting them and choosing Format menu> Align Text> Right. The shortcut is Command+] or Control+].
c. The Price and Amount fields are currency values, so change the number format by selecting them and choosing Format menu> Number… Select “Format as decimal.” Also select “Fixed number of decimal digits:” and enter 2. Also select “Use notation:” and choose “Currency (Leading/Inside).” And finally, select “Use thousands separator” under Separators. Click OK to exit the dialog.
e. Also, the Quantity field is a number field, rather than currency. Select the field and choose
Format menu> Number. Select “Leave data formatted as entered.” Click OK to exit the dialog. f. We also need to add the Inventory drop-down list to the IDProduct field. Select the IDProduct
field and choose Format menu> Field/Control> Setup… Under Control Style, select Drop-down List. From the Display values from list, choose Inventory. Click OK to exit the dialog. g. This value list needs to use the Product ID field in order to be effective. Choose File menu>
Define> Value Lists. Double click on the Inventory value list. Click Specify Field. Under Inventory, in the left column, select Product ID. Leave the second field as Product Name. Click OK, OK, and OK to exit the dialogs.
h. The portal itself is formatted to show a vertical scroll bar, but it does not have a line style applied yet. Select the portal by click on any part of the gray area. In the Status Area, select the line color and choose black. Next, select the line style drop-down and choose 1 pt.
Figure 19: Line color and style in the Status Area.
i. Before we go into Browse mode to start working with the portal, resize each of the fields to match the repeating field—select the new field in the portal and the corresponding repeating field at the same time (select one, hold the Shift key, and select the second one). Choose
Arrange menu> Resize To> Smallest Width (or largest, depending on which fields you are working with). Do the same with each of the fields in the portal and the corresponding repeating field.
j. After resizing, align each of the fields in the portal with the repeating fields—again select the new field in the portal and the corresponding repeating field at the same time. Select
Arrange menu> Align> Left Edges or Right Edges. Use keyboard shortcuts to make quick work of alignment—after selecting the objects to be aligned, use Control+Alt+Left arrow or Command+Option+Left arrow to align the objects to the left. Use the same key combination with the right, up, or down arrows to align on those edges.
k. Make the portal wider or narrower depending on how well the fields fit inside. See Figure 20 for the final result.
l. Finally, change the title Serial Number to Product ID, and change the title Description to Product.
Figure 20: The new portal to Line Items, with fields aligned with the old repeating field, and the portal formatted with a black, 1 pt line.
m. It is time to look at your portal—Enter Browse mode.
8. Test your new portal by clicking into the Product ID column. Select a product from the drop down. If you do not see any products, see the section above called Adding Inventory.
9. If the product you selected has a product name and price in the Inventory table, those fields will fill in automatically. Enter a quantity to see the Amount fill in.
10. We have one little problem with the current set up: The Subtotal is still totaling based on the old repeating field. Let’s go into Define Fields to change that.
a. Choose File menu> Define> Database.
b. Scroll down to the Subtotal field, and double click on it to edit the calculation.
c. Instead of performing a Sum function on the original repeating field, we want this calculation to Sum on the Line Items related to this invoice.
d. Choose Line Items from the drop-down at the top left, which probably has “Current Table…” selected.
Figure 21: Product Extended Amount is highlighted, ready to be replaced
f. Double click on ::Amount in the Line Items list. The calculation should now read “Sum(Line Items::Amount).” See Figure 22.
Figure 22: showing the new Subtotal calculation.
g. Click OK to dismiss the Specify Calculation dialog. h. Click OK to dismiss the Define Database dialog.
i. Your Subtotal should now total the Amount field in the Line Items portal.
11. In Layout mode, clean up the layout by selecting the old repeating fields and deleting them. Also, resize the layout by dragging the bottom of the body up to the last field on the layout.
12. Take a deep breath—we are almost done.
13. You may have noticed the “Check Stock” button to the left of the portal. This button runs a script that subtracts the quantities on the current order from the Amount In Stock field in Inventory. When the script subtracts the quantity, it sets a field called Flag Stock Checked to 1. This tells the script to skip the line item if it has already been subtracted.
14. With our new portal, we need to add a Flag Stock Checked field to Inventory and another one to Line Items, and we need to make a few changes to the script. To add a number field called FlagStockChecked to Inventory:
a. In Inventory, choose File menu> Define> Database. b. Select the Fields tab.
c. Create a new number field called FlagStockChecked. d. Click OK to exit the dialog.
15. To add a number field called FlagStockChecked to Line Items: a. In Inventory, choose File menu> Define> Database.
b. Select the Fields tab.
c. Select Line Items from the Table drop down.
d. Create a new number field called FlagStockChecked. e. Click OK to exit the dialog.
16. We also need to modify the script to use the new field.
a. In Sales Orders, go into Layout mode. (Because the BPK uses custom menus, you will not be able to access the Scripts menu unless you are in Layout mode. If you are using FileMaker Pro 8 Advanced or 8.5 Advanced, you can install the Standard Menu Set, and access the Scripts menu in all modes.)
b. Choose Scripts menu> ScriptMaker. c. Scroll down to “Check Stock.”
d. Select the “Check Stock” script and click Duplicate.
e. Edit the new script, and change the name to “Check Stock Old.” f. Click OK to exit the dialog.
g. Double click the first “Check Stock” script, or select it and click Edit.
Figure 23: The original Check Stock script.
h. This script loops through each of the repetitions of the old fields. To modify it to loop through the related Line Items, follow the script steps in Figure 24. For assistance with ScriptMaker, see FileMaker Pro Help.
Taking control of your inventory page Check Stock
#Check Stock script modified June 30, 2006 by Katherine Russell.
#Script has been changed to use the CheckStockFlag from related Line Items. Allow User Abort [ Off ]
#Set the number of related line items into the $tempCounter variable. Set Variable [ $tempCounter; Value:Count(Line Items::IDLineItem) ] #Test to see if there are any line items.
If [ $tempCounter > 0 ]
#If there are related line items, loop through each related record. Loop
#Go to the portal row indicated by $tempCounter. Go to Portal Row [ $tempCounter ]
[ Select; No dialog ]
#Set the Temp Data field to the IDProduct of that portal row.
#This establishes a relationship to Inventory based on the IDProduct from the Line Item row. Set Field [ Sales Orders::Temp Data; Line Items::IDProduct ]
#Set variables to the quantity and status of the FlagStockChecked field. Set Variable [ $Quantity; Value:Line Items::Quantity ]
Set Variable [ $FlagStockChecked; Value:Line Items::FlagStockChecked ]
#Set the Amount in Stock field to the Amount in Stock, minus the $Quantity if $FlagStockChecked is empty. Set Field [ Sales Inventory ID::Amount in Stock; Sales Inventory ID::Amount in Stock - Case (IsEmpty
($FlagStockChecked); $Quantity) ]
#Change the color of the Amount in Stock field if it is less than zero. If [ Sales Inventory ID::Amount in Stock < 0 ]
Set Field [ Line Items::Quantity; TextColor ( Line Items::Quantity ; RGB ( 255 ; 0 ; 0 ) ) ] Else
Set Field [ Line Items::Quantity; TextColor ( Line Items::Quantity ; RGB ( 0 ; 102 ; 0 ) ) ] End If
#Set the FlagStockChecked field to 1, even if it already is 1. Set Field [ Line Items::FlagStockChecked; 1 ]
#Subtract 1 from $tempCounter, so that the loop will end at 0. Set Variable [ $tempCounter; Value:$tempCounter - 1 ] Exit Loop If [ $tempCounter = 0 ]
End Loop End If
Commit Records/Requests
Figure 24: The new Check Stock script, with comments. i. Exit ScriptMaker and check the script to see if it works.
Thinking ahead about checking stock…This script is a quick and easy way to manage inventory levels, but it is not always accurate. If you change the sales order after you have clicked the Check Stock button, the inventory level will not be adjusted. You could create a work-around by adding an additional field in which to store the last quantity and invoice number used in the script, and add steps in the script to compare the current quantity to the last quantity. The difference is the amount to adjust the inventory level, whether the difference is negative or positive.
Thinking ahead about the Sales Invoice and Packing Slip… The Sales Invoice and Packing Slip layouts are still using the repeating fields. You will need to replace those fields with your new portal. An even more advanced method is to shift the Sales Invoice and Packing Slip to the Line Items file, and create layouts that show the actual records for each line item. The top and bottom of both the Sales Invoice and Packing Slip will consist of related fields from the Sales Orders relationship.
Step : Connecting the new table to Inventory and reports
The new Line Items table makes it easy to see the sales of a particular product. Let’s add a relationship from the Inventory table to the Line Items table, and then create a calculation to see sales.
1. Navigate to the Inventory table (from Home, click on the Inventory link). 2. Choose File menu> Define> Database…
3. Click on the Relationships tab at the top.
4. Create a new table occurrence by clicking the first button on the bottom left.
5. In the Specify Table dialog, choose “Add a file reference” from the Table drop-down. 6. Navigate to the bps_Sales_Orders.fp7 file and click Open.
7. Select the Line Items table, and click OK.
8. Move the new table occurrence closer to the other occurrences on the graph.
9. Click and drag from any field in the Inventory table occurrence to any field in the new Line Items table occurrence.
10. Double click on the relationship line to edit the relationship.
11. Change the field on the left to Product ID (or the new name if you have already renamed this field).
12. Change the field on the right to IDProduct. 13. Click OK.
Figure 26: The relationship between Inventory and Line Items 14. Now that you have a relationship, click the Fields tab at the top.
a. Type “Sold” in the Field Name (with no quotation marks). b. Change the type to Calculation, and click Create.
c. Type “Sum(Line Items::Quantity)” (with no quotation marks). d. Click OK and OK to exit the dialogs.
15. The new field will be at the bottom of the Inventory layout. To move it and reformat it: a. Enter Layout mode.
b. Select the Sold field and title, and drag them up underneath Weight.
c. Use the Format Painter to reformat the title, and use it again to reformat the field. d. Align the title with the titles above, and align the field with the fields above. e. Resize the Sold field to match the fields above.
f. If you want to add a colon to the Sold title to match the other titles, double click on the title and add a colon.
16. Enter Browse mode to see the results of your new field.
Thinking ahead… Eventually, you may have so many sales orders and line items that this new
calculation will take longer and longer to calculate. One solution is to create other tables dedicated to regular archiving of your sales orders and line items. A similar table would contain physical inventory records, and another table would handle products ordered and received. The calculation you just made would then be expanded to sum up the archived line items and the line items in active sales orders, and subtract the latest physical inventory and items received. This will give you a more reliable picture of inventory on-hand, as well as history of each product.
Make it better with Tooltips (FileMaker Pro 8.5 Advanced only)
Tooltips are messages displayed when a user rolls over an object. In the Sales Order, it would be helpful to know the current inventory level before committing to a quantity on any of the product line items. Let’s add a Tooltip to display the current quantity.Step : Adding a Tooltip to the Sales Order
1. In the Sales Order, choose File menu> Define> Database. 2. In Fields, choose the Line Items table.
3. Create a new calculation called AmountInStock.
4. In the calculation, choose Inventory from the table drop down list at the top left. 5. Double click Amount In Stock to add it to the calculation.
Figure 27: The new AmountInStock calculation in Sales Orders 6. Click OK to exit the dialog.
7. Click OK again to exit Define Database. 8. Enter Layout mode.
9. Right-click the Quantity field and choose Set Tooltip… 10. Click the Specify…. button.
11. Choose Line Items from the drop down list at the top left. 12. Double click AmountInStock to add it to the Tooltip.
13. If you’d like, add & (an ampersand) and “ in stock.” (be sure to include a space at the beginning). 14. Also, to indicate whether or not you have already clicked the Check Stock button, add this
statement: & Case ( Line Items::FlagStockChecked > 0, “ Includes this line item.”, “ Does not include this line item.”)
15. The entire calculation should look like this: Line Items::AmountInStock & “ in stock.” & Case ( Line Items::FlagStockChecked > 0, “ Includes this line item.”, “ Does not include this line item.”)
Figure 28: The Tooltip calculation
16. Click OK to exit the dialog, and click OK to exit the Tooltip dialog. 17. Enter Browse mode.
18. Roll over the quantity field in a line item with a quantity to test the Tooltip. The Tooltip will appear after a short delay. Once the Tooltip appears, it will appear more quickly when you roll over other line items.
Make it better with labels
An attractive label makes your products stand out. In this section, we will create a label, format the text to be useful to the consumer, and add a barcode to make it useful for your system (at point of sale or distribution, click into the ID Product field in a sales order and scan the barcode).
Step : Creating a label layout 1. In Inventory, enter Layout mode.
2. Choose Layouts menu> New Layout/Report…
Figure 29: The New Layout/Report dialog 4. Click Next.
5. If you are using a label with an Avery number, select it from the “Use label measurement for” drop down. Otherwise, select “Use custom measurements” and add the dimensions of your labels. 6. Click next.
7. Select Product Name from “Available fields” and click Add Field (or double click Product Name). 8. Hit Return on your keyboard to add a return (do not use the Enter key on the number pad on your
keyboard—that will activate the Next button).
9. Select Description from “Available fields” and click Add Field (or double click Description). 10. Hit Return on your keyboard to add a return.
Figure 30: The New Layout/Report dialog with fields added to the Label contents 12. Click Next (or hit Enter on your keyboard).
13. Choose “View in Layout mode” and click Finish.
14. Your new label is on a new layout, with a new look. Columns are indicated by a vertical dashed line. Anything that you want to print on the label must be in the single white area of the layout. If you add anything to any other area of the layout, it will print over (or under) any labels on that area of the page. Also, by default, FileMaker centers the merge fields vertically.
15. Another difference here is that the fields are displayed as merge fields, which is text typed onto the layout, rather than as field objects. Merge fields are useful for inserting field values into text strings such as paragraphs.
16. In this case, we are going to reformat each field separately. Double click Product Name to modify the text, or select the Text tool from the Status Area and click into the fields on the layout.
Figure 31: The Product Name merge field selected
18. Change the size of the text to 18 by using the Text Formatting toolbar, if it is open, or choosing
Format menu> Size, or Format menu> Text… You can also use keyboard shortcuts to change the font size: Shift+Option+> (greater than) on the Macintosh or Shift+Alt+> on Windows to increase the font size, and Shift+Option+< and Shift+Alt+< to decrease the font size.
19. Leave Description as is, add a return between <<Description>> and <<Product ID>>, and highlight the entire Product ID merge field.
Figure 32: Resized field and an additional space
20. If you have a barcode font installed on your computer, copy and paste the Product ID merge field, and add a return between the two. This is so that you will be able to read the Product ID, as well as have it in barcode form. Tip: Barcode fonts are available online and bundled with barcode readers. Check the documentation of your reader for specifications.
21. Most barcode readers require a special character at the beginning and ending of a barcode, in order to understand that this is information it should read. Check the requirements for your barcode reader. In most cases, a combination of an asterisk and a slash are used. If this is the case for your barcode reader, add these characters to the first Product ID. It should now look like this: */<<Product ID>>/* HOWEVER, the documentation that comes with your barcode reader will give you the appropriate characters to use.
22. Change the font size of the barcode to at least 14 pt. Check the documentation for your barcode reader for the font sizes it will accept.
Figure 33: The first Product ID with special characters (check the requirements for your barcode reader). 23. Apply the barcode font to the first Product ID, leaving the second Product ID as is.
24. Enter Browse mode to view the label.
Figure 35: Label in Browse mode
25. From the View menu, choose View As List.
26. Depending on how much design you would like to apply to your labels, you might choose to center the text, add an underline to the Product Name, add your logo above or below the text, add your company’s name, address, and contact information, or add other graphics and information to the label.
27. A note about printing: As you add and reformat, be sure not to resize the header, body, or footer of the label. If you resize any of them, you may break the placement of the label on your label sheets. However, once you print a test page, you may find that you need to adjust the placement. In that case, try to adjust the header or footer first, before changing the size of the body.
Step : Adding a script for printing
In the section on Formatting the Line Items Layout, we duplicated the Sales Report button, renamed it Line Items, and pointed it to the Line Items layout. In this case, we need to add a new script to print labels, and then we will add a new button.
1. Return to the Form View layout in Inventory. 2. Enter Layout mode.
3. Choose Scripts menu> ScriptMaker.
4. Select Inventory Report and click Duplicate. 5. Click Edit to edit the new script.
6. Change the name to Labels.
Figure 36: The duplicated script, renamed Labels, with the sixth step selected 8. Choose your new Label layout from the Specify drop down at the bottom right. 9. Click OK to exit the dialog, and click OK to dismiss the ScriptMaker dialog. 10. Move View Reports 1.5 inches to the left.
11. Select and duplicate Inventory and the white bar, and place them between View Reports and Inventory.
12. Select the Text tool and change the new Inventory button to Labels. 13. Select the Pointer tool.
14. Double click the new Labels button.
15. From the Specify button, change the script to your new Labels script. 16. Enter Browse mode and test your new button.
Conclusion
Thinking ahead… The Web Viewer is a powerful and useful new feature in FileMaker Pro 8,5. In an inventory management system, it can be used to look up vendor pricing, customer locations, and shipping information. The FileMaker Shipping DIY is an excellent resource for adding the Web Viewer to your inventory management system.
After all of these additions, it is time to test, tweak, and implement your system. Remember to take it one step at a time, even if your list of tweaks is very long. Most users of your system will have opinions and requests. These are extremely important to the acceptance of your system (users will not happily use something that they resent), so pay attention. At the same time, stick to a reasonable plan of adjustments and additions.
When you are ready to implement the system, be sure you have the right hardware and software in place, and be sure to train all users. Of course, there is a lot more to these topics. Training, books, forums, the FileMaker Solutions Alliance, and the FileMaker Help system are all good resources for becoming proficient with FileMaker.
FileMaker Pro Resources
• Related FileMaker resources are available at www.filemakeroffer.com/DIY or www.filemaker.com • FileMaker development—FMPtraining’s 10 CD series on FileMaker 7 & 8, including two CDs on the
new features of FileMaker Pro 8 and 8 Advanced, presented by Katherine Russell • Security—Steven Blackwell’s FileMaker Security: The Book, available at
http://www.filemakersecurity.com
• Barcodes—25 frequently asked questions about starting a bar code project (http://www.skandata. com/howto.html)
• Generally accepted rules of accounting—search the Internet for objectives and conventions that govern how financial statements are prepared and presented. These conventions will affect how you plan and execute your database.
About the Author
Katherine Russell is the owner of Russellware, Inc., a custom software development company specializing in FileMaker Pro. Russellware is based in Orlando, Florida, and offers all aspects of FileMaker services.
Katherine has been working with FileMaker since 1993. She is a member of the FileMaker Solutions Alliance and is a FileMaker 7 and FileMaker 8 Certified Developer.
Russellware’s mission is to create peace in the world, one office at a time. Russellware designs creative solutions for all kinds of business frustrations—from reducing data entry duplication to creating software that runs entire businesses. Russellware helps companies from film studios to airlines. Their motto is, “At Russellware, there is no box,” not because they do everything, but because they can do anything. For more information on Russellware, please visit http://russellware.com, and check out Katherine’s interview at http://filemakeraddict.blogspot.com/
© 2006 FileMaker, Inc. All rights reserved. FileMaker and the FileMaker folder logos are trademarks or registered trademarks of FileMaker, Inc. in the U.S. and other countries. Mac and Mac logo are registered trademarks of Apple Computer, Inc. in the U.S. and other countries. Microsoft, Windows, and the Windows logo are trademarks or registered trademarks of Microsoft Corporation in the U.S. and/or other countries. Adobe and the Adobe PDF logo are trademarks or registered trademarks of Adobe Systems, Inc. in the U.S. and other countries. All other trademarks are the property of their respective holders.
The example companies, organizations, products, domain names, email addresses, logos, people, places and events are purely fictitious, and any resemblance to existing persons are companies is purely coincidental.