for NAS
Release 3.0
Theory of Operations
P/N 300-004-497
REV A02
EMC believes the information in this publication is accurate as of its publication date. The information is subject to change without notice.
THE INFORMATION IN THIS PUBLICATION IS PROVIDED “AS IS.” EMC CORPORATION MAKES NO REPRESENTATIONS OR WARRANTIES OF ANY KIND WITH RESPECT TO THE INFORMATION IN THIS PUBLICATION, AND SPECIFICALLY DISCLAIMS IMPLIED WARRANTIES OF MERCHANTABILITY OR FITNESS FOR A PARTICULAR PURPOSE.
Use, copying, and distribution of any EMC software described in this publication requires an applicable software license.
For the most up-to-date listing of EMC product names, see EMC Corporation Trademarks on EMC.com. All other trademarks used herein are the property of their respective owners.
Contents
... 3Preface
... 11Chapter 1
Components of the DX-NAS Solution
About the EMC Celerra... 16About the FileMover Functionality in DART ... 17
About the NetApp Filer ... 19
About the DX-NAS Policy Engine... 20
Recalling Migrated Files ... 20
About Secondary Storage ... 22
About NAS server to NAS server Migration... 22
NAS Server to Separate Host Migration ... 23
NAS Server Direct to EMC Centera ... 24
NAS Server to Other Storage Device Migration ... 25
DX-NAS server port usage ... 27
Celerra requirements ... 28
NetApp filer requirements ... 29
EMC Centera Recommendations ... 30
Chapter 2
Basic DX-NAS Configurations
About File Migration ... 32File Recall ... 45
Recalling All Files from Celerra ... 45
Recalling All Files from NetApp ... 48
About Orphan Files ... 49
About Source Scans ... 51
Orphan File Management ... 52
About File Versioning ... 54
Storage Reporting ... 57
About the Migration Report ... 57
About the Orphan File Report... 58
About the Primary Storage Report ... 59
About the Secondary Storage Report ... 60
About Printing Reports... 61
Error Reporting ... 62
About Alerts ... 62
Printing Alerts... 63
About Logs ... 63
Chapter 3
Differences between Celerra and NetApp with DX-NAS
Chapter 4
Differences between DX-NAS on Microsoft Windows
and UNIX
Chapter 5
Configuration Planning and Performance Tuning
DX-NAS Configurations... 74Two Data Movers on the Same Celerra ... 74
One Data Mover on the Same Celerra... 75
Two Celerras... 76
NetApp Filer to Celerra ... 77
Celerra or NetApp to DX-NAS Server Local Disk... 78
Celerra or NetApp to Network Disk Destination... 79
Celerra or NetApp to CLARiiON® ATA ... 79
Celerra or NetApp to FSM-Managed File System... 80
Celerra or NetApp to DiskXtender for Windows Server... 83
Celerra or NetApp Direct to EMC Centera... 84
Primary Storage Considerations... 86
DX-NAS Server Local Disk Considerations ... 89
Sizing Secondary Storage... 90
Effect of Source File Size on Secondary Storage ... 90
Effect of Volatile Source on Secondary Storage ... 90
Managing Secondary Storage with Orphan File Scans ... 90
Secondary Storage Considerations... 90
Deploying Multiple DX-NAS Servers ... 92
Chapter 6
Backup and Recovery for DX-NAS
Backing Up Full Data... 94Orphan File Management with Full Data Backups ... 95
Forcing a Full Data Backup to Read Stubs in Passthrough Mode ... 96
Backing up Stubs ... 97
Preparing primary storage for Stub Backups on Celerra ... 99
Performing Orphan File Management without Backup Synchronization... 100
Performing Orphan File Management with Backup Synchronization... 100
Backing up Secondary Storage... 102
Restoring Stubs from Backup Media... 103
About Orphan File Previews with Restored Stubs ... 103
Determining Offline File Name from the GUI... 104
Determining File Attributes from the CLI... 106
Chapter 7
Using Celerra CheckPoints with DX-NAS
About Checkpoints ... 110Checkpointing Source Directories ... 112
Copying Stubs from Checkpoint Directories ... 112
About Checkpoints and Readback Method Override ... 112
Using a Checkpoint Directory as a DX-NAS Source ... 112
Checkpointing Secondary Storage... 113
Chapter 8
Integrating DX-NAS with other Products
Integrating with DXUL Storage Manager 2.9... 123
Configuring DXUL-SM with DX-NAS ... 123
DXUL-SM and Celerra DX-NAS ... 125
Using EMC Celerra HighRoad™ ... 127
Chapter 9
High Availability Solutions for DX-NAS
High Availability on the Celerra... 131Data Mover Failover ... 131
Celerra Replication... 132
High Availability on NetApp... 133
High Availability for the DX-NAS server ... 134
DX-NAS Server and Microsoft Server Clustering ... 136
A DX-NAS Configuration on a Microsoft Cluster... 137
High Availability for Secondary Storage... 139
HA Secondary Storage on the Celerra... 139
HA Secondary Storage on the NetApp ... 140
HA Secondary Storage on a Microsoft or Linux Cluster ... 140
HA on an EMC Centera Using DX Windows... 141
HA on an EMC Centera Using FSM ... 141
Chapter 10
Disaster Tolerant Strategies for DX-NAS
Disaster Tolerant Strategies ... 144About Synchronous Data Mirroring... 144
About Point-In-Time Data Mirroring ... 144
About Asynchronous Data Mirroring ... 145
Failing Over a Disaster Tolerant Configuration ... 148
1 EMC Celerra provides file sharing for clients ... 16
2 Celerra perspective of file access on local disk arrays ... 17
3 Celerra perspective on file access for a migrated or offline file ... 18
4 NetApp Filer provides file sharing for clients ... 19
5 DX-NAS migrating files from one NAS server to another ... 23
6 DX-NAS migrating files to a remote host ... 23
7 DX-NAS migrating files directly to an EMC Centera ... 24
8 DX-NAS migrating files to other storage devices using FSM ... 26
9 Sources and Destinations in the DX-NAS GUI ... 33
10 Example of creating a job using the CLI ... 35
11 The Policy Wizard combines DX-NAS elements and search behaviors 36 12 Readback methods available for the Celerra ... 38
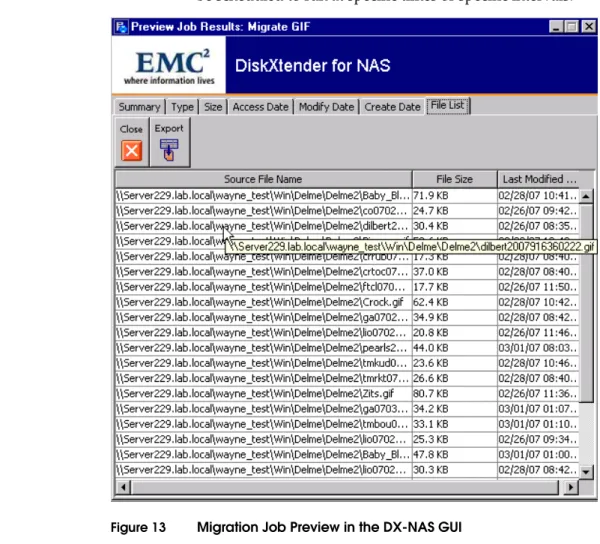
13 Migration Job Preview in the DX-NAS GUI ... 40
14 Orphan Job Preview in the DX-NAS GUI ... 41
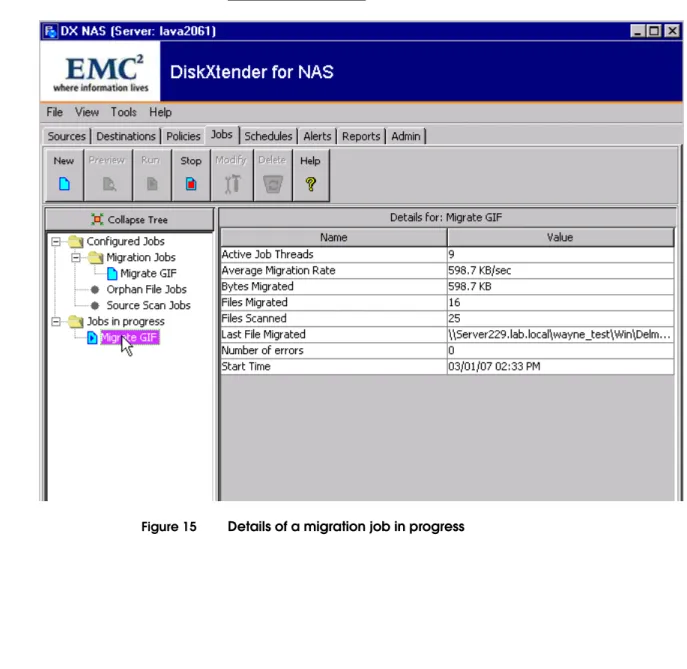
15 Details of a migration job in progress ... 42
16 Details of an orphan file job in progress ... 43
17 Details of a source scan job in progress ... 44
18 Connection string listing from Celerra ... 46
19 Examples of how orphan files can be created ... 50
20 Example of directory structure on secondary storage ... 55
21 Example of tracking multiple versions of files on Celerra ... 56
22 Example of a Migration Report ... 58
23 An example of an Orphan File Report ... 59
33 Celerra or NetApp to FSM to AVALONidm Configuration ... 82
34 Celerra or NetApp to DiskXtender for Windows Configuration ... 83
35 DX-NAS migrating files directly to an EMC Centera ... 85
36 Example of full data backup of migrated files on Celerra ... 95
37 Stub backup with corresponding secondary storage backup ... 97
38 Example of stub backup on EMC Legato Networker ... 99
39 Example of using the Windows file attributes GUI ... 105
40 Example of using the CLI fileattrs command ... 107
41 Example of the pfs12 file system with a WorkingData directory ... 110
42 Example of the pfs12 file system with checkpoints ... 111
43 DX-NAS policy set to find PDF files ... 117
44 VisualSRM filter set to find PDF files ... 118
45 DXUL-SM 2.9 running on different machine than DX-NAS ... 124
46 DXUL-SM 2.9 running on Solaris with DX-NAS ... 125
47 DX-NAS Components that need HA configuration ... 130
48 A Celerra configured with a standby Data Mover for failover ... 132
49 A Celerra configured with data mover failover and replication ... 132
50 AutoStart Configuration ... 135
51 DX-NAS installed in a two-node cluster configuration ... 137
52 DX-NAS using a Celerra to provide HA for secondary storage ... 140
53 FSM configured for HA using Autostart ... 142
54 Example of Synchronous Mirroring with DX-NAS ... 145
Title Page
1 Ports used by DX-NAS ... 27
2 Support matrix for Data ONTAP ...29
3 Example of information file used to track orphan files ... 53
4 Column definition for the Primary Storage Report ... 60
5 Column definition for the Primary Storage Report ... 60
6 Differences between Celerra and NetApp as source hosts ... 68
7 Differences between DX-NAS on Microsoft Windows and UNIX ... 69
8 Source File Size Considerations for DX-NAS migration ... 86
9 Source File System Volatility Considerations for DX-NAS ... 87
10 DX-NAS Server Disk Space Requirements on Microsoft Windows ... 89
11 Sizing Secondary Storage ... 91
As part of an effort to improve and enhance the performance and capabilities of its product lines, EMC® periodically releases revisions of its hardware and software. Therefore, some functions described in this document may not be supported by all versions of the software or hardware currently in use. For the most up-to-date information on product features, refer to your product release notes.
If a product does not function properly or does not function as described in this document, please contact your EMC representative.
Audience This document is part of the EMC DiskXtender for NAS (DX-NAS), Release 3.0, documentation set, and is intended for use by trained DX-NAS system administrators.
Readers of this document are expected to be familiar with the following topics:
◆ EMC Celerra® administration
◆ EMC Centera™ administration
◆ Celerra FileMover API (formerly known as DHSM)
◆ NetApp Filer administration
◆ Solaris, Linux, or Microsoft Windows operating system configuration and management
Related documentation
Related documents include:
◆ DiskXtender for NAS Release 3.0 Multiplatform Version Release Notes
◆ DiskXtender for NAS Release 3.0 Microsoft Windows Version
Installation and Configuration Guide
◆ DiskXtender for NAS Release 3.0 UNIX/Linux Version Installation and Configuration Guide
◆ DiskXtender for NAS Release 3.0 Multiplatform Version Administrator’s Guide
◆ Autostart Module For DiskXtender for NAS Release 3.0
◆ Using Celerra FileMover Technical Module
Conventions used in this document
EMC uses the following conventions for special notices.
Note: A note presents information that is important, but not hazard-related.
CAUTION
!
A caution contains information essential to avoid data loss or damage to the system or equipment. The caution may apply to hardware or software.
IMPORTANT
!
An important notice contains information essential to operation of the software. The important notice applies only to software.
Typographical conventions
EMC uses the following type style conventions in this document:
Normal Used in running (nonprocedural) text for:
• Names of interface elements (such as names of windows, dialog boxes, buttons, fields, and menus)
• Names of resources, attributes, pools, Boolean expressions, buttons, DQL statements, keywords, clauses, environment variables, filenames, functions, utilities
• URLs, pathnames, filenames, directory names, computer names, links, groups, service keys, file systems, notifications
Bold: Used in running (nonprocedural) text for:
• Names of commands, daemons, options, programs, processes, services, applications, utilities, kernels, notifications, system call, man pages
Used in procedures for:
• Names of interface elements (such as names of windows, dialog boxes, buttons, fields, and menus)
• What user specifically selects, clicks, presses, or types
Italic: Used in all text (including procedures) for:
• Full titles of publications referenced in text • Emphasis (for example a new term) • Variables
Courier: Used for:
• System output, such as an error message or script • URLs, complete paths, filenames, prompts, and syntax when
shown outside of running text
Courier bold: Used for:
• Specific user input (such as commands)
Courier italic: Used in procedures for:
• Variables on command line • User input variables
< > Angle brackets enclose parameter or variable values supplied by the user
[ ] Square brackets enclose optional values
Where to get help EMC support, product, and licensing information can be obtained as follows.
Product information —For documentation, release notes, software
updates, or for information about EMC products, licensing, and service, go to the EMC Powerlink website (registration required) at:
http://Powerlink.EMC.com
Technical support —For technical support, go to EMC Customer
Service on Powerlink. To open a service request through Powerlink, you must have a valid support agreement. Please contact your EMC sales representative for details about obtaining a valid support agreement or to answer any questions about your account.
Your comments Comments and suggestions about our product documentation are always welcome.
To provide feedback: 1. Go to:
http://Powerlink.EMC.com 2. Click the Feedback link.
The DiskXtender File System Manager for NAS (DX-NAS) is an archiving solution that allows you to free storage space on your NAS server while maintaining NAS client access to archived files. The solution consists of integrating the following three components: ◆ An EMC® Celerra® or NetApp Filer
◆ The DX-NAS 3.0 policy engine ◆ Secondary storage
Components of the
DX-NAS Solution
About the EMC Celerra
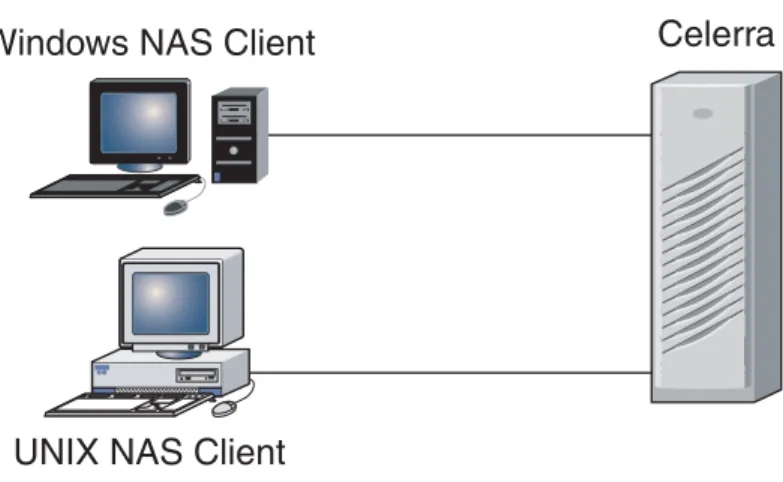
The EMC Celerra provides Network Attached Storage (NAS) to UNIX (Solaris or Linux) and Microsoft Windows clients. Windows clients connect to the Celerra using the CIFS protocol, and UNIX clients connect using NFS. From the perspective of these clients, they are simply mapping drives to, or mounting volumes on, a specialized server in the Celerra cabinet called a Data Mover.
Figure 1 EMC Celerra provides file sharing for clients
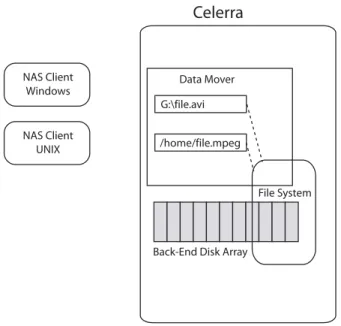
Generally, NAS clients are not concerned with the configuration of the file system on the back-end disk array nor the physical location of their files. However, from the Celerra perspective, the Data Mover manages the client connection and functions as an intermediate layer between the NAS clients and the physical storage (see Figure 2).
UNIX NAS Client
Windows NAS Client
Celerra
PS0PS1PS2PS3PS4SMB0 SMB1 SB0 SB1 SB2 SB3 SB4 SB5 SB6 SB7 SB8 SB9 SB10 SB11 SB12 SB13 SB14 SB15
Figure 2 Celerra perspective of file access on local disk arrays
As with all storage solutions, there are physical limits to the amount of storage that a Celerra can manage. Consequently, functionality was included in the Data Mover operating system (called DART) to allow files to be moved from a NAS file system to another location while preserving NAS client access to those files. The DX-NAS solution exploits this functionality by moving files through the DART FileMover API. (In earlier releases of DART, this functionality was called DHSM.)
About the FileMover
Functionality in
DART
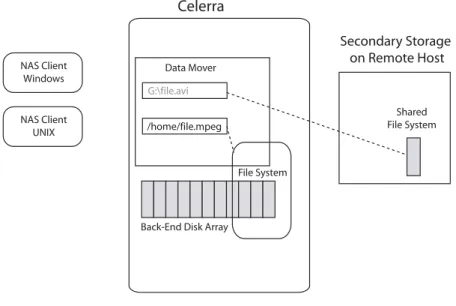
When a file is moved to another location using the Celerra File Mover API, the only change in the way the NAS client sees the file is that the file may now have an offline attribute set.
However, from the perspective of the Celerra, the file has now been moved to a separate location (most often referred to as secondary
NAS Client Windows
NAS Client UNIX
Celerra
Back-End Disk Array
File System Data Mover
G:\file.avi
well as the location of the data portion of the file.1 When a NAS client
attempts to read a file that is offline, the Data Mover retrieves the file from the secondary location (see Figure 3).
Figure 3 Celerra perspective on file access for a migrated or offline file
NAS Client Windows
NAS Client UNIX
Celerra
Back-End Disk Array
File System Data Mover
:\file.avi
/home/file.mpeg
Secondary Storage on Remote Host
Shared File System
About the NetApp Filer
NetApp filers provide Network Attached Storage (NAS) to UNIX and Microsoft Windows clients as well, and DX-NAS can be
configured to move files to secondary storage while leaving a stub on the NetApp Filer for NAS clients to access.
The stub on the NetApp filer is also 8KB in size; however, DX-NAS will not migrate a file smaller than 8KB off the NetApp filer. All migrations off the NetApp filer use a readback method of Full. Note: NetApp file migration is not available for DX-NAS servers running on Solaris.
Figure 4 NetApp Filer provides file sharing for clients
U
N
IX
NAS
Cl
ien
t
About the DX-NAS Policy Engine
The DX-NAS policy engine does not run on the Celerra or on the NetApp Filer. Rather, it runs on a separate host and connects to Celerra or NetApp like any other NAS client. It has four primary functions:
◆ Identifying files that need to be migrated ◆ Copying the files to the new location
◆ Creating a stub on Celerra or NetApp for continued access by NAS Clients
◆ Performing maintenance on orphaned files (i.e. stubs that no longer have a corresponding data portion on secondary storage, or files on secondary storage than no longer correspond to a stub) The DX-NAS administrator establishes criteria to identify which files should be archived or migrated to secondary storage. This criteria can be based on things like file size, file creation date, or days that have passed since the file was last accessed. To facilitate the articulation of this criteria, the DX-NAS GUI and CLI offer a preview function that allows administrators to see what files meet the defined criteria before they are actually moved.
The DX-NAS policy engine is the component of the solution that copies the files. Consequently, DX-NAS must be able to access or mount locations on Celerra and NetApp as well as on any hosts where the secondary storage will be located. (DX-NAS needs to have full read and write privileges on the drives or mount points being used as secondary storage.)
Recalling Migrated
Files
When NAS clients access migrated files on Celerra or NetApp the data portion of the files is recalled.
On the Celerra, the recall is performed by the Celerra data mover. When the file was originally migrated, DX-NAS wrote the location of the data file into the stub, and the data mover uses this information to retrieve the file. Consequently, even if DX-NAS is not present, the data mover on the Celerra can retrieve the data portion of migrated
In the case of a Celerra recalling files directly from an EMC Centera, the Celerra data mover contacts the DX-NAS server, and the DX-NAS server retrieves the requested data from the EMC Centera and passes it back to the Celerra. (DX-NAS must be present for a Celerra to recall files that have been migrated directly to an EMC Centera.)
Similarly, in all NetApp configurations, the DX-NAS server retrieves the data portion of migrated files. (DX-NAS must be present for NetApp to recall any files that have been migrated.)
About Secondary Storage
In the DX-NAS solution, secondary storage can be any file system on any host that the DX-NAS policy engine can connect to. In Microsoft Windows, DX-NAS needs to be able to access secondary storage using UNC paths. For Solaris and Linux, DX-NAS needs to be able to mount the file system on secondary storage.
While there are a number of ways that DX-NAS can be implemented, secondary storage configurations generally fall into the following categories:
◆ NAS server file systems ◆ File systems on remote hosts ◆ EMC Centera
◆ Other Storage Devices
About NAS server to
NAS server
Migration
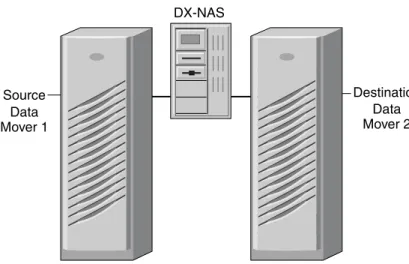
In some cases system administrators merely want to move files from “expensive” storage in a Celerra or NetApp cabinet to less-expensive storage in the same cabinet or on a different Celerra or NetApp Filer (see Figure 5).
Expensive storage might be, for example, a file system with a RAID 5 configuration. In such a case, a system administrator might want to archive older files to a file system which is just a bunch of disks (JBOD). Using DX-NAS terminology, then, the RAID 5 file system would be the source, and the JBOD file system would be destination.
Figure 5 DX-NAS migrating files from one NAS server to another
NAS Server to
Separate Host
Migration
Another common DX-NAS configuration is to migrate files to a file system on a separate host. These destination file systems can be a CIFS (Windows) or an NFS (UNIX) based file system, and the only requirement is that both the DX-NAS policy engine and the Celerra (if part of the configuration) need to be able to access secondary storage using a UNC paths (Windows) or by mounting the file system on the secondary storage as an NFS share (Solaris or Linux).
Data Mover 1
Source
DX-NAS
Destination
Data Mover 2
P S 0 P S 1 P S 2 P S 3 P S 4S M B 0S M B 1
SB0 SB1 SB2 SB3 SB4 SB5 SB6 SB7 SB8 SB9 SB1 0 SB1 1 SB1 2 SB1 3 SB1 4 SB1 5
P S 0 P S 1 P S 2P S 3 P S 4S M B 0S M B 1
SB0 SB1 SB2 SB3 SB4 SB5 SB6 SB7 SB8 SB9 SB1 0 SB1 1 SB1 2 SB1 3 SB1 4 SB1 5
PS0PS1PS2PS3PS4SMB0SMB1
S
B0 SB1
S
B2 SB3
S
B4 SB5
S
B6 SB7
S
B8 SB9
S
B10 SB11
S
B12 SB1
3
S
B14 SB15 DataMover 1
Source
DX-NAS Remote Host NFS/CIFS
NAS Server Direct to
EMC Centera
It is also possible for DX-NAS to migrate data directly to an EMC Centera (see Figure 7). This requires the Celerra to be running Dart 5.5 and the EMC Centera to be running CentraStar version 2.4, 3.0, 3.1, or higher. Any version of NetApp Ontap can migrate to the Centera.
In a Celerra configuration, DX-NAS provides a web server interface to the EMC Centera. When the Celerra needs to recall a file that has been migrated to the EMC Centera, it makes an HTTP call to the DX-NAS web server which retrieves the file from the EMC Centera and supplies it to the Celerra. This configuration requires you to identify the EMC Centera secondary storage as type http in the connection string on the Celerra. For example a connection string for direct to EMC Centera migration might look like this:
fs_dhsm -connection myfilesystem -create -type http -secondary http://TP2003-99.lab.local/centera -httpPort 8080 -cgi y
With NetApp, the DX-NAS server tracks all migrated files in its database, and DX-NAS knows if a file needs to be retrieved from the EMC Centera.
Note: With EMC Centera, the DX-NAS server is part of the restore path for migrated files. Consequently, if you want to uninstall DX-NAS you will want to migrate all your files back first. For more information on how this is accomplished see “Recalling All Files from Celerra” on page 45.
EMC Centera
P S 0P S 1P S 2P S 3P S 4S M B 0S M B 1
SB0 SB1 SB2 SB3 SB4 SB5 SB6 SB7 SB8 SB9 SB1 0 SB1 1 SB1 2 SB1 3 SB1 4 SB1 5
Celerra orNetApp
Destination (DX-NAS HTTP Server) DX-NAS
DataMover 1 Source
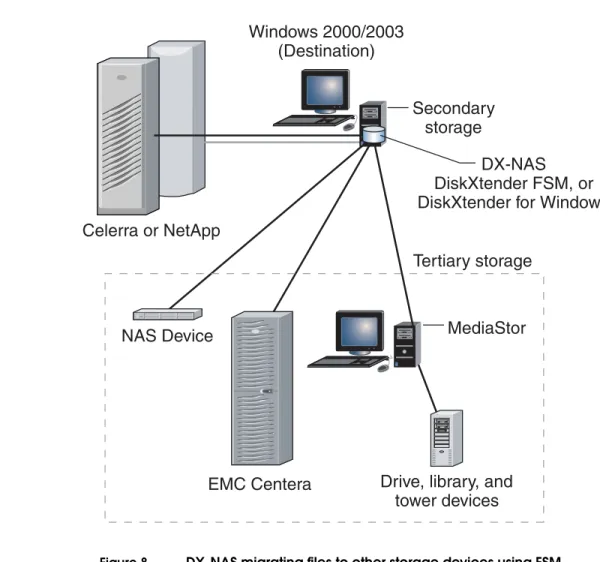
NAS Server to Other
Storage Device
Migration
It is possible to migrate files to devices such as a tape library. However the migration must be done indirectly through an intermediary product like the DiskXtender File System Manager (DX-FSM) or DiskXtender for Microsoft Windows (DX-Windows). With DX-FSM or DX-Windows, a managed file system is created where all the files placed on that file system are moved to an EMC Centera or to a supported storage device. Using DX-FSM or
DX-Windows, then, DX-NAS would migrate files to the managed file system, which in turn would migrate them to the storage device. (Figure 8) The restore path would be similar: when an offline file is accessed, Celerra or DX-NAS (in the case of NetApp) would attempt to read the file from the FSM managed file system, and it would have to wait for DX-FSM or DX-Windows to retrieve the file from the
storage device before transferring the contents of the file back to the requesting client.
Figure 8 DX-NAS migrating files to other storage devices using FSM
C
e
l
erra
o
r
Ne
t
A
pp
Se
co
ndar
y
s
to
ra
g
e
Wind
o
ws
2000/200
3
(D
es
t
ina
t
i
o
n
)
PS0PS1PS2PS3PS4SMB0SMB1
S B0 S B1 S B2 S B 3 S B4 S B5 S
B6 SB7
S
B8 SB9
S
B10 SB11
S
B12 SB13
S
B14 SB15
DX-
NAS
D
is
kXt
ender
F
SM
, o
r
D
is
kXt
ender
fo
r
Wind
o
ws
T
er
t
iar
y
s
to
ra
g
e
MediaS
to
r
D
ri
v
e
, l
i
b
rar
y,
and
to
wer
de
v
i
c
es
E
M
C C
en
t
era
DX-NAS server port usage
Table 1 on page 27 provides a list of the ports used by the DX-NAS server.
If you configured a fire wall on the network where the DX-NAS server and client are located, enable access to ports 1976, 11001, and 8080.
Table 1 Ports used by DX-NAS
Port number Description
139 NetApp callback (not configurable)
Note: If DX-NASis used to migrate files from a
NetApp filer, you cannot runSamba on thesame
machinewhere the DX-NASserverisrunning.
445 CIFS
2049 NFS
1976 DX-NASdatabase
3682 • EMC Centera CLI
• EMC Centera Viewer
• EMC Centera communication
8080 DX-NASweb server
Celerra requirements
The DX-NAS software supports the following versions of data access in real time (DART):
◆ 5.4.18.3 or later ◆ 5.5.20.1 or later ◆ 5.6
Note: Versions of DART that are before 5.4.18.3 are not supported.
The EMC NAS Support Matrix provides more information on
supported software and hardware, Fibre Channel switches, and applications for Celerra network-attached storage products.
The EMC NAS Support Matrix can be viewed at
NetApp filer requirements
DX-NAS release 3.0 is the first release to support NetApp filers as primary storage. The following requirements for using NetApp filers apply:
◆ DX-NAS server software installed on either Red Hat Linux or Microsoft Windows.
Note: You cannot use a NetApp filer as primary storage if you are using DX-NAS server software on Solaris.
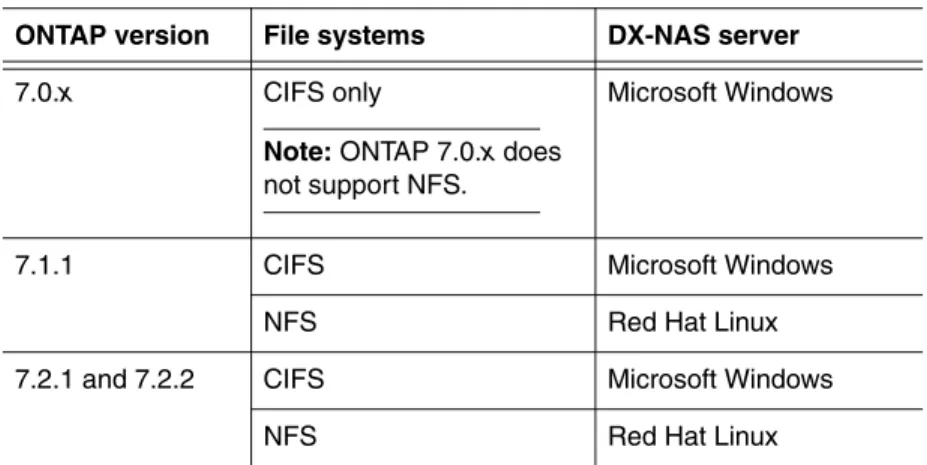
◆ Data ONTAP version 7.0.x or later installed on the NetApp filer. Table 2 on page 29 provides a support matrix for ONTAP versions that can be used with DX-NAS.
Table 2 Support matrix for Data ONTAP
ONTAP version File systems DX-NAS server
7.0.x CIFS only
Note: ONTAP 7.0.xdoes not support NFS.
Microsoft Windows
7.1.1 CIFS Microsoft Windows
NFS Red Hat Linux
7.2.1 and 7.2.2 CIFS Microsoft Windows
EMC Centera Recommendations
When migrating from primary storage to an EMC Centera, consider the following recommendations:
◆ Configure the EMC Centera to use its single instance storage abilities rather than use the DX-NAS check-summing feature. Single instance storage is the ability of the Centera to recognize that the same unchanged file is being migrated more than once and only store one instance of the file. By default, this feature comes turned on regardless of the Centera model (Basic, Governance, or Compliance
◆ Use retention classes rather than retention periods. ◆ Where possible, use EMC Centera virtual pools.
The primary objective of DX-NAS is to move files from primary storage to secondary storage. To accomplish this effectively, DX-NAS needs to provide the following basic services:
◆ File Migration ◆ File Recall ◆ File Versioning
◆ Orphan File Management ◆ Storage Reporting
◆ Error Reporting
Basic DX-NAS
Configurations
About File Migration
In DX-NAS, file migration is accomplished by creating and running jobs. Jobs consist of the following elements:
◆ A Source—the folder or directory on a Celerra or NetApp Filer where the policy engine looks for files that are candidates for migration.
On Microsoft Windows a source is specified as a UNC path (for example, \\server2\wip).
On Solaris or Linux a source is specified as a a directory or mount point (for example, /Celerra/server2/wip).
◆ A Destination—the folder or directory where the file will be migrated to. The machine the DX-NAS server is running on needs to be able to access the destination in one of the following ways: • As a local directory
• As a UNC path (for CIFS shares)
• As a mounted NFS share (for Solaris or Linux)
◆ A Policy—a description of what files to migrate and how to migrate them. When a policy is created, “match criteria” is established to identify which files are candidates for migration. This match criteria can be based on a variety of file attributes like file name, file size, last modification time, etc.
After jobs have been created, the DX-NAS server can be scheduled to run the jobs at times that will have the least impact on normal NAS client use.
Creating Jobs in the
GUI
The structure of a job is implied in the layout of the DX-NAS GUI. The tabs in the GUI reflect the elements or steps necessary to create a job.
In Figure 9, the first three tabs on the user interface correspond to the elements of a job identified above and represent the first three steps in creating a job.
Figure 9 Sources and Destinations in the DX-NAS GUI
The fourth step--the step of actually creating a job on the Jobs tab of the GUI--consists primarily in choosing which policy the job will implement.
Jobs can also be created in the DX-NAS command line interface (CLI). Figure 10 shows an example of the commands used to create a job in the CLI.
DXNAS Ready>host -c server229.lab.local -type celerra -user dhsm_user -pass dhsm_user -i "Celerra host from CLI"
Source Host Configurations: ========================== SourceHost :server229.lab.local Description=Celerra host from CLI FileMover Username=dhsm_user NAS Filer Type=EMC Celerra DART Hostname=server229.lab.local Number of sources=0
DXNAS Ready>source -c "Celerra CIFS Source" -h server229.lab.local -p \\server229.lab.local\wayne_test\Win -i "Celerra CIFS source from CLI"
Adding source : Celerra CIFS Source Source Configurations:
========================== Source :Celerra CIFS Source
Description=Celerra CIFS source from CLI Sourcehost=server229.lab.local
Source path=\\server229.lab.local\wayne_test\Win
DXNAS Ready>dest -c "Windows Dest for Celerra" -type fs -h TP2003-127.lab.local
-p \\TP2003-127.lab.local\WinStorage -fmp \\TP2003-127.lab.local\WinStorage -i "Windows Storage for Celerra referencing a connection string."
Destination Configurations: ==========================
Destination :Windows Dest for Celerra Type=Disk Filesystem
Offline directory=\\TP2003-127.lab.local\WinStorage
Description=Windows Storage for Celerra referencing a connection string. Destination path=\\TP2003-127.lab.local\WinStorage
Host Name=TP2003-127.lab.local
DXNAS Ready>policy -c "Migrate all .mpg to File System" -type mig -s "Celerra CIFS Source" -dest
“Windows Dest for Celerra" -mode filemover -rb passthrough -rule "-name *.mpg" -md5 off -i "Migrate to Local Disk"
Policy Configurations: ==========================
Policy :Migrate all .mpg to File System Migration Source=Celerra CIFS Source Match Criteria=
Use MD5 deduplication=false Policy Type=Migration Policy Readback Method=Passthrough Description=Migrate to Local Disk Destination=Windows Dest for Celerra Source Host=server229.lab.local
Source Path=\\server229.lab.local\wayne_test\Win Find Match Criteria=-type f -name *.mpg
Celerra Offline Directory=\\TP2003-127.lab.local\WinStorage Destination Path=\\TP2003-127.lab.local\WinStorage
DXNAS Ready>job -c "Migrate MPG" -p "Migrate all .mpg to File System" -m 15 -t 0 -i "Job created from CLI"
Job Configurations and Running Jobs: ========================== Job :Migrate MPG
Migration Source=Celerra CIFS Source Readback Method=Passthrough Destination=Windows Dest for Celerra Time Limit (minutes)=0.0
Find Match Criteria=-type f -name *.mpg
Celerra Offline Directory=\\TP2003-127.lab.local\WinStorage Match Criteria=
Policy Type=Migration Policy Use MD5 deduplication=false
Policy=Migrate all .mpg to File System
DXNAS Ready>source -c "Celerra CIFS Source" -h server229.lab.local -p \\server229.lab.local\wayne_test\Win -i "Celerra CIFS source from CLI"
Adding source : Celerra CIFS Source Source Configurations:
========================== Source :Celerra CIFS Source
Description=Celerra CIFS source from CLI Sourcehost=server229.lab.local
Source path=\\server229.lab.local\wayne_test\Win
DXNAS Ready>policy -c "Migrate all .mpg to File System" -type mig -s "Celerra CIFS Source" -dest
“Windows Dest for Celerra" -mode filemover -rb passthrough -rule "-name *.mpg" -md5 off -i "Migrate to Local Disk"
Policy Configurations: ==========================
Policy :Migrate all .mpg to File System Migration Source=Celerra CIFS Source Match Criteria=
Use MD5 deduplication=false Policy Type=Migration Policy Readback Method=Passthrough Description=Migrate to Local Disk Destination=Windows Dest for Celerra Source Host=server229.lab.local
Source Path=\\server229.lab.local\wayne_test\Win Find Match Criteria=-type f -name *.mpg
Celerra Offline Directory=\\TP2003-127.lab.local\WinStorage Destination Path=\\TP2003-127.lab.local\WinStorage
server229.lab.local
"Celerra CIFS Source"
"Windows Dest for Celerra"
"Migrate all .mpg to File System"
About Policies There are three types of DX-NAS policies:
◆ Migration Policies--which identify files that should be migrated from primary storage to secondary storage
◆ Orphan File Policies--which identify migrated files on secondary storage that no longer have a valid corresponding stub on primary storage
◆ Source Scan Policies--which identify stubs on primary storage that no longer have valid corresponding files on secondary storage Each of these policies is created with the Policy Wizard that is launched from the Policies tab.
About Readback Method
Polices currently support three readback methods:
◆ Full--(Celerra or NetApp) The file on secondary storage is recalled, and it replaces the stub on the source.
On the Celerra, if attempts to recall data produce an error related to insufficient space or quotas, the Celerra will attempt to re-read the data using the passthrough mode.
Full is the only readback method supported on NetApp.
Note: Except when using a NetApp source, EMC strongly recommends that you do not use the full readback method. However, if you do use the full readback method with Celerra, then also use the checksum feature.
◆ Partial--(Celerra only) The Celerra reads the file on secondary storage and restores only the parts of the file that are being accessed by the requesting client. There is no benefit to be gained by using the partial readback method unless the application recalling the file has the ability to read file using byte offsets. ◆ Passthrough--(Celerra only) The Celerra reads the file on
secondary storage and passes the data to the requesting client without affecting the stub.
Note:On Celerra, the read policy override parameter for the FileMover (or DHSM) connection takes precedence over the value set in the policy.
Figure 12 illustrates how the readback methods work.
Figure 12 Readback methods available for the Celerra
Cl
ien
t
O
n
l
ine
C
e
l
erra
o
r
Ne
t
A
pp
Se
co
ndar
y
S
to
ra
g
e
Full Readback Method
Cl
ien
t
C
e
l
erra
O
n
ly
Se
co
ndar
y
S
to
ra
g
e
Passthrough Readback Method
Offl
ine
Cl
ien
t
C
e
l
erra
O
n
ly
Se
co
ndar
y
S
to
ra
g
e
Partial Readback Method
About Match Criteria The behavior of a job is determined largely by the match criteria that is established in its policy. The match criteria tells the policy engine what files to search for. DX-NAS can search for files in the following ways:
◆ By name--search for files of a specific name or extension ◆ By size--search for files that are at or above a specified size ◆ By user--search for files belonging to a specified user ◆ By group--search for files belonging to a specified group ◆ By accessed date (atime)--search for files based on when they
were last accessed.
◆ By change time or create time (ctime)--on NFS file systems you can search for files based on when they have had their attributes changed. On CIFS file systems, you can search for files based on when they were created.
◆ By modified date (mtime)--search for files based on when they were modified.
◆ By file permissions (perm)--search for file based on their file permissions.
Note: Source file scan policies don’t allow search criteria. A source scan policy examines every file on the specified source.
DX-NAS will begin its search in the directory specified as the source and searches through each of its subdirectories. Every file that matches the search criteria is acted upon according to the requirements of the policy.
Running Jobs
When jobs are run they migrate files, delete files, or generate reports. Additionally, in the case of migration jobs and orphan files jobs you can run the jobs in preview mode to see a list of files that will be affected by the job. This allows you to fine tune your match criteria.Jobs can be run or previewed from the CLI or the GUI, and jobs can be scheduled to run at specific times or specific intervals.
Figure 14 Orphan Job Preview in the DX-NAS GUI
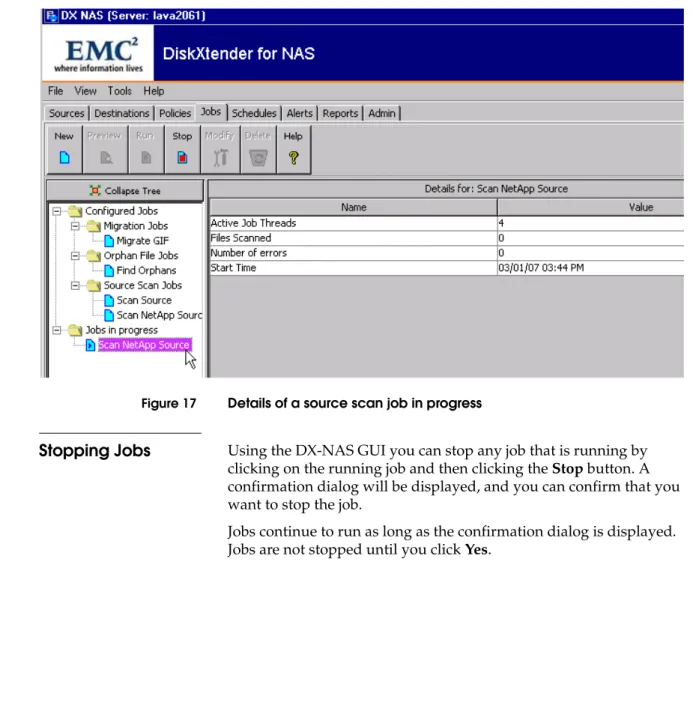
Monitoring Jobs
If you want to monitor the progress of jobs that are running, you can use the DX-NAS GUI. On the Jobs tab, in the tree display pane, there is a heading named Jobs in progress. All running jobs are listed in under this heading, and by clicking on one of these jobs you can see details about the running jobs.Note: You cannot monitor job status in the DX-NAS CLI
Figure 17 Details of a source scan job in progress
Stopping Jobs
Using the DX-NAS GUI you can stop any job that is running by clicking on the running job and then clicking the Stop button. A confirmation dialog will be displayed, and you can confirm that you want to stop the job.Jobs continue to run as long as the confirmation dialog is displayed. Jobs are not stopped until you click Yes.
File Recall
When a file is migrated, the file is copied to secondary storage, and a stub is created on Celerra or NetApp. At this point the file is
considered “offline,” and as long as the relationship between the stub and the data file is maintained, or remains valid, the file can be accessed normally. (This process is represented in Figure 19 on the “Migrate” line.)
However, if the file is migrated with a readback method of “full,” then when any NAS client accesses the stub, Celerra or NetApp deletes the stub and “recalls” the entire file from secondary storage. This file recall is transparent to the NAS client. It may take longer to open the file, but it is seen and accessed from the same location with the same name. The only difference may be that, in Microsoft Windows, the user may see that the file has an offline icon and/or offline attribute.
Note: As the information necessary to recall the file is contained in the stub on the Celerra, migrated files can be recalled even if DX-NAS is uninstalled. However, there are two exceptions:
1) If you have used DX-NAS to migrate directly to EMC Centera. If this is the case, you will need to recall all your files from the EMC Centera before uninstalling DX-NAS.
2) If you have migrated from a NetApp source. The DX-NAS server is required to recall files from secondary storage on NetApp.
Recalling All Files
from Celerra
If you want to recall all the files from secondary storage—that is, un-migrate all your files from secondary storage—you can
accomplish this by deleting the secondary storage connection string on the control station of the Celerra.
The connection string was created on the control station when you configured the Filemover protocol. This connection string contained the information about where to retrieve data for migrated stubs. For example, connection strings might have looked something like this:
◆ fs_dhsm -connection myfilesystem -create -type http -secondary http://TP2003-99.lab.local/centera -httpPort 8080 -cgi y
Connections created with the commands above would have been assigned connection IDs that might have looked like those listed in Figure 18.
Figure 18 Connection string listing from Celerra
You can force a recall of all migrated files from secondary storage by
cid = 2
type = HTTP
secondary = http://TP2003-99.lab.local/centera state = enabled
read policy override = none write policy = full user =
options = httpPort=8080 cgi=y cid = 3
type = CIFS
secondary = \\server227.lab.local\winstor state = enabled
read policy override = none write policy = full
local_server = server229.lab.local admin = lab.local\wtaylor wins =
cid = 4
type = NFSV3
secondary = lava2113:/solstor state = enabled
read policy override = none write policy = full
For example, to force a recall of all files from the CIFS connection shown in the example above, you could enter
fs_dhsm -connection CIFSFilesystem1 -delete 8 -recall_policy yes
When yes is specified with the -recall_policy option, the Celerra attempts to recall all the files on secondary storage. Depending on how many files have been migrated, this can take some time. While recalling the files the state of the connection will be Migration:
ON_GOING.
For example, during the time the files are being recalled, if you were to query the connection strings for the file system CIFSFilesystem1 by entering the following command
fs_dhsm -connection CIFSFilesystem1 -info
you might see something like this: cid = 8
type = CIFS
secondary = \\server227.lab.local\winstor\ state = recallonly[ Migration: ON_GOING ] read policy override = none
write policy = full
local_server = server227.lab.local admin = administrator wins =
When the files have all been recalled, the connection is deleted or the state of the connection changes to recallonly.
cid = 8
type = CIFS
secondary = \\server227.lab.local\winstor\ state = recallonly
read policy override = none
write policy = full
local_server = server227.lab.local admin = administrator wins =
With this command, the secondary storage connection ID is permanently deleted.
Note: When deleting a Centera connection string, the Celerra wants to have a
user associated with the CID before it will delete the connection string using
-recall_policy yes. For example, in Figure 18 above, you would need to change CID 2 to user administrator by using a command similar to this:
fs_dhsm -connection myfilesystem -modify 2 -user administrator
Supply the administrator password—usually the password you used to log in to the control station with—and the Celerra will update the connection string. Then you can delete the connection string using -recall_policy yes as described above.
Recalling All Files
from NetApp
Unlike Celerra, NetApp does not have a built-in mechanism for recalling all migrated files. In order to recall all files you would need to write a script that opens and reads at least one byte from each file in the directory and sub-directories where you have migrated files. As all NetApp migrations are done with a recall method of full, this will have the effect of recalling all migrated files.
About Orphan Files
When DX-NAS migrates a file from primary storage to secondary storage, it essentially breaks the file into two parts:
1. a stub on primary storage
2. the data portion of the file on secondary storage
And whenever the relationship between the stub on primary storage and the data file on secondary storage is broken, this constitutes an orphan file.
The most common way orphan files are created is when a NAS client deletes or overwrites a stub on primary storage. However, if DX-NAS has migrated the files using the “full” readback method, then simply reading a file will result in an orphan file being created as well. (See the “Migrate” and “Recall” lines in Figure 19.) 1
If for some reason the data file on secondary storage is deleted, then the stub file itself on primary storage is the orphan. (See the “Data File Delete” line in Figure 19.)
Figure 19 Examples of how orphan files can be created
In order, then, to effectively manage orphan files, three mechanisms were introduced into DX-NAS 2.0:
◆ source scans
X
Primary
Storage
Data FIle
Data File
Stub
(Offline)
Migrate
Stub
(Online)
Secondary
Storage
Recall
Now-orphaned
Data File
Data File
Delete
Now-orphaned
Stub
About Source Scans
A source scan will inspect every stub or offline file on a defined source and check to see if the information regarding the data portion of the file on secondary storage is still valid. If the data does not exist on secondary storage, the source scan generates an error. If the data exists, but it doesn’t have the location information, the source scan will correct the problem.Consequently, running a source scan before an orphan file scan will reduce the number of orphans found.
Source Scan on Celerra with File System Backend
For Celerras migrating to file system backends, a source scan performs the following steps:
1. It looks at every file on the specified source directory 2. If a file is not a stub, it skips the file.
3. If a file is a stub, the source scan checks to see if the data belonging to the stub is on secondary storage.
4. If the data is not on secondary storage, the source scan generates an alert to notify the user of the error. DX-NAS does not delete stubs or offline files from primary storage; the user needs to make the determination on whether or not to delete these files.
5. If the data is on secondary storage, the source scan looks at the info file. If the info file is wrong—that is, it is not pointing to the stub on primary storage correctly—the source scan corrects the information in the info file.
Source Scan on NetApp with File System Backend
For NetApp filers migrating to file system backends, a source scan performs the following steps:
1. It looks at every file on the specified source directory 2. If a file is online, it skips the file.
5. If the data is on secondary storage, the source scan looks up the information on the offline file in the DX-NAS database. If the information in the database is wrong—that is, it is not pointing to the stub on primary storage correctly—the source scan corrects the information in the DX-NAS database.
Source Scan on Celerra or NetApp with EMC Centera Backend
For Celerras or NetApp filers migrating to an EMC Centera, a source scan performs the following steps:
1. It looks at every file on the specified source directory 2. If a file is not a stub or is online, it skips the file.
3. If a file is a stub or is offline, the source scan looks in the DX-NAS database to see if the clip is in the EMC Centera.
4. If the clip is not in the EMC Centera, the source scan generates an alert to notify the user of the error. DX-NAS does not delete stubs or offline files from primary storage; the user needs to make the determination on whether or not to delete these files.
5. If the clip is in the EMC Centera, the source scan looks at the metadata stored with the clip and then checks for any updates to that metadata in the DX-NAS database. If any of the metadata is incorrect, the source scan corrects it.
Orphan File
Management
During an orphan file preview or orphan file job, DX-NAS looks at the information file associated with each file that has been migrated. If the stub identified in the information file is missing, then orphan tags are inserted into the file. If on a subsequent orphan file scan the stub is located (because a stub was restored or because network access to a a source is re-established) then the orphan tags are removed from the corresponding information file.
Table 3 shows an example of how an information file looks. The orphan tags have been bolded.
Table 3 Example of information file used to track orphan files Orphan File Job on Celerra with File System Backend
For Celerras migrating to file system backends, an orphan file job performs the following steps:
1. It looks at every file on the specified destination directory 2. When it finds a migrated data file, it looks for the info file. 3. If the info file does not exist, it creates one and flags the migrated
data file as an orphan.
4. If the info file exists, it goes to the source to see if the information in the info file matches the information in the stub.
5. If the information matches, it clears any orphan flags that might have been in the info file. (Effectively, at this point, the migrated data file is no longer an orphan.)
6. If the information is not valid, an orphan flag is placed in the migrated data file’s info file, and the migrated data file is now an orphan.
7. If a migrated data file is an orphan and has been previously flagged for later deletion, the “delete later” criteria is evaluated and acted upon accordingly.
Orphan File Job on NetApp with File System Backend
<entry>
<path>\\server227.lab.local\wayne1\Win\Backup\Depth\One\twoPillars.tif</path> <filehandle>4294967328-27092-1139594692</filehandle>
<datafile>40c743bfcb740</datafile> </entry>
<entry>
<path>\\server227.lab.local\wayne1\Win\Backup\twoPillars.tif</path> <filehandle>4294967328-27090-1139593996</filehandle>
<datafile>40c743bfcb740</datafile>
<orphan>43ECD610:5</orphan>
3. If there is no database entry for the migrated data file, it creates one and flags the migrated data file as an orphan.
4. If the database entry exists, it goes to the source to see if the information in the database matches the information in the offline file.
5. If the information matches, it clears any orphan flags that might have been set. (Effectively, at this point, the migrated data file is no longer an orphan.)
6. If the information is not valid, an orphan flag is placed in the migrated data file’s database entry, and the migrated data file is now an orphan.
7. If a migrated data file is an orphan and has been previously flagged for later deletion, the “delete later” criteria is evaluated and acted upon accordingly.
Orphan File Job on Celerra or NetApp with EMC Centera Backend
For Celerras or NetApp filers migrating to an EMC Centera, an orphan file job performs the following steps:
1. It looks at every clip in the storage pool where DX-NAS has migrated data.
2. It gets stub or offline file location information for the clip from the DX-NAS database.
3. If the stub or offline file location information is valid, it clears any orphan flags that might have been in the info file. (Effectively, at this point, the migrated data file is no longer an orphan.)
4. If the stub or offline file information is not valid, an orphan flag is placed in the clip’s database entry, and the clip is now an orphan. 5. If a clip is an orphan and has been previously flagged for later
deletion, the “delete later” criteria is evaluated and acted upon accordingly.
Note: The deletion of clips on the Centera will take place according to whatever retention settings are in effect.
itself is contained in a leaf node which has the same name as the file handle on the Celerra.
As an example, Figure 20 illustrates that DX-NAS has been configured to migrate files to a destination directory named
MoreStor. When migrating the first file DX-NAS begins by creating a directory that reflects the source host name, in this case server227. On each subsequent file migration from that source host, DX-NAS will create a series of three directories that are based on the inode of the source file. Then it creates a directory that has the same name as the Celerra file handle and puts the data file in this directory.
Figure 20 Example of directory structure on secondary storage
When two files with the same inode are migrated, there will be two or more data files in a leaf directory. This situation can happen when a program on the NAS client updates the file without changing an inode. If this case, after the update, when the file is re-migrated to
To help sort out which files are which on secondary storage, DX-NAS 2.0 implemented file versioning. Basically this consists of maintaining and information file (named infofile) about each file in the
secondary source directory. This info file contains information such as what the name of the file was on the Celerra.
Figure 21 illustrates how an info file works.
Figure 21 Example of tracking multiple versions of files on Celerra
Migrate
Primary Storage
Secondary Storage
Re-Migrate
Offline Data File
Infofile
Recall
Online Now orphaned Data File
Still orphaned Data File
Storage Reporting
The DX-NAS GUI provides reports on the migration activity of the system. There are four types of reports:
◆ Migration Report—which displays the amount of storage that has been migrated
◆ Orphan File Report—which displays the orphan files that have been deleted
◆ Primary Storage Report—which displays the storage capacity of primary storage
◆ Secondary Storage Report—which displays the storage capacity of secondary storage
About the Migration
Report
The migration report provides data about the number of files and the amount of storage that has been migrated. By default the report displays as a bar chart and shows migration activity for the past seven days.
Figure 22 Example of a Migration Report
About the Orphan
File Report
Whenever an orphan file job deletes files, the data is collected for an orphan file report. This report will tell you how many orphan files have been deleted from secondary storage and how much space these files took up.
By default the report displays as a bar chart and shows delete activity for the past seven days.
Figure 23 An example of an Orphan File Report
About the Primary
Storage Report
The primary storage report displays information on the amount of storage used and the amount of storage available on each DX-NAS source.
The primary storage report is displayed as a table with the following columns:
About the
Secondary Storage
Report
The secondary storage report displays information on the amount of storage used and the amount of storage available on each DX-NAS destination.
The secondary storage report is displayed as a table with the following columns:
Table 4 Column definition for the Primary Storage Report
Column Description
Source The DX-NAS source. This is the name the DX-NAS source object was given when it was created.
Source Path For Microsoft Windows, a UNC path displaying the hostname and file system where the source files are located. For Solaris and Linux, the path (on the machine where the DX-NAS server is running) where the source is mounted.
Total Bytes The total number of bytes available on the source file system. Bytes free The number bytes the Celerra is reporting as being free on the file
system.
Percent (%) used The percentage of total available bytes that are in use on the source file system.
Table 5 Column definition for the Primary Storage Report
Column Description
Destination The DX-NAS destination. This is the name the DX-NAS destination object was given when it was created.
Destination Path For Microsoft Windows, a UNC path displaying the hostname and file system where the destination files are located. For Solaris and Linux, the path (on the machine where the DX-NAS server is running) where the destination is mounted.
Total Bytes The total number of bytes available on the secondary storage host. Bytes free The number bytes the secondary storage host is reporting as being
About Printing Reports
The print function in the DX-NAS GUI only prints what is visible on the screen. Even if there are scroll bars on the screen indicating that there is additional information not shown, only the visible portion is printed.
If the migration report is large (that is, the software has been running for many days), it can be more efficient to export the report as a CSV file and then use a spreadsheet or a word processing program to print the file.
Error Reporting
DX-NAS provides information to users two ways: ◆ Alerts
◆ Logs
About Alerts
All alerts are related to job activity. If you have no jobs or schedules configured, you will never have any alerts. Messages about the status of jobs are displayed on the Alerts tab of the DX-NAS GUI (see Figure 24). There are three types of alerts:◆ Information—these alerts are displayed when jobs are start, complete, or stop.
◆ Warning—these alerts are displayed when minor problems occur. For example, a source scan job will report orphan stubs (that have the data file missing on secondary storage) as warnings.
◆ Critical—these alerts are displayed when migration fails or when scheduled jobs can not be run.
Figure 24 Alerts Tab in the DX-NAS GUI
Printing Alerts
The print function only prints what is visible on the screen.Consequently, if you have a large number of alerts to print, it can be more efficient to export the alerts as a CSV file and then use a spreadsheet or a word processing program to print the file.
About Logs
DX-NAS uses the following log files:– DXNASServerLog_x.log—any messages or errors
generated by the DX-NAS server process are written to this log. The value x is a number that is incremented.
Note: On Microsoft Windows, if you installed using the defaults, the server logs can be found at
C:\Program Files\EMC\DXNAS\Server\logs.
Solaris and Linux
– DXNASLog.log—any messages or errors that are written to the default output stream are captured in this log. In troubleshooting situations, examine this log first. – DXNASServerLog_x.log—any messages or errors
generated by the DX-NAS server process are written to this log. The value x is a number that is incremented.
Note: On Solaris and Linux, if you installed using the defaults, the server logs can be found at /opt/EMC/DXNAS/Server/logs
Setting the Server Log Level
Using the DX-NAS GUI you can set how much information gets written to the log files. The following logging levels can be set, and generally, these levels are listed in order from least information to most information:
◆ Emergency--report information only when a process becomes unusable. This is the least verbose logging.
◆ Alert--report information when action is required and where lack of action could result in the process becoming unusable
◆ Critical--report conditions that prevent the proper operation of a process
◆ Error--report conditions which cause an operation to fail ◆ Warning--report conditions that warn of impending operation
failures
◆ Notice--report normal, but significant, conditions ◆ Informational--report informational messages only
Note: Selecting one of the more verbose logging levels can cause your log files to grow in size very quickly, and large log files can adversely affect system performance. It is strongly suggested that you run in Debug, Informational, and Notice modes only long enough to complete troubleshooting or testing. Afterwards, copy the log files to a different location, and reset the logs by starting and stopping the DX-NAS console server.
Resetting DX-NAS Logs on Microsoft Windows
To reset DX-NAS logs on Microsoft Windows:
1. Log in to the host where you installed the DX-NAS server as the same user that installed DX-NAS.
2. Choose Start > All Programs > Administrative Tools > Services
3. In the Services panel, right-click EMC DX NAS Database and click Stop.
The Stop Other Services dialog appears informing you that this will stop the DX-NAS server as well.
Note: If you prefer to use the Windows command line, you can enter
net stop “EMC DX NAS Database”
4. Click Yes.
The services stop.
5. If you want to make copies of the log files, change to the folder C:\Program Files\EMC\DXNAS\Server\logs, and copy DXNASLog.log and DXNASServerLog_x.log to a different location.
6. In the services panel, right-click EMC DX NAS Server and click
Start.
Note: If you prefer to use the windows command line, you can enter
Resetting DX-NAS Logs on Solaris and Linux
To reset DX-NAS logs on Solaris and Linux:
1. Log in to the host where you installed the DX-NAS server as root. 2. Enter cd /opt/EMC/DXNAS/Server/database
If you installed the DX-NAS server in a location other than the default location, use that location.
3. Enter ./DxnasServer stop
4. Enter ./DxnasDb stop
5. If you want to make copies of the log files, change to the subdirectory /opt/EMC/DXNAS/Server/logs, and copy DXNASLog.logand ConsoleServerLog to a different location. 6. Enter /opt/EMC/DXNAS/Server/bin/DxnasDb start
7. Enter /opt/EMC/DXNAS/Server/bin/DxnasServer start
There are some differences in the way the DX-NAS works with a source host that is an EMC Celerra and a source host that is a NetApp filer.
Table 6 identifies the areas where the UNIX/Linux and Microsoft Windows versions of DX-NAS differ.
Differences between
Celerra and NetApp
with DX-NAS
Table 6 Differences between Celerra and NetApp as source hosts
Difference EMC Celerra Source Host NetApp Filer Source Host
DX-NAS Server Platforms Supported
• Microsoft Windows • Linux
• Solaris
• Microsoft Windows • Linux
Migration Mechanisms • Filemover API
• Must be configured on the control station of Celerra
• NetApp APIs
• Configured automatically by DX-NAS
Recall Mechanism • Celerra recalls files from secondary
storage. DX-NAS is not in recall path unless migrating direct to Centera.
• DX-NAS moves file back from secondary storage. DX-NAS is always in the data path.
Number of DX-NAS Servers Supported
• Multiple DX-NAS servers can connect to one Celerra.
• Multiple Celerras can be serviced by one DX-NAS server.
• Only one DX-NAS server can connect to a NetApp filer
• Multiple NetApp filers can be serviced by one DX-NAS server
Readback Methods • Full
• Partial • Passthrough
• Full
Orphan Creation • Delete source stub
• Access a file that was migrated with Full readback method
• Modify a migrated file
The UNIX/Linux and Microsoft Windows versions for DX-NAS are created from the same source code, and the differences between the two products exist either because of operating system differences or file system differences.
Table 7 identifies the areas where the UNIX/Linux and Microsoft Windows versions of DX-NAS differ.
Differences between
DX-NAS on Microsoft
Windows and UNIX
Table 7 Differences between DX-NAS on Microsoft Windows and UNIX
Difference Microsoft Windows UNIX/Linux
NetApp Filer Support • Configure NetApp filers as source hosts • Configure NetApp filers as source hosts on Linux
• NetApp filers not supported as source hosts on Solaris
Default Installation Location C:\Program Files\EMC\ DXNAS
/opt/EMC/DXNAS/
Default Location of Uninstall Program
C:\Program Files\EMC\DXNAS\ _uninst\uninstallwin32.exe
or, you can uninstall by choosing DXNAS from the Add or Remove Programs dialog
/opt/EMC/DXNAS/_uninstall/ uninstaller.bin