User Guide for the Cisco Unified Intelligence Center
Reporting Application
8.5(4)
June 2012
Americas Headquarters
Cisco Systems, Inc. 170 West Tasman Drive San Jose, CA 95134-1706 USA http://www.cisco.com Tel: 408 526-4000 800 553-NETS (6387) Fax: 408 527-0833
THE SPECIFICATIONS AND INFORMATION REGARDING THE PRODUCTS IN THIS MANUAL ARE SUBJECT TO CHANGE WITHOUT NOTICE. ALL STATEMENTS, INFORMATION, AND RECOMMENDATIONS IN THIS MANUAL ARE BELIEVED TO BE ACCURATE BUT ARE PRESENTED WITHOUT WARRANTY OF ANY KIND, EXPRESS OR IMPLIED. USERS MUST TAKE FULL RESPONSIBILITY FOR THEIR APPLICATION OF ANY PRODUCTS.
THE SOFTWARE LICENSE AND LIMITED WARRANTY FOR THE ACCOMPANYING PRODUCT ARE SET FORTH IN THE INFORMATION PACKET THAT SHIPPED WITH THE PRODUCT AND ARE INCORPORATED HEREIN BY THIS REFERENCE. IF YOU ARE UNABLE TO LOCATE THE SOFTWARE LICENSE OR LIMITED WARRANTY, CONTACT YOUR CISCO REPRESENTATIVE FOR A COPY.
The Cisco implementation of TCP header compression is an adaptation of a program developed by the University of California, Berkeley (UCB) as part of UCBs public domain version of the UNIX operating system. All rights reserved. Copyright 1981, Regents of the University of California. NOTWITHSTANDING ANY OTHER WARRANTY HEREIN, ALL DOCUMENT FILES AND SOFTWARE OF THESE SUPPLIERS ARE PROVIDED "AS IS" WITH ALL FAULTS. CISCO AND THE ABOVE-NAMED SUPPLIERS DISCLAIM ALL WARRANTIES, EXPRESSED OR IMPLIED, INCLUDING, WITHOUT LIMITATION, THOSE OF MERCHANTABILITY, FITNESS FOR A PARTICULAR PURPOSE AND NONINFRINGEMENT OR ARISING FROM A COURSE OF DEALING, USAGE, OR TRADE PRACTICE.
IN NO EVENT SHALL CISCO OR ITS SUPPLIERS BE LIABLE FOR ANY INDIRECT, SPECIAL, CONSEQUENTIAL, OR INCIDENTAL DAMAGES, INCLUDING, WITHOUT LIMITATION, LOST PROFITS OR LOSS OR DAMAGE TO DATA ARISING OUT OF THE USE OR INABILITY TO USE THIS MANUAL, EVEN IF CISCO OR ITS SUPPLIERS HAVE BEEN ADVISED OF THE POSSIBILITY OF SUCH DAMAGES.
Cisco and the Cisco logo are trademarks or registered trademarks of Cisco and/or its affiliates in the U.S. and other countries. To view a list of Cisco trademarks, go to http://www.cisco.com/go/trademarks
CCVP, the Cisco logo, and Welcome to the Human Network are trademarks of Cisco Systems, Inc.; Changing the Way We Work, Live, Play, and Learn is a service mark of Cisco Systems, Inc.; and Access Registrar, Aironet, Catalyst, CCDA, CCDP, CCIE, CCIP, CCNA, CCNP, CCSP, Cisco, the Cisco Certified Internetwork Expert logo, Cisco IOS, Cisco Press, Cisco Systems, Cisco Systems Capital, the Cisco Systems logo, Cisco Unity, Enterprise/Solver, EtherChannel, EtherFast, EtherSwitch, Fast Step, Follow Me Browsing, FormShare, GigaDrive, HomeLink, Internet Quotient, IOS, iPhone, IP/TV, iQ Expertise, the iQ logo, iQ Net Readiness Scorecard, iQuick Study, LightStream, Linksys, MeetingPlace, MGX, Networkers, Networking Academy, Network Registrar, PIX, ProConnect, ScriptShare, SMARTnet, StackWise, The Fastest Way to Increase Your Internet Quotient, and TransPath are registered trademarks of Cisco Systems, Inc. and/or its affiliates in the United States and certain other countries. Any Internet Protocol (IP) addresses used in this document are not intended to be actual addresses. Any examples, command display output, and figures included in the document are shown for illustrative purposes only. Any use of actual IP addresses in illustrative content is unintentional and coincidental.
Third-party trademarks mentioned are the property of their respective owners. The use of the word partner does not imply a partnership relationship between Cisco and any other company. (1110R)
Table of Contents
Preface ...1 Purpose ...1 Audience ...1 Organization ...1 Related Documentation ...2 Conventions...3Obtaining Documentation and Submitting a Service Request...3
Documentation Feedback...4
1. Product Overview...5
About Cisco Unified Intelligence Center...5
Deployment Models...6
Databases in the Unified IC Cluster...7
Installation and Configuration...7
Accessibility...7
The Overview Drawer...8
User Authentication...8
Links on Unified IC Reporting Pages...9
2. Getting Started with Unified IC Reporting...13
Acquire the License File from the License Website...13
Sign in to the Administration Interface...14
Upload the License...14
Configure the Active Directory Server...15
Optionally, Configure Report Scheduler Email Settings...15
Optionally, Create Another Super User ...15
Optionally, Enable Unified CCE User Integration ...16
About Unified CCE User Integration...16
Set Up Security for a Remote Data Base...17
Sign in to the Unified IC Reporting Interface...18
Complete the Configuration of the UCCE Data Sources...18
Review the User List and Set up User Roles, Permissions, and Groups...19
Create at Least One Dashboard...20
Unified IC Reporting: Basic Concepts...20
How Do I Create a User?...22
How Do I Run a Report?...23
Unified IC Reporting: Unified IC User Roles...23
Other Users...25
Caching in Unified IC...26
3. Dashboards...27
Available Dashboards Page...28
Timezone considerations for Dashboard...29
Dashboard permalink...29
Timezone considerations for Dashboard permalink...29
Create a Dashboard...30
View a Dashboard...30
Add Dashboard Items...31
Add a Report...32
Add a Note...33 Add a URL...34 Add a Widget...34 Dashboard Slideshow...35 Rename a Dashboard...35 Delete a Dashboard...36 4. Data Sources...37
Data Sources Page...38
Automatic Switch Over...40
Data Source Rules...40
Create/Edit a Data Source...41
Delete a Data Source...44
Mapping to Multiple Databases...44
5. Reports...47
Available Reports Page...48
Stock Report Templates...49
List of Stock Templates...50
Creating a Save As Version of a Stock Template...52
Historical and Real Time Templates...53
Custom Templates...54
Reports and Report Definitions...54
Manage Reports...54
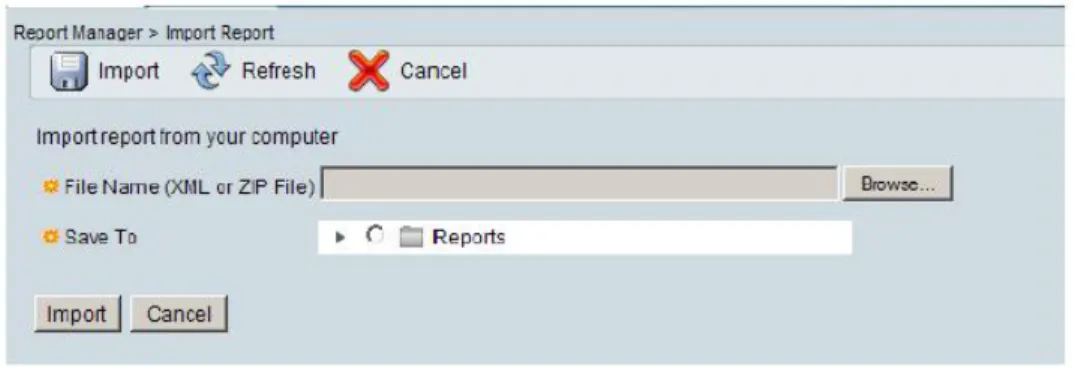
Importing Stock Reports and Other Reports...55
Upgrading Stock Report Template...59
Running a Report...60
Filtering Reports...61
Basic Filters Tab...61
Advanced Filters Tab...63
Basic Filters Tab for Anonymous Block/Stored Procedure...64
Setting the Default Filter...65
The Report Viewer...65
Report Editor...68 Save...69 Save As...69 Creating Reports...70 Renaming a Report...71 Exporting a Report...71 Deleting a Report...72 Report Views...73 Grids...73 Charts...74 Gauges...75 Report Permalinks...76
Timezone considerations for Report permalink...77
Views Editor...77
Exporting a Report to Excel using Permalinks...78
Opening an Exported Report in Excel...79
HTML permalink...80
XML permalink...80
Current Fields and Available Fields...85
Thresholds...86
Add/Edit Thresholds Page...87
Threshold Images...88
Report Summaries...89
Chart Editor...90
Gauge Editor...99
Export to Excel...101
Exporting reports to Excel for SSL users...102
Print...102
Reports and TimeZones...103
Timezone considerations for Report...104
Filters and Daylight Savings Time...105
Reports and Daylight Savings Time...105
6. Report Definitions...107
Available Report Definitions Page...108
Create a Report Definition...109
Save As...110
Edit Report Definition...110
Data Source Tab...111
Database Query...112 Anonymous Block...113 Stored Procedure...115 Fields Tab...117 Parameters Tab...123 Properties Tab...126 Unified IC SQL Syntax ...127
Working with Drilldowns...129
Create a Drilldown...129
Edit a Drilldown...131
Delete a Drilldown...131
Best Practices for Drilldowns...132
Rename a Report Definition...132
Delete a Report Definition...133
Import a Report Definition...133
Export a Report Definition...134
7. Value Lists and Collections...135
Data Collections...135
Value Lists...136
Create/Edit Value List...138
Display and Refresh Value List...139
Associating a Value List with a Report...139
Collections...140
All Collections...140
Create/Edit Collection Page...140
Collections from UCCE User Integration...142
Collection Types...142
8. Scheduler...145
Schedule List...146
Timezone considerations for Scheduled Reports...151
Daylight Savings Time and Scheduled Reports...151
9. Security...153
About Unified IC Security...154
Administrative Overview...154
User List Page...155
User Information Page...156
Creating a User on the User List Page...159
User Groups Page...159
Group Information...160
User Permissions Page...162
Assigned Group Permissions...162
Assigned User Permissions...163
Unified IC Reporting: Unified IC User Roles...164
Other Users...166
About Permissions...167
User Roles and Permissions...168
About User Groups...168
Groups and Child Groups...169
Run As...170
Audit Trail Logging in CUIC...170
Viewing the Audit Trail Logging in CUIC...171
Audit Trail Report...171
Current Fields in the Audit Trail Report Grid View...171
Sample Audit Trail Report...172
Best Practices for Security...173
10. System Concepts and Navigation Controls...175
Accessing Cisco Unified Communications Solutions Tools from Unified IC...175
Cisco Unified Serviceability...176
Cisco Unified OS Administration...177
Disaster Recovery System...180
Categories...181
Create a Sub-Category...181
Delete a Sub-Category...182
Drag and Drop within Categories...182
Rename Categories...182
Permissions for Categories...182
Drawers...183 Filtering...184 Multiple Delete...184 Online Help...185 Refresh...185 Sorting...185
Stock and Custom Objects...186
Tabs...186
List of Figures
Figure 1: Title Bar...9
Figure 2: Stock Templates...23
Figure 3: Available Dashboards page...28
Figure 4: Adding a Report to a Dashboard...32
Figure 5: Dashbord with Sticky Note...34
Figure 6: Data Sources...39
Figure 7: Mapping the Data Source...45
Figure 8: Stock Templates...48
Figure 9: Directory Structure of the Report ZIP fil...56
Figure 10: Stock zip...57
Figure 11: Report Manager...57
Figure 12: Importing Reports...58
Figure 13: Directory Structure of the Exported Report ZIP file...72
Figure 14: Grid...73
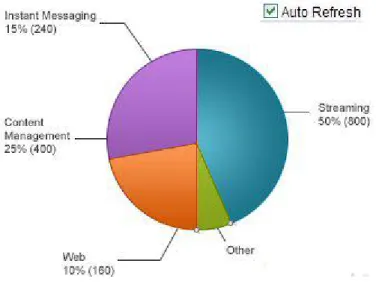
Figure 15: Pie Chart...74
Figure 16: Column Chart...75
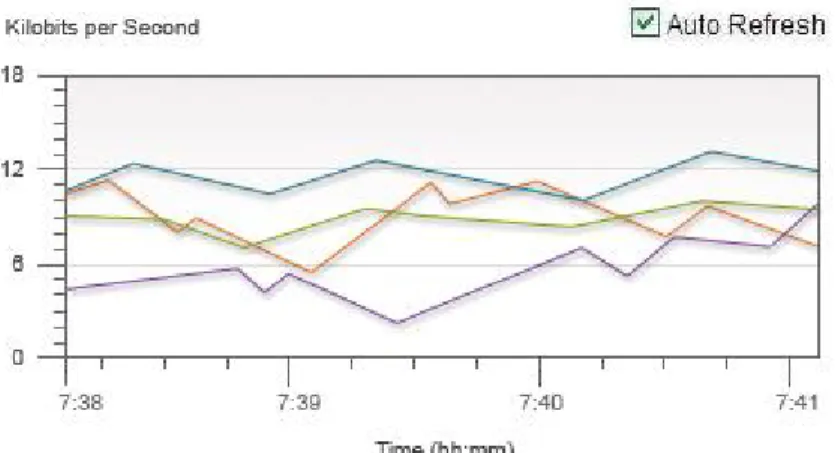
Figure 17: Line Chart...75
Figure 18: Sample Gauge...76
Figure 19: Threshold Image - Status Critical Error...88
Figure 20: Threshold Image - Status Error...88
Figure 21: Threshold Image - Status Warning...89
Figure 22: Threshold Image - Status Success...89
Figure 23: Threshold Image - Wizard Check...89
Figure 24: Threshold Image - Wizard Error...89
Figure 25: Threshold Image - Help...89
Figure 26: Threshold Image - Stop...89
Figure 27: Threshold Image - Green check...89
Figure 28: Threshold Image - Info...89
Figure 29: Chart Dynamic Dataset example...91
Figure 30: Chart Data with Use Report Filters disabled...92
Figure 31: Chart Data with Use Report Filters enabled...92
Figure 32: Chart Dynamic Dataset...96
Figure 34: Absolute Date Range...103
Figure 35: Available Report Definitions...108
Figure 36: Report Definition Data Source Tab...112
Figure 37: Anonymous Block example 1 of 5...114
Figure 38: Anonymous Block example 2 of 5...114
Figure 39: Anonymous Block example 3 of 5...114
Figure 40: ...114
Figure 41: Anonymous Block example 4 of 5...114
Figure 42: Anonymous Block example 5 of 5...114
Figure 43: Stored Procedure example 1 of 5...116
Figure 44: Stored Procedure example 2 of 5...116
Figure 45: Stored Procedure example 3 of 5...116
Figure 46: ...116
Figure 47: Stored Procedure example 4 of 5...116
Figure 48: Stored Procedure example 5 of 5...117
Figure 49: Report Definition Fields Tab...117
Figure 50: Report Definitions Edit Field Properties...121
Figure 51: Report Definition Edit Field Format...123
Figure 52: Report Definition Parameters Tab...124
Figure 53: Report Definition Data Settings Tab...127
Figure 54: Audit Trail Report...173
Figure 55: Navigation dropdown...176
Figure 56: Categories...181
Figure 57: Drawers in Unified IC Reporting...184
Figure 58: Online Help Navigation Icon ...185
Preface
Purpose
This guide explains the user interface and functionality in the Cisco Unified Intelligence Center reporting application.
Audience
This guide is intended for reporting users, administrators, and developers who use the Cisco Unified Intelligence Center (Unified IC) web server to run and manage reports for the Cisco Unified Contact Center products.
This guide documents the stock objects that are installed or can be imported and used with Unified IC and does not explain customization. Stock objects are Reports, Report Definitions, Data Sources, Categories, Value Lists, and Collections. You can download the necessary Cisco stock reports from the Software Download page on the Cisco WebSite and import these reports into Cisco Unified Intelligence Center.
Organization
Covers This Section
A high-level description of Unified IC, the Overview drawer, the cluster deployment model, logging in, and authentication. Chapter 1: Product Overview
(page 5)
First steps to perform when you begin to use Unified IC, basic concepts, User Roles.
Chapter 2: Getting Started with Unified IC Reporting (page 13)
The Dashboards interface, creating and viewing dashboards, adding items to a dashboard, the dashboard slideshow. Chapter 3: Dashboards (page
Covers This Section
The Data Sources interface, the data sources that are installed with Unified IC, how to create and edit a data source.
Chapter 4: Data Sources (page 37)
The Reports interface, the stock reports, how to import reports, how to run a report, how to edit a report, working with report views, charts, and gauges.
Chapter 5: Reports (page 47)
The Report Definitions interface that is offered with the Premium license, what is a report definition, the types of Chapter 6: Report Definitions
(page 107)
queries supported by Unified IC, working with a report definition, the SQL syntax used with Unified IC.
The Values List and Collections interface, how value lists are associated with report definitions, the types of collections you Chapter 7: Value Lists and
Collections (page 135)
can create for a value list, the collections that are created by UCCE User Integration.
The Scheduler interface, how to create and maintain a schedule for a report.
Chapter 8: Scheduler (page 145)
The Security interface, the User List, User Group, Permissions, and using Run As.
Chapter 9: Security (page 153)
The Unified IC user interface, how to access the Cisco Unified Communications tools, working with categories, the difference between stock and custom objects.
Chapter 8: System Concepts and Navigation Controls (page 175)
Troubleshooting is located online, on a customer-facing Wiki page that can be accessed by anyone who has a Cisco.com account:
Troubleshooting
Troubleshooting tips for the Cisco Unified Intelligence Center1
Related Documentation
Guides for the Cisco Unified Intelligence Center (http://www.cisco.com/en/US/products/ ps9755/products_user_guide_list.html)
The Bill of Materials for the Cisco Unified Intelligence Center (http://www.cisco.com/en/ US/products/ps9755/products_user_guide_list.html)
Troubleshooting tips for the Cisco Unified Intelligence Center (http://docwiki.cisco.com/ wiki/Troubleshooting_Unified_Intelligence_Suite)
The Developers' Forum for the Cisco Unified Intelligence Center (http://developer.cisco.com/ web/ccr)
Cisco ACE 4700 Series Appliance Server Load-Balancing Configuration Guide (http:// www.ciscosystems.com/en/US/docs/app_ntwk_services/data_center_app_services/
ace_appliances/vA3_1_0/configuration/slb/guide/preface.html) 1) http://docwiki.cisco.com/wiki/Troubleshooting_Unified_Intelligence_Suite
Preface Related Documentation
Conventions
This manual uses the following conventions:
Description Convention
Boldface font is used to indicate commands, such as user entries, keys, buttons, and folder and submenu names. For example: boldface font
• Choose Edit > Find.
• Click Finish.
Italic font is used to indicate the following:
italic font
• To introduce a new term. Example: A skill group is a collection of agents who share similar skills.
• For emphasis. Example: Do not use the numerical naming convention.
• A syntax value that the user must replace. Example: IF (condition, true-value, false-value)
• A book title. Example: See the Cisco CRS Installation Guide.
Window font, such as Courier, is used for the following:
window font
• Text as it appears in code or that the window displays. Example: <html><title>Cisco Systems,Inc. </ title></html>
Angle brackets are used to indicate the following:
< >
• For arguments where the context does not allow italic, such as ASCII output.
• A character string that the user enters but that does not appear on the window such as a password.
Obtaining Documentation and Submitting a Service Request
For information on obtaining documentation, submitting a service request, and gathering additional information, see the monthly What’s New in Cisco Product Documentation, which also lists all new and revised Cisco technical documentation, at:
Preface
http://www.cisco.com/en/US/docs/general/whatsnew/whatsnew.html
Subscribe to the What’s New in Cisco Product Documentation as a Really Simple Syndication (RSS) feed and set content to be delivered directly to your desktop using a reader application. The RSS feeds are a free service and Cisco currently supports RSS Version 2.0.
Documentation Feedback
You can provide comments about this document by sending email to the following address:
mailto:[email protected]
We appreciate your comments.
Preface Documentation Feedback
Product Overview
About Cisco Unified Intelligence Center
Cisco Unified Intelligence Center (Unified IC) is a web-based graphical user interface that provides real-time and historical reporting and customizable dashboards. You can "save as" the stock reports and then edit the cloned copies by changing the order and the names of columns and by presenting the information graphically as gauges and charts. You can also import additional templates. The premium version of Unified IC comes with a native Report Designer tool for designing new templates.
Depending on the features enabled by your license (Standard or Premium) and on your User Role and your Unified IC object permissions, you can work in Unified IC to:
• Create, maintain, share, and view dashboards that display reports, report lists, sticky notes, scheduled reports, URLs and widgets.
• Run real-time and historical reports from Cisco stock report templates.
• Copy ("Save As") and modify the stock templates to create custom templates.
• Create views for the custom templates to display them as grids, charts, gauges.
• View the status of the default data source that populates the stock templates.
Create and maintain additional data sources for reports that are populated by databases other than the Unified ICM/CC database.
• Control access to the reports, reporting features, and data that each user can see.
• Manage users and groups.
Note: Cisco Unified Intelligence Center reporting is one of two web-based interfaces for Unified IC. The other is the Administration console. The Administration console has its own user documentation and online help.
See Also
Stock Report Templates (page 49)
Custom templates (page 54)
Unified IC User Roles (page 23)
Deployment Models
Unified IC is added to the Cisco Unified Contact Center environment as a cluster, comprised of at least one and a maximum of eight nodes—one primary "Controller" node and as many as seven secondary "Member" nodes.
Description Node
Is present in all deployments. Controller (one)
Is installed with both the Administration (OAMP) and Unified IC Reporting applications.
Holds the License file, which is replicated to the member nodes. See Licenses (page ?).
Allows access, with System Administrator credentials, to Cisco Unified Serviceability, Cisco Unified OS
Administration, and the Disaster Recovery System. Are optional. (A deployment can consist of a Controller node only.)
Members (maximum of seven)
Are installed with Unified IC Reporting application only.
Allow URL access to the Controller node.
Obtain their license from the Controller.
Unified IC is an appliance application similar to Cisco Unified Communications Manager. It must be installed on dedicated servers, which must be Multimedia Communications Servers (MCS) or equivalent hardware.
Refer to the Cisco Unified Intelligence Center Bill of Materials (http://www.cisco.com/en/ US/products/ps9755/products_user_guide_list.html) for server requirements and version compatibility.
Chapter 1: Product Overview Deployment Models
Databases in the Unified IC Cluster
The Informix Dynamic Server (IDS) is installed on all nodes in the cluster.
The installation creates these databases on each node:
• The System database is installed on all nodes. This database is the standard Cisco Call Manager database, modified for the Unified IC.
• The Unified IC database (CUIC). This database holds information on reports, dashboard, users, and other objects maintained on each server. CUIC databases are replicated across the cluster.
The CUIC and System databases are not documented and are not directly accessible for review and management.
You can use the Command Line Interface to perform certain actions and to view database tables and properties. These commands include run sql, various show tech commands, the
utils dbreplication and utils purge commands.
• Two UCCE databases - UCCE Historical and UCCE Realtime. These databases are used to run the stock reports.
The UCCE database is documented in the Database Schema Handbook for Cisco Unified ICM/Contact Center Enterprise & Hosted (http://www.cisco.com/en/US/products/sw/ custcosw/ps1001/prod_technical_reference_list.html)
Installation and Configuration
Installation is documented in the Installation Guide for Cisco Unified Intelligence Center
(http://www.cisco.com/en/US/products/ps9755/products_user_guide_list.html)
Accessibility
Software
Cisco Unified Intelligence Center software is in compliance with Part 1193 of the United States Federal Telecommunications Act Accessibility Guidelines.
For more information, go to this website for details on the Cisco Accessibility (http:// www.cisco.com/web/about/responsibility/accessibility/index.html)
User Documentation Chapter 1: Product Overview
Due to technical limitations at this time, documentation groups are unable to fulfill all documentation accessibility design requirements.
Requests for improved accessibility for documentation are handled on a case-by-case basis upon request only.
To request a fully accessible document, please email [email protected].
Refer to the Accessibility Troubleshooting topics for tips about working in the Unified IC interface (http://docwiki.cisco.com/wiki/Troubleshooting_Tips_for_Unified_IC_8.0).
The Overview Drawer
A successful sign in to Unified IC opens the Getting Started page. Each line of blue text on the Getting Started page is a link that opens an online help topic about one of the Unified IC functions.
The Getting Started page is controlled by the Overview drawer. You can always return to Getting Started by clicking the Overview drawer. All users have access to the Overview drawer and to the Getting Started page.
Do This: To:
Click the X on the Overview tab Close (hide) the Getting Started page
Click the Overview drawer Reopen the Getting Started page
User Authentication
The url for the Unified IC reporting application is http://<HOST where HOST is the DNS name or IP Address of a Unified IC node.
Note:
• If you implement server load balancing, use the UP address of the Application Control Engine (ACE) server.
• When a user has logged in to CUIC with http protocol, and any of the resources like dashboard or threshold images are using https protocol, it may not work as there might be a permission denied error for accessing a secured resource from an unsecured session.
Who can log in?
• The individual designated as Server Application User during the installation is automatically eligible to log in and is the initial System Administrator for Unified IC. This user appears by default on the User List Page (page 155).
– This person can sign in to Unified IC with the user name and password he or she defined during the installation.
Chapter 1: Product Overview The Overview Drawer
• Any user who has been imported with the Unified CCE User Integration feature.
– Once integrated (imported), UCCE supervisors can sign in to Unified IC with their Active Directory User ID and Password.
– They automatically have the User Roles of Dashboard Designer and Report Designer and have Read and Execute permissions to view collections of their (and only their) Agent and Agent teams. They can select these collections when they filter reports.
• All IMS (IP Multimedia Subsystem) users can log in using their IMS username and password. Once they log in, they are added to the CUIC database (cuic_data) and appear in the User List Page.
– The login for these users is either CUIC\<username> or <username>. The user name is case insensitive, but the password is case sensitive. For example, if the user name is
cuicadmin, you can enter cuicadmin, CuicAdmin, and CUIC\cuicadmin.
– IMS does not perform cross-forest authentication. However, there is a workaround that involves the use of Active Directory proxies. For more information, refer to How to Configure Unified Communication Manager Directory Integration in a Multi-Forest Environment (http://www.cisco.com/en/US/products/sw/voicesw/ps556/
products_configuration_example09186a0080b2b103.shtml).
• For all domain (LDAP) users, once the LDAP server is configured in the Administration application, users in that domain can sign in to Unified IC. When they log in, they are added to the cuic database and appear on the User List Page (page 155). The Security Administrator must assign user roles to them. To configure Active Directory in the Administration
application, select Cluster Configuration > Reporting Configuration > Active Directory tab.
– The login username format is <FQDN>\<username> or <subDomainName>\<username> where <subDomainName> is the name of the last level of the sub domain. For example, for <FQDN>: cuic.ccbu.cisco.com, the <SubDomainName> is cuic.
– Domain\user name is case insensitive, but password is case sensitive.
See Also
Unified IC User Roles (page 23)
Links on Unified IC Reporting Pages
Figure 1: Title BarChapter 1: Product Overview
Description Link / Feature
Click the Cisco Systems logo icon to open the Cisco Systems web site.
Cisco Logo
By default, the Unified IC interface displays in the language that has been established for your operating system and browser. You Locale
can change this by clicking the locale dropdown and selecting the language you want.
Setting the locale changes the language used on web pages -including the reports and their generated output, as well as the date and time format.
Note: If your default browser language is one that Unified IC does not yet support, Unified IC will display the first supported language listed in your browser Language Preference. For example, if your browser Language Preference lists Croatian, Vietnamese, and French Canadian (in that order), Unified IC will default to French Canadian, which is the first language in your preferences that Unified IC supports.
Language is session-based. You can open one instance of Unified IC Reporting in French Canadian and another instance in European French.
You can select your locale:
• At the initial log in page. To do this, click the locale dropdown under the Password field.
• At the top of each page.
Unified IC Reporting interface and online help are available in these languages:
• Simpified Chinese = zh_CN
• Traditional Chinese = zh_TW
• Danish = da_DK (Denmark)
• Dutch = nl_NL (Netherlands)
• US English = en_US
• UK English = en_UK
Note: If you select UK English as the locale, the system displays all the date formats as dd/mm/yyyy.
• European French = fr_FR (France)
Chapter 1: Product Overview Links on Unified IC Reporting Pages
Description Link / Feature
• French Canadian = fr_CA (Canada)
• German = de_DE (Germany)
• Italian = it_IT (Italy)
• Japanese = ja_JP (Japan)
• Korean = kp_KR
• Polish = pl_PL
• Portuguese = pt_BR (Brazil)
• Russian = ru_RU (Russia)
• Spanish = es_ES (Spain)
• Swedish = sv_SE (Sweden)
• Turkish = tr_TR
Shows the user id for the user who is currently signed in. Signed On As
Opens a custom Google search for documentation relevant to Cisco Unified Intelligence Center.
Documentation Search
System Configuration Administrators can click this to clear the local cache. See Caching in Unified IC (page 26).
Synchronize Cluster
Shows the user id for the user that the Security Administrator is impersonating or "running as". See Run As (page 170).
Run As
Click to exit Run As mode. Stop Run As
Asks for confirmation and then logs you out. Logout
Shows the version of Unified IC that you are running. Also show the hostname and IP Address of the node.
About
The timeout for session inactivity is set by default to 14,400 seconds (four hours). It is configurable through the Command Line Interface: set cuic-properties session-timeout.
See Also
System Navigation Controls (page 175) Chapter 1: Product Overview
Chapter 1: Product Overview Links on Unified IC Reporting Pages
Getting Started with Unified IC Reporting
The System Application User (page 25) must perform these tasks so that other users can begin working with Unified IC Reporting.
This chapter contains the following topics:
• Acquire the License File from the License Website, page 13
• Sign in to the Administration Interface, page 14
• Set Up Security for a Remote Data Base, page 17
• Sign in to the Unified IC Reporting Interface, page 18
• Unified IC Reporting: Basic Concepts, page 20
• How Do I Create a User?, page 22
• How Do I Run a Report?, page 23
• Unified IC Reporting: Unified IC User Roles, page 23
• Caching in Unified IC, page 26
Acquire the License File from the License Website
Any user in your organization can contact Cisco Systems, Inc. to request a license.
Step 1 To acquire the license file, go to the Cisco Product License Registration website at this URL:
https://tools.cisco.com/SWIFT/Licensing/PrivateRegistrationServlet
Step 2 If you do not have a PAK, click the available licenses link (https://tools.cisco.com/SWIFT/ Licensing/PrivateRegistrationServlet?DemoKeys=Y).
Step 3 Scroll to Voice Products and click Cisco Unified Intelligence Center - v8.0.
Step 4 Enter your MAC Address, accept the agreement, and enter your Registrant Information.
Step 5 Follow prompts to complete the registration pages.
You will receive an email from Cisco Systems that contains your license file as an attachment. The file format is *.lic.
Step 6 Save the license file in a location where the System Application User (page 25) can access it.
Note: As a best practice, save a backup copy of this file. You can open a *.lic. file to look at it, but do not make any changes to it. Changing the file invalidates the license.
Sign in to the Administration Interface
The first person who signs in to the Administration application must do so using the User ID and password that were defined for the System Application User (page 25) during the installation. This user is the initial Super User for Unified IC Administration.
To sign in:
1. Enter this URL: http://<HOST ADDRESS>/oamp where HOST ADDRESS is the IP Address or Hostname of your Controller node.
2. Enter the application user ID and password that you defined during installation.
Next step: Upload the License (page 14).
Upload the License
As soon as the Super User signs in, he or she must upload the license file. The file is uploaded to the Controller node and, within a minute, is automatically replicated to all nodes in the cluster.
Step 1 Navigate to Cluster Configuration > License Management in the Administration application.
Step 2 Click Upload license file (Browse).
Step 3 Navigate to the location where the *.lic file was saved.
Step 4 Click Apply License to load the license.
A message displays indicating that the license file was uploaded successfully and will be distributed in the cluster in approximately one minute.
Note: The databases are polled once a minute for changes. The license replication is not immediate but will occur within a minute.
Next step: Configure the Active Directory Server (page 15).
Chapter 2: Getting Started with Unified IC Reporting Sign in to the Administration Interface
Configure the Active Directory Server
The initial Super User does not need to be authenticated through Active Directory.
Other users, such as Unified CVP reporting users, must be authenticated through Active Directory.
You must configure the Active Directory tab in the Administration console with the credential of Active Directory servers so that supervisors and others can log in to the Unified IC web application with the User Name and password that is defined in their domain.
Step 1 In the Administration application, navigate to Cluster Configuration > Reporting Configuration and select the Active Directory tab.
Step 2 Complete all fields on this page, referring to the online help for guidance.
Step 3 Click Test Connection.
Step 4 When the connection is confirmed, click Save.
Next step: Optionally, Configure Report Scheduler Email Settings (page 15).
Optionally, Configure Report Scheduler Email Settings
Perform this step if you intend to schedule reports and to have the scheduled reports delivered by email. You can skip this step and do this at a later time if you are not sure that you will be scheduling reports.
Step 1 From the Administration application, click Cluster Configuration > Reporting Configuration and select the Report Scheduler Email Settings tab
Step 2 Complete the fields on this tab, referring to online help for guidance.
Step 3 Test the connection.
Step 4 Save.
Next step: Optionally, Create Another Super User (page 15).
Optionally, Create Another Super User
At the initial sign in, the System Application user defined during installation is the only Super User recognized by the Administration application.
As a safeguard, set up at least one other Super User. Chapter 2: Getting Started with Unified IC Reporting
Step 1 In the Administration application, select Admin User Management drawer > Admin User Management to open the Admin Users page.
Step 2 Click Add New to open the Configure User page.
Step 3 Compete the General tab to define a user name and a password for the new Super User.
Step 4 Complete the Credentials tab and the Policy tab, referring to the online help for guidance.
Step 5 Save the Super User.
Until granted other roles, additional Super Users have the Login User role.
Next step: Optionally, Enable Unified CCE User Integration (page 16).
Optionally, Enable Unified CCE User Integration
Users who are configured as agent supervisors in Unified CCE Configuration Manager and saved in the Unified ICM database can be integrated into Unified IC. If you enable UCCE User Integration in the Administration interface, you can schedule and run a synchronize process that:
• Imports these supervisors and creates them as Report Designer and Dashboard users for Unified IC.
• Updates two stock value lists (Agents and Agent Teams) with collections for all supervisors' agents and agent teams.
Grants team supervisors READ and EXECUTE permissions for those collections.
Step 1 From the Administration application, click Cluster Configuration > UCCE User Integration.
Step 2 Click Enable UCCE User Integration.
Step 3 Optionally, set the schedule for time of day and days of the week when you want to user integration. (You can return to this page and set the schedule later, after you configure the UCCE Historical Data Source.)
Step 4 Click Save.
Step 5 Do not click Synchronize Now. (You must first configure the UCCE Historical data source.)
Next step: Set Up Reporting Data Source Security (page 17).
About Unified CCE User Integration
The Unified CCE User Integration feature imports supervisors and their teams from Unified Chapter 2: Getting Started with Unified IC Reporting Sign in to the Administration Interface
Supervisors are automatically given Unified IC user roles and can log in to Unified IC to access collections for - and run reports for - their agent team(s).
Note:
• You cannot run User Integration until you upload the license.
• There are five tasks in the initial setup for Unified CCE User Integration. Some are performed in the Administration interface. Some are performed in the Reporting interface. As the System Application User (page 25) has access to both interfaces, it is efficient for a that user to set up UCCE User Integration.
The tasks are to:
• Enable Unified CCE User Integration in the Administration interface.
• Complete the configuration of the UCCE Historical Data Source in the Reporting Interface.
• Synchronize Users in the Administration Interface.
• Validate Collections of Agents and Agent Teams in the Reporting Interface.
• Set up a synchronization schedule in the Administration Interface.
Results of Unified CCE User Integration:
• Integrated Supervisors can sign in to Unified IC Reporting (provided their Active Directory authentication has been configured).
• Integrated Supervisors are added to the Unified IC Reporting User List with the roles of Login User, Report Designer and Dashboard Designer.
• The Unified IC Value Lists page is updated with Agents and Agent Teams collections.
• Integrated Supervisors can view their Agents and Agent Teams collections (Unified IC Reporting > Value Lists drawer).
• Integrated Supervisors are granted permissions only to the Agents and Agent Teams collections that they "own".
Once Unified CCE User Integration schedule is set up, Unified IC is updated with changes to supervisors and their teams every time the synchronization updates.
Set Up Security for a Remote Data Base
All remote databases referred by Unified IC data sources are repositories for data that populates Unified IC report. They must meet these specifications:
• They must be accessible to Unified IC through the network. Chapter 2: Getting Started with Unified IC Reporting
• Their TCP/IP protocol support must be enabled.
• Their remote access must be enabled.
• They must be protected with read-only access.
• Select SQL Server & Windows Authentication. Windows Authentication is not an option.
• There must be a SQL Authentication User.
Next step: Sign in to the Unified IC Reporting Interface (page 18).
Sign in to the Unified IC Reporting Interface
The System Application User (page 25) is the initial Super User for Administration and is also the initial Security Administrator for the Unified IC Reporting interface. He or she uses the same User ID and password to sign in to the Administration interface and to the Unified IC Reporting interface.
To sign in to the Unified IC Reporting interface:
1. From the home page of the Administration interface, click the Control Center drawer.
2. Locate and double-click the name of the member node you want to access. This opens the Cisco Unified Intelligence Center login page for that member.
3. Enter your User ID and password.
The Overview page displays.
Note: If you implement server load balancing, you need to access the Unified IC reporting interface using http://<ACE Host> where <ACE Host> is either the DND name or the IP VLAN address of the Application Control Engine (ACE) server.
Next step: Complete the Configuration of the UCCE Data Source (page 18).
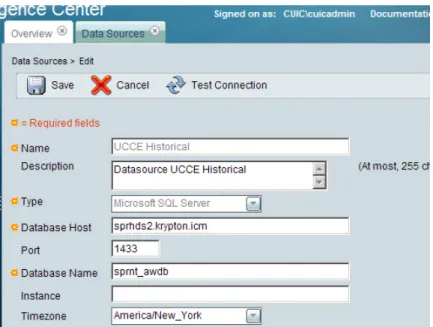
Complete the Configuration of the UCCE Data Sources
Placeholders for two UCCE Data Sources appear by default on the Data Sources page. These are the data sources for the data that populates the stock templates. Before you can run reports or can run UCCE User Integration, you must edit the parameters of these data sources to complete the configuration, including Database Host, Database port, Database Name, User ID and Password.
The two data sources - UCCE Historical and UCCE Realtime - contain the same information, but the UCCE Historical data source typically has a lower load volume and is used to gather data for most of the stock value lists and for UCCE User Integration.
Chapter 2: Getting Started with Unified IC Reporting Sign in to the Unified IC Reporting Interface
Before you can run reports or can run UCCE User Integration, you must edit the UCCE Historical data source to complete the configuration for the Database Host Address, Database Name, IP Address, User ID, and Password.
To do this:
Step 1 From the Unified IC Reporting application, click the Data Sources drawer in the left panel to open the Data Sources page.
Step 2 Select the UCCE Historical Data Source.
Step 3 Click Edit to open the Data Source Create/Edit page.
Step 4 Complete the fields for this data source, referring to online help for guidance.
Step 5 Test the data source connection. Troubleshoot if necessary.
Step 6 Save the data source.
Step 7 Repeat steps 2 through 6 for the UCCE Realtime data source.
Next step: Review the User List (page 19).
Review the User List and Set up User Roles, Permissions, and Groups
The System Application User (page 25), as the default Security Administrator, needs to review all the users who are on the User List, check their User Roles, assign Permissions, create User Groups and assign users as members of groups.
Step 1 From the Unified IC Reporting application, click the Security drawer. Then click User List.
The User List is populated with the initial Security Administrator as well as all supervisors who have been imported by UCCE User Integration.
Step 2 Select and edit each user to verify his or her User Roles and to set Permissions. Refer to the online help for details on User Roles and Permissions.
The System Application User (page 25) (initial Security Administrator) ) has all user roles and is the owner of all stock objects, including stock data sources, stock categories. report definitions, reports, value lists and connections. The Permission preference for this user is set to EXECUTE for both My Group and the All Users group.
Unified users who correspond to UCCE supervisors are created by UCCE User Integration and have the Report Designer role and Dashboard Designer roles.
Step 3 From the Unified IC Reporting application, click the Security drawer. Then click User Groups. Chapter 2: Getting Started with Unified IC Reporting
There are two stock groups: AllUsers, to which all Unified IC users are automatic members of, and Administrators which System Application Users are members of. You can create additional user groups as indicated by your organization's needs.
Step 4 Assign users to groups. By default, every user's default parent group is AllUsers. You can assign each user to a different group as its default parent group, and to as many as other groups as indicated by your organization's needs. Refer to the online help for details on User Groups.
Next step: Create at Least One Dashboard (page 20).
Create at Least One Dashboard
Unified IC Reporting uses dashboards to organize and orient users. The installation does not create a default dashboard. You must create at least one dashboard and set it with EXECUTE permissions for the AllUsers Group. To do this:
Step 1 From the Unified IC Reporting application, click the Dashboards drawer to open the Available Dashboards page.
Step 2 Right-click the Dashboards folder and select Create Dashboard.
This opens a dialog box that asks for a name and user permissions for the new dashboard.
Step 3 Enter the dashboard name and select EXECUTE permissions for All Users. Then click OK.
You return to the Available Dashboards page. Your new dashboard appears on the list.
Step 4 Right-click your dashboard and select View.
This opens a page where you can add items to the dashboard.
Step 5 Design the dashboard, referring to the online help if necessary.
Step 6 Save the dashboard.
Unified IC Reporting: Basic Concepts
Explanation Term
Dashboards are web pages that can display reports, report lists, scheduled reports, notes, and web-based Dashboards
elements - such as URLs and widgets - that are relevant to specific workflows and responsibilities.
A data source is a connection to a database from which reports are populated. Each data source has a
Data Sources
configuration page with the IP Address, username, Chapter 2: Getting Started with Unified IC Reporting Unified IC Reporting: Basic Concepts
Explanation Term
password, and database type for a database used by Unified IC.
Drilldowns allow you to create links from one report to another so that you can launch a second report from a field in the current report window.
Drilldowns
Reports show data that are returned by Report
Definitions and that can be displayed in various "views" - as grids, as charts, and as gauges.
Reports
A Report Definition defines the interface for a report. Each Report Definition contains the dataset that is Report Definitions
obtained for a report - this includes the SQL query, the fields, the filters, the formulas, the refresh rate, and the key criteria field for the report.
Unified IC separates Reports from Report Definitions.
Only if the Unified IC deployment has a Premium license, users can view, create, or edit Report Definitions.
Report Templates are well-formed XML files based on Report Definitions.
Report Templates
A report view is a layout presentation for the data that is retrieved for the report. Unified IC supports three types of views:
Report Views
• Grid Views
• Chart Views
• Gauge Views
All stock reports have a grid view. Some stock reports have a chart view.
You can create many views for a report, can define the default view for a report, and can change a report view once the report is generated.
You cannot delete all views. Every report must have at least one view.
Value lists contain all reportable items of the same type, for example, all agents or all skill groups.
Value Lists
Collections are subsets of value lists that can be used to control the amount of data that users can select to populate a report.
Collections
You can set a threshold for a field in a report grid to configure that field to display in a distinctive format. Thresholds
Chapter 2: Getting Started with Unified IC Reporting
Explanation Term
User Groups are constructs that allow security administrators to partition Unified IC functionality. User Groups
Creating User Groups expedites the provisioning process when multiple users need the same access to dashboards and reports, or when users require distinct permissions and features based on regional or organizational requirements.
Users have permissions associated with the groups in which they are members, and each member of a group has specific permissions in that group.
Object Permissions
Users need object permissions to perform operations on Unified objects. There are three levels of permissions: READ, EXEC and WRITE. Users may have permissions associated with the groups in which they are direct members or members of their child groups.
User Roles confer the actions and capabilities that a user has in Unified IC. There are seven User Roles, and each user can have multiple roles.
User Roles
How Do I Create a User?
UCCE report users (supervisors) are created automatically when you run UCCE User Integration. These users can log in using their Active Directory credentials and are able to view and run reports and dashboards and to view the collections of Agents and Agent Teams that they supervise. See About UCCE Integration (page 16).
Other report users can sign in only if they exist in the Administration console as Super Users or if Active Directory has been configured in the Unified IC Administration console for their domain.
• Super Users are IMS users and they can sign in using their IMS user credentials.
• Users authenticated through Active Directory are considered to be LDAP users, and they can sign in using their LDAP user credentials.
Both IMS users and LDAP users can log in to Unified IC Reporting and are restricted to the limited Login User role until the Unified IC Reporting security administrator gives them additional roles.
Although you can create a user on the Unified IC User List page, an entry on the User List is not sufficient for that user to be able to sign in to Unified IC. One reason to create users on the User List page is to expedite the assigning of roles to users before they sign in.
Note: CUIC uses LDAP V2 which does not support all Unicode characters that are used in the firstname or surname of LDAP users.
Chapter 2: Getting Started with Unified IC Reporting How Do I Create a User?
How Do I Run a Report?
To run a report:
1. Sign in to the Unified IC application.
2. Click the Reports drawer.
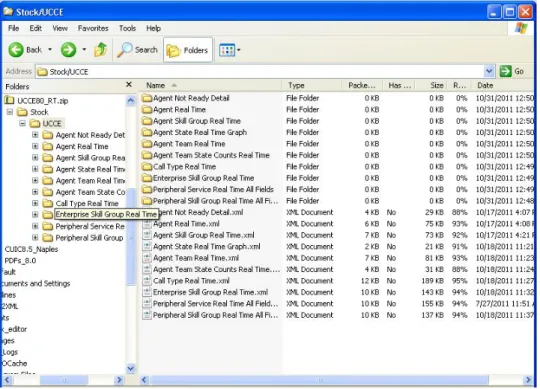
3. Open Report Category folders until you locate the report you want.
The imported Stock reports are listed under Reports > Stock > UCCE.
Figure 2: Stock Templates
4. Double-click the report name, or right-click the name and select Run.
Unified IC Reporting: Unified IC User Roles
There are seven User Roles, and a user can be assigned to one, any, or all of them.
Depending on the size, staff, geographical distribution, and security practices of your call center, you might prefer to assign multiple user roles to a few people or to distribute user roles to many people.
These are the User Roles for Unified IC:
• Login User
By default, everyone who signs in to Unified IC for the first time is a Login User. Login Users have that role and only that role until the Security Administrator assigns additional roles or deactivates (removes) the Login User role.
Only a Security Administrator can assign additional user roles to a user or remove any role including Login role from any user. If a user does not have the Login Role, he can no longer access the reporting interface..
Chapter 2: Getting Started with Unified IC Reporting
An active login user can:
– Log in to Unified IC
– Open the Security drawer, access the User List, and edit his own User Information page; for example, to change his alias or phone number.
• System Configuration Administrator
This user has all the rights of an active Login User and also:
– Has full access to the Data Sources drawer and its functions.
– Has full access to the Scheduler drawer and its functions.
– Can delete, import, and export stock reports.
– Can click the Synchronize Cluster button to clear the local cache.
• Security Administrator
This user has all the rights of an active Login User and also has full access to the Security drawer and its functions.
• Dashboard Designer
This user has all the rights of an active Login User and also has full access to the Dashboard drawer.:
• Report Designer
This user has all the rights of an active Login User and also:
– Has full access to the Reports drawer.
– Has View (Read) access to the Data Sources and Value Lists drawers
– Can access the Scheduler drawer to work with own reports.
• Report Definition Designer
This user has all the rights of an active Login User and also:
– Has full access to the Report Definition drawer.
– Has View (Read) access to the Data Sources and Value Lists drawers
• Value List Collection Designer
This user has all the rights of an active Login User and also:
– Has full access to the Value List drawer.
Chapter 2: Getting Started with Unified IC Reporting Unified IC Reporting: Unified IC User Roles
– Has View (Read) access to the Data Sources drawer.
Other Users
In addition to the seven designated Unified IC User Roles, the following individuals have access to Unified IC as follows:
UCCE Supervisors
Supervisors who are imported when UCCE User Integration is enabled. They become Unified IC users and are automatically give these roles. They:
• Are Active Login Users.
• Are Dashboard Designers.
• Are Report Designers and can run and schedule reports for the agents and agent teams they supervise.
• Can view their own Agent and Agent Team collections that are imported during UCCE User Integration.
System Application User
This is not a Unified IC role. This role is defined during installation. You set credentials for this user during the installation of all nodes. As a best practice, use the same Application User credentials for all nodes.
The Application user who is configured during the installation of the Controller node is is by default the initial Super User for the Adminstration console and has full rights to all functions in the Administration and Unified IC reporting applications.
This user:
• Is the user who is configured as the Application User during installation.
• Is the initial Super User in the Administration console.
• Can create additional Super Users in the Administration application.
• Can sign in to Unified IC and has full rights to all functions in Unified IC.
• Is the initial Security Administrator user in the Unified IC reporting application
• Can create additional Security Administrator users in the Unified IC reporting application.
• Cannot have any role taken away from him. Chapter 2: Getting Started with Unified IC Reporting
• Cannot take any role away from himself.
System Administration User
The System Administrator account User ID and password are configured at installation for each node. It is a best practice to enter the same user name and password for all nodes.
The System Administrator for the Controller can access:
• The Cisco Systems tools on the Navigation dropdown in the Administration console: Disaster Recovery System, Cisco Unified Serviceability, and Cisco Unified OS Administration interfaces.
• The CLI for the Controller.
The System Administrator has no access to functions in the Unified IC reporting application.
Note: If you configure unique System Administrator credentials for Member nodes, use those credentials to access the CLI for those Member servers.
Caching in Unified IC
Unified IC uses a cache to optimize access to the local configuration database (CUIC). This cache is built on top of the local configuration database. Using database replication, the contents of every node's CUIC database are kept in sycnchronization with the other nodes in the cluster.
The Unified IC architecture is designed to provide a highly scalable cluster in which every node manages its own local cache independently of other nodes. Whenever an item stored in the local cache (such as a report template or a dashboard) is modified, a message is sent to other nodes in the cluster indicating that that item has been modified and that their version of that item is stale.
Upon receipt of the message, each node invalidates its own references to the stale item in the local cache. In this manner, all nodes remain synchronized. There are a few exceptional cases where stale data can be re-cached or become out of synch in the cluster. For this reason, the Unified IC System Configuration Administrator has access to a link on the menubar called
Synchronize Cluster.
Clicking this link and confirming notifies all nodes in the cluster to clear their local cache and synchronizes and empties all caches in the cluster. Clearing the locale cache forces each node to go directly to the database for the requested information.
As each node gets fresh data from the database, the new data is automatically put into the local cache and accessed during future requests. Data will be consistent in the database, and there will be no loss of information.
Note: It is best to perform this action during off-hours.
Chapter 2: Getting Started with Unified IC Reporting Caching in Unified IC
Dashboards
The Unified IC interface is organized by dashboards.
Dashboards are web pages that can display reports, scheduled reports, sticky notes, and web-based elements such as URLs and web widgets that are relevant to specific workflows and
responsibilities.
For example, if your call center team supports a clothing retailer, it might be useful to create a dashboard with several versions of a real-time call activity report (a grid and a chart) as well as the URL for the retailer's web page.
Click the Dashboards drawer in the left panel to open the Available Dashboards Page (page 28). (Only users with the Dashboard Designer user role can open the Dashboards drawer.) The dashboards you see when you open the Dashboards drawer are those you have created and those that other users have created and have given you permission to view.
Note:
• All dashboards must be created by a Dashboard Designer.
• Unified IC is not installed with a default dashboard.
• All actions on the Dashboards interface are based on User Role and on the user's object Permissions for dashboards and for Categories. See About Permissions (page 167).
See also:
Troubleshooting Dashboards (http://docwiki-dev.cisco.com/wiki/ Troubleshooting_Tips_for_Unified_IC_8.0)
This chapter contains the following topics:
• Available Dashboards Page, page 28
• Create a Dashboard, page 30
• View a Dashboard, page 30
• Add Dashboard Items, page 31
• Dashboard Slideshow, page 35
• Rename a Dashboard, page 35
• Delete a Dashboard, page 36
Available Dashboards Page
You can manage dashboards from the Available Dashboards page - the page that opens when you click the Dashboards drawer.
Dashboards are contained in categories and sub-categories. Unified IC is installed with one default dashboard category named Dashboards1. All dashboards and sub-categories that your organization creates are nested under Dashboards. You can rename Dashboards. You cannot delete the Dashboards category.
Figure 3: Available Dashboards page
Actions from this page
• Refresh - updates both the Available Dashboards page and the tree under the Dashboards drawer to reflect changes anyone has made to add, modify, or delete dashboards or dashboard categories.
• Help - opens online help for the page.
• X on the tab heading - closes the page.
• Work with Categories
– Create Sub-category (page 181) from a category or a sub-category.
– Delete Sub-category (page 182)
– Rename Sub-category (page 182)
– Set permissions for the sub-category. See About Permissions (page 167).
• Drag and drop - You can drag and drop (page 182) dashboards and sub-categories.
1) Initially, this category contains no dashboards.
Chapter 3: Dashboards Available Dashboards Page
• Copy and use the dashboard permalink (page 29)- To retrieve the permalink, right click on the dashboard for which you want to copy the permalink in dashboards tree and click on Html Link.
Timezone considerations for Dashboard
Incase of a report added in a dashboard, all the time specific data in the report is based on timezone of the user. For example a user at GMT + 0 can view the report in a dashboard with information based on the timezone GMT +0. For more information see Timezone consideration for Report (page 104).
Incase of scheduler, all the time specific data in the scheduler filter is based on the timezone of the user who configures the scheduler. Where as all the report data in the dashboard is based on the timezone of the user who runs the dashboard. For example if the timezone of the user who configures the scheduler report is GMT + 0 and the timezone of the user who runs the dashboard is GMT +10, then the scheduler filter will be based on GMT +0 and the report data will be based on GMT + 10.
Dashboard permalink
Unified IC now supports Permalink to a dashboard. To retrieve the permalink, right click on the dashboard in dashboards tree, click on Html Link and copy the permalink.
Similar to the other type of permalinks, dashboard permalink can be disabled by unchecking Enable Links check box.
Click Pop Out to Open the dashboard permalink in a new, separate browser display window. The popout has no Unified IC edit or toolbar functions. Click x to close the popout.
Note: If the dashboard has got report widgets, then ensure that the default filter is set for these reports. Filters cannot be saved for stock reports since they are not editable. The recommended option is to make a copy of the stock report, set the default filter, check the Bypass Filter Dialog checkbox, save it, and add the report copy to the dashboard.
Timezone considerations for Dashboard permalink
In a dashboard permalink the report information is based on the timezone of the CUIC server. A user at GMT + 0 can view the report in a dashboard permalink with information based on the CUIC server at timezone GMT+ 2.
Incase of a scheduler in a dashboard permalink, the information is based on the timezone of the last modified user. A user at GMT + 0 can view the schedulers in a dashboard permalink with information based on the last modified user at timezone GMT+ 2. For more information see Timezone considerations for Report permalink. (page 77)
Chapter 3: Dashboards
Create a Dashboard
To create a dashboard, right-click on Dashboards or on a sub-category on the Available Dashboards Page (page 28). Then click Create Dashboard.
This opens a dialog box that requests a name and Default Permissions for the dashboard.
1. Enter a name (using a maximum of 50 characters).
2. Define the permissions for My Group and the All Users group. See About Permissions (page 167).
3. Click OK. This adds the new dashboard to the Dashboards page.
4. To add content to the new dashboard, right-click its icon and select View. See View a Dashboard (page 30).
View a Dashboard
If you have the EXECUTE permission, you can view a dashboard, based on your permission for the dashboard's category. (If you cannot READ the category, you cannot locate the dashboard, even if you have EXECUTE or WRITE permission for the dashboard.)
To access this function, click a dashboard or right-click a dashboard and select View.
Actions from this page
• Add - opens a dialog where users with the permission to do so can Add Dashboard Items (page 31). By default, the new dashboard is empty (has no items). A user who is a Dashboard Designer but who does not have the WRITE permission can add items to a dashboard but will not be able to save the added items.
• Auto Refresh - Allows you to enable or disable auto refresh for data displayed in this window. When the Auto Refresh check box is checked, the system refreshes data in this window at real time. If this check box is unchecked the data available when you opened this window remains static unless you refresh it using the Refresh menu button.
While in this window, if you press Refresh or the F5 button, the system refreshes the data in the window but does not alter the checked or unchecked state of the Auto Refresh check box.
Note: When you manually refresh the widgets that display a dashboard permalink, the state of the Auto Refresh check box returns to the selected state after you refresh. This behavior is only applicable if you open the dashboard permalink in the Dashboard viewer.
• Save - saves changes you make to the dashboard.
Chapter 3: Dashboards Create a Dashboard
• Refresh - updates the dashboard to reflect changes anyone has made to it.
• Pop Out - Opens the dashboard permalink in a new, separate browser display window. The popout has no Unified IC edit or toolbar functions. Click x to close the popout.
Note: The Auto Refresh checkbox allows you to enable or disable auto refresh for data displayed in this window. When the Auto Refresh check box is checked, the system refreshes data in this window at real time. If this check box is unchecked the data available when you opened this window remains static unless you refresh it using the Refresh menu button. Note that if the corresponding check box is checked in the parent window, the system checks the box in the pop out window as well. You can modify this by unchecking the box. While in this pop out window, if you press the F5 button, the system refreshes the data in the window but does not alter the checked or unchecked state of the Auto Refresh check box.
• Slideshow - select this to view the dashboard items as a Dashboard Slideshow (page 35). This is disabled until you have added items to the dashboard.
• Help - opens online help.
• X on the tab heading - closes the dashboard.
Add Dashboard Items
If you have the EXECUTE permission, you can add content to a new dashboard and can modify the content of an existing dashboard.
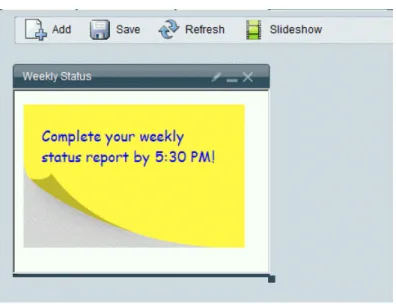
You can add the following items to a dashboard: Reports, Scheduled Reports, URLs, Widgets, and Sticky Notes.
After you add an item, move or resize it if necessary. Then click Save.
Actions for Dashboard items:
• Move - Newly-added items overlap existing items. Click the item titlebar and drag the item so that it does not obscure the item beneath it.
• Resize - To resize dashboard items, click the bottom right corner.
• Display item properties - Click the pencil (/ ) image in the item menu to open item settings for editing.
• Minimize Click the _ image in the top right corner to minimize an item.
• Delete - Click the x image in the top right corner to delete an item. Chapter 3: Dashboards
Add a Report
Step 1 Open the Dashboard and click Add.
Step 2 Enter a title for the report you are adding. You can specify the title as plain text or text within html tags.
Step 3 Select type Report.
Step 4 Retain the default parameters for size and position or change them to your preferred parameters.
Step 5 Select a report by clicking the arrow next to the Reports folder and then clicking a radio button for the report name.
Step 6 Click OK to return to the dashboard.
You might need to collapse the category to see the OK button.
Step 7 If necessary, move the report to a better location on the dashboard.
Step 8 Click Save.
Figure 4: Adding a Report to a Dashboard
Reports that you add to a dashboard are refreshed, and you can scroll up and down and can resize them on the dashboard.
Note: If you want a dashboard to display both a grid view and a chart view of the same report, you need to create a SaveAs version of the report with a chart view and select both the grid and the chart for the dashboard display.
Chapter 3: Dashboards Add Dashboard Items