User Guide Part 7
Status Server
Contents
1 OVERVIEW ... 3 1.1 About OPC UA ... 3 1.2 Uses of Status ... 3 1.3 Status as a Platform... 4 1.4 Communication Ports ... 4 2 SUB SYSTEMS ... 5 2.1 Data Model ... 52.1.1 Data Model Storage ... 5
2.1.2 Status Object Model ... 5
2.2 Live Data ... 5
2.3 Data Logging ... 6
2.3.1 Data Logging Database ... 6
3 SETTING UP SQL SERVER ... 7
4 CLIENT SERVER REDUNDANCY ... 8
5 NETWORKED DATABASE ... 9 6 USER CONFIGURATION ... 10 7 SECURITY ... 11 7.1 Transports ... 11 7.2 Authentication ... 11 7.3 Untrusted Certificates ... 12 8 APPENDIX 1 ... 14 8.1 Method 1 ... 14
8.1.1 Step 1 – Import the Status Enterprise Server certificate ... 14
8.1.2 Using certutil ... 14
Figures and Tables
Figure 1 - Status Enterprise Server Dialog Box ... 3
Figure 2 - Data Model in OPC UA ... 5
Figure 3 - Ports and Protocols ... 11
Figure 4 - Endpoint Url ... 11
Figure 5 - Certificates ... 12
Figure 6 -Accept Untrusted Certificates ... 13
1
Overview
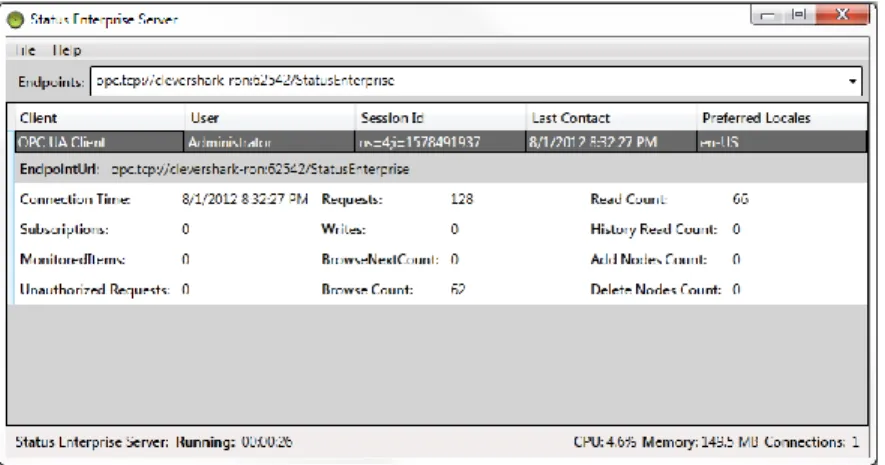
This document outlines the general purpose and functionality of the Status Server, an OPC UA SCADA (Supervisory Control and Data Acquisition) system capable of providing real-time data, alarms and historical data to client applications. While Status Enterprise is implemented as a Windows service, clients can connect and communicate from a variety of platforms and operating systems.
For a list of frequently used terms, definitions, and abbreviations, please see Part 1 – Overview and Concepts.
Figure 1 - Status Enterprise Server Dialog Box
1.1 About OPC UA
Founded in 1994, the OPC Foundation is a consortium of companies and organizations dedicated to interoperability between systems. The member companies, many being Fortune 500, build their products on open standards developed by the OPC Foundation to ensure their products are interoperable, reliable and secure.
The Unified Architecture (UA) is the next generation OPC standard that provides a cohesive, secure and reliable cross-platform framework for access to real-time and historical data and events. Status Enterprise Server is an OPC UA compliant server and client, supporting the real-time data, alarming, and historical portions of the OPC UA functional specifications.
1.2 Uses of Status
Status can be used wherever there is real-time data. Traditionally SCADA systems are used for
monitoring equipment on the factory floor. Industry has been evolving and SCADA systems are now used to monitor remote equipment, transportation information, statistics, and performance. SCADA systems are essential for increasing productivity and safety, reducing cost and waste, troubleshooting, providing compliance and managing maintenance efforts. As SCADA systems have become more versatile they have started to become more horizontal, monitoring data from financial services, sales, inventory and logistics.
1.3 Status as a Platform
While Status is an OPC UA Server, when combined with its data model capabilities, mimic design and object model access, it becomes a powerful platform that can be used for building various types of solutions. OPC working groups are bringing IAS-95 and OPC UA together to allow OPC UA to be even more strategic in the development of applications related to asset management, materials management and scheduling.
1.4 Communication Ports
When setting up Status Server you may need to open certain ports in your firewall. Below is a list of ports that Status Enterprise utilizes.
Opc.tcp 62542
Http 62540
Https 62541
Web Gateway 4502
2
Sub Systems
2.1 Data Model
Status operates on a data model, a model of the types of objects in your system and instances of those objects. Part 1 - Overview and Concepts describes the data model in more detail.
2.1.1 Data Model Storage
Models can be very large with thousands of objects and properties. As properties change on the assets in your model, Status will send event notifications to clients that have subscribed to those events. It will send alarm notifications if thresholds have been crossed and may log the properties of some objects to a history log for viewing or retrieval at a later time.
The data model in OPC UA is determined by series of references between objects.
Source Relationship Target
Air Conditioner 1 Is Type Of Air Conditioner Type
Air Conditioner 1 Has Property Efficiency
Air Conditioner 1 Has Component Compressor Motor 1
Figure 2 - Data Model in OPC UA
All databases in Status are My SQL or SQL Server. The database serialization in Status has been modularized and separated out into interfaces. Replacing the current database type with another database is a relatively easy task if required.
2.1.2 Status Object Model
The Status Object Model is described in detail in Part 9 - Object Model. The object model is a .NET library with a set of comprehensive classes for logging in and connecting to the Status Server, defining the data model, monitoring property changes, history and monitoring alarms.
The Status Object Model makes it easy to write custom applications that monitor and supply data to your data model.
2.2 Live Data
Changes to the properties of assets in the model come in from a client application with a connection to the server that is changing the value. Properties on assets in the Status Server can have their history saved; this is determined by the ’Historizing' property configured on a property in the model.
2.3 Data Logging
Data Logging is used to create a record of property changes. Logged data includes user login and logout information, property writes, and alarm information – including successful property value changes and failed attempts. This information is saved in the Data Logging Database and can be queried for review.
2.3.1 Data Logging Database
The database saved by the Status Server is saved into two parts. One table has the property value, timestamp information and quality with the key being the node id of the record being written. A second table has the history of the data item if it is configured for Historizing. See Part 2 – Model Designer for more information on configuring Data Logging.
3
Setting up SQL Server
All of the files that need to be edited will be located in one of the following directories depending on operating system:
Windows 7 and newer and Windows Server 2008 and newer. C:\ProgramData\B-Scada\StatusEnterprise
Windows Vista, XP, and Server 2003
C:\Documents and Settings\All Users\Application Data\B-Scada\StatusEnterprise
For SQL Server 2008 and later only.
1. Stop Status Enterprise service.
2. Create the Default User
The user has the option of inputting the username/password of an existing SQL user into the STATUS.STATUSSERVER.SQLRECORDSERIALIZER.dll.config.
(must have bulkadmin/dbcreator permissions…cannot be windows authentication user) …or they can run the following query.
Create a default user in Sql Server named SEUser by running this script (The user name and password should match in the sql record serializer config)
USE [master]
GO
CREATE LOGIN [SEUser] WITH PASSWORD=N'StatusEnterprise!2013', DEFAULT_DATABASE=[master], CHECK_EXPIRATION=OFF, CHECK_POLICY=OFF
GO
EXEC master..sp_addsrvrolemember @loginame = N'SEUser', @rolename = N'bulkadmin' GO
EXEC master..sp_addsrvrolemember @loginame = N'SEUser', @rolename = N'dbcreator' GO
3. In the \RecordSerializer\Status.StatusServer.SQLRecordSerializer.dll.config specify server name
4. Start the service.
You can specify another user name and password here and make sure that it matches the configuration in \RecordSerializer\Status.StatusServer.SQLRecordSerializer.dll.config
When the Status Server is started, it will generate the database and log file in one of the following locations depending on operating system.
Windows 7 and newer and Windows Server 2008 and newer. C:\ProgramData\B-Scada\StatusEnterprise
Windows Vista, XP, and Server 2003
4
Client Server Redundancy
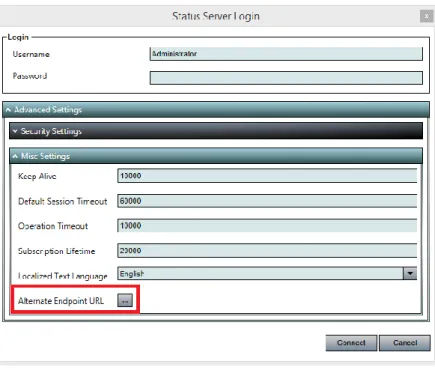
All of the Status Enterprise Clients have an option in the login screen to set an Alternate Endpoint. This alternate endpoint allows the users to specify a different Status Enterprise Server(s) that the clients can connect to if the main server goes down.
Figure 3 - Alternate Endpoint URL Button
The screen shot above shows the alternate endpoint configuration and the “Switch to main server when available” check box.
5
Networked Database
Status Enterprise Server is capable of connecting to databases that are located elsewhere on the network. The following steps will guide you through setting the Status Enterprise Server to do this. Steps are written using SQL Server as the database type.
1) Stop the Status Enterprise Service
2) Open the following directory based on your operating system
- Windows Vista, XP, and Windows Server 2003:
C:\Documents and Settings\All Users\Application Data\B-Scada\StatusEnterprise\RecordSerializer
- Windows 7 and newer, Windows Server 2008 and newer
C:\ProgramData\B-Scada\StatusEnterprise\RecordSerializer
3) Edit the STATUS.STATUSSERVER.SQLRECORDSERIALIZER.dll.config and change the “Value” for the Server to the network location and name of your database
4) Verify that the User and Password are correct credentials to access the remote database 5) Save the config file
6
User Configuration
Users may choose to customize the configuration of their Status Enterprise Server by editing the StatusEnterpriseServer.Config.xml file. Any changes that the user makes to this file must be backed up prior to upgrading the version of Status Enterprise as the upgrade will overwrite this file.
7
Security
7.1 Transports
Protocol Port Security User name/Password
opc.tcp 62542 Secure Yes
http 62540 Unsecured Yes
https 62541 Secure Yes
Figure 5 - Ports and Protocols
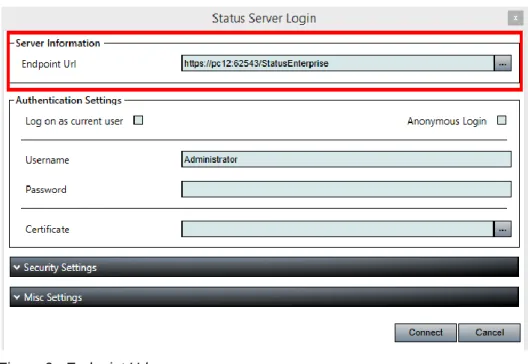
Status Enterprise use three different transport protocols. By changing the prefix and port number in the Endpoint Url, it will connect to the Status Enterprise Server using opc.tcp, http, or https. Both opc.tcp and https are secure and use certificates. Http does not use certificates and is not recommended.
Status Enterprise Server gets much of its security configuration from
StatusEnterpriseServer.Config.xml which resides in the server’s installed directory.
For installing an SSL certificate to work with the https transport, see Appendices I
Figure 6 - Endpoint Url
7.2 Authentication
Status Enterprise can use three kinds of authentication: Anonymous, User Name/Password, and Certificates.
When using Certificates, your system administrator will have to issue and assign the certificates. Issued
certificates should be installed on the local client at:
C:\ProgramData\B-Scada\StatusEnterprise\CertificateStore\Client\certs. You could also use the included UA
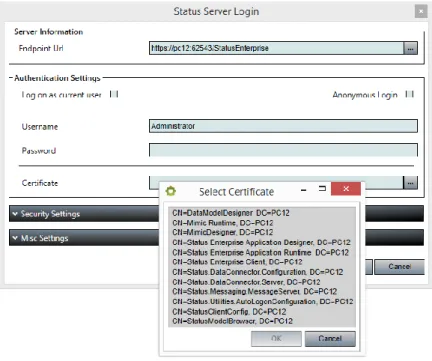
Configuration Tool from OPC Foundation, to import a certificate. Once the certificate has been installed in the Status Client Certificate Store folder, the certificate will be available through the certificate dropdown box at the logon screen.
Figure 7 - Certificates
It is important to note that each client application (Data Model Designer, Mimic Designer, etc.) will produce its own certificate and will need to be handled individually. The certificates bear the name of the application to which it belongs, followed by a digital signature. Alternatively, all application could share one certificate.
7.3 Untrusted Certificates
By default, Status login is set to accept untrusted certificate. By removing the check in the Accept Untrusted Server Certificate, you will be prompted at login to let Status Enterprise know how you would like to proceed with the untrusted certificate. You can change this default in the
When prompted, your choices are: Accept Permanently, Accept Once, or Reject. By selecting Accept Permanently, the certificate will be moved into your trusted certificate folder and you will not be prompted again to accept it. If you select Accept Once, your logon will proceed but, you will be prompted again next time you login. By selecting Reject, logon is cancelled and the certificate in moved into the Rejected folder.
Figure 9 - Future Logins
8
Appendix 1
8.1 Method 1
8.1.1 Step 1 – Import the Status Enterprise Server certificate
Run mmc.exe from your server.
Go to File, Add/Remove Snap-in.
Choose the Certificate Snap-In.
Select Local Computer.
Select Personal Certificates.
Right click the Certificate folder and choose All Tasks, Import.
Use the Wizard and browser to:
C:\ProgramData\B-Scada\StatusEnterprise\CertificateStore\Server\Trust\certs 8.1.2 Using certutil
Open a command prompt, Run as an Administrator.
Type certutil -store My
Unique container name should be representing a physical file under
%ProgramData%\Microsoft\Crypto\RSA\MachineKeys\.
If not found on the folder above look for the subfolder under %AppData%\Microsoft\Crypto\RSA\
for the user specific keys then delete it.
If unique container name is not displayed, issue the repair store command.
o certutil -repairstore My A10438E3BB316115BDB32A7DD7066AA774228042
o Replace the numbers after the word “My” with the certificate hash.
Then type: netsh http add sslcert ipport=0.0.0.0:62543
certhash=A10438E3BB316115BDB32A7DD7066AA774228042 appid={77094884-c1cf-43fa-9f24-9b4804359afd}
o Again, replace the numbers after the “certhash=” with you Certificate numbers.
8.2 Method 2
Below are instructions from the OPC Foundation, for creating a certificate using their UA configuration
tool. This tool can be found in your StatusEnterprise install folder, Opc.Ua.ConfigurationTool.exe.
UA Configuration Tool - Manage Certificates Tab
The [Manage Certificates] tab provides options for administering a certificate repository that is a place where certificates are stored for applications/users that are trusted and/or not trusted.
Store
Type The type of certificate repository: Windows or Directory. Store
Path The location of the currently selected repository. CA Key
File
If you have a "Certificate Authority" configured, then use the Browse button to select the key-file.
View Certificates
For viewing the certificates within the currently selected certificate repository.
Create Certificate Authority
Creating your own certificate authority is accomplished by clicking the Create Certificate
All fields are required. Select and Issue Certificate
The rapid re-generation of a new certificate that is based on an existing certificate can save you
time and avoid the need to re-enter similar information. Clicking the Select and Issue Certificate
button allows you to choose an existing certificate first, and then to edit the pre-populated fields as shown:
Import and Issue Certificate
Simply locate the current/original certificate file first, and the complete the screen enabling you to modify the contents of the certificate.
Export Private Key
... then use the save dialog to create the new certificate. Import Certificate to Store
Simply use the file dialog to locate your existing certificate to import. Import Certificates into Store
Select the repository first, which contains the certificates you want to import (source).
Upon clicking the OK button the certificates will be imported into the currently selected
application's trust list. Issue SSL/TLS Certificate