Juniper Networks, Inc.
1194 North Mathilda Avenue
Sunnyvale, CA 94089
USA
408-745-2000
www.juniper.net
530-029029-01, Revision 1
Intrusion Detection and Prevention
Custom Attack Objects
Reference and Examples Guide
Release 4.1r3
January 2009
ii
1988, 1989, 1991, 1992, 1993, 1994. The Regents of the University of California. All rights reserved.
GateD software copyright © 1995, the Regents of the University. All rights reserved. Gate Daemon was originated and developed through release 3.0 by Cornell University and its collaborators. Gated is based on Kirton's EGP, UC Berkeley's routing daemon (routed), and DCN's HELLO routing protocol. Development of Gated has been supported in part by the National Science Foundation. Portions of the GateD software copyright © 1988, Regents of the University of California. All rights reserved. Portions of the GateD software copyright © 1991, D. L. S. Associates.
This product includes software developed by Maker Communications, Inc., copyright © 1996, 1997, Maker Communications, Inc.
Products made or sold by Juniper Networks or components thereof might be covered by one or more of the following patents that are owned by or licensed to Juniper Networks: U.S. Patent Nos. 5,473,599, 5,905,725, 5,909,440, 6,192,051, 6,333,650, 6,359,479, 6,406,312, 6,429,706, 6,459,579, 6,493,347, 6,538,518, 6,538,899, 6,552,918, 6,567,902, 6,578,186, and 6,590,785.
Juniper Networks, the Juniper Networks logo, JUNOS, NetScreen, and ScreenOS are registered trademarks of Juniper Networks, Inc. in the United States and other countries. JUNOSe is a trademark of Juniper Networks, Inc. All other trademarks, service marks, registered trademarks, or registered service marks are the property of their respective owners.
Copyright © 2009 Juniper Networks, Inc. All rights reserved.
FCC Statement
The following information is for FCC compliance of Class A devices: This equipment has been tested and found to comply with the limits for Class A digital device, pursuant to part 15 of the FCC rules. These limits are designed to provide reasonable protection against harmful interference when the equipment is operated in a commercial environment. The equipment generates, uses, and can radiate radio-frequency energy and, if not installed and used in accordance with the instruction manual, may cause harmful interference to radio communications. Operation of this equipment in a residential area is likely to cause harmful interference, in which case users will be required to correct the interference at their own expense.
The following information is for FCC compliance of Class B devices: The equipment described in this manual generates and may radiate radio-frequency energy. If it is not installed in accordance with the instruction manual, it may cause interference with radio and television reception. This equipment has been tested and found to comply with the limits for a Class B digital device in accordance with the specifications in part 15 of the FCC rules. These specifications are designed to provide reasonable protection against such interference in a residential installation. However, there is no guarantee that interference will not occur in a particular installation.
If this equipment does cause harmful interference to radio or television reception, which can be determined by turning the equipment off and on, the user is encouraged to try to correct the interference by one or more of the following measures:
Reorient or relocate the receiving antenna.
Increase the separation between the equipment and receiver. Consult the dealer or an experienced radio/TV technician for help.
Connect the equipment to an outlet on a circuit different from that to which the receiver is connected.
Caution: Changes or modifications to this product could void the user's warranty and authority to operate this device and may result in the equipment no longer complying with FCC requirements for Class A or Class B digital devices. In that event, your right to use the equipment may be limited by FCC regulations, and you may be required to correct any interference to radio or television communications at your own expense.
U.S. Government Rights
Commercial software and commercial software documentation: This documentation is commercial computer software documentation and the products (whether hardware or software) covered by this documentation are or contain commercial computer software. Government users are subject to the Juniper Networks, Inc. standard end user license agreement and any applicable provisions of the FAR and its supplements. No further rights are granted. Products (whether hardware or software) covered by, and information contained in, this documentation are controlled by U.S. Export Control laws and may be subject to the export or import laws in other countries. Nuclear, missile, chemical, biological weapons end uses or end users, whether direct or indirect, are strictly prohibited. Export or re-export to countries subject to U.S. embargo or to entities identified on US export exclusion lists, including, but not limited to, the denied persons and specially designated national lists, is strictly prohibited.
iii
Disclaimer
THE SPECIFICATIONS AND INFORMATION REGARDING THE PRODUCTS IN THIS MANUAL ARE SUBJECT TO CHANGE WITHOUT NOTICE. ALL STATEMENTS, INFORMATION AND RECOMMENDATIONS IN THIS MANUAL ARE BELIEVED TO BE ACCURATE BUT ARE PRESENTED WITHOUT WARRANTY OF ANY KIND, EXPRESS OR IMPLIED.
THE SOFTWARE LICENSE AND LIMITED WARRANTY FOR THE ACCOMPANYING PRODUCT ARE SET FORTH IN THE INFORMATION PACKET THAT SHIPPED WITH THE PRODUCT AND ARE INCORPORATED HEREIN BY REFERENCE. IF YOU ARE UNABLE TO LOCATE THE SOFTWARE LICENSE OR LIMITED WARRANTY, CONTACT YOUR JUNIPER NETWORKS REPRESENTATIVE FOR A COPY.
End User License Agreement
READ THIS END USER LICENSE AGREEMENT ("AGREEMENT") BEFORE DOWNLOADING, INSTALLING, OR USING THE SOFTWARE. BY DOWNLOADING, INSTALLING, OR USING THE SOFTWARE OR OTHERWISE EXPRESSING YOUR AGREEMENT TO THE TERMS CONTAINED HEREIN, YOU (AS CUSTOMER OR IF YOU ARE NOT THE CUSTOMER, AS A REPRESENTATIVE/AGENT AUTHORIZED TO BIND THE CUSTOMER) CONSENT TO BE BOUND BY THIS AGREEMENT. IF YOU DO NOT OR CANNOT AGREE TO THE TERMS CONTAINED HEREIN, THEN (A) DO NOT DOWNLOAD, INSTALL, OR USE THE SOFTWARE, AND (B) YOU MAY CONTACT JUNIPER NETWORKS REGARDING LICENSE TERMS.
1. The Parties. The parties to this Agreement are Juniper Networks, Inc. and its subsidiaries (collectively "Juniper"), and the person or organization that originally purchased from Juniper or an authorized Juniper reseller the applicable Iicense(s) for use of the Software ("Customer") (collectively, the "Parties").
2. The Software. In this Agreement, "Software" means the program modules and features of the Juniper or Juniper-supplied software, and updates and releases of such software, for which Customer has paid the applicable license or support fees to Juniper or an authorized Juniper reseller. "Embedded Software" means Software which Juniper has embedded in the Juniper equipment.
3. License Grant. Subject to payment of the applicable fees and the limitations and restrictions set forth herein, Juniper grants to Customer a non-exclusive and non-transferable license, without right to sublicense, to use the Software, in executable form only, subject to the following use restrictions:
a. Customer shall use the Embedded Software solely as embedded in, and for execution on, Juniper equipment originally purchased by Customer from Juniper or an authorized Juniper reseller.
b. Customer shall use the Software on a single hardware chassis having a single processing unit, or as many chassis or processing units for which Customer has paid the applicable license fees; provided, however, with respect to the Steel-Belted Radius or Odyssey Access Client software only, Customer shall use such Software on a single computer containing a single physical random access memory space and containing any number of processors. Use of the Steel-Belted Radius software on multiple computers requires multiple licenses, regardless of whether such computers are physically contained on a single chassis.
c. Product purchase documents, paper or electronic user documentation, and/or the particular licenses purchased by Customer may specify limits to Customer's use of the Software. Such limits may restrict use to a maximum number of seats, registered endpoints, concurrent users, sessions, calls, connections, subscribers, clusters, nodes, realms, devices, links, ports or transactions, or require the purchase of separate licenses to use particular features, functionalities, services, applications, operations, or capabilities, or provide throughput, performance, configuration, bandwidth, interface, processing, temporal, or geographical limits. In addition, such limits may restrict the use of the Software to managing certain kinds of networks or require the Software to be used only in conjunction with other specific Software. Customer's use of the Software shall be subject to all such limitations and purchase of all applicable licenses.
d. For any trial copy of the Software, Customer's right to use the Software expires 30 days after download, installation or use of the Software. Customer may operate the Software after the 3D-day trial period only if Customer pays for a license to do so. Customer may not extend or create an additional trial period by re-installing the Software after the 3D-day trial period.
e. The Global Enterprise Edition of the Steel-Belted Radius software may be used by Customer only to manage access to Customer's enterprise network. Specifically, service provider customers are expressly prohibited from using the Global Enterprise Edition of the Steel-Belted Radius software to support any commercial network access services. The foregoing license is not transferable or assignable by Customer. No license is granted herein to any user who did not originally purchase the appliGable Iicense(s) for the Software from Juniper or an authorized Juniper reseller.
4. Use Prohibitions. Notwithstanding the foregoing, the license provided herein does not permit the Customer to, and Customer agrees not to and shall not: (a) modify, unbundle, reverse engineer, or create derivative works based on the Software; (b) make unauthorized copies of the Software (except as necessary for backup purposes); (c) rent, sell, transfer, or grant any rights in and to any copy of the Software, in any form, to any third party; (d) remove any proprietary notices, labels, or marks on or in any copy of the Software or any product in which the Software is embedded; (e) distribute any copy of the Software to any third party, including as may be embedded in Juniper equipment sold in the secondhand market; (f)use any 'locked' or key-restricted feature, function, service, application, operation, or capability without first purchasing the applicable Iicense(s) and obtaining a valid key from Juniper, even if such feature, function, service, application, operation, or capability is enabled without a key; (g) distribute any key for the Software provided by Juniper to any third party; (h) use the Software in any manner that extends or is broader than the uses purchased by Customer from Juniper or an authorized Juniper reseller; (i) use the Embedded Software on non-Juniper equipment; (j) use the Software (or make it available for use) on Juniper equipment that the Customer did not originally purchase from Juniper or an authorized Juniper reseller; (k) disclose the results of testing or benchmarking of the Software to any third party without the prior written consent of Juniper; or (I) use the Software in any manner other than as expressly provided herein.
5. Audit. Customer shall maintain accurate records as necessary to verify compliance with this Agreement. Upon request by Juniper, Customer shall furnish such records to Juniper and certify its compliance with this Agreement.
6. Confidentiality. The Parties agree that aspects of the Software and associated documentation are the confidential property of Juniper. As such, Customer shall exercise all reasonable commercial efforts to maintain the Software and associated documentation in confidence, which at a minimum includes restricting access to the Software to Customer employees and contractors having a need to use the Software for Customer's internal business purposes.
7. Ownership. Juniper and Juniper's licensors, respectively, retain ownership of all right, title, and interest (including copyright) in and to the Software, associated documentation, and all copies of the Software. Nothing in this Agreement constitutes a transfer or conveyance of any right, title, or interest in the Software or associated documentation, or a sale of the Software, associated documentation, or copies of the Software.
iv
FREE OF VULNERABILITY TO INTRUSION OR ATTACK. In no event shall Juniper's or its suppliers' or licensors' liability to Customer, whether in contract, tort (including negligence), breach of warranty, or otherwise, exceed the price paid by Customer for the Software that gave rise to the claim, or if the Software is embedded in another Juniper product, the price paid by Customer for such other product. Customer acknowledges and agrees that Juniper has set its prices and entered into this Agreement in reliance upon the disclaimers of warranty and the limitations of liability set forth herein, that the same reflect an allocation of risk between the Parties (including the risk that a contract remedy may fail of its essential purpose and cause consequential loss), and that the same form an essential basis of the bargain between the Parties.
9. Termination. Any breach of this Agreement or failure by Customer to pay any applicable fees due shall result in automatic termination of the license granted herein. Upon such termination, Customer shall destroy or return to Juniper all copies of the Software and related documentation in Customer's possession or control.
10. Taxes. All license fees for the Software are exclusive of taxes, withholdings, duties, or levies (collectively "Taxes"). Customer shall be responsible for paying Taxes arising from the purchase of the license, or importation or use of the Software.
11. Export. Customer agrees to comply with all applicable export laws and restrictions and regulations of any United States and any applicable foreign agency or authority, and not to export or re-export the Software or any direct product thereof in violation of any such restrictions, laws or regulations, or without all necessary approvals. Customer shall be liable for any such violations. The version of the Software supplied to Customer may contain encryption or other capabilities restricting Customer's ability to export the Software without an export license.
12. Commercial Computer Software. The Software is "commercial computer software" and is provided with restricted rights. Use, duplication, or disclosure by the United States government is subject to restrictions set forth in this Agreement and as provided in DFARS 227.7201 through 227.7202-4, FAR 12.212, FAR 27.405(b)(2), FAR 52.227-19; or FAR 52.227-14(ALT III) as applicable.
13. Interface Information. To the extent required by applicable law, and at Customer's written request, Juniper shall provide Customer with the interface information needed to achieve interoperability between the Software and another independently created program, on payment of applicable fee, if any. Customer shall observe strict obligations of confidentiality with respect to such information and shall use such information in compliance with any applicable terms and conditions upon which Juniper makes such information available.
14. Third Party Software. Any licensor of Juniper whose software is embedded in the Software and any supplier of Juniper whose products or technology are embedded in (or services are accessed by) the Software shall be a third party beneficiary with respect to this Agreement, and such licensor or vendor shall have the right to enforce this Agreement in its own name as if it were Juniper. In addition, certain third party software may be provided with the Software and is subject to the accompanying Iicense(s), if any, of its respective owner(s). To the extent portions of the Software are distributed under and subject to open source licenses obligating Juniper to make the source code for such portions publicly available (such as the GNU General Public License ("GPL") or the GNU Library General Public License ("LGPL")), Juniper will make such source code portions (including Juniper modifications, as appropriate) available upon request for a period of up to three years from the date of distribution. Such request can be made in writing to Juniper Networks, Inc., 1194 N. Mathilda Ave., Sunnyvale, CA 94089, ATTN: General Counsel. You may obtain a copy of the GPL at http://www.gnu.org/licenses/gpl.html. and a copy of the LGPL at http://www.gnu.org/licenses/lgpl.html.
15. Miscellaneous. This Agreement shall be governed by the laws of the State of California without reference to its conflicts of laws principles. The provisions of the U.N. Convention for the International Sale of Goods shall not apply to this Agreement. For any disputes arising under this Agreement, the Parties hereby consent to the personal and exclusive jurisdiction of, and venue in, the state and federal courts within Santa Clara County, California. This Agreement constitutes the entire and sole agreement between Juniper and the Customer with respect to the Software, and supersedes all prior and contemporaneous agreements relating to the Software, whether oral or written (including any inconsistent terms contained in a purchase order), except that the terms of a separate written agreement executed by an authorized Juniper representative and Customer shall govern to the extent such terms are inconsistent or conflict with terms contained herein. No modification to this Agreement nor any waiver of any rights hereunder shall be effective unless expressly assented to in writing by the party to be charged. If any portion of this Agreement is held invalid, the Parties agree that such invalidity shall not affect the validity of the remainder of this Agreement. This Agreement and associated documentation has been written in the English language, and the Parties agree that the English version will govern. (For Canada: Les parties aux présentés confirment leur volonté que cette convention de même que tous les documents y compris tout avis qui s'y rattaché, soient redigés en langue anglaise. (Translation: The parties confirm that this Agreement and all related documentation are and will be in the English language)).
v
Table of Content
Overview
. . . .1
Chapter 1
Setting Up the Test Lab
. . . .3
Chapter 2
Identifying Your Approach
. . . .5
Using Internet Security Community Resources . . . 5
Using Your Resources . . . 6
Chapter 3
Obtaining Attack Information
. . . .9
Using the Attack Capture Tools. . . 10
scio ccap . . . 10
scio pcap . . . 11
Wireshark . . . 11
Other Tools . . . 11
Running Attack Code . . . 12
Running a Packet Capture . . . 13
Chapter 4
Analyzing Attack Information
. . . 15
Understanding Services . . . 15
Supported Services & Service Contexts. . . 17
Non-Service Contexts . . . 17
Chapter 5
Creating the Attack Object
. . . 19
Configuring Basic Attack Object Properties . . . 19
Configuring Platform and Type. . . 21
Configuring Service and Time Bindings . . . 21
False Positives . . . 22
Service Bindings. . . 22
Time Bindings . . . 25
Configuring Attack Pattern and Context . . . 25
Creating the Pattern . . . 26
Selecting Context . . . 30
Entering Direction and Flow . . . 30
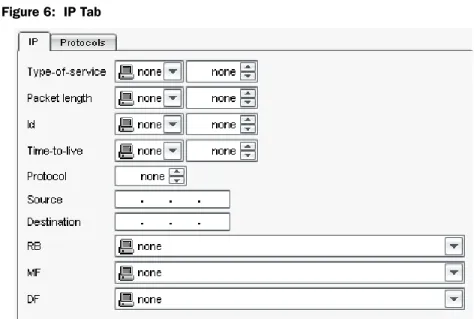
IP Tab . . . 31
IP Fields . . . 31
IP Flags . . . 32
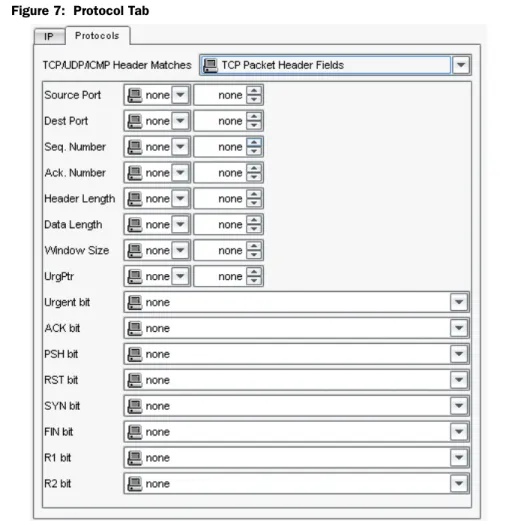
Protocol Tab . . . 33
TCP Header Matches . . . 33
UDP Headers . . . 34
ICMP Headers . . . 34
Chapter 6
Testing the Attack Object
. . . 37
Chapter 7
Attack Object Examples
. . . 39
Detecting Non-Attack Traffic . . . 39
Example: Detecting Special Characters. . . 39
Example: Restricting Access (Using Negation) . . . 41
vi
Detecting Brute Force Attacks . . . 43
Example: Brute Force Logins . . . 43
Detecting Known Vulnerabilities . . . 45
Example: Apache Tomcat Denial-of-Service . . . 45
Run the Attack . . . 46
Analyze the Attack . . . 46
Create and Test the Attack Object . . . 47
Example: Unix CDE/dtlogin Vulnerability . . . 48
Run the Attack . . . 49
Analyze the Attack . . . 49
Create and Test the Attack Object . . . 50
Example: Detecting a Worm. . . 52
Run the Attack . . . 52
Analyze the Attack . . . 52
Create and Test the Attack Object . . . 53
Using Compound Signatures . . . 55
Example: HTTP Frontpage . . . 55
Run the Attack . . . 56
Analyze the Attack . . . 56
Create the Attack Object . . . 57
Appendix A
Service Contexts . . . 61
Appendix B
Extended ASCII Tables . . . 123
1
Overview
This document describes how to create custom attack objects for your Juniper
Networks IDP system.
Using custom attack objects, you can edit the context of an existing attack object
that is producing too many false positives on your network, or edit an existing
protocol anomaly attack object to detect brute force attacks. Maybe you heard about
some new virus or Trojan that is sweeping the Internet and you want to create a
custom signature to detect it if it suddenly appears on your network. If you are
noticing abnormal or suspicious traffic on your network, you might also want to
analyze that traffic and create a custom signature to detect that traffic.
Creating a new attack object is a six step process:
1.
Setting up a test lab.
This step recommends the equipment, software, and
network design for a test lab. You should create, test, and fine-tune all custom
attack objects in a test lab environment that is not connected to your corporate
network.
2.
Determining your approach
. This step helps you decide on the method you
should use to create the attack object. Typically, the approach you take to create
a custom attack object is determined by how much information you already
have about the attack. For known attacks that are well-documented, you can
take a proactive approach, using the known information to craft targeted attack
objects; for unknown attacks that appear on your network, you must use the
reactive approach, using packet capture and network analysis tools to identify
the important characteristics of an attack.
3.
Obtaining attack information
. This step guides you through obtaining
important information about the attack. Using context and packet capture tools,
you run the attack in your test lab to capture the necessary information.
4.
Analyzing attack information
. This step helps you analyze the information you
captured. First, you review the context capture output to determine the context
the attack uses to enter your network, then review the packet capture to
determine the direction the attack is headed and the unique pattern that
identifies the attack.
5.
Creating an attack object
. This step helps you use the information you
analyzed to create a targeted attack object that can detect the attack with
minimal false positives.
2
6.
Testing the attack object
. This step guides you through creating a rule that
contains the new attack object, testing to see if the attack object detects the
attack, then fine-tuning the attack object.
Chapter 7: Attack Object Examples: includes several examples that demonstrate the
techniques discussed in this document.
Appendix A: Service Contexts: provides a list of all service contexts supported by
the IDP system.
Appendix B: Extended ASCII Tables: provides a list of all hex and octal numbers for
printable and non-printable characters.
Appendix C: Services: provides a list of all supported services for each version of
IDP.
3
Chapter 1
Setting Up the Test Lab
Juniper Networks highly recommends that you test and fine-tune all custom attack
objects in a test lab environment that is not connected to your corporate network.
Your lab should include the following equipment:
IDP Sensor running IDP 4.1 in Transparent or Sniffer mode and a
NetScreen-Security Manager server running NSM 2007.3r3 or later.
Attacker computer (used to generate the attack).
Target computer (used to receive the attack).
Hub or Switch with spanning port.
A packet capture utility. The examples in this document use Wireshark as a
packet capture utility. You can download Wireshark from www.Wireshark.org/.
A context capture utility. The examples in this document use scio ccap as a
service context utility.
A sample test lab using the IDP system is shown below:
Figure 1: Test Lab with IDP SystemTarget (contains the packet capture utility)
eth0
eth2 IDP Sensor
(contains the scio ccap utility)
Attacker (contains exploit code, packet captures, packet generation tools)
IDP UI Client
IDP MgtSvr
TEST LAB
Hub/Switch
4
If you do not want to use a test lab environment, you can use your existing
production environment. This approach works well when you are using packet
captures to identify the attack context and pattern.
However, when running attack code, Juniper Networks highly recommends that you
run the attack code within a test lab that is not connected to any other network. In
the test lab, use an Attacker computer to run the attack code against a Target
computer, which captures the attack packets with Wireshark (or similar pcap
capture program), then use that packet capture on your existing IDP-capable device
to identify attack context and pattern. The examples provided in this document
uses Wireshark.
Using the Proactive Approach
5
Chapter 2
Identifying Your Approach
Typically, you need to create custom attack object for four different reasons:
You read a security advisory about a known attack and want to create an attack
object that detects the malicious traffic described in that advisory.
You need to update or improve an existing third-party signature (such as a
Snort signature).
You want to customize an existing signature or protocol anomaly attack object
to your local environments. For example, you might need to customize a
signature to prevent false positives generated by a specific application running
on your network.
You want to detect specific activity on your network. For example, abnormal
traffic (possibly malicious), remote logins; or brute force attacks that attempt to
guess usernames and passwords.
In some situations, you are proactively protecting your network from malicious
traffic; in others, you are reacting to traffic that is currently on your network.
Using the Proactive Approach
You can be proactive when you already have specific information about the attack
or network activity you want to monitor. Not surprisingly, known attacks are the
easiest to detect because you know what you are looking for. In most situations you
have read about an attack in a security advisory or know the network activity that
you want to prevent on your network.
Attacks typically become “known” in two ways: The Internet security community
discovers the attack or you discover the attack.
Using Internet Security Community Resources
When the Internet security community discovers an attack, they analyze it and
reports their findings on how the attack works, where to look for it, and how to
detect it. The Internet security community is comprised of several security
organizations, security analysts, and security forums. The security community
continually discovers and analyzes new attacks, and communicates their findings to
each other over the Internet, making their work the best way to quickly locate,
identify, and truly understand an attack.
6
Using the Proactive ApproachThe following organizations are active in the security community and are a good
resource for locating attack information:
NVD - National Vulnerability Database
(http://nvd.nist.gov)—The NVD is the
U.S. government repository of vulnerably management data represented using
the Security Content Automation Protocol (SCAP).
SANS - SysAdmin, Audit, Network, Security Institute
(www.sans.org)—An
information security research, certification, and education organization that
provides security alerts. Also hosts the Internet Storm Center (ISC) at
http://www.incidents.org.
CVE - Common Vulnerabilities and Exposures
(http://cve.mitre.org)—A
standardized list of vulnerabilities and other information security exposures.
BugTraq
(http://securityfocus.com/archive/1)—A moderated mailing list hosted
by Security Focus that discusses and announces computer security
vulnerabilities.
CERT coordination center
(http://www.cert.org/)—A federally-funded security
alert organization that provides security advisories.
Packet Storm Security
(http://packetstormsecurity.nl/)—A non-profit
organization of security professionals that provides security information via
security news, advisories, forums, and often attack code.
Metasploit
(http://www.metasploit.com)—Metasploit provides useful
information for performing penetration testing, IDS signature development,
and exploit research.
FrSIRT - French Security Incident Response Team
(http://www.frsirt.com) —
FrSIRT is an independent security research organization providing security
advisories and real-time vulnerability alerting and notification services.
ISS - Internet Security Systems
(http://www.iss.net/)—An internet security
company that provides alerts and internet threat levels.
Some security advisories include the actual attack code (it is important remember
to isolate code acquired from unknown sources); you can use the attack information
and the attack code (you might need to compile the code) to capture packet
information and service contexts, as detailed in “Getting the Attack.” With this
information, you can create a custom signature attack object to detect the attack on
your network.
Unfortunately, most advisories do not post attack code with the attack description.
If you cannot obtain attack code, read through the advisory carefully and try to
reconstruct the basics of the attack packet.
Using Your Resources
When you know the network activity you want to prevent (or in some cases allow)
on your network, you can use this knowledge to create a signature attack object.
Typical examples might include:
Using the Reactive Approach
7
Brute Force Attacks
—Brute force attacks use a list of usernames and a
password dictionary. In a brute force attack, the attacker uses a tool that enters
the first password in dictionary for the first user in the list, then subsequently
tries every password for every user until it gets a match.
Network-Specific Activity
—This involves creating a new attack object from
scratch that matches a particular activity unique to your network environment.
You can also use the proactive approach when recreating a third-party signature in
the IDP system.
Using the Reactive Approach
Unknown attacks are more complicated to detect because they’re unknown—and
unpredictable. You don’t know what you are looking for or even where the attack
might occur, so you need to be suspicious of any unusual activity on your network.
To create a signature attack object from suspicious traffic on your network, first
capture packets and service context information from the suspicious traffic. By
analyzing the packets and contexts generated by the unusual activity, you can
identify the attack information and create a custom signature attack object to detect
that traffic on your network.
Getting the Attack
9
Chapter 3
Obtaining Attack Information
Obtaining important attack information is a two-step process: Get the attack code
and then run it in your test lab.
To get the attack code, review the security advisory, if available, then download and
analyze the attack code from the security advisory (you might need to compile the
code) or the packet capture (.pcap) to determine the attack information. If no
security advisory exists, you must obtain the attack traffic from your own network
traffic.
After you have the attack code, run the code (or packet capture) in your test lab to
capture four important attack features:
Attack Service & Context
. Using a context capture utility, record the protocols
that the attack uses so you can determine the best service context to use for the
attack signature. Not all attacks have a service context, however; you might
need to use packet, line, or stream.
Attack Direction & Pattern
. Using a packet capture utility, record the session
flow of the attack and use this to identify the direction of the attack by locating
the source IP that initiated the session. The packet capture utility also records
the payload of the attack packet, which you can use to identify the attack
pattern within the malicious or suspicious code.
Getting the Attack
You must have the attack code, some attack information, or a packet capture before
you can create a custom attack object. The more you know about an attack, the
more targeted your custom attack object can be, and the fewer false positives
generated by the attack object when you include it in your Security Policy.
Known attacks are often well-documented in a security advisory (usually a
non-profit or federally funded organization), on a security forum, or on a security
corporation Web site. For example, the CERT advisories often describe the protocol
and port number used in the attack, and some security forums even include attack
“proof-of-concept” code or packet capture that you can use to replicate the attack.
NOTE:
The attack pattern is the signature of the attack you want to detect. The
signature is a pattern that always exists within an attack; if the attack is present, so
is the signature.
10
Running the AttackUnknown attacks are typically suspicious activity found in your network traffic. For
example, you might see abnormal activity in your firewall or IDP logs that you want
to investigate further.
Running the Attack
The process for running the attack depends on the type of attack information you
have:
If you have attack code
, you can copy the code to the attacker computer in your
test lab (and compile the code if necessary). Then, enable the context capturing tool
(scio ccap) on the Sensor and enable the packet capturing tool (Wireshark) on the
target computer. Finally, run the attack against the target computer. Ideally, you
should use scio ccap and Wireshark concurrently so you only have to run the attack
a single time.
If you have a packet capture
, copy the packet capture file to the Sensor. From here,
you can enable the context capturing tool (scio ccap) on the Sensor and run the
packet capture on the Sensor as well. On a separate computer, such as the target
computer or the computer you used to obtain the packet capture with, open the
.pcap file in Wireshark.
Your goal in this step is simply to obtain context, direction, and packet information.
Later, in “Analyzing Attack Information, you investigate the information to help you
determine how to create the custom attack object that can detect the attack.
Using the Attack Capture Tools
To capture attack information, Juniper Networks recommends that you use the
following tools.
scio ccap
Use scio ccap to capture the contexts used in attack. scio ccap is included on the
IDP Sensor, in the directory. To display the scio ccap options, type the command
scio ccap
. The following list of options appears:
all
captures all service contexts from all sessions to and from the IDP Sensor.
When using scio pcap to replay pcap files, if you do not know the IP address of
the computer that generated the attack, use
allto capture all sessions on the
IDP Sensor.
When using a IDP in a test lab, where no other network traffic exists, using all
works well because the only traffic on the IDP is the attack packet capture.
However, when using a IDP in a production network, where normal network
traffic occurs, using
allcaptures all contexts for all sessions on the IDP—even
the non-attack traffic—making it difficult to identify the contexts for just the
attack packet capture.
sip <ipaddr>[/<netmask>]
captures all service contexts for all sessions from the
specified IP address for the specified netmask. Use the sip option when you are
running attack code from the attacker computer, or when using scio pcap to
replay a pcap file for which you know the IP address of the computer that
generated the attack.
Running the Attack
11
If you do not know the IP address or netmask, as is often the case with packet
captures obtained from security advisories, you cannot use the sip option.
dip <ipaddr>[/<netmask>]
captures all service contexts for all sessions to the
specified IP address for the specified netmask.
svc <service>
captures contexts for sessions that match the specified service.
As you use scio ccap to capture contexts from an attack or packet capture, you can
output the results to a text file (.txt) for later viewing. To save all output to a text file,
use the command:
scio ccap all > <filename>.txt.
scio pcap
Use scio pcap to replay a packet capture file (.pcap) on the IDP Sensor. To use scio
pcap, you must be running the Sensor in router or sniffer mode. scio pcap is
included on the IDP Sensor, in the directory
usr/idp/device/bin.
Before using scio ccap, you must disable Profiler activities on the Sensor: Login to
the IDP Sensor and browse to the directory
/usr/idp/device/binand type the
following command:
./profiler.sh stop. After you have finished using scio pcap to
replay packet captures, you can restart the profiler with the following command:
./profiler.sh start
.
Wireshark
You can download Wireshark from http://www.wireshark.org. Use Wireshark to:
Record the attack packets. Later, you can review the attack, analyze how the
attack works, and identify the attack pattern.
View prerecorded packet captures, such as those you downloaded from a
security advisory. (For example, http://www.packet-level.com/traces/)
Other Tools
The examples in this document use the tools mentioned above. However, you might
find these other tools helpful as you run attacks in your test lab:
tcpreplay
(http://tcpreplay.sourceforge.net/). You can use tcpreplay to replay
packet captures.
tcpdump
(http://www.tcpdump.org/). You can use tcpdump (included on the
IDP Sensor) to view traffic as it flows through the IDP Sensor.
Running Attack Code
If you are using attack code, use the following process to capture attack information:
NOTE:
When using scio pcap to run packet captures on the Sensor, wait 30
seconds between running the .pcap files.
12
Running the Attack1.
Copy the code to the attacker computer in your test lab. Compile the code if
necessary.If replaying a TCP session, ensure the pcap includes the TCP
Three-Way Handshake of the session of interest or the IDP may not be able to
build a correct protocol state in the Protocol State Engine and will not generate
appropriate protocol contexts.
2.
On the IDP Sensor, enable the context capture utility.
a.
Login to the Sensor and browse to
usr/idp/device/bin.
b.
Enter the scio ccap command:
To view the output of scio ccap onscreen only, use the command:
scio ccap sip <IP of the attacker computer>/
To view the output of scio ccap onscreen and save the output to a text file
that you can view later, use the command:
scio ccap sip <IP of the attacker computer>/> <filename>.txt
3.
On the target computer, start Wireshark:
a.
From the menu bar, click Capture > Start. The Capture Options dialog box
appears.
b.
Select the interface on the target computer that receives traffic from the
IDP and configure the remaining capture options as desired.
c.
In the Capture Option dialog box, click OK. The Captured Frames progress
box appears.
4.
On the attacker computer, run the attack code.
5.
On the IDP Sensor, use Ctl-C to stop the context capture:
If the attack uses service contexts supported by the IDP system, those
contexts are listed in the scio ccap output.
If the attack does not use a service context or uses a service context that is
not supported by the IDP system, the output (onscreen or in the text file)
contains no data.
6.
On the target computer, view the Captured Frames progress box in Wireshark
to the packets being captured. The progress box displays a list of services and
the number of frames captures for each services. When the capture limits have
been met, the progress box closes and the packet capture automatically
displays in the main Wireshark window (you can also close the progress box
manually at any time).
Running the Attack
13
Running a Packet Capture
If you have a packet capture file, you can use scio pcap to run the pcap file and
capture the contexts in scio ccap.
1.
Copy the .pcap file to the /tmp directory of the Sensor.
2.
On the IDP Sensor, enable the context capture utility.
d.
Login to the Sensor and browse to
usr/idp/device/bin.
To enable the output of scio ccap onscreen only, use the command:
scio ccap all
To enable the output of scio ccap onscreen and save the output to a text file
that you can view later, use the command:
scio ccap all > <filename>.txt
3.
In a separate SSH window or virtual terminal, use scio pcap to run the packet
capture file:
a.
Ensure that you have disabled profiling activities for the Sensor.
b.
Move to the directory that contains the .pcap file for the attack (
/tmpdirectory).
c.
Type the command:
scio pcap s0 eth0 <filename>.pcapd.
Switch to the window or terminal that you used to enable scio ccap. As scio
pcap runs the packet capture, the scio ccap captures the contexts used in
the packet capture. On the IDP Sensor, use Ctl-C to stop the context
capture:
If the attack uses service contexts supported by the IDP system, those
contexts are listed in the scio ccap output.
If the attack does not use a service context, the output (onscreen or in the
text file) contains no data.
Identify the Service
15
Chapter 4
Analyzing Attack Information
Analyzing attack information is a four-step process:
1.
Identify the Service
2.
Identify the Signature Pattern
3.
Identify the Context
4.
Identify the Attack Direction
These four key pieces of information can help you create a custom attack object
that detects the attack with minimal false positives.
Identify the Service
On the IDP Sensor review the scio ccap output (either onscreen or from a saved .txt
file) to determine the service used in the attack.
Services are high-level protocols that define how data is structured. A protocol is a
set of rules that determines how computers communicate with each other;
protocols rely on other protocols to handle communication tasks that are outside
their own functionality. In the TCP/IP model of communication, the four protocol
layers (Link, Network, Transport, and Application) work together to transmit data,
with each protocol layer using different protocols to manage a specific aspect of the
communication process.
The highest protocol layer, Application, contains service protocols, also known as
Services. Although services must still use a transport or network layer protocol to
actually transfer data, the service itself defines how that data is structured as it is
transmitted across the network.
Understanding Services
Understanding how the service works is critical to analyzing an attack. To gain
knowledge of a service, you should first identify the service in the attack, then
research the service using the following resources:
Internet Engineering Task Force
(www.ietf.org). This organization works to
produce and maintain Internet communications standards. Their Web site
includes all published RFCs and RFC drafts, which define the data structure for
many service protocols.
16
Identify the Signature Pattern
Application Vendor
. For services that do not have RFCs, you might need to
consult the Web site of the vendor that produces the service. Peer-to-peer
applications (Yahoo! Messenger, AIM, etc.) often do not have published RFCs,
but do have information posted on the Web.
After you have researched the service protocol, you should understand how a
normal session occurs, including the start and end procedures, the service contexts
used, and the payload transfer (if any). This knowledge can help you to spot
abnormal activity in an attack session.
Be aware that some attacks use multiple services as they attempt to enter a
network; your goal is to understand which service carries the attack pattern.
Identify the Signature Pattern
After you have identified and researched the attack service, you can then attempt to
understand how the attack works, and identify a pattern within the attack that you
can use to detect the attack.
Open the packet capture in Wireshark, then analyze packet capture to determine
the signature pattern. Using what you know about the service, review the session
and identify the areas that deviate from normal activity. Examples include:
Does the session initiation look normal?
Does each side of the connection (server and client) make appropriate
responses to the other’s requests?
When the payload is transferred, does it get transferred at the appropriate time
and in the appropriate format?
Does the session teardown occur normally?
Identify the Context
On the IDP Sensor, review the scio ccap output (either onscreen or from a saved .txt
file) to determine the service contexts triggered by the attack. The context defines
the location of the signature, and is important because it specifies where IDP looks
for attacks. When creating a new signature attack object, you can tell IDP to detect
attacks in multiple contexts, or you can limit the search to just one context.
Choosing a single context makes IDP more effective and reduces false positives.
Ideally, you want to identify a service context for your attack pattern; however, you
might need to use a more general context, such as packet, line, etc. for certain
patterns.
Review the output of scio ccap to decide which type of context you must use:
If the attack uses service contexts supported by the IDP system, those contexts
are listed in the scio ccap output. Select the service context that contains the
signature pattern you previously identified.
Identify the Context
17
If the attack does not use a service context or uses a service context that is not
supported by the IDP system, the output (onscreen or in the text file) contains
no data. You must use a non-service context for the attack. You might also need
to choose this option if the attack uses multiple services to attack your network.
When you select a non-service context, you can still bind the context to a
protocol (TCP, UDP, ICMP, RPC) or a specific service (without specifying a
service context. You can also select Any as the service binding, however,
Juniper Networks does not recommend this option because it can impact the
performance of your IDP system.
For now, you are identifying the service and service context or service binding.
Later, in “Creating the Attack Object,” you can use this information to quickly create
the attack object that detects the attack.
Supported Services & Service Contexts
Services define how data is structured; a service context is a specific location within
that defined data structure. Because a service context is the exact location that the
attack occurs, you can use a service context to create an extremely accurate custom
attack object that produce few false positives. Service Context in Appendix A
provides a list of all service contexts supported by the IDP System.
If the attack contains multiple service contexts, identify all of them.
Non-Service Contexts
A non-service context is a section of the connection. If the attack does not occur
within a supported service context (the output of scio ccap is blank), you can create
a more generic context binding by selecting a non-service context. Use a
non-service context only when scio ccap does not show a service context for the
attack.
IDP supports the following non-service contexts:
Choose
packet context
to match the signature pattern within a packet. You
should also specify the packet service binding in the binding tab and define the
packet header options in the IP tab. Although not required, specifying these
additional parameters helps to improve the accuracy of the signature attack
object, and can improve IDP performance.
Choose
first packet context
to match the signature pattern in only the first
packet of a stream. When the flow direction for the attack object is set to any,
IDP checks the first packet of both the server-to-client (STC) and client-to-server
(CTS) flows. If you know that the attack signature appears in the first packet of a
session, choosing first packet instead of packet reduces the amount of traffic
the IDP needs to monitor, improving performance.
Choose
stream context
to match the signature pattern against the entire
stream (IDP reassembles packets and extracts the data to search for a pattern).
However, IDP does not recognize packet boundaries for stream contexts, so
data for multiple packets is combined. You should also specify a stream service
binding in the binding tab. Again, although not required, this helps to improve
the accuracy of the signature attack object and IDP performance.
18
Identify the Attack Direction
Choose
stream 256, stream1k, or stream8k context
to match the signature
pattern against first 256 bytes of a stream (IDP reassembles packets and
extracts the data to search for a pattern). When the flow direction for the attack
object is set to any, IDP checks the first 256 bytes of both the STC and CTS
flows.
Stream 256 is often the best choice for non-UDP attacks. If you know that the
attack signature will appear in the first 256 bytes of a session, choosing stream
256 instead of stream will reduce the amount of traffic the IDP needs to
monitor and cache, improving performance.
Choose
line context
to match the signature pattern within a specific line. If the
attack uses a line-oriented application or protocol (such as FTP), this is a good
choice.
When you select a non-service context, you should also attempt to identify the
protocol or service that the attack uses. Although not as specific as the service
context, this information can help to pinpoint the attack location, and can help you
create a more accurate attack object.
Identify the Attack Direction
You can determine the direction of an attack by locating the source IP that initiated
the session. The session initiator is considered the client, even if that client source
IP belongs to a dedicated server.
To determine the direction of the attack, analyze the session that contains the
attack pattern:
If the session is TCP you can use the Follow TCP Stream option in Wireshark to
quickly discover the source IP that initiated the session.
If the session is not TCP, read through the session carefully, and determine
which IP address initiates the session.
You must determine if the attack is client-to-server, server-to-client, or if the attack
is present in both streams. Most attacks occur in the client-to-server flow; however,
some peer-to-peer application exploits use a server-to-client flow to initiate the
attack. If you are unsure which flow contains the attack, you can specify both
directions when you create the attack object.
You can also use Wireshark’s Hex Dump feature to see the details of the
connection.
Configuring Basic Attack Object Properties
19
Chapter 5
Creating the Attack Object
When you have the attack context, direction, and pattern of an attack, you can use
the NSM GUI to create a custom signature attack object that detects that attack. All
attack objects, including the ones you create yourself, are stored in the attack object
database. A custom signature attack object has four tabs of information:
The
General tab
contains high-level information about the attack object, such
as the object name, attack severity and category, and a description. This tab
also launches the Attack Version wizard, which lets you specify the patterns,
bindings, and protocol of the actual attack.
The
Extended tab
specifies additional information about the attack, such as the
vulnerabilities BugTraq number, patches that may be relevant, or external
web
sites that contain additional information about the vulnerability.
To create a custom attack object, do the following.
1.
In the NSM navigation Tree, select Object Manager > Attack Objects > IDP
Objects.
2.
In the main display area, select the Custom Attacks tab.
3.
Click the + button.
The Custom Attack dialog box appear and displays the General tab.
Configuring Basic Attack Object Properties
In the General tab, specify the basic attack properties, such as name, description,
severity, category, and keywords. You also enter the attack information you
analyzed in step 4 (attack direction, attack pattern, and attack contexts).
20
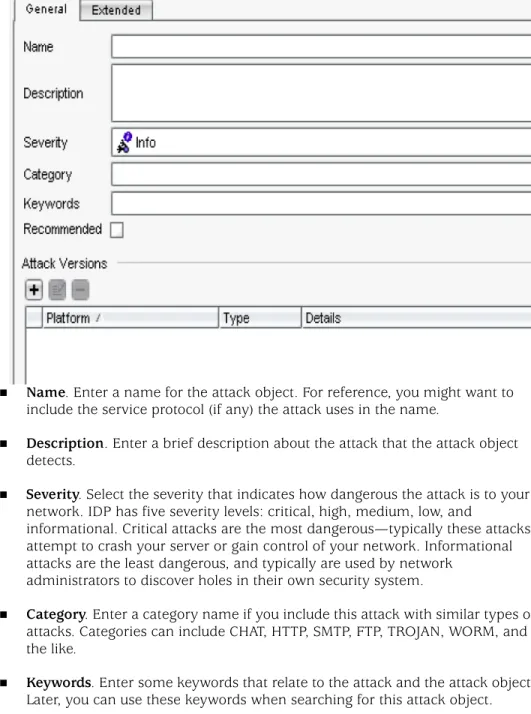
Configuring Basic Attack Object PropertiesFigure 2: General Attack Object Properties Tab
Name
. Enter a name for the attack object. For reference, you might want to
include the service protocol (if any) the attack uses in the name.
Description
. Enter a brief description about the attack that the attack object
detects.
Severity
. Select the severity that indicates how dangerous the attack is to your
network. IDP has five severity levels: critical, high, medium, low, and
informational. Critical attacks are the most dangerous—typically these attacks
attempt to crash your server or gain control of your network. Informational
attacks are the least dangerous, and typically are used by network
administrators to discover holes in their own security system.
Category
. Enter a category name if you include this attack with similar types of
attacks. Categories can include CHAT, HTTP, SMTP, FTP, TROJAN, WORM, and
the like.
Keywords
. Enter some keywords that relate to the attack and the attack object.
Later, you can use these keywords when searching for this attack object.
Recommended
. Check this box if the attack object should be included in
Recommended attack object groups.
After entering this information, click the + button to select target platforms and
specify bindings and patterns.
Configuring Basic Attack Object Properties
21
Configuring Platform and Type
In the first panel of the wizard, specify which versions of IDP the new attack object
will work with. Then, at the bottom, indicate that this is a Signature attack object.
Then click Next to enter binding information.
Figure 3: Platform Panel
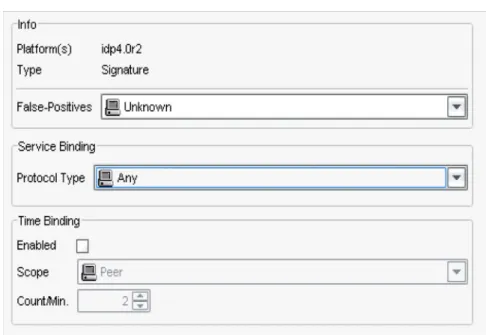
Configuring Service and Time Bindings
In the General Properties panel, indicate the frequency of false positives for this
attack and the service and time bindings.
22
Configuring Basic Attack Object PropertiesFalse Positives
Select the false positive setting that indicates the frequency (unknown, rarely,
occasionally, frequently) that the attack object produces a false positive when used
in a Security Policy. Typically, you will not know the false positive frequency for a
new custom attack object, so you can leave this setting as unknown. Later, as you
fine-tune the attack object, you should change this setting to help you track false
positives.
Service Bindings
Select the service that an attack uses to enter your network to bind the signature
pattern to that service. Selecting a service binding significantly improves the
accuracy of the signature attack object and can improve IDP performance.
Any
. If you are unsure of the service, choose
any
to match the signature pattern
against all services.
IP
. If you are unsure of the service, but you know the IP protocol type, bind the
attack pattern to the IP protocol type. Specify the name of the protocol type, or
the protocol type number.
You can use an IP protocol binding with IP Header Matches (detailed in
“Configuring IP Settings and Header Matches” on page 33) or with an
attack pattern. However, when using an IP protocol type with the first
packet context, the attack pattern must be left empty.
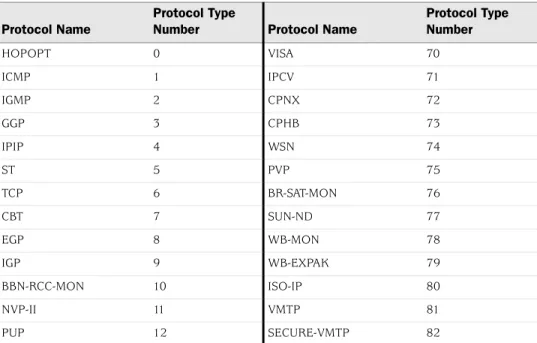
The supported protocol types are shown below:
Table 1: Supported Protocol TypesICMPNOTE:
Using the context binding
any
can impact the performance of your IDP
Sensor. Be sure to use
any
only for attacks that use multiple services to attack your
network.
Protocol Name
Protocol Type
Number Protocol Name
Protocol Type Number HOPOPT 0 VISA 70 ICMP 1 IPCV 71 IGMP 2 CPNX 72 GGP 3 CPHB 73 IPIP 4 WSN 74 ST 5 PVP 75 TCP 6 BR-SAT-MON 76 CBT 7 SUN-ND 77 EGP 8 WB-MON 78 IGP 9 WB-EXPAK 79 BBN-RCC-MON 10 ISO-IP 80 NVP-II 11 VMTP 81 PUP 12 SECURE-VMTP 82
Configuring Basic Attack Object Properties
23
ARGUS 13 VINES 83 EMCON 14 TTP 84 XNET 15 NSFNET-IBP 85 CHAOS 16 DGP 86 UDP 17 TCF 87 MUX 18 EIGRP 88 DCN-MEAS 19 OSPFIGP 89 HMP 20 SPRITE-RPC 90 PRM 21 LARP 91 XND-IDP 22 MTP 92 TRUNK-1 23 AX_25 93 TRUNK-2 24 IPIP 94 LEAF-1 25 MICP 95 LEAF-2 26 SCC-SP 96 RDP 27 ETHERIP 97 IRTP 28 ENCAP 98 ISO-TP4 29 APES 99 NETBLT 30 GMTP 100 MFE-NSP 31 IFMP 101 MERIT-INP 32 PNNI 102 SEP 33 PIM 103 3PC 34 ARIS 104 IDPR 35 SCPS 105 XTP 36 QNX 106 DDP 37 A/N 107 TP_PLUS_PLUS 39 IPCOMP 108 IL 40 SNP 109 IPV6 41 COMPAT-PEER 110 SDRP 42 IPZ-IN-IP 111 IPV6-ROUTING 43 VRRP 112 IDV6-FRAGMENT 44 PGM 113 IDRP 45 HOP-O 114 RSVP 46 L2TP 115 GRE 47 DDX 116 MHRP 48 IATP 117 BNA 49 STP 118 ESP 50 SRP 119 AH 51 UTI 120 Protocol Name Protocol TypeNumber Protocol Name
Protocol Type Number
24
Configuring Basic Attack Object Properties
ICMP, TCP & UDP
. If you are unsure of the service, but you do know the
protocol
that the attacks uses, select the protocol and port number.
RPC
. For attacks that use the remote procedure call (RPC) protocol, select RPC
and specify the RPC program number. RPC is used by distributed processing
applications to handle interaction between processes remotely. When a client
makes a remote procedure call to an RPC server, the server replies with a
remote program. Each remote program uses a different program number.
Service
. For attacks that use a service to attack your network, select a service
from the service menu.
After you have selected a binding for a line, stream, stream256, stream1k, or
stream8k,signature pattern, click OK to save the attack object to the attack object
database. Your custom signature attack object is now ready to be used in a Security
Policy and tested for accuracy; see “Testing the Attack Object.”
For signature patterns that use a packet, first packet, or first data packet context,
you can also specify the IP header settings and set protocol flags for the attack
object, as detailed in the following sections.
I-NLSP 52 SMP 121 SWIPE 53 SSM 122 NARP 54 PTP 123 MOBILE 55 ISIS 124 TLSP 56 FIRE 125 SKIP 57 CRTP 126 IPV6-ICMP 58 CRUDP 127 IPV6-NONXT 59 SSCOPMCE 128 IPV6-OPTS 60 IPLT 129 AHIP 61 SPS 130 CFTP 62 PIPE 131 ALNP 63 SCTP 132 SAT-EXPAK 64 FC 133 KRYPTOLAN 65 RSVP-E2E-IGNORE 134 RVD 66 n/a IPPC 67 n/a ADFSP 68 n/a SAT-MON 69 RESERVED 255 Protocol Name Protocol Type
Number Protocol Name
Protocol Type Number
Configuring Basic Attack Object Properties
25
Time Bindings
Time binding attributes control how the attack object identifies attacks that repeat
for a certain number of times. By configuring the scope and count of an attack, you
can detect a sequence of the same attacks over a period of time (one minute) across
sessions. This method is useful for detecting brute force attacks that attempt to
guess authentication credentials or overwhelm a system’s capacity to handle data.
In the Time Binding tab, enable Time Bind Attributes and then configure the
following time attributes:
Scope—Select the scope within which the count occurs:
Source: Select this option to detect attacks from the source IP address for
the specified number of times, regardless of the destination IP address.
Destination: Select this option to detect attacks to the destination IP
address for the specified number of times, regardless of the source IP
address.
Peer: Select this option to detect attacks between source and destination IP
addresses of the sessions for the specified number of times. We
recommend using the Peer option when detecting distributed attacks,
which can use multiple sources to attack multiple destinations.
Count—Enter the number of times that the attack object must detect an attack
within a minute before the device considers the attack object to match the
attack. The minute timer starts when the attack pattern first matches the event;
if the attack pattern matches the same event for the specific count or higher
within the following 60 seconds, the attack object is considered to have
matched
the attack object.
If you bind the attack object to multiple ports and the attack object detects that
attack on different ports, each attack on each port is counted as a separate
occurrence. For example, when the attack object detects that attack TCP/80 and
then on TCP/8080, the count is two.
Configuring Attack Pattern and Context
The attack pattern is the combination of the signature pattern and the context. The
pattern tells the IDP Sensor what to look for, and the context tells where to look.
You can specify the pattern and context in the Attack Pattern Wizard, as shown
below:
26
Configuring Basic Attack Object PropertiesFigure 5: Attack Pattern Panel
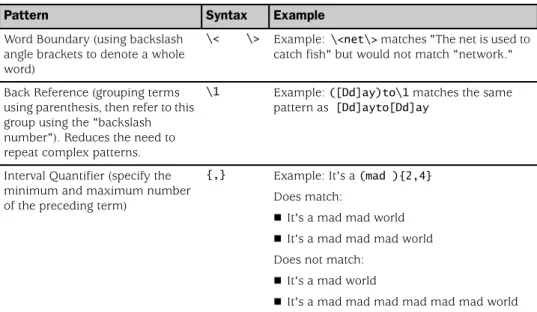
Creating the Pattern
For the pattern, you must create a regular expression that matches that pattern of
the attack code. IDP supports a subset of the standard regular expressions, as
detailed in the following sections.
Supported Regular Expressions
IDP uses a syntax that is based on regular expressions to match attack patterns. The
supported regular expression syntax is shown below
Table 2: Supported Regular Expressions:
NOTE:
For more details on regular expressions, refer to a standard regex resource,
such as “Mastering Regular Expressions” Jeffrey E. F. Friedl, O'Reilly & Associates;
2nd edition (July 15, 2002), ISBN 0-596-00289-0.
Pattern Syntax
Direct binary match (octal) \0<octal-number>
Direct binary match (hexadecimal) \X<hexadecimal-number>\X
Case insensitive matches \[<character-set>\]
Match any symbol .
Match 1 or more symbols * Match 0 or 1 symbols ? Grouping of expressions () Alternation, typically used with ( ) |
Character range [<start>-<end>]
Negation of range [^<start>-<end>]
Unicode insensitive matches \u<string>\u