w w w . d e l l . c o m | s u p p o r t . d e l l . c o m
Dell™ Systems Build and Update Utility 1.0.3
Quick Reference Guide
Notes and Notices
NOTE: A NOTE indicates important information that helps you make better use of your computer.
NOTICE: A NOTICE indicates either potential damage to hardware or loss of data and tells you how to avoid the problem.
____________________
Information in this document is subject to change without notice. © 2007 Dell Inc. All rights reserved.
Reproduction in any manner whatsoever without the written permission of Dell Inc. is strictly forbidden. Trademarks used in this text: Dell, the DELL logo, PowerEdge, and OpenManage are trademarks of Dell Inc.; Microsoft, Windows, and Windows Server, are either trademarks or registered trademarks of Microsoft Corporation in the United States and/or other countries; VMware is a registered trademark and ESX Server is a registered trademark of VMware, Inc.; SUSE is a registered trademark of Novell, Inc. in the United States and other countries; Red Hat and Red Hat Enterprise Linux are registered trademarks of Red Hat, Inc.
Other trademarks and trade names may be used in this document to refer to either the entities claiming the marks and names or their products. Dell Inc. disclaims any proprietary interest in trademarks and trade names other than its own.
Contents 3
Contents
1
About This Document
. . . .7
Who Should Read This Document? . . . 7
How Will This Document Help Me? . . . 7
How Do I Use This Document? . . . 8
2
Dell Systems Build and
Update Utility Overview
. . . .11
What Dell Systems Build and Update Utility Offers. . . 11
What Can I Do With Dell Systems Build and Update Utility?. . . 12
3
Before You Begin With The Dell Systems
Build and Update Utility
. . . .15
Prerequisites And Requirements . . . 15
Supported Operating Systems. . . 16
Supported Systems . . . 16
Are There Other Dell Documents I Might Need? . . . . 17
4 Contents
4
Boot Menu
. . . .19
5
Server Operating System Installation
. . .21
How Do I Access the SOI?. . . 21
Anything Else I Should Know? . . . 22
If you are installing an operating system on your system. . . 22
If you are configuring controllers . . . 22
6
Firmware Update
. . . .23
How do I Access Firmware Update? . . . 23
What is the Repository?. . . 24
Anything Else I Should Know? . . . 24
If you face any prerequisite failure . . . 24
If you use your custom repository for firmware updates. . . 24
If you plan to downgrade the firmware . . . 24
If some of the updates fail . . . 24
If you are using a USB key as your source repository. . . 25
7
Update Utility Creation
. . . .27
How do I Access Update Utility Creation? . . . 27
Contents 5
How do I Use The Customized Repository?. . . 28
Anything Else I Should Know? . . . 28
If you create multiple custom repositories in the same location . . . 28 If you are using a USB key as your
destination location . . . 28
8
Hardware Configuration
Scripting Tool
. . . .29
How Do I Access The Hardware Configuration
Scripting Tool? . . . 29
How Do I Access The Command Line Interface?. . . . 29
Some Questions About Configuring Hardware. . . 30
How Do I Know Which Components
To Configure?. . . 30 Where Do I Get More Information On
RAID Controllers? . . . 31 How Do I Know Which BIOS Setup Options
Are Available On My System? . . . 31 When Setting the Boot Sequence for Devices, What Happens If I Choose A Device That Is
Not On My System? . . . 32
How Do I Use The .ini File To Deploy My System? . . . 32
One-To-One Scenario (.ini file on USB key) . . . . 32 One-To-Many Scenario . . . 33
Anything Else I Should Know? . . . 33
If you are creating a virtual disk . . . 33 If you are using a USB key as
6 Contents
9
Content Manager
. . . .35
How Do I Access Content Manager? . . . 35
How Do I Get Server Update Utility Application
Using Content Manager? . . . 36 How Do I Create The Customized Repository
On A Network Share Using Content Manager?. . . 36
How Will Checking For Repository
Updates Help Me? . . . 36 Anything Else I Should Know? . . . 37
If you create a customized repository
with only Windows packages . . . 37
Glossary . . . 39
About This Document 7
About This Document
It is strongly recommended that you read this section, "Dell Systems Build and Update Utility Overview," and "Before You Begin With The Dell Systems Build and Update Utility" before proceeding further.
Who Should Read This Document?
This document is for system administrators who are responsible for deploying and updating Dell™ systems in their organizations.
As an existing Dell customer, you may have been using:
• Dell OpenManage™ Server Assistant • Dell OpenManage Server Update Utility • Dell OpenManage Deployment Toolkit
You will have to re-orient your deployment and update processes to be in line with the Dell Systems Build and Update Utility that is replacing the first product and offers functionalities of the second and third products listed above.
How Will This Document Help Me?
This document introduces you to the Dell Systems Build and Update Utility, and give tips on how to make the product effective in helping you streamline your deployment and update procedures for Dell systems.
• If you are a first-time user of this product, this document will help you set up your systems prior to, during, and after using the Dell Systems Build and Update Utility.
• If you are an existing user of any of the products listed above, this document will help you understand how and where this product now fits in the Dell Systems Build and Update Utility, and also help you set up your systems to continue getting benefits of your earlier product. It will also help you use the unified and integrated features of the Dell Systems Build and Update Utility to leverage the benefits without having to dramatically change your existing deployment and update processes.
8 About This Document
This document focuses only on setting up your Dell systems to use the Dell Systems Build and Update Utility effectively and efficiently, and the possible scenarios in which to use this utility.
How Do I Use This Document?
This document provides an overview of the various modules of the Dell Systems Build and Update Utility and the possible scenarios in which you might use them. However, it does not cover all scenarios and possibilities. For specific information on Dell products whose functionalities are now provided by the Dell Systems Build and Update Utility, see "Are There Other Dell Documents I Might Need?."
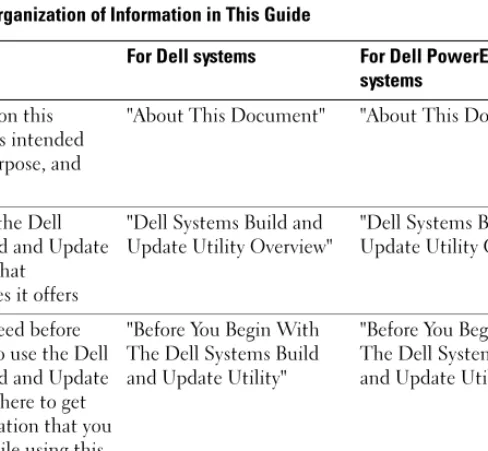
Depending on the Dell systems you want to deploy, redeploy or update, it is recommended that you use the document as follows.
Table 1-1. Organization of Information in This Guide
Topics For Dell systems For Dell PowerEdge SC
systems
Information on this document, its intended audience, purpose, and organization
"About This Document" "About This Document"
Overview of the Dell Systems Build and Update Utility and what
functionalities it offers
"Dell Systems Build and Update Utility Overview"
"Dell Systems Build and Update Utility Overview"
What you need before proceeding to use the Dell Systems Build and Update Utility and where to get other information that you may need while using this utility.
"Before You Begin With The Dell Systems Build and Update Utility"
"Before You Begin With The Dell Systems Build and Update Utility"
Important information about the entry point to the Dell Systems Build and Update Utility
About This Document 9 Now that you have an idea of what this document is about and how to use it to easily access the information you want, see "Dell Systems Build and Update Utility Overview" to get an overview of Dell Systems Build and Update Utility and the functionalities it offers.
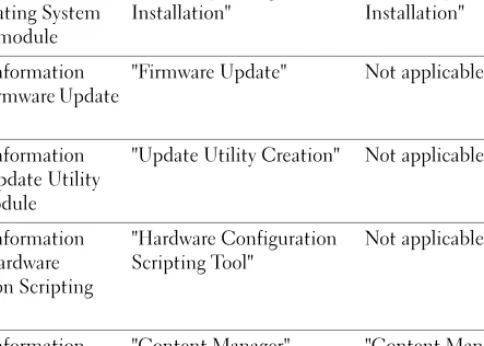
Information about the Server Operating System Installation module
"Server Operating System Installation"
"Server Operating System Installation"
Important information about the Firmware Update module
"Firmware Update" Not applicable
Important information about the Update Utility Creation module
"Update Utility Creation" Not applicable
Important information about the Hardware Configuration Scripting Tool "Hardware Configuration Scripting Tool" Not applicable Important information about the Content Manager tool
"Content Manager" "Content Manager"
Table 1-1. Organization of Information in This Guide (continued)
Topics For Dell systems For Dell PowerEdge SC
Dell Systems Build and Update Utility Overview 11
Dell Systems Build and Update
Utility Overview
This section provides an overview of the Dell™ Systems Build and Update Utility. This section helps you to understand the functionalities that the Dell Systems Build and Update Utility provides to update and deploy your Dell systems.
If you are an existing user of the Dell OpenManage™ products, see "What Dell Systems Build and Update Utility Offers."
If you are a first-time user, see "What Can I Do With Dell Systems Build and Update Utility?."
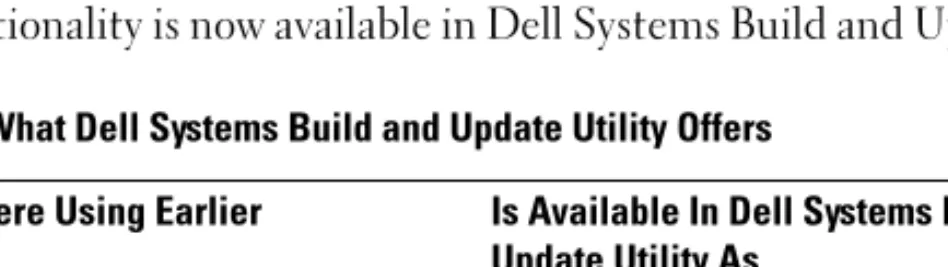
What Dell Systems Build and Update Utility Offers
Table 2-1 lists the Dell OpenManage products that are either replaced by or whose functionality is now available in Dell Systems Build and Update Utility.Table 2-1. What Dell Systems Build and Update Utility Offers
What You Were Using Earlier Is Available In Dell Systems Build and
Update Utility As
Dell OpenManage Server Assistant Server Operating System Installation Dell OpenManage Server Update Utility • Firmware Update
• Update Utility Creation
12 Dell Systems Build and Update Utility Overview
What Can I Do With Dell Systems Build and
Update Utility?
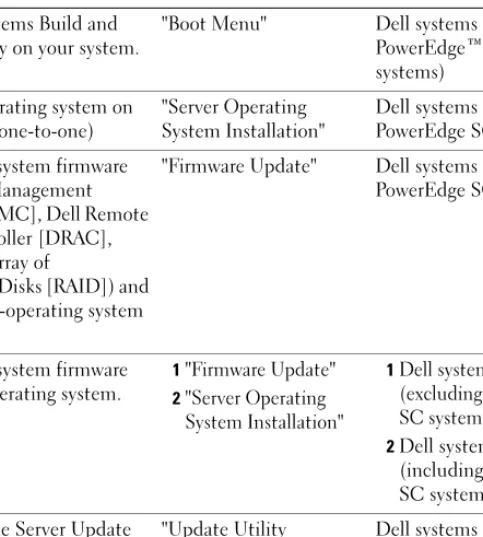
Table 2-2 lists the functionalities of the Dell Systems Build and Update Utility to deploy and update your Dell systems.
Table 2-2. Dell Systems Build and Update Utility Functionalities
You Want To Go To For
Run Dell Systems Build and Update Utility on your system.
"Boot Menu" Dell systems (including PowerEdge™ SC systems) Install an operating system on
your system (one-to-one)
"Server Operating System Installation"
Dell systems (including PowerEdge SC systems) Update your system firmware
(Baseboard Management Controller [BMC], Dell Remote Access Controller [DRAC], Redundant Array of
Independent Disks [RAID]) and BIOS in a pre-operating system environment.
"Firmware Update" Dell systems (excluding PowerEdge SC systems)
Update your system firmware and install operating system.
1"Firmware Update" 2"Server Operating System Installation" 1Dell systems (excluding PowerEdge SC systems) 2Dell systems (including PowerEdge SC systems)
Customize the Server Update Utility and use it to update your Dell system one-to-one (requires an operating system on your system).
"Update Utility Creation"
Dell systems (excluding PowerEdge SC systems)
Use the customized repository on a CD or DVD to update your system one-to-one.
"Update Utility Creation"
Dell systems (excluding PowerEdge SC systems)
Dell Systems Build and Update Utility Overview 13 Now that you have an overview of Dell Systems Build and Update Utility and what functionalities it offers, read "Before You Begin With The Dell Systems Build and Update Utility" to see what you should have before you begin using Dell Systems Build and Update Utility in your environment.
Deploy multiple systems (update your systems’ firmware and install operating system on them) 1"Firmware Update" 2"Server Operating System Installation" 1Dell systems (excluding PowerEdge SC systems) 2Dell systems (including PowerEdge SC systems)
Update firmware and BIOS in a pre-operating system
environment on multiple systems.
"Firmware Update" Dell systems (excluding PowerEdge SC systems)
Deploy multiple systems (configure the hardware).
"Hardware Configuration Scripting Tool"
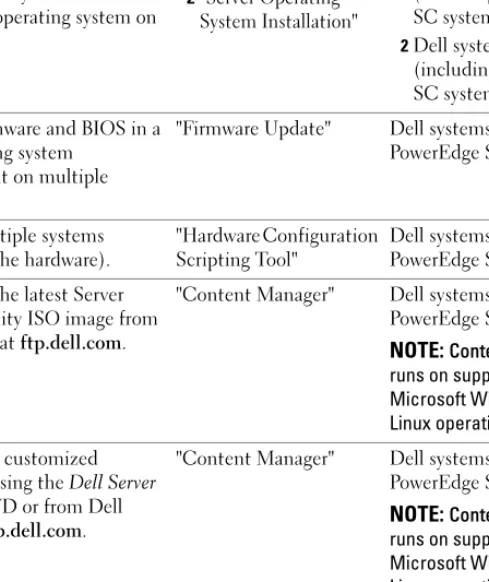
Dell systems (excluding PowerEdge SC systems) Download the latest Server
Update Utility ISO image from Dell online at ftp.dell.com.
"Content Manager" Dell systems (including PowerEdge SC systems) NOTE: Content Manager
runs on supported Microsoft Windows and Linux operating systems. Create your customized
repository using the Dell Server Updates DVD or from Dell online at ftp.dell.com.
"Content Manager" Dell systems (including PowerEdge SC systems) NOTE: Content Manager
runs on supported Microsoft Windows and Linux operating systems. Check for the latest updates by
comparing your local or customized repository with the Dell online repository at ftp.dell.com.
"Content Manager" Dell systems (including PowerEdge SC systems) NOTE: Content Manager
runs on supported Microsoft Windows and Linux operating systems.
Table 2-2. Dell Systems Build and Update Utility Functionalities (continued)
Before You Begin With The Dell Systems Build and Update Utility 15
Before You Begin With The Dell
Systems Build and Update Utility
This section lists the prerequisites you require before proceeding to use Dell™ Systems Build and Update Utility and where to get other information that you may need while using this utility.
Prerequisites And Requirements
You should have a Dell system with:• Minimum memory of 512 MB • CD drive or DVD drive
NOTE: The Dell Systems Management Tools and Documentation DVD contains the Dell Systems Build and Update Utility version 5.4. If your system does not have a DVD drive, it is recommended that you use the ISO image of the Dell Systems Build and Update Utility located in the /root folder of the DVD to create your CD. However, the version of this image is 5.3.
Table 3-1 lists the prerequisites and requirements for specific modules of Dell Systems Build and Update Utility.
Table 3-1. Prerequisites And Requirements
Module Prerequisites And Requirements
Server Operating System Installation
• Operating system CD/DVD
•Dell Systems Management Tools and Documentation DVD (if you want to install Dell OpenManage™
System Administrator). This is not applicable for Dell PowerEdge™ SC systems.
• Basic knowledge of Redundant Array of Independent Disks (RAID)
16 Before You Begin With The Dell Systems Build and Update Utility
Supported Operating Systems
For the list of operating systems that the Dell Systems Build and Update Utility supports, see the readme.txt in the root folder or the Dell Systems Software Support Matrix on the Dell Support website at support.dell.com or the Dell Systems Management Tools and Documentation DVD.
Supported Systems
For the list of Dell systems supported for this version of the Dell Systems Build and Update Utility, see the readme.txt in the root folder or the Dell Systems Software Support Matrix on the Dell Support website at support.dell.com.
Firmware Update • DVD drive
•Dell Server Updates DVD or
• A network share with the Server Update Utility content • Knowledge of setting up the Network File System (NFS)
or Microsoft® Windows ® share Update Utility Creation • DVD drive
•Dell Server Updates DVD or
• A network share with the Server Update Utility content • Knowledge of setting up Network File System (NFS)
or Microsoft Windows share
• Network share or USB key to store the customized repository
Hardware Configuration Scripting Tool
• Basic knowledge of BIOS, RAID, Baseboard Management Controller (BMC), and Dell Remote Access Controller (DRAC)
• Network share or USB key to store the .ini files • Knowledge of setting up the NFS or Windows share
Table 3-1. Prerequisites And Requirements
Before You Begin With The Dell Systems Build and Update Utility 17
Are There Other Dell Documents I Might Need?
In addition to this guide and the Dell Systems Build and Update Utility online help, you might need to refer the following documents to get details on specific Dell Systems Build and Update Utility modules and/or Dell OpenManage products. These documents are available on the Dell Support website at support.dell.com and the Dell Systems Management Tools and Documentation DVD.• The Dell OpenManage Installation and Security User's Guide provides additional information about performing an unattended installation of Server Administrator on systems running supported Windows, Red Hat® Enterprise Linux® Server, and SUSE® Linux Enterprise Server operating systems.
• The Dell OpenManage Server Administrator Compatibility Guide provides compatibility information about Server Administrator installation and operation on various hardware platforms (or systems) running supported Windows, Red Hat Enterprise Linux Server, and SUSE Linux Enterprise Server operating systems.
• The Dell Remote Access Controller 4 User's Guide provides comprehensive information about using the RACADM command line utility to configure a Dell Remote Access Controller (DRAC) 4.
• The Dell Remote Access Controller 5 Firmware User's Guide provides comprehensive information about using the RACADM command line utility to configure a DRAC 5.
• The Dell Chassis Management Controller User’s Guide provides comprehensive information about using the controller that manages all modules in the chassis containing your Dell system.
• The Integrated Dell Remote Access Controller User’s Guide provides information about installation, configuration, and maintenance of the Integrated Dell Remote Access Controller (iDRAC) on management and managed systems.
• The Dell Remote Access Controller/Modular Chassis User's Guide provides information about installation, configuration, and maintenance of the Dell Remote Access Controller/Modular Chassis (DRAC/MC). • The Dell Remote Access Controller Racadm User's Guide provides
18 Before You Begin With The Dell Systems Build and Update Utility
• The Dell Baseboard Management Controller Utilities User's Guide provides information about configuring a managed system to use the BMC Management Utility to manage your system through its BMC.
• The Dell Update Packages User's Guide provides information about obtaining and using Dell Update Packages as part of your system update strategy. • The Dell OpenManage Deployment Toolkit User's Guide provides
information on how to run Linux DUP in the Dell-provided or in your customized Embedded Linux (ELI) environment including the required dependencies.
• The Dell OpenManage Deployment Toolkit Command Line Interface Reference Guide provides information on the command line utilities to configure system features.
• The Server Update Utility User's Guide provides information on how to identify and apply updates to your system.
• The Dell Systems Software Support Matrix provides information about the various Dell systems, the operating systems supported by these systems, and the Dell OpenManage components that can be installed on these systems.
How Do I Get Technical Assistance?
If at any time you do not understand a procedure described in this guide or if your product does not perform as expected, help tools are available to assist you. For more information about these help tools, see "Getting Help" in your system's Hardware Owner's Manual.
Additionally, Dell Enterprise Training and Certification is available; see www.dell.com/training for more information. This service may not be offered in all locations.
Boot Menu 19
Boot Menu
This is the entry point to the Dell™ Systems Build and Update Utility. To get to the boot menu:
1 Insert the Dell Systems Management Tools and Documentation DVD in your system drive.
2 Reboot your system.
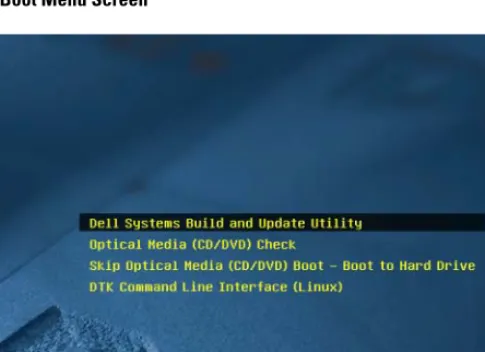
The boot menu screen displays. Figure 4-1 shows the boot menu screen.
20 Boot Menu
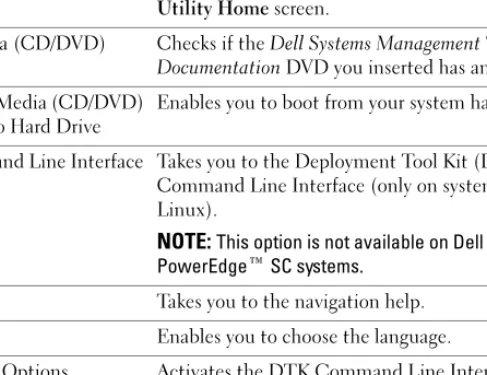
Table 4-1 lists the options and their descriptions available on this screen.
Table 4-1. Boot Menu Options
Boot Menu Option Does This For You
Dell Systems Build and Update Utility
Takes you to the Dell Systems Build and Update Utility Home screen.
Optical Media (CD/DVD) Check
Checks if the Dell Systems Management Tools and Documentation DVD you inserted has any errors. Skip Optical Media (CD/DVD)
Boot - Boot to Hard Drive
Enables you to boot from your system hard drive. DTK Command Line Interface
(Linux)
Takes you to the Deployment Tool Kit (DTK) Command Line Interface (only on systems running Linux).
NOTE: This option is not available on Dell PowerEdge™ SC systems.
F1 Help Takes you to the navigation help. F2 Language Enables you to choose the language.
F3 Advanced Options Activates the DTK Command Line Interface (Linux) option.
NOTE: This option is not available on Dell PowerEdge SC systems.
Server Operating System Installation 21
Server Operating System
Installation
The Server Operating System Installation (SOI) module in the Dell™ Systems Build and Update Utility enables you to install Dell-supported operating systems on your Dell systems. SOI also maps the operating system you want to install to your system and installs the requisite drivers. It also has a simple interface to configure Dell-supported storage controllers.
You can use SOI to:
• deploy an operating system on your "bare-metal" Dell system (that is, your system does not have an operating system installed on it).
• "repurpose" your system (that is, your system already has an operating system installed on it, and you want to install a different operating system). • extract drivers and save them on a directory on your system.
All the operations listed above are one-to-one.
How Do I Access the SOI?
1 From the Dell Systems Build and Update Utility Home page, click Server OS Installation.
2 The SOI Home screen displays.
3 From here on, SOI is an easy-to-follow, step-by-step interface to install the operating system and configure Dell-supported storage controllers.
NOTE: For more information on the specific SOI screens and what you can do on each screen, see the Dell Systems Build and Update Utility online help.
22 Server Operating System Installation
Anything Else I Should Know?
If you are installing an operating system on your system
• If you already have an operating system on your system (that is, if you are "repurposing" your system), and you use the SOI to install a different operating system, the existing operating system will be removed and data will be deleted from your system.
• For operating systems such as Microsoft® Windows Server® 2008 and VMware® ESX Server™, the native Graphical User Installation tool provided by the operating system installation media is used. Setting the date and time zone in the Systems Build and Update Utility setup screen does not apply to the Windows Server 2008 and ESX Server operating systems.
NOTE: Microsoft Windows Server 2008 is scheduled to be available in the first half of 2008. For the latest information, see
http://www.microsoft.com/windowsserver2008/default.mspx.
If you are configuring controllers
• If you have virtual disks configured on your controller and you use the SOI
to configure Redundant Array of Independent Disks (RAID) controllers on your system, the existing virtual disks will be deleted.
• Some operating systems are not supported with some RAID controllers. See the readme.text in the root folder for details.
• Depending on the storage controllers on your system, some operating systems may not be supported. See readme.txt in the root folder or the online help for details.
Firmware Update 23
Firmware Update
The Firmware Update module in the Dell™ Systems Build and Update Utility enables you to update the BIOS and firmware versions of your Dell systems in a pre-operating system environment. This module:
• inventories your system (BIOS, firmware, and drivers)
• enables you to select your own repository (To learn more about the repository, see "What is the Repository?")
• generates a comparison report (comparison of the currently installed version of each component on the existing system with the repository component version for the same system.)
• enables you to upgrade the system components
How do I Access Firmware Update?
1 From the Dell Systems Build and Update Utility Home page, click
Firmware Update.
The Repository Selection screen in the Firmware Update module displays.
2 Specify either the local or the remote repository location where your update files reside.
3 The Firmware Update inventories your system, generates a comparison report, and applies update packages to your system in step-by-step manner.
NOTE: For more information on the specific Firmware Update screens and what you can do on each screen, see the Dell Systems Build and Update Utility online help.
24 Firmware Update
What is the Repository?
The repository contains the updated BIOS, firmware, and driver components for Dell systems.
The repository can be:
• a customized repository you create with the Update Utility Creation
module or the Content Manager module
• the Dell Server Updates DVD contents that you copy from the DVD or get from the Content Manager module
To learn more about the Content Manager, see "Content Manager."
Anything Else I Should Know?
If you face any prerequisite failure
• If you face any prerequisite failure during the update process, see the
Server Update Utility User's Guide on how to rectify this.
If you use your custom repository for firmware updates
• If you want to use your custom repository for firmware updates using the Dell Systems Build and Update Utility, you will need a Linux repository. Also, you must ensure that the repository contains updates for the system on which you want to run firmware updates.
If you plan to downgrade the firmware
• If you want to downgrade the firmware, you will not be able to do it using the Firmware Update module. Use the Dell Server Updates DVD to downgrade the firmware on your system.
If some of the updates fail
• If some of the updates fail, reboot your system and try using the latest repository to update the firmware. Also, see the Server Update Utility User's Guide for more information.
Firmware Update 25
If you are using a USB key as your source repository
• If you are using a USB key as your source repository, insert the USB key when you are prompted.
NOTE: It is recommended that you do not boot your system to Systems Build and Update Utility with the USB key inserted in your system. This is because the Systems Build and Update Utility may not detect a USB key that is inserted before you boot the utility.
Update Utility Creation 27
Update Utility Creation
The Dell™ Server UpdatesDVD contains a repository which includes update packages for supported Dell systems for Microsoft® Windows® and Linux operating systems. The Update Utility Creation module in the Dell Systems Build and Update Utility enables you to customize and create a smaller and more compact update utility repository by selecting only the systems and operating systems you require. This custom repository retains the features of the Server Update Utility.
You can use the Update Utility Creation module to carry out one-to-one updates on your systems.
How do I Access Update Utility Creation?
1 From the Dell Systems Build and Update Utility Home page, clickUpdate Utility Creation.
The Source Repository Selection screen in the Update Utility Creation
module displays.
2 Specify either the local or the remote repository location where your source repository resides.
3 From here on, the Update Utility Creation module will take your inputs on the operating system, the Dell systems that you want to update, and the target location for the customized update utility. After you specify these details, the module will generate a customized update utility. You can now use the customized utility to carry out one-to-one updates on your systems.
NOTE: For more information on the specific Update Utility Creation screens and what you can do on each screen, see the Dell Systems Build and Update Utility online help.
What is the Source Repository?
The source repository contains the updated BIOS, firmware, and driver components for Dell systems.
The source repository can be the Dell Server Updates DVD or the contents you copy to a network share. You can also download the Dell Server Updates DVD from Dell online using Content Manager.
28 Update Utility Creation
To know more about the Content Manager, see "Content Manager." NOTE: If you are using a USB key or a network location to save a copy of the Dell Server Updates DVD, make sure you copy all the contents, including all the folders in the same directory structure. The Update Utility Creation module will not recognize the source within any sub-folder.
How do I Use The Customized Repository?
Once you have created the customized repository (either on the USB key or on a network share), access the customized repository from the system that you want to update.
For example, to use a customized repository saved on a USB key: 1 Insert the USB key in the system you want to update.
2 Launch Windows Explorer.
3 Locate the USB key drive.
4 Navigate to the custom repository folder.
5 Double-click the suu.exe to launch the customized update utility.
For details on the update utility, see the Dell™ OpenManage™Server Update Utility User's Guide.
Anything Else I Should Know?
If you create multiple custom repositories in the same location
• When you create multiple custom repositories on the same location, the
Update Utility Creation module will create multiple folders, one for each repository that you created. For example, CustomRepository,
CustomRepository1, CustomRepository2, and so on.
If you are using a USB key as your destination location
• If you are using a USB key as your destination location for update utility creation, insert the USB key when you are prompted.
NOTE: It is recommended that you do not boot your system to Systems Build and Update Utility with the USB key inserted in your system. This is because the Systems Build and Update Utility may not detect a USB key that is inserted before you boot the utility.
Hardware Configuration Scripting Tool 29
Hardware Configuration
Scripting Tool
The Hardware Configuration Scripting Tool in the Dell™ Systems Build and Update Utility enables you to configure your system’s Baseboard
Management Controller (BMC), Dell Remote Access Controller (DRAC), Redundant Array of Independent Disks (RAID), and BIOS.
Once you save the configuration settings for your system’s BMC, DRAC, RAID, and BIOS, you can use the tool to generate the .ini file, and apply these configuration settings across multiple systems.
How Do I Access The Hardware Configuration
Scripting Tool?
To access the GUI:
1 From the Dell Systems Build and Update Utility Home page, click
HW Config Scripting Tool.
The Configuration Status Summary screen displays.
2 From this page, you can configure your system’s BMC, DRAC, RAID, and BIOS by clicking on the specific component.
NOTE: For more information on the specific configuration screens and what you can do on each screen, see the online help.
How Do I Access The Command Line Interface?
To access the command line interface:30 Hardware Configuration Scripting Tool
Some Questions About Configuring Hardware
How Do I Know Which Components To Configure?
Table 8-1 lists the components you can configure depending on your Dell system.
NOTE: This list is not exhaustive and is only meant as a cheat sheet for your reference.
NOTE: Ensure that you click Export Configuration on the Configuration Status Summary screen to generate the .ini file to configure the hardware components of your system.
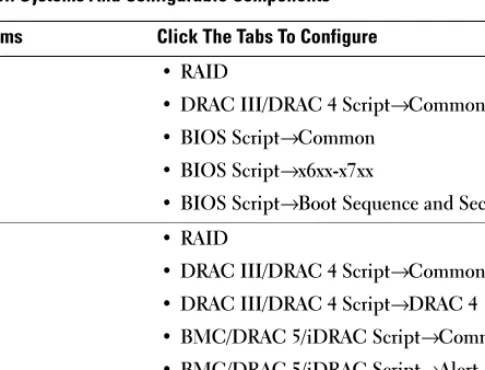
Table 8-1. Dell Systems And Configurable Components
For Dell Systems Click The Tabs To Configure
x6xx–x7xx • RAID
• DRAC III/DRAC 4 Script→ Common • BIOS Script→ Common
• BIOS Script→ x6xx-x7xx
• BIOS Script→ Boot Sequence and Security
x8xx • RAID
• DRAC III/DRAC 4 Script→ Common • DRAC III/DRAC 4 Script→ DRAC 4 • BMC/DRAC 5/iDRAC Script→ Common • BMC/DRAC 5/iDRAC Script→ Alert • BMC/DRAC 5/iDRAC Script→ Filter • BMC/DRAC 5/iDRAC Script→ User • BIOS Script→Common
• BIOS Script→x8xx
Hardware Configuration Scripting Tool 31
Where Do I Get More Information On RAID Controllers?
For details on read, write, and cache policies and supported stripe sizes, see the Dell OpenManage™ Deployment Toolkit Command Line Interface Reference Guide.
How Do I Know Which BIOS Setup Options Are Available On My System?
To see which BIOS setup options are available on your system, go to the boot menu screen, select DTK Command Line Interface (Linux). Use the SYSCFG tool to see the list of options available on your system.x9xx • RAID
•BMC/DRAC 5/iDRAC Script→ Common •BMC/DRAC 5/iDRAC Script→ BMC (x9xx) •BMC/DRAC 5/iDRAC Script→ DRAC 5 •BMC/DRAC 5/iDRAC Script→Alert •BMC/DRAC 5/iDRAC Script→ Filter •BMC/DRAC 5/iDRAC Script→User •BIOS Script→ Common
•BIOS Script→ x9xx
• BIOS Script→ Boot Sequence and Security
xx0x • RAID
•BMC/DRAC 5/iDRAC Script→ Common •BMC/DRAC 5/iDRAC Script→ iDRAC •BMC/DRAC 5/iDRAC Script→ Alert •BMC/DRAC 5/iDRAC Script→ Filter •BMC/DRAC 5/iDRAC Script→ User •BIOS Script→ Common
•BIOS Script→ xx0x
•BIOS Script→ Boot Sequence and Security
Table 8-1. Dell Systems And Configurable Components
32 Hardware Configuration Scripting Tool
When Setting the Boot Sequence for Devices, What Happens If I Choose
A Device That Is Not On My System?
The configuration utility selects the boot devices in the sequence that you specify for boot order. However, if you choose a device that is not present on your system, the utility ignores the device, selects the remaining boot devices, and lists them based on the specified order.
How Do I Use The .ini File To Deploy My System?
One-To-One Scenario (.ini file on USB key)
1 After you configure the components and save the configurations on individual screens, click Export Configuration on the Configuration Status Summary screen to generate the .ini file.
2 Insert the USB key on which you want to save the .ini file.
3 On the Configuration Script Save Location, select the target location to save the script (in this case, the USB key) and click Continue.
4 After the script generation is complete, the Configuration Status Summary displays.
5 Click Reboot.
6 From the Dell Systems Build and Update Utility Boot Menu, select
DTK Command Line Interface (Linux). 7 Mount the USB key:
If your system is running on Microsoft Windows, the USB key drive is automatically detected (for example, E:).
If your system is running on Linux, you must manually mount the USB key using the command:
mount dev/sdg1 mnt/usb
(where sdg1 is the system-enumerated USB mass storage device)
8 Export the environment variable with the .ini file location:
Hardware Configuration Scripting Tool 33 9 Navigate to /opt/dell/toolkit/bin folder.
10 Run the DTK master file:
If your system is running on Microsoft Windows, go to E:\dtkrunall.bat. If your system is running on Linux, use the command:
sh/mnt/usb/dtkrunall.sh
This invokes the master file and applies the configuration settings you saved in step 1 to your system.
One-To-Many Scenario
For details on how to use the .ini file to update multiple systems, see the Deployment Toolkit User's Guide.
Anything Else I Should Know?
If you are creating a virtual disk
• If you create a virtual disk by specifying the size (instead of using the
Select to create maximum virtual disk size option), subsequent virtual disks that you create will be bound to the controller and the array disk that you selected. This condition is valid until you exhaust all the available space on that array disk.
• When you select a virtual disk to delete, and that virtual disk is just one of the virtual disks that was created using a particular array disk, all the virtual disks created on that array disk will be selected for deletion.
If you are using a USB key as your destination location
• If you are using a USB key as your destination location for the .ini file, insert the USB key when you are prompted.
NOTE: It is recommended that you do not boot your system to Systems Build and Update Utility with the USB key inserted in your system. This is because the Systems Build and Update Utility may not detect a USB key that is inserted before you boot the utility.
Content Manager 35
Content Manager
The Content Manager is a tool in Dell™ Systems Build and Update Utility that enables you to:
• download the latest Server Update Utility ISO image from Dell online at
ftp.dell.com.
• create your customized repository using the Dell Server Updates DVD or
from the Dell online website.
• save your customized repository on a local or shared location and use it later for system hardware updates in a pre-operating system or post-operating system environments.
• check for the latest updates by comparing your local or customized repository with the Dell online repository at ftp.dell.com.
How Do I Access Content Manager?
• If your system is running on a supported Microsoft® Windows® operating system:
– From the Dell Systems Management Tools and Documentation DVD, the autorun GUI displays when you insert the DVD. Select the
Content Manager option.
• If your system is running on a supported Linuxoperating system: – From the Dell Systems Management Tools and Documentation DVD,
go to /contentmanager/lin/lincontent.tar. Extract the lincontent.tar
file to a location of your choice and run the ./contentmanager script to launch the contentmanager application from this location. If you are running the Content Manager for the first time on a supported Linux operating system, you must run cabextract-1.2-1.i386.rpm
located under the /rpms folder in the location where you extracted the
lincontent.tar.
NOTE: Content Manager does not run on SUSE® Linux Enterprise Server version 9 operating systems.
NOTE: For more information on the specific Content Manager screens and what you can do on each screen, see the Dell Systems Build and Update Utility online help.
36 Content Manager
How Do I Get Server Update Utility Application
Using Content Manager?
1 From the Select an Operation to Perform screen, select Download Server Update Utility ISO image and proceed to the next screen.
Content Manager enables you to download the ISO image and save it to a location of your choice.
2 Using any CD/DVD burning software, burn the image onto a CD/DVD.
3 Insert the CD/DVD in the system where you want to update the firmware and drivers.
4 If your system is running on a Windows operating system, the CD/DVD will autorun to launch the Server Update Utility application.
If your system is running on a Linux operating system, launch the Server Update Utility application from the CD/DVD. For example:
suu -g
How Do I Create The Customized Repository On
A Network Share Using Content Manager?
1 Mount the network drive of your choice manually. Later, when you are creating the customized repository using Content Manager, specify this network drive in Select Create Destination.
2 If you have the Dell Server Updates DVD, select the DVD as the source (under Select Create Source) and continue.
Else, select Dell Online Website as the source and continue.
3 Select the operating systems and platforms and complete the wizard to get your customized repository.
How Will Checking For Repository Updates
Help Me?
By using the Check for Repository Updates operation, you get a detailed report on driver and firmware updates. This will help you evaluate what updates are needed for your system.
Content Manager 37
Anything Else I Should Know?
If you create a customized repository with only Windows packages
• If you create a customized repository with only Windows packages, you cannot update firmware using the Firmware Update module with the customized repository in the Dell Systems Build and Update Utility.
Glossary 39
Glossary
BIOSAcronym for basic input/output system. Your system's BIOS contains programs stored on a flash memory chip. The BIOS controls the following:
• Communications between the microprocessor and peripheral devices, such as the keyboard and the video adapter
• Miscellaneous functions, such as system messages BMC
Abbreviation for baseboard management controller, which is the controller interface between the DRAC and the managed system’s embedded systems management (ESM).
DRAC
The Dell™ Remote Access Controller (DRAC) is a systems management tool that enables users to remotely access, monitor, troubleshoot, repair, and upgrade their systems, independent of the operating system status.
DTK
The Dell OpenManage™ Deployment Toolkit (DTK) is a set of utilities for configuring and deploying Dell PowerEdge™ systems. The DTK is designed for customers who need to build scripted installations to deploy large numbers of systems in a reliable fashion without having to dramatically change their current deployment processes.
ESM
Abbreviation for embedded systems management, which is a set of instruction coding in system software and firmware that notifies a user about potential hardware problems on a system.
Inventory
Inventory is a list of components, such as the BIOS versions, firmware, and drivers installed on your system.
NIC
Abbreviation for the network interface card. The NIC is an adapter circuit board installed in a computer to provide a physical connection to a network.
40 Glossary
USB
Abbreviation for Universal Serial Bus. A USB connector provides a single connection point for multiple USB-compliant devices, such as mice, keyboards, printers, and computer speakers. USB devices can also be connected and disconnected while the system is running.
utility partition
A bootable partition on the hard drive that provides utilities and diagnostics for your hardware and software. When activated, the partition boots and provides an executable environment for the partition's utilities.
Windows Preinstallation Environment (Windows PE)
The Microsoft Windows Preinstallation Environment (Windows PE) is a minimal Win32 subsystem with limited services, based on the Windows kernel running in a protected mode. It contains the minimal functionality that you need to run Windows Setup, install an operating system from a network share, automate basic processes, and perform hardware validation.
Index 41
Index
A
Accessing Boot Menu, 19
Command Line Interface, 29 Content Manager, 35 Firmware Update, 23
Hardware Configuration Scripting Tool, 29
Server Operating System Installation (SOI), 21 Update Utility Creation, 27
B
Boot Menu accessing, 19 options, 20C
Content Manager accessing, 35creating customized repository on a network share using, 36 getting Server Update Utility
application using, 36 miscellaneous, 37 uses, 35 Customized Repository using, 28
F
Firmware Update accessing, 23 miscellaneous, 24 uses, 23 Functionalities in brief, 12H
Hardware Configuration Scripting Tool accessing, 29 miscellaneous, 33 uses, 29using the .ini file to deploy system (one-to-many), 33
using the .ini file to deploy system (one-to-one), 32
what BIOS options on your system?, 31
which components to configure for which Dell system, 30
42 Index
P
Prerequisites
Firmware Update, 16
Hardware Configuration Scripting Tool, 16
Server Operating System Installation, 15
Update Utility Creation, 16 Product overview
earlier OpenManage products, 11 functionalities, 12
R
Repository
checking for repository updates, 36 what is, 24
S
Server Operating System Installation (SOI) accessing, 21 miscellaneous, 22 uses, 21 Source Repository what is, 27
U
Update Utility Creation accessing, 27
miscellaneous, 28 uses, 27
Using .ini file
to deploy system in one-to-many scenario, 33
to deploy system in one-to-one scenario, 32