Manuale
Premessa / Premise . . . ..8
Il modulo EOBD2 / The EOBD2 module . . . .9
Processori Tricore . . . .10
Cavo per EDC/MED17 con connettore OBD . . . 11
Cavo per EDC/MED17 con connettore DB15 . . . .12
Esempio schematico collegamento con EDC17 / Schematic example with EDC17 . . . .14
Esempio collegamento con EDC17 / Example connection with EDC17. . . 15
Driver Tprot 08/10 . . . .16
Bosch EDC17 CP14/CP20 . . . . . . Micro TC1796 . . . Int. - Ext. Flash. . . 17
Bosch EDC17 CP14 . . . Micro TC1796. . . .Int. Flash . . . 18
Bosch EDC17 CP04 . . . MicroTC1796. . . .Int. Flash. . . 19
Bosch EDC17 C46. . . Micro TC1767. . . .Int. Flash. . . 20
Bosch EDC17 C54 . . . .Micro TC1797 . . . Int. Flash . . . .21
Bosch EDC17 C64 . . . .Micro TC1797 . . . Int. Flash . . . .21
Bosch EDC17 CP24 . . . MicroTC1796. . . .Int. - Ext. Flash. . . 22
Bosch EDC17 CP44 . . . . . . MicroTC1797. . . .Int. Flash. . . .23
Bosch EDC17 U01 . . . .Micro TC1766. . . .Int. Flash . . . .24
Bosch EDC17 U05. . . MicroTC1796. . . .Int. - Ext. Flash . . . .25
Bosch MED 17.1 . . . .MicroTC1796. . . .Int. Flash . . . . .. . . .26
Bosch MED 17.1.1 . . . .Micro TC1796. . . .Int. Flash . . . .27
Bosch MED 17.1.6. . . Micro TC1797. . . .Int. Flash. . . 28
Bosch MED 17.5 . . . Micro TC1766. . . .Int. Flash. . . 29
Bosch MED 17.5.1 . . . Micro TC1767. . . .Int. Flash . . . .30
Bosch MED 17.5.2 . . . Micro TC1796. . . .Int. - Ext. Flash . . . .31
Bosch MED 17.5.5 . . . .Micro TC1766. . . .Int. Flash. .. . . ... . .32
Bosch MED 17.5.6 . . . .Micro TC1767. . . .Int. Flash. . . 33
Bosch MED 17.5.20 . . . Micro TC1766. . . .Int. Flash. .. . . ... . .34
Bosch ME 17.5.20 . . . Micro TC1767 . . . Int.Flash . . . 35
Continental SDI 3 . . . .MicroTC1796. . . .Int. - Ext. Flash.. . . 36
Continental Simos PCR2.1*UNLOCK TOOL ..Micro TC1796. . . .Int.Flash . . . 37
Continental Simos 10.11 . . . Micro TC1766. . . Int.Flash. . . .40
Bosch EDC17 CP02 . . . . . Micro TC1766. . . Int. Flash. . . .. 41
Bosch EDC17 Bmw 318D. . . Micro TC1766. . . Int. Flash. . . .. .42
Bosch MEV17.4 6 . . . MicroTC1796. . . Int. - Ext. Flash . . . .43
Bosch MEVD17.2 . . . .Micro TC1797. . . Int. Flash . . . .45
Bosch MED17 Bmsx . . . Micro TC1797 . . . .Int. Flash . . . .46
Bosch EDC17 CP45 . . . .Micro TC1797. . . Int. Flash . . . .47
Bosch EDC17 CP09. . . MicroTC1796/66. . . .Int. Flash . . . .48
Bosch EDC17 C41 . . . .Micro TC1797. . . Int. Flash . . . .49
Bosch EDC17 C41 BMW/Mini/PSA . . . .Micro TC1797. . . Int. Flash. . . 100
Bosch EDC17 CV52 . . . Micro TC1796 . . . Int. Flash . . . 50
Bosch EDC17CP27. . . .Micro TC1796. . . Int.Flash. . . .70
Bosch EDC17 . . . .Micro TC1797. . . .Int.Flash . . . .71
Bosch EDC17 CV52 . . . Micro TC1797 . . . Int. Flash . . . .52
Bosch MED17.3.1. . . .Micro TC1766. . . .Int. Flash . . . 53
Bosch EDC17 CP52 . . . .Micro TC1797. . . .Int.Flash . . . .66
Bosch EDC17CP27. . . .Micro TC1796. . . Int.Flash. . . .70
Bosch EDC17 . . . .Micro TC1797. . . .Int.Flash . . . .71
Bosch EDC17 CP05 . . . .MicroTC1796. . . Int. - Ext. Flash . . . . 54
Bosch Fomoco MED17.2 . . . Micro TC1767. . . Int. Flash. . . 58
Bosch EDC17CP11 FORD/PSA/JAGUAR. . . . .MicroTC1796. . . Int. - Ext. Flash. . . 59
Bosch EDC17CP42 FORD/PSA . . . . . . . .Micro TC1797. . . Int. Flash. . . .60
Siemens Continental SID807 . . . .Micro TC1797. . . Int. Flash. . . .. . . 61
Siemens Continental SID208 . . . .Micro TC1797. . . Int. Flash. . . .. . . 62
EDC17 CP06 . . . Micro TC1792. . . Int. Flash. . . . . . . . .63
EDC17 CP16 . . . Micro TC1796. . . Int. Flash. . . 65
Bosch EDC17 CP52 . . . Micro TC1797. . . Int.Flash . . . .66
Bosch EDC17 C49 . . . Micro TC1797 . . . .Int.Flash . . . 67
Bosch EDC17CP11 PSA/FORD/JAGUAR. . . . Micro TC1796. . . .Int. - Ext. Flash. . . 59
Bosch EDC17CV54 . . . Micro TC1767. . . Int.Flash . . . 69
Bosch EDC17CP27. . . .Micro TC1796. . . Int.Flash. . . 70
Bosch EDC17. . . .Micro TC1796 . . . Int. Flash. . . 72
Bosch EDC17C08 . . . Micro TC1766. . . .Int. Flash.. . . .73
Bosch ME 17.9.11.. . . .Micro TC1762. . . .Int. Flash. . . 74
Bosch MEG17.9.12 . . . Micro TC1762 . . . .Int. Flash . . . .75
Kefico ME17.9.1. . . Micro TC1796 . . . Int. Flash . . . .76
Delphi MT86. . . Micro TC1766 . . . Int. Flash . . . 77
Continental SIM 2K . . . .Micro1 TC1767 - Micro2 TC1766. . . .Int.Flash . . . .79
Bosch M17.8.7 . . . Micro TC1762.. . . Internal Flash. . . .110
Bosch EDC17. . . Micro TC1796. . . .Int. Flash. . . 81
Bosch EDC17CP42. . . Micro TC1797 . . . Int. Flash. . . .82
Siemens Continental SID208 . . . Micro TC1797. . . . Int. Flash. . . .. . . .62
Bosch EDC17 C55 . . . .Micro TC1767 . . . Int. Flash . . . 83
Bosch EDC17 CV44/54 . . . .Micro TC1767 . . . Int. Flash . . . 84
Bosch EDC17 . . . .Micro TC1796. . . .Int. Flash. . . 86
Bosch EDC17 CP01 . . . .Micro TC1796. . . .Int. Flash. . . 87
Bosch EDC17/CP10 MB Sprinter . . . Micro TC1796. . . .Int. Flash. . . 88
Bosch EDC17CP46/01 . . . .Micro TC1797. . . .Int.Flash. . . .89
Bosch EDC17C43 . . . .Micro TC1797 . . . Int.Flash . . . 90
Bosch EDC17.1.1 . . . Micro TC1797 . . . Int.Flash . . . .91
Bosch MED17.7.1 . . . Micro TC1797 . . . .Int.Flash . . . .91
Bosch EDC17CP15 . . . Micro TC1796. . . .Int. - Ext. Flash. . . .92
Bosch EDC17 . . . .Micro TC1797. . . .Int. Flash . . . 93
Bosch VME17 . . . Micro TC1762. . . .Int. Flash . . . 94
Bosch EDC17 . . . Micro TC1792/96 . . . .Int. Flash. . . .. . . .95
Bosch EDC17 C18 . . . .Micro TC1766. . . .Int. Flash… . . . .96
Bosch EDC17 ACDelco . . . .Micro TC1767. . . .Int. Flash… . . . 97
Bosch EDC17C10 . . . Micro TC1796. . . .Int. - Ext. Flash. . . 98
Bosch EDC17C10 . . . .Micro TC1797. . . Int. Flash. . . .99
Bosch EDC17CP11 PSA/FORD/JAGUAR. . . .Micro TC1796. . . Int. - Ext. Flash. . . .59
Bosch EDC17 C41 . . . .Micro TC1797. . . Int. Flash. . . 100
Bosch MEV 17.2 (motore aspirato) . . . .Micro TC1796. . . Int. - Ext. Flash. . . 101
Bosch MEV17.4. . . Micro TC1766. . . Int. Flash. . . 102
Bosch MEVD1722 . . . .Micro TC1797. . . Int. Flash. . . 103
Bosch MED17 . . . . . . Micro TC1796. . . Int. - Ext. Flash. . . 104
Bosch MED17 . . . .. . . .Micro TC1766. . . Int. Flash. . . 105
Bosch MED17.2.2 – MEV17.4.2. . . .Micro TC1767 . . . Int. Flash . . . 106
Bosch MED17.4 . . . Micro TC1796. . . Int. - Ext. Flash. . . 107
Bosch MED17.4 . . . Micro TC1766. . . Int. Flash. . . .108
Bosch MED17.4.2 . . . Micro TC1767. . . Int. Flash . . . .109
Siemens Continental SID807 . . . Micro TC1797. . . Int. Flash. . . 61
Siemens Continental SID807 . . . Micro TC1796. . . Int. - Ext. Flash . . . .110
Siemens Continental SID208 . . . Micro TC1797. . . Int. Flash. . . .. . . .62
Bosch EDC17C08 . . . Micro TC1766. . . .Int. Flash.. . . 111
Bosch M17.8.7 . . . Micro TC1762.. . . Internal Flash. . . 112
Continental SDI 3 . . . .MicroTC1796. . . .Int. - Ext. Flash. . . 36
Bosch EDC17 CP44 . . . . . . MicroTC1797. . . .Int. Flash. . . 23
Bosch EDC17 CP19 . . . .Micro TC1766. . . Int. Flash. . . 113
Bosch EDC17 C11 Master DCI 2.3 145 . . . Micro TC1766. . . .Int. Flash . . . .114
Bosch EDC17 C11 . . . .Micro TC1766. . . .Int. Flash . . . .115
Bosch EDC17 C42. . . .. . . Micro TC1767. . . Int.Flash . . . 116
Siemens Continental SID305 HW01. . . Micro TC1766 . . . Int.Flash . . . 117
Siemens Continental SID305 HW02. . . Micro TC1766. . . .Int.Flash. . . .118
Siemens Continental EMS 3110. . . .Micro TC1766. . . .Int.Flash. . . .119
Bosch MED17.8.5 . . . . . . Micro TC1766. . . .Int. Flash. . . 121
Bosch ME17.8.xx HW01. . . Micro TC1762 . . . Int. Flash. . . .. . . 122
Bosch ME17.8.xx HW02 . . . .Micro TC1767. . . .Int.Flash . . . .123
Bosch VME17 . . . .Micro TC1762. . . .Int. Flash . . . 94
Bosch EDC17 . . . Micro TC1766 . . . Int. Flash. . . .. . . 124
Bosch ME17.9.7 . . . Micro TC1762 . . . Int. Flash. . . 125
Bosch EDC17 CP22. . . Micro TC1796. . . Int. Flash. . . 126
Bosch EDC17 CP48. . . Micro TC1797. . . Int. Flash. . . 127
Versione del manuale / Manual version . . . .129
Premessa – Premise
IMPORTANTE – IMPORTANT
Il collegamento tra l’interfaccia EOBD e le ECU è molto semplice, tuttavia noi consigliamo di seguire attentamente questo manuale perché ogni piccolo errore può danneggiare la centralina.
The connection between the EOBD interface and the ECU is very simple, but we recommend to follow this manual attentively because each small error could damage the ECU.
EOBD 2
Come prima cosa è indispensabile installare
nel vostro computer il software, seguendo le
istruzioni, presente nel CD di installazione.
As before thing is what is necessary install the
software in your computer, following the
instructions, present in the CD of installation.
Attenzione:
Alimentare l’interfaccia utilizzando un
alimentatore a 12V, indifferentemente dal
tipo di centralina che si deve leggere. Il led
rosso si accenderà.
Attention:
It’s essential that the interface has fed using
a feeder to 12V
always
, without note of from
the type of ECU that must be read. The red
led will light.
Connettere il cavo con connettore DB15 alla
porta DB15 dell’interfaccia EOBD 2.
Figura 2.
Connect the cable with connector DB15 to the
DB15 door of EOBD 2 interface.
Figure 2
Figura 1: Il led rosso è acceso
The red led is light
Figura 2: Cavo DB15 connesso all’interfaccia
Esistono diversi tipi di processori Tricore; è importante fare attenzione alla sigla scritta sopra
al processore per capire di che tipo si tratta e per selezionare nel software il driver corretto.
Riportiamo qui sotto due esempi di processore Tricore:
There are different Tricore processors, it is important to give attention at the signaling writing on
the processor for select the correct driver in the software.
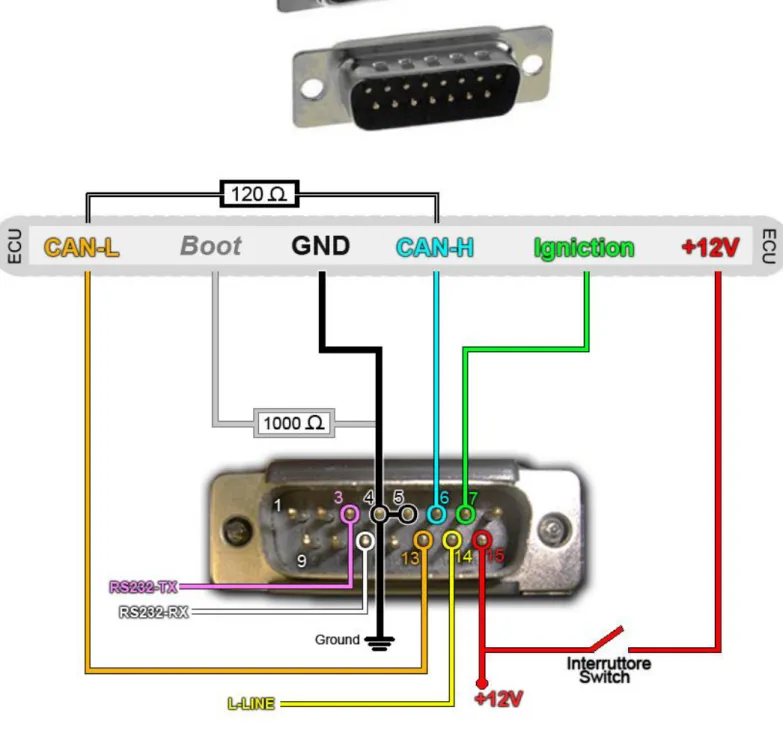
CAVO PER EDC E MED 17 CON CONNETTORE OBD
Figura 3: Spina OBD maschio / The OBD connector male:
Figura 4: Connettore DB15 / Connector DB15:
Attenzione: La resistenza da 1000 Ohm per il boot è già all’interno del filo grigio.
Attenzione: La resistenza da 1000 Ohm per il boot è già dentro al filo grigio.
In fase di lettura di una centralina, nel caso in cui appaia il messaggio di errore “ERROR
UNLOCK READ” seguente:
During the reading process of an ECU, if appair an error message “ERROR UNLOCK READ”
following:
è necessario utilizzare i driver
TOOL PASSWORD:
you have tu use the driver
TOOL PASSWORD:
1- Spegnere la centralina e nel pinout sostituire i fili verdi dell’igniction con i fili rossi 12V;
2- Disattivare la condizione di boot mode dissaldando il filo grigio di boot e/o le resistenze dalla scheda; 3- Accendere la centralina e lanciare il driver Tool
Password corrispondente. (Nel caso non funzioni a banco, provare il driver Tool Password tramite OBD con la ECU montata sulla macchina); 4- Al termine della risposta del driver, spegnere la
centralina, riconnettere nel pinout i fili verdi dell’igniction al posto dei fili rossi messi al punto 1;
5- Mettere in condizione di boot la centralina saldando nuovamente il filo grigio e/o le resistenze sulla scheda;
6- Accendere la centralina e lanciare il driver relativo al micro: TRICORE SAK TC17xx BOOTMODE.
N.B.: È consigliabile provare il driver Tool Password prima di smontare e aprire la centralina.
1- Switch off the ECU, and in the pinout replace the green
threads of the igniction with the red threads 12V; 2- Disarm the boot mode desoldering the gray threads
and/or the resistance on the electric card;
3- Switch on the ECU and use the driver Tool Password (If it doesn’t functions at board, try the Tool Password through OBD with the ECU climbed on the car); 4- At the end of the answer of the driver, switch off the
ECU, connect in the pinout the green threads of the igniction where there are the red threads positioned to the step 1;
5- Set in boot mode the ECU soldering the gray thread and/or the resistance on the electric card;
6- Switch on the ECU and use the driver about the micro:
TRICORE SAK TC17xx BOOTMODE
P.S. It is advisable try the driver Tool Password before raise and open the ECU.
↑
↑
↑
Questa centralina si mette in Boot Mode utilizzando 4 resistenze da 1000 Ohm: This is the Boot Mode for this ECU used 4 resistance of 1000 Ohm:
↑
↑
↑
↑
↑
Attention: In this ECU you can read only External Flash.
↑
↑
N.B. Su alcune ECU il CAN H può essere sul Pin 79, il CAN L sul Pin 80 In some ECU the CAN H can be the Pin 79 and the CAN L is the Pin 80
↑
↑
↑
↑
Questa centralina si mette in Boot Mode utilizzando 3 resistenze da 1000 Ohm: This is the Boot Mode for this ECU used 3 resistance of 1000 Ohm:
↑
↑
↑
↑
↑
N.B. Fare attenzione al jumper.
P.S. Make attention to the jumper.
↑
Attenzione:
La centralina Continental Simos PCR2.1 si può scrivere SOLO sulla macchina tramite presa OBD. Prima però, è necessario sbloccare la scrittura tramite boot mode utilizzando il driver:
TOOL UNLOCK VAG SIMOS PCR2.1:
Attention:
You can write the Continental Simos PCR2.1 ONLY
through OBD taken on the car.
But before it is necessary unlock the writing through boot mode using the driver:
TOOL UNLOCK VAG SIMOS PCR2.1:
Quindi, dopo aver effettuato lo sblocco si potrà chiudere e rimontare la centralina sulla macchina e scriverla tramite il driver seriale.
Attenzione: Effettuare lo sblocco della centralina solo
una volta.
So, after unlocking the ECU, you can close and climb on it on the car and write with the serial driver.
Attention: Do the unlock of the ecu only one time.
ECU Vag Continental SIMOS PCR2.1 - TC1796 Internal Flash PER SBLOCCARE LA PROGRAMMAZIONE SERIALE
A pagina seguente le istruzioni per mettere in boot la centralina.
At following page there are the instructions for setting the ECU in boot.
Mettere in boot la centralina utilizzando 1 resistenza da 1000Ω e 1 da 560Ω. Set to boot the ECU using 1 resistore of 1000 Ω and 1 of 560 Ω.
Driver da utilizzare / Driver to use:
TOOLS BOOT MODE > INFINEON TRICORE (EDC17/MED17) > TOOL UNLOCK VAG SIMOS PCR2.1
Attention: Effettuare lo sblocco della centralina solo una volta / Do the unlock of the ecu only one time.
↑
↑
↑
↑
↑
↑
↑
Il boot si trova nella parte inferiore della centralina / The pin of the boot is in the backside
↑
↑
↑
↑
↑
↑
Questa centralina si mette in Boot Mode utilizzando 3 resistenze da 1000 Ohm: This is the Boot Mode for this ECU used 3 resistance of 1000 Ohm:
↑
↑ ECU Siemens Continental SID 807
↑
Le ECU EDC17 CP06 Honda si possono porre in stato di Boot in due modi. The ECU EDC17 CP06 Honda could be set in Boot mode in two ways.
1° MODO:
Parte superiore della Ecu/ Above the Ecu:
Parte inferiore della ECU/ Under the ECU:
↑
Questa centralina ha 2 pin di boot, uno sulla parte superiore e l’altro sulla parte inferiore della scheda; è possibile scegliere quale dei due pin utilizzare per porre la centralina in Boot mode.
This Ecu has 2 pin of boot, one on the superior part and another on the inferior part of the card; you can choose which pin use for set the Ecu in Boot mode. 1 - Parte superiore della Ecu / Above the Ecu:
2 - Parte inferiore della ECU / Under the ECU:
↑
↑
↑
↑
1° STEP:
Sollevare il pin del processore indicato in figura /
Lift the pin of the processor indicated in figure:
Saldare due resistenze da 1000 Ω come in figura /
Solder two resistance of 1000 Ω like in figure:
ATTENTION;
Prima di rimontare la ECU sulla vettura riabbassare il pin del processore alzato precedentemente.
Before climb on the ECU in the car lower the pin of the lifted processor previously.
INSTRUCTIONS FOR SET TO BOOT THE MICRO TC1767:
↑
↑
Questa centralina si mette in Boot Mode utilizzando 3 resistenze da 1000 Ohm: This is the Boot Mode for this ECU used 3 resistance of 1000 Ohm:
↑
↑
↑
↑
ECU EDC17.1.1 - MED 17.7.1 TC1797 Internal Flash↑
↑
↑
↑
↑
↑
↑
↑
ECU MEV 17.2 - TC1796 External Flash (motore aspirato)
↑
↑
Questa centralina si mette in Boot Mode utilizzando 4 resistenze da 1000 Ohm: This is the Boot Mode for this ECU used 4 resistance of 1000 Ohm:
↑
Questa centralina si mette in Boot Mode utilizzando 3 resistenze da 1000 Ohm: This is the Boot Mode for this ECU used 3 resistance of 1000 Ohm:
↑
Questa centralina si mette in Boot Mode utilizzando 3 resistenze da 1000 Ohm: This is the Boot Mode for this ECU used 3 resistance of 1000 Ohm:
↑
↑
↑
↑ ECU Siemens Continental SID305 HW01 - TC1766 Internal Flash
↑
Questa centralina si mette in boot mode utilizzando 4 resistenze da 1000 Ohm e 1 resistenza da 2700 Ohm.
For boot mode of this ECU use 4 resistance of 1000 Ohm and 1 resistance of 2700 Ohm.
↑
Questa ECU si mette in boot usando 3 resistenze da 1KΩ:
This ECU set to boot using 3 resistance of 1KΩ:
↑
↑
↑
↑
Questa centralina ha 2 pin di boot, uno sulla parte superiore e l’altro sulla parte inferiore della scheda; è possibile scegliere quale dei due pin utilizzare per porre la centralina in Boot mode.
This Ecu has 2 pin of boot, one on the superior part and another on the inferior part of the card; you can choose which pin use for set the Ecu in Boot mode. 1 - Parte superiore della Ecu / Above the Ecu:
MANUALE BOOT TRICORE