Grafting and
Propagating
Fruit Trees
Contents
Introduction . . . . 3
Wrapping and Waxing . . . . 4
Collecting Scion Wood . . . . 5
Types of Grafting or Budding . . . . 5
Dormant or Winter . . . . 5
Bench Grafting . . . . 6
Cleft Graft . . . . 7
Bridge and Inarch Grafts . . . . . 8
Bark and Inlay Grafts . . . . 9
Budding . . . . 9
Shield or T-Budding . . . . 10
Chip Budding . . . . 10
Growing Fruit Plants from Seed . . . . 11
Grafting Supply Resources . . . . 12
Introduction
Many people mistakenly believe that fruit trees grow true to name from seeds . In reality, if you collect seed from a fruit grown on a plant, the seeds will produce plants that will be a hybrid of two plants . The new plant will be the same kind of plant, but its fruit and vegetative portions may not look the same as the parent because the plant is “heterozy-gous .” Therefore, all fruit trees must be vegetatively propagated by either grafting or budding methods .
Fruit growers frequently use grafting techniques to topwork new varieties or strains of fruit onto established trees bearing misnamed or obsolete varieties and to repair injury or damage caused by mice, rabbits, deer, or mechanical means . Commercial nursery workers propagate new fruit trees, and producing a tree ready for planting takes several years .
All of the temperate-zone deciduous fruit plants may be propagated by budding . Cleft,
whip, and bridge grafting of apple and pear is possible, but such grafts are not often successful on stone fruits . Sweet cherry and, occasionally, peach may be suc-cessfully grafted using the side graft onto a 2- to 3-year-old limb .
Materials needed for any type of grafting are scions, rootstocks, a sharp knife, a cleft grafting tool, and a lightweight hammer . Depending on the type of graft to be prepared, you will need grafting “wax,” rubber bud strips, waxcoated cotton twine, grafting tape, and wire nails (number 16 or 18) . Having a sharp knife is of paramount importance—using a dull knife can lead to serious injury .
In this publication we will describe some successful propa-gation methods that can be used on tree fruit . The techniques described may be used in all instances where grafting is re-quired . The choice of methods depends on the time of year, the type of material available, and the type of propagation desired .
Wrapping and Waxing
As a general rule, all grafts made by budding or whipping should be wrapped . Grafts made by clefting, side limb insertion (often called “hip graft”), inarch-ing, and bridging need to be waxed, and in some instances nailed tight .
Many cloth-backed and plastic tapes are available for use in wrapping the graft, although plastic tapes appear to be easier to use . Rubber composition bud strips are used to wrap the dor-mant buds . The plastic materials come in rolls of 3/
8- and 1/2-inch widths and are well suited for grafting purposes . When care-fully wrapped, they will form a very tight seal . The plastic tape is secured by pulling the free end under the last turn around the stem . Whether the tape is wrapped from the bottom up or vice versa makes little difference . However, making the wrapping as airtight as possible is important .
When rubber bud strips are used to wrap the bud or graft, no further attention is usually needed . When nursery workers’ adhesive tape is used, care must be taken to slit the tape vertically about 4 to 6 weeks after growth starts to prevent girdling .
Cotton twine or cloth strips impregnated with wax may be used to wrap the graft . The waxed string is useful, but great care is necessary to ensure an airtight wrapping . The strips of impregnated cloth (1/
2 inch wide) are useful in wrapping bark grafts or T-buds .
Several wax-based and water-soluble waxing materi-als are available . When using the more liquid water-soluble materials, be sure to recoat the graft several times to make sure that any cracks (which often occur with these materials) are closed . Water-soluble asphaltic compounds, commonly sold as wound dressings, are simpler to use than the wax-based materi-als . Containers of water-soluble materials must be protected from freezing to prevent breakdown of the product . Grafting wax, also called “hand wax,” does not re-quire a heating device to liquify it . It is soft, pliable, and simply pressed around the graft . Hand wax is suitable when only a few grafts are to be prepared since it is very sticky and unpleasant to use . Commercial formulations of hand wax can be purchased from the companies listed in the “Grafting Supply Resources” sec-tion of this publicasec-tion .
You can also make your own hand wax using the following recipe:
• 4 parts (by volume) of rosin
• 2 parts (by volume) of beeswax
• 1 part (by volume) of tallow or raw linseed oil
Melt the tallow or heat the linseed oil (to about 125ºF), and then add the beeswax . When these two parts have melted together, then add the powdered rosin . Stir until thoroughly mixed, pour into a bucket of water, and allow to cool . Form the wax into a ball and pull (or knead) it until it
assumes a yellowish or tan color . Divide into 1/
4- or 1/2-pound balls and store in plastic bags until ready for use .
The fluid hot waxes and water-soluble materials flow freely around all cut surfaces of the graft and are less trouble-some to apply than the hand wax; however, a special wax melter is needed for the hot waxes .
Sealing all cut surfaces is important for the graft to suc-ceed . This includes all exposed surfaces where the stock and scion are joined and the free end of the scion .
Collecting Scion Wood
The success of any form of prop-agation depends on the quality of the scion wood to be grafted . Collect scion or budwood early in the day while temperatures are cool and the plants are still fully turgid . The best vegetative buds usually come from the cur-rent season’s growth or dormant wood that grew the previous year . Mature buds are most desirable; discard terminal and younger buds . To keep buds from drying out, getting hot, or freez-ing (dependfreez-ing on the season), place the budwood into plastic bags or wrap it in moist towels or burlap as you collect it . Place budwood of only one variety in a labeled bag .
Budsticks that will not be used immediately should be bundled, labeled, and stored in moisture-retaining containers such as plastic bags or waxed cardboard boxes, which should be kept cool (32 to 45ºF) . The longer budwood is stored, the less likely it is to “take .” General-ly, budwood stored for more than a few days should be discarded .
In budding, the situation is somewhat different in that the “June bud” technique involves the use of previous season’s terminal growth, whereas the dormant budding is made from nongrowing buds on the current season’s growth . In either case, only one-year-old material is suitable for any form of graftage discussed here .
Using water sprouts (or suckers) from the interior branches of the tree—especially older fruit trees—is not recom-mended for propagating a variety but is excellent for bridge graft-ing purposes .
The scions for all forms of graftage (except dormant bud-ding) must be collected in late March while still completely dor-mant . Although not universally held, it is a good idea not to take scion wood while it is frozen . You should wait 2 to 3 days after the initial thawing to collect the scions .
The scions should be
wrapped in nonperforated plastic (a plastic bread wrapper is excel-lent) and placed in cold storage (30 to 40ºF) or buried in moist sand or sawdust until ready for use . When making the graft, remove an inch or two of the tip and basal portions of the scions to eliminate wood that may have dried out . Another reason for dis-carding the tip and basal portions is that the tip portion is too small and the base too large for proper handling . Furthermore, neither portion will have properly matured buds .
Types of Grafting or
Budding
Time of season will largely determine what type of propaga-tion techniques you will need to use to create new plants . All forms of topworking and repair grafting are done only when the plants are dormant in late winter to early spring . Budding can be done in the dormant season with a dormant chip bud but is most often done during the growing season using either T-budding or chip budding .
Dormant or Winter
Propagation to be done during the dormant or winter period is usually carried out in late March to early April . Both the receiving and inserted plant material must be fully dormant . If either piece of plant material is not dormant, the grafts may fail . Propagation techniques used when trees are dormant include bench graft-ing, dormant chip buddgraft-ing, cleft grafting, bridge grafting, bark grafting, and inlay grafting . The first two methods are primarily used to create new trees; bridge grafting and inarch grafting are used to repair damage to the tree trunk; and cleft grafting, bark grafting, and inlay grafting are used to topwork a tree to a new variety or to add multiple varieties to a single tree .
Bench Grafting
Bench grafting, also known as whip and tongue grafting, is per-formed indoors, preferably in a cool area . An unheated garage or barn is an ideal location .
This method is most success-ful for grafting material pencil sized (1/
4 to 3/8 inch) to about 1 inch in diameter . Because of the large amount of cambial contact, it heals quickly and makes a strong union . Ideally, the stock and scion should be the same diameter . This type of graft is made when both the stock and scion are dormant (late March to early April) .
The scions should be collect-ed only from dormant terminal twigs . Scion wood comes from the previous season’s growth . If you need to store the scion wood for a brief period, keep it in moist sphagnum moss, sand, or a plastic bag in a cool place . Scion wood must be kept moist and cool until used . After the cuts are made, scions must be inserted immediately . Do not store scion wood in a refrigerator or storage room that has held or currently holds apples . Apples give off ethylene gas, which can damage the scion wood .
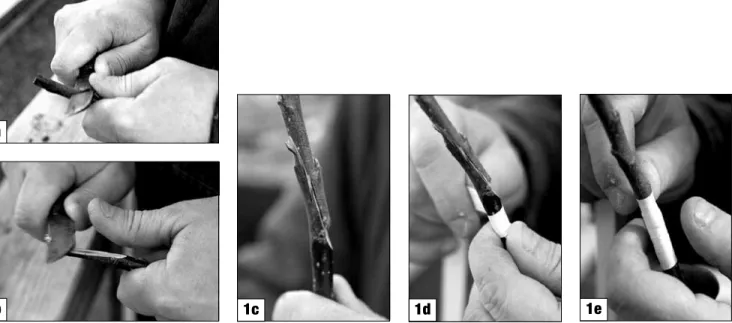
The stock is prepared by making a 1- to 2-inch sloping cut at the top of the stock, as shown in Figure 1a . A second downward cut (Figure 1b) is made into the stock, starting a third of the way down from the top end . The second cut is made about half as long as the first . The scion is prepared in the same manner .
The two pieces are then fitted together with the tongues inter-locking (Figure 1c), and the graft is wrapped (Figures 1d and 1e) and waxed immediately . When the scion is of a smaller diameter than the stock, be sure to match the cambium layer of both pieces on one side . Examine the graft after the wax hardens and rewax any holes or cracks that may have developed .
Alternatively, you can pur-chase a grafting tool (Figure 2a, next page) . The tool makes an omega cut in one stock (Figure 2b) and a corresponding cut in the other stock (Figure 2c) . The two pieces are then fitted togeth-er (Figure 2d) and wrapped .
Store the completed trees in a cool, moist area for 7 to 10 days to make sure the cambiums heal together . Be sure to plant them out before the buds begin to expand .
Figure 1. Preparing and performing bench grafting. 1a
Cleft Graft
Cleft drafting is the most com-monly used method for topwork-ing a relatively mature tree over to another variety . This system is used on stocks from 1 to 3 inches in diameter . The scion is
pre-pared by making a tapering cut 1 to 2 inches long on each side (Figures 3a and 3b) . The scion should be 3 to 4 inches long and about 3/
8 to 1/2 inch in diameter . The stock is cut off squarely (Figure 4a) and split vertically
with a knife or cleft grafting tool to a depth of about 2 to 3 inches (Figures 4b and 4c) . Keep the knife in position or insert a chisel to keep the split open and insert the scions (Figure 4d) . The scion is placed so that its cambium layer and the cambium layer of the stock are in contact . All exposed surfaces are waxed or coated immediately . Usually, no wrapping is needed because the stock exerts sufficient pressure to hold the scions; however, wrapping the stock will en-sure a tighter connection and less chance for the scion to be bumped out of the stock .
Figure 4. Splitting stock for a cleft graft. Figure 3. Tapering cut
used to prepare the scion for a cleft graft.
left graft . 4a Figure 2. Using an omega cut grafting tool. 2a 2b 2c 2d 3a 3b 4c 4b 4d
Figure 7. Bridge graft and inarching of a rootsucker (C). Y' A A' B B' C D X X' Y After wrapping the scion and
stock, paint the stock surface and the ends of the scions with a wound dressing or cover them with wax (Figures 5a and 5b) .
Once growth starts in the spring, the bark loosens, or slips . When this occurs, the bark and wood portions may not split evenly and clefting may not be satisfactory . You should then switch to either the bark or inlay type of graft .
After the scion starts to grow in the spring, a good idea is to cut off all of the wood from the old variety except one limb as a “nurse” limb (Figure 6) . Later in the summer revisit the grafts to see how much growth is
occur-ring . If excessive growth occurs or you are in a windy area, you may want to support the new scions . Tack a 1-inch piece of wood board below the union and fasten the new scion to the wood with ties .
Bridge and Inarch Grafts
Rodents, machinery, and cold weather often cause the bark to be removed or separated from a part (or all) of the trunk . When a minor injury is noticed early, bridge grafting may be used to save the tree . Trim the edges of the girdled section back to sound bark as shown along lines in Figure 7X to Y and 7X' to Y', and cut the scion as illustrated in 7D . Place the scion along the trunk so that the beveled edges rest on sound bark at 7A and A' . Mark and remove the bark rec-tangles as indicated . The stem piece to be inserted should be slightly longer than needed to ensure a snug fit .
Insert the scion as indicated at B and B' and then secure with two number 16 or 18 wire nails at each end as shown .
Inarch or approach grafts are used when there is an insufficient area of trunk below the dam-aged portion because the trunk is too close to the soil line . If a rootsucker is present, it can then be grafted above the damage as shown in 7C. The loose end should be handled as explained for the top portion of the bridge graft . Alternatively, if no root-suckers are present, planting a rootstock liner and grafting it into the healthy portion of the tree is necessary . You may also wish to grow your own seedlings (see the section on propagating fruit plants from seed) .
Wax all exposed surfaces of the inserted scions . The beveled cuts on the scion (7D) should be from 1 to 11/
2 inches long and tapered across the stem . Insert one bridge for each 2 inches of the injury’s width .
Figure 6. Nurse limb on recently grafted tree.
Figure 5. Covering scion and graft with wound dressing.
5a
Figures 8a and 8b show a suc-cessful inarch graft 3 years (8a) and 6 years (8b) after grafting .
Bark and Inlay Grafts
The bark graft is used frequently to obtain a larger amount of surface contact when topworking a tree to a new variety (Figure 9) . The scion, however, is not as secure as when the inlay graft is used . The stock is cut off and a vertical slit is made as at 9A . The bark is loosened, the scion is set, and then the bark is pressed in place and the trunk is tightly wrapped . Alternatively, nails can be inserted as indicated at 9B. The properly cut scion can be seen at 9C . All exposed surfaces should be waxed .
Figure 10 shows a finished bark graft after it has started to
and set on the stock as in 11C . The area of the stock covered by the scion is then marked with a knife and the bark is removed (11B) . After removing the bark, insert the scion and secure it with number 16 or 18 flat-head wire nails (11D) . Several scions (up to four or five) can be inserted, and grafting should be done when the bark slips for the bark graft . Wax all exposed parts . The fol-lowing year, return to the tree and remove all but the strongest-growing graft .
Budding
Budding is another form of graft-ing where only the bud is used rather than a piece of scion with several buds . There are two types of budding: shield or T-budding and chip budding . Budding is commonly done in late summer, but dormant chip budding can be done in late winter before growth starts . Budding is the primary method used by nursery workers propagating fruit trees .
A third variation in which buds are forced to grow the same season they are grafted is called June budding . As the name im-plies, it is done during the grow-ing season in late May or early June . June budding can either be a chip or T-bud technique . The top of the rootstock is broken over (but not off) several inches above the bud 3 to 4 weeks after the bud has been inserted . As soon as bud growth starts, the top of the rootstock is cut . June budding will only work in areas where there is a long, warm growing season .
Figure 8. Successful inarch graft using rootstock liners when young.
8a 8b Figure 9. Bark graft. A B C Figure 11. Inlay graft. A B C D Figure 10. Finished bark graft.
grow . Be careful that birds do not land on the scion and dislodge it before it is completely callused .
Inlay grafting is suitable for topworking stocks that are more than 1/
2 inch in diameter (Fig-ure 11) . Scions are cut as in 11A,
Shield or T-Budding
T-budding operation is limited to the period of the summer when the bark is said to slip (Figure 12)—when it separates easily from the wood . This usually occurs from late May to early June and from mid-July to early September, but most budding is done during the latter period . Budsticks of the scion variety (Figure 13A) are prepared from the mid-portion of the current season’s growth . The rootstock is either a one-year-old seedling or rooted layer . This is also referred to as fall (or dor-mant) budding and is the common budding system used .
In dormant budding, the bud remains in place on the trunk of the rootstock until the following spring, when the rootstock is cut off just above the scion bud . A tree may be produced in one year by June budding, but produc-ing a finished tree by dormant budding requires at least two growing seasons . In either case, the scion buds (13B) are cut from the budstick and placed in the “T” as indicated at 13C and 13D. The bud is then wrapped in place with a rubber bud strip as shown at 13E. The rubber bud strip will disintegrate in several weeks . If it does not, or you use a nonbio-degradable tie, you will need to cut the rubber band .
Figure 14. Chip budding cuts.
There has been considerable success budding sweet cherries using an inverted “T .” The only difference in the procedure is the placement of the cross-cut at the bottom of the vertical cut on the stock .
Chip Budding
Chip budding is a technique that can be used whenever mature buds are present and the bark is not slipping . It can be done in the spring before growth starts and when the stock and the scion are still totally dormant . Chip budding is generally used when the stock and scion are relatively small (1/
2 to 1 inch in diameter) . In recent years, most commercial tree fruit nurseries have changed from T-budding to chip budding because the buds tend to grow out better .
In chip budding, the first cut is made below the bud and down into the wood at an angle of 30 to 45 degrees (Figure 14) . The second cut is started about 1 inch above the bud and goes inward and downward behind the bud until it intersects the first cut .
Figure 13. Budstick (A), bud to be inserted (B), T-cut (C), bud insertion (D), and finished wrapping (E).
A
B
C
D E
Figure 12. Slipping bud.
The same procedure is then fol-lowed on the stock, making sure to match the size of the “chip” cut from the budstick .
Unlike the T-bud, there are no protective flaps to keep the chip bud from drying out . There-fore, securely wrapping the bud is necessary to seal the cut edges, as well as to hold the bud piece in place . Nursery workers’ adhe-sive tape works well, although white or transparent plastic tape is more often used . Once the buds start to grow, the tape must be cut .
In chip budding the stock is not cut back above the bud until the union is complete . If the bud is inserted in the fall, the stock is cut back just before growth starts the next spring . If the budding is done in early spring, the stock is cut back about 10 days after the bud has been inserted .
Growing Fruit Plants
from Seed
Grafting and budding require a compatible rootstock or stock plant onto which you attach your desired variety of fruit plant . An inexpensive way to obtain a seedling rootstock is to col-lect seeds from the type of plant you are propagating . This sec-tion gives a simple method to help germinate seeds to produce grafting rootstocks .
The seeds of all common tree fruits (apple, pear, peach, and cherry) require a chilling period before they will germinate and form new plants . The chilling period, known as dormancy or
after-ripening, occurs after the fruit portion is ripe . During this period the embryo develops until it is mature . The necessary after-ripening could be accomplished by the following two systems .
Method 1—Outdoors
Prepare a garden-soil plot in the fall as you would for planting any other type of seeds . Make a furrow no deeper than one or two times the longest dimen-sion of the seed . Cover the seeds with a light cover of soil and add an inch or two of sand over the row . The sand will prevent the soil from crusting, which inhibits germination .
Next, place wire screen, or hardware cloth, over the row—be sure that all of the edges are pushed several inches into the soil and that the ends are closed . This prevents chipmunks and squirrels from digging up the seeds . The following April watch the seeded area closely for newly germinated seedlings . As the seedlings grow, remove the wire screen to prevent restricting the
new plants (see “Handling in the Nursery” below) .
Method 2—Refrigerator
Extract seeds and/or pits from the fruit you want to reproduce . Remove all adhering fruit por-tions and allow seeds to air-dry . Then, place them in a glass jar or other suitable container to which a loosely fitted lid or cover may be added . Set the seeds aside in a cool place until mid-January .
Seeds require after-ripening . The length of this period varies by type of fruit (Table 1) . The temperature at which the seeds are stored will also impact the success of germination . Seeds should be stored dry in a sealed container at the appropriate temperature . Most seeds can be stored in airtight containers for up to 1 year if temperature is controlled .
If seeds have not previously received a cold treatment, mix the seeds with either moist (not wet) peat moss, sand, or shredded paper towels in mid-January . Return the mixture to
Table 1. After-ripening requirements for certain fruit tree seeds.
tree effective best days
temperature temperature required
(ºf) (ºf) Apple 40–50 40–41 70–80 Apricot 40–50 45 60–70 Cherry 33–50 41 90–140 Peach 33–50 45 120–130 Pear 33–41 40 60–90
the seedlings . Water thoroughly every 10 to 12 days .
The new seedling has a taproot . To facilitate transplant-ing, cut the taproot by pushing a spade under each plant . Push the blade into the soil to cut the taproot about 5 to 6 inches below the surface .
Peach, nectarine, almond, and apricot seedlings may be budded the first summer, usu-ally in late July or early August . Apples, cherries, pears, and plums should be allowed to grow through to the July-August period of the second year before budding is done .
Prepared by R . M . Crasweller, professor of tree fruit .
Penn State College of Agricultural Sciences research and cooperative extension programs are funded in part by Pennsylvania counties, the Commonwealth of Pennsylvania, and the U .S . Department of Agriculture .
Visit Penn State’s College of Agricultural Sciences on the Web: agsci.psu.edu
This publication is available from the Publications Distribution Center, The Pennsylvania State University, 112 Agricultural Adminis-tration Building, University Park, PA 16802 . For information telephone 814-865-6713 .
This publication is available in alternative media on request .
The Pennsylvania State University is committed to the policy that all persons shall have equal access to programs, facilities, admis-sion, and employment without regard to personal characteristics not related to ability, performance, or qualifications as determined by University policy or by state or federal authorities . It is the policy of the University to maintain an academic and work environ-ment free of discrimination, including harassenviron-ment . The Pennsylvania State University prohibits discrimination and harassenviron-ment against any person because of age, ancestry, color, disability or handicap, national origin, race, religious creed, sex, sexual orienta-tion, gender identity, or veteran status . Discrimination or harassment against faculty, staff, or students will not be tolerated at The Pennsylvania State University . Direct all inquiries regarding the nondiscrimination policy to the Affirmative Action Director, The Pennsylvania State University, 328 Boucke Building, University Park, PA 16802-5901, Tel 814-865-4700/V, 814-863-1150/TTY . © The Pennsylvania State University 2005
Produced by Ag Communications and Marketing Code# UJ255 rev5C2/11mpc4712
the container and replace the lid . Place container and seeds in the refrigerator until after the last severe spring frosts . The seeds should remain in the refrigerator for at least 60 days . In early April prepare a garden-soil seedbed with furrows as described above and plant the seeds . Keep the soil moist but not wet . Do not add fertilizer .
Handling in the Nursery
When the plants are 6 to 8 inches tall, apply 1 to 2 tablespoons of urea along every 12 inches of row in a band on one side of the seedlings . Keep the fertil-izer about 3 inches away from
Grafting Supply Resources
Orchard Valley Supply Phone: 888-755-0098
Web site: orchardvalleysupply .com
A .M . Leonard Inc . 241 Fox Drive Piqua, OH 45356 Phone: 800-543-8955 Web site: www .amleo .com OESCO, Inc .
PO Box 540, Route 116 Conway, MA 01341 Phone: 800-634-5557
Web site: www .oescoinc .com Ben Meadows Company PO Box 5277
Janesville, WI 53547 Phone: 800-241-6401
Web site: www .benmeadows .com Forestry Suppliers
205 West Rankin St . PO Box 8397
Jackson, MS 39284 Phone: 800-647-5368 Web site: www .forestry- suppliers .com