The Linux
®
Command Line
William E. Shotts, Jr.
This work is licensed under the Creative Commons Attribution-Noncommercial-No Derivative Works 3.0 United States License. To view a copy of this license, visit
http://creativecommons.org/licenses/by-nc-nd/3.0/us/ or send a letter to Creative Commons, 171 Second Street, Suite 300, San Francisco, California, 94105, USA.
Linux® is the registered trademark of Linus Torvalds. All other trademarks belong to
their respective owners.
This book is part of the LinuxCommand.org project, a site for Linux education and advocacy devoted to helping users of legacy operating systems migrate into the future. You may contact the LinuxCommand.org project at http://linuxcommand.org.
Printed copies of this book, in large, easy-to-read-format, are available for purchase from lulu.com. Orders may be placed at the following:
http://www.lulu.com/content/paperback-book/the-linux-command-line/7594184
Release History
Version Date Description
09.12 December 14, 2009 First Edition.
09.11 November 19, 2009 Fourth draft with almost all reviewer feedback incorporated and edited through chapter 37. 09.10 October 3, 2009 Third draft with revised table formatting,
partial application of reviewers feedback and edited through chapter 18.
09.08 August 12, 2009 Second draft incorporating the first editing pass.
Table of Contents
Part 1 – Introduction...1
1 – Introduction...2
Why Use The Command Line?...2
What This Book Is About...3
Who Should Read This Book...3
What's In This Book...4
How To Read This Book...5
Prerequisites...5
Why I Don't Call It “GNU/Linux”...5
Acknowledgments...6
Your Feedback Is Needed!...7
Further Reading...7
Colophon...7
Part 2 – Learning The Shell...9
2 – What Is The Shell?...10
Terminal Emulators...10
Your First Keystrokes...10
Command History...11
Cursor Movement...11
A Few Words About Mice And Focus...11
Try Some Simple Commands...12
Ending A Terminal Session...13
The Console Behind The Curtain...13
Further Reading...13
3 – Navigation...14
Understanding The File System Tree...14
The Current Working Directory...14
Listing The Contents Of A Directory...15
Changing The Current Working Directory...16
Absolute Pathnames...16
Relative Pathnames...16
4 – Exploring The System...20
More Fun With ls...20
Options And Arguments...21
A Longer Look At Long Format...22
Determining A File's Type With file...23
Viewing File Contents With less...24
What Is “Text”?...24
Less Is More...26
A Guided Tour...26
Symbolic Links...29
Hard Links...30
Further Reading...30
5 – Manipulating Files And Directories...31
Wildcards...31
Character Ranges...33
Wildcards Work In The GUI Too...33
mkdir – Create Directories...34
cp – Copy Files And Directories...34
Useful Options And Examples...35
mv – Move And Rename Files...36
Useful Options And Examples...36
rm – Remove Files And Directories...37
Useful Options And Examples...37
Be Careful With rm!...38
ln – Create Links...39
Hard Links...39
Symbolic Links...40
Let's Build A Playground...40
Creating Directories...40
Copying Files...41
Moving And Renaming Files...42
Creating Hard Links...43
Creating Symbolic Links...44
Removing Files And Directories...45
Creating Symlinks With The GUI...47
Summing Up...47
6 – Working With Commands...48
What Exactly Are Commands?...48
Identifying Commands...49
type – Display A Command's Type...49
which – Display An Executable's Location...49
Getting A Command's Documentation...50
help – Get Help For Shell Builtins...50
--help – Display Usage Information...51
man – Display A Program's Manual Page...51
whatis – Display A Very Brief Description Of A Command...53
The Most Brutal Man Page Of Them All...53
info – Display A Program's Info Entry...54
README And Other Program Documentation Files...55
Creating Your Own Commands With alias...56
Revisiting Old Friends...58
Further Reading...58
7 – Redirection...59
Standard Input, Output, And Error...59
Redirecting Standard Output...60
Redirecting Standard Error...61
Redirecting Standard Output And Standard Error To One File...62
Disposing Of Unwanted Output...63
/dev/null In Unix Culture...63
Redirecting Standard Input...63
cat – Concatenate Files...63
Pipelines...65
Filters...66
uniq - Report Or Omit Repeated Lines...66
wc – Print Line, Word, And Byte Counts...67
grep – Print Lines Matching A Pattern...67
head / tail – Print First / Last Part Of Files...68
tee – Read From Stdin And Output To Stdout And Files...69
Summing Up...70
Linux Is About Imagination...70
8 – Seeing The World As The Shell Sees It...72
Expansion...72
Pathname Expansion...73
Pathname Expansion Of Hidden Files...74
Tilde Expansion...74 Arithmetic Expansion...75 Brace Expansion...76 Parameter Expansion...77 Command Substitution...78 Quoting...79 Double Quotes...79 Single Quotes...81 Escaping Characters...82
Backslash Escape Sequences...82
Summing Up...83
Further Reading...83
9 – Advanced Keyboard Tricks...84
Command Line Editing...84
Cursor Movement...84
Modifying Text...85
Cutting And Pasting (Killing And Yanking) Text...85
Using History...88 Searching History...89 History Expansion...91 script...91 Summing Up...92 Further Reading...92
10 – Permissions...93
Owners, Group Members, And Everybody Else...94
Reading, Writing, And Executing...95
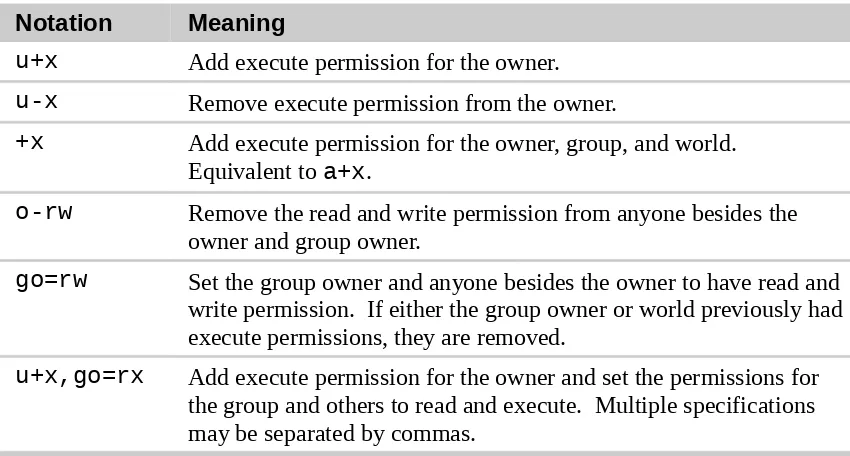
chmod – Change file mode...97
What The Heck Is Octal?...98
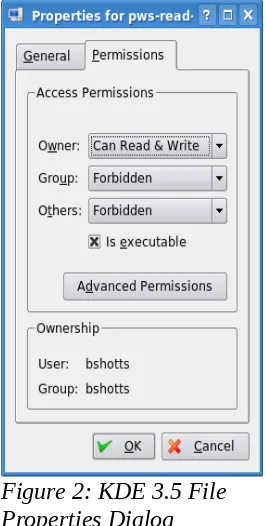
Setting File Mode With The GUI...100
umask – Set Default Permissions...101
Some Special Permissions...103
Changing Identities...104
su – Run A Shell With Substitute User And Group IDs...105
sudo – Execute A Command As Another User...106
Ubuntu And sudo...107
chown – Change File Owner And Group...107
chgrp – Change Group Ownership...109
Exercising Our Privileges...109
Changing Your Password...111
Further Reading...112
11 – Processes...113
How A Process Works...113
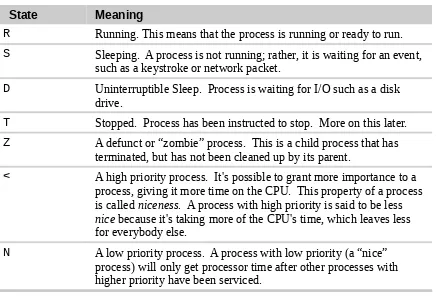
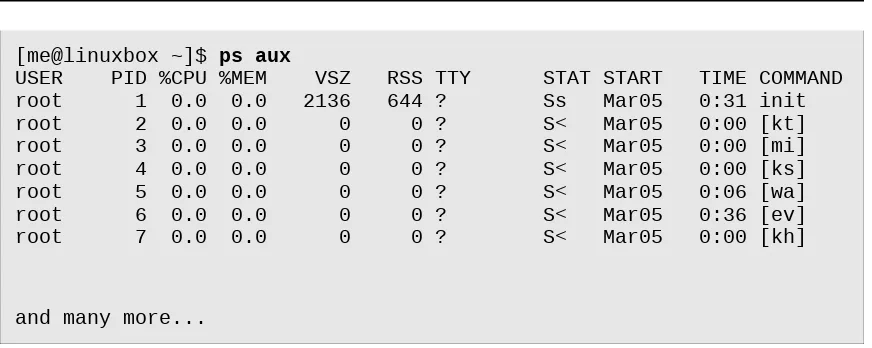
Viewing Processes...114
Viewing Processes Dynamically With top...116
Controlling Processes...118
Interrupting A Process...119
Putting A Process In The Background...119
Returning A Process To The Foreground...120
Stopping (Pausing) A Process...121
Signals...122
Sending Signals To Processes With kill...122
Sending Signals To Multiple Processes With killall...125
More Process Related Commands...125
Part 3 – Configuration And The Environment...127
12 – The Environment...128
What Is Stored In The Environment?...128
Examining The Environment...128
Some Interesting Variables...130
How Is The Environment Established?...131
Modifying The Environment...134
Which Files Should We Modify?...134
Text Editors...134
Using A Text Editor...135
Why Comments Are Important...138
Activating Our Changes...139
Summing Up...139
Further Reading...139
13 – A Gentle Introduction To vi...140
Why We Should Learn vi...140
A Little Background ...141
Starting And Stopping vi...141
Compatibility Mode...142
Editing Modes...143
Entering Insert Mode...144
Saving Our Work...144
Moving The Cursor Around...145
Basic Editing...146
Appending Text...146
Opening A Line...147
Deleting Text...148
Cutting, Copying And Pasting Text...149
Joining Lines...151
Search And Replace...151
Searching Within A Line...151
Searching The Entire File...151
Global Search And Replace...152
Editing Multiple Files...154
Switching Between Files...155
Opening Additional Files For Editing...155
Copying Content From One File Into Another...156
Inserting An Entire File Into Another...157
Saving Our Work...158
Further Reading...159
14 – Customizing The Prompt...160
Anatomy Of A Prompt...160
Trying Some Alternate Prompt Designs...162
Adding Color...163
Terminal Confusion...163
Moving The Cursor...166
Saving The Prompt...167
Summing Up...167
Further Reading...168
Part 4 – Common Tasks And Essential Tools...169
Package Files...171
Repositories...171
Dependencies...172
High And Low-level Package Tools...172
Common Package Management Tasks...173
Finding A Package In A Repository...173
Installing A Package From A Repository...173
Installing A Package From A Package File...174
Removing A Package...174
Updating Packages From A Repository...175
Upgrading A Package From A Package File...175
Listing Installed Packages...176
Determining If A Package Is Installed...176
Displaying Info About An Installed Package...177
Finding Which Package Installed A File...177
Summing Up...177
The Linux Software Installation Myth...178
Further Reading...179
16 – Storage Media...180
Mounting And Unmounting Storage Devices...180
Viewing A List Of Mounted File Systems...182
Why Unmounting Is Important...185
Determining Device Names...186
Creating New File Systems...189
Manipulating Partitions With fdisk...189
Creating A New File System With mkfs...192
Testing And Repairing File Systems...193
What The fsck?...193
Formatting Floppy Disks...193
Moving Data Directly To/From Devices...194
Creating CD-ROM Images...195
Creating An Image Copy Of A CD-ROM...195
Creating An Image From A Collection Of Files...195
A Program By Any Other Name...196
Writing CD-ROM Images...196
Mounting An ISO Image Directly...196
Blanking A Re-Writable CD-ROM...197
Writing An Image...197
Further Reading...197
Extra Credit...197
17 – Networking...199
Examining And Monitoring A Network...200
ping...200
traceroute...201
netstat...202
ftp...204
lftp – A Better ftp...206
wget...206
Secure Communication With Remote Hosts...206
ssh...207
Tunneling With SSH...210
scp And sftp...211
An SSH Client For Windows?...212
Further Reading...212
18 – Searching For Files...213
locate – Find Files The Easy Way...213
Where Does The locate Database Come From?...215
find – Find Files The Hard Way...215
Tests...216
Operators...218
Predefined Actions...221
User Defined Actions...223
Improving Efficiency...224
xargs...224
Dealing With Funny Filenames...225
A Return To The Playground...226
Options...228
Further Reading...229
19 – Archiving And Backup...230
Compressing Files...230
gzip...231
bzip2...233
Don’t Be Compressive Compulsive...234
Archiving Files...234
tar...234
zip...240
Synchronizing Files And Directories...242
Using rsync Over A Network...245
Further Reading...246
20 – Regular Expressions...247
What Are Regular Expressions?...247
grep...247
Metacharacters And Literals...249
The Any Character...250
Anchors...251
A Crossword Puzzle Helper...251
Bracket Expressions And Character Classes...252
Negation...252
Traditional Character Ranges...253
POSIX Character Classes...254
Reverting To Traditional Collation Order...257
Quantifiers...260
? - Match An Element Zero Or One Time...260
* - Match An Element Zero Or More Times...261
+ - Match An Element One Or More Times...262
{ } - Match An Element A Specific Number Of Times...262
Putting Regular Expressions To Work...263
Validating A Phone List With grep...263
Finding Ugly Filenames With find...264
Searching For Files With locate...265
Searching For Text In less And vim...265
Summing Up...267
Further Reading...267
21 – Text Processing...268
Applications Of Text...268
Documents...269
Web Pages...269
Email...269
Printer Output...269
Program Source Code...269
Revisiting Some Old Friends...269
cat...270
MS-DOS Text Vs. Unix Text...271
sort...271
uniq...279
Slicing And Dicing...280
cut...280 Expanding Tabs...283 paste...284 join...285 Comparing Text...287 comm...288 diff...288 patch...291
Editing On The Fly...292
tr...292
ROT13: The Not-So-Secret Decoder Ring...294
sed...295
People Who Like sed Also Like...303
aspell...303
Summing Up...307
Further Reading...307
Extra Credit...308
22 – Formatting Output...309
Simple Formatting Tools...309
nl – Number Lines...309
fmt – A Simple Text Formatter...313
pr – Format Text For Printing...317
printf – Format And Print Data...318
Document Formatting Systems...321
groff...322
Summing Up...328
Further Reading...328
23 – Printing...330
A Brief History Of Printing...330
Printing In The Dim Times...330
Character-based Printers...331
Graphical Printers...332
Printing With Linux...333
Preparing Files For Printing...333
pr – Convert Text Files For Printing...333
Sending A Print Job To A Printer...335
lpr – Print Files (Berkeley Style)...335
lp – Print Files (System V Style)...336
Another Option: a2ps...337
Monitoring And Controlling Print Jobs...340
lpstat – Display Print System Status...340
lpq – Display Printer Queue Status...341
lprm / cancel – Cancel Print Jobs...342
Summing Up...342
Further Reading...342
24 – Compiling Programs...344
What Is Compiling?...344
Are All Programs Compiled?...345
Compiling A C Program...346
Obtaining The Source Code...346
Examining The Source Tree...348
Building The Program...350
Installing The Program...354
Summing Up...354
Further Reading...355
Part 5 – Writing Shell Scripts...357
25 – Writing Your First Script...358
What Are Shell Scripts?...358
How To Write A Shell Script...358
Script File Format...359
Executable Permissions...360
Script File Location...360
Good Locations For Scripts...362
More Formatting Tricks...362
Summing Up...364
Further Reading...364
26 – Starting A Project...365
First Stage: Minimal Document...365
Second Stage: Adding A Little Data...367
Variables And Constants...368
Assigning Values To Variables And Constants...371
Here Documents...372
Summing Up...375
Further Reading...375
27 – Top-Down Design...376
Shell Functions...377
Local Variables...380
Keep Scripts Running...381
Shell Functions In Your .bashrc File...384
Summing Up...384
Further Reading...384
28 – Flow Control: Branching With if...385
if...385
Exit Status...386
test...388
File Expressions...388
String Expressions...391
Integer Expressions...392
A More Modern Version Of test...393
(( )) - Designed For Integers...395
Combining Expressions...396
Portability Is The Hobgoblin Of Little Minds...398
Control Operators: Another Way To Branch...399
Summing Up...399
Further Reading...400
29 – Reading Keyboard Input...401
read – Read Values From Standard Input...402
Options...404
IFS...406
You Can’t Pipe read...407
Validating Input...408
Menus...409
Summing Up...411
Extra Credit...411
Further Reading...411
Looping...412
while...412
Breaking Out Of A Loop...415
until...416
Reading Files With Loops...417
Summing Up...418
Further Reading...418
31 – Troubleshooting...419
Syntactic Errors...419
Missing Quotes...420
Missing Or Unexpected Tokens...420
Unanticipated Expansions...421
Logical Errors ...423
Defensive Programming...423
Verifying Input...425
Design Is A Function Of Time...425
Testing...425
Test Cases...426
Debugging...427
Finding The Problem Area...427
Tracing...427
Examining Values During Execution...430
Summing Up...430
Further Reading...431
32 – Flow Control: Branching With case...432
case...432
Patterns...434
Summing Up...436
Further Reading...436
33 – Positional Parameters...437
Accessing The Command Line...437
Determining The Number of Arguments...438
shift – Getting Access To Many Arguments...439
Simple Applications...440
Using Positional Parameters With Shell Functions...441
Handling Positional Parameters En Masse...442
A More Complete Application...444
Summing Up...447
Further Reading...450
34 – Flow Control: Looping With for...451
for: Traditional Shell Form...451
Why i?...453
for: C Language Form...454
Summing Up...455
Parameter Expansion...457
Basic Parameters...457
Expansions To Manage Empty Variables...458
Expansions That Return Variable Names...460
String Operations...460
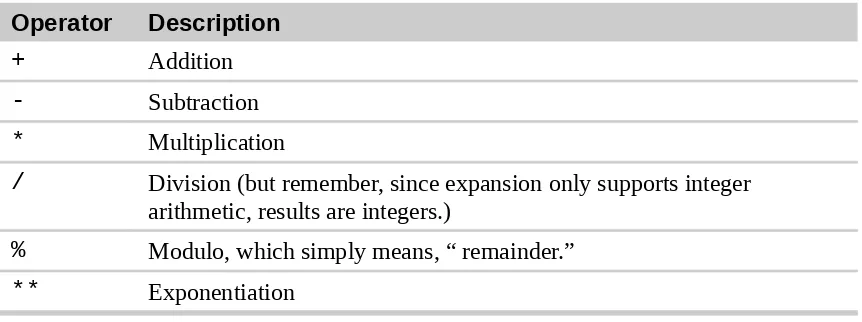
Arithmetic Evaluation And Expansion...463
Number Bases...464 Unary Operators...464 Simple Arithmetic...464 Assignment...466 Bit Operations...468 Logic...469
bc – An Arbitrary Precision Calculator Language...472
Using bc...473
An Example Script...473
Summing Up...475
Extra Credit...475
Further Reading...475
36 – Arrays...476
What Are Arrays?...476
Creating An Array...476
Assigning Values To An Array...477
Accessing Array Elements...478
Array Operations...480
Outputting The Entire Contents Of An Array...480
Determining The Number Of Array Elements...480
Finding The Subscripts Used By An Array...481
Adding Elements To The End Of An Array...481
Sorting An Array...482
Deleting An Array...482
Summing Up...483
Further Reading...484
37 – Exotica...485
Group Commands And Subshells...485
Process Substitution...486 Traps...488 Temporary Files...491 Asynchronous Execution...492 wait...492 Named Pipes...493
Setting Up A Named Pipe...494
Using Named Pipes...494
Summing Up...495
Further Reading...495
Part 1 – Introduction
1 – Introduction
I want to tell you a story.
No, not the story of how, in 1991, Linus Torvalds wrote the first version of the Linux kernel. You can read that story in lots of Linux books. Nor am I going to tell you the story of how, some years earlier, Richard Stallman began the GNU Project to create a free Unix-like operating system. That's an important story too, but most other Linux books have that one, as well.
No, I want to tell you the story of how you can take back control of your computer.
When I began working with computers as a college student in the late 1970s, there was a revolution going on. The invention of the microprocessor had made it possible for ordinary people like you and me to actually own a computer. It's hard for many people today to imagine what the world was like when only big business and big government ran all the computers. Let's just say, you couldn't get much done.
Today, the world is very different. Computers are everywhere, from tiny wristwatches to giant data centers to everything in between. In addition to ubiquitous computers, we also have a ubiquitous network connecting them together. This has created a wondrous new age of personal empowerment and creative freedom, but over the last couple of decades something else has been happening. A single giant corporation has been imposing its control over most of the world's computers and deciding what you can and cannot do with them. Fortunately, people from all over the world are doing something about it. They are fighting to maintain control of their computers by writing their own software. They are building Linux.
Many people speak of “freedom” with regard to Linux, but I don't think most people know what this freedom really means. Freedom is the power to decide what your computer does, and the only way to have this freedom is to know what your computer is doing. Freedom is a computer that is without secrets, one where everything can be known if you care enough to find out.
Why Use The Command Line?
Why Use The Command Line?
the computer, he never touches a mouse? It's because movie makers realize that we, as human beings, instinctively know the only way to really get anything done on a computer is by typing on a keyboard.
Most computer users today are only familiar with the graphical user interface (GUI) and have been taught by vendors and pundits that the command line interface (CLI) is a terrifying thing of the past. This is unfortunate, because a good command line interface is a marvelously expressive way of communicating with a computer in much the same way the written word is for human beings. It's been said that “graphical user interfaces make easy tasks easy, while command line interfaces make difficult tasks possible” and this is still very true today.
Since Linux is modeled after the Unix family of operating systems, it shares the same rich heritage of command line tools as Unix. Unix came into prominence during the early 1980s (although it was first developed a decade earlier), before the widespread adoption of the graphical user interface and, as a result, developed an extensive command line interface instead. In fact, one of the strongest reasons early adopters of Linux chose it over, say, Windows NT was the powerful command line interface which made the “difficult tasks possible.”
What This Book Is About
This book is a broad overview of “living” on the Linux command line. Unlike some books that concentrate on just a single program, such as the shell program, bash, this book will try to convey how to get along with the command line interface in a larger sense. How does it all work? What can it do? What's the best way to use it?
This is not a book about Linux system administration. While any serious discussion of the command line will invariably lead to system administration topics, this book only touches on a few administration issues. It will, however, prepare the reader for additional study by providing a solid foundation in the use of the command line, an essential tool for any serious system administration task.
This book is very Linux-centric. Many other books try to broaden their appeal by including other platforms such as generic Unix and MacOS X. In doing so, they “water down” their content to feature only general topics. This book, on the other hand, only covers contemporary Linux distributions. Ninety-five percent of the content is useful for users of other Unix-like systems, but this book is highly targeted at the modern Linux command line user.
Who Should Read This Book
all the security problems and want to give Linux a try. That's fine. All are welcome here.
That being said, there is no shortcut to Linux enlightenment. Learning the command line is challenging and takes real effort. It's not that it's so hard, but rather it's so vast. The average Linux system has literally thousands of programs you can employ on the command line. Consider yourself warned; learning the command line is not a casual endeavor.
On the other hand, learning the Linux command line is extremely rewarding. If you think you're a “power user” now, just wait. You don't know what real power is— yet. And, unlike many other computer skills, knowledge of the command line is long lasting. The skills learned today will still be useful ten years from now. The command line has survived the test of time.
It is also assumed that you have no programming experience, but not to worry, we'll start you down that path as well.
What's In This Book
This material is presented in a carefully chosen sequence, much like a tutor sitting next to you guiding you along. Many authors treat this material in a “systematic” fashion, which makes sense from a writer’s perspective, but can be very confusing to new users.
Another goal is to acquaint you with the Unix way of thinking, which is different from the Windows way of thinking. Along the way, we'll go on a few side trips to help you understand why certain things work the way they do and how they got that way. Linux is not just a piece of software, it's also a small part of the larger Unix culture, which has its own language and history. I might throw in a rant or two, as well.
This book is divided into five parts, each covering some aspect of the command line experience. Besides the first part, which you are reading now, this book contains:
● Part 2 – Learning The Shell starts our exploration of the basic language of the command line including such things as the structure of commands, file system navigation, command line editing, and finding help and documentation for commands.
● Part 3 – Configuration And The Environment covers editing configuration files that control the computer's operation from the command line.
● Part 4 – Common Tasks And Essential Tools explores many of the ordinary tasks that are commonly performed from the command line. Unix-like operating systems, such as Linux, contain many “classic” command line programs that are used to perform powerful operations on data.
What's In This Book
rudimentary, but easy to learn, technique for automating many common computing tasks. By learning shell programming, you will become familiar with concepts that can be applied to many other programming languages.
How To Read This Book
Start at the beginning of the book and follow it to the end. It isn’t written as a reference work, it's really more like a story with a beginning, middle, and an end.
Prerequisites
To use this book, all you will need is a working Linux installation. You can get this in one of two ways:
1. Install Linux on a (not so new) computer. It doesn't matter which distribution you choose, though most people today start out with either Ubuntu, Fedora, or OpenSUSE. If in doubt, try Ubuntu first. Installing a modern Linux distribution can be ridiculously easy or ridiculously difficult depending on your hardware. I suggest a desktop computer that is a couple of years old and has at least 256 megabytes of RAM and 6 gigabytes of free hard disk space. Avoid laptops and wireless networks if at all possible, as these are often more difficult to get working.
2. Use a “Live CD.” One of the cool things you can do with many Linux distributions is run them directly from a CDROM without installing them at all. Just go into your BIOS setup and set your computer to “Boot from CDROM,” insert the live CD, and reboot. Using a live CD is a great way to test a computer for Linux compatibility prior to installation. The disadvantage of using a live CD is that it may be very slow compared to having Linux installed on your hard drive. Both Ubuntu and Fedora (among others) have live CD versions.
Regardless of how you install Linux, you will need to have occasional superuser (i.e., administrative) privileges to carry out the lessons in this book.
After you have a working installation, start reading and follow along with your own computer. Most of the material in this book is “hands on,” so sit down and get typing!
Why I Don't Call It “GNU/Linux”
people in a vast, distributed development effort. Technically speaking, Linux is the name of the operating system's kernel, nothing more. The kernel is very important of course, since it makes the operating system go, but it's not enough to form a complete operating system.
Enter Richard Stallman, the genius-philosopher who founded the Free Software movement, started the Free Software Foundation, formed the GNU Project, wrote the first version of the GNU C Compiler (gcc), created the GNU General Public License (the GPL), etc., etc., etc. He insists that you call it “GNU/Linux” to properly reflect the contributions of the GNU Project. While the GNU Project predates the Linux kernel, and the project's contributions are extremely deserving of recognition, placing them in the name is unfair to everyone else who made significant contributions. Besides, I think “Linux/GNU” would be more technically accurate since the kernel boots first and everything else runs on top of it.
In popular usage, “Linux” refers to the kernel and all the other free and open source software found in the typical Linux distribution; that is, the entire Linux ecosystem, not just the GNU components. The operating system marketplace seems to prefer one-word names such as DOS, Windows, MacOS, Solaris, Irix, AIX. I have chosen to use the popular format. If, however, you prefer to use “GNU/Linux” instead, please perform a mental search and replace while reading this book. I won't mind.
Acknowledgments
I want to thank the following people, who helped make this book possible:
Jenny Watson, Acquisitions Editor at Wiley Publishing who originally suggested that I write a shell scripting book.
John C. Dvorak, noted columnist and pundit. In an episode of his video podcast, “Cranky Geeks,” Mr. Dvorak described the process of writing: “Hell. Write 200 words a day and in a year, you have a novel.” This advice led me to write a page a day until I had a book. Dmitri Popov wrote an article in Free Software Magazine titled, “Creating a book template with Writer,” which inspired me to use OpenOffice.org Writer for composing the text. As it turned out, it worked wonderfully.
Mark Polesky performed an extraordinary review and test of the text.
Acknowledgments
Karen M. Shotts contributed a lot of hours, polishing my so-called English by editing the text.
And lastly, the readers of LinuxCommand.org, who have sent me so many kind emails. Their encouragement gave me the idea that I was really on to something!
Your Feedback Is Needed!
This book is an ongoing project, like many open source software projects. If you find a technical error, drop me a line at:
Your changes and suggestions may get into future releases.
Further Reading
● Here are some Wikipedia articles on the famous people mentioned in this chapter:
http://en.wikipedia.org/wiki/Linux_Torvalds http://en.wikipedia.org/wiki/Richard_Stallman
● The Free Software Foundation and the GNU Project:
http://en.wikipedia.org/wiki/Free_Software_Foundation http://www.fsf.org
http://www.gnu.org
● Richard Stallman has written extensively on the “GNU/Linux” naming issue:
http://www.gnu.org/gnu/why-gnu-linux.html http://www.gnu.org/gnu/gnu-linux-faq.html#tools
Colophon
Part 2 – Learning The Shell
2 – What Is The Shell?
When we speak of the command line, we are really referring to the shell. The shell is a program that takes keyboard commands and passes them to the operating system to carry out. Almost all Linux distributions supply a shell program from the GNU Project called
bash. The name “bash” is an acronym for “Bourne Again SHell”, a reference to the fact
bash is an enhanced replacement for sh, the original Unix shell program written by Steve Bourne.
Terminal Emulators
When using a graphical user interface, we need another program called a terminal emulator to interact with the shell. If we look through our desktop menus, we will probably find one. KDE uses konsole and GNOME uses gnome-terminal, though it's likely called simply “terminal” on our menu. There are a number of other terminal emulators available for Linux, but they all basically do the same thing; give us access to the shell. You will probably develop a preference for one or another based on the number of bells and whistles it has.
Your First Keystrokes
So let's get started. Launch the terminal emulator! Once it comes up, we should see something like this:
[me@linuxbox ~]$
This is called a shell prompt and it will appear whenever the shell is ready to accept input. While it may vary in appearance somewhat depending on the distribution, it will usually include your username@machinename, followed by the current working directory (more about that in a little bit) and a dollar sign.
Your First Keystrokes
privileges.
Assuming that things are good so far, let's try some typing. Type some gibberish at the prompt like so:
[me@linuxbox ~]$ kaekfjaeifj
Since this command makes no sense, the shell will tell us so and give us another chance:
bash: kaekfjaeifj: command not found [me@linuxbox ~]$
Command History
If we press the up-arrow key, we will see that the previous command “kaekfjaeifj” reappears after the prompt. This is called command history. Most Linux distributions remember the last five hundred commands by default. Press the down-arrow key and the previous command disappears.
Cursor Movement
Recall the previous command with the up-arrow key again. Now try the left and right-arrow keys. See how we can position the cursor anywhere on the command line? This makes editing commands easy.
A Few Words About Mice And Focus
While the shell is all about the keyboard, you can also use a mouse with your terminal emulator. There is a mechanism built into the X Window System (the underlying engine that makes the GUI go) that supports a quick copy and paste technique. If you highlight some text by holding down the left mouse button and dragging the mouse over it (or double clicking on a word), it is copied into a buffer maintained by X. Pressing the middle mouse button will cause the text to be pasted at the cursor location. Try it.
Your graphical desktop environment (most likely KDE or GNOME), in an effort to behave like Windows, probably has its focus policy set to “click to focus.” This means for a window to get focus (become active) you need to click on it. This is contrary to the traditional X behavior of “focus follows mouse” which means that a window gets focus by just passing the mouse over it. The window will not come to the foreground until you click on it but it will be able to receive input. Setting the focus policy to “focus follows mouse” will make the copy and paste technique even more useful. Give it a try. I think if you give it a chance you will prefer it. You will find this setting in the configuration program for your window manager.
Try Some Simple Commands
Now that we have learned to type, let's try a few simple commands. The first one is
date. This command displays the current time and date.
[me@linuxbox ~]$ date
Thu Oct 25 13:51:54 EDT 2007
A related command is cal which, by default, displays a calendar of the current month.
[me@linuxbox ~]$ cal
October 2007 Su Mo Tu We Th Fr Sa 1 2 3 4 5 6 7 8 9 10 11 12 13 14 15 16 17 18 19 20 21 22 23 24 25 26 27 28 29 30 31
To see the current amount of free space on your disk drives, type df:
[me@linuxbox ~]$ df
Filesystem 1K-blocks Used Available Use% Mounted on /dev/sda2 15115452 5012392 9949716 34% /
Try Some Simple Commands
Likewise, to display the amount of free memory, type the free command.
[me@linuxbox ~]$ free
total used free shared buffers cached Mem: 513712 503976 9736 0 5312 122916 -/+ buffers/cache: 375748 137964
Swap: 1052248 104712 947536
Ending A Terminal Session
We can end a terminal session by either closing the terminal emulator window, or by entering the exit command at the shell prompt:
[me@linuxbox ~]$ exit
The Console Behind The Curtain
Even if we have no terminal emulator running, several terminal sessions continue to run behind the graphical desktop. Called virtual terminals or virtual consoles, these sessions can be accessed on most Linux distributions by pressing Ctrl-Alt-F1 through Ctrl-Alt-F6 on most systems. When a session is accessed, it presents a login prompt into which we can enter our user name and password. To switch from one virtual console to another, press Alt and F1-F6. To return to the graphical desktop, press Alt-F7.
Further Reading
● To learn more about Steve Bourne, father of the Bourne Shell, see this Wikipedia article:
http://en.wikipedia.org/wiki/Steve_Bourne
● Here is an article about the concept of shells in computing:
3 – Navigation
The first thing we need to learn to do (besides just typing) is how to navigate the file system on our Linux system. In this chapter we will introduce the following commands:
● pwd - Print name of current working directory ● cd - Change directory
● ls - List directory contents
Understanding The File System Tree
Like Windows, a Unix-like operating system such as Linux organizes its files in what is called a hierarchical directory structure. This means that they are organized in a tree-like pattern of directories (sometimes called folders in other systems), which may contain files and other directories. The first directory in the file system is called the root directory. The root directory contains files and subdirectories, which contain more files and subdirectories and so on and so on.
Note that unlike Windows, which has a separate file system tree for each storage device, Unix-like systems such as Linux always have a single file system tree, regardless of how many drives or storage devices are attached to the computer. Storage devices are attached (or more correctly, mounted) at various points on the tree according to the whims of the system administrator, the person (or persons) responsible for the maintenance of the system.
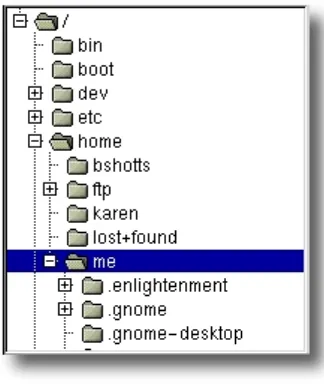
The Current Working Directory
Most of us are probably familiar with a graphical file manager which represents the file system tree as in Figure 1. Notice that the tree is usually shown upended, that is, with the root at the top and the various branches descending below.
The Current Working Directory
Imagine that the file system is a maze shaped like an upside-down tree and we are able to
stand in the middle of it. At any given time, we are inside a single directory and we can see the files contained in the directory and the pathway to the directory above us (called the parent directory) and any subdirectories below us. The directory we are standing in is called the current working directory. To display the current working directory, we use the
pwd (print working directory) command.
[me@linuxbox ~]$ pwd
/home/me
When we first log in to our system (or start a terminal emulator session) our current working directory is set to our home directory. Each user account is given its own home directory and when operating as a regular user, the home directory is the only place the user is allowed to write files.
Listing The Contents Of A Directory
To list the files and directories in the current working directory, we use the ls command.
[me@linuxbox ~]$ ls
[image:29.612.246.408.135.327.2]Desktop Documents Music Pictures Public Templates Videos Figure 1: File system tree as shown by a
Actually, we can use the ls command to list the contents of any directory, not just the current working directory, and there are many other fun things it can do as well. We'll spend more time with ls in the next chapter.
Changing The Current Working Directory
To change your working directory (where we are standing in our tree-shaped maze) we use the cd command. To do this, type cd followed by the pathname of the desired working directory. A pathname is the route we take along the branches of the tree to get to the directory we want. Pathnames can be specified in one of two different ways; as
absolute pathnames or as relative pathnames. Let's deal with absolute pathnames first.
Absolute Pathnames
An absolute pathname begins with the root directory and follows the tree branch by branch until the path to the desired directory or file is completed. For example, there is a directory on your system in which most of your system's programs are installed. The pathname of the directory is /usr/bin. This means from the root directory (represented by the leading slash in the pathname) there is a directory called "usr" which contains a directory called "bin".
[me@linuxbox ~]$ cd /usr/bin
[me@linuxbox bin]$ pwd
/usr/bin
[me@linuxbox bin]$ ls
...Listing of many, many files ...
Now we can see that we have changed the current working directory to /usr/bin and that it is full of files. Notice how the shell prompt has changed? As a convenience, it is usually set up to automatically display the name of the working directory.
Relative Pathnames
Where an absolute pathname starts from the root directory and leads to its destination, a relative pathname starts from the working directory. To do this, it uses a couple of special symbols to represent relative positions in the file system tree. These special symbols are "." (dot) and ".." (dot dot).
Changing The Current Working Directory
usr/bin again:
[me@linuxbox ~]$ cd /usr/bin
[me@linuxbox bin]$ pwd
/usr/bin
Okay, now let's say that we wanted to change the working directory to the parent of
/usr/bin which is /usr. We could do that two different ways. Either with an absolute pathname:
[me@linuxbox bin]$ cd /usr
[me@linuxbox usr]$ pwd
/usr
Or, with a relative pathname:
[me@linuxbox bin]$ cd ..
[me@linuxbox usr]$ pwd
/usr
Two different methods with identical results. Which one should we use? The one that requires the least typing!
Likewise, we can change the working directory from /usr to /usr/bin in two different ways. Either using an absolute pathname:
[me@linuxbox usr]$ cd /usr/bin
[me@linuxbox bin]$ pwd
/usr/bin
Or, with a relative pathname:
[me@linuxbox usr]$ cd ./bin
[me@linuxbox bin]$ pwd
/usr/bin
omit the "./". It is implied. Typing:
[me@linuxbox usr]$ cd bin
does the same thing. In general, if you do not specify a pathname to something, the working directory will be assumed.
Some Helpful Shortcuts
In table 3-1 we see some useful ways the current working directory can be quickly changed.
Table 3- 1: cd Shortcuts
Shortcut Result
cd Changes the working directory to your home directory.
cd - Changes the working directory to the previous working directory.
cd ~user_name Changes the working directory to the home directory of
user_name. For example, cd ~bob will change the directory to the home directory of user “bob.”
Important Facts About Filenames
1. Filenames that begin with a period character are hidden. This only means that
ls will not list them unless you say ls -a. When your account was created, several hidden files were placed in your home directory to configure things for your account. Later on we will take a closer look at some of these files to see how you can customize your environment. In addition, some applications place their configuration and settings files in your home directory as hidden files.
2. Filenames and commands in Linux, like Unix, are case sensitive. The filenames “File1” and “file1” refer to different files.
Changing The Current Working Directory
determined by other means. Although Unix-like operating system don’t use file extensions to determine the contents/purpose of files, some application programs do.
4 – Exploring The System
Now that we know how to move around the file system, it's time for a guided tour of our Linux system. Before we start however, we’re going to learn some more commands that will be useful along the way:
● ls – List directory contents ● file – Determine file type ● less – View file contents
More Fun With
ls
The ls command is probably the most used command, and for good reason. With it, we can see directory contents and determine a variety of important file and directory attributes. As we have seen, we can simply type ls to see a list of files and subdirectories contained in the current working directory:
[me@linuxbox ~]$ ls
Desktop Documents Music Pictures Public Templates Videos
Besides the current working directory, we can specify the directory to list, like so:
me@linuxbox ~]$ ls /usr
bin games kerberos libexec sbin src etc include lib local share tmp
Or even specify multiple directories. In this example we will list both the user's home directory (symbolized by the “~” character) and the /usr directory:
[me@linuxbox ~]$ ls ~ /usr
More Fun With ls
Desktop Documents Music Pictures Public Templates Videos
/usr:
bin games kerberos libexec sbin src etc include lib local share tmp
We can also change the format of the output to reveal more detail:
[me@linuxbox ~]$ ls -l
total 56
drwxrwxr-x 2 me me 4096 2007-10-26 17:20 Desktop drwxrwxr-x 2 me me 4096 2007-10-26 17:20 Documents drwxrwxr-x 2 me me 4096 2007-10-26 17:20 Music drwxrwxr-x 2 me me 4096 2007-10-26 17:20 Pictures drwxrwxr-x 2 me me 4096 2007-10-26 17:20 Public drwxrwxr-x 2 me me 4096 2007-10-26 17:20 Templates drwxrwxr-x 2 me me 4096 2007-10-26 17:20 Videos
By adding “-l” to the command, we changed the output to the long format.
Options And Arguments
This brings us to a very important point about how most commands work. Commands are often followed by one or more options that modify their behavior, and further, by one or more arguments, the items upon which the command acts. So most commands look kind of like this:
command -options arguments
Most commands use options consisting of a single character preceded by a dash, for example, “-l”, but many commands, including those from the GNU Project, also support
long options, consisting of a word preceded by two dashes. Also, many commands allow multiple short options to be strung together. In this example, the ls command is given two options, the “l” option to produce long format output, and the “t” option to sort the result by the file's modification time.
We'll add the long option “--reverse” to reverse the order of the sort:
[me@linuxbox ~]$ ls -lt --reverse
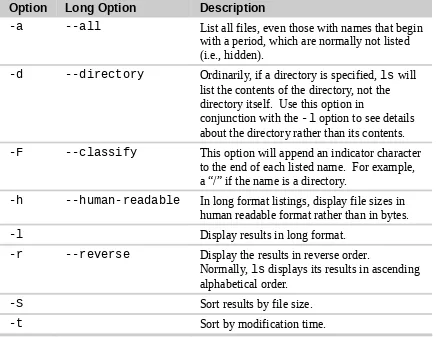
[image:36.612.72.514.245.582.2]The ls command has a large number of possible options. The most common are listed in the Table 4-1.
Table 4- 1: Common ls Options
Option Long Option Description
-a --all List all files, even those with names that begin with a period, which are normally not listed (i.e., hidden).
-d --directory Ordinarily, if a directory is specified, ls will list the contents of the directory, not the directory itself. Use this option in
conjunction with the -l option to see details about the directory rather than its contents.
-F --classify This option will append an indicator character to the end of each listed name. For example, a “/” if the name is a directory.
-h --human-readable In long format listings, display file sizes in human readable format rather than in bytes.
-l Display results in long format.
-r --reverse Display the results in reverse order.
Normally, ls displays its results in ascending alphabetical order.
-S Sort results by file size.
-t Sort by modification time.
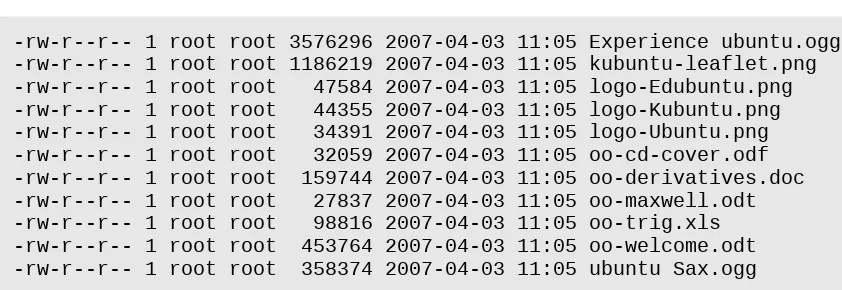
A Longer Look At Long Format
More Fun With ls
-rw-r--r-- 1 root root 3576296 2007-04-03 11:05 Experience ubuntu.ogg -rw-r--r-- 1 root root 1186219 2007-04-03 11:05 kubuntu-leaflet.png -rw-r--r-- 1 root root 47584 2007-04-03 11:05 logo-Edubuntu.png -rw-r--r-- 1 root root 44355 2007-04-03 11:05 logo-Kubuntu.png -rw-r--r-- 1 root root 34391 2007-04-03 11:05 logo-Ubuntu.png -rw-r--r-- 1 root root 32059 2007-04-03 11:05 oo-cd-cover.odf -rw-r--r-- 1 root root 159744 2007-04-03 11:05 oo-derivatives.doc -rw-r--r-- 1 root root 27837 2007-04-03 11:05 oo-maxwell.odt -rw-r--r-- 1 root root 98816 2007-04-03 11:05 oo-trig.xls -rw-r--r-- 1 root root 453764 2007-04-03 11:05 oo-welcome.odt -rw-r--r-- 1 root root 358374 2007-04-03 11:05 ubuntu Sax.ogg
[image:37.612.109.530.93.238.2]Let's look at the different fields from one of the files and examine their meanings:
Table 4-2: ls Long Listing Fields
Field Meaning
-rw-r--r-- Access rights to the file. The first character indicates the type of file. Among the different types, a leading dash means a regular file, while a “d” indicates a directory. The next three characters are the access rights for the file's owner, the next three are for members of the file's group, and the final three are for everyone else. The full meaning of this is discussed in Chapter 10 – Permissions.
1 File's number of hard links. See the discussion of links later in this chapter.
root The user name of the file's owner.
root The name of the group which owns the file.
32059 Size of the file in bytes.
2007-04-03 11:05 Date and time of the file's last modification.
oo-cd-cover.odf Name of the file.
Determining A File's Type With
file
file filename
When invoked, the file command will print a brief description of the file's contents. For example:
[me@linuxbox ~]$ file picture.jpg
picture.jpg: JPEG image data, JFIF standard 1.01
There are many kinds of files. In fact, one of the common ideas in Unix-like operating systems such as Linux is that “everything is a file.” As we proceed with our lessons, we will see just how true that statement is.
While many of the files on your system are familiar, for example MP3 and JPEG, there are many kinds that are a little less obvious and a few that are quite strange.
Viewing File Contents With
less
The less command is a program to view text files. Throughout our Linux system, there are many files that contain human-readable text. The less program provides a convenient way to examine them.
What Is “Text”?
There are many ways to represent information on a computer. All methods involve defining a relationship between the information and some numbers that will be used to represent it. Computers, after all, only understand numbers and all data is converted to numeric representation.
Some of these representation systems are very complex (such as compressed video files), while others are rather simple. One of the earliest and simplest is called ASCII text. ASCII (pronounced "As-Key") is short for American Standard Code for Information Interchange. This is a simple encoding scheme that was first used on Teletype machines to map keyboard characters to numbers.
Viewing File Contents With less
contain many non-text elements that are used to describe its structure and formatting. Plain ASCII text files contain only the characters themselves and a few rudimentary control codes like tabs, carriage returns and line feeds.
Throughout a Linux system, many files are stored in text format and there are many Linux tools that work with text files. Even Windows recognizes the importance of this format. The well-known NOTEPAD.EXE program is an editor for plain ASCII text files.
Why would we want to examine text files? Because many of the files that contain system settings (called configuration files) are stored in this format, and being able to read them gives us insight about how the system works. In addition, many of the actual programs that the system uses (called scripts) are stored in this format. In later chapters, we will learn how to edit text files in order to modify systems settings and write our own scripts, but for now we will just look at their contents.
The less command is used like this:
less filename
Once started, the less program allows you to scroll forward and backward through a text file. For example, to examine the file that defines all the system's user accounts, enter the following command:
[me@linuxbox ~]$ less /etc/passwd
Once the less program starts, we may view the contents of the file. If the file is longer than one page, we can scroll up and down. To exit less, press the “q” key.
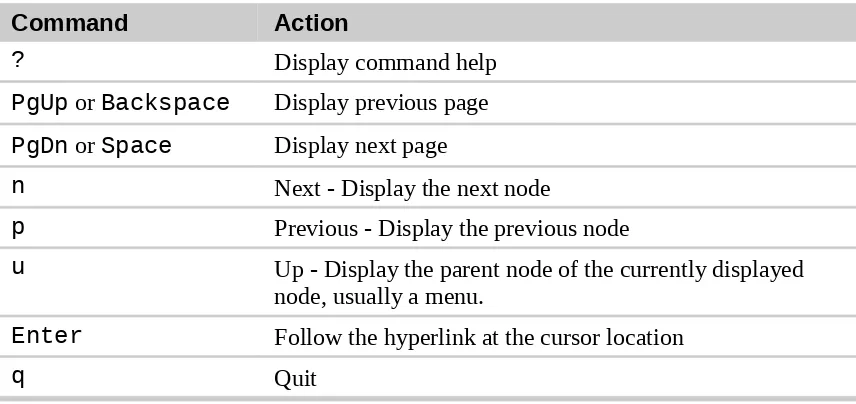
The table below lists the most common keyboard commands used by less.
Table 4-3: less Commands
Command Action
Down Arrow Scroll down one line
G Move to the end of the text file
1G or g Move to the beginning of the text file
/characters Search forward to the next occurrence of characters
n Search for the next occurrence of the previous search
h Display help screen
q Quit less
Less Is More
The less program was designed as an improved replacement of an earlier Unix program called more. The name “less” is a play on the phrase “less is more”—a motto of modernist architects and designers.
less falls into the class of programs called “pagers,” programs that allow the easy viewing of long text documents in a page by page manner. Whereas the
more program could only page forward, the less program allows paging both forward and backward and has many other features as well.
A Guided Tour
The file system layout on your Linux system is much like that found on other Unix-like systems. The design is actually specified in a published standard called the Linux Filesystem Hierarchy Standard. Not all Linux distributions conform to the standard exactly but most come pretty close.
Next, we are going to wander around the file system ourselves to see what makes our Linux system tick. This will give you a chance to practice your navigation skills. One of the things we will discover is that many of the interesting files are in plain human-readable text. As we go about our tour, try the following:
1. cd into a given directory
2. List the directory contents with ls -l
3. If you see an interesting file, determine its contents with file
A Guided Tour
Remember the copy and paste trick! If you are using a mouse, you can double click on a filename to copy it and middle click to paste it into commands.
As we wander around, don't be afraid to look at stuff. Regular users are largely prohibited from messing things up. That's the system administrators job! If a command complains about something, just move on to something else. Spend some time looking around. The system is ours to explore. Remember, in Linux, there are no secrets!
Table 4-4 lists just a few of the directories we can explore. Feel free to try more!
Table 4-4: Directories Found On Linux Systems
Directory Comments
/ The root directory. Where everything begins.
/bin Contains binaries (programs) that must be present for the system to boot and run.
/boot Contains the Linux kernel, initial RAM disk image (for drivers needed at boot time), and the boot loader.
Interesting files:
● /boot/grub/grub.conf or menu.lst, which are used to configure the boot loader.
● /boot/vmlinuz, the linux kernel
/dev This is a special directory which contains device nodes. “Everything is a file” also applies to devices. Here is where the kernel maintains a list of all the devices it understands.
/etc The /etc directory contains all of the system-wide configuration files. It also contains a collection of shell scripts which start each of the system services at boot time. Everything in this directory should be readable text.
Interesting files: While everything in /etc is interesting, here are some of my all-time favorites:
● /etc/crontab, a file that defines when automated jobs will run.
● /etc/fstab, a table of storage devices and their associated mount points.
Directory Comments
/home In normal configurations, each user is given a directory in
/home. Ordinary users can only write files in their home directories. This limitation protects the system from errant user activity.
/lib Contains shared library files used by the core system programs. These are similar to DLLs in Windows.
/lost+found Each formatted partition or device using a Linux file system, such as ext3, will have this directory. It is used in the case of a partial recovery from a file system corruption event. Unless something really bad has happened to your system, this directory will remain empty.
/media On modern Linux systems the /media directory will contain the mount points for removable media such USB drives, CD-ROMs, etc. that are mounted automatically at insertion.
/mnt On older Linux systems, the /mnt directory contains mount points for removable devices that have been mounted
manually.
/opt The /opt directory is used to install “optional” software. This is mainly used to hold commercial software products that may be installed on your system.
/proc The /proc directory is special. It's not a real file system in the sense of files stored on your hard drive. Rather, it is a virtual file system maintained by the Linux kernel. The “files” it contains are peepholes into the kernel itself. The files are readable and will give you a picture of how the kernel sees your computer.
/root This is the home directory for the root account.
/sbin This directory contains “system” binaries. These are programs that perform vital system tasks that are generally reserved for the superuser.
/tmp The /tmp directory is intended for storage of temporary, transient files created by various programs. Some
A Guided Tour
Directory Comments
/usr The /usr directory tree is likely the largest one on a Linux system. It contains all the programs and support files used by regular users.
/usr/bin /usr/bin contains the executable programs installed by your Linux distribution. It is not uncommon for this directory to hold thousands of programs.
/usr/lib The shared libraries for the programs in /usr/bin.
/usr/local The /usr/local tree is where programs that are not included with your distribution but are intended for system-wide use are installed. Programs compiled from source code are normally installed in /usr/local/bin. On a newly installed Linux system, this tree exists, but it will be empty until the system administrator puts something in it.
/usr/sbin Contains more system administration programs.
/usr/share /usr/share contains all the shared data used by
programs in /usr/bin. This includes things like default configuration files, icons, screen backgrounds, sound files, etc.
/usr/share/doc Most packages installed on the system will include some kind of documentation. In /usr/share/doc, we will find documentation files organized by package.
/var With the exception of /tmp and /home, the directories we have looked at so far remain relatively static, that is, their contents don't change. The /var directory tree is where data that is likely to change is stored. Various databases, spool files, user mail, etc. are located here.
/var/log /var/log contains log files, records of various system activity. These are very important and should be monitored from time to time. The most useful one is
/var/log/messages. Note that for security reasons on some systems, you must be the superuser to view log files .
Symbolic Links
lrwxrwxrwx 1 root root 11 2007-08-11 07:34 libc.so.6 -> libc-2.6.so
Notice how the first letter of the listing is “l” and the entry seems to have two filenames? This is a special kind of a file called a symbolic link (also known as a soft link or
symlink.) In most Unix-like systems it is possible to have a file referenced by multiple names. While the value of this may not be obvious, it is really a useful feature.
Picture this scenario: a program requires the use of a shared resource of some kind contained in a file named “foo,” but “foo” has frequent version changes. It would be good to include the version number in the filename so the administrator or other interested party could see what version of “foo” is installed. This presents a problem. If we change the name of the shared resource, we have to track down every program that might use it and change it to look for a new resource name every time a new version of the resource is installed. That doesn't sound like fun at all.
Here is where symbolic links save the day. Let's say we install version 2.6 of “foo,” which has the filename “foo-2.6” and then create a symbolic link simply called “foo” that points to “foo-2.6.” This means that when a program opens the file “foo”, it is actually opening the file “foo-2.6”. Now everybody is happy. The programs that rely on “foo” can find it and we can still see what actual version is installed. When it is time to upgrade to “foo-2.7,” we just add the file to our system, delete the symbolic link “foo” and create a new one that points to the new version. Not only does this solve the problem of the version upgrade, but it also allows us to keep both versions on our machine. Imagine that “foo-2.7” has a bug (damn those developers!) and we need to revert to the old version. Again, we just delete the symbolic link pointing to the new version and create a new symbolic link pointing to the old version.
The directory listing above (from the /lib directory of a Fedora system) shows a symbolic link called “libc.so.6” that points to a shared library file called “libc-2.6.so.” This means that programs looking for “libc.so.6” will actually get the file “libc-2.6.so.” We will learn how to create symbolic links in the next chapter.
Hard Links
While we are on the subject of links, we need to mention that there is a second type of link called a hard link. Hard links also allow files to have multiple names, but they do it in a different way. We’ll talk more about the differences between symbolic and hard links in the next chapter.
Further Reading
● The full version of the Linux Filesystem Hierarchy Standard can be found here:
5 – Manipulating Files And Directories
5 – Manipulating Files And Directories
At this point, we are ready for some real work! This chapter will introduce the following commands:
● cp – Copy files and directories
● mv – Move/rename files and directories ● mkdir – Create directories
● rm – Remove files and directories ● ln – Create hard and symbolic links
These five commands are among the most frequently used Linux commands. They are used for manipulating both files and directories.
Now, to be frank, some of the tasks performed by these commands are more easily done with a graphical file manager. With a file manager, we can drag and drop a file from one directory to another, cut and paste files, delete files, etc. So why use these old command line programs?
The answer is power and flexibility. While it is easy to perform simple file manipulations with a graphical file manager, complicated tasks can be easier with the command line programs. For example, how could we copy all the HTML files from one directory to another, but only copy files that do not exist in the destination directory or are newer than the versions in the destination directory? Pretty hard with with a file manager. Pretty easy with the command line:
cp -u *.html destination
Wildcards
called wildcards. Using wildcards (which is also known as globbing) allow you to select filenames based on patterns of characters. The table below lists the wildcards and what they select:
Table 5-1: Wildcards
Wildcard Meaning
* Matches any characters
? Matches any single character
[characters] Matches any character that is a member of the set characters
[!characters] Matches any character that is not a member of the set
characters
[[:class:]] Matches any character that is a member of the specified
class
Table 5-2 lists the most commonly used character classes:
Table 5-2: Commonly Used Character Classes
Character Class Meaning
[:alnum:] Matches any alphanumeric character
[:alpha:] Matches any alphabetic character
[:digit:] Matches any numeral
[:lower:] Matches any lowercase letter
[:upper:] Matches any uppercase letter
Using wildcards makes it possible to construct very sophisticated selection criteria for filenames. Here are some examples of patterns and what they match:
Table 5-3: Wildcard Examples
Pattern Matches
* All files
g* Any file beginning with “g”
Wildcards
Data??? Any file beginning with “Data” followed by exactly three characters
[abc]* Any file beginning with either an “a”, a “b”, or a “c”
BACKUP.[0-9][0-9][0-9] Any file beginning with “BACKUP.” followed by exactly three numerals
[[:upper:]]* Any file beginning with an uppercase letter
[![:digit:]]* Any file not beginning with a numeral
*[[:lower:]123] Any file ending with a lowercase letter or the numerals “1”, “2”, or “3”
Wildcards can be used with any command that accepts filenames as arguments, but we’ll talk more about that in Chapter 8.
Character Ranges
If you are coming from another Unix-like environment or have been reading some other books on this subject, you may have encountered the [A-Z] or the
[a-z] character range notations. These are traditional Unix notations and worked in older versions of Linux as well. They can still work, but you have to be very careful with them because they will not produce the expected results unless properly configured. For now, you should avoid using them and use character classes instead.
Wildcards Work In The GUI Too
Wildcards are especially valuable not only because they are used so frequently on the command line, but are also supported by some graphical file managers.
● In Nautilus (the file manager for GNOME), you can select files using the Edit/Select Pattern menu item. Just enter a file selection pattern with wildcards and the files in the currently viewed directory will be highlighted for selection.
Many ideas originally found in the command line interface make their way into the graphical interface, too. It is one of the many things that make the Linux desktop so powerful.
mkdir
– Create Directories
The mkdir command is used to create directories. It works like this:
mkdir directory...
A note on notation: When three periods follow an argument in the description of a command (as above), it means that the argument can be repeated, thus:
mkdir dir1
would create a single directory named “dir1”, while
mkdir dir1 dir2 dir3
would create three directories named “dir1”, “dir2”, and “dir3”.
cp
– Copy Files And Directories
The cp command copies files or directories. It can be used two different ways:
cp item1 item2
to copy the single file or directory “item1” to file or directory “item2” and:
cp item... directory
cp – Copy Files And Directories
Useful Options And Examples
Here are some of the commonly used options (the short option and the equivalent long option) for cp:
Table 5-4: cp Options
Option Meaning
-a, --archive Copy the files and directories and all of their attributes, including ownerships and permissions. Normally, copies take on the default attributes of the user performing the copy.
-i, --interactive Before overwriting an existing file, prompt the user for confirmation. If this option is not specified, cp will silently overwrite files.
-r, --recursive Recursively copy directories and their contents. This option (or the -a option) is required when copying directories.
-u, --update When copying files from one directory to another, only copy files that either don't exist, or are newer than the existing corresponding files, in the destination
directory.
-v, --verbose Display informative messages as the copy is performed.
Table 5-5: cp Examples
Command Results
cp file1 file2 Copy file1 to file2. If file2 exists, it is overwritten with the contents of file1<