by Gordon McComb
and Earl Boysen
Electronics
FOR
111 River Street Hoboken, NJ 07030-5774
Copyright © 2005 by Wiley Publishing, Inc., Indianapolis, Indiana Published by Wiley Publishing, Inc., Indianapolis, Indiana Published simultaneously in Canada
No part of this publication may be reproduced, stored in a retrieval system or transmitted in any form or by any means, electronic, mechanical, photocopying, recording, scanning or otherwise, except as permit-ted under Sections 107 or 108 of the 1976 Unipermit-ted States Copyright Act, without either the prior written permission of the Publisher, or authorization through payment of the appropriate per-copy fee to the Copyright Clearance Center, 222 Rosewood Drive, Danvers, MA 01923, (978) 750-8400, fax (978) 646-8600. Requests to the Publisher for permission should be addressed to the Legal Department, Wiley Publishing, Inc., 10475 Crosspoint Blvd., Indianapolis, IN 46256, (317) 572-3447, fax (317) 572-4355, e-mail:
Trademarks:Wiley, the Wiley Publishing logo, For Dummies, the Dummies Man logo, A Reference for the Rest of Us!, The Dummies Way, Dummies Daily, The Fun and Easy Way, Dummies.com, and related trade dress are trademarks or registered trademarks of John Wiley & Sons, Inc. and/or its affiliates in the United States and other countries, and may not be used without written permission. All other trademarks are the property of their respective owners. Wiley Publishing, Inc., is not associated with any product or vendor mentioned in this book.
Stock photos from Hemera Technologies, Inc. Used under license.
LIMIT OF LIABILITY/DISCLAIMER OF WARRANTY: THE PUBLISHER AND THE AUTHOR MAKE NO REP-RESENTATIONS OR WARRANTIES WITH RESPECT TO THE ACCURACY OR COMPLETENESS OF THE CONTENTS OF THIS WORK AND SPECIFICALLY DISCLAIM ALL WARRANTIES, INCLUDING WITHOUT LIMITATION WARRANTIES OF FITNESS FOR A PARTICULAR PURPOSE. NO WARRANTY MAY BE CRE-ATED OR EXTENDED BY SALES OR PROMOTIONAL MATERIALS. THE ADVICE AND STRATEGIES CON-TAINED HEREIN MAY NOT BE SUITABLE FOR EVERY SITUATION. THIS WORK IS SOLD WITH THE UNDERSTANDING THAT THE PUBLISHER IS NOT ENGAGED IN RENDERING LEGAL, ENGINEERING, OR OTHER PROFESSIONAL SERVICES. IF PROFESSIONAL ASSISTANCE IS NEEDED, THE SERVICES OF A COMPETENT PROFESSIONAL PERSON SHOULD BE SOUGHT. NEITHER THE PUBLISHER NOR THE AUTHOR SHALL BE LIABLE FOR DAMAGES ARISING HEREFROM. THE FACT THAT AN ORGANIZATION OR WEBSITE IS REFERRED TO IN THIS WORK AS A CITATION AND/OR A POTENTIAL SOURCE OF FUR-THER INFORMATION DOES NOT MEAN THAT THE AUTHOR OR THE PUBLISHER ENDORSES THE INFORMATION THE ORGANIZATION OR WEBSITE MAY PROVIDE OR RECOMMENDATIONS IT MAY MAKE. FURTHER, READERS SHOULD BE AWARE THAT INTERNET WEBSITES LISTED IN THIS WORK MAY HAVE CHANGED OR DISAPPEARED BETWEEN WHEN THIS WORK WAS WRITTEN AND WHEN IT IS READ.
For general information on our other products and services, please contact our Customer Care Department within the U.S. at 800-762-2974, outside the U.S. at 317-572-3993, or fax 317-572-4002.
Wiley also publishes its books in a variety of electronic formats. Some content that appears in print may not be available in electronic books.
Library of Congress Control Number: 2004107905 ISBN: 0-7645-7660-7
Manufactured in the United States of America 10 9 8 7 6 5 4 3 2 1
Gordon McCombhas penned 60 books and over a thousand magazine arti-cles. More than a million copies of his books are in print, in over a dozen lan-guages. For 13 years, Gordon wrote a weekly syndicated newspaper column on personal computers. When not writing about hobby electronics and other fun topics, he serves as a consultant on digital cinema to several notable Hollywood clients.
Earl Boysenis an engineer who, after 20 years in the computer-chip industry, decided to slow down and move to a quiet town in Washington. Earl lives in a house he built with a wonderful lady and finds that he is as busy as ever with teaching, writing, house building, and acting.
Dedication
To my father, Wally McComb, who instilled in me a fascination with electron-ics; and to Forrest Mims, who taught me a thing or two about it.
G.M. To my parents, Dick and Nettie, who keep providing an example of the right way to live.
E.B.
Authors’ Acknowledgments
Some of the people who helped bring this book to market include the following:
Acquisitions, Editorial, and Media Development
Project Editor:Nancy Stevenson
Acquisitions Editor:Katie Feltman
Copy Editor:Laura Miller
Technical Editor:Ward Silver
Editorial Manager:Carol Sheehan
Editorial Assistant:Amanda Foxworth
Cartoons:Rich Tennant (www.the5thwave.com)
Production
Project Coordinator: Maridee Ennis
Layout and Graphics: Lauren Goddard, Denny Hager, Joyce Haughey, Barry Offringa, Melanee Prendergast, Jacque Roth, Erin Zeltner
Proofreaders: Amanda Foxworth,
Leeann Harney, Jessica Kramer, Carl Pierce, Carol Sheehan, TECHBOOKS Production Services
Indexer: TECHBOOKS Production Services
Publishing and Editorial for Technology Dummies
Richard Swadley,Vice President and Executive Group Publisher
Andy Cummings,Vice President and Publisher
Mary Bednarek,Executive Acquisitions Director
Mary C. Corder,Editorial Director
Publishing for Consumer Dummies
Diane Graves Steele,Vice President and Publisher
Joyce Pepple,Acquisitions Director
Composition Services
Gerry Fahey,Vice President of Production Services
Introduction ...1
Part I: Getting Started in Electronics...7
Chapter 1: From Electrons to Electronics ...9
Chapter 2: Keeping Humans and Gadgets Safe...29
Part II: Aisle 5, Component Shack: Stocking Up...41
Chapter 3: Outfitting Your Electronics Bench ...43
Chapter 4: Getting to Know You: The Most Common Electronic Components ...63
Chapter 5: Filling Out Your Parts Bin ...93
Part III: Putting It on Paper ...121
Chapter 6: Reading a Schematic ...123
Chapter 7: Understanding the Basics of Electronics Circuits...141
Part IV: Getting Your Hands Dirty...159
Chapter 8: Everything You Need to Know about Soldering ...161
Chapter 9: Making Friends with Your Multimeter ...175
Chapter 10: Getting Down with Logic Probes and Oscilloscopes ...207
Part V: A Plethora of Projects ...231
Chapter 11: Creating Your Own Breadboard Circuit...233
Chapter 12: Building Your Own Printed Circuit Boards ...249
Chapter 13: The Exciting World of Microcontrollers ...281
Chapter 14: Great Projects You Can Build in 30 Minutes or Less...299
Chapter 15: Cool Robot Projects to Amaze Your Friends and Family ...323
Part VI: The Part of Tens ...359
Chapter 16: Ten (Or So) Cool Electronics Testing Tool Tips ...361
Chapter 17: Ten Great Electronics Parts Sources ...369
Chapter 18: Ten Electronics Formulas You Should Know ...375
Appendix: Internet Resources...383
Glossary...389
Introduction...1
Why Buy This Book? ...1
Why Electronics?...1
Foolish Assumptions ...2
Safety Is Number 1 ...3
How This Book Is Organized...3
Part I: Getting Started in Electronics ...3
Part II: Aisle 5, Component Shack: Stocking Up...4
Part III: Putting It on Paper...4
Part IV: Getting Your Hands Dirty ...4
Part V: A Plethora of Projects ...4
Part VI: The Part of Tens ...5
Icons Used in This Book...5
Part I: Getting Started in Electronics ...7
Chapter 1: From Electrons to Electronics . . . .9
Just What Is Electricity? ...9
First, you take an electron...10
Moving electrons around through conductors ...10
Voltage, the driving force ...11
An important combo: Electrons, conductors, and voltage...12
Where Do You Get Electricity? ...12
They just keep on going: Batteries...13
Garden-variety electrical outlets ...13
Solar cells ...15
Where Do Electrical Components Fit In?...15
Controlling electricity ...16
Controlling electricity even better (ICs) ...16
Sensing with sensors ...17
Powering up ...18
How Electricity Becomes Electronics...19
Creating a simple circuit...19
Deciding what to build...20
Along the Way You Get to Play with Tools ...21
Tools to build things ...21
Tools to measure things ...21
The Wonderful World of Units ...22
Measuring things in units ...22
Getting to bigger or smaller units ...22
Understanding Ohm’s Law...26
Taking Ohm’s Law farther ...26
Dealing with numbers both big and small ...27
The power of Ohm’s Law...27
Chapter 2: Keeping Humans and Gadgets Safe . . . .29
The Sixth Sense of Electronics ...29
The Dangers of Electrical Shock ...30
Electricity = voltage + current...30
Is it AC or DC? ...31
Trying to not get electrocuted...31
Getting a first aid chart...32
Zaps, Shocks, and Static Discharge ...33
That guy from the $100 bill again ...34
How static can turn components to lumps of coal ...34
Tips for reducing static electricity...35
Grounding your tools...37
Working with AC Current ...37
The Heat Is On: Safe Soldering ...39
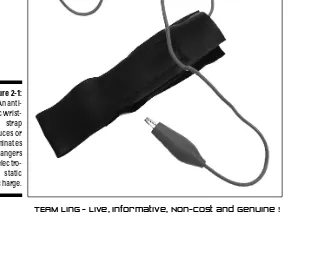
Wearing Body Armor ...40
Part II: Aisle 5, Component Shack: Stocking Up ...41
Chapter 3: Outfitting Your Electronics Bench . . . .43
Oh, the Hand Tools You Will Use...43
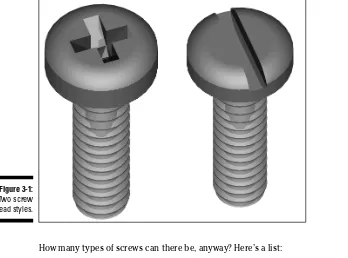
Screwdrivers (the tool, not the cocktail) ...44
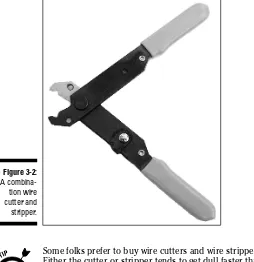
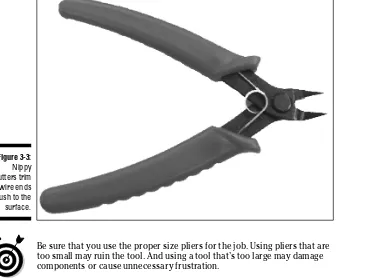
Take it off: Wire cutters and strippers ...46
Getting a grip with needle-nosed pliers...47
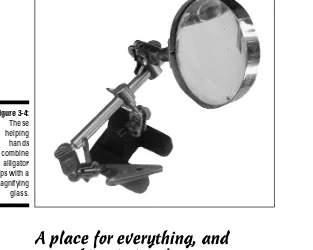
Magnifiers: The better to see you with...48
A place for everything, and everything in its place ...49
Filling out the toolbox...50
Where to Park Your Tools ...51
Tools You Don’t Absolutely Need (But May Find Handy) ...52
Getting ‘hole-istic’ with a drill press ...52
Cutting things to size with a table saw or circular saw...53
Getting intricate with a motorized hobby tool...53
Keeping Things Clean and Well-Oiled...54
Spic-and-span electronics...54
Oil and grease to keep parts slippery...55
Yet more cleaning and construction supplies ...56
Sticky Stuff to Keep Things Together ...57
Setting Up Your Electronics Lab...58
The top ingredients for a great lab...58
Picking a perfect place to practice electronics ...59
Triple threat: Heat, cold, and humidity ...60
Chapter 4: Getting to Know You: The Most Common Electronic
Components . . . .63
Viva la Resistors ...64
Ohming in on resistor values ...65
Color me red, green, and blue...66
Understanding resistor tolerance ...67
Let there be heat ...68
Dialing with potentiometers ...69
Capacitors: Reservoirs for Electricity ...70
A quick look inside a capacitor ...70
Farads big and small ...71
Keeping an eye on the working voltage...71
Dielectric this, dielectric that ...71
How much capacity does my capacitor have? ...73
When a microfarad isn’t quite a microfarad ...75
Tolerating hot and cold ...76
Being positive about capacitor polarity ...77
Changing capacitance ...78
Diode Mania ...78
Important ratings for diodes: Peak voltage and current ...80
Which way is up?...81
Fun, fun, fun with light-emitting diodes...81
Resistors, meet LEDs ...82
The Transistor: A Modern Marvel ...83
Slogging through transistor ratings ...84
On the case of transistor cases ...85
Making connections ...86
Transistor types ...87
Packing Parts Together on Integrated Circuits ...88
Linear, digital, or combination plate? ...88
IC part numbers...90
Understanding IC pinouts ...90
Exploring ICs on your own ...91
Chapter 5: Filling Out Your Parts Bin . . . .93
Making the Connection...93
Wire ...94
Making connections with connectors...97
Powering Up...98
Turning the juice on with batteries...98
Turning on power with solar cells ...102
Turning Electricity On and Off ...103
Turning current on and off with switches...103
Let a relay flip the switch ...105
Making Decisions with Logic Gates ...106
Using logic in electronics ...107
Controlling Frequency with Inductors and Crystals ...109
Storing energy in inductors...109
Making frequencies crystal clear ...111
Making Sense of Things ...111
Can you see the light? ...111
Sensing the action with motion detectors ...112
You’re getting warmer: Temperature sensors ...113
Good Vibrations with DC Motors ...115
So You Want to Make Some Noise? ...116
Speaking of speakers...117
Buzzers ...118
Part III: Putting It on Paper ...121
Chapter 6: Reading a Schematic . . . .123
What’s a Schematic, and Why Should I Care?...123
Getting a Grip on Schematic Symbols ...124
Getting the scoop on basic schematic symbols...125
Symbols for electronic components ...129
Logic gate symbols...133
Miscellaneous symbols...134
Getting Component Polarity Right...136
One Size Fits All: Adjustable Components ...138
Photo-Sensitive Components Help You See the Light ...139
Alternative Schematic Drawing Styles...139
Chapter 7: Understanding the Basics of Electronics Circuits . . . .141
What the Heck Is a Circuit? ...142
A Very Basic Circuit ...142
Powering a light bulb ...142
Controlling the current with a resistor...143
Parallel (or Series) Parking Your Light Bulbs ...144
Circuits: The series ...144
Parallel circuits ...145
Exploring a Voltage Divider Circuit...146
Measuring Current with Voltage...148
What a Team: Capacitors and Resistors ...149
How the dynamic duo of resistors and capacitors works ...149
Turning things on and off ...150
Talking of Transistors ...151
Using a transistor as a switch...151
When is a transistor an amplifier? ...152
What else can you do with transistors? ...154
An Operational Amplifier ...155
Part IV: Getting Your Hands Dirty ...159
Chapter 8: Everything You Need to Know about Soldering . . . .161
To Solder or Not to Solder ...161
Things You Absolutely, Positively Need for Soldering ...163
Choosing just the right soldering pencil ...166
Selecting a soldering tip ...166
Preparing Your Soldering Pencil ...167
Successful Soldering ...167
Avoiding Cold Solder Joints like the Plague ...169
Avoiding Static Discharge While Soldering...170
Thwarting discharge before it begins ...170
Stocking up on anti-static supplies ...171
Unsoldering and Resoldering ...172
Putting a spring-loaded plunger desolder pump to work ...172
This bulb desolder pump definitely sucks...173
Soldering Tips and Techniques ...174
Chapter 9: Making Friends with Your Multimeter . . . .175
The Basics of Multimeters ...175
Remember: Safety First!...177
Which to choose: Digital or analog? ...177
Taking a Close-Up Look at Multimeters...179
Basic features of every meter ...179
Making sense of all the inputs and dials ...181
Accuracy, resolution, and sensitivity...183
The well-stocked multimeter ...183
Maximum range: Just how much is enough? ...185
Home on the automatic range ...186
Extra nice-to-have functions ...188
Setting Up the Meter ...189
Five Basic Tests That You Can Make with Your Multimeter ...191
Testing voltage...191
Testing current ...193
Testing wires and cables for continuity ...194
Testing switches ...196
Testing fuses ...199
Testing Resistors, Capacitors, and Other Electronic Components ...200
Gee, it looks all burned out! ...200
Testing resistors ...201
Testing potentiometers ...202
Testing diodes...202
Testing capacitors ...204
Chapter 10: Getting Down with Logic Probes and
Oscilloscopes . . . .207
The Search for Spock: Using a Logic Probe ...207
Sound, lights, action!...208
Signals that are too fast (even for Superman) ...209
Know thy circuit ...211
Putting the Logic Probe to Work ...211
Observe the usual safety precautions, please...211
Connecting the probe to the circuit...212
What if the indicator doesn’t indicate? ...213
Scoping Out the Oscilloscope ...214
So, exactly what does it do?...215
Sticking to common oscilloscope features ...216
Bench, handheld, or PC-based? ...217
Understanding oscilloscope bandwidth and resolution ...219
The ins and outs of using an oscilloscope ...219
What all the wiggly lines mean ...221
So, When Do I Use an Oscilloscope?...223
Putting the Oscilloscope to Work: Testing, 1-2-3!...223
Basic setup and initial testing...224
Does your battery have any juice?...226
Dissecting your radio to display an audio waveform ...227
Testing the frequency of an AC circuit ...228
Part V: A Plethora of Projects...231
Chapter 11: Creating Your Own Breadboard Circuit . . . .233
Taking a Look at Solderless Breadboards ...234
Solderless breadboards, inside and out ...234
All sizes, big and small...237
Creating a Circuit with Your Solderless Breadboard ...238
Why you gotta get pre-stripped wires ...238
Breadboarding techniques...240
Neatness counts ...241
Making the Move from Your Circuit to a Solder Breadboard ...243
Prototyping with Pre-Drilled Perf Boards ...245
Getting Wrapped Up in Wire Wrapping ...247
Chapter 12: Building Your Own Printed Circuit Boards . . . .249
Anatomy of a Circuit Board ...250
How the Copper Gets onto the Circuit ...252
Ready, Set: Preparing to Build Your Board ...253
Choosing the right copper clad ...253
Cutting and cleaning ...253
Creating a PCB Photographically ...255
Positively or negatively sensitized...256
Mirror, mirror on the PCB ...257
Preparing the PCB for etching ...257
Let there be light: Exposing and developing the board ...259
Creating a PCB by Using the Transfer Film Method ...260
Flip-flop, flop-flip...261
Getting a good image ...261
Transferring the layout to copper clad ...262
Be sure to QC (Quality Control) your work!...263
Choosing a Method for Making Your Own Circuit Layouts ...264
Showing You My Etchings: Etching the Circuit Board ...265
First step: Inspecting the board...265
Cleaning the board — carefully, please! ...266
Kvetching about etching ...266
Mixing the etchant ...267
Now that you’re itching to etch . . ...269
Final Prep and Drilling ...270
PCBs R Us: Using a PCB Service ...272
Now you’re a board designer...272
PCBs: Everybody’s doing it (But will they do it for you?)...273
Using CAD to Make Artwork ...274
What you can do with Eagle Light CAD ...274
Getting to work designing a board ...274
Chapter 13: The Exciting World of Microcontrollers . . . .281
So, How Does It Work? ...281
What’s Inside a Microcontroller? ...282
Discovering Microcontrollers for Hobbyists ...284
How much is that microcontroller in the window?...285
PC calling microcontroller: Come in, please! ...286
Microcontrollers That Stand Out from the Rest ...287
Introducing the BASIC Stamp...287
Introducing the OOPic ...290
Getting to Know the BASIC Stamp 2 ...292
Step 1: Making the circuit ...292
Step 2: Programming the darned thing...292
Step 3: Let ‘er rip! ...295
Making changes made easy...296
Adding a switch to the mix ...296
Where to Go from Here...298
Chapter 14: Great Projects You Can Build in 30 Minutes
or Less . . . .299
Getting What You Need Right Off the Bat ...300
Creating Cool, Crazy, Blinky Lights...300
Taking a closer look at the 555 flasher ...301
Putting the Squeeze on with Piezoelectricity ...305
Piezo — what?...305
Experimenting with piezoelectricity ...305
Gathering parts for the piezoelectricity circuit...307
Building the Amazing See-in-the-Dark Infrared Detector ...308
Chasing down infrared light...308
Detecting parts for the infrared detector...310
Cheese It! It’s the Cops!!...310
How your warbler works ...310
Scoping out the 555 siren parts list...311
Get Lost . . . or Found, with the Electronic Compass ...312
Peeking under the compass hood ...312
Checking your electronic compass parts...314
When There’s Light, You Hear This Noise . . . ...314
Making your alarm work for you ...314
Assembling a light alarm parts list ...315
‘Lil Amp, Big Sound ...316
The ins and outs of ‘Lil Amp ...316
Sounding the roll call for little amplifier’s parts...317
Building the Handy-Dandy Water Tester ...317
How the water tester works ...317
Gathering water tester parts...318
Creating a Very Cool Lighting Effects Generator...319
Arranging the LEDs ...319
Going to the store for light chaser parts ...321
Chapter 15: Cool Robot Projects to Amaze Your Friends and Family...323
Robots: The Big Picture...324
Rover the Robot parts list ...325
The bits and pieces of a ‘bot...326
Introducing Rover the Robot ...326
Preparing to Build the ‘Bot ...327
First, get yourself a template ...327
Gathering your materials ...328
Getting to know the pieces...328
Building the Body of the ‘Bot...330
Cutting and drilling the pieces of a robot body ...330
Assembling and mounting the motors ...332
Doing a wheelie...333
Mounting the caster ...334
Adding the second deck ...335
Control switches...336
Driving Miss Rover ...338
Giving Rover Some Smarts...340
DC motors out, R/C servo motors in ...341
Going inside a servo motor...342
Going shopping for servos ...342
Making servos serviceable...343
Modifying the R/C servo motors ...343
Mounting the servos to the Rover ...347
Putting Your Servos on a Roll with Wheels ...350
Sensing Things with a Bumper Car Switch ...351
Connecting Up to the Board of Education ...352
Making Switch and Power Connections ...354
Making the Smart Rover Smart ...355
Putting the program in place ...355
Looking at the program up-close ...356
Where Can I Go from Here?...358
Part VI: The Part of Tens ...359
Chapter 16: Ten (Or So) Cool Electronics Testing Tool Tips . . . .361
Put a Pulse Here, Put a Pulse There...362
Counting Up Those Megahertz...363
A Power Supply with a Changeable Personality ...364
Making All Kinds of Signals ...365
Calling All Alien Worlds ...365
Analyze This ...366
A Trio of Testing Toys...366
Where to Get Testing Tool Deals ...367
Chapter 17: Ten Great Electronics Parts Sources . . . .369
North America ...369
All Electronics ...369
Allied Electronics...370
B.G. Micro ...370
Digikey ...370
Electronic Goldmine...370
Fry’s Electronics ...371
Jameco Electronics ...371
Mouser Electronics ...371
RadioShack...371
Outside North America ...372
Dick Smith Electronics (Australia) ...372
Farnell (UK) ...372
Maplin (UK) ...372
Advice for Shopping Mail Order...372
Do ...373
Don’t...373
Chapter 18: Ten Electronics Formulas You Should Know . . . .375
Calculating Relationships with Ohm’s Law...375
Calculating Resistance...377
Calculating resistors in series...378
Calculating two resistors in parallel ...378
Calculating Capacitance ...379
Calculating capacitors in parallel...379
Calculating two capacitors in series ...379
Calculating three or more capacitors in series ...379
Calculating Units of Energy...380
Calculating RC Time Constants ...380
Calculating Frequency and Wavelength ...381
Calculating frequency of a signal ...382
Calculating wavelength of a signal ...382
Appendix: Internet Resources ...383
Figuring Things Out with Calculators...383
Gabbing about Electronics in Discussion Forums ...384
Surfing for Robot Parts...384
Getting Up to Speed with Tutorials and General Information ...385
Trolling for Printed Circuit Board Chemicals and Supplies...386
Getting Things Surplus ...387
Surfing for Circuits ...387
Glossary ...389
A
re you thinking about building your own electronic gizmos? Ever wonder how transistors, capacitors, and other building blocks of electronics work? Do you have an interest in finding out how to solder or make your own circuit boards?Well, you’ve come to the right place! Electronics For Dummiesis the key that opens the fun and exciting door of modern electronics. No dry and boring tome, this; what you hold in your hands is a book that gives you just what you need to know to make and troubleshoot your own electronic gadgets.
Why Buy This Book?
Electronics is a huge — no, make that HUGE — subject. Like any science, it consists of a lot of concepts and all sorts of highly complicated mathematical equations. For any really in-depth study of electronics, you need to spend hours and hours memorizing a lot of facts and figures.
But this book takes a different path. It provides you with just what you need to understand the basics of electronics, get to work building electronic circuits, and even tackle a dozen fun projects that you can build in under an hour each for just a few dollars. This book doesn’t pretend to answer all your questions about electronics, but it does give you a good grounding in the essentials and makes this exciting science fun!
Why Electronics?
This is a rhetorical question because you no doubt already know why you have an interest in electronics, or you wouldn’t have picked up this book. But we’ll take a moment to review the things that make electronics well worth your while.
And don’t forget that electronic products are all around us. They make up a growing part of our lives. Some people are content just accepting these gadgets, gizmos, and widgets, but others want to know how they all work. Obviously, you’re in that second group, which is definitely the cooler group out there. The science of electronics has advanced to the point that you can now hold a very powerful computer in the palm of your hand. With that com-puter, you can build something that controls the lighting in your entire house, a robot that vacuums the living room all on its own, or a sensor system that sounds an alarm if somebody tries to get at your collection of 1950s comic books.
Here’s the amazing part: You can make electronic gadgets that do these things for just a couple of bucks! At the same time that the art and science of electron-ics is rapidly advancing, the price for building a circuit that can do something incredibly nifty is dropping like a stone. Unless you’re constructing a time machine, or the world’s largest robotic rabbit, the typical home-brewed elec-tronics project costs less than dinner for four at a no-frills restaurant. If you’re looking for a cool hobby, electronics is one of the least expensive ones around. Oh, and did I mention that electronics is fun?
You may also want to consider this possibility: People who know the practi-cal side of electronics — what things are, how they work, and how to put them together — can find some really great jobs on the market right now. If you’re interested in a career in electronics, make this book your first step to a fun and rewarding new job.
Also, many other hobbies rely on knowledge of electronics in some way. Maybe you’re into model railroading. You can figure out how to build your own auto-mated track switchers. Or perhaps you like racing radio-controlled cars. With an understanding of electronics, you may discover how to improve the perfor-mance of your car and beat your best friend in the next race. Knowing more about how electronics stuff works can make your other hobbies more fun. And, last but not least, electronics is fun. Or maybe I mentioned that already?
Foolish Assumptions
You can also use the most-excellent table of contents at the front of the book and the index that Wiley has thoughtfully provided at the back to quickly find the information that you need.
Safety Is Number 1
Reading about electronics is pretty safe. About the worst that can happen is that your eyes get tired from too many late nights with this book. But actually building electronics projects is another matter. Lurking behind the fun of the electronics hobby are high voltages that can electrocute you, soldering irons that can burn you, and little bits of wire that can fly into your eyes when you snip them off with sharp cutters. Ouch!
Safety is Numero Unoin electronics. It’s so important, in fact, that we devote an entire chapter of this book (Chapter 2) to it. If you’re brand new to electronics, please be sure to read this chapter. Don’t skip over it, even if you think you’re the safest person on earth. Even if you’ve dabbled in electronics before, it never hurts to refresh your safety memory. When you follow proper precau-tions, electronics is a very safe and sane hobby. Be sure to keep it that way! Although we try to give you great advice about safety throughout, we can’t possibly give you every safety precaution in the world in one book. In addi-tion to reading our advice, use your own common sense, read manufacturer’s instructions for parts and tools that you work with, and always stay alert.
How This Book Is Organized
Electronics For Dummiesis organized so that you can quickly find, read, and understand the information that you want. It’s also organized so that if you have some experience with electronics, you can skip chapters and move on to the parts that interest you.
The chapters in this book are divided into parts that also help you find the information that you’re looking for quickly and easily.
Part I: Getting Started in Electronics
Part II: Aisle 5, Component Shack:
Stocking Up
If you’re just starting out in electronics, you probably need a couple of tools. Read about the most important ones in Chapter 3, “Outfitting Your
Electronics Bench.”
You can’t make a project out of thin air. You need resistors, diodes, capacitors, and other building blocks of today’s electronics. Chapters 4 and 5 explain what each of the most important electronics components does and how often you use each in building a circuit.
Part III: Putting It on Paper
If you’ve ever seen an electronics diagram, you probably thought it looked like Egyptian hieroglyphics. In Chapter 6, we explain all about how to read these diagrams (they’re called schematics), and you can discover how to follow a schematic to determine the basic functionality of a circuit in Chapter 7.
Part IV: Getting Your Hands Dirty
At this point, you’re ready to start building your own electronics projects. The chapters in Part IV tell you how to solder and how to use three of the most important testing tools in electronics — the multimeter, logic probe, and oscilloscope. You don’t absolutely need the last two to get started with electronics, so you can come back to Chapter 10 a few months from now if you’re just starting out.
Part V: A Plethora of Projects
Part VI: The Part of Tens
This part contains several chapters laid out in top-ten-list format. Here, you explore some optional testing tools that you can add to your electronics bench as you gain more experience; get advice about where to find electron-ics parts; and finally, study useful electronelectron-ics formulas that don’t require a degree in math.
Icons Used in This Book
We’re a graphical society, bombarded with images from blockbuster movies and computer games, and so this book uses little graphic icons to visually point out useful information that you may want to know about.
The Tip icon indicates information that may help save you time, headaches, or money (or all three!). These icons tend to point out tasty morsels that make electronics more enjoyable, so don’t just skip ‘em!
Uh-oh! Something bad is about to happen — if you don’t read the text that follows the Warning icon, that is. Some of these point out cautions to avoid personal injury, and others give you advice on avoiding damage to tools, components, circuits, or your pocketbook.
Y
ou say you’ve always wanted to get into electronics, but didn’t know where to start? You’ve come to the right place!From Electrons to Electronics
In This Chapter
Understanding the role of electrons, conductors, and voltage
Looking at how electricity is generated
Exploring some electronic components
Connecting components together in circuits
Introducing a few tools of the electronics trade
Breaking it all down into units
Understanding Ohm’s Law
W
hen you plug in the coffee maker in the morning, you’re using electric-ity. When you flip on the TV to watch a rerun of Sex in the City, you’re using electricity again (for better or worse).You use electricity and electronics devices all the time, and you’ve finally worked up enough curiosity to want to tinker with electronic gadgets yourself. That’s great. But before you can jump into playing with wires and batteries, it helps to understand what puts the elecin electricity and electronics.
In this chapter, you discover all about how electrons make electricity and how harnessing that electricity is the basis of electronics. You also get an introduc-tion to some of the tools and parts that you can play with in the electronics projects in Chapters 14 and 15.
Just What Is Electricity?
First, you take an electron
Electrons are one of the building blocks of nature. Electrons are buddies with another of nature’s building blocks, protons. Electrons and protons are very small and are contained in . . . well, everything. A speck of dust contains mil-lions and milmil-lions of electrons and protons, so you can imagine how many there are in your average sumo wrestler.
Electronsand protonshave equal and opposite electric charges, with elec-trons having the negative charge and protons the positive. Opposite charges are attracted to each other. You can visualize a similar type of attraction by putting the ends of two magnets together. If the ends of the magnets are opposite poles, the magnets cozy right up to each other and stick together. If the ends of the magnets are the same pole, the magnets will move apart like two politicians in a heated debate. In a similar way, because electrons and protons have opposite charges, they are attracted to each other just as you can see opposite magnetic poles attracting. The attraction between electrons and protons acts like glue on a microscopic scale, holding matter together. Although protons stay reasonably static, electrons are adventurous little fel-lows who don’t like to just sit around at home. They can, and often do, move from one object to another. Walk across a carpet on a dry day and touch a doorknob; electrons traveling between your finger and the doorknob cause the spark that you feel and sometimes see. Lightning is another example of electrons traveling between two things — in this case, between a cloud and the ground. These examples both show electricity in an unharnessed state.
Moving electrons around
through conductors
What do electrons use to travel from one place to another? The answer to that question gives you the next piece of the electricity puzzle. Although you may use your old Chevy to get around, electrons use something called a conductor.
Electricityis simply the movement of electrons through a conductor.
So which materials are good conductors and which are good insulators? Most folks use copper and aluminum as conductors. In fact, electronics projects often use copper wire conductors. Plastic and glass are commonly used insulators.
Resistanceis the measurement of the ability of electrons to move through a material. A copper wire with a large diameter has lower resistance to the flow of electrons than a copper wire with a small diameter. You need to understand resistance because almost every electronics project you do involves a resistor. Resistors have controlled amounts of resistance, which allows you to control the flow of electrons in a circuit.
Voltage, the driving force
The previous sections in this chapter explain how electrons move and that they move more freely in a conductor. But some kind of force has to pull the electrons from one place to another. This attractive force between positive and negative charges is an electromotive force called voltage. Negative elec-trons move toward a positive voltage by way of a conductor.
Remember Ben Franklin’s adventure flying a kite in a storm? The spark he produced that night gave him an understanding of how an electric current moves. In Ben’s case, electrons traveled down the wet string, which acted as a conductor. (This was at least in part because the string was wet. Try this same stunt with dry string and it doesn’t work nearly as well). The voltage difference between the negatively charged clouds and the ground pulled the electrons down the wet string.
Don’t try Franklin’s experiment yourself! By flying a kite in a storm, you’re basically playing with lightning — which can effectively turn you into toast.
What happened to protons?
You may have noticed that we stopped talkingabout protons. Although you should understand the positive and negative charges in protons and electrons, we’re focusing on electrons because they’re more mobile than protons. In most cases, it is electrons, and their negative charges, that move through conductors and generate elec-tricity. But in special cases, such as batteries, positive charges also move through conductors.
An important combo: Electrons,
conductors, and voltage
Say that you have a wire (a conductor), and you attach one of its ends to the positive terminal of a battery and the other end of the wire to the negative ter-minal of the battery. Electrons then flow through the wire from the negative to the positive terminal. This flow of electrons is referred to as an electric current. When you combine electrons, a conductor, and voltage you create an electric current in a form that you can use.
To help you picture how conductors and voltage affect the flow of electric current in a wire, think of how water pressure and pipe diameter affect the flow of water through a pipe. Here’s how this analogy works:
Increasing water pressure causes more water to flow through the pipe. This is analogous to increasing voltage, which causes more electrons to flow, producing greater electric current.
Using a larger diameter pipe allows more water to flow through the pipe for a given amount of pressure. This is analogous to using wire with a larger diameter, which allows more electrons to flow for a given voltage, producing greater electric current.
Where Do You Get Electricity?
Electricityis created when voltage pulls an electric current through a conduc-tor. But when you sit down and run a wire between a switch and a light, just where do you get the juice (the electricity) to power that light?
Conventional current versus real current
Early experimenters believed that electriccur-rent was the flow of positive charges. So they described electric current as the flow of a pos-itive charge from pospos-itive to negative voltage. Much later, experimenters discovered electrons and determined that the flow of electrons in wires goes from negative to positive voltage.
There are many different sources of electricity — everything from the old walking-across-a-carpet-and-touching-a-doorknob kind to solar power. But to make your life simple, this book takes a look at the three sources that you’re likely to use for electronics projects: batteries, your wall outlet, and solar cells.
They just keep on going: Batteries
A battery uses a process called electrochemical reaction to produce a positive voltage at one terminal and a negative voltage at the other terminal. The bat-tery creates these charges by placing two different metals in a certain type of chemical. Because this isn’t a chemistry book, we don’t get into the guts of a battery here — but trust us, this is essentially what goes on.
Batteries have two terminals (a terminalis just a fancy word for a piece of metal to which you can hook up wires). You often use batteries to supply electricity to devices that are portable, such as a flashlight. In a flashlight, the bulb has two wires running to the battery, one to each terminal. What happens next? Something like this:
Voltage pulls electrons through the wire from the negative terminal of the battery to the positive terminal.
The electrons moving through the wire pass through the wire filament in the light bulb, causing the bulb to light up.
Because the electrons move in only one direction, from the negative terminal through the wires to the positive terminal, the electric current generated by a battery is called direct current,or DC. This is in contrast to alternating current (AC) which is discussed in the following section, “Garden-Variety Electrical Outlets.”
The wires on a battery must connect to both terminals. This setup allows electrons to flow from one terminal of the battery, through the bulb, and all the way to the other terminal. If the electrons can’t complete this kind of loop between negative and positive, electrons don’t flow.
Garden-variety electrical outlets
plant, the direction in which the electrons flow changes 120 times a second, making a complete turnaround 60 times a second. This change in electron flow is called alternating current,or AC.
When the change in electron flow makes a complete loop, it’s called a cycle. The number of cycles per second in alternating current is measured in Hertz,
abbreviated Hz. The example of a cycle in the previous paragraph is based on the fact that the United States uses a 60 Hertz standard frequency; some other countries use 50 Hertz as a standard, which means that the electrons change direction 100 times a second.
Electricity generated at a dam uses water to turn a coil of wire inside a huge magnet. One of the properties of magnets and wires is that when you move a wire near a magnet, a flow of electrons is induced in the wire. First, the magnet causes the electrons to flow in one direction, and then, when the wire loop rotates 180 degrees, the magnet pulls the electrons in the other direction. This rotation creates alternating current.
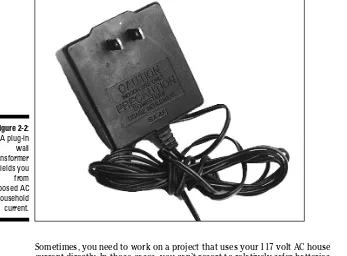
Just plugging a cord into a wall outlet sounds easy enough, but you need direct current for most projects, rather than alternating current. If you use wall outlets to supply electricity for your project, you have to convert the electricity from AC to DC. You can do this conversion with something called a power supply. For an example of a power supply, think of the charger that you use for your cell phone; this little device essentially converts AC power into DC power that the battery uses to charge itself back up. You can find out more about power supplies in Chapter 3.
Safety, safety, safety. It’s an important issue for you to consider when decid-ing whether to use the AC electricity that you get from wall outlets. Usdecid-ing the electricity from a battery is like petting a house cat. Using the electricity from wall outlets is more like cozying up to a hungry lion. With a cute tabby, you may get your hand scratched; with the king of the jungle, you may be eaten alive. If you think that you need to use electricity from a wall outlet for a pro-ject, make sure that you know what you’re doing first. See Chapter 2 for spe-cific advice about safety.
Which came first, voltage or current?
Batteries produce a voltage that drives anelec-tric current. Generators at dams drive a current that produces a voltage. Which comes first?
This is like asking yourself the well-known ques-tion about the chicken and egg. Voltage, cur-rents, and conductors all work together. If there
Solar cells
Solar cells are a form of semiconductor. Like batteries, solar cells have wires attached to two terminals. Shining light on a solar cell causes an electric cur-rent to flow. (This reaction to light is a property of semiconductors and is discussed in the sidebar “Getting fancy with semiconductors,” later in this chapter.) The current is then conducted through wires to devices, such as a calculator or a garden light beside the pathway to your front door.
Using a calculator containing a solar cell, you can demonstrate that the calcu-lator depends on the light shining on the solar cell for its power. Turn the calculator on and punch some numbers into the screen (choose a nice big number, like your income tax). Now, use your thumb to cover the solar cell. (The solar cell is probably near the top of the calculator in a rectangular area with a clear plastic cover.) After you’ve covered up the solar cell for a moment, the numbers fade away. Take your thumb off the solar cell, and the numbers reappear. Things powered by solar cells need light to work.
Where Do Electrical Components Fit In?
Electrical componentsare parts you use in electronics projects. Simple enough, right? You use some electrical components to control the flow of electricity, such as a dimmer switch that adjusts the brightness of a light. Electricity simply powers other electrical components, such as speakers blasting out sound. Still other electronic components, called sensors,detect something (such as light or heat) and then generate a current to do something in response, such as set off an alarm.
In this section, you meet some basic electrical components. Chapters 4 and 5 provide much more detail about components.
A simple choice: AC or DC
What difference does it make to you if you usealternating or direct current? A lot of difference!
AC costs less to generate and send over trans-mission lines than DC. That’s why you use AC for many household electricity needs, such as powering light bulbs and heaters.
However, DC is simpler to use for the pro-jects discussed in this book (and many other
Controlling electricity
Electrical components, or parts, can control electricity. For example, a switch connects a light bulb to electric current. To disconnect the light bulb and make it go dark, the switch simply makes a break in the circuit.
Some other parts that control electricity are resistors, capacitors, diodes, and transistors. You can find more information on these parts in Chapter 4.
Controlling electricity even better (ICs)
Integrated circuits,or ICs, are components that contain a whole bunch of miniature components (such as resistors, transistors, or diodes, which you hear about in Chapter 4) in one device that may not be much bigger than an individual component. Because each IC contains many components, one little IC can do the same job as several individual parts.Getting fancy with semiconductors
Transistors, diodes, LEDs, integrated circuits, andmany other electronic devices use a semicon-ductor instead of a consemicon-ductor. A semiconductor
is a material, such as silicon, that has some of the properties of both conductors and insulators.
Silicon is pretty cool stuff. In fact, they’ve named a whole valley in California after it. In its pure state, silicon conducts an electric current poorly. But if you add contaminates, such as boron or phosphorus, to the silicon, it conducts. When you add phosphorus, silicon becomes an “n”-type semiconductor. When you add boron, silicon becomes a “p”-type semiconductor. An “n”-type
semiconductor has more electrons than a pure
semiconductor and a “p”-type semiconductor
has fewer electrons than a pure semiconductor.
When the regions containing boron and phos-phorus are next to each other in silicon, you have a “pn” junction.Current flows in only one direc-tion across a “pn” juncdirec-tion. Diodes,components that can convert AC to DC by limiting the flow of
current to one direction, are an example of a component that contains a “pn” junction.
A “pn” junction generates an electric current when exposed to light; this property is used when building solar cells. On the other hand, when you run an electric current through a “pn” junction, it emits light, as light-emitting diodes (LEDs) do.
Transistors use junctions in which three adja-cent areas have contaminants added. For example, one region with phosphorus, one with boron, and another with phosphorus result in an “npn” junction. In a transistor, you apply a cur-rent to the middle of the three regions (the base), allowing a current to flow.
An audio amplifier is one example of an IC. You can use audio amps to increase the power of an audio signal. For example, if you have a microphone, its small output signal is fed through an audio amplifier to make a strong enough signal to power a speaker.
Another type of IC used in electronics projects is a microcontroller,a type of integrated circuit that you can actually program to control cool gadgets like robots. We discuss microcontrollers in more detail in Chapter 13.
Sensing with sensors
Certain electrical components generate a current when you expose them to light or sound. You can use the current generated, together with a few of the components listed in the previous sections that control electricity, to turn on or off electronic devices, such as light bulbs or speakers.
Motion detectors, light sensors, microphones, and temperature sensors all generate an electrical signal in response to a stimulus (motion, light, sound, or temperature, respectively). These signals can then be used to turn other things on or off. A high signal level might turn something on and a low signal level turn something off. For example, when a salesperson walks up to your house, a motion detector can turn on a light (or better yet, sound a general alarm).
These signals take different forms, depending on the component supplying them. For example, a microphone supplies an AC signal, and a temperature sensor supplies a DC signal.
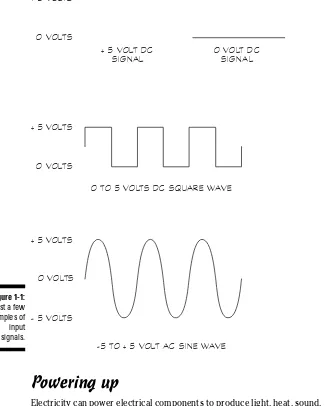
Figure 1-1 shows diagrams of a few signals that you run into often when work-ing with electronics. These signals include
+ 5 Volt DC signal:A high input.
0 volt DC signal:A low input.
0 to 5 volt DC square wave:The output of an oscillator(a device that cycles between high and low voltage); if you use this signal as input to a light bulb, it causes the light to blink on and off.
- 5 volt to + 5 volt AC sine wave:A signal, such as from a microphone, that generates alternating current that a device, such as an amplifier, uses as input. A microphone generates the waveform in Figure 1-1 when it receives the sound produced by a tuning fork. Notice in Figure 1-1 that the transitions from +5 volts to -5 volts are gradual for the sine wave and more abrupt in the square wave.
Powering up
Electricity can power electrical components to produce light, heat, sound, motion, and more. For example, an electric current supplied to a DC motor causes the shaft of the motor to rotate, along with anything you’ve attached to that shaft.
You can power speakers, light bulbs, LEDs, and motors with electricity. If you want to read more about these types of components, check out Chapters 4 and 5.
+ 5 VO LTS
0 VO LTS
+ 5 VO LT D C S I G N A L
0 VO LT D C S I G N A L
0 TO 5 VO LTS D C S Q UA R E WAV E
- 5 TO + 5 VO LT A C S I N E WAV E + 5 VO LTS
0 VO LTS
0 VO LTS + 5 VO LTS
[image:35.531.81.406.88.494.2]- 5 VO LTS Figure 1-1:
How Electricity Becomes Electronics
When you need to use electricity to make something work, such as a boom box, you’ve entered the world of electronic gadgets. No doubt you’re eager to start making your own electronic gadgets. We cover the basics of how elec-tronics and gadgets interact in the following sections.
Creating a simple circuit
Take a battery, a resistor, an LED, and some wires, put them together, and you have a simple electronic circuit. That’s all an electronic circuitis — wires con-necting components so that a current can flow through the components and back to the source.
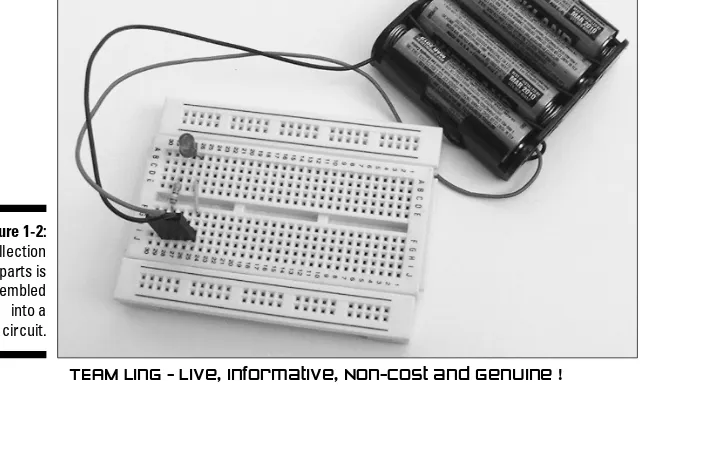
[image:36.531.83.446.393.630.2]Figure 1-2 shows a simple circuit. You place the parts in this circuit (also called components) on something called a breadboard and connect those parts with wires. If you’ve ever played with Mr. Potato Head, you understand the principle of a breadboard. You stick things in the potato (ears, a hat, eyes, and so on) to form a potato person. In the same way, a breadboardhas slots for you to insert electronic components to build a sample circuit. If you’re really happy with what you’ve created, you can then use that design to get a printed circuit board made. (See Chapter 11 for more information on building circuits on breadboards.)
Figure 1-2:
Figure 1-2 shows wires connected to both terminals of the battery in the cir-cuit. This connection allows the current to flow from the battery, through the LED and other components, and back to the battery to complete the circuit. You can also complete the circuit by connecting parts of the circuit to the metal chassis of a gadget, such as the metal housing of a stereo. We call this connection a groundbecause it is used as the reference for all voltages in the circuit. Ground may or may not be connected to the actual earth, but it is always the reference from which you measure all other voltages. We discuss grounding in detail in Chapter 6.
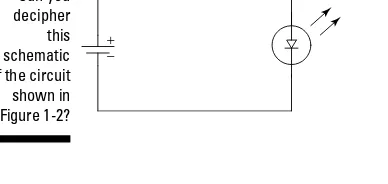
You can represent a circuit as a schematic. A schematicis just a drawing showing how components are connected together by wires. Check out the schematic for the circuit in Figure 1-2 in Figure 1-3. You can go to Chapter 6 for more on schematics.
Deciding what to build
If you’re itching to build a simple circuit to try out your skills, you can find sev-eral circuits in Chapter 14. For example, you can create a breadboard circuit that sounds an alarm when someone turns on a light in your room. Building these projects is a fun way to get familiar with how to put together a circuit. (But don’t jump right into projects if you’re a beginner — not until you’ve read through a few chapters in this book, especially Chapter 2 about safety.) After you put together some of the breadboard projects in Chapter 11 and build up your basic skills, you can move on to the projects in Chapter 15, such as constructing a small robot. These projects take more time, but they can result in some truly neat gadgets.
After you’ve developed your skills building some of the projects in this book, you can go farther. One place to get additional ideas is on the Internet. Two sites we recommend are discovercircuits.com/and www. electronics-lab.com.
[image:37.531.71.265.265.357.2]+ −
Figure 1-3:
Along the Way You Get
to Play with Tools
One of the best things about building electronics projects is that you get to tinker with tools and parts and see what you can make from them. You use some tools to put the circuits together and some tools to check out how the circuits you build are working.
Tools to build things
You’re probably glad to hear that you don’t need that many tools to get started. You just need a wire cutter, needle-noise pliers, a wire stripper, and a few screwdrivers to get started with the projects covered in Chapter 14. If you design a circuit that you want to make more permanent, you need to get a soldering pencil (also called a soldering iron) to attach the elements of a circuit together. We cover choosing a soldering pencil in Chapter 8. As you work with projects, no doubt other miscellaneous tools pop up that you may want to get your hands on. You can use a magnet to retrieve screws and other tiny things that you inevitably drop in hard-to-reach places, for example. Check out Chapter 3 for details on outfitting your workbench.
Tools to measure things
When building or troubleshooting a circuit, you need to make measurements to check that parts are working the way they should and that you designed and built the circuit correctly. Tools that you can use to measure things include a multimeter, an oscilloscope, and a logic probe. Chapters 9 and 10 cover the use of these tools.
We’ll take a moment to briefly tell you what you can use a multimeter for because it’s the measuring tool that you buy first and possibly the only one that you ever need.
Before troubleshooting a circuit for problems, read Chapter 2 on safety. You can very easily hurt yourself or your electronic gadget if you’re not careful.
The Wonderful World of Units
To understand the results of your multimeter measurements, you need to understand electrical units. In the following sections, we run through the basics with you.
Measuring things in units
Unitssimply tell you how much of something you have. For example, when you buy apples, you measure how much they weigh in pounds (lbs). Similarly, a multimeter measures resistance in ohms, voltage in volts, and current in amperes (amps for short).
Table 1-1 shows common units and abbreviations used in electronics.
Table 1-1
Units Used in Electronics
Term Abbreviation Unit Unit Symbol Component
Resistance R ohm Ω Resistor
Capacitance C farad F Capacitor
Inductance L Henry H Inductor
Voltage E or V volt V
Current I amp A
Power P watt W
Frequency f hertz Hz
Getting to bigger or smaller units
Electronics uses things called prefixes and scientific notation to indicate small or large numbers. Table 1-2 shows common prefixes and scientific nota-tions used in electronics.
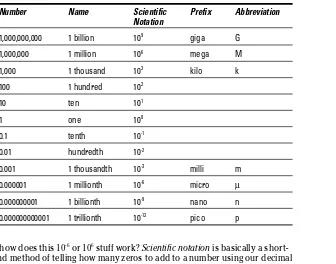
Table 1-2
Prefixes used in Electronics
Number Name Scientific Prefix Abbreviation
Notation
1,000,000,000 1 billion 109 giga G
1,000,000 1 million 106 mega M
1,000 1 thousand 103 kilo k
100 1 hundred 102
10 ten 101
1 one 100
0.1 tenth 10-1
0.01 hundredth 10-2
0.001 1 thousandth 10-3 milli m
0.000001 1 millionth 10-6 micro µ
0.000000001 1 billionth 10-9 nano n
0.000000000001 1 trillionth 10-12 pico p
So how does this 10-6or 106stuff work? Scientific notationis basically a
short-hand method of telling how many zeros to add to a number using our decimal system, which is based upon powers of 10. For example, the superscript ‘6’ in 106means place the decimal point six places to the right. 10-6means move the
decimal point six places to the left. So, with 1 x 10⁶, you move the decimal
point 6 places to the right of the 1, which gives you 1,000,000 or 1 million. With 1 x 10⁻⁶, you move the decimal point 6 places to the left, giving you
0.000001 or 1 millionth. With 3.21 x 10⁴, you move the decimal point 4 places
to the right, for a result of 32,100.
Prefixes + units = ?
Just as you usually use a pound or so of apples to bake your average pie or several tons of steel to build a suburban office park, in electronics, some things just naturally come in small measurements and others in large measurements. That means that you typically see certain combinations of prefixes and units over and over. Here are some common combinations of notations for prefixes and units:
Current:pA, nA, mA, µA, A
Inductance:nH, mH, µH, H
Capacitance:pF, nF, mF, F
Voltage: mV, V, kV
Resistance:Ω, kΩ, MΩ
Frequency:Hz, kHz, MHz, GHz
Exploring some new terms
Although we discussed resistance, voltage, andcurrent earlier in this chapter, some other terms in this section may be new to you.
Capacitanceis the ability to store a charge in an electric field. This stored charge has the effect of making decreases or increases of voltage
more gradual. You can use components called
capacitorsto provide this property in many cir-cuits. This figure shows the signal that occurs when you decrease voltage from +5 volts to 0 volts, both with and without a capacitor.
+ 5 VO LTS
0 VO LTS
W I T H O U T CA PA C I TO R
W I T H CA PA C I TO R
Frequency is a measurement of how often an
AC signal repeats. For example, voltage from a wall outlet undergoes one complete cycle 60 times a second. The following figure shows a sine wave. In this figure, the signal completes
Using the information in Tables 1-1 and 1-2, you can translate these notations. Here are some examples:
mA:milliamp or 1 thousandth of a amp
µV: microvolt or 1 millionth of a volt
nF:nanofarad or 1 billionth of a farad
kV:kilovolts or 1 thousand volts
MΩ:megohms or 1 million ohms
GHz:gigahertz or 1 billion hertz
The abbreviations for prefixes representing numbers greater than 1, such as
Mfor mega,use capital letters. Abbreviations for prefixes representing num-bers less than 1, such as mfor milli,use lowercase. The exception to this rule (there’s always one) is kfor kilo,which is lowercase even though it stands for 1,000.
Inductanceis the ability to store energy in a magnetic field; this stored energy resists changes in current just as the stored charge in a capacitor resists changes in voltage. Components called inductorsare used to pro-vide this property in circuits.
Power is the measure of the amount of work
that electric current does while running through
an electrical component. For example, when voltage is applied to a light bulb and current is driven through the filament of the bulb, work is done in heating the filament. In this example, you can calculate power by multiplying the volt-age applied to the light bulb by the amount of current running through the filament.
−5 TO +5 VO LT A C S I N E WAV E 0 VO LT
+5 VO LTS
−5 VO LTS
The use of capital K is a special case reserved for kilohms; when you see a capital K next to a number such as 3.3k, this translates as 3.3 kilohms. You have to translate any measurement expressed with a prefix to base units to do any calculation, as you can see in the following sections.
Understanding Ohm’s Law
Say that you’re wiring a circuit. You know the amount of current that the component can withstand without blowing up and how much voltage the power source applies. So you have to come up with an amount of resistance that keeps the current below the blowing-up level.
In the early 1800s, George Ohm published an equation called Ohm’s Law that allows you to make this calculation. Ohm’s Lawstates that the voltage equals current multiplied by resistance, or in standard mathematical notation
V = I x R
Taking Ohm’s Law farther
Remember your high school algebra? Remember how if you know two things (such as xand y) in an equation of three variables, you can calculate that third thing? Ohm’s Law works that way; you can rearrange its elements so that if you know any two of the three values in the equation, you can calcu-late the third. So, here’s how you calcucalcu-late current: current equals voltage divided by resistance, or
I R V
=
You can also rearrange Ohm’s Law so that you can calculate resistance if you know voltage and current. So, resistance equals voltage divided by current, or
R I V
=
So far, so good. Now, take a specific example using a circuit with a 12-volt bat-tery and a light bulb (basically, a big flashlight). Before installing the batbat-tery, you measure the resistance of the circuit with a multimeter and find that it’s 9 ohms. Here’s the formula to calculate the current:
I R V
9 ohms
12 volts 1.3 amps
What if you find that your light is too bright? A lower current reduces the brightness of the light, so just add a resistor to lower the current. Originally, we had 9 ohms; adding a 5-ohm resistor to the circuit makes the total resis-tance 14 ohms. In this case, the formula for current is
.
14 0 9
I R V
ohms
12 volts amps
= = =
Dealing with numbers both big and small
Say that you have a circuit with a buzzer that has resistance of 2 kilohms and a 12-volt battery. You don’t use 2 kilohms in the calculation. To calculate the current, you have to state the resistance in the basic units, without using the “kilo” prefix; in this example that means that you have to use 2,000 ohms for the calculation, like this:
, .
2 000 0 006 I
R V
ohms
12 volts amps
= = =
You now have the calculated current stated as a fraction of amps. After you finish the calculation, you can use a prefix to restate the current more suc-cinctly as 6 milliamps or 6 mA.
Bottom line: You have to translate any measurement expressed with a prefix to base units to do a calculation.
The power of Ohm’s Law
Ohm (never one to sit around twiddling his thumbs) also expressed that power is related to voltage and current using this equation:
P = V x I; or power = voltage x current
You can use this equation to calculate the power consumed by the buzzer in the previous section:
P = 12 volts x 0.006 amps = 0.072 watts which is 72 milliwatts (or 72 mW) What if you don’t know the voltage? You can use another trick from algebra. (And you thought Mrs. Whatsit wasted your time in Algebra 101 all those years ago!) Because V = I x R, you can substitute I x R into this equation, giving you
You can also use algebra to rearrange the equation for power to show how you can calculate resistance, voltage, and current if you know power and any one of these parameters.
Keeping Humans and
Gadgets Safe
In This Chapter
Using common sense when working with electronic components
Avoiding electrocution
Keeping watch over static
Working with AC current
Measuring safely with a multimeter
Soldering without fear
Wearing the right clothes for safety
Y
ou probably know that Benjamin Franklin “discovered” electricity in 1752 by flying a kite during a lightning storm. But actually, Franklin already knew about electricity. He was really just testing a form of lightning conductor. Though his experiment proved modestly successful, it was anything but safe. Franklin almost killed himself, and if he had, whose picture would be on the $100 bill?Respect for the power of electricity is necessary when working with electron-ics. In this chapter, we take a look at keeping yourself — and your electronic projects — safe. This is the one chapter that you really should read from start to finish, even if you already have some experience in electronics.
The Sixth Sense of Electronics
No book can ever teach you common sense. You have to cultivate it like an exotic flower. But a few words to the wise may help get you started in your quest for electronics common sense. For starters:
Never assume. Always double-check.Pretend that your soldering pencil is out to get you. Your family may think you’re crazy, but you’re less likely to burn or electrocute yourself.
If you’re not sure about how to do something, read up on it first.Not everything in electronics is as obvious as it first appears.
Don’t take chances.If you can make a 50/50 bet that something is plugged in, give some thought as to what happens if you lose the bet this time. Never let your guard down. Don’t ruin the fun of a wonderful hobby or voca-tion because you neglected a few basic safety measures.
The Dangers of Electrical Shock
By far, the single most dangerous aspect of working with electronics is the possibility of electrocution. Electrical shockresults when the body reacts to an electrical current — this reaction can include an intense contraction of muscles (namely, the heart) and extremely high heat at the point of contact between your skin and the electrical current. The heat leads to burns that can cause death or disfigurement. Even small currents can disrupt your heartbeat.
The degree to which electrical shock can harm you depends on a lot of fac-tors, including your age, your general health, the voltage, and the current. If you’re over 50 or in poor health, you probably won’t stand up to injury as well as if you’re 14 and as healthy as an Olympic athlete. But no matter how young and healthy you may be, voltage and current can pack a wallop, so it’s important that you understand how much they can harm you.
Electricity = voltage + current
To fully understand the dangers of electrical shock, you need to know the basics of what makes up electricity. In Chapter 1, we state that electricity is made up of two elements: voltage and current.
water in the pipe is like increasing voltage. You know that even small amounts of water at high pressure can be devastating. The same is true of electricity, where even low voltages at high currents can potentially kill you.
Is it AC or DC?
You can describe electrical current as being either of the following
Direct (DC):The electrons flow one way through a wire or circuit.
Alternating (AC):The electrons flow one way, then another, in a continuing cycle.
If this stuff is new to you, you may want to go back and read Chapter 1 for a more detailed discussion.
Household electrical systems in the U.S. and Canada operate at about 117 volts AC. This significantly high voltage can, and does, kill. You must exercise
extreme cautionwhenever you work with it.
Until you become experienced working with electronics, you’re best off avoiding circuits that run directly off household current. Stay with circuits that run off standard-size batteries, or those small plug-in wall transformers. Unless you do something silly, like lick the terminal of a 9-volt battery (yes, you get a