CodeWarrior™ IDE
Essentials for
Embedded Systems
Featuring Hiware
Technology
other countries. All other tradenames and trademarks are the property of their respective owners.
Copyright © Metrowerks Corporation. 2003. ALL RIGHTS RESERVED.
The reproduction and use of this document and related materials are governed by a license agreement media, it may be printed for non-commercial personal use only, in accordance with the license agreement related to the product associated with the documentation. Consult that license agreement before use or reproduction of any portion of this document. If you do not have a copy of the license agreement, contact your Metrowerks repre-sentative or call 800-377-5416 (if outside the US call +1 512-997-4700). Subject to the foregoing non-commercial personal use, no portion of this documentation may be reproduced or transmitted in any form or by any means, electronic or mechanical, without prior written permission from Metrowerks.
Metrowerks reserves the right to make changes to any product described or referred to in this document without further notice. Metrowerks makes no warranty, representation or guarantee regarding the merchantability or fitness of its prod-ucts for any particular purpose, nor does Metrowerks assume any liability arising out of the application or use of any product described herein and specifically disclaims any and all liability. Metrowerks software is not authorized for and has not been designed, tested, manufactured, or intended for use in developing applications where the fail-ure, malfunction, or any inaccuracy of the application carries a risk of death, serious bodily injury, or damage to tangible property, including, but not limited to, use in factory control systems, medical devices or facilities, nuclear facilities, aircraft or automobile navigation or communication, emergency systems, or other applica-tions with a similar degree of potential hazard.
USE OF ALL SOFTWARE, DOCUMENTATION AND RELATED MATERIALS ARE SUBJECT TO THE METROWERKS END USER LICENSE AGREEMENT FOR SUCH PRODUCT.
How to Contact Metrowerks
Corporate Headquarters Metrowerks Corporation 7700 West Parmer Lane Austin, TX 78729 U.S.A.
World Wide Web http://www.metrowerks.com
Sales Voice: +1 800-377-5416
Fax: +1 512-996-4910
Table of Contents
1 Introduction to the CodeWarrior™ IDE
5
Features . . . . 5
Project Manager . . . . 5
Source Code Editor . . . . 6
Browser . . . . 6
Functions . . . . 6
2 Installing the CodeWarrior IDE
7
System Requirements . . . . 7Installation . . . . 8
Setup . . . . 8
Installation Directories . . . . 9
Tips and Tricks . . . 10
3 CodeWarrior Projects
11
Projects and Targets . . . 11Launching the CodeWarrior IDE . . . 12
CodeWarrior Main Menu . . . 12
Build Targets . . . 13
Target Customization and Configuration . . . 13
Project Window . . . 13
Adding Files to Your Project . . . 16
Removing Files From Your Project . . . 17
Touching Files . . . 17
4 Working With Projects
19
Creating a Project . . . 19Making a Project . . . 21
Using the Simulator and Debugger . . . 22
Access Paths Panel . . . 27
Build Extras Panel. . . 28
Runtime Settings Panel . . . 30
Files Mappings Panel . . . 31
Source Trees Panel . . . 33
PC-lint Panels . . . 33
Hiware Build Tools . . . 37
Assembler Panel . . . 37
Burner Panel . . . 39
Compiler Panel . . . 42
Importer Panel . . . 44
Linker Panel . . . 45
Libmaker Panel . . . 47
6 Technical Support
49
E-mail . . . 49Fax/Voice . . . 49
Mail . . . 50
Internet . . . 50
1
Introduction to the
CodeWarrior™ IDE
The CodeWarrior™ Integrated Development Environment (IDE) for embedded microprocessors is a powerful, easy-to-use tool suite that helps you increase your software development productivity.
NOTE The CodeWarrior IDE for embedded targets is hosted on Microsoft® Windows® 9X, Windows NT, Windows 2000, and Windows XP.
This chapter explains the features and functions of the CodeWarrior IDE. This chapter contains the following sections:
• Features
• Functions
Features
The CodeWarrior software provides an intuitive Graphical User Interface (GUI) with these main features:
• Project Manager • Source Code Editor • Browser
Project Manager
Functions
Source Code Editor
Use the CodeWarrior IDE Source Code Editor to edit source code and text. The Source Code Editor lets you:
• Edit, search, and replace text in one file or several files • Split an editor window into multiple panes
• Toggle between a source file and its related interface file • Open an interface file referred to by a source file
• Set markers at arbitrary locations in a text file • Jump to any routine in any file instantly • Customize the source code display
Browser
Use the commands in any source code view and controls in the browser's window for quick, intuitive access to variables, routines, enumeration, and definitions of classes, and other source-code elements.
Functions
The software has these main functions: • Highly optimizing C/C++ Compiler • Powerful Macro Assembler
• SmartLinker, which only links objects that are really referenced • Burner to create Motorola S-Records, Intel Hex files, or Binary files • Decoder to decode object and absolute files
• Libmaker to generate libraries
• Multipurpose Debugger, which allows
– Simulation and debugging of embedded applications.
– Simulation and debugging of real time embedded applications. – Simulation and/or cross-debugging of embedded applications. • Multi-Language Debugging: Assembly, C, and C++
2
Installing the CodeWarrior
IDE
This chapter explains how to install and setup the CodeWarrior IDE. This chapter also explains the directories that the CodeWarrior installer creates, and tips and tricks for using the CodeWarrior IDE more effectively.
This chapter contains the following sections: • System Requirements
• Installation
• Setup
• Installation Directories
• Tips and Tricks
System Requirements
The Windows® hosted version of the CodeWarrior IDE requires:
• Pentium® processor or greater (recommended: Intel Pentium class processor or AMD-K6® class microprocessor)
• At least 128 megabytes of RAM
• Approximately 120 megabytes of free hard disk space for minimal installation • Approximately 450 megabytes of free hard disk space for full installation
• Microsoft® Windows 9X, Windows NT 4.0 with Service Pack 3, Windows 2000, or later operating system
Installation
Installation
To install the CodeWarrior software:
1. Load the CD-ROM into the CD-ROM drive
If CD AutoPlay in Windows is active (default setting), install program appears. If CD AutoPlay is not active, run install.exe on the CD-ROM.
The CD-Browser menu appears. 2. Click Installations.
The installation process starts. In the dialog boxes that appear, you can customize the installation to suit your needs.
Setup
You can use the Setup dialog box to modify, repair, or remove your installation after the you install the CodeWarrior IDE. To use the Setup dialog box:
1. From the Windows taskbar, click Start > Programs > Settings > Control Panel. The Windows Control Panel window opens.
2. Open the Add/Remove Programs control panel. 3. Select the CodeWarrior entry from the program list. 4. Click Add/Remove.
The Setup dialog appears (Figure 2.1). 5. Follow the directions in the Setup dialog:
Installation Directories
Figure 2.1 Setup Dialog
NOTE The entry in the add/remove dialog box (Control Panel) always refers to the last installation you created or modified. You can use the shortcut generated in the Program group to select another installation.
Installation Directories
Table 2.1 lists the directories created when you install the CodeWarrior IDE:
Table 2.1 CodeWarrior IDE Installation Directories
Directory Name Contents
Bin IDE executable files
Bin\Plugins All plugin DLL files
CodeWarrior Help CodeWarrior help files
CodeWarrior Manuals CodeWarrior online manuals
(CodeWarrior_Examples) Directory for creating your examples
Tips and Tricks
Tips and Tricks
Here are some tips and tricks for using the CodeWarrior IDE:
• If you cannot launch the simulator debugger, check the settings in the Build Extras Preference Panel. Check also if the Debugger is enabled in the Project
menu entry.
• If you delete the data folder of the project, you delete project related settings. One of the settings determines whether the debugger and simulator are enabled. For that reason, we do not recommend deleting the data folder of the project directory.
• If you are unable to add a file to a project, the problem might be that the file extension is not defined in the File Mappings Preference Panel. You must use the File Mappings Preference Panel so that the CodeWarrior IDE recognizes the file extension.
• If you think that project data is corrupted, you can export and re-import your project using File > Export Project and File > Import Project.
• If the CodeWarrior software does not run, check if you have another version of the CodeWarrior IDE installed on your computer. If you have an older version of the CodeWarrior IDE, or a version for a different architecture, there might be a conflict between the two versions. To fix the problem, run the regservers.bat
batch file. The batch file corrects the paths defined in the Windows registry. You can find the regservers.bat batch file in the Bin directory of the installation directory.
\lib\<target>c\prm target prm file templates
Lint PC-lint installation path and configuration files
Prog Build tools and Debugger/Simulator
Other Metrowerks Tools Additional programs such as registration tools
Release_Notes General information
Stationery Project stationery
Template Generic default files templates
Table 2.1 CodeWarrior IDE Installation Directories
3
CodeWarrior Projects
This chapter contains information about CodeWarrior projects and targets. This chapter also explains how to add, remove, and touch files.
This chapter contains the following sections: • Projects and Targets
• Launching the CodeWarrior IDE
• CodeWarrior Main Menu
• Build Targets
• Adding Files to Your Project
• Removing Files From Your Project
• Touching Files
Projects and Targets
The CodeWarrior Integrated Development Environment (IDE) uses projects and build targets to organize the files and settings for creating a program. A project is a file that contains one or more build targets.
A build target can contain these elements: • Source code files
• Libraries • Settings • Other projects
These target elements describe how to create software for a particular processor or operating system. Build targets in a project can share the same files, but each build target has its own settings.
The CodeWarrior IDE also includes pre configured projects called stationery. Creating a new project is as easy as deciding on a platform target and then choosing the
Launching the CodeWarrior IDE
The CodeWarrior IDE lets you:
• Set options to choose the platform target for which you are developing code • Customize compiler optimizations and other object code details
• Configure source code translation
• Specify the kinds of files added to a build target
• Set additional options depending on the platform target
Launching the CodeWarrior IDE
To launch the CodeWarrior IDE:
1. Click the Windows Start menu from the taskbar at the lower left of your screen. The Start menu appears.
2. Select Programs > Metrowerks > CodeWarrior IDE. The CodeWarrior IDE starts.
NOTE The above menu path might vary if you installed the CodeWarrior software to a program group other than the default program group.
CodeWarrior Main Menu
Figure 3.1 shows the CodeWarrior main menu and toolbar.
Figure 3.1 CodeWarrior Main Menu and Toolbar
The toolbar is located under the main menu bar. The toolbar contains icons that represent many of the menu commands.
TIP If you place the cursor over an icon or GUI screen object, a tooltip appears that briefly describes the object under the cursor.
Pulldown Menus
Build Targets
Build Targets
Every project contains one or more build targets. Each build target in a project is a collection of files that the IDE uses to create (build) an output file. Project build targets can share some or all of their files.
Target Customization and Configuration
Each project’s build target has its own options that instructs the IDE about how to build the output file. The options control such things as code optimization, browsing, debugging, compiler warnings, and more.
You can also configure a build target to depend on other build targets in the project. This means that you can build software that combines the output files for different platform targets into a single output file.
Project Window
The Project window (Figure 3.2) contains information about the files and build targets of a project file.
Figure 3.2 The Project Window
The Project window has three different views: • Files
• Link Order • Targets
Build Targets
Files View
The Files view of the Project window shows a list of all the files in a project. You can organize the items in this view into hierarchical groups. That is, you can create folders and arrange the files in a way that makes sense to you.
To create a group:
1. From the main menu bar, select Project > Create Group...
The Create Groupdialog box appears.
2. Type a name for the new group in the Create Group dialog box.
3. Click OK. A new group (folder) appears in the Files view of the Project
window.
To move one or more files or groups in the Files view of the Project window: 1. Select the files or groups to be moved.
2. Drag the selected files or groups to their new location in the Project window. A focus bar (an underline) indicates where the selected files will be moved when you release the mouse button.
3. When the focus bar is at the desired file or group position, release the mouse button. The IDE moves the selected files or groups to the new position.
Link Order View
The Link Order view (Figure 3.3) of the Project window shows information about how the IDE will compile or link the final output file for the project's current build target.
Build Targets
Figure 3.3 Project Window Link Order View
To change the link order of one or more files:
1. In the Files view of the Project window, select the file that you want to move. 2. Drag the selected files to the new location in the link order. A focus bar (an
underline) indicates where the selected files will be moved when you release the mouse button.
3. When the focus bar is at the desired position, release the mouse button. The IDE moves the selected file to the new position in the link order.
Targets View
The Targets view (Figure 3.4) of the Project window shows information about the build targets in the project such as target dependencies, and build targets that are link-compatible.
Adding Files to Your Project
Adding Files to Your Project
To add a file to your project:
1. From the main menu bar, select Project > Add Files. The Select files to add... dialog box appears.
Figure 3.5 Select Files to Add... Dialog Box
TIP To select multiple files, hold down the Control key while clicking the file names in the dialog box. To select a contiguous group of files, click the first file name in the group, then hold down the Shift key and click the last file in the group.
2. When you have selected the files you wish to add, click the Add button.
If your project contains multiple build targets, the IDE prompts you to select the build targets to which you want the files added. There might be a delay while the IDE locates the selected files and adds them to your project.
Click Cancel to close the dialog box without adding any files to the project.
Removing Files From Your Project
You can also add library (.lib) files to your project. In this case, the library is linked
with your application. You don’t have to specify it in your linker parameter (.prm)
file.
Removing Files From Your Project
To remove files from your project:
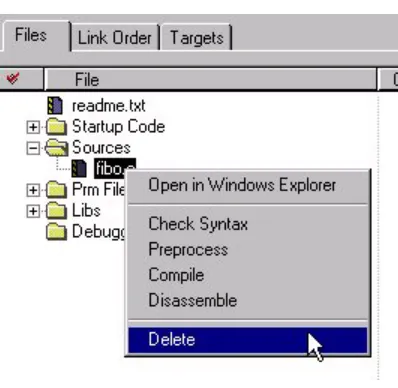
1. In the Files view of the Project window, click the right mouse button on the filename of the file to remove. A pop-up menu appears.
[image:17.612.136.335.351.545.2]2. Select Delete from the pop-up menu (Figure 3.6). The IDE removes the file from the build target. The IDE does not delete the file from the hard disk. THe IDE does not remove the file from other build targets.
Figure 3.6 Removing Files From a Project
Touching Files
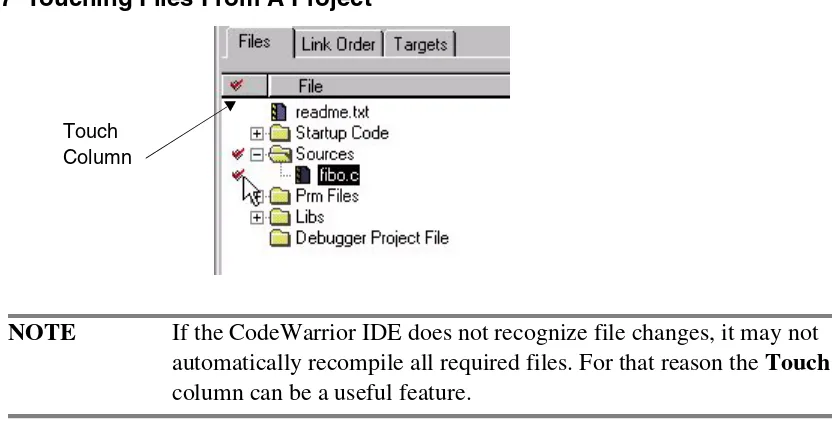
Touching Files
Figure 3.7 Touching Files From A Project
NOTE If the CodeWarrior IDE does not recognize file changes, it may not automatically recompile all required files. For that reason the Touch
column can be a useful feature.
There are three possible ways to make sure files get compiled:
• In the Files view of the Project window, click the Touch column next to the filename of the file you want to touch. The IDE places a check mark in the Touch
column next to the filename. This check mark indicates that the file will be recompiled the next time you build the project.
• Select the Touch command from the pop-up menu.
• Click into the Touch column on the left side of the files/folders. The IDE resynchronizes the state of the files in the project depending on the dates they were last modified.
To unmark files so that they are not compiled, click again in the Touch column left of the file name, or choose Untouch from the pop-up menu.
NOTE Clicking on the check mark icon at the top of the Touch column instructs the IDE to touch all files of the build target.
4
Working With Projects
This chapter explains how to use project stationery to create, build, and debug a project.
This chapter contains the following sections: • Creating a Project
• Making a Project
• Using the Simulator and Debugger
Creating a Project
To create a project:
1. From the main menu bar, select File > New. The New window appears (Figure 4.1).
NOTE The New window might look different on your screen, depending on installed targets.
Creating a Project
2. Click the Project tab to display the Project panel (Figure 4.1). 3. Select the stationery that you want to use to create the new project. 4. In the Project Name field, type a name for the new project.
NOTE When the IDE creates a new project, the IDE automatically adds the
.mcp file extension to the filename of the project file.
5. In the Location field, specify the directory where you want the IDE to save the project file.
6. Click OK. The New Project dialog appears (Figure 4.2).
NOTE The NewProject window might look different on your screen, depending on the supported targets that you have installed.
Figure 4.2 New Project Window
7. Select the desired stationery file from the Project Stationary list.
8. Expand the list items and choose the desired target interface from the sublist. 9. Click OK.
Making a Project
Making a Project
To make (build) a project:
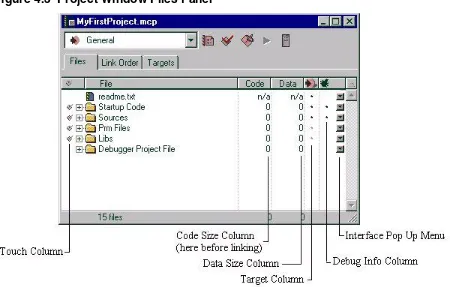
1. Click the Files tab in the Project window.
[image:21.612.87.537.239.526.2]The Files panel (Figure 4.3) appears. The Files panel shows the filenames of all the files in your project.
Figure 4.3 Project Window Files Panel
2. Click the Make button (Figure 4.4) in the Project window’s toolbar. The IDE compiles and links the files of your project.
Figure 4.4 Make button
Using the Simulator and Debugger
Figure 4.5 Errors & Warnings Window
Using the Simulator and Debugger
The simulator and debugger use the absolute file that you created by using the Make
command.
To simulate and debug your project:
1. Click the Debug button (Figure 4.6) in the Project window. The IDE starts the debugger.
Figure 4.6 The Debug Button
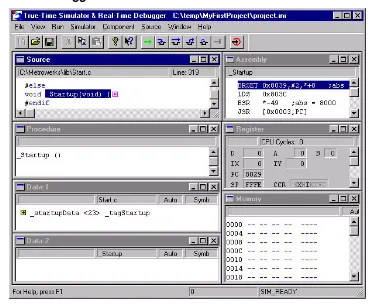
Using the Simulator and Debugger
Figure 4.7 The Debugger Main Window
2. Place the mouse pointer over a C statement in the Source pane of the Simulator/ Debugger.
3. Click the right mouse button. A pop-up menu appears. 4. Select Set Breakpoint from the pop-up menu.
The debugger sets a breakpoint on the corresponding C statement. 5. Click the Run button in the toolbar.
5
Specifying Target Settings
This chapter explains how to configure target settings. This chapter contains the following sections:
• Target Settings Panel
• Access Paths Panel
• Build Extras Panel
• Runtime Settings Panel
• Files Mappings Panel
• Source Trees Panel
• Hiware Build Tools
Target Settings Panel
Display the Target Settings panel as follows:
1. Click the Targets General Settings button (Figure 5.1) in the Project window toolbar.
Figure 5.1 Targets General Settings Button
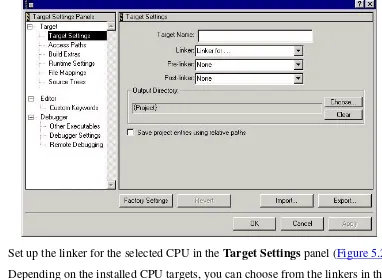
Target Settings Panel
Figure 5.2 Target Settings Panel
2. Set up the linker for the selected CPU in the Target Settings panel (Figure 5.2). Depending on the installed CPU targets, you can choose from the linkers in the linker drop box. If you choose a linker, use the linker to build an absolute (.abs) file.
You can also select a libmaker. By specifying a libmaker, you instruct the IDE to build a library (.lib) file.
Access Paths Panel
Access Paths Panel
[image:27.612.136.500.198.444.2]Display the Access Paths panel (Figure 5.3) by clicking Access Paths in the Target Settings Panels list.
Figure 5.3 Access Paths Panel
Use the Access Paths panel to define additional paths that the CodeWarrior Integrated Development Environment (IDE) should search while compiling and linking your project.
The IDE searched System Paths for compiler include files specified in
Build Extras Panel
Build Extras Panel
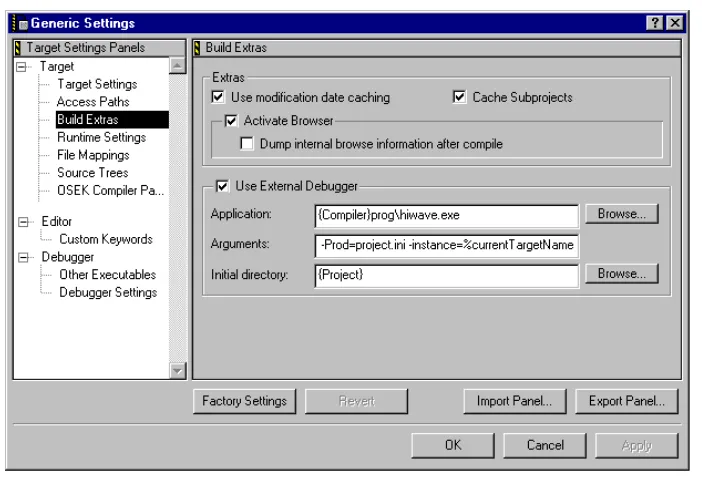
[image:28.612.98.449.197.436.2]Display the Build Extras panel (Figure 5.4) by clicking Build Extras in the Target Settings Panels list.
Figure 5.4 Build Extras Panel
Use the Build Extras panel to specify build extras options.
Table 5.1 explains the controls in this panel.
Table 5.1 Build Extras Panel Controls
Control Name
Function
Activate Browser checkbox
Build Extras Panel
Use External Debugger checkbox
If checked, external debugger is selected. You must specify a relative or absolute path with the Browse... button.
Arguments text box
Specifies additional command-line arguments to pass to the debugger. Besides normal arguments, you can specify the following % macros:
%sourceFilePath : File path of source %sourceFileDir : Directory of source %sourceFileName : File name of source
%projectFilePath : Directory of the project source %projectFileDir : Directory of the project
%projectFileName : Name of the project %targetFilePath : Path of the absolute file %targetFileDir : Directory of the absolute file %targetFileName : Name of the absolute file
Table 5.1 Build Extras Panel Controls (continued)
Control Name
Runtime Settings Panel
Runtime Settings Panel
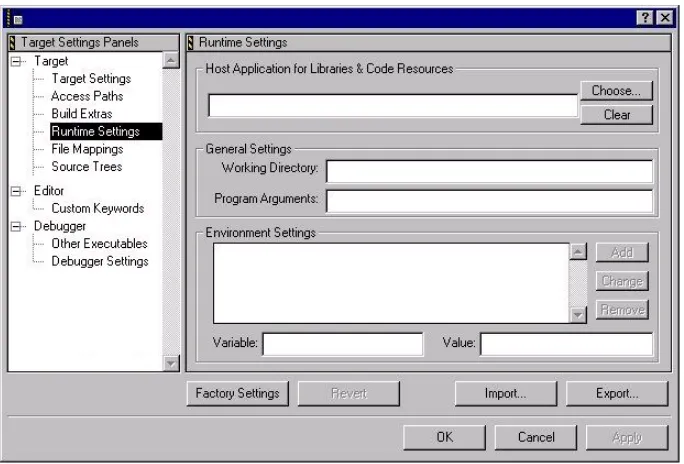
Display the Runtime Settings panel (Figure 5.5) by clicking Runtime Settings in the
[image:30.612.101.443.200.432.2]Target Settings Panels list.
Figure 5.5 Runtime Settings Panel
Use the Runtime Settings panel to specify arguments that your application must have in order to work correctly when executed.
Files Mappings Panel
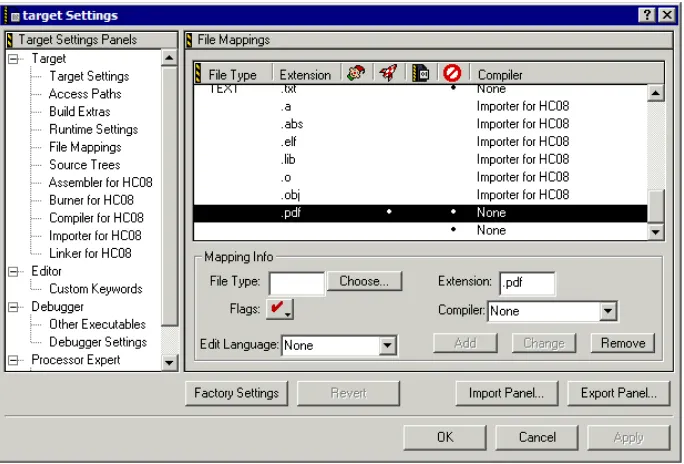
Files Mappings Panel
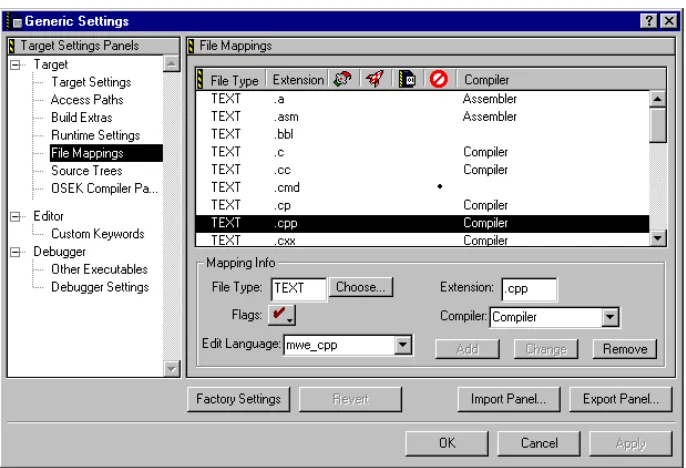
Display the File Mappings panel (Figure 5.6) by clicking File Mappings in the
[image:31.612.137.480.198.432.2]Target Settings Panels list.
Figure 5.6 File Mappings Panel
Use the File Mappings panel (Figure 5.6) to list current file mappings and their settings, including:
• File type • Extensions • Flag
• Associated compiler
• Edit Language (used for syntax coloring)
If you want to add a file such as a PDF or Word document to your CodeWarrior project, and you want to be able to double click on it to open it in the corresponding viewer, you need to specify that file type in the File Mappings settings panel.
To specify a file type, open the project preference panel and create a new file mapping with:
• File Type is empty • Extension: clear
Files Mappings Panel
• Compiler: None • Edit Language: None
[image:32.612.102.444.209.441.2]If you add your file to the project, and double click on it, the CodeWarrior IDE will use the corresponding viewer/editor to open the file.
Source Trees Panel
Source Trees Panel
[image:33.612.138.481.201.436.2]Display the Source Trees panel (Figure 5.8) by clicking Source Trees in the Target Settings Panels list.
Figure 5.8 Source Trees Panel
Use the Source Trees panel to define access paths and build target output in terms of source trees. You can also create a source tree to define global source trees (root paths) for use in your projects.
With this approach, you can share projects across various hosts. You only need to make minor changes to the source tree paths to maintain project functionality.
PC-lint Panels
PC-lint is a source file checker that checks your C/C++ source code for bugs, glitches, inconsistencies, non-portable constructs, redundant code, and other problem areas. The CodeWarrior software includes preference panels and plug-ins that make it possible for you to use PC-lint with the CodeWarrior IDE. However, the CodeWarrior software does not include the actual PC-lint software. You must purchase the PC-lint software from the makers of PC-lint, Gimpel Software (www.gimpel.com).
PC-lint Panels
To see the PC-lint panels (Figure 5.9 and Figure 5.10) click PC-lint Linker in the
Target Settings Panels list.
There are two panels that control PC-lint: the PCLint Main Settings Panel and the
[image:34.612.102.446.202.438.2]PCLint Options Panel.
Figure 5.9 PC-lint Main Panel
Use the PCLlint Main Settings panel to configure the main settings for PC-lint. The IDE displays the PC-lint panels only if you have specified the linker in the Target Settings panel (Figure 5.2) to be PC-lint Linker.
Table 5.2 explains the controls of the PCLint Main Settings panel.
Table 5.2 PCLint Main Settings Panel Controls
Control Name Function
PC-lint Executable text field
Specify the PC-lint executable file. Use the browse button on the right to browse for the executable file. The panel uses {Compiler}Lint\Lint-nt.exe as the default name for the executable file.
Display generated command lines in message window checkbox
PC-lint Panels
No inter-modul checkbox If checked, PC-lint does not perform an inter-module check. An inter-module check results in slower compilation.
Additional Path to PC-lint compiler options files text field
The preference panel looks for PC-lint compiler options files in the {Compiler}Lint\lnt directory. However, you can specify CodeWarrior-specific files here. The CodeWarrior specific configuration files are installed in the
{Compiler}Lint\lnt\CodeWarrior directory. Use the Choose button on the right side to browse for a file.
Compiler Option text field Use the drop down list to select a configuration. The list of available options is selected with the path specified to the compiler options files (see Additional Path to PC-lint compiler options files and Display default PC-lint compiler option files too).
Display default PC-lint compiler option files too checkbox
PC lint uses option/configuration files that end with the .lcf extension. The Compiler Option drop down list shows the option files that work with the CodeWarrior IDE. Check this checkbox to see other option files. The option files are in the {Compiler}Lint\lnt
directory of the CodeWarrior installation directory.
Prefix File text field Allows you to specify an additional prefix file to be passed to PC-lint. For example, if you want specific
defines or command line commands to be checked, you need to make these known to PC-lint with this prefix file. Use the Choose button on the right to browse to the prefix file.
Table 5.2 PCLint Main Settings Panel Controls (continued)
PC-lint Panels
Figure 5.10 PC-lint Options Panel
Table 5.3 explains the controls in the PC-lint Main panel.
Table 5.3 PC-lint Options Panel Controls
Control Name Function
Author Options checkboxes Allows you to select one of the three Author options which control the rules that PC-lint uses to check your source code.
Library Options checkboxes Depending on the application, you can select several library options. Selecting an option makes PC-lint aware of the library implementation.
Warnings drop down box Allows you to select the warning/information message level. The default setting shows error, warning and information messages.
Library Warnings drop down box Allows you to select the warning/information message level for libraries. The default setting shows error, warning and information messages.
Hiware Build Tools
Hiware Build Tools
The following panels customize the way the IDE generates code using HIWARE build tools:
• Assembler Panel
• Burner Panel
• Compiler Panel
• Importer Panel
• Linker Panel
• Libmaker Panel
Assembler Panel
[image:37.612.139.483.392.624.2]Display the Assembler panel (Figure 5.11) by clicking Assembler in the Target Settings Panels list.
Figure 5.11 Assembler Panel
Hiware Build Tools
[image:38.612.101.376.340.555.2]Figure 5.12 Assembler Message Settings Panel Table 5.4 Assembler Panel Controls
Control Name Function
Messages button Displays the Assembler Message Settings dialog (Figure 5.12). Use this dialog to filter messages.
Options button Displays the Assembler Options Settings dialog (Figure 5.13). Use this dialog to add, delete, or modify options. Display generated command lines
in message window checkbox
If checked, the complete command line passed to the tool is displayed in the Errors & Warnings window.
Use Decoder to generate Disassembly Listing checkbox
If checked, the external decoder produces a disassembly listing.
Hiware Build Tools
Figure 5.13 Assembler Options Settings Panel
Burner Panel
Display the Burner panel (Figure 5.14) by clicking Burner in the Target Settings Panels list.
[image:39.612.134.497.455.697.2]Hiware Build Tools
Use the Burner panel to control the burner to generate S-Records, Intel, or binary files.
[image:40.612.67.511.252.524.2] [image:40.612.88.512.252.525.2]The Burner plug-in has special functionality: in the File Mappings Panel (Figure 5.6), the *.bbl (batch burner language) files are mapped to the Burner plug-in. Whenever a *.bbl file is in the project file, the *.bbl file is processed during the post-link phase using the settings in the Burner panel.
Table 5.5 explains the controls in this panel.
Table 5.5 Burner Panel Controls
Control Name Function
Command Line Arguments text field
Displays command-line options. You can add, delete, or modify these options by hand or by using the Messages, Options, Type Sizes, and Smart Sliders buttons.
Messages button Displays the Burner Message Settings dialog (Figure 5.12). Use this dialog to filter messages. Options button Displays the Burner Options Settings dialog (Figure
5.13). Use this dialog to add, delete, or modify options. Burner button Displays Burner dialog (Figure 5.15).
Options button Displays Options dialog. Display generated command
lines in message window checkbox
If checked, the complete command line passed to the tool is displayed in the Errors & Warnings window.
Hiware Build Tools
Hiware Build Tools
Compiler Panel
[image:42.612.102.456.198.438.2]Display the Compiler panel (Figure 5.16) by clicking Compiler in the Target Settings Panels list.
Figure 5.16 Compiler Panel
[image:42.612.48.524.494.707.2]Use the Compiler panel to control compiler behavior. Table 5.4 explains the controls in this panel.
Table 5.6 Compiler Panel Controls
Control Name Function
Command Line Arguments text field
Displays command-line options. You can add, delete, or modify these options by hand or with the Messages, Options, Type Sizes, and Smart Sliders buttons. Messages button Displays the Compiler Message Settings dialog
(Figure 5.12). Use this dialog to filter messages.
Options button Displays the Compiler Options Settings dialog (Figure 5.13). Use this dialog to add, delete, or modify options. Type Sizes button Displays the Standard Type Size dialog box (Figure
5.17).
Hiware Build Tools
[image:43.612.96.553.110.264.2]Figure 5.17 Standard Types Settings Dialog
Figure 5.18 Compiler Smart Control Dialog
Display generated command lines in message window checkbox
If checked, the complete command line passed to the tool is displayed in the Errors & Warnings window.
Use Decoder to generate Disassembly Listing checkbox
If checked, the external decoder produces a disassembly listing.
About button Displays status and version information. Help button Displays helpfiles.
Table 5.6 Compiler Panel Controls (continued)
[image:43.612.135.332.478.676.2]Hiware Build Tools
Importer Panel
[image:44.612.106.446.197.423.2]Display the Importer panel (Figure 5.19) by clicking Importer in the Target Settings Panels list.
Figure 5.19 Importer Panel
Use the Importer panel for decoding objects, as well as absolute or library files. Table 5.7 explains the controls in this panel.
Table 5.7 Importer Panel Controls
Control Name Function
Command Line Arguments text field
Displays command-line options. You can add, delete, or modify these options by hand or by using the Messages, Options, Type Sizes, and Smart Sliders buttons. Messages button Displays the Importer Message Settings dialog (Figure
5.12). Use this dialog to filter messages.
Options button Displays the Importer Options Settings dialog (Figure 5.13). Use this dialog to add, delete, or modify options. Display generated command lines
in message window checkbox
If checked, the complete command line passed to the tool is displayed in the Errors & Warnings window.
[image:44.612.71.519.493.694.2]Hiware Build Tools
Linker Panel
Display the Linker panel (Figure 5.20) by clicking Linker in the Target Settings Panels list.
Figure 5.20 Linker Preference Panel
• Use the Linker panel to control the linker. The Linker panel displays only if you select a linker in the Target Settings panel (Figure 5.2).
[image:45.612.141.488.194.455.2]• Table 5.8 explains the controls in this panel.
Table 5.8 Linker Panel Controls
Control Name Function
Command Line Arguments text field
Displays command-line options. You can add, delete, or modify these options by hand or by using the
Messages, Options, Type Sizes, and Smart Sliders buttons.
Messages button Displays the Linker Message Settings dialog (Figure 5.12). Use this dialog to filter messages.
Options button Displays the Linker Options Settings dialog (Figure 5.13). Use this dialog to add, delete, or modify options. Display generated command
lines in message window checkbox
Hiware Build Tools
Use custom PRM file radio button
If selected, you can specify a custom linker parameter file in the edit box on the right. To browse for a file, click the Browse... button.
Use template PRM file radio button
If selected, you can choose a premade prm file located in the templates directory:
(c:\metrowerks\templates\<target>\prm)
You can also use the Copy Template button to copy the prm file into your project so that a local copy is available.
Use PRM file from Project radio button
If selected, the linker PRM file present in the project is used.
Absolute, Single-File
Assembly project radio button
If selected, the linker in fact is bypassed. For absolute, single-file assembly projects there is no need for the linking phase, because the assembler already is writing the final application file. Please note that for absolute assembly projects you have to direct the assembler as well to generate this special form of files (using the -FA2 assembler option).
[image:46.612.95.511.123.426.2]About button Displays status and version information. Help button Displays helpfiles.
Table 5.8 Linker Panel Controls (continued)
Hiware Build Tools
Libmaker Panel
[image:47.612.140.480.197.429.2]Display the Libmaker panel (Figure 5.21) by clicking Libmaker in the Target Settings Panels list.
Figure 5.21 Libmaker Panel
Use the Libmaker panel to control the libmaker for building libraries, as well as adding and removing files from libraries. The Libmaker panel displays only if you select Libmaker in the Target Settingspanel (Figure 5.2).
Table 5.9 explains the controls in this panel.
Table 5.9 Libmaker Panel Controls
Control Name Function
Command Line Arguments text field
Displays command-line options. You can add, delete, or modify these options by hand or by using the Messages, Options, Type Sizes, and Smart Sliders buttons.
Messages button Displays the Libmaker Message Settings dialog (Figure
5.12). Use this dialog to filter messages.
Options button Displays the Libmaker Options Settings dialog (Figure
Hiware Build Tools
Display generated command lines in message window checkbox
If checked, the complete command line passed to the tool is displayed in the Errors & Warnings window.
Build a single object file (no library) checkbox
If checked, only a single object file is generated (instead of a library). Useful to generate startup object files.
Library File Name text box Specify the output file name. Use the Browse... button if necessary.
About button Displays status and version information. Help button Displays helpfiles.
Table 5.9 Libmaker Panel Controls (continued)
6
Technical Support
This chapter contains information on how to get technical support for the CodeWarrior Integrated Development Environment (IDE). This chapter contains the following sections:
• Fax/Voice
• Internet
The best way to get technical support is to contact us by sending an e-mail message. You can attach examples that explain your problem. You can use a compression utility to compress the attachment. You can also use uuencoding to send the attachment. The email addresses are:
Fax/Voice
You can use the following numbers to report a problem:
EUROPE [email protected]
ASIA/PACIFIC [email protected]
EUROPE: Fax +41 61 690 7501
USA: Voice +1 (800) 377-5416
To reach technical support by normal mail, use the addresses below:
Internet
For the latest updates and product enhancement information, point your browser to:
http://www.metrowerks.com
EUROPE Metrowerks Europe, Riehenring 175, CH-4058 Basel, Switzerland USA Metrowerks Corp., 7700 West Parmer Lane, Austin, TX 78729, U.S.A. ASIA/PACIFIC Metrowerks Japan - Metrowerks Co., Ltd. - Shibuya Mitsuba Building
Index
Symbols
#include 27 %projectFileDir 29 %projectFileName 29 %projectFilePath 29 %sourceFileDir 29 %sourceFileName 29 %sourceFilePath 29 %targetFileDir 29 %targetFileName 29 %targetFilePath 29 (CodeWarrior_Examples) 9 *.bbl 40 .abs 26 .lib 26 .mcp 20A
About 38, 40, 43, 44, 46, 48
Absolute, Single-File Assembly project 46 Access Paths 27
Access Paths Panel 27
Adding Files to your Project 16 Additional Options 36
Additional Path to PC-lint compiler options files 35 Assembler Panel 37
Author Options 36
B
Bin 9, 10
browse information 28
Build a single object file (no library) 48 Burner 40
C
CodeWarrior Help 9 CodeWarrior Manuals 9
Command Line Arguments 40, 42, 44, 45, 46, 47, 48 Compiler Option 35
Compiler Preference Panel 42 Copy Template 46
D
Debugging 22
Display default PC-lint compiler option files too 35 Display generated command lines in message
window 34, 38, 40, 43, 44, 45, 46, 47, 48
F
-F2A 46
Files Mappings Panel 31
H
Help 38, 40, 43, 44, 46, 48 HIWARE Build Tools 37
I
IDE
Files view 14 Link Order 14 projects 11 targets 11 Targets view 15
Importer Preference Panel 44
J
[email protected] 49L
Lib 9 lib<target>cprm 10 libmaker 26Libmaker Preference Panel 47 library 26
Library File Name 48 Library Options 36 Library Warnings 36 Linker Preference Panel 45 Lint 10
M
Mapping 31
N
No inter-modul 35
O
Options 38, 40, 42, 44, 45, 47 Other Metrowerks Tools 10
P
PC-lint 26 PCl-int 33 PClint 34
PC-lint Executable 34 Prefix File 35 project
Making 21
R
recursive 27 Release Notes 10 Removing 17 Requirements 7 Runtime Settings 30
S
setup 8 Simulation 22
Simulator/Debugger 23 Smart Sliders 42 source tree 33
Source Trees Panel 33 Stationery 10 stationery 11 Support 49 [email protected] 49 [email protected] 49
T
target 11Technical Support 49 Template 10
tool tip 12 Touching 17 Type Sizes 42
U
Use custom PRM file 46, 47, 48
Use Decoder to generate Disassembly Listing 38, 43, 44 Use External Debugger 29
Use PRM file from Project 46 Use template PRM file 46
W