AT&T
MERLIN
®
II
COMMUNICATIONS SYSTEM
Feature Module 2
Call Management System
Installation and
©1988 AT&T Issue 1
All Rights Reserved September, 1988
Printed in USA
NOTICE
The information in this document is subject to change without notice. AT&T assumes no responsibility for any errors that may appear in this document.
MERLIN is a registered trademark of AT&T.
MS-DOS is a registered trademark of Microsoft Corporation.
Contents
Introduction 1
Upgrade Information 1
What’s in This Manual 2
Key Terms 3
Step 1: Planning Your System
Key Facts and Considerations
System Considerations
Supervisor’s Console and Agent Voice Terminals Line Assignments
Station Assignments
Line Group and Agent Split Considerations External Alerts
Other Considerations
4
5 5 5 5 6 6 6 6
Step 2: Administering Your MERLIN II System for CMS 7
Setting Basic Operating Conditions for Your System 7
Assigning Lines and Line Pools to Voice Terminals 8
Assigning Lines to the CMS (PC) Attendants 8
Line Assignments and the Voice Announcement Unit 9
Specifying Ringing-on-Transfer 9
Assigning Required No Ring Options 9
Programming Status Buttons 10
Programming Cover Buttons 10
Step 3: Installing Your Hardware
Installing the CMS Expansion Card
Disconnect the Power
Remove the Cover from the PC
Before You Insert the CMS Expansion Card into the PC Insert the Expansion Card into the PC
Reassemble the PC
Connecting the PC to Your MERLIN II Communications System
Connecting the PC to the Voice Announcement Unit Installing the External Alerts (Optional)
11 12 12 12 15 16 19
Step 4: Installing Your Software 25
CMS Preparation Requirements
Installing the MS-DOS system program Types of CMS Diskettes
Installing CMS to Start Automatically Setting the Date and Time
Making a Work Copy of the CMS Diskette Preparing for Upgrade
Installing the CMS Software
25 25 25 25 26 27 27 28
Step 5: Starting CMS and Entering Data 30
Starting CMS 30
Entering Data 31
E d i t i n g D a t a 33
Using the Help Screens 33
Step 6: Identifying Your Agents and Lines 34
Creating an Agent Directory 34
Administering Lines and Line Groups 36
Assigning Line Group ID (Optional) 36
Adding Lines 37
Identifying Priority Lines 37
Returning to the Administration Menu 37
Step 7: Building a Shift Configuration 38
Initial Settings 38
Managing Calls During the Day and at Night 39
Selecting a Configuration Selecting and Displaying a Renaming a Configuration Administering Splits Administering Line Group Administering Call Flow Exiting CMS
39
Configuration 39
40 41
Options 42
44 4 6
Step 8: Testing CMS 4 7
Startup Test 47
Line Status Test 48
Agent Status Test 50
Voice Announcement Unit Test 51
Step 9: Managing Calls
Starting Call Management Monitoring Call Management
System Status Screen Split Status Screens Line Status Screen Events Log Screen
Dynamic Reconfiguration Handling Calls at Night
Selecting Night Service
53 53 55 56 57 58 59 60 60 60
Step 10: Customizing Your CMS
Setting System Options
Service Level Limit Abandoned Call Threshold Alarm On/Off
Flexible Message Length Business Name
Setting Exceptions
Agent Exceptions Split Exceptions Line Group Exceptions Alert Exceptions
Monitoring Exceptions
Setting Exception Thresholds
Assigning External Alerts to Exceptions
Setting Call Flow Options
Choose Startup I n t r a f l o w
Intraflow Threshold Force Delay Answer Delay Automatic After-Call-Work 62 62 62 62 62 63 63 63 63 64 64 64 65 65 65 66 67 67 67 67 67 67
Introduction
This guide explains how to install and start the Call Management System (CMS) on the MERLIN II Communications System with Feature Module 2. By the time you finish this guide, CMS can be managing calls with a primary shift configuration and a night configuration. This guide also describes CMS options and exceptions you can use to customize CMS for your business needs. Once CMS is managing calls, you can fine-tune the system at your own pace.
NOTE: An installation guide for CMS may come with the CMS expansion card. Don’t use that guide. Instead, follow the instructions in this CMS Installation and Getting Started Guide to install and start your new CMS.
The information on the following pages is to be used with the other
documents that come with CMS and the MERLIN II system. The following is a list of CMS and MERLIN 11 system documents, their codes for ordering, and their short titles in parentheses. This guide refers to the documents by their short titles.
MERLIN II Communications System with Feature Module 2: System Manual for the Call Management System (999-501-149, CMS System Manual)
MERLIN II Communications System with Feature Module 2: Planning Guide for the Call Management System (999-504-149, CMS Planning Guide)
MERLIN II Communications System with Feature Module 2: User’s Card for the Call Management System (999-500-149, CMS User’s Card)
MERLIN II Communications System with Feature Module 2: System Manual (999-507-149, MERLIN II System Manual)
MERLIN II Communications System with Feature Module 2: Installation and Administration Manual (518-600-009, MERLIN II System Installation and Administration Manual)
MERLIN II Communications System with Feature Module 2: Planning Guide
(999-503-149, MERLIN II System Planning Guide)
To obtain additional copies of any of the above documents, note their titles and their 9-digit codes, and dial the following number to order them:
1-800-432-6600
The instructions in this guide assume that, in addition to the above documents, you have the following:
● A properly installed MERLIN II Communications System with Feature Module 2
● An AT&T PC dedicated exclusively to CMS, and the documents that came with the PC
● An AT&T customer representative available for help if you need it
UPGRADE INFORMATION Some of enhancements to the previous CMS release include: Assigning up to 28 agents into one split
Administering an automatic after-call-work state (Auto ACW)
Changing agents’ work states in active configuration (Supervisory Login/Logout)
● Generating more types of reports, including cumulative reports, and doing so while CMS is running
● Using updated and improved help screens
● Viewing color screens (if you have a color monitor)
● Using headset adapters for hands-free operation
● Using external alerts to help you keep the system operating efficiently
You are making a new beginning when you install CMS to work with the MERLIN II Communications System with Feature Module 2. Earlier CMS versions are not designed to work with this latest MERLIN 11 system, nor can the administered information in them be transferred to the new CMS.
Since you need to administer the new CMS anyway, take the time to plan your system, draw on your experience, and make the changes that will best benefit your business. (For more information on planning, see the CMS Planning Guide for the MERLIN II Communications System with Feature Module 2.)
IMPORTANT: Before installing the new Call Management System, you must delete all your existing files from the CMSMGMT and
CMSREPT directories. See "Step 4. Installing Your Software” for more information.
Once CMS is installed, the agent directories, line and station number assignments, thresholds, exceptions, and other information must be entered into the new CMS from the keyboard.
This version of CMS is designed to work with both the AT&T PC 6300 and AT&T 6300 WGS, operating under MS-DOS version 3.2 or later. (The PC 6300 can also use MS-DOS version 3.1). It is not designed to work with any other personal computer.
If you have been using an AT&T PC 6300 to manage CMS (or have purchased an AT&T 6300 WGS) and you have MERLIN II System Console to be used as an administrator attendant, you don’t require any more hardware. Be sure, however, that the PC 6300 has at least 512K RAM.
If you used a 6300 PLUS, you can remove the CMS expansion card and put it in the PC you will use with the new system.
You can use the same voice announcement unit with the new CMS that you were using with your earlier version of CMS.
WHAT’S IN THIS MANUAL This guide is organized as follows:
● Introduction. Explains the organization of this guide
● Step 1: Planning Your System. Includes a checklist for planning your CMS agent splits, line groups, and shift configurations using the CMS planning forms
● Step 2: Administering Your MERLIN II System for CMS. Describes how to set certain MERLIN II system features to work well with CMS
● Step 3: Installing Your Hardware. Describes:
Installing your CMS hardware and connecting it to the MERLIN II system
KEY TERMS
● Step 4: Installing Your Software. Describes:
Installing the MS-DOS® operating system
Installing the CMS software
● Step 5: Starting CMS and Entering Data. Describes:
Getting to the CMS Main Menu
Entering and editing data
● Step 6: Identifying Your Agents and Lines. Describes entering the information from your CMS planning forms (completed in Step 1) into the system and includes:
Creating an agent directory
Identifying your CMS lines and line groups
Identifying priority lines
● Step 7: Building a Shift Configuration. Describes:
Administering splits Administering call flow
Administering intraflow
● Step 8: Testing CMS. Provides the opportunity to verify that some key elements of CMS are working correctly before the system begins full-scale call management
● Step 9: Managing Calls. Describes:
Using the status screens to monitor call management
Using dynamic reconfiguration to change a configuration while it is being used to manage calls
Handling calls at night
● Step 10: Customizing Your CMS. Briefly describes the options,
exceptions, and features you can use to customize CMS for your business
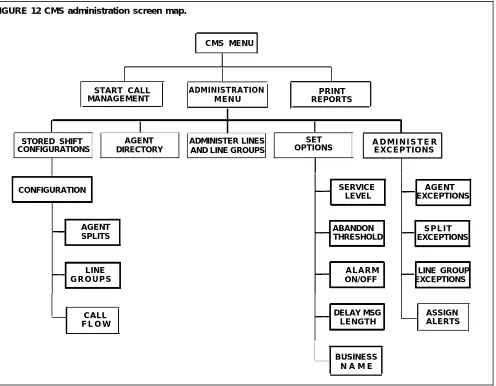
● Appendix A: Guide to CMS Screens. Illustrates the network of CMS screens in the system
Important CMS terms and concepts are described in “Key Terms and Concepts” in the CMS Planning Guide, which you’ll be using in Step 1 of this guide. You can also find this information in Section 2, “Understanding CMS, ” in the CMS System Manual.
Step 1: Planning Your System
To make the most of both the MERLIN II system and CMS and to meet your call-handling needs, it’s essential to integrate the features of both systems along with your telephone lines and agents. As a first step, get your CMS Planning Guide and complete the following planning forms.
● Line Button Planning Form
● Line Groups Planning Form
● Agent Directory Planning Form
● Agent Splits Planning Form
● Shift Configuration Planning Form
When you’ve completed these forms, review the key facts and considerations in the next section before going on to “Step 2: Administering Your
MERLIN II System for CMS. ”
Key Facts and Considerations
SYSTEM
CONSIDERATIONS
Key facts and considerations concerning proper CMS installation and operation are emphasized throughout this guide. For easy reference, they are listed below.
SUPERVISOR’S CONSOLE ●
AND AGENT VOICE TERMINALS
●
LINE ASSIGNMENTS
This version of CMS is designed to work solely with the MERLIN II Communications System with Feature Module 2.
CMS will work on either the AT&T PC 6300 or the AT&T 6300 WGS, operating under MS-DOS version 3.2 or later. (The PC 6300 can also use MS-DOS version 3.1). It is not designed to work on any other personal computer.
The PC must have at least 512K RAM.
The CU1 and CU2 ports on the CMS PC must be attached to two attendant ports on the same module on the MERLIN II system. This module must be either a 408 or 008 analog circuit pack module.
On both of these modules, the first attendant port is the bottom jack, the second attendant port is the fifth jack from the bottom. Both of these jacks must be designated as attendant jacks during MERLIN II system administration.
The CU1 and CU2 ports must have lines administered in the same order to insure proper operation of the Voice Announcement unit.
The MERLIN II system must always be set to “large” in order for CMS to work.
The MERLIN II system cannot be in behind-switch mode during CMS operation. (It can, however, operate behind a switch in standard mode).
Do not use the MERLIN II system flexible numbering feature with CMS.
The CMS supervisor can use only one type of administrator/attendant console: the MERLIN II System Display Console.
The CMS supervisor’s MERLIN II System Display Console must be plugged into a station attendant port on a MERLIN II system analog circuit pack module.
Agents can use any of the MERLIN II system analog or digital voice terminals; they cannot use the basic voice terminals.
You can assign up to 28 lines to CMS, using any block of line ports on the MERLIN II system from 1 to 56. If you want all of the lines to have line button appearances, use only lines 1 through 32.
Do not mix CMS line or line pool assignments in with non-CMS line or line pool assignments.
The line assignments for the CMS PC and the order in which they are assigned at both CU1 and CU2 attendant ports, must be exactly the same.
Do not mix CMS lines covered by different splits in the same pool.
STATION
●
●
A S S I G N M E N T S ●
●
LINE GROUP AND AGENT ●
SPLIT CONSIDERATIONS
●
EXTERNAL ALERTS
All CMS lines must have the MERLIN II system ringing option feature set for No Ring (at the main
Each line of a line group agent’s voice terminal.
attendant console).
assigned to an agent must be assigned to the
CMS agent stations can be MERLIN II system from 10 stations can be operational
CMS uses only the default system (10 throught 69).
assigned any block of stations on the through 69. Keep
at one time.
intercom numbers
in mind that only 28
assigned to the MERLIN II
CMS can have up to six shift configurations.
Each shift configuration can have up to four line groups and up to six agent splits.
Each line group may have one and only one main split assigned to it.
Line groups do not require secondary splits.
An agent split may be designated the main split for one, more than one, or all line groups.
An agent split may be designated the secondary split for one, more than one, or all line groups.
An agent split assigned as the main split to one or more line groups can also be assigned as the secondary split to one or more additional line groups.
● Up to four wall-mounted alerts can be used with CMS. They are connected to line jacks on the MERLIN II system control unit, and administered to light up when thresholds set by the administrator are exceeded. The line jacks used for alerts are in addition to the maximum of 28 lines that can be assigned to CMS. (For example, if all 28 outside lines were assigned, the line button numbers for four alerts would be 29, 30, 31, and 32).
OTHER CONSIDERATIONS ● DO not use flexible numbering with CMS.
If you are going to use flexible numbering with non-CMS portions of your MERLIN II system, do not press [InitSp] (initialize space) when
administering the MERLIN II system. Instead, use block or single
renumbering. (For more information, see “Perform Flexible Numbering” in Section 4 of the MERLIN II System Installation and Administration Manual. )
Step 2: Administering Your MERLIN II System for CMS
Certain MERLIN II system settings, features, and options affect CMS operation. This section describes how to administer those aspects of the MERLIN II system.
Read the descriptions of the settings, features, and options described in the following pages, and make sure you have administered your MERLIN 11 system accordingly. If you aren’t responsible for administering your MERLIN II system, ask your MERLIN II system administrator for help. Instructions for administering the MERLIN II system are in Section 4, “Administering the System, “ in the MERLIN II System Installation and Administration Manual.
SETTING BASIC As you set the basic operating conditions for your MERLIN 11 system,
OPERATING CONDITIONS integrating CMS into the system requires special consideration as you set the
FOR YOUR SYSTEM system’s size and designate certain intercom numbers for attendant consoles.
Set the System Size
For CMS to operate properly, your MERLIN II system must be set to “large,” regardless of how many outside lines it has.
should to
Designate Attendant Consoles
As the “Station Jacks” side of your MERLIN II system Planning Form indicate, the CMS PC requires two intercom numbers that correspond
attendant station jacks on the MERLIN II system control unit, and your CMS supervisor’s attendant console (the MERLIN II System Display Console) requires one such intercom number.
IMPORTANT: Make sure that you (or the MERLIN II system
administrator) designate both intercom numbers assigned to the PC as attendant stations. Follow the procedure under the heading
“Designate Attendant Positions” in Section 4, “Administering the System, ” in the MERLIN II System Installation and Administration Manual.
CMS requires that both the CU1 and CU2 ports at the back of the PC be connected with cables to the MERLIN II system control unit at properly administered attendant station jacks. Both attendant ports on the control unit must be located on the same circuit pack module, This circuit pack module must have an 8-station jack capacity–either a 408 line/station module or a 008 station module. The possible attendant ports are the first and fifth jacks from the bottom on either of the analog modules. If the system had only analog modules mounted on the control unit, the attendant port intercom numbers would be 10 and 14, 18 and 22, 26 and 30, and so on. However, do not use ports 10 and 14 for the CU1 and CU2 attendant ports; intercom 10 is for the system console.
A typical configuration, for example, would have the supervisor’s MERLIN II System Display Console connected to intercom 10, and the CU1 and CU2 ports would be connected to intercom numbers 18 and 22 on the second circuit pack module.
If non-analog modules occupy the control unit, the jack numbers that are assigned to it cannot be used by CMS. For example, if an 008D module occupied slot 2 (followed by an analog module in slot 3), its station jack numbers are 18 through 25. The CU1 and CU2 attendant ports would be assigned to jack numbers 26 and 30 on the analog module in slot 3.
ASSIGNING LINES AND The lines and/or pools should appear on each CMS voice terminal exactly as
LINE POOLS TO VOICE they appear on the Voice Terminal Configuration Form you completed for it.
TERMINALS Follow the instructions under the appropriate heading for your system in Section 4 of the MERLIN II System Installation and Administration Manual.
ASSIGNING LINES TO THE When you finish assigning lines and/or pools to the voice terminals for your
CMS (PC) ATTENDANTS CMS agents and supervisor, you have to assign all CMS lines individually
(not in pools) to the CMS PC. Think of the PC as the same thing as the attendant console you’ve just programmed. To do this, you’ll need your CMS Line Button Planning Form and your MERLIN II system Master Planning Form.
The Master Planning Form shows you the intercom numbers (called “Station Jack” numbers on the form) that have been assigned to the CMS PC
attendants. The button numbers on the Line Button Planning Form show the order to follow as you assign the lines.
Also, you must use the MERLIN II System Display Console connected to intercom number 10. (For more information on menu-driven administration see Section 2, “Reference, ” in the MERLIN 11 System Manual. If someone else is responsible for administering the MERLIN II system, ask that person to perform this procedure.)
To assign lines:
1 2
3 4
5
6
7
Place the administration overlay over the console.
Enter administration mode by sliding the T/P (Test/Program) switch to P
and touching Conference twice.
The administration menu appears on the display,
Touch [Stations] then [Line/Pool].
Find the first 2-digit intercom number (“Station Jack” number) assigned to the CMS PC on the “Station Jacks” side of the Master Planning Form.
Dial the intercom number or touch the Auto Intercom button for the number.
Green lights go on next to the buttons for any lines already assigned to that intercom number:
Green light on = Green light off =
Remove all lines it.
line assigned to the CMS PC line not assigned to the CMS PC
by touching each line button with a green light on next to
The green lights go off as you touch the corresponding line buttons.
Because CMS uses the button numbers listed on the Line Button Planning Form to identify and keep track of the lines assigned to CMS, assign the same CMS lines to the CMS PC in the exact order in which they appear on the Line Button Planning Form:
a Touch the button for the line that appears on button number 1 on the Line Button Planning Form.
The green fight goes on next to the line button.
b Touch the buttons for the remaining CMS lines in the order in which they appear on the form (2, 3, 4, etc.) until you have assigned all the lines that appear on the form.
The green lights go on as you touch the corresponding line buttons.
8 Use the following Copy procedure to copy the CMS line assignments to the second of the two intercom numbers assigned to the CMS PC.
a
b c d e
f
Find the second intercom number for the CMS PC on the Master Planning Form.
Press [Copy] .
Dial the first intercom number and touch [Enter] to return. Dial the second 2-digit intercom number, and touch [Enter] .
When the copy is complete, press Conference to return to the main menu.
Slide the T/P switch to the center position to exit administration.
LINE ASSIGNMENTS AND The CMS line assignments and the order in which they are assigned at
THE VOICE intercom 10 by the MERLIN 11 system administrator (beginning at the line jack
ANNOUNCEMENT UNIT decided upon during planning and installation) must match the CMS line assignments and the order in which they are assigned by the CMS administrator (beginning with button 1). The CMS Line Button Planning Form and the MERLIN II system Master Planning Form should reflect this correlation.
Once properly administered, the CMS line assignments should be the same for both the CU1 and CU2 attendant ports. When checking these attendant ports, the MERLIN 11 system administrator compares the CMS line
assignments for CU1 and CU2, represented as the lit lamps on the MERLIN II system console. If, for any reason, the line assignments do not match, the voice announcement unit will not work correctly.
NOTE: The copy procedure in the previous section should reduce the chances of error when assigning lines to the CUl and CU2 attendant ports.
SPECIFYING TRANSFER
RINGING-ON- The MERLIN II system is initially set to connect a transferred call to Music-on-Hold while the call is ringing at the destination voice terminal. For CMS, specify the Ringing-on-Transfer feature instead of Music-on-Transfer. Then callers will hear ringing rather than a sudden short burst of music when CMS transfers the call to an agent.
For programming instructions, see “Ringing-on-Transfer” in Section 2 of the
MERLIN II System Manual.
ASSIGNING REQUIRED NO As your agents’ Voice Terminal Configuration Forms should indicate, you
RING OPTIONS should set the ringing option on all CMS lines and line pools assigned to agents’ voice terminals to “No Ring. ” You may also want to set any other lines or line pools assigned to CMS agents’ voice terminals to “No Ring” as well. For programming instructions, see “Ringing Options” in Section 2 of the MERLIN II System Manual.
NOTE: The MERLIN II system No Ring option for lines assigned to voice terminals is not related to the CMS option of assigning All-Ring operation to an agent split. Turning off the All-Ring option for a split does not set the lines that appear on the agents’ voice terminals to No Ring.
PROGRAMMING STATUS Each CMS agent’s voice terminal must have two status buttons: an Available
BUTTONS button and an After-Call-Work (ACW) state button. Each of these buttons must have lights. Label one button “Available” and the other “ACW. ”
The programming codes are:
*301 for Available *302 for ACW
You can use the procedure for Centralized Programming in Section 2 of the
MERLIN II System Manual.
PROGRAMMING COVER Check your CMS Agent Splits Planning Form and the MERLIN II system
BUTTONS Voice Terminal Configuration Forms for your CMS agents to determine if any agents’ voice terminals will have Cover buttons for All-Ring operation or the Transfer-to-Split feature. If so, use Centralized Programming or follow the procedure under “Call Coverage” in Section 2 of the MERLIN II System Manual to program Cover buttons on the agents’ voice terminals.
For the most efficient operation, program the buttons for “primary coverage” and “immediate ring” in the appropriate steps in the programming sequence. The agents’ Voice Terminal Configuration Forms should show you which buttons to program and how to label them.
Step 3: Installing Your Hardware
This section provides instructions for installing the CMS hardware. The instructions will guide you through the following procedures:
● Installing the CMS expansion card
● Connecting the PC to the MERLIN II system
● Connecting the voice announcement unit to the system
Unpack and install the PC’s main unit, keyboard, monitor, and printer using the instructions in the guides that came with the equipment.
Check that your PC has the video controller card (VDC) installed. If you are using the 6300 WGS, make sure it has the VDC 400 installed (not the VDC 750) .
If not installed, follow the instructions in the manual that came with the PC and install the card before continuing with the CMS installation. Then follow the instructions below for installing the CMS expansion card.
CAUTION: To reduce the chances of accidental disconnection, you should not plug the PC’s power cord into a wall outlet controlled by a switch.
Installing the CMS Expansion Card
DISCONNECT
Use the following procedure for installing the CMS expansion card into your PC. A flat-blade screwdriver is the only tool you need.
THE POWER 1 Turn the PC power switch to OFF and disconnect the PC power plug from the power source.
2 Turn the printer power switch to OFF and disconnect its power plug from the power source.
3 Turn the power switches to any other peripheral equipment to OFF and disconnect their power plugs from the power source.
WARNING: Failure to disconnect the power may damage the computer or result in electrical shock.
REMOVE THE COVER FROM THE PC
1 Locate the two screws on the upper back comers of the unit (Figure 1).
Using a flat-blade screwdriver, unscrew each screw about 1/4 inch, or until they move freely.
FIGURE 1 Loosening the screws on the PC.
Screws
2 Stand in front of the unit and place your hands on the sides of the cover (Figure 2).
FIGURE 2 Sliding the cover of the PC forward.
1/8”
3 Brace the base of the unit against your hip or thigh, and firmly slide the cover toward the front of the unit. (It will move only about 1/8 inch.)
NOTE: The cover fits snugly, and it may be difficult to move out of its normal position. If the cover does not move, you may have to loosen the screws a bit more or gently pry the cover forward with the screwdriver.
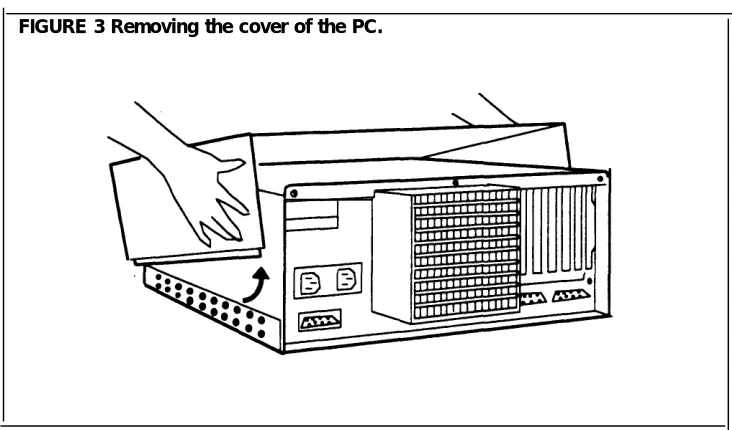
4 Place your hands on the sides of the cover toward the rear and tilt it so that the rear section is higher than the front (Figure 3).
FIGURE 3 Removing the cover of the PC.
5 Lift and remove the cover from the base unit and set it aside.
The Expansion Slots
Once you removed the cover from your PC, you are ready to insert the CMS expansion card.
In your PC there are seven expansion slots (Figure 4). At the front of the PC there’s a plastic guide aligned with each expansion slot. The CMS expansion card must fit into an expansion slot receptacle and its corresponding plastic guide.
FIGURE 4 The expansion slots in the PC.
Plastic guide
Expansion Slots
BEFORE YOU INSERT THE Before you begin to insert the CMS expansion card into the PC, you should
CMS EXPANSION CARD note these important points:
INTO THE PC
A Note on the RAM Address and the IRQ Select
Each card in a personal computer requires exclusive use of certain areas (addresses) in the computer’s memory. Two PC cards cannot share the same address(es).
The CMS expansion card uses the following Random Access Memory (RAM) hexadecimal addresses and Interrupt Request (IRQ) select. These are set by the
factory and cannot be changed.
RAM C0000–C03FF IRQ 3
CMS requires that the PC be dedicated to CMS alone; other cards should not be installed in the PC.
NOTE: A card connected to the hard disk already occupies an expansion slot in the PC. The addresses on this card do not need to be changed.
If using the 6300 WGS, make sure it has the VDC 400 installed (not the VDC 750).
Also note these important considerations when you are ready to insert the card in the PC:
● Avoid touching the gold n fingers” at the base of the card. Always hold the card by its top corner edges.
● AS you insert the card, be sure that you do not bend it.
INSERT THE EXPANSION To insert the CMS expansion card in one of the expansion slots, follow these
CARD INTO THE PC directions:
1
2
3
4
Select an empty slot for the CMS expansion card.
If there are other cards inside the unit, be sure they do not interfere with the space you need for the CMS expansion card.
Using the flat-blade screwdriver, remove the screw from the metal cover of the expansion slot that you have chosen (Figure 5). Set the screw aside because you will need it later.
Use the screwdriver to snap off the plastic slot cover that protects the metal expansion slot cover.
Remove the metal expansion slot cover by sliding it up (Figure 5).
FIGURE 5 Removing the metal expansion slot cover.
5 Make sure the expansion slot is clear. Position the colored wires crossing the slot so they lie beneath the card as you install it.
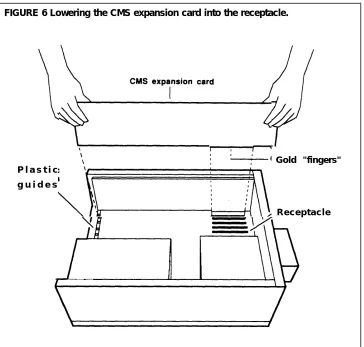
6 Holding the CMS expansion card by its top corner edges, lower the card into the expansion slot receptacle you have chosen (Figure 6). Do not try to insert the card through the back of the unit.
7 Position the card so the electrical contacts, the gold “fingers,” are aligned with the receptacle in the expansion slot and the back edge of the card fits into the groove on the plastic guide.
FIGURE 6 Lowering the CMS expansion card into the receptacle.
Gold "fingers" P l a s t i c
g u i d e s
Receptacle
8 Press down on the top edge of the card until you feel and hear the card “lock” into place.The card is locked when the frame of the card is flush with the frame of the unit.
If the card tilts or wobbles when you press on either end, the card is not properly installed. Take out the card and reinsert it. Be careful that you do not bend the card.
Make sure that the CMS expansion card is not touching any other card. If it is, move the interface card to another slot.
Be sure the bracket that replaces the slot cover slides into the appropriate slot.
9 Screw down the CMS expansion card with the screw you removed from the metal expansion slot cover (Figure 7).
FIGURE 7 Screwing down the CMS expansion card.
I
REASSEMBLE THE PC Check the installation guide that came with the PC again to be sure you have
installed all the necessary components (such as the VDC Card). When you are satisfied that all components are properly installed, and when you have inserted the CMS expansion card, reassemble the PC by following this procedure:
1 Face the front of the unit and lower the front of the cover so that the rear is slightly higher than the front.
2 Align the front of the cover with the front of the base (Figure 8). Make sure that the sides of the cover fit within the base of the unit at the front, and that the plastic tabs at the front of the cover are under the disk drive.
FIGURE 8 Replacing the cover of the PC.
Sides must fit within base
3 4 5
6
7
8
Lower the back of the cover onto the base.
Slide the cover about 1/8 inch toward the front of the unit.
Then, slide the cover toward the rear of the unit. The sides of the cover should now fit within the base, and the top of the cover should extend slightly beyond the back of the unit.
Tighten the two screws that you previously loosened at the back of the u n i t .
Make sure you have connected the monitor, keyboard, and printer according to the directions that came with the PC.
Plug the PC’s power cord into an ac outlet.
Connecting the PC to Your MERLIN II Communications System
The station jacks that have been assigned to the CMS PC should be identified on the MERLIN II system Master Planning Form next to their respective intercom numbers. These numbers must be designated as attendant positions.
The PC must be connected to the MERLIN II system at two station jacks on the same circuit pack module on the control unit and these jacks must be attendant positions. You must connect both the CU 1 and CU 2 jacks to attendant ports. If you’re unsure whether you’ve done this correctly, ask for help from the person responsible for MERLIN II system administration.
Use the following directions to connect the PC to your MERLIN II system:
1 2
3
4
5
Turn your PC so you can see the three jacks in the expansion card.
Plug one of the 14-foot station cables provided in the CMS hardware package to the expansion card’s middle jack, marked CU 1.
Plug the loose end of the cable to one of the control unit attendant ports in a circuit pack module with an 8-station capacity—either a 408
line/station module or a 008 station module. (For example, if the circuit packs were in slots 2 and 3 on the control unit, their available ports would be 18 and 22 or 26 and 30, respectively. The ports would have to be
administered. Do not use intercom 10).
Your installation may require that you plug the cables into a MERLIN II system wall jack connected to one of the attendant ports on the
MERLIN II system control unit through the building wiring. If so, be sure that both cables eventually connect to the same circuit pack module.
Plug the other 14-foot station cable provided in the CMS hardware package to the CMS expansion card’s lower jack, marked CU 2.
Plug the second station cable, now plugged into the CU 2 jack, into the other attendant port on the control unit.
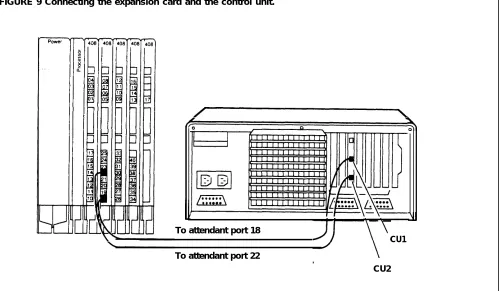
Figure 9 shows the connection between the expansion card CU 1 and CU 2 jacks and the two attendant ports on the MERLIN II system control unit.
FIGURE 9 Connecting the expansion card and the control unit.
To attendant port 18
CU1 To attendant port 22
.
CU2
Connecting the PC to the Voice Announcement Unit
To connect the two units, you need the 14-foot cord provided for announcement unit in the CMS hardware package. Follow these for connecting the PC to the voice announcement unit.
1 2
3
the voice procedures
Turn your PC so you can see the three jacks on the CMS expansion card.
Plug the 14-foot cord for the voice announcement unit into the jack labeled AUX (top jack) on the expansion card.
Plug the loose end of the cord to the connecting cord attached of the voice announcement unit.
Figure 10 shows how the cord for the voice announcement unit is to both the PC and to the voice announcement connecting cable.
to the back
connected
FIGURE 10 Connecting the expansion card and the voice announcement unit.
To ac outlet
Installing the External Alerts (Optional)
External alerts are the small incandescent lamps that are designed to be mounted on a wall in full view of the CMS supervisor and agents. Each alert is connected to a dry circuit relay which in turn is connected to a line jack on the MERLIN II system control unit, either directly or through building wiring. (The dry circuit is connected to a separate power source as well as to a wall-mount adapter. The wall-wall-mount adapter completes the wiring connection between the MERLIN II system control unit and the alert).
Up to four alerts can be connected to one MERLIN 11 system control unit. Each alert should be clearly marked as to whether it is alert number 1, number 2, number 3, or number 4.
During MERLIN II system administration, the alerts must be assigned to lines that are not assigned to CMS. During CMS administration, the alerts must be assigned to the line button numbers. The line button numbers correspond to the outside line ports on the MERLIN II system control unit which connect to the alerts.
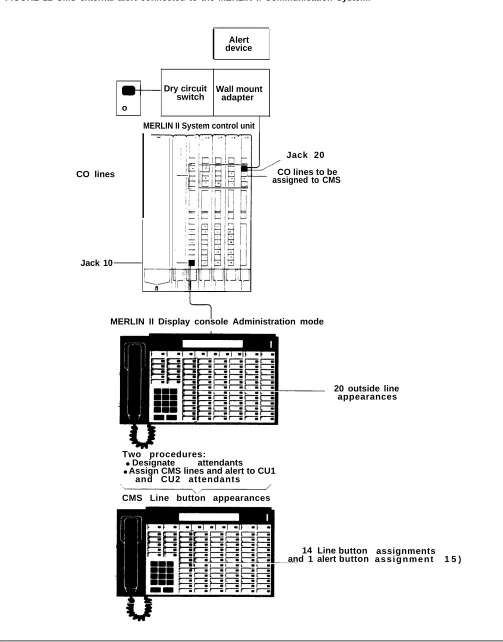
Figure 11shows an example diagram of an alert for CMS connected to the MERLIN II system. The diagram also shows its corresponding line
assignment as represented on a MERLIN II System Display Console during MERLIN II system administration (in this example, number 20). After the lines are assigned to the CU1 and CU2 ports of the CMS PC, CMS uses the line button numbers to access the outside lines and the alert. In Figure 11, the line button number for the alert is 15.
NOTE: During CMS administration, you’ll complete the association between an external alert and an exception threshold from the CMS PC. Beginning with the Administration Menu, you will go to the Exceptions Setting screen, choose the ALERTS option, and enter the line button number (for example, 15, as in Figure 11) in the
appropriate alert number field. Then, to associate the alert with the exception, you will enter the alert number in the appropriate exception threshold field. (See “Setting Exceptions, ” later in this guide for more information).
Remember, the line button number refers to the line button position on the MERLIN II System Display Console while the administrator is assigning lines to the CU1 and CU2 attendant ports. It is not the default line jack number on the MERLIN II system control unit.
Except for the external alert assignments, only those lines assigned to CU1 and CU2 should appear on the console buttons in consecutive order, beginning with line button number 1. (The buttons number form 1 to 32). During CMS administration, the administrator assigns the lines to CMS (CU1 and CU2) using the line button numbers on which the lines appear. (See “Assigning Lines to the CMS (PC) Attendants, ” above).
Up to 28 lines can be assigned to CMS for outside calls-allowing for four more line buttons .to be assigned to external alerts. The administrator simply assigns the remaining line buttons to CU1 and CU2 for the alert(s). (For example, if all 28 outside lines were assigned, the line button numbers for four alerts would be 29, 30, 31, and 32–regardless of their default line numbers on the MERLIN II system control unit).
You are now finished installing the CMS hardware and connecting the necessary equipment. Go on to Step 4, “Installing the Software. ”
FIGURE 11 CMS external alert connected to the MERLIN II Communication System.
Alert device
CO lines
Jack 10
Dry circuit Wall mount o
switch adapter
MERLIN II System control unit
Jack 20 CO lines to be assigned to CMS
MERLIN II Display console Administration mode
20 outside line appearances
Two procedures:
● Designate attendants ● Assign CMS lines and alert to CU1
and CU2 attendants CMS Line button appearances
14 Line and 1 alert
button
button a s s i g n m e n tassignments 1 5 )
Step 4: Installing Your Software
CMS PREPARATION Before you can install the CMS software, you must be sure that CMS will be
REQUIREMENTS working on a hard disk dedicated exclusively to running the CMS program and storing CMS reports. Non-CMS applications or data files should not be on the hard disk. If you need instructions for using the MS-DOS “del” (delete) and “dir” (directory) commands to clear the hard disk for CMS see the document titles listed below.
Also, you must copy the MS-DOS version 3.2 (or later) onto your hard disk and set the date and time. (The PC 6300 can also use MS-DOS version 3.1). You should also make a duplicate copy of the CMS diskette(s) so that you can use the duplicate(s) as your working copy and keep the original(s) in a safe place. If a working copy is damaged, you can make another from the original.
INSTALLING THE MS-DOS Locate the User’s Guide: AT&T 6300 WGS Processor that came with your 6300
SYSTEM PROGRAM WGS. If you are using the PC 6300, locate the User’s Guide: AT&T Personal
Computer MS-DOS by Microsoft that came with it. Then remove the MS-DOS system diskette from the envelope at the back of the guide.
Now complete the tasks listed below, using the instructions in the guide that contained the MS-DOS diskette.
1 Create an MS-DOS partition using the entire hard disk.
2 Format the hard disk drive.
3 Install the MS-DOS program onto the hard disk.
4 Set the date and time.
All of the above tasks must be done. The date and time you set at this point in the procedure is reflected in CMS operation as well as in the CMS reports.
NOTE: Using the command
format c: /s
for the copy procedure, will automatically format the hard disk and copy the MS-DOS system onto it.
TYPES OF CMS DISKETTES
CMS is provided on two types of diskettes:
● Two 5 1/4 inch floppy diskettes, for use with either the PC 6300 or 6300 WGS
● One 3 1/2 inch diskette, for use with a comparably equipped 6300 WGS
If you have the PC 6300, use the 5 1/4 inch diskettes in the following
duplication and installation procedures. If you have the 6300 WGS, use either the 5 1/4 inch diskettes or the 3 1/2 inch diskette, depending on the type you have.
INSTALLING CMS TO For CMS program to start automatically each time you turn on the PC, you
START AUTOMATICALLY must have an AUTOEXEC.BAT file that includes the appropriate commands. For information on setting up or adding to an AUTOEXEC.BAT file, see the user’s guide that comes with the MS-DOS diskette.
In order to set up or add to this file on your PC you need to use a text editor. Use either EDLIN, the MS-DOS line editor, or another text editor you are familiar with.
The following are the commands you need in your AUTOEXEC.BAT file to start CMS automatically:
cd cms c m s
If your hard disk does not have an AUTOEXEC.BAT file, you can use EDLIN to create one for the CMS commands as follows:
1 At the c> prompt , type cd , then press (< ) 2 Type edlin autoexec.bat , then press (< ) 3 At the
*
prompt, type i4 At the 1:* prompt, type
5 At the 2:* prompt, type
6 At the 3:* prompt, hold
then press (< )
cd cms ,then press (< )
cms , then press (< )
down the (Ctrl) and (Z) keys together, then press (< )
7 At the *prompt, type e , then press (< ) You should now be at the C>.
SETTING THE DATE AND The date and time are important parts of your daily CMS statistics and must
TIME be represented correctly on your PC screen. When you have set up your PC and copied the MS-DOS program onto the hard disk, the system prompts you to check the date and the time to be displayed on the screen. If either is not correct, follow the procedures below. (When in CMS, you can check the date and time by looking at the right-hand comer of any CMS Menu screen).
NOTE: The date must be changed at the beginning of each year, and the time must be adjusted for daylight savings time.
Setting the Date
To check or change the date on your PC, do as follows:
1 When the C> prompt appears, type
date
and press (< ) .
The following message appears on your screen:
Current date is Wed 4-07-1987 Enter new date: (mm-dd-yy)
2 If the date is correct, press (< ) .
If the date is incorrect, type in the correct date (for example, 4-08-1987 )
and press (< ) .
Setting the Time
To check or change the time on your PC, do as follows:
1 When the c> prompt appears,
time
and press (< ). The following
Current time is 0:01:30.00 Enter new time:
type
message appears on your screen:
2 If the time is correct, press (< )
If the time is incorrect, type in the correct hour and minute (for example,
9:03 ) and press (< ) MS-DOS works on the basis of a 24-hour clock, so
if you want to enter the time as 2:30 p.m. you must type 14:30.
MS-DOS keeps track of the seconds and hundredths of seconds for you.
MAKING A WORK COPY To make a work copy of the CMS diskette(s), remove the appropriate CMS
OF THE CMS DISKETTE diskette(s) from the pocket at the back of the CMS System Manual. Then copy each CMS diskette onto a blank diskette using the MS-DOS diskcopy
command. For more information, see the MS-DOS user’s manual.
Label the duplicate “CMS Copy, ” and use it as your working copy for installing or reinstalling CMS. If you have copied the 5 1/4 inch diskettes, label the first one “CMS Copy 1 of 2“ and the second one “CMS Copy 2 of 2.” Keep the original CMS media in a safe place in case you have to make additional working copies.
PREPARING FOR U P G R A D E
If CMS is being upgraded, all of your current files under the CMSMGMT and the CMSREPT directories must be removed. To delete the old files from CMSMGMT, enter the following command from the root directory (the c>
prompt):
del C:\CMS\CMSMGMT\*.CMS
To delete the old files from CMSREPT, enter the following command from the root directory (the c> prompt):
del C:\CMS\CMSREPT\*.CMS
Installing the CMS Software
To install
1 Insert using copy
2 If the
the CMS program, do the following:
the duplicate copy of the CMS software into drive A. (If you are the 5 and 1/4 inch floppies, insert the copy you have labeled “CMS 1 of 2“).
A> prompt does not appear on your computer screen, type
a:
and press (< ).The A> prompt should then appear on your screen,
3 T y p e
c m s i n s t a l l
and then press (< ) .
The following message appears in the upper portion of the screen:
**** Call Management System for the MERLIN II CMS **** Installation Procedure
This message remains on the PC screen throughout the installation procedure. Additional messages appear in the lower
If the system has less then 512K RAM (memory), the
appears: .
**** Insufficient System Memory for CMS
A Minimum of 512K System Memory is Required
area of the screen,
following error
Increase System Memory and Repeat Installation
If this message appears, you must upgrade your system by increasing its RAM to a minimum of 512K before you can continue the installation procedure.
4 While the installation procedure is in progress, the following message usually appears on your screen:
**** Installation Now in Progress. Please wait...
If you are using the first of the two 5 1/4 inch diskettes and the installation is error-free, the installation procedure will stop when the first diskette has been completely copied. The system will issue the following request for the second diskette:
**** Insert Floppy #2. Press Enter to Continue.
Remove the first diskette, insert the second diskette (you’ve labeled it “CMS Copy 2 of 2“ ), and press (< )to continue with the installation.
The installation procedure can also be interrupted for any of the following:
If there are errors on your CMS duplicate copy that prevent the installation program from continuing, the following message appears on your screen:
**** Error on Installation Floppy Disk
Try Installation from another Floppy
Discard the CMS duplicate copy, make another duplicate copy using the original CMS diskette, and then begin the CMS installation procedure again.
There may be insufficient storage space on the hard disk for new information. In that case, you will see the following message on your screen:
***** Insufficient Disk Space for CMS.
An additional xxxK is required.
Delete Old Files and Try Installation Again.
REMEMBER: CMS must work on a hard disk dedicated exclusively to running the CMS program and storing CMS reports. If you need instructions for using the MS-DOS “del” (delete) and “dir” (directory) commands to clear the hard disk for CMS, see User’s Guide: AT&T 6300 WGS Processor or User’s Guide: AT&T Personal Computer 6300 MS-DOS by Microsoft.
5 Once the installation program has copied all the CMS programs and files onto the hard disk, the final installation message appears on your screen:
**** Call Management System Successfully Installed
When this screen appears, the program returns control to MS-DOS and the A> prompt appears.
6 Remove the CMS duplicate copy from the disk drive, place it in its paper sleeve, and store it in a safe place.
Step 5: Starting CMS and Entering Data
STARTING CMS
This section describes how to reach the CMS Main Menu, the starting point for CMS activities. It also explains how to respond to prompts and enter and edit data.
The following procedure applies to both the PC 6300 and 6300 WGS keyboards.
To
1
2
start CMS and access the CMS Main Menu: Turn on your PC.
If the A> prompt appears, type c: and press (< )to change to disk drive C.)
When the MS-DOS c> prompt appears, type
cd cms
and press (< ) .
When C> reappears, type
c m s
and press (< ) .
This starts the CMS program. The CMS Main Menu, shown below, appears.
Bon Voyage Travel CMS CMSIIRZ 2: 03p 06/27
F1 - Start Call Management F4 - Administer CMS
(Agents, Lines, Configurations) F5 - Print Reports
F8 - Exit to DOS F
1
F 4
F 2
F10- Help F 8
ENTERING DATA You enter data by pressing function keys and responding to the prompts that appear on your PC screen. Whenever a prompt appears on the prompt line, the editing function keys also appear, as shown on the following screen.
Bon Voyage Travel ADMIN CMSIIRZ 3: 58p 06/02 Agent Agent Num Answer Force Auto Split Pos ID Split Pos ID Group Lines Delay Delay ACW 1 PERS 16 TON 3 CORP 37 IKE A PUBLC 4 5s On 5s
17 CLIFF 39 TINA B SPECL 3 5s Off 10s 19 ERNIE 40 DIANA C CHART 6 5s Off 5s 21 DEB 4 SUPPT 42 RON D CORP 2 5s On 5s 23 BOB 43 NANCY ,
24 SHERM 5
-25 WALT
6-2 CHART 27 BEN Flow All 28 SAM Splits Intra Spl Thresh Ring 29 NORM Grp Main Sec Flow 1 10s off 31 DI A 1 3 On 2 5s off 32 CARLA B 1 3 On 3 30s off 33 BJ C 2 4 On 4 30s off 35 MAX D 3 - Off 5 30s off 6 30s off Configuration ¤1 - DAILY
FORCE DELAY: Group Letter: F
1
The PC 6300 and 6300 WGS Keyboards
The type of keyboard you are using depends on the type of PC to which it is connected. However, CMS works the same no matter which keyboard you are using.
The function keys discussed in this guide are the same on both keyboards. The design differences between the two keyboards affect the position of the keys, but not their function. Also the tab, backspace, shift, and enter keys on the 6300 WGS keyboard have arrows and labels to identify them; the 6300 keyboard has only arrows. The cursor directional keys are the same on both keyboards. See Section 10, “Quick Reference Guides, ” for illustrations of the two keyboards.
In many instances, both keyboards allow more than one key to perform the same function. The next table shows the function keys you use to cancel a prompt, move the cursor to different fields in a prompt, and enter data. This guide uses the 6300 WGS keyboard in the procedures.
Press Or To
(F1) (Cancel Prompt) (Delete) Cancel a prompt, including any data
you may have already entered in any field.
(F5) (Previous Field) ( ^ ) ( )< > Move to the beginning of the
(the shift key and the tab key previous field. both at once)
(F6) (Next Field) ( )<
(the tab key) Move to the beginning of the next
>
field.
( ›)(the right arrow key Move one character to the right.Does not work in a blank field. on the numeric keypad)
(‹ ) (the left arrow key (‹ ) (the backspace key) Move one character to the left.
on the numeric keypad) Does not work in a blank field.
(F8) (Enter Data) (< )(the return key) Indicate you have finished your response.
Don’t worry about making any fatal mistakes when you enter data in CMS. If you make an invalid entry (for instance, entering a letter instead of a number), your PC beeps and displays an error message, and you can reenter the data correctly.
Follow these guidelines when completing the fields in a prompt:
You may use uppercase or lowercase letters. In the examples in this manual, enties are usually shown lowercase. On your PC screen, almost all entries appear as uppercase, even if you typed lowercase letters. (The system displays agent names and your business name exactly as you type them, however.)
Some field entries can be numbers or special characters. Spaces are not allowed, so use underlines instead. To get an underline, press the shift key (either ( ^ ) or (Shift), depending on your keyboard), and then press the hyphen and underline key in the top row of the keyboard.
Press (F8) (labeled “Enter Data”), (Return), or (< ) when you finish typing your response. This tells the PC to process the data you have entered. The cursor can be in any field when you press these keys.
Your PC beeps and displays an error message if you skipped a required field in a prompt and pressed (F8), (Return), or (< ) .
EDITING DATA Follow the instructions in the table below to change entries.
USING THE HELP SCREENS
T o Do this
Change a character in a field Move the cursor to the incorrect character and type another character over it.
Add characters at the end of an Press ( >)after the last character
entry and type additional characters.
Insert characters in an entry Move the cursor to the first character you want to change and retype the entire entry from that character. (You cannot use (Insert) to insert a character between other characters.)
Replace a long entry with a shorter Type over the characters you want
entry to change, then press the space bar
after the last character of the new entry. The remaining characters in the previous entry disappear.
For example, to change “Joseph” to “ J o en
:
1 Move the cursor to “s”
2 Type “e”
3 Press the space bar.
The letters “eph” disappear.
For more information about any screen or prompt appearing on the monitor, press (F10) (labeled “Helpn
). A help screen that describes the screen or the prompt will appear.
To exit a help screen and return to your previous place, press any key. If you press a function key to exit a help screen, you will exit help and then perform the function of that particular function key.
Step 6: Identifying Your Agents and Lines
Administration enables you to tailor CMS for your business by identifying your agents and lines, as described in this section, and by arranging your
lines and agents in shift configurations, as described in “Step 7: Building a Shift Configuration.” These activities begin with the Administration Menu, shown below. Press (F4) (labeled “ Admin CMS” ) on the CMS Main Menu to reach the Administration Menu.
Bon Voyage Travel ADMIN CMSIIRZ l0:36a 06/13
F1 Build/Edit Shift Configuration F2 Build Agent Directory (Names and IDs) F3 Administer Lines and Line Groups F5 Set Options
F6 Select Exception Thresholds to be Monitored F8 Exit From the Administration Module
F10-Help
F 1
F 2
F 3
F 5
F 6
F 8
Creating an Agent Directory
Your agent directory is your master list of agents. The following procedure describes how to enter agent information into the system. Use your completed Agent Directory Planning Form as your guide.
To create an agent directory:
1 Press (F2) (labeled “Agent Directory” ) on the Administration Menu. The Agent Directory screen, shown below, appears. The illustration includes sample agent entries.
Bon Voyage Travel ADMIN CMSIIRZ 10:54a 06/13 Last Name First ID Last Name First ID
Anders Harry HARRY Middon Beth BETH Bakerson Tom TOM O’Rourke Walter WALT Chanleys Diane DI Pantilly Ernie ERNIE Chapman Charlie CHUCK Patrick Bob BOB Claren Clifford CLIFF Peters Norman NORM Clover Ward WARD Piers Benjamin BEN Easttree Clive CLINT Price Sherman SHERM Fielding Sally SALLY Reynolds Nancy NANCY Fielding William BILL Rice Ronald RON Hall Benny BENNY Rice Diana DIANA Honelly Billy Joe BJ Turner Carla CARLA Kiley Gene GENE Turton Ike IKE Kloner Maxwell MAX Turton Tina TINA Mailer Sam SAM Weiss Debra DEB
F10 - Help
2 Press (F1) (labeled “Add Agent”).
The screen’s function keys are replaced by the editing function keys, and the following prompt appears on the prompt line:
ADD AGENT: Last Name: First: I D :
3 Refer to your Agent Directory Planning Form and enter the information for an agent in the fields. Then press (F8) (labeled “Enter Data”).
The prompt disappears, the screen’s function keys replace the editing function keys, and the new agent appears on the agent directory.
NOTE: You can backspace to make corrections or use the editing keys (such as Next Field and Previous Field) to move around on the prompt line. If you want to change agent information after you have entered the agent in the directory, use (F2) (labeled “Remove Agent”) or (F3) (labeled
“Change Agt Info”) and follow the prompts.
4 Repeat steps 2 and 3 for each agent. If your Agent Directory Planning Form indicates All-Ring operation for any splits, add a “ghost n
agent for those splits. “Ghost” agents are added in the same way as regular agents,
5 When you have identified all your agents (or at least those in your first configuration), press (F8) (labeled “ Admin Menu” ) to return to the Administration Menu.
Administering Lines and Line Groups
On the Line Group Planning Form, you identified the MERLIN II system lines and line groups you plan to use with CMS. You also identified your priority lines. You can enter that information into the system with the following procedures.
You’ll be using the Administer Lines and Line Groups screen, shown below. To reach this screen, press (F3) (labeled “Lines/Groups”) on the
Administration Menu.
Bon Voyage Travel ADMIN CMSIIRZ 10: 57a 06/13 Group Btn Line ID Priority Group Btn LineID Priority
A PUBLC 1 1816 D CORP 15 8918 2 1888
3 1818 4 8515 B SPECL 5 8532 6 8518 7 8531 C CHART 8 8911 9 8912 10 8913 11 0914 12 8915 13 8916 D CORP 14 8917
F10 -Help
ASSIGNING LINE GROUP Your Line Group Planning Form should indicate a 5-character ID
ID (OPTIONAL) (identification) for each line group in addition to a line group letter. You may find it helpful to enter the line group IDs now to remind you of the types of calls coming in on each line group.
To assign an ID to a line group:
1 Press (F6) (labeled “Change Group ID”) on the Administer Lines and Line Groups screen.
The editing function keys replace the screen’s function keys, and the following prompt appears on the prompt line:
CHANGE GROUP ID: Group Letter:_ New Group ID:
2 Enter the group letter and group ID for a line group. Then press (F8) (labeled “Enter Data”).
The prompt disappears, the screen’s function keys replace the editing function keys, and the line group ID you entered appears on the screen.
3 Repeat steps 1 and 2 for each line group.
ADDING LINES T o
1
,2
3
add a line to CMS:
Press (F1) (labeled “AddLine’’) on the Administer Lines and Line Groups Screen.
The editing function keys replace the screen’s function keys, and the following prompt appears on the prompt line:
ADD LINE: Button #.. _ L i n e I D : Group Letter:_
The button number corresponds to the button on the CMS supervisor’s console assigned to an outside line. (See your Line Button Planning Form)
Enter the information for the line in the fields. Then press (F8) (labeled “Enter Data” ).
The prompt disappears, the screen’s function keys replace the editing function keys, and the new line appears on the screen.
Repeat steps 1 and 2 for each line. If you want to make a change after you have entered the information for a line, use (F2) (labeled “Remove Line” ) to remove the line, and (F1) (labeled “Add Line”) to add the line again.
IDENTIFYING PRIORITY Calls on priority lines are answered before other calls in the same line group,
LINES
To
1
2
3
make a line a priority line:
Press (F4) (labeled "Change Priority”).
The editing function keys replace the screen’s function keys, and the following prompt appears on the prompt line:
CHANGE PRIORITY: Line ID:
Enter the ID of a priority line.Then press (F8) (labeled “Enter Data”). The prompt disappears, the screen’s function keys replace the editing function keys, and a plus sign (+) appears in the “Priority” column on the s c r e e n .
Repeat steps 1 and 2 to identify other priority lines.
RETURNING TO THE When you finish administering your CMS lines, press (F8) (labeled “Admin
ADMINISTRATION MENU Menu” ) on the Administer Lines and Line Groups screen to return to the Administration Menu.
Step 7: Building a Shift Configuration
Now that you have identified the agents and line groups, you can build your first shift configuration in this order:
● Name and select the configuration you want to build.
● Administer splits (involves assigning each split an ID and some agents).
● Administer call flow (involves assigning splits to handle calls for specific line groups).
● Administer intraflow (if you wish to assign some splits to back up others).
● Set All-Ring operation (optional).
Use your Agent Splits Planning Form and your Shift Configuration Planning Form as guides for these procedures.
To get to the screen you’ll need, press (F1) (labeled “Config List”) on the Administration Menu. The Stored Shift Configurations screen, shown below, appears.
INITIAL SETTINGS
I
Bon Voyage Travel ADMIN CMSIIRZ 10:38a 06/13 1 - DAILY2 - WEEKEND 3 - NIGHT 4 - EVENING 5- USUSED 6- UNUSED
The Stored Shift Configurations screen displays the names and numbers of the six shift configurations CMS can store. Initially, all configurations are named “UNUSED. ”
You have to set only a few functions to create your first configuration and begin managing calls. Many functions (for example, the delays and the intraflow threshold) have initial settings that are automatically in effect as soon CMS begins managing calls. After you have monitored the system’s management for a few days, you should be ready to customize CMS by
call
changing the initial settings to values appropriate for your type of business. “Step 10: Customizing Your CMS” briefly describes the features you can tailor to your business needs.
MANAGING CALLS The first shift configuration you create should be one for managing calls
DURING THE DAY AND AT during one of your day shifts. Later on you can build other day shift
NIGHT configurations and decide how you want to handle calls at night. The different ways of handling calls at night are described in “Step 9: Managing Calls. ”
SELECTING A CONFIGURATION
SELECTING AND DISPLAYING A CONFIGURATION
Before you can assign splits to line groups, you’ll need to select the configuration you want to build.
To select a configuration:
1 Press (F1) (labeled “Select Config” ).
The editing function keys replace the screen’s function keys, and the following prompt appears:
SELECT CONFIGURATION: Config #:_
2 Type 1 (because this is your first configuration).
3 Then press (F8) (labeled “Enter Data “).
The Configuration screen for the first configuration appears.
NOTE: The configuration name changes from “UNUSED” to
“CONFIG 1.” Once you have built the configuration, you can rename it.
To select and display a configuration, do as follows:
1 From the Configuration List screen, press (F1) (labeled “Select Config” ) to select the configuration screen to be displayed.
The editing function keys replace the screen’s function keys, and the following prompt appears:
SELECT CONFIGURATION: Config #:_
2 Then type 1 to select the first configuration. Then press (F8) (labeled “Enter Data” ) to enter the selection.
The Configuration screen for shift Configuration 1 appears.
A typical Configuration screen for a new configuration is shown below.
RENAMING A CONFIGURATION
Bon Voyage Travel ADMIN CMSIIR2 ll:00a 06/0l Agent Agent Num Answer Force Auto Split Pos ID Split Pos ID Group Lines Delay Delay ACW 1 PERS 16 TOM 3 CORP 37 IKE A PUBLC 4 5s On 5s
17 CLIFF 39 TINA B SPECL 3 5s off 10s 19 ERNIE 40 DIANA C CHART 6 5s off 5s 21 DEB 4 SUPPT 42 RON D CORP 2 5s On 5s 23 BOB 43 NANCY
24 SHERM 5 25 WALT 6
-2 CHART 27 BEN Flow All 28 SAM Splits Intra Spl Thresh Ring 29 Nom Grp thin Sec Flow 1 10s off 31 DI a 1 3 On 2 5s off 32 CARLA B 1 3 On 3 30s off 33 BJ C 2 4 On 4 30s off 35 MAX D 3 - Off 5 30s off 6 30s off Configuration ¤1 - DAILY
F10 - Help
Notice that the line group letters, line groupies, and number of lines in each group are displayed.
To 1
2
3
rename a configuration, do as follows:
If the Configuration Screen is currently displayed, press (F7) to go back to the Configuration List.
Then press (F3) (labeled “Rename Config”).
The editing function keys replace the screen’s function keys, and the following prompt appears on the prompt line:
RENAME CONFIGURATION: Config #:_ New Name:
Type 1 (or the number of the configuration you want to rename) and enter the new configuration name.
NOTE: The new configuration name should be indicated on your Shift Configuration Planning Form.
Then press (F8) (labeled “Enter Data” ).
The prompt disappears, the screen’s function keys replace the editing function keys, and the new name for your shift configuration appears on the screen.
NOTE: You cannot rename a configuration labeled “UNUSED.” You must select the configuration first, then either build it or go back to the Configuration List (Config List) to rename it.
The following procedures explain how to enter agent split information.