Implementation and Service Manual
585-313-135
Comcode 108504093 101-1753-001, Rev. A Issue 1
registered trademarks or trademarks respectively of Octel Communications Corporation, a subsidiary of Lucent Technologies. All other trademarks are the properties of their respective owners. The above information is based on knowledge available at the time of publication and is subject to change without notice. Printed in the USA.
Notice
Every effort was made to ensure that the information in this book was complete and accurate at the time of printing. However, information is subject to change without notice.
Your Responsibility for Your System’s Security
Toll fraud is the unauthorized use of your telecommunications system by an
unauthorized party, for example, persons other than your company’s employees, agents, subcontractors, or persons working on your company’s behalf. Note that there is a risk of toll fraud associated with your telecommunications system and, if toll fraud occurs, it can result in substantial additional charges for your telecommunications services.
You and your system manager are responsible for the security of your system, such as programming and configuring your equipment to prevent unauthorized use. The system manager is also responsible for reading all installation, instruction, and system
administration documents provided with this product in order to fully understand the features that can introduce risk of toll fraud and the steps that can be taken to reduce that risk.
The manufacturer does not unconditionally warrant that this product is immune from or will prevent unauthorized use of common-carrier telecommunications services or facilities accessed, or any charges that result from such unauthorized use.
If you purchased the Octel 100® system directly from Lucent Technologies Business Communications Systems Division or it’s authorized representatives, please see document 585-313-137 regarding additional security considerations and offers that may be applicable.
Federal Communications Commission Statement
This Class A digital apparatus meets all requirements of the Canadian Interference-Causing Equipment Regulations.
Cet appareil numérique de la classe A respecte toutes les exigences du Règlement sur le matériel brouilleur du Canada.
Warranty
The manufacturer provides a limited warranty on this product. Refer to your customer agreement for specific warranty information.
Customer Support
If you require assistance, contact your authorized representative.
Ordering Information
If you purchased this product directly from Octel Communications Division or it’s
authorized representatives, use the following information when ordering additional copies of this manual:
Call: Octel Company Store Voice 1-800-416-2835 Fax 1-303-294-3737 Internet: www.octel.com Order: 101-1753-001
November 1999, Rev A
If you purchased this product directly from Lucent Technologies Business
Communications Systems Division or it’s authorized representatives, use the following information when ordering additional copies of this manual:
Call: Lucent Technologies BCS Publications Center Voice 1-800-457-1235
Fax 1-800-457-1764
International Voice 1-317-322-6791 International Fax 1-317-322-6849
Write: Lucent Technologies BCS Publications Center 2855 North Franklin Road
Indianapolis, IN 46219 Order: Document No. 585-313-135
Comcode 108504093 Issue 1.0, November 1999
How to Comment on This Manual
We would like to hear from you about the quality of the documentation, products, and service. Your comments will help us provide increased satisfaction to our customers. Would you please take a few minutes and complete the following questionnaire and fax it to 303-538-1741.
Please rate the effectiveness of this Implementation and Service Manual in the following areas:
Area Excellent Good Fair Poor
1 Organization
2 Clarity
3 Completeness
4 Accuracy
5 Illustrations
6 Overall satisfaction
Please provide any other comments.
Document:
Products:
Service:
Implementation and Service Manual Table of Contents i 1 Implementation and Service Overview ... 1-1
Understanding the Implementation and Service Toolset ...1-2 Additional Product Information Sources ...1-3 Understanding the User Interface...1-3 User Interface Procedures ...1-3 Keyboard Conventions ...1-3 Mouse Conventions ...1-4 OS/2 Desktop Overview ...1-4 OS/2 Windows ...1-4 Graphical Objects ...1-6 Most Commonly Performed OS/2 Tasks...1-6 To open an OS/2 window: ...1-6
2 Determining the Customer’s System Needs... 2-1
Step 1: Complete the Feature Selection Sheet ...2-2 Interpreting the Completed Feature Selection Sheet...2-2 Step 2: Complete the System Sizing and Phone Usage Sheets ...2-2 Interpreting the Completed System Sizing Sheet and Phone Usage Sheet ...2-2 Step 3: Consider Additional Hardware Needs...2-5 CPU and Memory ...2-5 Monitor ...2-5 Bus and Slots...2-5 3½-inch Disk Drive...2-5 CD-ROM Drive ...2-5 Parallel Port ...2-5 Voice Boards ...2-6 Mouse...2-6 Modem ...2-6 UPS (Uninterruptible Power Supply) ...2-6 Printer (Optional) ...2-6 Tape Backup (Optional) ...2-6 Brooktrout TruFax Boards (Optional) ...2-6
3 Gathering Necessary Information ... 3-1
Step 1: Complete the Preinstallation Configuration Worksheets...3-2 Step 2: Agree on a Worksheet Return Date ...3-2 Step 3: Review Worksheet Information...3-3 Step 4: Understand How and When to Use Worksheet Data ...3-3
4 Understanding the Installation Process ... 4-1
Implementation and Service Manual Table of Contents ii 5 Preparing the Hardware... 5-1
Assembling Materials...5-2 Verifying Phone System Readiness ...5-2 Confirming Dial Tone ...5-2 Verifying the Phone System Configuration ...5-2 Compiling Phone System Configuration Information...5-2 Configuring the Voice Boards ...5-3
Configuring DIALOG/4, D/4xD, D/42D-NS, D/42D-SX, and
D/42D-SL Boards ...5-3 Configuring the Fax Boards ...5-6 Configuring the Brooktrout TruFax Board ...5-7 Setting the TruFax Board’s Port Address ...5-7 Setting the TruFax Board’s Hardware Interrupt Level ...5-8 Installing the Voice and Fax Boards...5-8 Installing Ferrite Bead Cable Clamps...5-9 Installing the Ferrite Bead Cable Clamps on 2-Cable Boards ...5-10 Installing the Ferrite Bead Cable Clamps on 4-Cable Boards ...5-10 Connecting the Telephone Lines...5-11 Connecting Dialogic DIALOG/4 and D4xD Boards...5-11 Connecting the Fax Lines ...5-11 Using the Transfer Method vs. the Non-Transfer Method...5-12 Connecting TruFax Boards for the Transfer Method...5-12 Connecting TruFax Boards for the Non-Transfer Method ...5-13 Installing the Sentinel ...5-14 Installing Serial Integration Hardware...5-14 Installing and Testing the Uninterruptible Power Supply...5-14 Configuring the IBM V.90 PCI Data/Fax Modem ...5-15 Installing the Tape Backup Unit (Optional) ...5-17 Installing and Configuring the External Iomega Ditto Tape Drive ...5-17 Connecting the External Ditto Tape Drive Hardware...5-18 Installing the Software for the External Tape Backup Drive...5-18 Selecting Files for Tape Backup...5-22 Setting Up the System for Automatic Backups ...5-23 Installing the Iomega Ditto Internal Tape Backup Drive ...5-25 Installing the Internal Ditto Tape Backup Drive in the PC...5-26 Installing the Software for the Internal Tape Backup Drive...5-26 Selecting Files for Tape Backup...5-29 Setting Up the System for Automatic Backups ...5-31 Installing a Printer (Optional) ...5-33
6 Installing the Software ... 6-1
Implementation and Service Manual Table of Contents iii
Installing the Messaging System Software ...6-6 Verifying Files After Installation ...6-11 Sample CONFIG.SYS File ...6-12 Sample STARTUP.CMD File...6-12 Sample RUNVM.CMD File ...6-13 Configuring the System to Support Multiple Languages ...6-15 Installing Language Files ...6-15 Setting Up the System to Provide Multilingual Prompts ...6-17 Setting Up System Mailboxes to Utilize the Multilingual Feature...6-17 Specifying the Language for a Mailbox ...6-18 Installing and Configuring Remote Management...6-18 Considerations for Using Remote Management ...6-18 Installing Remote Management Software Version 4.2...6-19 Installing and Configuring Graham Utilities ...6-23 Installing Graham Utilities...6-23 Setting Up the System to Run HPFSDfrg Automatically During System
Maintenance...6-24
7 Setting Up the System to Recognize Voice and Fax Boards ... 7-1
Specifying Dialogic Board Settings ...7-2 Specifying Settings for Dialogic DIALOG/4 and D/41D Boards ...7-2 Specifying Settings for Dialogic D/42D-SL and D/42D-SX Boards...7-7 Specifying Settings for the Dialogic D/42D-NS Boards ...7-13 Specifying Brooktrout TruFax Board Settings ...7-19
8 Integrating with the Phone System ... 8-1
Running the Integrator Utility ...8-2 Understanding Inband Templates ...8-5 Understanding Inband Template Characters...8-5 Understanding Inband Functions ...8-6 Understanding Inband Template Rules ...8-7 Creating, Modifying, and Deleting Inband Templates...8-8 Inband Template Examples ...8-10
9 Defining Phone System Signals ... 9-1
Implementation and Service Manual Table of Contents iv 10 Establishing a Serial Integration ... 10-1
Running the Serial Integration Utility After Messaging System Installation ...10-2 Configuring the Serial Integration Utility...10-5 Supporting Multiple-Prefix Centrex Systems...10-6 Creating the SMDI.TPT File ...10-6 Example SMDI.TPT File ...10-8 Creating the SMDI.PFX Table ...10-9 Example SMDI.PFX File ...10-11
11 Integrating with an Uninterruptible Power Supply ... 11-1
Understanding How UPS Integration Works...11-2 Meeting the Requirements for Running the UPS Integration Utility...11-2 Running the UPS Integrator Utility ...11-3 Running UPS Integration After Messaging System Installation...11-6 Checking the UPS’s Current Operating State Manually...11-9
12 Determining Outdial Strings ... 12-1
Identifying Local Area Code and Prefixes ...12-2 Deleting a Prefix ...12-3 Activating Dial Plan ...12-4 Understanding How Dial Plan Works ...12-5
13 Setting Up the System ... 13-1
Implementation and Service Manual Table of Contents v
Outbound Dialing Parameters (Page 17 of 26) ...13-69 Message Delivery Parameters (Page 18 of 26)...13-72 Message Indicator Parameters (Page 19 of 26) ...13-74 Inband Page 1 Parameters (Page 20 of 26) ...13-78 Inband Page 2 Parameters (Page 21 of 26) ...13-81 Hangup Detection Parameters (Page 22 of 26)...13-81 Port Parameters (Page 23 of 26) ...13-84 Voice System Parameters (Page 24 of 26) ...13-90 Simplified Message Desk Interface Parameters (Page 25 of 26)...13-94 Server Parameters (Page 26 of 26) ...13-96
14 Setting Up System Prompts ... 14-1
Understanding System Prompts...14-2 Setting Up System Greetings...14-3 Setting Up Greeting by Port ...14-5 Setting Up the Language Selection Prompt...14-7 Setting Up the Attendant Menu Prompt...14-9 Setting Up Holiday Greeting Prompts ...14-12 Setting Up Call Queuing Prompts ...14-13 Setting Up Message Notification Prompts ...14-14 Setting Up Network Node Prompts...14-15
15 Recording and Editing Prompts... 15-1
Selecting a Recording and Editing Technique...15-2 Recording and Editing Prompts Using the Keypad Prompt Recording
Functions...15-2 Recording and Editing Prompts Using SOLVE ...15-3 Recording and Editing Prompts Using V-Edit ...15-5 Starting V-Edit ...15-5 Changing the V-Edit Display ...15-7 Opening Phrase Files ...15-8 Selecting Individual Phrases in the Phrase File ...15-9 Recording Phrases ...15-10 Adding Segments to Phrases...15-12 Removing Parts of a Phrase...15-14 Controlling Silence Before and After a Phrase...15-15 Managing Phrase Files ...15-15 Creating, Displaying, and Printing Text Comments...15-17 Shutting Down V-Edit ...15-20
16 Managing System Mailboxes ... 16-1
Implementation and Service Manual Table of Contents vi
Implementation and Service Manual Table of Contents vii
Local Only ...16-41 Long Distance...16-41 Batch Mode ...16-41 Networking Options...16-41 Highest Outgoing Dispatch...16-42 Casual AMIS...16-42 Administered AMIS ...16-42 OctelNet ...16-42 Follow-Me-Forward ...16-43 Network Reply ...16-43 Language...16-43 Fax Options ...16-43 Send Faxes ...16-43 Receive Faxes...16-44 Max Messages...16-44 Msg Time...16-44 Max Rings...16-44 New Messages...16-45 Saved Messages ...16-45 Using Dialing Codes ...16-45
17 Working with V-Trees... 17-1
Implementation and Service Manual Table of Contents viii
Transfer to a Mailbox...17-36 Assigning Prompts to V-Trees...17-37 Assigning an Existing Prompt to an Option on a V-Tree...17-37 Recording a New Prompt for an Option on a V-Tree...17-37 Activating and Deactivating the Call Handling for V-Trees ...17-39 Activating a V-Tree for a Mailbox ...17-39 Deactivating a V-Tree for a Mailbox ...17-41 Opening a V-Tree ...17-42 Opening a Mailbox V-Tree...17-43 Copying a V-Tree File to a Mailbox ...17-43 Opening a V-Tree File from Outside a Mailbox ...17-45 Saving a V-Tree ...17-46 Saving a Mailbox V-Tree to a V-Tree File...17-46 Saving a V-Tree File ...17-48 Saving a V-Tree File to Another File...17-48 Editing a V-Tree ...17-50 Editing V-Tree Action Information...17-51 Cutting a V-Tree Menu Option to the Clipboard ...17-51 Copying a V-Tree Menu Option to the Clipboard...17-52 Pasting a V-Tree Menu Option from the Clipboard ...17-52 Deleting a V-Tree Option...17-52 Deleting a V-Tree ...17-53 Deleting a V-Tree from a Mailbox ...17-53 Deleting a V-Tree File ...17-54 Printing a V-Tree ...17-55 Changing the V-Tree Display ...17-55 Setting V-Tree Display Options...17-56 Changing the V-Tree Magnification ...17-57 Hiding and Displaying Blank V-Tree Options ...17-57 Expanding and Collapsing V-Tree Menus ...17-57 Managing Fax Retrieval Documents ...17-58 Adding Fax Retrieval Documents ...17-59 Changing the Number of a Fax Retrieval Document...17-60 Updating a Fax Retrieval Document ...17-61 Setting Up a Cover Page for Faxes ...17-62 Deleting Fax Retrieval Documents ...17-63
18 Using Network Messaging ... 18-1
Implementation and Service Manual Table of Contents ix
Deactivating a Node ...18-13 Activating a Node ...18-15 Searching for a Node...18-16 Managing NameNet Directories ...18-16
19 Installing and Configuring Visual Mailbox ... 19-1
Understanding the Visual Mailbox Components ...19-2 Messaging System Voice Fax Server ...19-2 PBX...19-2 Client PC...19-3 Client Software...19-3 Understanding Visual Mailbox Requirements...19-3 LAN...19-3 LAN Server ...19-3 Messaging System/Voice Fax Server ...19-4 Hardware ...19-4 Software ...19-4 Private Branch Exchange ...19-5 Client PC...19-5 Hardware ...19-5 Software ...19-5 Additional Client Requirements for PC Audio Features ...19-5 Planning for Visual Mailbox Implementation ...19-6 LAN Considerations ...19-7 Messaging System Considerations...19-7 System Security Considerations...19-7 Client Software Setup Considerations ...19-7 Working with the LAN Administrator to Configure the LAN...19-7 Installing the Network Interface Card ...19-8 Installing OS/2 Networking Support...19-9 Installing Networking Support for a Novell NetWare LAN ...19-9 Installing OS/2 Networking Support for Windows NT Server Using
Implementation and Service Manual Table of Contents x
Visual Mailbox POSTROOM Errors ...19-24 Connectivity Errors ...19-24 System Problem Errors...19-24 Network Fault Errors ...19-25 Internal Software Errors ...19-25 Visual Fax Warning ...19-26 Channel Status Error...19-26 Inactive Client Polling Problems ...19-26 Insufficient Timeouts for Active Login and Message Playback ...19-26 Installing the Client Software on the LAN Server...19-27 Installing Visual Mailbox on Client PCs ...19-28 Subscriber PC Considerations ...19-28 Setting Up Subscriber PCs to Use Visual Mailbox ...19-29 Using the Client Software Installation Template...19-30 Client Software Installation Template ...19-31
20 Starting, Logging Into, and Shutting Down the System ... 20-1
Starting the System ...20-2 Understanding System Security ...20-2 Logging Into the System ...20-2 Changing Passwords ...20-3 Logging Off the System ...20-4 Shutting Down the System...20-5 Disabling Ports and Dropping Calls...20-5
21 Generating and Interpreting Reports... 21-1
Implementation and Service Manual Table of Contents xi
Interpreting the Uninitialized Mailboxes Report ...21-11 Port Assignments Report ...21-12 Generating the Port Assignments Report...21-12 Interpreting the Port Assignments Report ...21-12 Class of Service Report ...21-13 Generating the Class of Service Report...21-13 Interpreting the Class of Service Report ...21-13 Prompt Assignments Report ...21-15 Generating the Prompt Assignments Report ...21-15 Interpreting the Prompt Assignments Report ...21-15 Network Statistics Report...21-16 Generating the Network Statistics Report ...21-16 Interpreting the Network Statistics Report ...21-17
22 Displaying System Statistics ... 22-1
Channel Status Window...22-2 Displaying the Channel Status Window ...22-2 Interpreting the Channel Status Window...22-2 Mailbox Status Screen...22-2 Displaying the Mailbox Status Screen...22-2 Interpreting the Mailbox Status Screen ...22-3 Calls per Hour Screen...22-4 Displaying the Calls per Hour Screen ...22-4 Interpreting the Calls per Hour Screen...22-4 System Usage Screen ...22-4 Displaying the System Usage Screen ...22-4 Interpreting the System Usage Screen ...22-5 50% Contention Screen ...22-5 Displaying the 50% Contention Screen...22-5 Interpreting the 50% Contention Screen ...22-6 100% Contention Screen ...22-6 Displaying the 100% Contention Screen ...22-6 Interpreting the 100% Contention Screen ...22-7 System Status Dialog Box ...22-7 Displaying the System Status Dialog Box ...22-7 Interpreting the System Status Dialog Box...22-7
23 Maintaining the System... 23-1
Implementation and Service Manual Table of Contents xii
Running an Update on All Mailboxes...23-10 Rebuilding All Mailboxes...23-12 Running Quick Assist as Part of Routine System Maintenance...23-15 Running the Lister Utility...23-18 Adding Modules and Ports to a System...23-19 Verifying File Version Information...23-20 Refreshing Message Indicators ...23-21 Protecting Your System ...23-22 Security Checklist...23-28
24 Testing and Troubleshooting the System ... 24-1
Testing and Troubleshooting the System ...24-2 Understanding Prompts Voiced Under Specific Call Handling Conditions...24-2 Installation Test Plan ...24-2 Part 1—Integration, Greeting, and Messaging Testing ...24-3 Part 2—Special Feature Testing...24-12 System Troubleshooting Table ...24-19 Determining a Switch’s Disconnect Signal ...24-47 Displaying Features Enabled on the Sentinel ...24-47 Interpreting the View Sentinel Information ...24-47 Viewing the PLUS.LOG File...24-48 Prompts Voiced Under Specific Call Handling Conditions ...24-49 Interpreting the Call Handling Tables...24-50 Supervised Call Handling Table ...24-51 Integrations with Inband Templates Call Handling Tables ...24-52 Go to Voice Mail (Call Forward to Personal Greeting) Function Table ...24-52 Busy Function Table ...24-53 Ring No Answer Function Table...24-54
Customer Needs Worksheets...1
Feature Selection Sheet ... CN-1 Feature and Functionality Introduction ... CN-3 System Sizing Sheet ...CN-13 Phone Usage Sheet...CN-15
Preinstallation Configuration Worksheets ...1
Implementation and Service Manual Table of Contents xiii
Class of Service Information Sheet... PI-17 Predefined COS Sheet ... PI-25 COS Redefinition Sheet... PI-27 Custom COS Definition Sheet ... PI-29 Mailbox Assignment Sheet ... PI-31 Auto Forward Sheet ... PI-33 Message Notification Sheet ... PI-35 V-Tree Design Instructions... PI-37 V-Tree Design Sheet ... PI-39 V-Tree Design Sheet Example... PI-41
Site Information Worksheets...1
Site Contact Information Sheet ... SI-1 System Configuration Record Setup Parameters ... SI-3
Visual Mailbox Configuration Worksheets ...1
Visual Mailbox Implementation Configuration Worksheet ... VM-1 Novell NetWare Configuration Worksheet ... VM-3 Windows NT Configuration Worksheet ... VM-5
Glossary ...G-1
Implementation and Service Manual
1-1
C H A P T E R
1
Implementation and Service Overview
The Implementation and Service Manual is designed to walk you through the steps for selecting, installing, testing, and troubleshooting an Octel® 100 messaging system. Collectively, the steps presented in this manual will allow you to effectively implement different types and sizes of systems and minimize the time spent supporting and maintaining those systems.
This manual provides information on using all available system features and options. Note, however, that all features and options are not available with all systems. Access to features and options on a specific system depends on the system configuration and the options purchased for use with the system.
Implementation and Service Manual Implementation and Service Overview 1-2
Understanding the Implementation and Service Toolset
Several organizational tools are provided in this manual to help you collect and maintain customer, software, and site information throughout the implementation process. These tools include:
• Worksheets Tab – Many of the chapters in this manual include steps that
reference specific worksheets provided behind the Worksheets tab. Several of these worksheets are designed to be completed by the system manager at the customer’s site. (The system manager is the customer representative who will be responsible for maintaining the messaging system after it is installed.) Other worksheets are designed to assist you during the installation and system testing processes. Detailed instructions on completing or obtaining information using these worksheets, as well as interpreting and using the information, are provided at the implementation process points where the worksheets play a part. A summary of the purpose of each worksheet is provided below.
One copy of each worksheet is provided later in this manual. Another blank copy of each worksheet is also included with each messaging system.
− Customer Needs Worksheets – Help introduce the customer to messaging
system features and functionality and assists the representative with identifying the hardware and software necessary to build the type of auto attendant and voice/fax mail system best suited for the customer.
− Preinstallation Configuration Worksheets – Help determine which
features should be activated on the messaging system during installation and which, if any, can be set up before installation.
− System Configuration Record – Provides the installer with a written
transcript of how system setup screens are completed during the installation process and provides the installer with customer information that can be retained for future reference.
− Visual Mailbox™ Configuration Worksheets – Help the installer
successfully complete Visual Mailbox installation and configuration.
• Customer Information Tab – The Customer Information tab is provided to help
you organize and retain data you collect from customer sites during the
implementation process. After you have completed the entire messaging system implementation process, you will be prompted to store all the worksheets you used throughout the process, along with any notes you accumulated, behind this tab. By storing information in this way, you will have easy access to critical site contact names and phone numbers, system setup records, and other information you may need to reference later to provide customer assistance.
• Additional Information Tab – The Additional Information tab is provided to help
Implementation and Service Manual Implementation and Service Overview 1-3
Additional Product Information Sources
In addition to this manual, other information tools are available:
• Configuration Notes – Each supported switch has an associated Configuration
Note that provides comprehensive, switch-specific integration considerations. Configuration Notes are available through your authorized representative.
• System Manager Manual – The system manager is the individual at the
customer site who will be responsible for maintaining the installed messaging system. The System Manager Manual is designed to be left with a system manager at the site. The book provides information on creating, modifying, and deleting mailboxes; setting and modifying automated attendant features; generating system reports; and using various other system features such as AMIS Interface Module (AIM™), V-Trees™, and Fax Retrieval™.
• Quick Reference Guide – An easy-to-reference, foldout card, the Quick
Reference Guide shows messaging system subscribers the telephone keypress navigation paths to accessing messaging features. Fifty Quick Reference Guides are provided with each messaging system shipped.
• Wallet Card – The size of a typical business card, Wallet Cards can be easily
carried by subscribers at all times, providing them fast access to high-level system navigation information. Fifty Wallet Cards are provided with each messaging system shipped.
• Online Help – Extensive online help is available on most messaging system
utilities and screens, including Visual Mailbox screens, to assist installers, system managers, and subscribers with using the messaging system. You can access online help using options on the Help drop-down menu and, in many cases, by pressing <F1> from program screens.
• Technical Support – Technical support representatives are available to assist
you with problems and issues you cannot resolve using the other available information sources.
Understanding the User Interface
The Octel®
100 user interface provides fast, convenient access to all of the system’s features. This section provides an overview of the system’s graphical user interface (GUI) and some of the most commonly used OS/2 functions.
User Interface Procedures
You can navigate the messaging system and perform operations using either the keyboard or the mouse. Both are required to access full functionality of the messaging system.
Keyboard Conventions
Implementation and Service Manual Implementation and Service Overview 1-4
The key combinations and key sequences appear in the following format: <TAB> Moves control to the next item (field, button, etc.) <SHIFT+TAB> Moves control to the previous field or button.
<ALT+LETTER> Moves control to a particular field, button, or menu choice on the screen. Letter represents the character (usually the first) that is highlighted in the name.
<ENTER> Accepts input for a field or screen or selects the highlighted button. <ESC> Returns control to a previous screen or menu.
<SPACEBAR> Activates and deactivates options.
Numbers shown within angle brackets (<#>) represent telephone keypad numbers.
Mouse Conventions
The following terms are used throughout this manual to describe mouse actions:
• Point: Position the mouse pointer over a desired item.
• Click: Press and release a mouse button.
• Double-Click: Press and release the left mouse button twice in quick succession.
• Select: Point to an item and click the left mouse button.
• Open: Point to an item and double-click the left mouse button.
• Drag: Move a selected object while holding down the right mouse button.
• Drop: Release the right mouse button after dragging a selected object.
The instructions in the remainder of this manual are written for use of the mouse. If you intend to use the keyboard extensively, refer back to this section for the necessary key combinations and sequences.
OS/2 Desktop Overview
The display that appears when your computer restarts from OS/2 is called the desktop, which is the graphical user interface of OS/2. The icons displayed on the desktop are called objects, which may be folders, programs, or files.
OS/2 Windows
Implementation and Service Manual Implementation and Service Overview 1-5
The Octel 100 System Manager is an example of an OS/2 window.
Windows generally consist of the following components. Window
Frame
The window frame is the area surrounding a window. A window frame consists of a resize border, a title bar icon, and a title bar.
Resize Border
The resize border surrounds the window contents and frame area. It can be used to change the height or width of a window by clicking on it and dragging with the mouse. Not all windows can be resized.
Title Bar The title bar is the bar across the top of the window that consists of the title bar icon, the title area, and the window control buttons.
Title Bar Icon
The title bar icon (also called the Window menu button) is the object in the left corner of the title bar that represents the window. Clicking on the icon displays the Window menu contents and available actions.
Window Contents
The window contents is the area within the borders of a window’s frame that is controlled by the program (in this case, Octel 100).
Minimize Button
The minimize button reduces an application to an icon. When minimized, the application runs in the background. To minimize a window, position the mouse pointer over the minimize button and click the left mouse button. To restore a window to its original size, double-click the minimized icon. Maximize
Button
The maximize button enlarges a window to its maximum size or to restores a maximized window to its original size. To maximize a window, position the mouse pointer over the maximize button and click the left mouse button. To restore a window to its original size, click the maximize button again.
Scroll Bar A scroll bar allows you to view hidden parts of a window or a list by moving the slider (the rectangle in the scroll bar) in the desired direction.
Menus There are three types of menus. The menu bar, located across the top of the window, contains the titles of the window’s pull-down menus. Pull-down menus contain menu bar options, which display when you select the menu’s title. Click a menu option to select it. Pop-up menus contain parameter options. To open a pop-up menu, click the menu’s arrow button. To select a menu option, click it or drag to it. To close the menu without changing the selected value, drag the mouse pointer off the menu.
Maxmize button Maximize button
Title bar Title bar icon
Window frame Resize border Menu
Window contents
Implementation and Service Manual Implementation and Service Overview 1-6
Graphical Objects
Several interactive graphical objects may appear on the messaging system windows. The Class of Service screen is an example of an OS/2 dialog box that contains other graphical objects.
Dialog boxes Dialog boxes are used to display a special message or conduct a dialog. A dialog box may ask you to enter additional information or confirm a decision.
Spinbox A spinbox, which functions somewhat like a scroll bar, allows you to incrementally change the value of an entry by clicking on the up or down arrow buttons to the right of the field.
Push buttons Push buttons are graphical controls that are selected (clicked on with a mouse button) to start a designated action, such as saving your work or opening a window. A special kind of push button is an arrow button, which allows you to scroll through data. Arrow buttons can appear as part of a spinbox, scroll bar, list box, or pop-up menu.
Toggle buttons
Toggle buttons allow you to select or deselect an item by clicking on it with the left mouse button. There are two types of toggle buttons, checkboxes and radio buttons. Checkboxes allow you to select more than one item from the list. Radio buttons allow you to select only one item from a group. Selecting one item by clicking on its corresponding radio button automatically deselects any other item.
Fields Fields are used for text entry or edits via the keyboard. To enter text, position the mouse cursor in the field, click in the field, and enter the desired text. To edit an existing entry, highlight the text to be deleted and type over it.
Most Commonly Performed OS/2 Tasks
The following tasks are those most commonly performed when using OS/2 Warp with the messaging system:
• Opening an OS/2 Window
• Restarting the PC
• Shutting the PC
Use this section as a reference until you have learned these tasks.
To open an OS/2 window:
1. On the OS/2 desktop, double-click the OS/2 System icon. The OS/2 System folder opens.
2. In the OS/2 System folder, double-click the Command Prompts icon. The Command Prompts folder opens.
Implementation and Service Manual Implementation and Service Overview 1-7
To restart OS/2:
1. Click the right mouse button on an empty area of the OS/2 desktop and select Shut down from the menu that displays.
2. When you are prompted whether you want to close all windows and active programs, click OK.
3. When prompted to shut down or reboot, press <CTRL+ALT+DEL> to restart the PC. 4. When the PC restarts, a Recovery Choices screen displays. This screen, which is for
support purposes, displays for 5 seconds before the system continues with the startup.
To shut down OS/2:
1. Click the right mouse button on an empty area of the OS/2 desktop and select Shut down from the menu that displays.
2. When you are prompted whether you want to close all windows and active programs, click Yes.
Implementation and Service Manual Determining the Customer’s System Needs 2-1
C H A P T E R
2
Determining the Customer’s System Needs
The steps provided in this chapter will help you to:
• Introduce the messaging system to your customer
• Understand the customer’s system needs and expectations
• Determine the hardware and software required to support a system that meets the customer’s needs and expectations
As you follow the steps in this chapter, you will ask the customer to complete three of the Customer Needs worksheets provided behind the Worksheets tab in this manual:
• Feature Selection Sheet
• System Sizing Sheet
• Phone Usage Sheet
Information on using the data you obtain with these worksheets to determine the
customer’s system needs is provided within each step. Note that new turnkey messaging systems meet all of the necessary requirements.
Implementation and Service Manual Step 1: Complete the Feature Selection Sheet 2-2
Step 1: Complete the Feature Selection Sheet
The Feature Selection Sheet provides a forum for introducing the customer to the wide range of available features and identifying and discussing which features are most critical to satisfying the customer’s needs. Provide the customer with both the worksheet and the Feature and Functionality Introduction information (also included behind the Worksheets tab). The customer will need to consult the Feature and Functionality Introduction while completing the Feature Selection Sheet. Be sure to encourage the customer to contact you with any questions on the material presented.
Interpreting the Completed Feature Selection Sheet
Use data provided on the Feature Selection Sheet to understand and set customer expectations.
First, by considering the features that the customer has indicated are important, identify which optional add-on modules should be included with the customer’s system. Optional modules are identified on the Feature Selection Sheet with a superscript “o” (o)
immediately following the feature name. Optional modules will impact the price of the system. By determining early on which of these add-on modules are necessary, you can continually consider the pricing implications during the sales process. For pricing information, see your sales kit.
Second, ensure that the switch the customer plans to use with the system supports the features the customer has indicated are important. Do this by consulting the Feature Selection Sheet in conjunction with the Configuration Note issued for the customer’s switch. The Configuration Note identifies switch limitations and helps you to present those limitations to the customer now, so there are no surprises later. Features that may be unavailable with certain switches are identified on the Feature Selection Sheet with a superscript “s” (s) immediately following the feature name.
Step 2: Complete the System Sizing and Phone Usage Sheets
The System Sizing Sheet and Phone Usage Sheet help you better define the hardware needed to support the customer’s system. Using the data provided on these sheets and the instructions provided in the following procedure, you can determine:
• Number of ports the system should include
• Number of mailboxes the system will support
• PC hard drive size required
Interpreting the Completed System Sizing Sheet and
Phone Usage Sheet
To determine the number of ports necessary and mailboxes supported:
1. For each line entered on the System Sizing Sheet, add the Direct and Indirect values and enter the sum in the Leave Blank, for Vendor Use 1 column.
Implementation and Service Manual Step 2: Complete the System Sizing and Phone Usage Sheets 2-3
3. Add all the values in the Highest Number in Group column to determine the total. 4. Add all the values in the Leave Blank, for Vendor Use 2 column to determine the total. Divide this number by the total Highest Number in Group figure from step 3. This produces the Weighted Average of Minutes per Day per Mailbox value.
Refer to the Phone Usage Sheet. If phone system statistics are provided (the top section of the form is complete), continue with step 1, below. If call estimates are provided (the bottom section of the form is complete), continue with step 3.
1. Determine the Average Number of Calls per Business Day by dividing the sum of each business day column by the number of business days in the week.
2. Determine the Busiest Hour Percent of Calls by dividing the Average Number of Calls per Business Day figure by the number of calls during the busiest hour of the week. Skip step 3, and continue with step 4.
3. Determine the Busiest Hour Percent of Calls by dividing the number of calls on an average business day by the number of calls in the busiest hour of the busiest day of the week.
4. Considering the Weighted Average Minutes per Day per Mailbox figure calculated on the System Sizing Sheet and the Busiest Hour Percent of Calls figure calculated on the Phone Usage Sheet, locate the row in the following table that best applies to the customer. Following the row across, you can identify the number of mailboxes supported by different port sizings. By considering the size of the customer’s organization and other needs and expectations the customer identified on the Feature Selection Sheet, estimate the number of ports necessary for the customer.
Port Sizing Table
Weighted Avg.
Busiest Hour % of Calls
4 Ports 8 Ports 12 Ports 16 Ports 20 Ports 24 Ports 28 Ports 32 Ports
10 18 50 151 265 385 508 634 762 892
“ 14 65 194 340 494 653 815 980 1146
“ 10 91 272 477 692 915 1141 1372 1605
8 18 65 189 331 480 635 792 953 1115
“ 14 81 243 426 618 816 1019 1225 1433
“ 10 114 340 596 865 1143 1427 1715 2006
6 18 84 252 442 641 847 1057 1271 1486
“ 14 108 324 567 824 1089 1359 1634 1911
“ 10 152 454 795 1154 1525 1903 2287 2675
4 18 127 378 662 961 1270 1585 1906 2229
“ 14 163 486 851 1236 1633 2038 2450 2866
“ 10 229 681 1192 1731 2287 2854 3430 4012
2 18 254 758 1325 1923 2541 3172 3812 4458
“ 14 327 973 1703 2473 3268 4028 4901 5732
Implementation and Service Manual Step 2: Complete the System Sizing and Phone Usage Sheets 2-4
To determine the hard drive size required:
1. For each line entered in the System Sizing Sheet, multiply the Number in Category value by the Average Number of Messages Stored value. Multiply the result by the Average Length of Message value divided by 60 (to convert seconds to minutes). Enter the result in the Leave Blank, for Vendor Use 3 column.
2. Multiply the Number in Category value by the Average Number of Faxes Stored value. Multiply the result by the Average Number of Pages per Fax value divided by 4 (because four pages of typical fax data can be stored in one minute of storage space). Enter the result in the Leave Blank, for Vendor Use 4 column.
3. Add the values in the Leave Blank, for Vendor Use 3 column to determine the minutes of storage required for messages. Add the values in the Leave Blank, for Vendor Use 4 column to determine the minutes of storage required for faxes. Add these totals together to determine the total minutes of storage required. Multiply this figure by 1.15 to increase it by 15%, providing a peak load adjustment.
4. To determine the minimum megabytes of hard drive space required for message storage, multiply the Minutes of Disk Space Storage Required value by .25. 5. To determine the minimum total megabytes of hard drive space required to house
messages and the OS/2 and system software, prompts, and subscriber information for up to 1,000 subscribers, add 100 MB to the number determined in step 4.
Example:
Avg. No. Avg. Len. Avg. No. Avg. No.
Category of No. in of Msgs of a Msg of Faxes of Pages Vendor Use Subscriber Category Stored (Seconds) Stored PerFax 3 4
Executive 5 6 45 8 10 22.5 100
Manager 20 6 30 5 8 60 200
General Professional 80 4 30 5 5 200 500
Service Technician 30 5 20 4 3 70 90
Order Entry Clerk 20 2 30 2 2 50 20
Other Clerks 30 2 30 2 2 45 30
Secretary 15 3 30 3 4 15 45
Minutes of storage required for messages --->462.5 985 Minutes of storage required for Faxes ---↑ Total Minutes of Storage Required: (462.5 + 985) 1447.5 15% Peak Load Adjustment: (1.15 x 1447.5) + 217 Minutes of Disk Space Storage Required: 1664.5
Implementation and Service Manual Step 3: Consider Additional Hardware Needs 2-5
Step 3: Consider Additional Hardware Needs
The hardware requirements listed below represent the minimum required to run OS/2 and the messaging system software efficiently.
CPU and Memory
Use the following table to determine the minimum system CPU and memory requirements.
Voice Ports
System without Visual Mailbox
System with < 50 Visual Mailbox Clients
System with 50 - 250 Visual Mailbox Clients
4 486 /33 w/ 16 MB RAM 486 /33 w/ 16 MB RAM 486 /66 w/ 16 MB RAM
8 486 /33 w/ 16 MB RAM 486 /33 w/ 16 MB RAM 486 /66 w/ 16 MB RAM
12 486 /33 w/ 16 MB RAM 486 /100 w/ 16 MB RAM 486 /100 w/ 16 MB RAM
16 486 /33 w/ 16 MB RAM 486 /100 w/ 16 MB RAM 486 /100 w/ 24 MB RAM
20 486 /33 w/ 24 MB RAM 486 /100 w/ 24 MB RAM 486 /100 w/ 24 MB RAM
24 486 /33 w/ 24 MB RAM 486 /100 w/ 24 MB RAM 486 /100 w/ 24 MB RAM
28 486 /100 w/ 24 MB RAM 486 /100 w/ 32 MB RAM P100 w/ 32 MB RAM
32 486 /100 w/ 24 MB RAM 486 /100 w/ 32 MB RAM P100 w/ 32 MB RAM
Certain PCs have Energy Saving Modes that, when enabled, automatically shut down or conserve energy in various parts of the PC. Areas affected can include the hard drive (may stop spinning), the monitor (may be dimmed or turned off), and the CPU and associated components (may be put to “sleep” in a low-power consumption mode). These energy saving features can hinder performance and cause other system
problems. If you are running on a PC with these features, you must disable them in the PC’s CMOS. Consult your PC manual for instructions. This feature is disabled on all turnkey messaging systems.
Monitor
A monochrome VGA or better is recommended.
Bus and Slots
The only voice and fax boards available for use with the system require the ISA bus interface. Each voice board requires one 8- or 16-bit slot (depending on the board), and each TruFax board requires one full-length 16-bit slot. It is recommended that at least one full-length 16-bit slot be available for future expansion.
3½-inch Disk Drive
One 1.4 megabyte, 3½-inch drive may be used to install software and perform system backups.
CD-ROM Drive
A CD-ROM drive is required for software installation.
Parallel Port
Implementation and Service Manual Step 3: Consider Additional Hardware Needs 2-6
Other than the printer or a BackPak external CD-ROM, nothing should be connected to the same parallel port as the sentinel. The sentinel may be corrupted if a tape backup unit is connected to it or if file transfer software is run through it. If you want to use a tape backup unit or a file transfer program, either use a different parallel port, use a device that connects to a serial port, or disconnect the sentinel while you are using the other program or device (make sure the messaging system is shut down first).
Voice Boards
Dialogic voice boards are supported for the system. The system only recognizes a voice board if the EPROM has been programmed to contain the proper “signature.” If a nonsignatured board is detected during initialization, its ports are disabled.
Mouse
A mouse is required for full functionality of the system.
Modem
A modem can be used for remote diagnostics. Modems with a minimum speed of 9600 bps are recommended. An internal modem is supplied with the messaging system. Contact your authorized representative for additional information.
UPS (Uninterruptible Power Supply)
A UPS protects the system PC from a sudden loss of power. You must connect the UPS to a serial port if you plan to run UPS integration. See Chapter 11, “Integrating with an Uninterruptible Power Supply,” for additional information.
Printer (Optional)
A printer can be attached to the messaging system PC to produce hard copies (reports, V-Trees, for example). The printer, which must connect to a parallel port, can be attached to the back of the system’s sentinel unit. The printer and/or PC must include drivers that allow the printer to operate properly with OS/2 programs. For information on required drivers, consult the printer and OS/2 documentation.
Tape Backup (Optional)
A tape backup unit can be used to archive your entire messaging system or a portion of it (for example, phrase files). For additional information on tape backup units, contact your authorized representative.
Brooktrout TruFax Boards (Optional)
Implementation and Service Manual Gathering Necessary Information 3-1
C H A P T E R
3
Gathering Necessary Information
The steps provided in this chapter will help you to:
• Collect information from the customer that you will use during the messaging system installation and system setup process
• Review the information provided with the customer, validating completeness and accuracy
• Understand how that information is used during the messaging system implementation process
As you follow the steps in this chapter, you will ask the customer to complete the Preinstallation Configuration Worksheets provided behind the Worksheets tab in this manual.
Implementation and Service Manual Step 1: Complete the Preinstallation Configuration Worksheets 3-2
Step 1: Complete the Preinstallation Configuration Worksheets
There are 14 worksheets provided behind the Worksheets tab in this manual that are collectively referred to as the Preinstallation Configuration Worksheets. These
worksheets prompt the customer to provide information that will assist you as you install and set up the customer’s messaging system. Before you begin the installation process, ask the customer to complete the following sheets:
• Company Profile Sheet
• Call Flow Sheet
• Single-Company Greetings Sheet or Multiple-Company Greetings Sheet
• Attendant Menu Prompt Sheet
• Call Queuing Prompts Sheet
• Holiday Greetings Sheet
• Class of Service Sheet
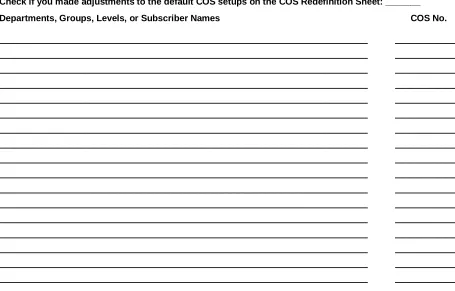
• COS Redefinition Sheet
• Custom COS Definition Sheet
• Mailbox Assignment Sheet
• Auto Forward Sheet
• Message Notification Sheet
• V-Tree Design Sheet
Instructions on completing Preinstallation Configuration Worksheets are provided at the top of each sheet. Though these instructions should be adequate, be sure to encourage customers to contact you immediately with any questions.
To assist customers in completing certain sheets, be sure to provide them with the following information, which is also included behind the Worksheets tab:
• Class of Service Information Sheet
• Predefined COS Sheet
• V-Tree Design Sheet Instructions and V-Tree Design Sheet Example
When asking customers to complete the worksheets, inform them that Prompt # and Mailbox # fields that display in italics on many of the sheets will be completed by the installer when the system is implemented at the site.
Step 2: Agree on a Worksheet Return Date
In an effort to facilitate the implementation process, be sure to set a worksheet
Implementation and Service Manual Step 3: Review Worksheet Information 3-3
Step 3: Review Worksheet Information
After you receive completed Preinstallation Configuration Worksheets from the customer, review each worksheet. Be sure to note:
• Missing worksheets
• Missing worksheet entries
• Seemingly inconsistent or odd worksheet entries
• Worksheet entries that require optional add-on modules you had not previously planned to include with the system
By carefully reviewing the Preinstallation Configuration Worksheets your customer provides, you can become increasingly familiar with the customer’s system needs and expectations before you actually implement the messaging system. You can also identify any additional optional modules that should be included with the system and were not previously planned. Furthermore, by identifying missing or seemingly inconsistent data now, you can immediately address worksheet entries that were confusing to or
overlooked by the customer to facilitate the actual installation and setup steps.
Step 4: Understand How and When to Use Worksheet Data
The steps provided in this manual will guide you through the messaging system installation and setup process and periodically refer you to specific customer entries on the Preinstallation Configuration Worksheets, so you can make informed installation and setup decisions. In general terms, you will be asked to refer to worksheet entries while completing the following installation and setup tasks:
• Configuring software parameters on the System Setup screens
• Defining the functionality of the automated attendant
Implementation and Service Manual Understanding the Installation Process 4-1
C H A P T E R
4
Understanding the Installation Process
This chapter provides information on the general methodology you must follow to successfully install, set up, and test the messaging system.
An Installation Checklist is provided separately with the messaging system to guide you through the installation methodology. Copy and use this checklist each time you perform a messaging system installation.
In almost all cases, the messaging system is delivered with all necessary voice and fax boards and both the OS/2 and Octel® 100 software preinstalled. Consequently, you may not need to complete many of the hardware and software installation procedures
Implementation and Service Manual Installation Methodology Steps 4-2
Installation Methodology Steps
The following table identifies each general system installation step and its purpose. Detailed procedures for completing each step are provided throughout this manual.
Installation Step Purpose and Importance
Determine the customer’s system needs and gather necessary customer information
By defining exactly what your customer needs from the messaging system, you can address issues, concerns, and questions early on, thereby facilitating communication and avoiding confusion and surprises later. You can also make informed decisions on the size of the system, type of hardware, and the optional add-on modules necessary to meet your customer’s needs. For additional information, see Chapter 2, “Determining the Customer’s System Needs.”
Verify phone system configuration
During the installation process, you will need to provide specific information on the customer’s phone switch and system. This step prompts you to gather that information prior to installation, so that you have all the information you need at hand. This step is particularly critical if the switch at the customer’s site is not among those supported by the system’s Integrator utility. The Integrator utility sets several codes and parameters to those settings best suited for a particular switch. For additional information on the Integrator-supported switches, contact a technical support representative. For additional information on using Integrator, see Chapter 5, “Preparing the Hardware.”
Assemble the required materials
To facilitate the actual installation process, you need to assemble all the materials you will be using. This helps to dramatically improve your installation efficiency. A list of required materials is included in the Installation Checklist, which is provided separately with the messaging system.
Prepare the PC for installation
Before you install the system on the PC, you must set up and install certain hardware components such as the voice board and sentinel. This step walks you through the procedures. For additional information, see Chapter 5, “Preparing the Hardware.”
Install the OS/2 and system software
On turnkey systems, the OS/2 and messaging system software is preinstalled. If the software needs to be reinstalled, see Chapter 6, “Installing the Software.”
Run the Configure utility The Configure utility enables the system to recognize the installed voice and fax boards. On turnkey systems, the voice boards are preinstalled in the system PC and the Configure utility is preconfigured. For information on running the Configure utility, see Chapter 7, “Setting Up the System to Recognize Voice and Fax Boards.”
Run the Integrator utility The Integrator utility configures the system for use with the phone switch installed at the customer site. The Integrator utility is preconfigured on some systems. To determine if you must run the Integrator utility, launch Integrator and verify that the Currently Installed Switch field displays the name of the switch to which the system will be connected. If the field displays None or if the name displayed for the installed switch is incorrect, you must run Integrator. For information on running the Integrator utility, see Chapter 8, “Integrating with the Phone System.”
Run the Call Analysis Utility
Implementation and Service Manual Installation Methodology Steps 4-3
Installation Step Purpose and Importance
Run the System Setup utility
The System Setup utility configures the system. For information on running the System Setup utility, see Chapter 13, “Setting Up the System.”
Install the Visual Mailbox module (optional)
The Visual Mailbox software is preinstalled on most systems. However, there are additional steps you must perform to complete Visual Mailbox installation. For information on implementing Visual Mailbox, see Chapter 19, “Installing and Configuring Visual Mailbox.”
Configure serial integration (optional)
If the phone system at the customer site requires a serial integration, you must install the appropriate serial integration software and run the ICONFIG utility. For information on running serial integration, see Chapter 10, “Establishing a Serial
Integration.”
Run the UPS utility (optional)
It is strongly recommended that the UPS utility be run to integrate the system and the attached UPS. Note that the UPS must have a serial port connection to run UPS integration. The UPS shipped with the messaging system has this connection. For information on running the UPS utility, see Chapter 11, “Integrating with an Uninterruptible Power Supply.”
Run the Dial Plan utility (optional)
The Dial Plan utility determines the correct outdial string for a number of outbound operations. For information on running the Dial Plan utility, see Chapter 12, “Determining Outdial Strings.”
Test the system using the provided test plan
After you have completed the actual software installation and setup steps, it is critical that you comprehensively test the system to ensure it is functioning properly. This step takes you through a low-level test plan and helps you to troubleshoot any problems. For information on testing the system, see Chapter 24, “Testing and Troubleshooting the System.”
Document and store site information
Implementation and Service Manual Preparing the Hardware 5-1
C H A P T E R
5
Preparing the Hardware
In almost all cases, the messaging system is delivered with all necessary voice and fax boards installed. Consequently, you may not need to complete certain hardware configuration and installation steps detailed in this chapter. You should, however, connect the phone and fax lines to the messaging system and install certain additional hardware components, such as the uninterruptible power supply (UPS). If you need to install new hardware in the messaging system PC or you need to modify the hardware, this chapter will provide detailed board setup and installation information. The steps provided help you to:
• Assemble the necessary materials
• Verify phone system readiness
• Configure the voice boards
• Configure the fax boards
• Install the voice and fax boards in the PC
• Connect the phone and fax lines to the phone system
• Install the sentinel on the PC
• Install the Serial integration device in the PC
• Install and test the UPS
• Install and configure the modem
• Install the tape backup unit (optional)
• Install printer (optional)
Implementation and Service Manual Assembling Materials 5-2
Assembling Materials
Before you begin hardware installation, assemble the materials you are required to use. The materials are listed on the Installation Checklist provided with the messaging system.
Some of the equipment listed, such as a tape backup device, is optional and therefore not required for the messaging system.
Verifying Phone System Readiness
Before beginning hardware installation, you must make sure that the phone system is ready for system installation by:
• Confirming the presence of a dial tone on each board used
• Verifying that the phone system is configured properly
• Compiling phone system configuration information
Confirming Dial Tone
The first step in preparing the phone system at the customer site is to establish the presence of dial tone.
To confirm the presence of a dial tone on the phone system:
1. Connect one end of a modular plug into the phone system.
2. Plug the other end of the modular plug into a 2500 set, a telephone test set, or the proprietary telephone instrument if using a Dialogic D/42D-NS, D/42D-SX, or D/42D-SL integration.
3. Lift the handset and confirm that a dial tone is present.
Verifying the Phone System Configuration
Verify that the phone system is configured properly for the system:
• Ensure that the phone system technician followed the procedures detailed in the latest Configuration Note when programming the phone system.
• If a Configuration Note is not available for the customer’s switch, contact a technical support representative for information on the codes required.
Compiling Phone System Configuration Information
Obtain the following phone system configuration information:
• List of hunt groups configured for the phone system, if there are any.
Implementation and Service Manual Configuring the Voice Boards 5-3
Configuring the Voice Boards
Voice boards provide the interface between the messaging system and the phone system that allows them to communicate. You must configure the jumpers and switch settings on the Dialogic voice boards before you install them. Note that after you install the messaging system, you must also configure the software to recognize the voice boards.
Voice boards contain ports, which are the interface between a voice board and a phone system channel.
The boards you install in the PC must be purchased from your messaging system provider so they are programmed with the proper signature. If a nonsignatured board is detected during system initialization, the number of ports on that board is not available. In addition, the system writes an entry to the log file identifying the location of the nonsignatured board.
WARNING: Use caution when handling voice boards as they are
electrostatic-sensitive. Be sure you ground the PC, the work area, and the ground end of the antistatic wrist strap prior to handling a board, and always use antistatic wrist straps and/or electrostatic-dissipative mats while handling a board.
The following Dialogic boards are supported:
• DIALOG/4: 4-port, half-length board
• D4xD: 4-port board
• D/42D-NS: 4-port digital board
• D/42D-SL: 4-port digital board
• D/42D-SX: 4-port digital board
In the voice board drawings, the black square in the switch settings indicates the jumper position.
Configuring DIALOG/4, D/4xD, D/42D-NS, D/42D-SX, and
D/42D-SL Boards
The steps for configuring the DIALOG/4, D/4xD, D/42D-NS, D/42D-SX, and D/42D-SL boards are identical.
Different versions of the Dialogic voice boards may be installed in existing messaging systems; therefore, the location of the relevant jumpers and switches may vary between versions. Note that only the jumper blocks and switches relevant to the boards’
Implementation and Service Manual Configuring the Voice Boards 5-4
The following diagram illustrates the DIALOG/4 board.
The following diagram illustrates the D/4xD board. The location of the relevant jumpers and switches on the D/42D-SX and D/42D-SL boards are approximately the same as on the D/4xD board.
The following diagram illustrates the D/42D-NS board.
Complete the following steps, as required, to configure each Dialogic board: 1. Set the board’s base shared memory address.
2. Modify the board’s base memory segment. 3. Set the board’s hardware interrupt.
Implementation and Service Manual Configuring the Voice Boards 5-5
Setting the board’s base shared memory address – The base shared memory
address allows the voice board to communicate with the voice driver and, in turn, the messaging system. SW1 determines the Dialogic board’s base shared memory address. If you are only installing one Dialogic board, leave SW1 at the default setting unless it conflicts with another component. If you are installing multiple boards or if there is a conflict, you can change the base shared memory address by configuring the first three switches on SW1.
The following figure illustrates the recommended switch settings. The first column lists the board number, the second column lists the base shared memory address that should be assigned to each board, and the third column represents the switch settings that correspond to the base shared memory address.
Record the Shared Memory Address for each DIALOG/4, D/4xD, D/42D-NS, D/42D-SX, and D/42D-SL board you configure. You will need to enter this information when you run the Configure utility.
Modifying the board’s base memory segment – The shared memory block on the PC
is called a segment. Most Dialogic boards use the D segment, which is the default. To use the D segment, make sure that the J5 and J6 jumper clips are removed.
If you cannot use the D segment due to a conflict or for some other reason, a technical support representative can advise you to use an address in segment A or C.
To use an alternate segment, you must install one of two jumpers on the Dialogic board:
• Install the JP5 jumper clip if you assign the voice board an address using the A segment, such as A0000.
Implementation and Service Manual Configuring the Fax Boards 5-6
Do not change the settings of either of these jumpers unless a technical support representative directs you to set the voice board to an address using an alternate segment.
Setting the board’s hardware interrupt – The JP1 jumper block sets the Dialogic board hardware interrupt level, also called the IRQ. Interrupt settings for these boards range from 2 through 7. Install the jumper that corresponds to the interrupt level you want to use. You must set all Dialogic boards to the same interrupt level. The
recommended interrupt is IRQ 5. Depending on the system configuration, you may have to try different interrupts before you find one that does not conflict with other devices.
Record the Hardware Interrupt for each DIALOG/4, D/4xD, D/42D-NS, D/42D-SX, and D/42D-SL board you configure. You will need to enter this information when you run the Configure utility.
Setting the board’s default line state – The fourth switch on SW1 determines whether the lines connected to the voice board return a ring-no-answer signal or a busy signal when the messaging system is not running. Make sure this switch is always on, as shown in the board diagrams, to indicate that the lines should return a busy signal when the messaging is not running.
Configuring for multiple boards – If you are using a single voice board, leave the JP7 jumper clip installed. If you are installing multiple Dialogic boards, leave the JP7 jumper clip on the first Dialogic voice board (which has the lowest base shared memory address) and remove the JP7 jumper clip on the other Dialogic boards.
Configuring the Fax Boards
Fax boards allow the messaging system to use the Fax Solution features. You must configure the jumpers and switch settings on the Brooktrout fax boards before you install them. The Brooktrout TruFax fax board is supported.
Fax boards contain ports, which are the interface between the fax board and a phone system channel.
The boards you install in the PC must be purchased from your messaging system provider so they are programmed with the proper signature.
Implementation and Service Manual Configuring the Fax Boards 5-7
Configuring the Brooktrout TruFax Board
The TruFax is a 2-port fax board supported for use with the messaging system. In the board drawing, the black square in the switch settings indicates the jumper position.
Use caution when handling fax boards as they are electrostatic-sensitive. Make sure you ground the PC, the work area, and the ground end of the antistatic wrist strap prior to handling a board, and always use antistatic wrist straps and/or electrostatic-dissipative mats while handling a board.
Before installing the TruFax board, you must:
• Set the board’s port address
• Set the interrupt level
Setting the TruFax Board’s Port Address
Implementation and Service Manual Installing the Voice and Fax Boards 5-8
The system searches addresses 140 through 280 to determine if fax boards are present. Because the system considers any board found in this range of addresses a fax board, do not set other boards, such as a network interface card (NIC), to addresses within this range.
Record the port address for each TruFax board you configure; you will need to refer to it when you run the Configure utility.
Setting the TruFax Board’s Hardware Interrupt Level
The interrupt jumper in the upper-left corner of the board controls the TruFax board’s hardware interrupt level. The recommended hardware interrupt level for Brooktrout boards is 10. Note that you must install the board in a 16-bit slot to use interrupt 10. Use the same interrupt for all Brooktrout boards you install in the messaging system.
Record the Hardware Interrupt for the fax boards. You will need to enter this information when you run the Configure utility.
Installing the Voice and Fax Boards
After you configure the voice and fax boards, you can install them in the PC. The same basic procedure is used to install both the voice and the fax boards.
Implementation and Service Manual Installing Ferrite Bead Cable Clamps 5-9
To install the voice and fax boards:
1. Turn off the power to the PC and any peripherals.
2. Unfasten the screws retaining the PC’s cover and remove the cover.
3. Select an expansion slot in which to install the board. Use an 8- or 16-bit slot for the Dialogic DIALOG/4, D/4xD, D/42-SL, D/42-SX, and D/42-NS boards. Use a 16-bit slot for the Brooktrout fax boards.
4. Unfasten the screw retaining the slot cover, located at the rear of the PC chassis, and remove the slot cover.
5. Insert the board into the expansion slot by holding the board at the top of each corner. Apply equal pressure to both sides of the board and push down firmly to seat the board. The board should easily slide down most of the way. If you feel any resistance, check the alignment of the board. Repeat for each voice or fax board you are installing.
6. Make sure that the board’s RJ-11 or RJ-14 jacks are accessible from the rear of the PC chassis.
7. Secure the board’s metal bracket with the retaining screw.
8. Replace the PC’s cover and fasten it back into place with the retaining screws.
Installing Ferrite Bead Cable Clamps
Ferrite bead cable clamps must be installed on the following voice and fax board I/O cables to meet current EMI suppression requirements:
• Dialogic D/42D-SX (2-cable)
• Brooktrout TruFax (2-cable)
• Dialogic D/42D-NS (4-cable)
• Dialogic D/42D-SL (4-cable)
The procedure used to install the ferrite bead cable clamps depends on the number of cables connected to the voice or fax boards.
Notes on the following illustrations:
• All numerical dimensions referenced on the attached drawings are in inches, with corresponding metric values, in millimeters.
Implementation and Service Manual Installing Ferrite Bead Cable Clamps 5-10