DOI : https://doi.org/10.32628/CSEIT195426
Smart Home Using Raspberry Pi
Shauvik Purkayastha*, Triporna Kashyap, Navam Pradhan, Rajashree Konwar
Computer Science and Engineering Department, Assam Engineering College, Ghy, Assam, India
ABSTRACT
The human race has always been in the quest for a better and easier life and ever since technology begun heavily integrating itself into the society. From the appliances in our kitchen to the phones in our palms, there are many high tech devices that make our lives easier. But it would be more convenient if we could control these devices remotely. An automated system could control machines and perform tasks as per the convenience of the user from long distances. In this paper, we are presenting a proposed system for a Smart Home automation where the user can control home electronic appliances easily and with higher controllability using an android application. To design this system, we are using a Raspberry Pi module. The Raspberry Pi acts as a mini computer.
Keywords : Raspberry Pi, Bluetooth, Thingspeak, raspberry pi camera, Android App, MIT app inventor
I. INTRODUCTION
In a nutshell, the Internet of Things is the concept of connecting any device (so long as it has an on/off switch) to the Internet and to other connected devices. The IoT is a giant network of connected things and people all of which collect and share data about the way they are used and about the environment around them. That includes an extraordinary number of objects of all shapes and sizes from smart microwave, which automatically cook your food for the right length of time, to self-driving cars, whose complex sensors detect objects in their path, to wearable fit-ness devices that measure your heart rate and the number of steps youve taken that day, then use that information to suggest exercise plans tai-lored to you. There are even connected footballs that can track how far and fast they are thrown and record those statistics via an app for future training purposes.
The Internet of Things (IoT) is an important topic and technology in-dustry, policy, and engineering circles and has become headline news in both the specialty press and the popular media. The technology is em-bodied in a wide spectrum of networked products, systems, and sensors, which take advantage of advancements in computing power,
electronics miniaturization, and network
interconnections to offer new capabilities not previously possible. An abundance of conferences, reports and new articles discuss and debate the
II. METHODS AND MATERIAL
The purpose of our project is to design smart home automation for the user. By using this smart home automation, the user can control home appliances like lights, fans, water pumps and so on using an Android application. The user can also request for images of the surroundings in case of an emergency. These images will be sent to the e-mail account of the user. This chapter delves into the methodology employed by us in building the project, the designing of the Android app and the scripts running on the Raspberry Pi.
Before starting our project we first drew up a rough plan of how we were going to proceed with our work. We designed a flow chart to be followed during the entire duration of work. We have used the ThingS-peak Cloud API to send and receive signals from the Raspberry Pi. The sensors- HC-SR04 Ultrasonic sensor and the Pi Camera sensors are con-nected to the Raspberry Pi. The Pi receives the sensor data from these sensors and uploads them to the cloud. An app will be designed so that the user can control the electronic devices, get alert notifications etc. The user can also receive status updates of all the devices connected to the Pi.
Figure 1 : Flowchart
Our Entire work is chronologically divided into four phases. Each phase is explained in detail in this chapter.
In PHASE I, Connection over Bluetooth is established. In Raspberry Pi, The Raspberry Pi is connected to the 4-channel relay, in which two of the channels are connected to two bulbs. The 4-channel relay is used to control a high voltage circuit (i.e. the bulbs) by using low voltage signals (from the Raspberry Pi). The bulbs are then connected to an AC power source. The GPIO pins 12 and 16 are used to connect the Pi to the relay. The Bluetooth library is used.
Figure 2
variable. The predefined values are then compared to the variable and actions are taken.
For example, if the predefined values are assigned such that-
For turning off Blub 1: 0 For turning on Blub 1: 1 For turning off Blub 2: 2 For turning on Blub 2: 3
If the client requests to turn the first bulb on, the App sends a value of 1 to the Pi. The Pi then turns the first bulb on. Similarly, it can be turned off.
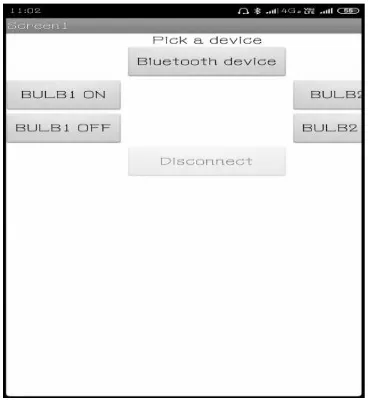
Figure 3 : Bluetooth App
In the App, the user can pick the desired Bluetooth device from a list of paired devices. If the device is not paired, then a pair request is sent to both devices. Once connection is established, the user can choose to turn the bulbs on or off. The user is also given an option to disconnect from the Bluetooth device from the app. In PHASE II, connection with ThingSpeak Cloud API is accomplished. ThingSpeak allows the creation of Channels. Each Channel is as-signed an unique Channel ID. There are Private Channels which data is collected; Data can be shared with Public Channels. ThingSpeak also provides API Keys
which enables us to write data to a channel or read data from a private channel. To do this, there are Read and Write API keys. These keys are also unique. These keys provide security. If the keys are compromised, new keys can be generated.
Thingspeak allows the updating of a channel by using HTTP GET and POST requests. For this, a set of API Requests are provided. For updating of a channel,
“Update a channel feed” is used. To get a channel feedline. Data from a channel, “Get a channel feed” is
used. To read data from a single field of a channel
with HTTP GET request, “Get a channel field” is used.
To read status of a field of a channel with HTTP GET,
“Get Channel Status Updates” is used. In Raspberry Pi,
the sensor data is sent to the ThingSpeak Cloud API from the Pi over the Internet. We have implemented this in the same circuit as described above. But the connection is established using Internet access and not via Blue-tooth. The “Update channel feed” API
request is being used to send the data from the Pi to ThingSpeak. Here, the status of the bulbs is sent as data to ThingSpeak. Also, the status of the bulbs is
received by the Pi using the “Get Channel Field” API
Request. In PHASE III, Connection of the Pi Camera and HC-SR04 Ultrasonic Sensor is done. This Phase is divided into two Pi Camera, and HC-SR04 Ultrasonic Sensor. Each method is described exhaustively in the following texts.
The Camera Module is connected to the Raspberry
Pi’s camera port. To ensure that the camera software
is enabled, the Raspberry Pi must be configured. We have interfaced the Pi camera with the Raspberry Pi. The camera module will act as a savior in a case where the user wants to see the surroundings of their house when they might not be at home.
The camera module could be placed at the door and the neighborhood of the house can be monitored infrequently or as an when the user desires. The
box. In Raspberry Pi, since the images are being sent to the recipient in the form of an email, Simple Mail Transfer Protocol (or SMTP) is used. SMTP is a method to transfer email from one person to another. It is a push protocol which means that it is used to send the mail to the user whereas other protocols used in the mail domain like IMAP and POP retrieve mails for the recipient. SMTP is protocol which functions in the application layer. There is a client and a server. The client is the user who wants to send the mail and the server is the SMTP server. The client establishes a connection to the server using a TCP connection. Since the SMTP server is on listening mode all the time, it listens for a TCP connection from any client. When a connection is heard, the SMTP process sets up a connection on that particular port .Once the TCP connection is established successfully, the client sends the mail.
There are two types of methods in the SMTP protocol End-to End and Store-and-Forward. In our project we have used the Store-and-Forward method. In this method, there can be one or more than one intermediate stations which stores the information sent by the user and at some later time sends it to the recipient or another intermediate station. The integrity of the messages are verified at these intermediate stations. Libraries used in this process are- os, glob, picam, smtplib and time. The sender’s email ID, the receiver’s email ID and the pass-word of the sender are defined in the python script. The images which are clicked by the Pi are stored in a directory. If there is no directory, then a new directory will be created. The image is stored in the .jpg format. The images are named according to the requests sent by the user. For example if the user requests for the image for the first time, then it will
be named as ’image1.jpg’.
The image is then sent as an attachment with the
subject ”Picture requested” and the body of the email with the message, ”Picture is attached”. The server.
Login (user, pwd) function is used to login to the
sender’s email ID so as to send the message. The images are saved in the database/directory before being sent via email.
In Android App
Figure 4 : Image Request App
The Android app has a Request Photo button. When the user re-quests for an image of the surroundings, the app sends an email with the attached requested image. The Android app is only responsible for taking the picture and forwarding it through the mail. The app is really user-friendly as it can be used with ease. 2. Connection with the HC-SR04 Ultrasonic Sensor.
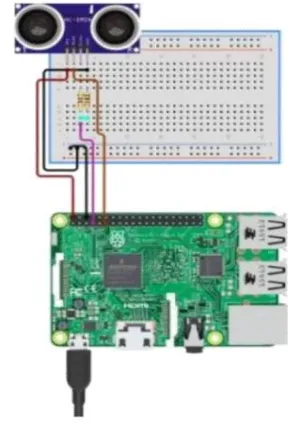
In the raspberry pi, there are four pins in the HC-SR04. They are- VCC, Trig, Echo and GND. The VCC of the sensor is connected to the VCC of the Raspberry Pi. The Trigger pin is high for some micro-seconds, during which it sends an ultrasonic wave to initiate the measurement process. The Echo pin stays high for the period of time till the ultrasonic wave returns back to the sensor. It is an output pin. The arrival time is recorded. The Trig and Echo pins are connected to the GPIO pins of the Raspberry Pi. The GND pin of the sensor is connected to the GND pin of the Pi. The ultrasonic sensor uses the data of the start time and the arrival time of the ultrasonic wave to calculate the distance of the object (which is water in our project) from the sensor. It can be done using the formula:
Time Elapsed = Stop Time- Start time Distance = (Time Elapsed *34300)/2
Here, Time Elapsed is the difference between the start time and the arrival time of the wave. It is divided by two because it travels to-fro from the object. It is then multiplied by the sonic speed (which is 34300cm/s) to get the distance, Distance. The libraries used in the water-level detection are-time and re-quests. The ultrasonic sensor is placed on top of the water tank. The distance between the water-the user can choose to eiwater-ther Turn water-the motor ON or OFF. The motor can be connected to the Raspberry Pi using a relay. A different channel is created for the water-level sensor. The creation of different channels is beneficial. This is because having too many fields in the same channel increases the delay in receiving and sending data. Thus, different channels are
created. In PHASE IV, Integration of all the Modules is done. In the last phase of the project, we have integrated all the modules that we had developed in the last three phases to construct a finely finished product. In ThingSpeak Cloud API
We have created 4 different channels in the ThingSpeak Cloud API. They are:
1. Channel 1: For the 2 bulbs being used and for a motor i.e. there are 3 fields in this channel.
2. Channel 2: For the Bluetooth connection. 3. Channel 3: For the Pi Camera module.
4. Channel 4 : For the HC-SR04 Ultrasonic Sensor(Water-level sensor). The Channel 1 is responsible for receiving and sending data to and from the bulbs and the motor. We have not used a motor in our project. We are assuming that the motor could be connected to the Pi through the relay. This channel basically interacts with the relay module.
The Channel 2 is responsible for switching between Bluetooth and Internet. The Channel 3 is responsible for receiving the requests for im-ages and responding by sending data to the Pi to capture the image. The Channel 4 is responsible for receiving sensor data from the HC-SR04 and sending status updates to the Android app.
In the Raspberry Pi, the Pi Camera, the Ultrasonic Sensor and the 4-channel relay are connected to the Raspberry Pi. The bulbs are in turn connected to the relay. The libraries used are-os, json, request and RPi.GPIO. The requests sent from the Android app are in json format. These requests are retrieved from
the cloud using ”Get Channel field” request API. The
json requests then need to be decoded to get the values. These values are stored in variables. Initially, the value of the camera field is retrieved and saved to a temporary variable. We have used variables like-bulb1, bulb2, camera and Bluetooth for storing values of the two bulbs, the camera and Bluetooth respectively.
If the values for the first bulb are received to be 0 then it is turned off. It is turned on for a value of 1. Similarly, the second bulb turns on when the variable contains a value of 3 and turns off with the value of 2. If a value of 4 is received for the bluetooth variable, then the process of connection over Internet is put to a halt and the connection over Bluetooth script is run. There is a switch in the executing script. The Bluetooth script is run until the user disconnects the Bluetooth. Once the user disconnects from the Bluetooth, the connection over Internet script resumes execution.
The script initially stores the value for the camera field in a temporary variable. If there is request made by the user, then the value obtained in the camera variable would be different from that of the temporary variable. This is because, when a request is sent for an image, the value of the camera field is incremented by 1. Thus, when there is a difference in the previous value and the new value, the camera captures a picture and assigns the new value to the temporary variable.
In the Android App, the Android application is designed such that the bulbs and the sup-posed motor can be turned ON or OFF. Also, when a user is
outside their home, they can check the status of their home appliances. Since the app works over Internet, they can choose to turn the device ON or OFF from wherever in the world.
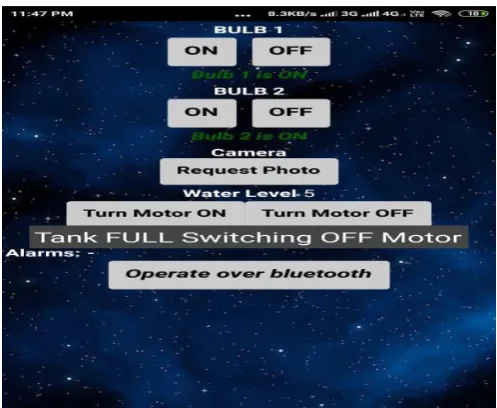
Figure 7 : Final Android App: Low Water-Level.
The user can also request a photo. The photo is captured and sent to the user via email. When the Ultrasonic sensor detects that the water level is 100cm or greater than that, then it displays a Water Level Low status along with the measurement of the water-level. These values are retrieved from the ThingSpeak Cloud API. The user is thus alerted of the low water-level and can thus, turn the motor ON.
When the water-level is 5cm or lesser, the Motor is automatically turned OFF. The user is then notified that the motor is turned OFF by displaying the message-Tank FULL Switching OFF motor. When the user is outside, they would be able to remotely control their home appliances over the Internet. But when they are inside they are also given the option of using a Bluetooth connection to remotely control devices.
Figure 9 : Final Android App : Bluetooth Control.
When the operate over bluetooth button is clicked, a new screen comes up. This screen allows the user to connect to the Bluetooth module of the Raspberry Pi. Once connection is established, the user can control the home appliances over Bluetooth.
III. RESULT ANALYSIS
In this we will discuss the results that we obtain after the design and implementation of the entire project. The chapter helps us to know if the results obtain are satisfactory or not. We will discuss the various anomalies that occur in the project. An overview on how the programs interact with users will be evaluated. It will then compare the performance of our prototype.
The user interface is an Android application which was designed using the MIT App Inventor 2. The Android app helps the users interact with their home appliances. The app provides two interfaces- one, where the user can control these devices over Bluetooth and the other where Internet access is required to send and receive data from the Pi Board. When a request is sent for switching a bulb ON or OFF from the user through the Internet, the requests are first received in these fields of the ThingSpeak Channel. These values are then retrieved from these fields. In the figure below graphically represents the values received at a particular instant of time.
Figure 10 : A Channel with fields-Bulbs 1 and 2.
Figure 12 : A Channel with field as Water level.
Figure 13 : A Channel with field-Bluetooth.
When the user requests for a photo, the Raspberry Pi directs the Pi Camera to click pictures and sends them to the mail of the user.
Figure 14 : E-mails received by the user on request of pictures.
Figure 15 : A Pi Camera clicked picture sent via email.
When the devices connected to the Pi are switched over a Bluetooth connection, the communication is rather fast. This is not the case with the connection over the Internet. This could be because of a weak network connection. Also, data can be sent to ThingSpeak after every 15 seconds thus slowing our communication speed.
IV. CONCLUSION
V. REFERENCES
[1]. Sarthak Jain, Anant Vaibhav and Lovely Goyal, Raspberry Pi based Interactive Home
Automation System through E-mail,
International Conference on Reliability, Optimization and Information Technol-ogy(ICROIT), February 2014.
[2]. M. Mahadi Abdul Jamil and M. Shukri Ahmad, A Pilot Study: Development of Home Automation System via Raspberry Pi,
Inter-national Conference on Biomedical
Engineering (ICoBE), March 2015.
[3]. Pavithra D and Ranjith Balakrishnan, IoT based Monitoring and Control System for Home Automation, Proceedings of 2015 Global
Conference on Communication
Technologies(GCCT), April 2015.
[4]. V. Sandeep, K. Lalith Gopal, S. Naveen, A. Amudhan and L. S. Ku-mar, Globally Accessible Machine Automation Using Raspberry Pi, 2015 International Conference on Advances in Computing, Com-munications and Informatics (ICACCI), August 2015.
[5]. Vamsikrishna Patchava, Hari Babu Kandala and P Ravi Babu, A Smart Home Automation Technique with Raspberry Pi using IoT , International Conference on Smart Sensors and Systems (IC-SSS), December 2015.
[6]. S L S Sri Harsha, S Chakrapani Reddy and S Prince Mary, En-hanced Home Automation System using Internet of Things, Inter-national Conference on I-SMAC (IoT in Social, Mobile, Analytics and Cloud) (I-SMAC), February 2017. [7]. Vikas Kumawat, Shubham Jain, Vikram Vashisth, Neha Mittal and Bhupendra Kumar Jangir, Design of Controlling Home Appliance Remotely Using Raspberry pi , International Conference for Con-vergence in Technology (I2CT), April 2017.
[8]. Syed Ali Imran Quadri and P.Sathish, IoT Based Home Automation and Surveillance System,
International Conference on Intelligent Computing and Control Systems (ICICCS), June 2017.
[9]. V. Chayapathy, G. S. Anitha and B. Sharath, IOT BASED HOME AUTOMATION BY
USING PERSONAL ASSISTANT,
Inter-national Conference On Smart Technologies For Smart Nation (SmartTechCon), August 2017.
[10]. Naser Abbas Hussein and Inas Al mansoori, Smart Door System for Home Security Using Raspberry pi3, 2017 International Conference on Computer and Applications (ICCA), September 2017.
[11]. M. M. Aktaruzzaman, S. M. Badhan , Sarwat Adnan, M. R. Alam and Most. T. A. Begum, Application of Cloudbridge Automation using Raspberry Pi, 2017 IEEE Region 10 Humanitarian Technol-ogy Conference (R10-HTC), December 2017.
[12]. Tussanai Parthornratt, Pasd Putthapipat, Dollachart Kitsawat and Prapap Koronjaruwat, A Smart Home Automation via Facebook Chatbot and Raspberry Pi, International Conference on Engineer-ing Innovation (ICEI), July 2018.
Cite this article as :
Shauvik Purkayastha, Triporna Kashyap, Navam Pradhan, Rajashree Konwar, "Smart Home Using Raspberry Pi", International Journal of Scientific Research in Computer Science, Engineering and Information Technology (IJSRCSEIT), ISSN : 2456-3307, Volume 5 Issue 4, pp. 153-161, July-August
2019. Available at doi :
https://doi.org/10.32628/CSEIT195426