Installation Guideline
for Cabling and
Assembly
Version 1.0 January 2009
PROFINET
Installation Guideline
for Cabling and
Assembly
Version 1.0
Jan 2009
Order No.: 8.072
© Copyright by PNO 2009 – all rights reserved 2/99
PROFINET Order No: 8.072 Identification: TC2-08-0002
This document has been created by the working group “Installation Guides“ (TC2 WG13) of the PROFIBUS User Organization (Profibus Nutzerorganisation, PNO).
Published by:
PROFIBUS Nutzerorganisation e.V. Haid-und-Neu-Str. 7 76131 Karlsruhe Germany Phone: +49 721 / 96 58 590 Fax : +49 721 / 96 58 589 [email protected] www.PROFINET.com
All rights reserved, including the right to copy, to reproduce (photocopy, microfilm), to store in data processing systems, and to translate, either in part or completely.
Revision log
Version Date Changes/History
© Copyright by PNO 2009 – all rights reserved 4/99
Table of contents
1. Laying PROFINET cables ...15
1.1 Routing PROFINET cables...16
1.1.1 Copper cables ...16
1.1.2 Cable spacing...17
1.1.3 Cable routing in switch cabinets ...19
1.1.4 Cable routing inside buildings...21
1.1.5 Cable routing outside buildings ...23
1.2 Mechanical protection of PROFINET cables ...27
1.3 Laying copper PROFINET cables...29
1.3.1 General...29
1.3.2 Storage and transportation ...29
1.3.3 Temperature limits...30
1.3.4 Tensile strength...31
1.3.5 Using pulling aid and protecting connectors ...32
1.3.6 Attaching cable strain relief ...33
1.3.7 Pressure load ...33
1.3.8 Distortion ...34
1.3.9 Flexible PROFINET cables (distortion cables) ...34
1.3.10 Trailing and festoon cables...35
1.3.11 Keeping to bending radii...36
1.3.12 Avoiding loop formation ...37
1.3.13 Avoiding sharp edges ...38
1.3.14 Adding supplementary cables ...38
1.4 PROFINET copper cable...39
1.5 Fiber optic (FO) cables ...39
1.5.1 Laying fiber optic PROFINET cables ...40
1.5.2 Protecting connectors against contamination ...40
1.5.3 Electromagnetic interference (EMI) ...41
1.5.4 Underground cables / Connecting building...41
2 PROFINET cable assembly work ...43
2.1.1 General assembling information...47
2.1.2 RJ45 insulation displacement technology...48
2.1.3 M12 connector assembly...51
2.1.4 M12 screwing clamp technology...51
2.1.5 M12 insulation displacement technology ...54
2.1.6 Hybrid connectors...57
2.2 Fiber optic cable assembly work...58
2.2.1 Fiber optic harnesses handling precautions ...58
2.2.2 Protecting connectors against contamination and damage ...58
2.2.3 Optical face inspection ...60
2.2.4 Optical face cleaning ...61
2.2.5 Fiber optic cable ...62
2.2.6 Assembly and safety instructions ...64
2.2.7 SC-RJ connector ...65
2.2.8 M12-Fiber Hybrid connector ...69
2.2.9 Other FO connectors ...72
2.3 Grounding and equipotential bonding...73
2.3.1 Protective ground ...73
2.3.2 Functional ground...74
2.3.3 Equipotential bonding ...75
2.3.4 Connecting cable shields to the equipotential bonding conductor ...78
2.3.5 At the PROFINET node ...79
2.3.6 At the cabinet entry...79
2.3.7 Establishing a connection between the cable shield and the equipotential bonding bar ...80
3 Connecting PROFINET nodes ...85
3.1.1 Electrostatic discharge (ESD)...86
3.1.2 Connecting PROFINET nodes via plug connectors...87
© Copyright by PNO 2009 – all rights reserved 6/99
List of figures
Figure 1: Cable distances ...17
Figure 2: Laying cables outside buildings ...42
Figure 3: Pin-assignment of RJ45 and M12 connectors ...44
Figure 4: Connectors - Overview ...45
Figure 5: Structure of PROFINET cable ...46
Figure 6: Hybrid connectors...57
Figure 7: Quality of optical surface ...61
Figure 8: SC-RJ and SC-RJ push-pull connectors...65
Figure 9: M12 Hybrid connectorM12 Hybrid Connector...69
Figure 10: BFOC (ST) Connector ...72
Figure 11: Possible connections between shield and potential equipotential bonding bar ...80
List of tables
Table 1: Symbols indicating important text ...13Table 2: Use of expressions ...13
Table 3: Minimum cable spacing according to IEC 61918 ...18
Table 4: Electrical PROFINET cable types ...31
Table 5: Maximum FO cable lengths ...39
Table 6: Marking of wire pairs...45
Table 7: Connector pin assignment ...47
Table 8: Plastic fiber optic cable ...63
Preface
The aim of the PROFINET Installation Guideline is to support service technicians who have to install PROFINET cables, allowing them to professionally complete their job.
The authors of this guideline have attempted to present the information in a simple way. Therefore, no previous knowledge of PROFINET installation is required. However, basic electrotechnical and optical knowledge are considered as useful. Moreover the fiber optic assembly requires specifics skills and it must be carried out by qualified persons.
The PROFINET Installation Guideline does not cover basic operational principles of PROFINET. If such information is required, please see the appropriate documents e.g. “PROFINET Cabling and Interconnection Technology“ (Order No: 2.252) available from the PROFIBUS User Organization or comparable technical literature. This document does not replace any previous documents. The previous PNO documents therefore continue to be valid.
© Copyright by PNO 2009 – all rights reserved 8/99
Safety instructions
The use of the PROFINET Installation Guideline for Cabling and Assembly may involve handling hazardous materials or tools or involve dangerous work. Due to the many and diverse applications of PROFINET, it is not possible to take all options or safety requirements into consideration. Each application makes different demands on the installer. In order to competently judge possible dangers, you must inform yourself about the safety requirements of the respective system before starting your work. Special attention must be paid to the laws and regulations of the respective country in which the system will be operated. You shall also observe general health and safety requirements, as well as the requirements of the company for which the system is being installed. In addition the manufacturer supplied documentation for the PROFINET components used must be considered.
PROFINET manufacturers declaration
Use only cables and connectors that are provided with a PROFINET manufacturer's declaration. These declarations can be obtained form the PROFINET web site at the following Link:
Power off for installation
Make sure all cables and equipment is de-energized when installing electrical components.
Touching energized wiring or equipment can cause severe or even fatal injuries.
Short circuits can also cause serious and expensive damage to the components.
Cable damage
© Copyright by PNO 2009 – all rights reserved 10/99
Liability exclusion
The PROFIBUS User Organization has taken utmost care in the preparation of this document and compiled all information to the best of their knowledge. This document nevertheless has only informative character and is provided on the basis of liability exclusion. This document may be subject to change, enhancement or correction without any expressive reference. The PROFIBUS User Organization refuses all types of contractual or legal liability for this document, including the warranty for defects and the assurance of certain usage properties. Under no circumstances shall the PROFIBUS User Organization accept liability for any loss or damage caused by or resulting from any defect, error or omission in this document or from anybody using this document or relying on this document.
Referenced standards
EN 50174-2 (2000)
Information Technology – Cabling Installation – Part 2: Installation Planning and Practices Inside Buildings ;
EN 50174-3 (2003)
Information Technology – Cabling Installation – Part 3: Installation Planning and Practices Outside Buildings;
IEC 60364-5-54 (2002)
Electrical installation of buildings – Part 5-54: Selection and erection of electrical equipment – Earthing arrangements, protective conductors and protective bonding conductors
IEC 61918 (2007)
Industrial communication networks – Installation of communication networks in industrial premises
IEC 61784-5-3 (2007)
Industrial communication networks – Profiles – Part 5-3: Installation of fieldbuses – Installation profiles for CPF 3
© Copyright by PNO 2009 – all rights reserved 12/99
Symbols
This document contains various images. The images are supposed to help the reader understand the text. The images are usually in black and white. A green color is used to highlight important details. The field below shows the color used for this purpose.
The following line style represents equipotential bonding and grounding conductors.
The following symbol illustrates the connection to functional ground.
Notice: Do not used functional ground as protective ground. Protective ground is illustrated using the following symbol:
Protective ground is provided firstly to protect people against electrocution. It also provides protection for equipment against faults. Protective ground ensures that any fault currents are passed to ground, so causing the fuse to blow or a protection relay to trip thus de-energizing the system.
Additionally, the following symbols are used. These symbols draw the attention to particularly important text .
Use of expressions
Symbol Name Description Danger!
This symbol indicates danger to life and health. It is extremely important to observe these instructions!
Caution!
This symbol indicates a risk of damage to property. Observe these instructions to avoid such material damage.
Manufacturer’s instructions
The symbol on the left indicates that you have to observe the manufacturer’s instructions. In this case, instructions provided in the PROFINET Installation Guideline are additional information, only.
Notice
This symbol indicates a risk of malfunctions. You shall observe this information to reduce the risk of malfunctions.
Tip Tips provide useful information on how to facilitate your work and improve the system configuration.
Table 1: Symbols indicating important text
"shall" The use of the word shall in this guide indicates a mandatory requirement.
"should" The use of the word "should" in this document indicates flexibility of choice with a strongly preferred implementation.
Table 2: Use of expressions
Manufacturer instructions
© Copyright by PNO 2009 – all rights reserved 14/99
© Copyright by PNO 2009 – all rights reserved 16/99
1.1
Routing PROFINET cables
1.1.1 Copper cables
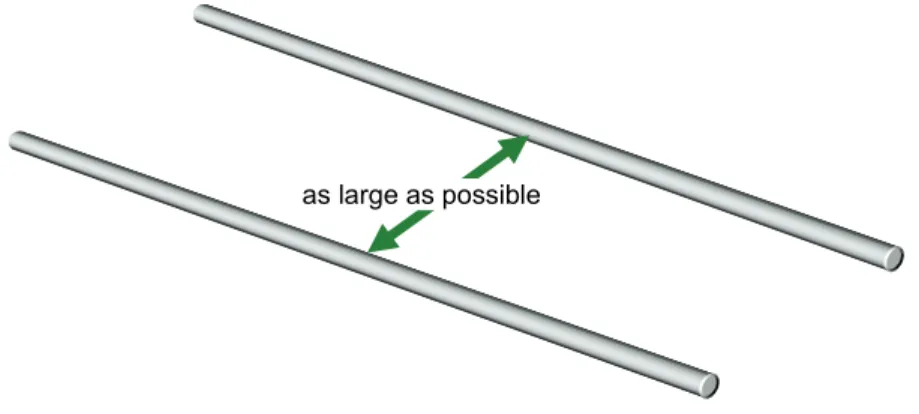
In order to minimize pickup of electromagnetical interferences, PROFINET cables should be laid separately from other plant wiring. Parallel routing of PROFINET and other cables should be minimized and the distance between these different cables should be maximized.
The minimum cable bend radius and tensile strength shall be observed whilst laying PROFINET cables.
During installation, additionally observe the applicable national safety and installation regulations for data and power cables. The specifications provided in this guideline are based on applicable IEC standards.
1.1.2 Cable spacing
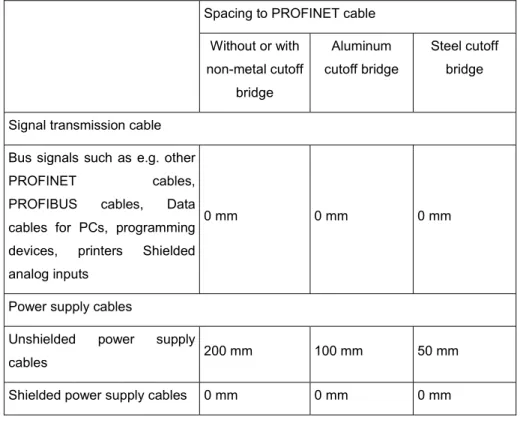
Table 3 shows the minimum spacing required between PROFINET cables (shielded data cable) and other cables according to IEC 61918. The table also mentions two options with a separating web which can be used to separate data cables from power cables.
Generally, the risk of disturbances (crosstalk) decreases when the spacing between the cables increases and when the parallel cable paths get shorter.
Figure 1: Cable distances
© Copyright by PNO 2009 – all rights reserved 18/99
How to read the table
To determine the required minimum separation distance between PROFINET cables and other electrical cables, proceed as follows:
In the left column (PROFINET cables and cables for ...) select which electrical cables you wish to lay in parallel with the PROFINET cables.
In the right table area (Spacing), select the type of cable separation that you intend to use.
See the column with the relevant cable separation type for the appropriate distance for each cable type. You shall also observe the regulations described below Table 3 for different installation areas.
Table 3: Minimum cable spacing according to IEC 61918
Spacing to PROFINET cable Without or with non-metal cutoff bridge Aluminum cutoff bridge Steel cutoff bridge Signal transmission cable
Bus signals such as e.g. other
PROFINET cables, PROFIBUS cables, Data
cables for PCs, programming devices, printers Shielded analog inputs
0 mm 0 mm 0 mm
Power supply cables
Unshielded power supply
cables 200 mm 100 mm 50 mm
1.1.3 Cable routing in switch cabinets
• See Table 3 for the required minimum spacing between different categories of cables. In general, the risk of disturbances caused by interference pickup decreases as the spacing between the cables increases.
• Where cables in different categories have to cross, they should always cross at right angles. Try to avoid running cables in different categories in parallel even for short distances.
• In case there is not sufficient space to achieve the required spacing between cables of different categories, the cables must be installed in separate, metallic, conducting ducts. Each duct should only carry cables of the same category. These channels can be arranged directly side by side.
© Copyright by PNO 2009 – all rights reserved 20/99
• Metallic conductive cable ducts should be fastened every 50 cm to the cabinet frame or walls using screws. Make sure that there is low-resistance connection path between the duct and the cabinet frame. When using painted or coated switch cabinets, this can be achieved by using lock washers. Another option is to remove the coating or paint. However, any bare surfaces shall be protected against corrosion.
• At the cabinet entry, connect the shields of all cables run into the cabinet to the equipotential bonding conductor. For this, the shields should be connected to operational ground across an area of appropriate size. Special installation components are available from various vendors for this purpose. The cables should be mechanically supported above the grounding clamp in order to avoid cable damage caused by cable movement.
• Use a suitable cable entry to feed the cable into the cabinet, e.g. screwed cable glands.
• Do not run incoming external cables in parallel with internal PROFINET cables between the cabinet entry and the shield connector. The same applies to cables of the same category!
1.1.4 Cable routing inside buildings
Observe the following when routing cables outside cabinets, but inside buildings: See Table 3 for the minimum spacing between two cables. In general, the risk of disturbances caused by crosstalk decreases when the spacing between the cables increases.
No
OK
© Copyright by PNO 2009 – all rights reserved 22/99
If the cables are laid in metallic cable ducts, the ducts can be placed directly next to each other.
If a common metallic cable duct is used for all categories, observe the clearances specified in Table 3. In case there is insufficient space to do this, different cable categories must be separated by using metallic partitions. These partitions must be electrically connected to the channel over a large area.
Where cables in different categories have to cross, they should always cross at right angles. Try to avoid running cables in different categories in parallel even for short distances.
P R O F I N E T 90°
Connect metallic conductive cable trays or ducts to the equipotential bonding system of the building.
Observe the instructions on equipotential bonding in chapter 2.3 of this document.
1.1.5 Cable routing outside buildings
It is recommended that fiber optic cables are used for PROFINET links outside buildings. Fiber optic cabling has the following advantages over copper cabling:
a) Total immunity to interference pickup. Thus fiber optic cables can be run along side to power cables without problems.
b) Electrical isolation between the two ends. So there is no need for equipotential bonding between the two ends of the cable.
© Copyright by PNO 2009 – all rights reserved 24/99
Only use approved cables for installations outside buildings. This applies in particular to underground cables.
The rules which apply for cable routing inside buildings also apply to disturbance-free routing of PROFINET cables outside buildings. In addition:
• Lay the cables on metallic conductive cable trays.
• Connect the joints of the cable trays using a large conductive area. Make sure that the connection is made of the same material as the cable track (no mix of materials).
• Connect the cable trays to ground.
• Fiber optic (FO) cables are recommended for links between buildings or building parts. No equipotential bonding is required due to the fact that the optic cable is isolating.
• A media converter or switch is required as an interface between fiber optic cables and PROFINET copper cables (e.g. between outdoor and indoor systems).
Plant part 1
Plant part 2
F O
© Copyright by PNO 2009 – all rights reserved 26/99
1.2
Mechanical protection of PROFINET cables
Mechanical protection is intended to prevent wire/fiber breaks or short circuits on PROFINET cables and mechanical damage to the cable sheath/cladding and shield.
Notice:
The methods for mechanical protection described here apply to both electrical and FO cables.
• If the PROFINET cable cannot be laid in a cable tray, use a cable protection tube.
• In areas with heavy mechanical stress, lay the PROFINET cables in metal-armored conduits. In areas with light to medium stress, plastic conduits can be used instead.
• If there are 90° bends or building joints (e.g. expansion joints), the cable protection may have to be interrupted. In such cases, make sure that the minimum bend radius of the PROFINET cable is not exceeded. In addition to that make sure that the cable cannot be damaged, e.g. by falling parts.
© Copyright by PNO 2009 – all rights reserved 28/99
• In areas where people can step or climb, PROFINET cables should be run in metal armored conduits or cable trays.
Notice:
It is recommended to use FO cables for links between buildings to overcome the restrictions resulting from the maximum length of 100 m for PROFINET copper cables and for reasons of potential separation and interference immunity.
1.3
Laying copper PROFINET cables
1.3.1 General
During installation be aware that PROFINET cables only have limited mechanical resilience. Cables can thus be damaged or destroyed by excessive tension or pressure. Twisting or sharp bending (kinking) of the PROFINET cable can also have the same effect. The following notes will help you to avoid damage resulting from the installation of PROFINET cables.
Notice:
Replace all PROFINET cables that may have been damaged or overstrained during installation.
1.3.2 Storage and transportation
• During transportation, storage and installation, PROFINET cables must be sealed at both ends using a shrink-fit cap. This prevents oxidation of individual wires and accumulation of moisture and dirt on the PROFINET cable.
© Copyright by PNO 2009 – all rights reserved 30/99
• Store and transport the cable reel according to the picture (side view), so that the coiled cable does not entangle.
1.3.3 Temperature
limits
The cable manufacturer usually specifies the minimum and maximum ambient temperatures for laying, operation and storage. The mechanical resilience of the cable will significantly decrease outside this temperature range.
• You will find these temperature specifications in the manu-facturer data sheets. Some manufacturers even print the temperature specifications on the cable sheath.
• The typical temperature range for electrical PROFINET cable, that is installed and not subject to any movement, normally lies between –20°C and +70°C. However, some PROFINET cables have a deviating temperature range.
Min. temp. Max. temp.
• As soon as the cable is subject to mechanical stress caused by movement or during installation or when using it in drag chains, the temperature range is reduced significantly. Observe the manufacturers instructions.
1.3.4 Tensile strength
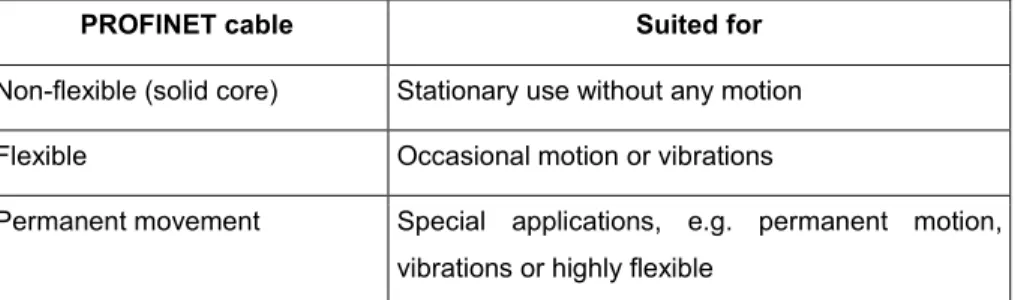
The manufacturer specifies a maximum tensile strength for each cable type. The PROFINET cable can be damaged or even destroyed when this maximum tensile strength is exceeded. This is important because of the high mechanical stress when using drag chains or festoon attachment, or because of the tensile force generated when laying the cable. Please select from the table below the cable type best suited for each application:
PROFINET cable Suited for
Non-flexible (solid core) Stationary use without any motion Flexible Occasional motion or vibrations
Permanent movement Special applications, e.g. permanent motion, vibrations or highly flexible
© Copyright by PNO 2009 – all rights reserved 32/99
• Carefully unreel the PROFINET cable from the drum by hand, only.
• Do not apply force to pull it off.
1.3.5 Using pulling aid and protecting connectors
• Use cable stockings when pulling in PROFINET cables. If the PROFINET cable has already been pre-assembled, protect the connector by using a plastic or metal tube to cover the connector.
1.3.6 Attaching cable strain relief
• For all cables that are subject to tensile stress, attach a strain relief about 30 cm from the connection point. The shield connector at the cabinet entry does not provide sufficient strain relief! As the insulation has been removed in order to allow contact to the cable shield, the cable is sensitive to strain and torsion. Assembly components for strain relief are available from various vendors.
1.3.7 Pressure load
• Do not squash the PROFINET cable, e.g. by walking or driving over it.
• Avoid excessive loading of PROFINET cables through pressure, e.g. caused by squashing due to improper attachment.
Device
© Copyright by PNO 2009 – all rights reserved 34/99
1.3.8 Distortion
• Distortion, and in particular, twisting can degrade the electrical properties of PROFINET cables. Therefore, do not distort or twist PROFINET cables whilst unreeling or laying. Special distortion-resistant PROFINET cables can be obtained from some manufacturers.
1.3.9 Flexible PROFINET cables (distortion cables)
• For PROFINET cables subject to frequent distortion, use flexible, distortion-resistant PROFINET cables. Robots are a typical application.
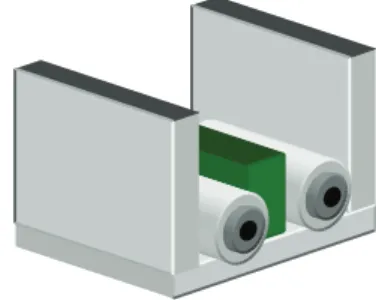
1.3.10 Trailing and festoon cables
• Use only those cables and attachments as trailing and festoon cables that have been approved for this application by the manu-facturer. Appropriate components are available from various vendors.
• Make sure that trailing and festoon cables are not damaged or squashed by other components or cables when in motion.
• Make sure that the cables in drag chains are not crossed (use appropriate cutoff bridges). Otherwise the cables may be excessively stretched.
• Ensure that PROFINET cables are laid without distortion or twisting since this can cause damage or change the electrical properties of the cable.
Please note that the PROFINET cable shall be capable for the type of usage. For example trailing cables are often not capable for usage as trailing cable.
© Copyright by PNO 2009 – all rights reserved 36/99
1.3.11 Keeping to bending radii
• Keep to the minimum permissible bending radii. Falling below the minimum bending radius may damage the PROFINET cable. Please consult the manufacturer data sheets for bending radii specifications.
• For a single bend, the bending radius should typically not be smaller than 10 times the cable diameter. If multiple bending (>10 x) is expected, e.g. due to the connection and disconnection of PROFINET nodes, a larger bending radius is required (typically 20 times the cable diameter).
• When laying PROFINET cables they can be subjected to additional mechanical load caused by excessive tension. For that reason, larger bending radii are required during pulling than in the installed state. Pulling the PROFINET cable over a quoin can be particularly dangerous. It is therefore advisable to use guide pulleys.
Keep to minimum bending radius!
• Use whenever possible ducts or cable channels with radii or chamfers That helps to prevent a kink of the cables.
1.3.12 Avoiding loop formation
• Always unreel the PROFINET cable straight from the drum. Never unwind the cable without rotating the drum, since that can cause looping or kinking of the cable.
• The cable drum should always be mounted so as to rotate as the cable is pulled from the drum. This helps to avoid the formation of loops and associated cable kinks.
• In the case where a loop has been formed, The loop shall be carefully unwound to avoid twisting or distortion. Never simply pull or stretch the cable straight, since this can damage the PROFINET cable and/or change its electrical properties.
© Copyright by PNO 2009 – all rights reserved 38/99
1.3.13 Avoiding sharp edges
• Sharp edges may damage the PROFINET cable. You should therefore de-burr sharp edges – e.g. the cutting edges of cable ducts – using a de-burring tool or file.
• Use plastic edge protectors to protect edges and angles.
• Use bends limiting parts in the direction of cable routing at the end of the duct or cable channel. That helps to prevent a kink of the cables.
1.3.14 Adding supplementary cables
When laying additional cables, make sure that existing PROFINET cables and other system cables are not overstrained or damaged. This may happen e.g. in case the PROFINET cables are laid together with other cables on a joint cable tray (as long as permitted by electric safety). Take special care when installing new cables (for repair or upgrades). It is particularly critical to run several cables in one protection tube. This may cause damage to those cables already laid in the tube.
Lay the PROFINET cable lastly when running it with other cables in the same cable duct.
1.4 PROFINET
copper
cable
The connection between two PROFINET nodes is callled PROFINET channel. In most cases PROFINET channels consist of PROFINET copper cables. The maximum length of a copper cable PROFINET channel is 100 m.
1.5
Fiber optic (FO) cables
Because fiber optic cables do not carry electrical currents or voltages they are totally immune to electromagnetic interference. Therefore the routing of fiber optic cables is less critical than for copper cables. However, mechanical protection must be provided for fiber optic cables. In addition minimum bend radius and tensile strength of the cable must be observed.
Depending on the distance FO cables with different types of fiber are available. The different types of fiber allow different maximum distances to be covered. Table 5: Maximum FO cable lengths shows the maximum cable lengths for the common types of fiber used. A fiber optic cable requires a connector at each end. However, sometimes additional connectors can be used in a single run of fiber. These additional connectors introduce additional attenuation of the signal and so can reduce the allowable cable length. Table 1: Symbols indicating important text shows the effect of additional connectors on the maximum cable length.
Fiber No additional connectors One additional connector Two additional connectors
Plastic Optical Fiber (POF) 50 m 43.5 m 37 m Plastic Cladded Fiber (PCF) 100 m 100 m 100 m Multimode fiber 2000 m 2000 m 2000 m Monomode fiber 14000 m 14000 m 14000 m
© Copyright by PNO 2009 – all rights reserved 40/99
1.5.1 Laying fiber optic PROFINET cables
When exceeding the tensile strength, the fibers may be overstreched, may cause higher attenuation, may reduce the lifespan or/and may be permanently damaged. This will cause sporadic or continuous data communication errors. A failure may occur some time later, e.g. several years later, after the installation. Special attention needs to be paid to adhere to the minimum bending radii of the cables. The minimum bending radius of a PROFINET cable is usually 15 times the diameter of the cable. Please observer the data sheets of the manufacturers.
1.5.2 Protecting
connectors against contamination
• Connectors of fiber optic cables are sensitive to contamination.
• Attach the provided dust protection caps to protect unused connectors and jacks.
• Clean the end face of the connector prior to connecting it to a device. Use a lint-free tissue soaked with isopropyl alcohol. Lay the tissue on an even and not too hard surface. In oder do clean the connector move it in one direction over the tissue. Repeat the procedure if necessary at a different spot on the tissue. Inspect the end face with a microscope to ensure the cleaning was effective.
1.5.3 Electromagnetic interference (EMI)
Fiber optic cables are immune to EMI! It is therefore no problem to jointly lay fiber optic cables and copper cables. However take care when re-pulling or replacing fiber optic cables. Do not exceed the maximum tensile load.
When using FO cables with steel reinforcement, the reinforcement shall be connected to the equipotential grounding conductor in order to avoid interference.
1.5.4 Underground
cables
/ Connecting building
Cables to be laid in the ground must be of particularly rugged design. When laying cables directly in the ground, exclusively use cables explicitly approved by the manufacturer for this application.
Observe the following for direct ground installation:
• Install the cable in a trench approx. 80 cm below ground level. Observe the applicable local specifications.
• Protect the cable against mechanical damage, e.g. using a plastic tube. Place cable warning tape on top.
Caution cable 80 cm
© Copyright by PNO 2009 – all rights reserved 42/99
• If copper PROFINET cables are laid in the same trench as other categories of cable, observe the clearances as per Table 3. You can, for example, use bricks as spacers. Because fiber optic cables are immune to interference pickup, these can be laid next to other categories of cable without problems.
Watch out for hints to other cables or devices (e.g. cable warning tape) when digging a trench. Damage to other cables or devices (e.g. power cables, gas pipes) may not only result in material damage, but also endangers persons’ life and health.
Figure 2: Laying cables outside buildings
Caution – Cable
Switch / Media converter
PROFINET cable Plastic pipe
© Copyright by PNO 2009 – all rights reserved 44/99
2.1
PROFINET copper cable assembly work
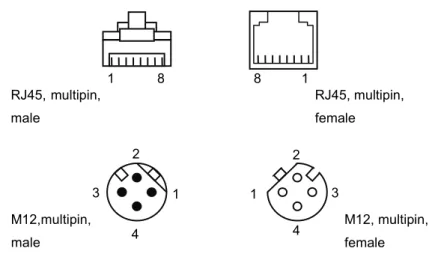
There are several types of connectors to connect PROFINET copper cables to a PROFINET node: The 8-pin RJ45 and the M12 connector.
.
For an IP20 environment in a cabinet the RJ45 connector is used. In case of increased requirements with respect to the ingress protection (IP65/67) the RJ45-connector with a push pull housing or an M12 RJ45-connector (D-coding) is used.
Figure 3: Pin-assignment of RJ45 and M12 connectors
1 1 2 2 3 3 4 4 M12,multipin, male M12, multipin, female RJ45, multipin, male 1 8 8 1 RJ45, multipin, female
Hint: The connector type is determined by the interface of the PROFINET node. Select a suitable PROFINET connector type which fits the connector at the device and fulfills your requirements with respect to assembly.
For all connectors the way how the cable is connected to the connector differ from manufacturer to manufacturer. Therefore it is not possible to generally describe the assembly of the connectors.
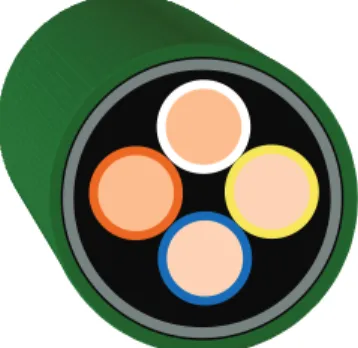
The PROFINET cable considered here is a 4-wire round cable. The wires are arranged to form a so-called star-quad. Table 6 shows the color codes of the wire pairs.
Pair 1 (Transmitted Data) 2 (Received Data) Wire A Yellow (TD+) White (RD+) Wire B Orange (TD-) Blue (RD-)
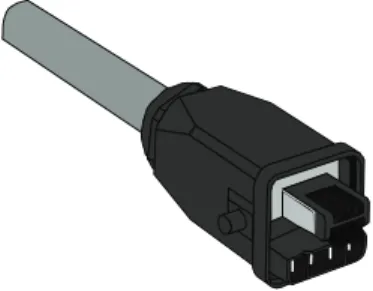
Figure 4: Connectors - Overview
Table 6: Marking of wire pairs
RJ45 (IP20) Push Pull RJ45 (IP65/67) M12 (IP65/67
© Copyright by PNO 2009 – all rights reserved 46/99
Note that the two opposite wires in the cable create a pair that is used together, to reduce susceptibility to electromagnetic interference. I.e. always use Yellow and Orange together as a pair and White and Blue together as a pair.
All wire pairs are enclosed by a plastic-covered aluminum foil and a braid consisting of tinned copper wires. The exact structure may vary depending on the manufacturer. Please observe the manufacturer's specifications.
Use only PROFINET cables and connectors that are provided with a PROFINET manufacturer's declaration.
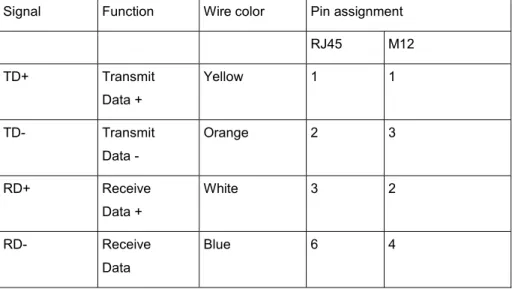
Signal Function Wire color Pin assignment RJ45 M12 TD+ Transmit Data + Yellow 1 1 TD- Transmit Data - Orange 2 3 RD+ Receive Data + White 3 2 RD- Receive Data Blue 6 4
Note that to ensure that the screen is effective at high frequencies, the cable screen must always be connected to the local earth at each device. This is normally done through the connector. In addition to that the device should also be locally earthed.
2.1.1 General assembling information
When using connectors with insulation displacement technology observe the following instruction: In case connectors are removed and mounted again, the end of the cable shall be cut off and stripped off again. Otherwise there is a danger that contact might not be fully established.
© Copyright by PNO 2009 – all rights reserved 48/99
PROFINET Insulation displacement technology usually consists of a compatible system of connectors, cable and stripping tool. You shall only use components that are part of the manufacturer's system in order to avoid problems.
The stripping tools for different cable types are in some cases identical in appearance. However, there are often differences in the knife cartridge that is installed in the stripping tool. The knife cartridge must be suited to the PROFINET cable/connector that is being used. Using the incorrect cartridge can result in defective connection of the data wires or screen.
Make sure that the shield is properly connected when mounting the connector. Shield and signal wires shall not have any connection to each other
Please close the connector carefully.Otherwise the wires can be damaged and short circuits can occur.
Make sure to use only those PROFINET cables that have been approved by the connector manufacturer for use with the relevant connector. This applies in particular to the use of insulation displacement technology. For IP65 applications make sure that the cable diameter matches the connector housing. This is mandatory to ensure correct sealing between connector and cable.
2.1.2 RJ45 insulation displacement technology
Read the instructions from the connector manufacturer. The instructions provide valuable information on the connector design which can vary from one manufacturer to another.
Manuf. instructions
PROFINET Insulation displacement technology usually consists of a compatible system of connectors, cable and stripping tool. You shall only use components that are part of the manufacturer's system in order to avoid problems.
This type of connector is available from different manufacturers in various styles. The next section shows as an example the principal steps to assemble such a kind of connector. The exact Dprocedure might differ from vendor to vendor. Please observe the manufacturer's instuctions.
• Open the connector
• Strip off the cable by using a stripp off tool. This tool is sold suiting to the diameter of the cable. Make sure that you adhere to the given lengths for the shield and the wires. When using the genuine stripping tool for PROFINET cable, this is automatically the case.
• Insert the wires into the tansparent retainer. Match the color of the wire to the color code of the retainer
© Copyright by PNO 2009 – all rights reserved 50/99
• Push down the retainer.
• Close the housing. Ensure proper contact between the cable shield and the connector housing.
• Lock the housing
For insulation displacement technology there are appropriate stripping tools for each manufacturer's system. These tools not only strip the insulation, but also prepare the cable shield ready for good connection. They considerably facilitate the assembly of connectors and reduce the assembly time.
2.1.3 M12 connector assembly
The 4-pin M 12 connector is also an important type of connector for PROFINET. It is frequently used in rugged industrial environments outside the switching cabinet. The connection technology varies depending on the manufacturer. The next section will focus on field assembly connectors for PROFINET. The following connection technologies are available for field-assembly PROFINET cables:
• Screwed clamp technology
• Insulation displacement technology
2.1.4 M12 screwing clamp technology
Manufacturer instructions:
Read the instructions from the connector manufacturer. The instructions provide valuable information of the connector design. The following description reflects the basic procedure, but by no means does it replace the manufacturer's instructions.
Notice:
M12 connectors usually consist of several parts. The IP protection type may vary depending on the connector type. After opening the package, check whether all parts are included.
The general steps are: Manuf.
© Copyright by PNO 2009 – all rights reserved 52/99
• Open the connector.
• Slide the cap, seal and other required housing parts onto the PROFINET cable.
• Strip the PROFINET cable sheath, ensuring that the stripped cable and shield dimensions fit the connector being used (see the manufacturer’s specifications).
• Strip the cable and the individual cores to fit the connector.
• Insert the stripped wires into the opened contact clamps. Make sure to correctly assign the wire color codes to the clamps.
• Tighten the contact clamps using a screw driver (observe torque).
• Connect the shield. For this, you usually fold back the cable braid over a metal sleeve. Insert a gasket into the sleeve in order to seal the connector. Make sure that the shield wires to not touch the gasked. Ensure there is no short-circuit between the shield and the data wires.
• Close and tighten the connector, making sure that the wires inside the connector are not twisted as the screwed housing is assembled
Observe torque!
© Copyright by PNO 2009 – all rights reserved 54/99
2.1.5 M12 insulation displacement technology
Manufacturer instructions:
Read the connector manufacturer’s instructions. These instructions provide valuable information on the connector design. The following description reflects the basic procedure, but by no means does it replace the manufacturer's instructions.
The main advantage of insulation displacement technology is quicker and simpler assembly procedure.
The general steps are:
• Open the connector. Manuf.
• Slide the cap, seal and other required housing parts like seals or contact springs onto the PROFINET cable.
• Strip the PROFINET cable sheath, ensuring that the stripped cable and shield dimensions fit the connector being used (see the manufacturer’s specifications). Do not strip the insulation of thei individual wires.
• Connect the cable shield. Ensure there is no short-circuit between the shield and the data wires.
• Insert the wires in the open contact clamps. Make sure that the color of the wires fits the color coding of the contact clamps
© Copyright by PNO 2009 – all rights reserved 56/99
• Push the two parts of the connector together
• Ensure that the cable strain relief and cable seal are correctly fitted.
• Close and tighten the connector, making sure that the wires inside the connector are not twisted as the screwed housing is assembled.
For insulation displacement technology there are appropriate stripping tools for each manufacturer's system. These tools not only strip off the insulation, but also expose the shield. They considerably facilitate the assembly and reduce the assembly time.
Notice:
The stripping tools for different cable types are in some cases identical in appearance. However, there are often differences in the knife cartridge that is installed in the stripping tool. The knife cartridge must be suited to the PROFINET cable/connector that is being used. Using the incorrect cartridge can result in defective connection of the data wires or screen.
2.1.6 Hybrid
connectors
Hybrid connectors use the same connector for the power supply of the PROFINET nodes and for the connection of the PROFINET cable. This reduces the installation work. Installation can be simplified significantly by using ready-made cables that are available from the cable manufacturers in various lengths. Where connectors have to be assembled on site due to deviating cable lengths or repair work, the manufacturer’s instructions shall be observed. The contacts of hybrid connectors are usually crimped. Crimping tools are provided by the connector manufacturers. Use only crimping tools specified by the manufacturer of the connector. Correctly crimped connections are mandatory for a permanent, high-quality connection.
© Copyright by PNO 2009 – all rights reserved 58/99
2.2
Fiber optic cable assembly work
Manufacturer instructions:
The specifications of the FO cable components can be found in the data sheets. Always observe this information.
The assembly of ready-made fiber optic cables depends on the fiber and connector types. In general, assembly requires a higher precision and higher tool cost with decreasing diameter of the fiber core.
2.2.1 Fiber optic harnesses handling precautions
The following sections describe the generic procedures for harness and installation of fiber optic cables.
2.2.2 Protecting
connectors
against contamination and
damage
• Connectors of fiber optic cables are sensitive to contamination.
• Attach the provided dust protection caps to protect unused connectors and jacks.
• Do not remove protective cap until ready to mate.
• If cap is displaced, inspect and recap the connector end. Manuf.
CAUTION
Even though the optical connector is protected by dust caps, the connector can be soiled.
A soiled optical surface of a connector can reduce the reliability and the quality of the signal transmission. Clean the optical surface ot the connecotre prior to connecting it to a PROFINET device.
The process of inspecting and cleaning the face ferrules depend on the kind of fibers used: multimode, single-mode, PCF or POF. The following instructions are general.
© Copyright by PNO 2009 – all rights reserved 60/99
2.2.3 Optical face inspection
Manufacturer instructions:
Refer to the manufacturer’s optical inspection instructions. The following steps can be used as a guideline:
Make sure that the fiber link to be examined is not actively transmitting. This is accomplished by physically detaching the connectors from the transmitter or turning off the power of all interface equipment. Protect equipment against re-connection or power on during inspection.
Serious eye injury can occur during the inspection of a connector if an active transmitter is connected to the fiber Always verify that the connector under inspection is not attached to a transmitting source.
Notice that the wavelengths 850nm and 1300nm, used for the optical transmission, are not visible for the human eye!
Manuf. instructions
Use a fiber optic video probe or a hand held fiber microscope to inspect the optical face for contamination, chips, pits, scratches in the core and in the cladding.
If dirt, debris or other surface contamination is identified then proceed to the following paragraph for cleaning procedures. The following figures show the basic aspect defaults.
2.2.4 Optical
face
cleaning
Manufacturer instructions:
Refer to the manufacturer’s cleaning instructions. The following steps can be used as a guideline:
Figure 7: Quality of optical surface
Good Debris Î Bad Pits ÎBad Scratches Î Bad Manuf. instructions
© Copyright by PNO 2009 – all rights reserved 62/99
The next steps describe the generic steps for optical face cleaning of connectors
• Use a lint free wipe moistened with isopropyl alcohol or optical quality cleaning fluid to clean the end faces. Rub lightly the ferule on the wipe. Always wipe in one direction not back and forth.
• Re-inspect the end faces with a fiber optic video probe or a hand held fiber optic microscope and verify that the contamination has been removed. Refer to the former paragraph about inspection.
• If the contamination is still present, after repeated attempts to clean the ferrules have failed, the contacts must re-polished or replaced. Polishing is a delicate step. It must be made by qualified persons. Contact the connector manufacturer.
2.2.5 Fiber optic cable
Glass or plastic fiber optic cables have a number of outstanding properties:
• Total immunity to electromagnetic interference.
• Total electrical isolation of connected devices.
• Largely tap-proof.
• Extremely low attenuation when using glass fibers, therefore longer transmission distances.
Due to these properties, they are particularly well suited for:
• Cabling outside of buildings
• Long distances
• Environments subject to heavy electromagnetic interference The following categories exist
• Glass fiber optic cables: single mode (SM) and multi mode (MM)
• Plastic Cladded Fiber (PCF))
The following commercial cable types are used for industrial applications (Table 8 and Table 9):
Plastic Optical Fibre (POF) or Plastic Cladded Fiber (PCF)
Installation type stationary or flexible highly flexible Cable marking type B + fiber type type B + fiber type Sheath color green application-specific Wire color orange + black orange + black Maximum attenuation at
650 nm
Plastic Optical Fiber (POF)
Plastic Cladded Fiber (PCF)
160 dB/km 10 dB/km
10 dB/km
Single Mode(SM) or Multi Mode(MM)
Installation type stationary or flexible highly flexible Cable marking type B + fiber type type B + fiber type Sheath color green application-specific Wire color orange + black orange + black Maximum attenuation at 1300 nm (IEC 60793-1-40/41) MM: 1.5 dB/km SM: 0,6 dB/km Manufacturer instructions:
The selection of a suitable connector (SC-RJ or SC-RJ-Push-Pull or M12 Hybrid Connector) depends on the device to be connected, on the
Table 8: Plastic fiber optic cable
Table 9: Glass fiber optic cable
Manuf. instructions
© Copyright by PNO 2009 – all rights reserved 64/99
For multimode fibers the types 50/125µm and 62,5/125 µm are commonly used. Please observe: When connecting a transmission line from different section, that only section of the same type are put together. Otherwise you will experience additional connection loss at the joints due to the different diameter of the core of the fiber.
2.2.6 Assembly and safety instructions
• The assembly of the thin glass fibers requires a high degree of precision that can only be obtained using special tools and training.
• When glass FO cables are used only occasionally, it is normally more cost effective to use ready-made cables. These are available from the cable manufacturers in various lengths.
• When using glass FO cables more frequently, connector manufacturers can often advise on tools and training for their connectors.
Do not leave the waste of glass fiber assembly scattered around. The thin wires of the fiber optic cable may cause injuries. Dispose of all glass fiber waste safely.
Insert the connector into the PROFINET device only after having completed the cable assembly. An unfinished connector assembly can damage the optical interface of any device to which it is connected.
Before mating an optical connector examine the optical contact end face with the appropriate tool: the surface must be clean. This means no scratches, pits or debris. Such defects could damage the PROFINET device interface and/or degrade the communications. Special tools are required for the assembly of glass FO cables. These tools are always optimized for a specific connector type and can only be used with this type. Suitable tools, so-called “assembly packages“, are offered by the connector manufacturers. Training is also required.
2.2.7 SC-RJ connector
For PROFINET fiber optic networks (glass and plastic), SC-RJ type connectors are commonly used. The SC-RJ connector is a duplex connectore. The two elements of the connector for receiving and transmitting data are hold in place by a frame and are connected and disconnected always as a unit. The base version of this connector is specified for use in cabinets or electronic rooms (protection class IP 20). For harsh environmental conditions or applications requiring IP65/68 protection, the SC-RJ Push/Pull variant can be used.
The manufacturer’s instructions shall always be read and followed. By carefully observing the manufacturers instructions and by using the specified tools you will be able to produce optical connections with high quality.
The following example shows the typical steps to assemble a connector for a plastic optical fiber. For an optical fiber made of glass, a cleave tool to cut (break) off the fiber is needed.
Figure 8: SC-RJ and SC-RJ push-pull connectors
Manuf. instructions
© Copyright by PNO 2009 – all rights reserved 66/99
• Strip the FO cable sheath.
• Separate the two wires of the twin wire fiber optic cable with a sharp knife (do not pull apart, since this can break the fibers).
• Strip the fiber optic cable (observe the correct stripping diameter).
• Push the connector components onto the optical fiber. The fiber sticks out of the ferrule.
• Insert the fiber by screwing or crimping into the connector housing. (Use crimp tool specified by the manufacturer of the connectore)
• Cut off the fiber, sticking out of the ferrule. In case of a glass fiber, use special cleave tool.
• Polish optical fiber cable in minimal two steps (rough and then fine polish) according the termination instruction. Use a polishing holder to align the connector to the polishing pad and polish it with movements in a shape 8.
• Remove all traces of abrasive material.
• Check the quality of the optical surface with a portable Inspection microscope. Make sure that the surface is free of dirt, debris or damage.
• Check the correct mounting of the connector by measuring the attenuation of the cable with the assembled connectors. (Se
© Copyright by PNO 2009 – all rights reserved 68/99
Guideline for further details
• Protect the assembled connector by attaching dust caps
• Mate the two parts of the SC-RJ connector into the frame to create the duplex connector. Observe the manufacturers instruction how to place the transmitting and the receiving part of the connector into the frame. As a support the PROFINET FO cable has indicators printed on the cable, that show the transmission direction.
2.2.8 M12-Fiber Hybrid connector
The M12 Fiber Hybrid connector provides two optical connections (for data) and two optional electrical connections (for device power supply, AWG 20). M12 Fiber Optic Connectors are available for Multimode, Single-mode, POF and PCF fibers.
The manufacturer’s instructions shall always be read and followed. By carefully observing the manufacturers instructions and by using the specified tools you will be able to produce optical connections with high quality.
The following example shows the typical steps to assemble a Hybrid connector. For an optical fiber made of glass, a cleave tool to cut (break) off the fiber is needed.
Cable preparation
• Slide the cap, seal and other required housing elements onto the cable.
Figure 9: M12 Hybrid connectorM12 Hybrid Connector
Manuf. instructions
© Copyright by PNO 2009 – all rights reserved 70/99
• Strip the external jacket and the 2.4mm fiber jacket. Strip of the insulation of the fibers according to the instructions of the manufacturer
Gluing
• Insert the glue inside the contact using a syringe.
• Insert the fiber into the contact and protect the exceed fiber with a cap.
• - Polymerize (cure) the glue.
Ã
NOTE: For POF, if you wish a quick installation and if the optical budget can accept higher insertion loss, the gluing and polishing step can be replaced by a cutting step.
Mounting
• Score the exceed fiber.
• Insert the contacts into the plugs ensuring that the fibers are crossed over between the two connectors
Note: The crossover requires that a fiber pair shall be crossed over in the cable. The crossover ensures that the transmitter at one end of the cable is connected to the receiver at the other end. A fool proofing (keying) system within the plug and socket ensure the crossover is maintained when connection is made. As additional support the wires of the PROFINET cable carry indicators that indicate the direction of the data flow
• Screw the housing elements to close and seal the connector.
Polishing
• Place the ferrule and plug in the polishing tool.
• Polish by pressing the plug and moving the tool onto polishing paper in 2 steps: coarse and fine polishing.
• An automated polishing process can be used for volume production.
End face inspection
• Inspect the end face with an inspection microscope to be sure that no dirt, no debris or other surface contaminations are present and that the surface is free of scraces.
© Copyright by PNO 2009 – all rights reserved 72/99
Optical measurement
• Measure the attenuation of cable and connectors to ensure that al mountingsteps have been made correctly. (Se PROFINET Commissioning Guideline )
2.2.9 Other FO connectors
For fiber optic connection in existing plants in many cases a connector BFOC/2,5 is still in use. The connector is also know under the trade mark "ST®-Connector". This connector has been in use as industrial grade connector for many years and is available for all PROFINET fiber types (plastic as well as glass)
The ST connector is a single wire connector with bayonet latch. As both fibers of a connection are connected individually, special attention has to be taken for the correct assignment of sending and receiving fiber.
The mounting of the connector is comparable to the mounting of the SC-RJ connector.
2.3
Grounding and equipotential bonding
Good grounding and equipotential bonding are vital to the resistance of PROFINET networks to electromagnetic interference. Grounding of the PROFINET cable screen shall be done at both ends of every cable (i.e. at each device) to reduce the impact of electromagnetic interference. Equipotential bonding ensures that the ground potential is identical throughout the entire PROFINET network, so providing protection against equipotential bonding currents which could otherwise flow through the PROFINET cable shield. Basic information on the installation of grounding and equipotential bonding is given below:
Manufacturer instructions:
Read and observe the manufacturer’s instructions. These instructions provide important information on how to best connect the PROFINET node to ground and to the equipotential bonding conductor.
2.3.1 Protective
ground
Protective ground is principally provided to protect people against electrocution in the case of a fault. The protective ground also protects devices, machines and plant equipment against more serious damage in the case of faults. The frame, case or cabinet of electrical equipment shall be connected to protective ground via ground wire that can carry the full fault current.
Protective ground is illustrated by the following symbol: Manuf.
© Copyright by PNO 2009 – all rights reserved 74/99
As protective ground is part of the general electrical system, it is not described in more detail in this document. Always observe the applicable standards and regulations!
Notice:
Some PROFINET nodes are equipped with a protective ground connector. These are mainly PROFINET nodes with an additional, higher-voltage power supply. Establish a protective ground connection in compliance with the applicable regulations for these devices.
2.3.2 Functional
ground
Functional ground is used to divert electromagnetic interference voltages to ground. This improves the interference resistance of data transmission. The functional ground is used to earth the screen of the cable and device case so diverting any interference pickup to ground.
Manufacturer instructions:
The manufacturer’s documentation will generally provide important information on how to best connect the PROFINET node to ground and to the equipotential bonding conductor.
Some PROFINET nodes are equipped with a functional ground connector terminal. This terminal is marked with the symbol for functional ground. Connect the functional ground terminal of the PROFINET node to the functional ground connector of the system using a large cross-section cable which is as short as possible. In many cases, the entire metal construction of the system is used as functional ground. Other devices use the installation mounting as functional ground. You shall therefore connect the DIN rails of the system to functional ground.
Manuf. instructions
For grounding the PROFINET nodes, use a copper cable with appropriate cross-section (at least 2.5 mm²). Grounding cables usually have a green-yellow insulation. The green-yellow marking is mandatory in some countries (green only in the USA). Functional ground is represented using the following symbol:
2.3.3 Equipotential
bonding
Equipotential bonding is intended to provide identical grounding potential throughout the entire system. Therefore no equalizing currents will flow through the PROFINET cable shield. Use a copper cable or a tinned grounding rod as the equipotential bonding conductor for equipotential bonding in the system and between the system components.
• Connect the equipotential bonding conductor to the grounding clamp or bar across a sufficiently sized surface.
Functional ground symbol
© Copyright by PNO 2009 – all rights reserved 76/99
• Interconnect all shields and ground connectors (if any). As the name suggests, equipotential bonding ensures that the potential is equal in all plant parts. This avoids equipotential bonding currents across the PROFINET cable shields.
• Connect the mounting area (for example top-hat rails) with the equipotential bonding conductor.
• Connect the plant equipotential bonding system with the building's equipotential bonding system as many times as possible.
• If components are coated, remove the coating from the contact areas before establishing the connection.
• After installation, any exposed contact areas shall be protected against corrosion, for example by applying a zinc-based, paint or varnish coating.
Plant Equipotential bonding Functional ground PROFINET Plant
• All equipotential bonding connections shall be protected against corrosion. This protection can be achieved using special anti-corrosive compounds or by varnishing or painting the contact areas after assembly.
• Use self-locking screw or clamp connections. Make sure that the connection will not disengage inadvertently.
• Use crimped wire end sleeves or cable lugs for flexible equipotential bonding cables. Do not tin the cable ends (this is no longer permissible).
• Install the equipotential bonding as close as possible to the PROFINET cable.
• Interconnect the individual parts of all metal cable trays. Use special connecting elements that are available from the manufacturer for this purpose. Make sure that the connecting elements are of the same material as the trays.
PROFINET
© Copyright by PNO 2009 – all rights reserved 78/99
• Connect the metal cable trays to the equipotential bonding system as often as possible.
• Use flexible grounding straps at expansion joints or articulated joints. Grounding straps are normally available from the cable manufacturers.
• When fiber optic cables are used for interconnections between buildings or parts of buildings. No equipotential bonding is required due to the immunity of fiber optic cables to electromagnetic interference, as long as the cable is free of metal.
2.3.4 Connecting cable shields to the equipotential
bonding conductor
The shield is an important part of the PROFINET copper cable. It shields the data wires in the cable against electromagnetic interference coming from the environment. To make sure that the shield can properly provide this function, it must be connected to the plant’s equipotential bonding system. The general principles of connecting the PROFINET copper cable shield to the equipotential bonding system follow:
Equipotential bonding system
2.3.5 At the PROFINET node
• Equipotential bonding is realized via the relevant connectors as well as by connecting the cable to the equipotential bonding bar.
2.3.6 At the cabinet entry
• At the cabinet entry, connect the PROFINET cable shield to the equipotential bonding conductor across a large area and as close as possible to the point of entry. This prevents interference acting on the PROFINET cable outside the cabinet from being conducted into the cabinet.
• Install an equipotential bonding bar behind the strain relief at the cabinet entry.
• Chapter 2.3.7. shows how to connect the shield to the equipotential bonding bar.
© Copyright by PNO 2009 – all rights reserved 80/99
2.3.7 Establishing a connection between the cable
shield and the equipotential bonding bar
There are several ways for connecting the cable shield and the equipotential bonding conductor over a large area. The figure below illustrates three connection options. These approaches have proven to be successful in daily operation.
Make sure that the PROFINET cable is not squashed by the connection between the shield and the equipotential bonding bar. Use a shield clamp that is appropriate for the cable diameter. Any distortion can deteriorate the electrical properties of the PROFINET cable.
Observe the following when establishing the shield connection:
• Remove the PROFINET cable sheath only for the required connection length. The PROFINET cable is susceptible to mechanical damage in the area where the sheath has been removed.
• Be careful not damage the shield when stripping off the PROFINET cable sheath.
OK
© Copyright by PNO 2009 – all rights reserved 82/99
• Do not use the shield connection as a strain relief. This would impair the contact between the shield and the equipotential bonding bar. Exception: installation elements specifically designed for this application.
• Secure the PROFINET cable before and after the position of shield application. The PROFINET cable which is sensitive in this region can thus be protected against buckling and bending. Pay particular attention to strain relied when the cable is subjected to movement, .
• Use only connection elements that are appropriate for the diameter of the stripped cable.
• Do not attach the equipotential bonding bar to coated surfaces. Galvanized or chromed surfaces, for example, are well suited.
• Use tinned, galvanized or otherwise galvanically treated installation material. This is protected against corrosion and establishes permanent, good contact.
No strain relief!
• Establish the connection between the shield and the equipotential bonding bar only via the braided shield. PROFINET cables are also equipped with an additional foil screen. This must not be used for connection. For improved stability, it is usually plastic-coated on one side. This plastic coating has an insulating effect.
No OK
© Copyright by PNO 2009 – all rights reserved 84/99
© Copyright by PNO 2009 – all rights reserved 86/99
3.1.1 Electrostatic discharge (ESD)
Electronic components are however extremely sensitive to high voltages. In the case where the electrostatic discharge passes to an electronic component or circuit, the component may be destroyed. PROFINET nodes include sensitive electronic circuitry which can be damaged by electrostatic discharge. Therefore, when handling PROFINET components, you shall observe the following precautions in order to protect them from being damaged.
• Touch a grounded metal part before handling any PROFINET components or devices. This w