Chapter 8
Forms and Form Processing
When users surf the Web, information flows from servers to browsers. But, the Web is not a one-way street. Information can also be collected from end-users by browsers and sent to servers, or client-side scripts (Chapter 9), for processing. The Web would be much less useful without the ability to request and process user input. In fact, e-business and e-commerce are dependent on the interactive exchange of information between users and servers.
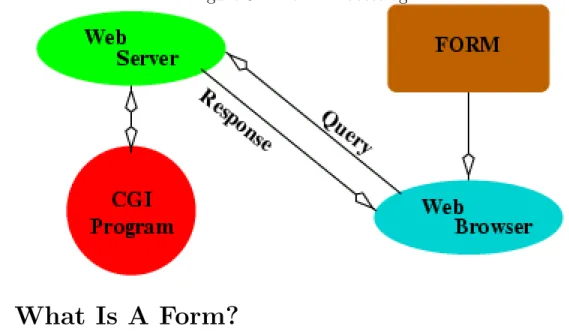
To make the cycle of user input collection, server-side processing, and response work, client-side (browser) support, HTTP support, and server-side support are needed. The HTML form enables browsers to collect information from users and to send the data obtained to a designated server via an HTTP POST or GET query. The receiving server invokes specified programming, commonly a CGI program, to process the data and to provide a response (Figure 8.1).
This chapter gives you a clear understanding of HTML form processing, enables you to design forms, and introduces server-side programming to support HTTP queries from HTML forms and from URLs. Examples are given to illustrate how forms work in practice.
The introduction gives you an overview and a good foundation for further materials on Perl and CGI programming in Chapter 13.
Figure 8.1: Form Processing
8.1
What Is A Form?
The form element of HTML is designed to collect input from Web surfers for processing on the server side. You place different types of input control1
elements inside a form to receive user input for server-side processing. The form element may contain any kind of block elements so you can include instructions, explanations, and illustrations together with input controls.
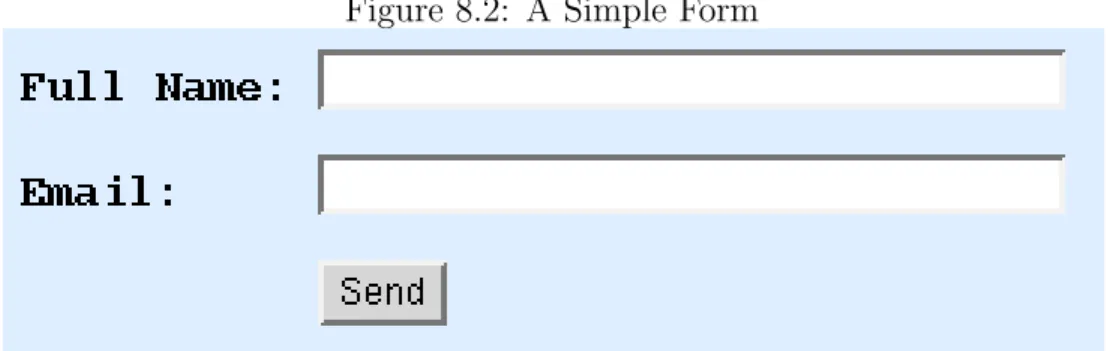
For example (Ex: SimpleForm), the following sample form
<form method="post" (1) action="/cgi-bin/member.cgi"> (2) <pre>
Full Name: <input name="fname" size="35" /> (3)
Email: <input name="email" size="35" /> (4)
<input type="submit" value="Send" /> (5) </pre>
</form>
requests the full name (line3) and email address (line4) from the user and sends the collected 1
Input controls used to be limited to within forms and were known as form controls. We will use the terminput control.
8.2. A HISTORICAL NOTE 353
Figure 8.2: A Simple Form
information via an HTTP POST query (line 1) to the program member.cgi (line 2) on the server side. XHTML requires method to be either post or get, in lower case. This form involves three input controls (lines 3, 4, and 5). The form data is sent when the user clicks the submit button (line 5). Figure 8.2 shows the display of such a form.
8.2
A Historical Note
The “form” concept was completely missing from HTML 2.0 (1995), the first standard for HTML. At that time, the Web was mostly a one-way street for information dissemination– URLs lead to pages and hyperlinks in those pages lead to more pages.
To remedy the situation and to collect user input, theISINDEXtag was introduced which was a kind of primitive form mechanism. ISINDEX displays a user prompt and collects any string typed. That input string is attached to the end of the host page’s URL and sent via an HTTP GET query.
The HTML 3.2 standard (1977) includes both theISINDEXelement and the fill-out form (FORM) element. Also introduced are various user input collection elements designed to work within a FORM. A FORM can be submitted to any URL-designated server-side program via either the GET or the POST query. The method (application/x-www-form-urlencoded) to encode user input for transmission within an HTTP query is also defined. Furthermore, HTML 3.2 introduced a method for users to upload files based on the FORM.
element.
8.3
Form Basics
The HTML fill-out form involves three phases: collecting user input, sending HTTP queries, and server-side processing. Let’s first take a closer look at collecting user input with the HTML formelement and the various innpt elements available.
A typical form element consists of these essential parts:
1. Instructions for the end-user on what information is sought and how to fill out the form.
2. Blanks, produced by input collection elements, to be completed by the user.
3. Text or label for each input control to clearly indicate the exact information to be entered.
4. A button, displayed by an input element of type submit, for the user to submit the completed form. Thevalueattribute of asubmitbutton gives the label on the button. 5. An HTTP query method, given by the methodattribute of form, for sending the form data to the server. It is advisable to always use the post method even though get is the default.
6. The URL of a server-side program to receive and process the collected form data, given by therequired action attribute2
of the form element. Thus, generally a form is coded as follows
<form method="post or get action="program-URL">
any number of block elements that may contain input-control elements
</form>
2
8.4. TEXT INPUT 355
Form-control elements include: input, select, textarea, and button. All input controls are inline elements. When a form is submitted, all values collected by input-control elements within the form will be sent to the server-side program.
In the past, input-controls could only be placed inside form elements or the input con-trols would be ignored by browsers. Now input-control elements may be placed outside the
form for other purposes such as interactions with client-side Javascript (Chapter 9). Under XHTML, a form may only contain block elements (of any kind). Thus, be sure to enclose input controls in block elements before placing them inside a form. Aformmay not contain another form so no form nesting is allowed.
Different kinds of input-control elements are available to make collecting user input easy— short input, long input, multiple choices, selection menus, and file uploading.
Let’s look at input-control elements.
8.4
Text Input
The simplest and most frequently used input control is the textinput element that receives a text string. For example,
<input name="lastname" type="text" size="20" maxlength="30" />
displays a one-line input window of size 20 (twenty characters wide) with a maximum user input of 30 characters. The name attribute specifies the key for the input element (or any other input-control element). User input becomes the value of the input element. The received input is submitted as a key-value pair, for example,
lastname="Katila"
to the server-side program. The value attribute can be used to specify an initial value to be displayed in the input window. For example,
Figure 8.3: A textarea
Multi-line text input can be collected with the inline element textarea. For example (Ex: Area),
<p>Please let us have your comments:<br /> <textarea name="feedback" rows="4" cols="60">
Tell us what you really think, please.
</textarea></p>
can be used to collect user feedback in a 4-row by 60-column input window. Content inside the textareaelement (plain text with entities) gives the initial display in the input window (Figure 8.3). The end user may type more than 4 lines, in which case a vertical scrollbar will appear, similarly for lines with more than 60 characters.
Because of the automatic scrolling feature,textareais sometimes useful to present longer information inside an area of limited size. For such purposes, the readonly="readonly"
attribute can be added to make an input window un-editable. Notice how the readonly
attribute is specified. Unlike before, XHTML does not allow such Boolean (true/false) attributes to be abbreviated (given without values).
8.5
User Selections
Radio Buttons
A group of radio buttons allows the user to choose exactly one from a number of choices. Clicking on one choice selects it and de-selects all others in the group. Each button is an
8.5. USER SELECTIONS 357
Figure 8.4: Radio Buttons
input element of type radio and all buttons in the group has the same name.
Figure 8.4 shows the display of the following radio button group (Ex: RadioButton).
<!-- inside a form -->
<p style="font-size: larger; font-weight: bold;"> Choose a color:
<input id="r" type="radio" name="color"
value="red" checked="checked" /> (a) <label for="r" style="color: red">Red</label> (b) <input id="g" type="radio" name="color" value="green" />
<label for="g" style="color: green">Green</label> <input id="b" type="radio" name="color" value="blue" />
<label for="b" style="color: blue">Blue</label> </p>
Here we have three radio buttons named color. The button with the value red is checked
(line a) as the initial selection (caution: no attribute abbreviation). Selecting a button pops the previous choice, like pushing buttons on a radio. The data sent to the server-side program is the name-value pair of the selected radio button.
The labelelement associates any enclosed inline element as the label for a input control whose id is given by the for attribute. In this example, the label Red (line b) is for the input field on linea. By identifying the label, a browser usually allows the user to also click on the label to make a selection.
Checkboxes
You can use checkboxes to allow users to choose several items from a list of choices. A checkbox is an input element of type checkbox. Clicking on a checkbox selects/deselects it without affecting other checkboxes. Thus, a user may select all, none, or any number of checkboxes in between.
Figure 8.5: Checkboxes
Figure 8.5 displays the following form (Ex: CheckBoxes)
<!-- inside a form -->
<p style="font-size: larger; font-weight: bold;"> Your favorite sports:
<input id="t" type="checkbox" name="tennis" /> <label for="t">Tennis</label>
<input id="b" type="checkbox" name="baseball" /> <label for="b">Baseball</label>
<input id="w" type="checkbox" name="windsurf" /> <label for="w">Wind Surfing</label>
</p>
For checkboxes,
• any number of items can be initially checked
• a user may pick any number of choices, including zero
• Each selected item is sent to the server-side program as name=on.
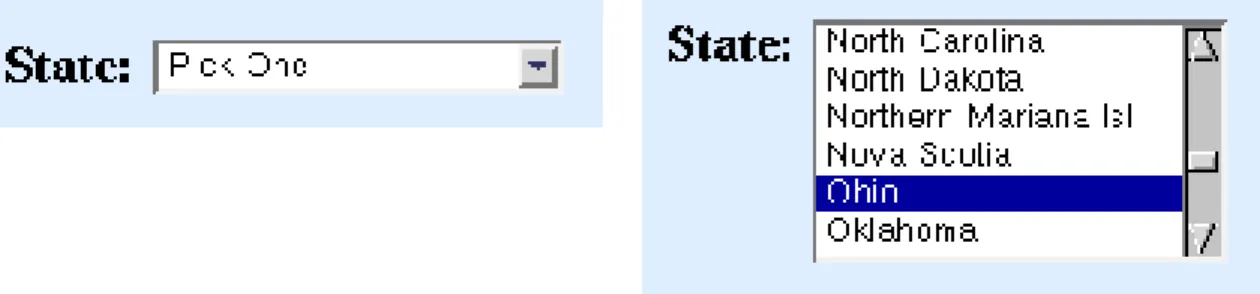
Pull-down Menus
When there are many choices, a pull-down menu can save space and make the form cleaner and clearer. The select element is a input control this purpose. You include any number of option elements inside a select element as the choices.
The code for a user to select a State in their address (Ex: PullDown) is outlined below.
<!-- inside a form -->
<p style="font-size: larger; font-weight: bold;">State: <select id="statename" name="statename" size="1">
<option value="0"> Pick One </option> <option value="Alabama"> Alabama </option>
8.5. USER SELECTIONS 359
Figure 8.6: A Pull-down Menu
<option value="Alaska"> Alaska </option> ...
</select></p>
Figure 8.6 shows the menu before and after it is pulled down. The size attribute specifies how many options are displayed on the menu at one time. If size is one, then the menu initially displays the first option with a pull-down button beside it. Typically size is 1
and the first option is an instruction on how or what to pick. To allow multiple choices, the boolean attribute multiple="multiple" must be given. Otherwise, only one choice is allowed. Data sent to the server-side program include one name-value pair of each option chosen.
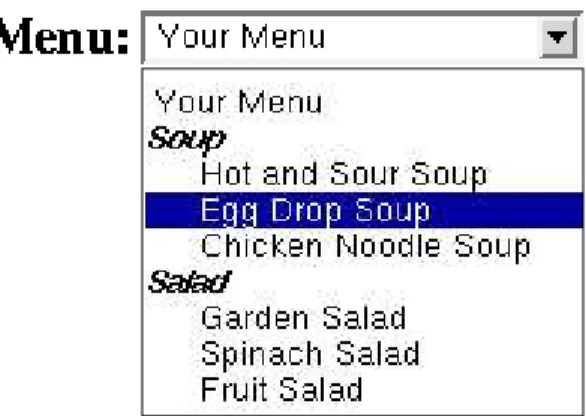
Sometimes options can be divided into different groups to make the selections better organized and easier for the end-user. The optgroup can separate options into groups. For example (Ex: OptGroup), the form
<form method="post" action="/cgi-bin/wb/reflect.pl"> (1) <p style="font-size: larger; font-weight: bold;">Menu:
<select id="menu" name="menu" size="1" multiple="multiple"> <option value="0"> Your Menu </option>
<optgroup label="Soup">
<option value="hot and sour">Hot and Sour Soup</option> <option value="egg drop">Egg Drop Soup</option>
<option value="chicken noodle">Chicken Noodle Soup</option> </optgroup><optgroup label="Salad">
<option value="garden">Garden Salad</option> <option value="spinach">Spinach Salad</option> <option value="fruit">Fruit Salad</option> </optgroup>
</select></p>
<p><input type="submit" value=" Order Meal "></p> (2) </form>
results in the display shown in Figure 8.7. The CGI program reflect.pl (line 1) displays form data and environment variables received and can be a good checker for your HTML forms (Section 8.19).
Figure 8.7: Menu Option Grouping
If the multiple="multiple" attribute is added to select, the end user picks the first item with a simple mouse click (left mouse button) and picks each additional item with a
ctrl-click. It is a good idea to set a sufficient size for menus allowing multiple picks. Most
Web surfers may not be aware of this mouse usage and, therefore, the checkbox may be a better choice for users to pick multiple items.
Let’s look at the submit button (line 2) next.
8.6
Submit Buttons
The basic submit button for a form is
<input type="submit" value="button-label />
Use a meaningful button-label such as Continue, Go, Register, etc. that relates to the purpose of the form.
8.7. FILE UPLOADING 361 A form may have multiple submit buttons with different values. For example, a mem-bership application form may have a Joinbutton and a Trial button for a regular or trial membership. Data sent to the server-side program includes the submit="value" for the clicked submit button.
You may customize the look of a submit button by using an image input element (Ex: ImageInput)
<input type="image" src="url" name="key" alt="..." />
Data sent to the server-side program is in the form key.x=x0
key.y=y0
where (x0, y0) is the position of the mouse cursor in the image when clicked.
As an alternative to theinput-based submit button, you can also use thebuttonelement to create submit buttons. For example (Ex: Button),
<button name="mybutton" value="Join Now">Join the Club</button>
displays a submit button with the label Join the Club and sends submit="join" to the server-side program. By placing animgelement insidebuttonyou obtain a graphical button of your own design.
It is possible to invoke programmed actions on the client side before submitting a form to the server-side program (Chapter 9). A button-type input element or a button-type
button element is useful for this purpose.
8.7
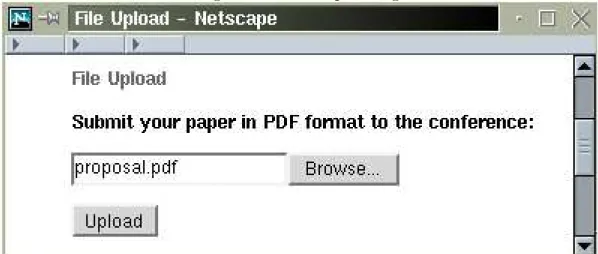
File Uploading
So far user input is collected from the keyboard or the mouse. But it is also possible to receive file uploads from the end user’s computer. This is done with the file-type input
Figure 8.8: File Uploading
<form method="post" action="/cgi-bin/receive.cgi" enctype="multipart/form-data">
<p style="font-size: larger; font-weight: bold;"> Submit your paper to the conference:</p>
<p><input type="file" name="paper" accept="application/pdf" /></p> <p><input type="submit" value="Upload" /></p>
</form>
Figure 8.8 displays the file uploading form where the browse button allows the user to pick a file from the local file system.
Several points worth noting about file uploading are:
• The query method must be post.
• The enctype="multipart/form-data" is needed to specify a data encoding format
different from the default application/x-www-form-urlencoded.
• The accept attribute specifies the MIME type for the uploaded file. If accept is not
specified, then there is no restriction on the file type.
• Very old browsers may not support form-based file uploading.
• Server-side processing must deal with the multipart/form-data data encoding.
8.8. OTHER INPUT ELEMENTS 363
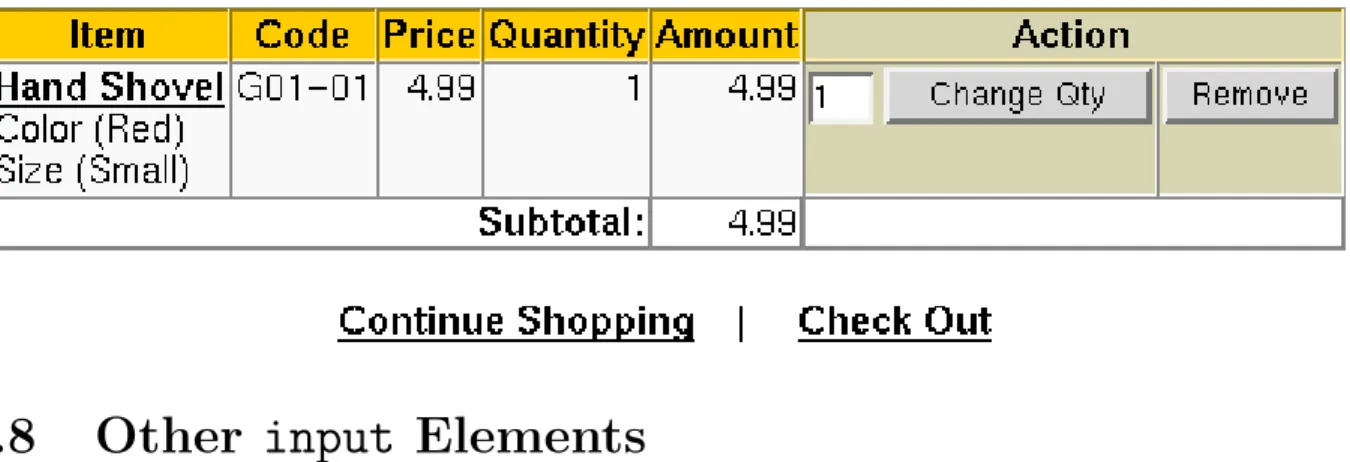
Figure 8.9: Shopping Cart with Submit Buttons
8.8
Other
input
Elements
Ahidden input element is not displayed with the form. But itskey=valuepair is sent along with other form data to the server-side program. A hidden input field can supply values to customize general-purpose programs on the server side or to provide session control where multiple forms are involved in a sequence of end-user interactions.
For example, a feedback form may use the following hidden input
<input type="hidden" name="receiver" value="[email protected]" />
to inform the server-side program where to send the feedback.
Figure 8.9 shows a shopping cart with aChange Qtybutton and aRemovebutton. These are actually submit buttons in two separate forms with hidden form fields. For example, the form for the remove button looks like
<form action="/cgi-bin/wb/reflect.pl" method="post"> <div>
<input type="hidden" name="ps_session" value="45d2b15ff4dbb8d" /> <input type="hidden" name="func" value="cartDelete" />
<input type="hidden" name="product_id" value="11" /> <input type="Submit" name="delete" value="Remove" /> <input type="submit" value=" Remove "></div>
</form>
A reset-type input element
<input type="reset" value="Clear form" />
or a reset typebutton
<button type="reset">Clear All Form Entries</button>
displays a button that resets the values of all input fields in a form.
A password-type input element is just like atext-type one except the browser will not display the text entered. It is not secure because the password is sent to the server-side in plain text with no encryption. Don’t get confused. The familiar userid and password dialog you see on the Web is not a result of the password input in a form. It is usually caused by an authentication request from the Web server.
8.9
Tabbing Order
When filling out a form, a Web surfer can use the tab key to go to the next entry in the form. If for some reason a form wishes to deviate from this tabbing order, input con-trols may be given explicit tabbing positions (integers between 0 and 32767) using the
tabindex="number" attribute. A input control with tabindex="0" or no tabindex at-tribute will be visited after any elements with a positive tabindex. A smaller positive
tabindex is visited first.
A form control may also specify an accesskey="char" attribute. It means the user can go to that form entry directly by typing the character alt-char(Ex: AccessKey).
8.10
Form Layout
Forms are critical components of websites. Forms without a good design can be confusing and unpleasant. It is important to design the visual layout of a form so it is clear, simple, attractive, and easy to follow. The page containing the form must also be visually integrated with the site.
8.10. FORM LAYOUT 365
Figure 8.10: Grouping Form Entries
Here are some rules of thumb:
• A form usually uses a single-column format. Related items, such as first name and last
name, can be grouped on the same line.
• Entries are labeled consistently and the label tag is used to bind labels to input
controls in the HTML code.
• Text to explain the form is placed before and outside the form.
• Instructions for individual entries can be placed before, after or beneath each entry.
But must be consistently placed for all the tables used in a site.
• Required and optional entries are clearly indicated.
• Avoid long forms. Group related entries together to divide a long form into smaller
Figure 8.11: Table-formatted Form
• Avoid repeatedly asking for the same information.
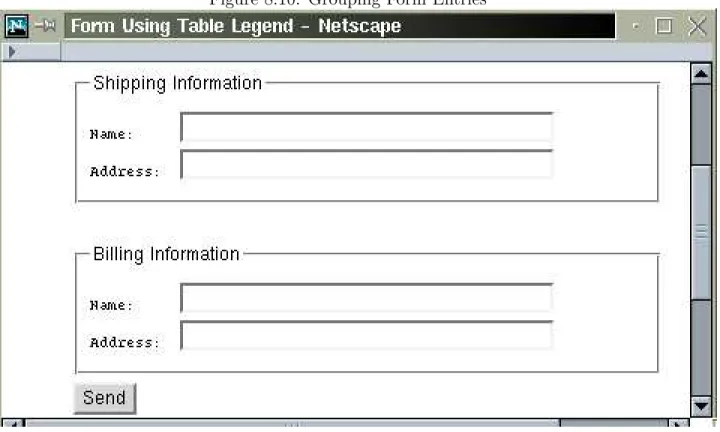
Thefieldsetelement brackets a set of related input controls and gives it alegend(title). For example (Ex: FieldSet),
<fieldset> <legend>Shipping Information</legend> ... </fieldset> <fieldset> <legend>Billing Information</legend> ... </fieldset>
groups the input controls and displays the legends as shown in Figure 8.10.
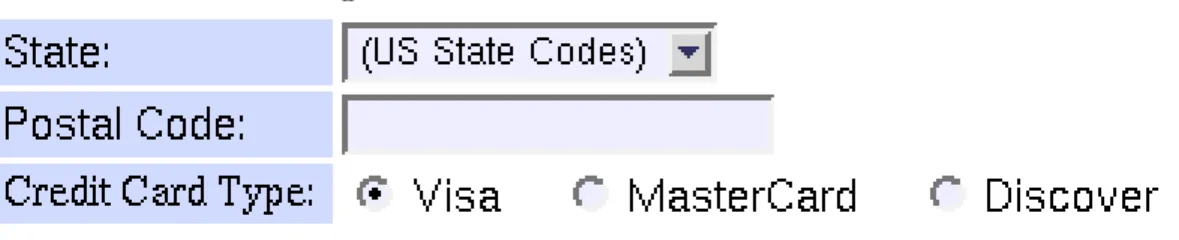
Form Layout with Tables
In practice forms are often displayed using a table layout. The table element is placed inside theformelement to organize and to align the input controls and labels. A style sheet for forms can be established to apply to all forms of a particular site.
The source code for the form displayed in Figure 8.11 is (Ex: FormTable)
<form action="/cgi-bin/wb/reflect.pl" method="post"> <table width="400">
<tr><td class="fla"><label for="state">State:</label></td> <td> <select id="state" name="state">
<option>(US State Codes)</option> <option>AL</option>
...
8.11. HTTP BASICS 367
</select></td></tr>
<tr><td class="fla"><label for="zip">Postal Code:</label></td> <td><input id="zip" name="zip"
size="20" maxlength="20" /></td></tr> <tr><td class="fla">Credit Card Type:</td>
<td><input type="radio" id="va" name="card" value="Va" checked="checked" />
<label for="va">Visa </label>
<input id="mc" type="radio" name="card" value="MC" /> <label for="mc">MasterCard </label> <input type="radio" id="ds" name="card" value="dc" /> <label for="ds">Discover</label></td></tr>
</table></form>
And the style sheet included with
<link rel="stylesheet" href="form.css" type="text/css" title="form" />
contains style declarations for form label cell background color (line 1), form label font (line 2), input field background color (line 3), etc.
td.fla { background-color: #d2dbff } /* 1 */
form label, form option
{ font-family: Arial, Helvetica, sans-serif } /* 2 */
form input, form select { background-color: #eef } /* 3 */
8.11
HTTP Basics
To understand form data submission by a browser and form processing on the server side, it is necessary to have some basic ideas about the HTTP protocol.
On the Web, servers and clients (browsers) follow theHypertext Transfer Protocol(HTTP) for communication. Hence, Web servers are sometimes called HTTP servers and browsers are known as HTTP clients. We have mentioned this already in Chapter 1 (Figure 1.5).
The HTTP protocol governs how the Web server and client exchange information. HTTP employs the connection-oriented TCP/IP to support a reliable bi-directional communication channel connecting the client and server. We described HTTP briefly in Section 1.14. Let’s now take a closer look at HTTP.
When a browser requests a page (for example the user clicks a hyperlink) or sends form data (for example, the user clicks the submit button) identified by a URL, it starts the following sequence of events:
1. Connection—A client opens a HTTP connection to a server specified by the URL. 2. Query—The client sends anHTTP requestto access a resource controlled by the server. 3. Processing—The server receives and processes the request.
4. Response—The server sends an HTTP response, representing the requested page or the results of form processing, back to the client.
5. Transaction Done—The transaction is done and the connection between the client and server may be kept open for a follow-up request, or it may be closed.
The form action attribute specifies the URL of the server-side program to receive and process the form data. The program is usually a CGI program (Section 1.13), but can be an active page (Section 1.13), or a servlet (a special Java program for capable servers). Figure 8.1 shows the form processing data flow.
8.12
HTTP Message Format
An HTTP message can be a request (query) or a response and consists of a sequence of ASCII characters conforming to the required format:
initial line (different for query and response) HeaderKey1: value1 (zero or more header fields)
8.12. HTTP MESSAGE FORMAT 369 HeaderKey2: value2
HeaderKey3: value3
(an empty line separating header and body) Optional message body contains query or response data.
The amount and type of data in the body is specified in the headers.
The header part consists of one or moremessage headers. Each message header is a key-value pair. HTTP defines what header keys can be used. Each message header ends in return
and newline but, in deference to UNIX systems, it may also end in just newline.
The Query Line
The initial line identifies the message as a query or a response.
• A query line has three parts, separated by spaces: a query methodname, a server-side
path (URI3
) of the requested resource, and an HTTP version number.
GET /path/to/file/index.html HTTP/1.1 POST /cgi-bin/script.cgi HTTP/1.1 HEAD /path/to/file/index.html HTTP/1.1
• The GET method simply request the specified resource and does not allow a message
body.
• TheHEADquery requests only the header part of the response for the requested resource. • The POST method allows a message body consisting of form data for server-side
pro-cessing. 3
The Response Line
A response (or status) line of an HTTP message also has three parts separated by spaces: a version number, a status code, and a textual description of the status. Typical status lines are:
HTTP/1.1 200 OK
for a successful query, or
HTTP/1.1 404 Not Found
when the requested resource cannot be found.
The POST Query
HTML forms usually specify thepostrequest method resulting in a browser-generatedPOST
query. The query sends the form data to the program designated by the action URL. A POST query contains: a Content-Typeheader, a Content-Lengthheader, and a mes-sage body consisting of URL-encoded form data. The content type header is
Content-Type: application/x-www-form-urlencoded
The receiving Web server processes the incoming data by calling the URI-specified form-processing program (typical a CGI program). The program receives the message body con-taining the encoded form data, processes it, and generates a response.
Here is a sample POSTquery:
POST /cgi-bin/register-user HTTP/1.1 HOST: www.SymbolicNet.org From: [email protected] User-Agent: NetScape 6.2 Content-Type: application/x-www-form-urlencoded Content-Length: 132 name=John+Doe&address=678+Main+Street&...
8.12. HTTP MESSAGE FORMAT 371
URL Encoding
Because HTTP uses special characters for certain protocol purposes, the POST query body containing the form data is always form-urlencodedin the following way:
• The query body is in the form of a series of entries separated by &. Each entry is a
name=value pair.
• Each space within an entry is replaced by a+.
• Special characters in the name and value parts must be URL-encoded to avoid
misin-terpretation.
• URL-encoding basically means replacing each non-alphanumeric character by%xxwhere
xxis its ASCII code in hexadecimal. For example,
= %3D or%3d + %2Bor %2b & %26
A server-side form-processing program must decode the form data before processing it.
Data Posting via
GET
Queries
As an alternative to the POST query, form data can be sent via a GET query by appending the form-urlencoded data at the end of the URL locating the server-side program. In this case the data sent is known as a query string and is joined to the URL by a? character:
url of server side program?query string
The query string is passed to the target program for processing.
GET
vs.
POST
A GET request does not require a form, it can be just a URL with a hard-coded query string. Thus any hyperlink can potentially generate a GET request.
Either the GET or the POSTmethod may be used for a form. Is there a difference? In most cases, there is little difference. Some say if a form does not send user data to be recorded at the server side, the GETmethod is the right choice.
Otherwise, thePOSTmethod is the right choice. For example, a form for making payments or membership registration should use the POST method.
Software implementations may put a length limitation on URIs. Thus, a very long query string may not work. Also, file uploading must use the POST request to send a body using the encryption type multipart/form-data.
8.13
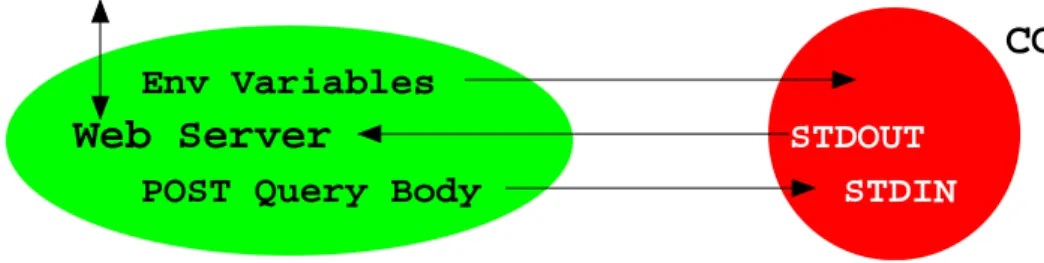
CGI Overview
User data sent by a Web client require customized processing on the server side. Whether via aPOSTor aGETrequest, the query goes to a Web server which relays the data to atarget program(specified by theaction attribute, for example), receives its output, and sends that output back to the client as an HTTP response. The Web server here refers to the piece of software, such as Apache, that takes care of HTTP requests on a particular host. The target program may be a software module loaded into the server, a Java servlet, an active-page interpreter (ASP, PHP), or a stand-alone CGI program. We will focus on CGI programs in this text.
A CGI program is a stand-alone executable that is invoked by the Web server each time a request for the CGI is received. The server process and CGI process performs interprocess communicationand cooperate following the Common Gateway Interface(Figure 8.1).
The Common Gateway Interface (Figure 1.7) governs the way a Web server interacts with these external programs. Those conforming to the CGI are known as CGI programs. A popular scripting language for CGI programming is Perl. But, CGI programs can be
8.13. CGI OVERVIEW 373
Figure 8.12: CGI Interface Data Flow
CGI Program
Web Server
Env Variables
POST Query Body
Client
STDOUT STDIN
written in any language. For security reasons CGI programs must usually be placed in special directories where programs accessible through Web servers are placed. These CGI directories can use any name but are usually given the name cgi-bin.
Here are some details on the Common Gateway Interface (Figure 8.12):
• For a POST query, a CGI program receives the form-urlencoded query body through
standard input.
• For aGETquery, a CGI program receives the form-urlencoded query string through the
environment variable QUERY STRING.
• The Web server transmits environment variables to the CGI program. Query headers,
the query string, and other incoming data are sent to the CGI program through a set of predefined environment variables.
• A CGI program’s standard output goes to the Web server which relays the output back
to the Web client in a well-formed HTTP response.
Complete information on the CGI specification can be found on the Web:
hoohoo.ncsa.uiuc.edu/cgi/interface.html
The rest of the chapter introduces CGI programming. Examples are given in Perl (Chap-ter 13).
8.14
Outline of a CGI Program
A CGI program (or script) is invoked by the Web server which provides input to the CGI program and receive its output. Typically, a CGI program follows this outline:
1. Determines request method and receives input data: The request method is given by the REQUEST_METHOD environment variable. For a POST query the data is read from standard input and the length of the data is indicated by the CONTENT LENGTH envi-ronment variable. For a GET query, the input data is the value of the QUERY STRING
environment variable.
2. Decodes and Checks input data: The form-urlencoded input data is decoded and the key-value pairs recovered. The correctness of the input data is checked. Incomplete or incorrect input results in a response to the end-user for the correct information. 3. Performs tasks: The input data is complete and correct. The program now processes
the information and performs required actions.
4. Produces output: A generated response is sent to standard output. The response is usually in HTML format.
Receiving and Decoding Input
The value of the environment variable REQUEST METHOD is either GET orPOST. And the CGI program gets the raw input data in the format
name1=value1&name2=value2&name3=value3
where the names and values are URL-encoded. To decode each name and value: 1. Convert each + character to a space
2. Convert each%xxsequence to a single character whose ASCII code isxxin hexadecimal. Then check the decoded input for correctness and completeness.
8.14. OUTLINE OF A CGI PROGRAM 375
Formatting Output
Most likely, a CGI program, after processing the input, sends back an HTML document to provide a response to the end-user. Data sent to standard output by the CGI program is captured by the Web server and included in an HTTP response message. For HTML, the CGI output follows this format
Content-Type: text/html (header) empty line
the HTML page (body)
If the CGI program knows the exact length (in bytes) of the body, it ought to send an additional header, for example,
Content-Length: 256
Note, all headers must be sent before the empty line which marks the end of headers. The Content-Type header indicates its MIME type of the message body. For example, to send a GIF image by itself, the output can be
Content-Type: img/gif Content-Length: 1258
empty line
the image in GIF format
If a CGI program wishes to send a response specified by an URL, it simply sends a single-line output
Location: url
which instructs the server to return the specified document if the url is local, or the client to retrieve the url if it is not local. For example, a user registration program can send the user to one URL for successful registration and another otherwise. This technique is useful in many similar situations.
Figure 8.13: Form for Hello Example
8.15
Getting Started with CGI Programming
Let’s begin with a toy CGI program (Ex: Hello) that simply collects the name and email address of a person and responds with a “Hello” message.
The HTML form (Figure 8.13) that collects the user information has the following HTML code:
<p style="font-weight: bold; font-size: larger"> Complete this form:</p>
<form method="post" action="/cgi-bin/hello.cgi"> <table width="400">
<tr>
<td class="fla"><label for="name">Full Name:</label></td> <td><input id="name" name="name" size="35" /></td>
</tr><tr>
<td class="fla"><label for="email">Email:</label></td> <td><input id="email" name="email" size="35" /></td> </tr><tr>
<td></td><td><input type="submit" value="Send" /></td> </tr></table>
</form>
The server-side program that receives the information, as indicated by theactionattribute, is hello.cgiwhich has the following Perl code:
8.15. GETTING STARTED WITH CGI PROGRAMMING 377
Figure 8.14: Hello Response Page
#!/usr/bin/perl
## hello.cgi--a toy CGI program ## (1)
use CGI qw(:standard); ## cgi perl module ## (2)
var $name = param(’name’); ## (3) var $email = param(’email’); ## (4)
## Send response to standard output
print "Content-type: text/html\r\n\r\n"; ## (5)
print <<END; ## (6)
<?xml version="1.0" encoding="UTF-8" ?>
<!DOCTYPE html PUBLIC "-//W3C//DTD XHTML 1.0 Strict//EN" "http://www.w3.org/TR/xhtml1/DTD/xhtml1-strict.dtd"> <html xmlns="http://www.w3.org/1999/xhtml"
xml:lang="en" lang="en"> <head><title>Hello</title></head> <body style="background-color: #def"> <h3>Hello $name,</h3>
<p>The email address you sent is</p> <p>$email</p></body></html>
END
After sending in the form, the user sees a response page similar to the one shown in Fig-ure 8.14.
Now let’s look at the CGI program. The very first line of this CGI program
identifies Perl as the interpreter of the code to follow. The first two character on the very first line must be #! followed by the location of the perl command. This location can be different on different computers.
The next line is a comment. In a perlprogram, anything from a # character to the end of line is ignored by the interpreter and thus a comment.
The program then declares to use the perl module CGI (line 2), a collection of code for easy CGI programming. In Section 13.19), we’ll find out more about Perl modules and the CGI Perl module (CGI.pm).
Two variables $name and $email are defined (lines 3-4). These are scalar variables
in Perl and they use the $ prefix. Also, Perl statements and declarations terminate with the semicolon (;). The CGI.pm supplied function param is handy to retrieve and decode incoming form data (sent via either GET or POST). The notation ’name’ is a single-quoted string. Everything inside the single quotes (except a single quote of course) is taken literally as a character.
After receiving the form data, this toy program simply sends a “hello” message back. This is done by sending a valid HTML page to standard output. The content type line is sent first by calling print (line 5). The argument to print is a double-quoted string. which can contain variables and special characters such as \n (newline) and \r (return). To
stand for themselves in a double-quoted string, special characters such as $, ", @, %, and \
can be escaped. Simply place a \ in front of the character to escape it. For example,
$red_h2 = "<h2 class=\"red\">";
Note the two consecutive end-of-line markers (\r\n return-newline). They are needed
to mark the end of the header and the beginning of the body of an HTTP message. The simpler version
print "Content-type: text/html\n\n";
is also acceptable. The HTML code for the response page is sent next as the message body. The output statement (lines 6-7)
8.16. DEPLOYING CGI PROGRAMS 379
print <<END;
sends all subsequent lines to standard output until it sees a line consisting only of the specified identifier END. Variable substitution is perfromed before the lines are sent. This output notation is adopted from Csh (the UNIX C-Shell).
A Perl program ends when it runs out of statements. Or when the functionexitis called.
8.16
Deploying CGI Programs
A CGI program is deployed by placing it in the cgi-bin directory designated by the Web server. The cgi-bindirectory should allow Web access:
chmod o+rx cgi-bin
And any CGI program placed in this directory must also allow Web access: chmod o+rx program.cgi
When deploying a Perl program, make sure the first line of the program
#!/usr/bin/perl
indicates the location of the perl command on that particular host. If you copy-and-paste
a Perl script, make sure you delete and retype the first line using a text editor on the host computer. Hidden characters on the first line have caused many a headache for the unwary. More likely than not, a Perl CGI program will use the CGI.pm perl module with the line
use CGI qw(:standard);
For this to work you need to be sure that Perl on your computer has that module installed in a location included on the Perl variable @INCwhich is a list of directories where Perl headers and modules are found. If you are installing a Perl script on a host meant to serve the Web, all this are most likely already set.
Once deployed, the URL to reach the CGI program is in the general form
http://host/cgi-bin/program.cgi
Figure 8.15: Joiningclub.com
8.17
CGI Example: Club Membership
The Ex: Hello program is very simple. Let’s look at a more realistic example (Ex: Join-Club) where users join a club of some sort by filling out a form. The form (Figure 8.15) collects the user’s full name and email address and sends the form data to a server-side program join.cgi.
<form method="post"
action="http://www.club.com/cgi-bin/join.cgi"> ...
</form>
The program join.cgi, written in Perl, performs these tasks 1. Obtains and checks the incoming form data
2. Sends an error message to the end-user if any input is missing 3. Sends email to the club manager with the information
8.17. CGI EXAMPLE: CLUB MEMBERSHIP 381
#!/usr/bin/perl
## join.cgi--Perl script for
## sending email to the manager
use CGI qw(:standard); ## cgi perl module
var $err_msg = "", $club="club.com"; ## (1) var $subject = "-s ’New Member club.com’";
var $cmd="/bin/mail $subject manager\@$club"; var $xhtml_front =
’<?xml version="1.0" encoding="UTF-8" ?>
<!DOCTYPE html PUBLIC "-//W3C//DTD XHTML 1.0 Strict//EN" "http://www.w3.org/TR/xhtml1/DTD/xhtml1-strict.dtd"> <html xmlns="http://www.w3.org/1999/xhtml"
xml:lang="en" lang="en">’;
var $name = param(’name’); ## form data
var $email = param(’email’); ## form data ## (2)
if ( ! $name ) ## $name is empty ## (3) { $err_msg .= "<p>Name must be specified.</p>";
}
if ( ! $email ) ## $email is empty ## (4) { $err_msg .= "<p>Email must be specified.</p>";
}
if ( $err_msg ) ## (5)
{ error(); ## function call ## (6) exit(1); ## abnormal termination ## (7) }
## mail notice to manager
open(MAIL, "| $cmd"); ## (8) print MAIL "Name: $name\n";
print MAIL "Email: $email\n"; print MAIL "to join $club";
close(MAIL); ## (9)
## Send response to standard output
print "Content-type: text/html\r\n\r\n"; ## (10)
print <<END; ## (11)
<head><title>Thanks for Joining</title></head> <body style="background-color: white">
<h3>Thank you $name.</h3>
<p>Welcome to club.com. Your membership will be processed shortly.</p>
<p>We will email you at <code>$email</code> about your new membership at $club.</p>
</body></html> END
After the standard opening lines, the program proceeds to define seven variables: $err_msg,
$club, $subject, $cmd, $xhtml_front, $name and $email (lines 1-2). Again the param
function from theCGI.pm module help retrieve the incoming form data. The $xhtml_front
is a constant string representing the initial lines of an XHTML page.
The $name and $email strings are checked (lines 3-4). Both must have values. If the end user failed to fill in a form field, the corresponding value retrieved would be an empty string. If$name is an empty string, then the expression! $name(not$name) becomes true. In case any of these is empty, an appropriate string is appended to the $err_msg variable. Which will be used later for error reporting.
In Perl the period operator (.) concatenates two strings. The expression
$str1 .= $str2
is the C-like shorthand for
$str1 = $str1 . $str2
If there is any error (line5), theerror()function is called (line6) and the program ends (line 7). In Perl, a function call takes the usual form
function name(arg1, arg2, ... )
It is possible to omit the parenthesis around the arguments. Normal termination isexit(0)
and abnormal termination, as on line 7, is exit(1).
If there is no error, the program continues and sends email to the club manager about the new member. The program opens a mailing process to receive the data to be mailed
8.17. CGI EXAMPLE: CLUB MEMBERSHIP 383
Figure 8.16: Membership Response Page
(lines 8). The channel to send to the mailing process is given the arbitrary name MAIL. The content of the email is sent toMAIL via the Perlprintfunction. Closing the output channel (line 9) finishes sending the mail. The remaining task is to send an acknowledgement page (Figure 8.16) to the end-user using the same output technique (line11) as before.
The error function is defined at the endo of this Perl program. It uses a sequence of
print calls to send a page containing the $err_msg.
sub error()
{ print "Content-type: text/html\r\n\r\n"; print "$xhtml_front\r\n";
print ’<head><title>Error</title></head>’; print ’<body style="background-color: white">’; print ’<h3>Data Missing</h3>’;
print "<p>$err_msg Please go BACK, make corrections, "; print ’and submit the form again.</p> </body></html>’; }
This program only checks the presence of the email address. But the email address given may also be invalid. A check can make this program more complete. It is also common practice to check form input on the client side as the user fills out the form (Section 9.15). Client-side checks are no substitute for server-Client-side checking because CGI programs can always be invoked without using the HTML forms that have the checks.
8.18
CGI Environment Variables
Under CGI, an important way to communicate information from the Web server to the CGI program is via environment variables. Anenvironment variableis one that’s already in place when a program starts to run. So, a program can simply access its value to obtain the data.
A server will always provide these environment variables:
• SERVER NAME: domain name of the host computer • SERVER_ADDR: IP of the host computer
• PATH: command search path
• GATEWAY INTERFACE: version of CGI, e.g. CGI/1.1 • SERVER_ADMIN: email address of the server administrator
• SERVER_SIGNATURE: name/version, domain, and port of the server program • DOCUMENT_ROOT: full path of the top document directory
• SERVER SOFTWARE:name/version ... of the Web server for example
Apache/1.3.12 (Unix) ApacheJServ/1.1 PHP/4.0 mod_ssl/2.6.6 OpenSSL/0.9
The preceding quantities are fixed for a Web server running on a particular host computer and are independent of the incoming HTTP request.
The server also transmits the following environment values that are dependent on each request:
• SERVER_PORT: port used by the server (e.g. 80) • SERVER_PROTOCOL: protocol used, (e.g. HTTP/1.1) • TZ: local time zone (e.g. US/Eastern)
8.18. CGI ENVIRONMENT VARIABLES 385
• REQUEST_URI: the URI of this request
• REQUEST_METHOD: the HTTP request method (GET, POST, HEAD, ...) • CONTENT_LENGTH: length of POST request body in bytes
• CONTENT_TYPE: the MIME content type designation of body • QUERY_STRING: string after first? of the URI given
• AUTH_TYPE: user authentication type used, if any, (e.g. basic or digest) • SCRIPT_NAME: URI of the CGI program
• SCRIPT_FILENAME: full path of CGI program
• PATH_INFO: the part of the URI after the cgi-name and before any query string • PATH_TRANSLATED: full path for PATH_INFO
• REMOTE_ADDR: IP of client • REMOTE_PORT: port of client
Other environment values available relate to the HTTP headers of a particular request:
• HTTP_ACCEPT: MIME types client prefers/accepts • HTTP_ACCEPT_LANGUAGE: language accepted (e.g en-us)
• HTTP_ACCEPT_CHARSET: character set preferred/accepted (e.g ISO-8859-1, utf-8) • HTTP_REFERER: URL of the page containing the form submitting the request • HTTP_COOKIE: cookie information
• HTTP_ACCEPT_ENCODING: data encoding preferred/accepted • HTTP_HOST: host name part of the request URL
• HTTP_USER_AGENT: for exampleMozilla/5.0 (X11; U; Linux i686; en-US; rv:0.9)
Gecko/20019 Netscape6/6.2
In a Perl program you can easily access the value of an environment variable with the notation
$ENV{var name}
For example,
$str = $ENV{’QUERY_STRING’}; $agent = $ENV{’HTTP_USER_AGENT’};
A rather complete list of environment variables is given here. The meaning of some are already clear. Others will be explained as they are used.
8.19
Data Received on the Server-Side
Let’s look at a CGI program that displays the form input that it receives. This program can be handy for checking what your form is sending to the server side.
The program performs these steps:
1. Setting the$xhtml_frontvariable to a constant string (lineA) and calls thehtmlBegin
function (line B) to begin output of the response page.
2. The HTTP request method is obtained from the environment variableREQUEST_METHOD
(line C).
3. The form input is obtained either from the request content (line D) or the environment variableQUERY_STRING(lineE). The Perl operatoreq(ne) compares strings for equality (non-equality). The operator || is logical or.
8.19. DATA RECEIVED ON THE SERVER-SIDE 387
#!/usr/bin/perl
$xhtml_front = ’<?xml version="1.0" encoding="UTF-8" ?> ## (A) <!DOCTYPE html PUBLIC "-//W3C//DTD XHTML 1.0 Strict//EN"
"http://www.w3.org/TR/xhtml1/DTD/xhtml1-strict.dtd"> <html xmlns="http://www.w3.org/1999/xhtml"
xml:lang="en" lang="en">’;
htmlBegin("Reflect CGI", "white", $xhtml_front); ## (B)
### displaying post query string from form
$input="";
$method = $ENV{’REQUEST_METHOD’}; ## (C)
if ( $method eq "POST" || $method eq "post" ) ## (D) { read(STDIN, $input, $ENV{’CONTENT_LENGTH’});
}
elsif ( $method eq "GET" || $method eq "get" ) ## (E) { $input=$ENV{’QUERY_STRING’};
}
if ( $input ne "" ) ## (F) { print "<h2>Submitted String from $method Query:</h2>";
print "<p style=\"font-size: larger; color: #c33\">"; print "<code>$input </code></p>";
}
print "</body></html>"; exit(0);
################# subroutines #####################
sub htmlBegin
{ my $title=$_[0]; ### page title ## (G) my $bg =$_[1]; ### background for body
my $front = $_[2]; ### XHTML code ## (H)
print "Content-type: text/html\n\n $front
<head><title>$title</title></head>\n
<body style=\"background-color: $bg\; margin: 20px\">\n"; }
The notations $_[0], $_[1], and $_[2] (lines G-H) refer to argument one, two, and three passed to the function (line B). The keywordmy declares the variables local to the function.
A more elaborate version of this CGI program has been placed on the WDP website:
http://www.sofpower.com/cgi-bin/wb/reflect.pl
When testing a new form, this CGI program can be used to reflect back to you the form input for easy checking.
8.20
Content Length
When the server is using the new HTTP/1.1 protocol, the connection between the server and the client is kept alive after the server sends the response4
. The server closes the connection only when the client so requests via the
Connection: close
header or after a time-out interval. The keep-alive feature makes the Web much more efficient.
To avoid having to close the connection, the server can include aContent-lengthheader so the client knows when the response body has been fully received. A Web server can supply the length of a static file very easily. But when it comes to the content length of a dynamically generated page, this is more tricky. Most servers do not generate the content length for dynamic pages and are forced to shutdown the connection.
But, this shutdown can be avoided if a CGI program provides the content length header itself. It is a good idea for a dynamically generated page to always supply the content length header under HTTP/1.1. A CGI program can check the SERVER_PROTOCOL environment variable to see if HTTP/1.1 is being used. When sending the content with length information, make sure the byte count matches the length of the content exactly.
As a simple example, let’s look at a CGI program in Perl (Ex: ImageGet) that receives the name of a GIF file and sends that along with length information.
4
8.21. SUMMARY 389
#!/usr/bin/perl #### getimage.pl use CGI qw(:standard);
$file = param(’gif’); ## (1) open(IMG, "img/$file") or error_reply("can’t open $file"); ## (2)
$size = -s IMG; ## (3)
read(IMG, $bytes, $size); ## (4)
binmode(STDOUT); ## (5)
print "Content-type: image/gif\r\n"; ## (6) print "Content-length: $size\r\n\r\n"; ## (7)
print $bytes; ## (8)
exit;
The program receives the GIF file name (line 1), opens it for reading (line 2), obtains the size of the file (line 3), then reads the whole file into the variable $bytes (line 4).
Now the program is ready to produce output. Standard output is set to binary mode (line5) to allow GIF data. The content type (line5) and content length (line 7) headers are sent, followed by empty line and the GIF file (line 8).
The error_reply subroutine sends an error message in HTML.
sub error_reply()
{ my $msg=$_[0], $page="", $len; ## local variables $page .= "$xhtml_front <head><title>Error</title>" .
"</head><body><h3>$msg</h3></body></html>"; ## (9) $len = length($page); ## (10) print "Content-type: text/html\r\n";
print "Content-length: $len\r\n\r\n"; ## (11) print $page;
}
Note how the HTML page is constructed in a string $page (line 9) so we can measure its length (line 10) for the Content-lengthheader (line 11).
8.21
Summary
<input type="text" ... /> (single-line text)
<textarea> ... </textarea> (multi-line text)
<input type=”radio” ... /¿? (radio buttons)
<input type="checkbox" ... /> (check boxes)
<select><option ... /> ... </select> (menus)
<input type=”image” ... /¿? (mouse position)
<input type="submit" ... /> (submit button)
<input type="button" ... /> (click button)
<input type="reset" ... /> (reset button)
<input type="hidden" ... /> (hidden data)
<input type="file" ... /> (files) Hidden input elements can send data built-in to the form.
Form controls are inline elements and must be enclosed in block elements before being placed inside aform. It is important to design forms to be simple, clear, and integrated with the site.
Collected form data are url-encoded and sent, via an HTTPPOST orGETrequest, (speci-fied by the method attribute) to a prescribed server-side program (specified by the required
action attribute) for processing. A GET request has no message body and can only send a URI to the server. A POST request can send a URI and a message body. XHTML allows input controls to be placed outside of forms and in any block or inline elements. A form sends only data from input controls inside the form. When possible, a CGI program ought to use the HTTP content-length header to preserve the HTTP connection between the server and the client.
Form data are often processed by CGI programs. A CGI program is an independent program invoked by the Web server to handle incoming data. Such data may come from an HTML form or from an URL with an attached query string. CGI programs communicate with Web servers following the Common Gateway Interface. The Perl scripting language uses a C-like syntax and is a popular, and free, language for writing CGI programs.
EXERCISES 391 A server-side program processes incoming requests by determining the request method, obtaining the form data or query string, checks the completeness and correctness of the form data, perform required tasks on the data, and sends a response page back to the user. If something is wrong with the input form data, an error page is sent back. The reflect.pl
CGI program, placed at the WDP website, demonstrates receiving form data and can be used for checking new forms.
Designers and programmers should work together to create fill-out forms. It is important to format forms for clarity and ease of use. Reply pages from a server-side program must preserve the look and feel of the site to avoid confusion.
More coverage of CGI programming with Perl can be found in Chapter 13.
Exercises
Review Questions
1. What HTML elements can be placed inside the form element?
2. What happens if an input control is placed outside the form element? 3. What is the difference between radio buttons and check boxes?
4. In Web page, when and why should one use the GETand the POSTrequest method? 5. Which Perl module supplies the param function? What does the param function do? 6. What is form-urlencoding?
7. Describe the sequence of actions needed for a server-side program to decode form data. 8. What is a hidden input control? How is it used?
9. How should the first line of a Perl program be coded? What prefix does a Perl scalar variable use?
10. What operation in Perl concatenates strings? 11. What is a cgi-bin?
12. What techniques help reply pages produced by server-side programs maintain the look and feel of the website.
13. Why is the content length information needed for the HTTP 1.1 keep alive feature to work?
Assignments
1. Design a form to use as many input controls as you know. Make sure the form is formatted well and easy to follow.
2. Experiment with the background color of inputcontrols. Can you set them to reason-able colors to enhance the appearance of a form? Show your code.
3. Deploy Ex: Hello (Section 8.15) on your computer and experiment with it. Try sending the form with some input missing.
4. Take the Ex: Hello(Section 8.15) example and format the form with a table, making it look as nice and clear as you can.
5. Take Ex: Hello and modify it to use the GETmethod. Test to make sure it works. 6. Modify the Ex: Hello form to use the reflect.pl CGI program at the WDP site
instead (Section 8.19). Stydy the url-encoded string for the form data.
7. Start your browser and type in the location box the URL of the CGI program used by Ex: Hello. Type a ? at the end of that URL, then continue with the url-encoded string you found in Assignment 6. Enter this URL and see what response page you get. Explain this way of invoking a CGI program.
EXERCISES 393 8. Design a form with several text input fields. Write a CGI program that displays all
the incoming text strings as a single string.
9. Write a short CGI program that when called will display the values of a set of envi-ronment variables.
10. Write a CGI program that when called with no form data will send an HTML form to the end user for collecting information to be processed again by the same CGI program.