Pace Clock Controller
User Guide
F901 Rev. 10071551 East Eleventh Street
Loveland, Colorado 80537-5056 Customer Service Department
Web: www.coloradotime.com
Email: [email protected] Phone: 970-667-1000, x256
Toll Free U.S. and Canada 800-287-0653, x256 Fax: 970-667-1032
Colorado Time Systems Corporate Office 1551 East 11th Street Loveland, CO 80537 USA Sales : 1-800-279-0111 x 250 or +1 970-667-1000 x 250 Service: 1-800-287-0653 x256 or +1 970-667-1000 x256 Service Fax: 970-667-1032 Web: www.coloradotime.com Email: [email protected]
Part Number F901, Rev. 1007
Table of Contents
Pace Clock Controller ... 1
Introduction... 1
Pace Clock Controller Contents... 1
Physical Setup... 1 Overview... 3 Display Screen ... 3 Keyboard... 3 Time of Day ... 5 Example Workouts... 6 Setup/Operation ... 9 Operation... 9 Running a Workout... 11
Multiple Workout Feature... 13
Special Features ... 15
Hy-Tek Workout Manager Download ... 15
Displaying Time of Day... 15
Scoreboard as a Standard Pace Clock... 15
1 Introduction
1
Introduction
Colorado Time Systems (CTS) thanks you for purchasing the pace clock controller. The pace clock controller from CTS is a full-featured and compact training aid designed to help you help your swimmers achieve peak condition.
The pace clock controller can run workouts on CTS scoreboards and pace clocks.
Pace Clock Controller Contents
Pace Clock Controller console Pace Clock Controller user guide
7-foot adapter cable (CTS part #0002-0437) DB9 to RJ45 Converter (CTS part # 1004-0388) 14’ RJ45 Cable (CTS part # 015-342)
AC Power Adapter (CTS part # 015-555) 25’ Data Cable (CTS part # 25DC)
Immediately upon receiving your pace clock controller package, perform the following steps:
1) Open all boxes and remove protective packaging.
2) Inspect all parts for damage that may have occurred during shipment. Report any damage to freight carrier immediately.
3) Use the enclosed Packing List to ensure that you received all items ordered. If any parts are missing, contact Colorado Time Systems’ Customer Service Department immediately at 800-287-0653 x 256 or 970-667-1000 x 256 (international).
Physical Setup
To display a workout that is already programmed in the pace clock controller on a pace clock or scoreboard, follow these steps. See Chapter 3 to for step-by-step instructions on setting up a workout, or page 6 for a programming example.
1. Connect one end of the adapter cable (0002-0437) to the data cable port on the controller and the other end to a standard CTS data cable (DC series). You may use the 25-foot RS-232 data cable (25DC) included with your pace clock
2 Introduction
controller, or another length if that works better in your situation. Connect the other end of the data cable into the data port on the pace clock or scoreboard you will be using to display the workout.
2. If you are using multiple displays (pace clocks and/or lines of scoreboard), they must be connected to each other with RS-232 DC data cables.
3. Ensure that the display(s) you are using have power (either AC power or battery power, depending on the type you are using) and are turned on.
3 Overview
2
Overview
This chapter describes in detail the operation of the pace clock controller and the function of each key on the keyboard. Some users prefer an overview before beginning to use the controller; others prefer to begin programming immediately. This section is the overview; for learning by example, see page 6, or for step-by-step instructions, see page 9.
Display Screen
Summary
The pace clock controller uses a LCD (Liquid Crystal Display) screen on the controller to communicate with you. Symbols and numbers are displayed on the screen to help guide you through the workout process.
Keyboard
This section describes the function of the keys on the pace clock controller.
ON
Use the ON key to turn on the controller. The controller will automatically shut off after five minutes of non-use if not connected to a scoreboard or pace clock. To run a workout, the controller must be plugged into one or more pace clocks or scoreboards from CTS. Power to the scoreboards or displays must be turned on.
OFF
The button to turn off the pace clock controller is located at the beginning of the Colorado Time Systems text (directly above the RUN MODE button) at the top of the controller. Press the button twice in quick succession to turn off the controller.
EDIT MODE and RUN MODE
The two mode keys, EDIT MODE and RUN MODE, enable you to switch back and forth between editing workouts and running workouts. Press the EDIT MODE key when
4 Overview
you want to begin programming a workout or if you need to edit an existing workout or set. The RUN MODE key is used when you are ready to begin the workout.
WORKOUT
The WORKOUT key is used in both the run and edit modes of operation. A workout refers to a series of sets. The pace clock controller has enough memory to store and retrieve up to fifty different workouts.
CLEAR MEMORY
To clear all of the workouts from the memory, press the button located under the sweep next to the Colorado Time Systems text. You will be asked to confirm the request to erase the memory by pressing the RESET key.
SET
The SET key is similar to the WORKOUT key in that it is used in both the edit and run modes of operation. A set, however, refers to the parts of a workout. A set can be made up of multiple subsets. The PC Controller can store 50 workouts, each containing up to 30 sets, with each set having up to 15 subsets.
Numeric Keypad, C/E and ENTER
The numeric keypad occupies the largest portion of the keyboard, and is used to enter numbers. The C/E (Clear/Erase) and ENTER keys are also located in this area.
Note: If the number shown on the LCD screen in the field you are working with is the one you want then you can simply press ENTER. If the number shown is different than the one you want press the C/E key then enter the number and press ENTER.
REPEAT SET and DEC. INTERVAL
The REPEAT SET key is located in the left section of the keypad together with DEC. INTERVAL. Both of these keys are used exclusively during the edit mode of operation. The REPEAT SET key is used when you want to program a particular set to be repeated. After programming a set press REPEAT SET and enter the number of times to be
repeated on the numeric keypad. Then press ENTER.
The DEC. INTERVAL key enables you to program a set in which the interval is decreased by a specified amount after each rep. To program 10 reps of 1:20 and
decreasing the interval by 2 seconds after each rep, you would press: 10, ENTER, 120, ENTER, DEC. INTERVAL, 2, ENTER, ENTER after selecting the workout and set number.
COUNT UP and COUNT DOWN
The COUNT UP and COUNT DOWN keys are used in both run and edit mode. The normal mode of operation is to count up each programmed interval. You can use these keys to change the pace clock’s operation to a count down mode and change back to count up later on. While in edit mode, select the appropriate workout and set then press
5 Overview
HORN ON and HORN OFF
These keys function when the controller is connected to a pace clock or scoreboard that has a horn.
The HORN ON and HORN OFF keys allow you to program the display to emit a tone to help send-off each heat of swimmers within a lane or in multiple lanes or to sound a pace. Select a workout within the run mode and press HORN ON. Key in the number of tones (usually the number of swimmers in each lane) using the numeric keypad, then press ENTER. Now key in the “Pace” (the number of seconds between each swimmer) and press ENTER. The display will inform each group of swimmers with a “beep” when they need to start.
RESET and START/STOP
RESET and START/STOP are both used exclusively during the run mode of operation. The RESET key enables you to restart a set from the beginning of the current rep or the current set. START/STOP is used to either begin a pre-programmed workout or to stop a workout in progress. Pressing START/STOP again after stopping a workout in progress will continue the workout from where it was stopped.
SELECT SCBD
SELECT SCBD is an important key if you are using more than one portable display or one line of a CTS scoreboard. Press the SELECT SCBD key to choose the number of the display (1-10). This is the channel to which the display is set. See your pace clock or scoreboard manual for details. Next press RUN MODE and the Workout and Set number to designate which workout will be displayed on that display. Press SELECT SCBD
again to designate workout and set for another display.
Time of Day
The TIME OF DAY key allows you to post the time of day on your CTS pace clock or scoreboard. The controller does not contain an internal clock so the time of day must be re-entered if it has been turned off. Simply turn on the display and press the TIME OF DAY key. Next, press the C/E key to clear the old time. Select the hour (1-12) and press
ENTER then select the minutes (0-59) followed by ENTER. Press the Time of Day again to display the new time on the scoreboard. To display the time of day on a multi-line scoreboard you must first select scoreboard 1 number using the SELECT SCBD
key.
6 Overview
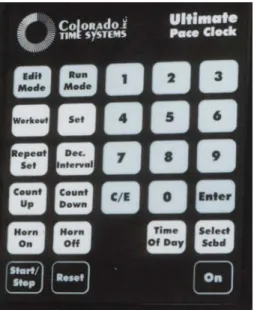
Figure 3 shows the layout of the keys on the pace clock controller
Example Workouts
Below are two examples of workouts showing the keystrokes needed to program each of them into the pace clock controller. These examples will help you better understand the programming capabilities of your pace clock controller.
Workout #1
Set # Repetitions Interval Description
Set, 1, Enter, 10, Enter 130, Enter, Enter 10 x 100 on 1:30 2, Enter, 5, Enter 500, Enter, Enter 5 x 400 free on 5:00 3, Enter, 4, Enter, 1, Enter, 1, Enter REPEAT SET, 2, 115, Enter 600, Enter 300, Enter Enter, Enter 4 x 100 free on 1:15 400 I.M. on 6:00 1 x 200 fly on 3:00 Repeat set 2 times 4, Enter, 1, Enter, 500, Enter, Count
Down, Enter
5 minute rest, counting down from 5:00 to 0:00
5, Enter 8, Enter, 230, Enter, Enter 8 x 150 kick on 2:30 6, Enter, 20, Enter DEC. INTERVAL, 100, Enter 1, Enter, Enter 20 x 50 beginning on 1:00 and decreasing the interval by 1 second each time.
7 Overview
Workout #2
Set # Repetitions Interval Description
Set, 1, Enter 1, Enter, 1500, Enter, Enter 500 swim, kick, pull on 15 minutes 2, Enter 4, Enter, 1000, Enter, Enter 4 x 800 free on
10:00
3, Enter 1, Enter, 300, Enter, Enter 3 minute rest 4, Enter 5, Enter 5, Enter 5, Enter REPEAT SET 45, Enter 40, Enter 35, Enter 3, Enter, Enter 5 x 50 on 45 sec. 5 x 50 on 40 sec. 5 x 50 on 35 sec. Repeat set 3 times
Workout #50
Scoreboard as a Standard Pace Clock when you are not running other workouts. Also useful for SASC 9 and Ultimate Pace Clock.
Set # Repetitions Interval Description
Set, 1, Enter 99, Enter 99, Enter Repeat Set 6000, Enter 6000, Enter 45, Enter, Enter Count up to 1 hour 99 times Same as Above Repeat set 45 times The above “workout set” would run for just over a year. You can customize the set as you like, making it shorter, or making it longer by increasing the number of subsets up the maximum of 14, and using the 15th to repeat the set up to 99 times. If that is not enough, you can do the same with sets 2 through 30 in the same workout.
To program a set to count down, press the COUNT DOWN key between the final 2 enters (ENTER, COUNT DOWN, ENTER)
9 Setup/Operation
3
Setup/Operation
The first part of this chapter gives you step-by-step instructions for programming workouts. The second part describes running a training program.
Operation
Programming The Pace Clock
Before you begin using the pace clock controller you must program a workout. Programming a workout is not difficult, but you should read through this section to be sure you are taking full advantage of the many programming features.
This section will cover the basics of programming a workout using the PC Controller. To download workouts from Hy-Tek's Workout Manager, please refer to Chapter 3, page 15. For examples of how to program a workout, please refer to the “Example Workouts” section beginning on page 6.
Programming a Workout
To begin programming a workout, press the EDIT MODE key. This key tells the pace clock controller that you want to begin programming a workout versus running a workout. Now select the WORKOUT key. The next available workout number (up to 50 total) is displayed on the LCD screen.
Select the workout number to be programmed by entering the number (1-50) on the numeric keypad followed by ENTER.
Since every workout is comprised of several sets you must now select the set that will be created. The next available set number (up to 30) will automatically be displayed on the LCD screen. To program a set, press SET then select the set number by entering the number (1-30) on the numeric keypad followed by ENTER. In this example, we will enter SET, 1, ENTER to select the first set.
Note: If the set number shown on the LCD screen is the one you want then you can simply press ENTER. If the set number shown is different than the one you want press the C/E key then enter the number and press ENTER.
10 Setup/Operation
Now you are ready to program your first set. First, enter the number of repetitions (the number of reps will be displayed on the LCD screen in the REPS area) followed by
ENTER. Second, input the interval followed by ENTER. (For example: 10, Enter, 125, Enter, is equivalent to programming a set of 10 reps, each 1 minute and 25 seconds in length). Press ENTER again to begin programming the next set or continue entering more subsets by inputting reps and new intervals. Since each set can have multiple subsets, you must press ENTER a second time after programming a rep and interval to begin programming the next major set.
Select the next set by pressing the SET key then entering number 2 on the numeric keypad. Press the ENTER key. Next, press the number of repetitions, ENTER, the interval, followed by ENTER, ENTER. Repeat up to 30 sets.
Workouts and sets are automatically saved when entered.
Count Up vs. Count Down Intervals
The normal mode of operation is to ‘count up’ the interval during a set. You may change this mode to ‘count down’ for any set. In order to change the mode from count up to count down, program the workout and set as usual but before pressing ENTER a second time, select COUNT DOWN. Now press ENTER again to save the set and continue programming. The LCD screen will display a ‘U’ or ‘D’ notation indicating the mode of operation.
Modify Existing Workout or Set
To modify an existing workout you must be in the EDIT MODE. Modifying a set
overwrites the previously saved set. Begin by pressing EDIT MODE. Select the workout to be modified by pressing WORKOUT, NUMBER, ENTER. Press SET, NUMBER,
ENTER. Now, program the set as usual. Example: Pressing 5, ENTER, 535, ENTER,
ENTER is equivalent to programming a set of 5 reps of 5:35.
Note: One set can contain multiple subsets. For example, a coach may program set #1 to be 10 reps of 1:10 followed by 2 reps of 35 seconds and finishing with 1 rep of 5 minutes. The keystrokes for this set would be: SET, 1, ENTER, 10, ENTER, 110, ENTER, 2
ENTER, 35, ENTER, 1, ENTER, 500, ENTER, ENTER.
Programming a Repeating Set
Having the ability to program multiple subsets within a set enables coaches to easily program a workout that contains complicated and repeating sets.
Note: Repeating sets are referred to as circuit sets in the Hy-Tek Workout Manager software.
11 Setup/Operation
The repeating set feature allows coaches to design workouts made up of repeated sets. For example, a main workout set could be: 10 reps of 1:10, followed by 2 reps of 45 seconds, completed by 1 rep of 6:00. If you wanted to repeat the set (which is identified as Set #1 of Workout #6 for the purposes of this example) four times, the keystrokes would be as follows: EDIT MODE, WORKOUT, 6, ENTER, SET, 1, ENTER, 10, ENTER, 110, ENTER, 2, ENTER, 45, ENTER, 1, ENTER, 600, ENTER, REPEAT SET, 4, ENTER, ENTER.
A “4” will be displayed under the REPEAT SET area on the LCD screen to indicate the number of times the entire set will be repeated.
Decreasing Interval Within a Set
The pace clock controller can also program sets that have a decreasing interval. This feature enables coaches to challenge their athletes with sets where the interval decreases after each repetition. 10 reps starting at 1:20 and decreasing the interval by 2 seconds after each rep is one example.
Programming this type of set is easy using the DEC. INTERVAL key on the pace clock controller keypad. After a set has been entered, press the DEC. INTERVAL key, enter the amount of which the interval will be decreased by, then press ENTER.
For example: 10, ENTER, 120, ENTER, DEC. INTERVAL, 2, ENTER, ENTER is programming 10 reps of 1:20 and decreasing the interval by 2 seconds after each rep.
Running a Workout
Now that you have programmed the pace clock controller, you can use it to automate your workouts.
Using a Single-Line Scoreboard or Portable Display
This section provides the basic information needed to run a programmed workout on a single-line scoreboard or a single, portable display. For information regarding running multiple workouts simultaneously, please turn to page 13 where the SELECT SCBD key is discussed in detail. Regardless of the number of workouts you are running, this section provides valuable information about the basics of running any programmed workout.
Load and Run a Stored Workout
To begin a saved workout, press the RUN MODE key. Select the workout that you want to run by pressing WORKOUT, NUMBER, ENTER. Begin the workout by pressing the START/STOP key.
12 Setup/Operation
Run Workout From a Point Other Than First Set
If you want to begin a workout at another point other than the first set you can do this by selecting the workout and set number. Enter the workout and set numbers using the numeric keypad then press START/STOP. For example, to run Workout #1 beginning at Set #3 you would press: RUN MODE, WORKOUT, 1, ENTER, SET, 3, ENTER, START/STOP.
Stopping Halfway Through a Workout or Set
At times, you may want to stop a workout at some point to advise your athletes and wish to resume where the workout left off. To do this, simply press START/STOP to stop the workout and START/STOP to resume the workout.
Stopping and Restarting a Set
The pace clock controller provides the ability to stop a set halfway through and restart from either the beginning of the current rep or from the beginning of the set. To do this, press START/STOP to stop the set. Press RESET to return to the beginning of the current rep or double click the RESET button to return to the beginning of the current set. Press START/STOP to begin the rep or set again.
Programming the Horn
The pace clock controller has the ability to sound a horn on Pace Clocks and Scoreboards that have one. The horn can be programmed to sound a pace or to send off swimmers at the beginning of each interval. The horn feature is used in Run Mode after a workout is selected.
From Run Mode, select the workout number followed by ENTER. Turn on the horn by pressing the HORN ON key. A “Y” will be displayed in the Horn section on the LCD screen to indicate that the horn has been turned on. You must now select the number of tones and pace. The number of tones refers to how many times per set or interval the buzzer will sound. The pace is the interval between each blast.
Programming for Multiple Send-offs
To use the pace clock controller horn to sound as each heat of swimmers leaves the wall at the beginning of each interval, you would set the number of tones to equal the number of swimmers in each lane and the Pace as the send-off interval. For example, if there are three swimmers per lane and the send-off is 10 seconds apart, you would program the horn as follows: HORN ON, 3, ENTER, 10, ENTER. The LCD screen would read “Y” for horn, 3 for # of tones, 10 for pace.
13 Setup/Operation
Sounding a Pace
The horn can also be used to sound a pace or goal split times during a long set. For example, you could program the horn to sound every 60 seconds during a set of 800s. This tone would alert each swimmer that another minute has passed. To program a pace simply press HORN ON, select an appropriate number of tones (in this case 8 would be the number) and press the pace interval (100 in this case). Press HORN OFF to turn off the horn feature. Press START/STOP to begin the workout.
Multiple Workout Feature
The pace clock controller is designed to run up to ten different workouts simultaneously. To utilize this feature the PC Controller must be connected to a series of scoreboards or pace clocks from Colorado Time Systems.
Selecting the Scoreboard or Display Line
To run any programmed workout you must first select the proper scoreboard. Use the
SELECT SCBD key to indicate which scoreboard will be running your workout. The scoreboard number will appear on the LCD screen under Scbd in the upper left hand corner. Use numbers 1-10. A “0” will be displayed for scoreboard #10. Once you have selected your scoreboard press RUN, WORKOUT then select the appropriate workout and set. Press START/STOP when you want to begin the workout.
Starting a Second Workout
To begin a second workout on another display, simply specify the new scoreboard
number using the SELECT SCBD key, press RUN,WORKOUT, enter the workout and set number then press the START/STOP key.
Starting and Stopping Multiple Workouts Simultaneously
The pace clock controller is equipped with a way to start multiple workouts simultaneously. From Run Mode, select each scoreboard and enter the appropriate workout number. Once all scoreboards are programmed, double-click the START/STOP
button to initiate all the workouts simultaneously. Double-click the START/STOP
button again to stop all workouts.
Edit One Workout While Running Multiple Workouts
The pace clock controller allows you to edit one workout without disrupting other workouts that are in progress. This also applies to stopping and restarting one of many workouts in progress. Press EDIT MODE and enter the workout and set number. Make the necessary changes then press RUN MODE, SELECT SCBD and enter the
14 Setup/Operation
scoreboard number. Next reload the workout by selecting the workout and set number. Press START/STOP to begin the workout.
If you want to stop one workout, press the SELECT SCBD then enter the appropriate scoreboard number. The PC Controller should still be in RUN MODE. Next press
15 Special Features
4
Special Features
Hy-Tek Workout Manager Download
To download workouts from Hy-Tek’s Workout Manager software program, follow the instructions in the Workout Manager user guide for downloading a workout to Colorado Time Systems’ pace clock software for a System 6, System 5 or Swim IV timers.
To initiate the download capability on the pace clock controller you must first connect the controller to your PC by connecting one end of the RJ45 cable into the pace clock
controller and the other end into the DB9 to RJ45 converter. Then plug the converter into the COM port of your PC. Next, turn the controller on by pressing the ON key and set the controller to receive the PC data by pressing the EDIT MODE key twice. The keystrokes should be ON, EDIT MODE, EDIT MODE.
Now you can begin downloading workouts from the Workout Manager software. Once the workouts have been saved in the pace clock controller you can edit them using the controller keypad just like the workouts you programmed using the controller.
Displaying Time of Day
You can use the Pace Clock controller to display time of day on your CTS pace clock or scoreboard when you are not using it to edit or run workouts. Use the AC power adapter (CTS part #015-555) that came with your controller to save your battery.
Turn the controller on and press the TIME OF DAY key. To set the current time, press the C/E key to clear the old time. Select the hour (1-12) and press ENTER, then select the minutes (0-59) followed by ENTER. Press the Time of Day again to display the new time on the scoreboard. It will show on a module set to channel 01, 11 or 0F. The
controller does not contain an internal clock, so if it has been turned off, you must re-enter the time of day.
Press ENTER to exit Time of Day mode and return to either RUN or EDIT mode.
Scoreboard as a Standard Pace Clock
When you are not running customized training workouts, you can use the Pace Clock controller to cause your scoreboard to display standard pace clock information by programming a specific workout to count up or down to one hour, and repeat it for more than a year. See page 7 for an example. The controller can also be used the SASC9 and the Ultimate Pace Clock.
16 Special Features
Technical Support
CTS Tech Support:
Phone: (ext. 256) 800-287-0653 or 970-667-1000 Fax: 970-667-1032
E-Mail Tech Support:
[email protected] The CTS Web Page: