Software Requirements Specifications
Copyright COMP5541 Team III © 2010Authors
Ahmed Daoudi David Zerkler Gay Hazan Isabelle Toutant Mariano Diaz René Toutant Virginia Cook William Nzoukou Yassine AmaicheRevision History
Revision
Date
Comments
1.0 2010-03-02 First draft
1.1 2010-03-04 Sections 1.1, 1.4, 2.2 and 2.3 added 1.2 2010-03-06 Sections 3.2.6 and 3.2.7 added 1.3 2010-03-10 Sections 3.2.1, 3.2.3, appendix A,B,C and
D added
2.0 2010-03-22 Merged Problem Reporting/Tracking and Requests/Approvals/Work Orders into a
single System Feature called Requests. Update Physical Asset Management 2.1 2010-03-22 Removed class diagrams, ER diagrams
and data dictionary
2.2 2010-03-22 Sections 3.2.4 added; Removed Cocomo and Log sheets
2.3 2010-03-23 Added Non-Functional Requirements from A2
2.4 2010-04-21 Added The last missing Parts Except User Characteristics
2.5 2010-04-25 Final edit
Table of Content
1. Introduction ... 1
1.1 Purpose and Scope ... 1
1.2 Acronyms... 1 1.3 References ... 2 1.4 Overview ... 2 2. Overall Description ... 3 2.1 Product Perspective ... 3 2.1.1 System Interfaces ... 4 2.1.2 User Interfaces ... 4 2.1.3 Hardware Interfaces ... 4 2.1.4 Memory Constraints ... 4 2.1.5 Software Interfaces ... 4 2.1.6 Communication Interfaces ... 5 2.1.7 Operations ... 5 2.2 Product functions ... 5 2.3 User characteristics ... 5 2.4 Constraints ... 6
2.5 Assumptions and Dependencies... 6
2.6 Apportioning of requirements... 6
3. Specific Requirements ... 7
3.1 Descriptive Requirements ... 7
3.1.1 User Interfaces ... 7
3.1.2 Hardware, Software and Communications Interfaces ... 7
3.2 System Features ... 8
3.2.1 Authentication/Manage Account Information ... 9
3.2.1.1 Use Case Model ... 9
3.2.1.2 Functional Requirements ... 14
3.2.2 Manage User Permissions ... 15
3.2.2.1 Domain Model ... 15
3.2.2.2 Use Case Model ... 16
3.2.3 Requests ... 19
3.2.3.1 Activity Diagram ... 20
3.2.3.2 Use Case Model ... 21
3.2.3.3 Functional Requirements ... 29
3.2.4 Physical Asset Management ... 32
3.2.5.2 Functional Requirements ... 57
3.2.6 Manage Locations ... 58
3.2.6.1 Domain Model ... 58
3.2.6.2 Use Case Model ... 59
3.2.6.3 Functional Requirements ... 62
3.2.7 Bulk Entry (via CSV files) ... 63
3.2.7.1 Use Case Model ... 63
3.2.7.2 Functional Requirements ... 63
3.3 Performance Requirements……….. ... 64
3.4 Design Constraints ... 65
3.5 Software System Attributes ... 65
3.6 Non-Functional Requirements ... 66 3.6.1 Multilingual support ... 66 3.6.2 Backups ... 66 3.6.4 Network architecture ... 66 3.6.6 Browser support ... 67 3.6.7 Performance ... 67 3.6.8 Users ... 67 3.6.9 Security ... 67 3.6.10 Device Support ... 67 3.6.11 System Crashes ... 67 3.6.12 Error Handling ... 68
3.6.14 System Logs & Audits ... 68
List of Figures
Figure 1 - UUIS Architecture ... 3
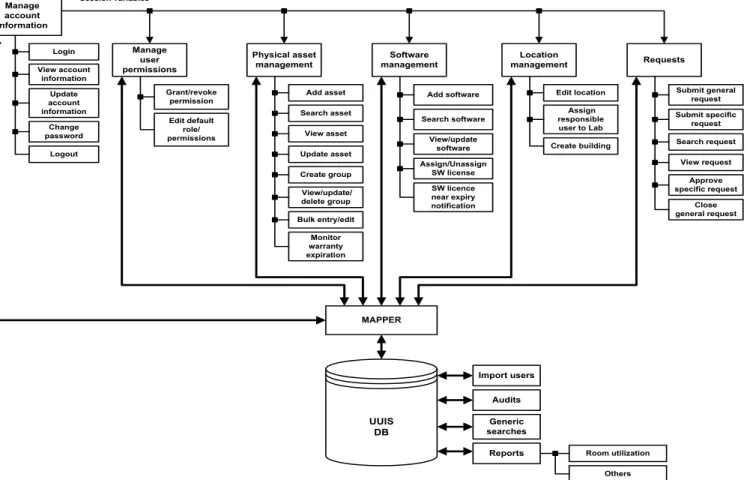
Figure 2 – System Features – Bloc Diagram ... 8
Figure 3 - Authentication/Manage Account Information – Use case diagram ... 9
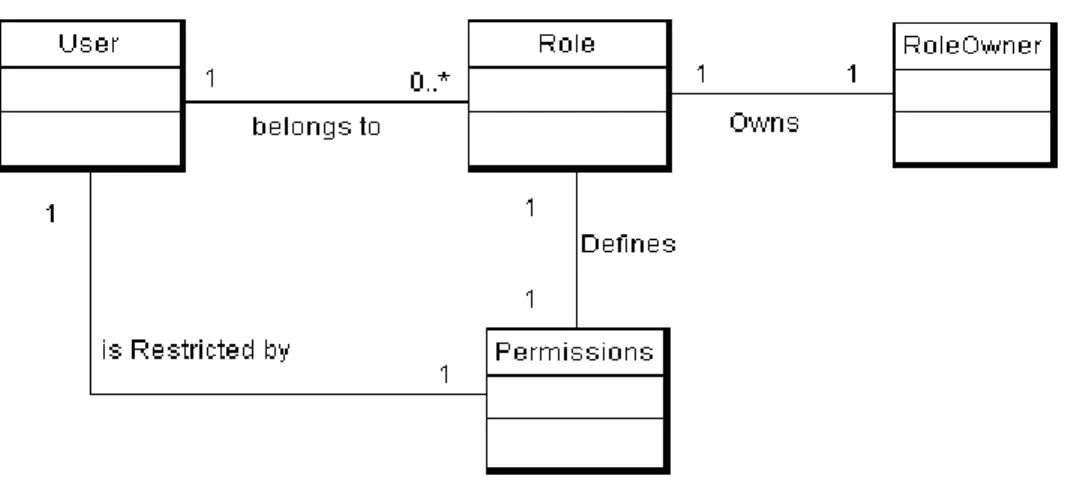
Figure 4 – Manage User Permission – Domain model ... 15
Figure 5 – Manage User Permission – Use case diagram ... 16
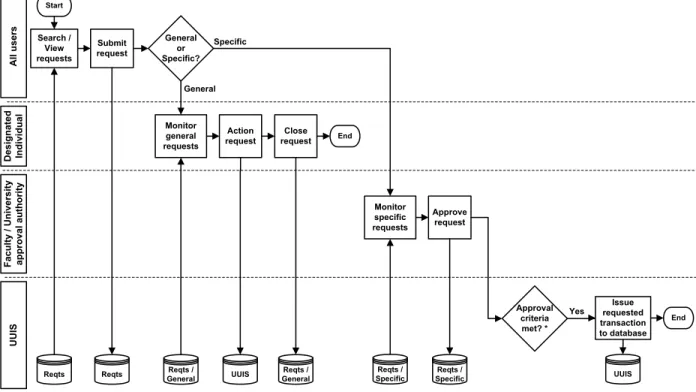
Figure 6 – Requests – Activity diagram ... 20
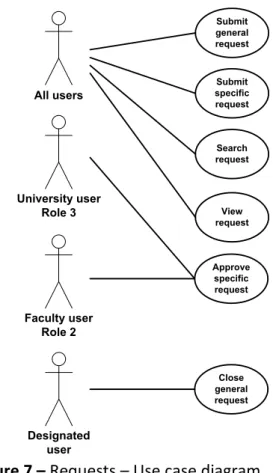
Figure 7 – Requests – Use case diagram ... 21
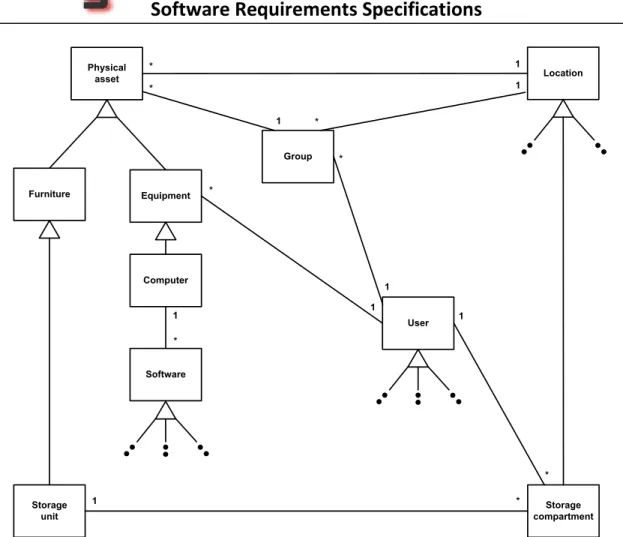
Figure 8 - Physical assets management – Domain model ... 33
Figure 9 - Physical assets management – Use case diagram ... 34
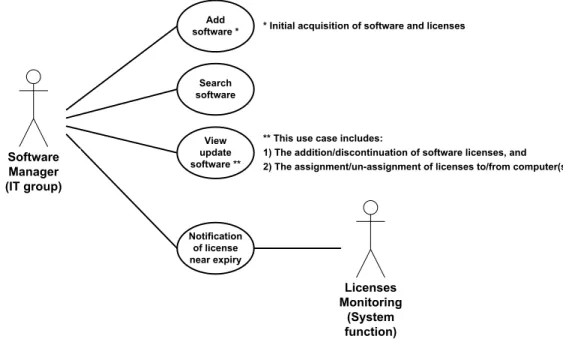
Figure 10 - Software management – Use case diagram ... 50
Figure 11 – Manage Locations – Domain model ... 58
Figure 12 – Manage Locations – Use case diagram ... 59
Figure A. 1 - User Interface (1 of 12) ... 69
Figure A. 2 - User Interface (2 of 12) ... 70
Figure A. 3 - User Interface (3 of 12) ... 71
Figure A. 4 - User Interface (4 of 12) ... 72
Figure A. 5 - User Interface (5 of 12) ... 73
Figure A. 6 - User Interface (6 of 12) ... 74
Figure A. 7 - User Interface (7 of 12) ... 75
Figure A. 8 - User Interface (8 of 12) ... 76
Figure A. 9 - User Interface (9 of 12) ... 77
Figure A. 10 - User Interface (10 of 12)... 78
Figure A. 11 - User Interface (11 of 12)... 79
List of Tables
1.
Introduction
1.1 Purpose and Scope
This Software Requirement Specification (SRS) provides the detailed requirements for the Unified University Inventory System (UUIS) produced for the Imaginary University of Arctica (IUfA). This document is intended to be used primarily by the software designers during the design phase, but will also be used extensively during the testing phase. The UUIS will integrate and organize the existing inventory systems of three faculties in the IUfA. While the system will support the faculties existing legacy inventory codes and barcodes, emphasis will be placed on the new unified barcode system.
The system’s primary function will be to manage all types of physical assets, software licenses, and location contents & custodians. Managing, in this context, implies keeping a record of the current location, status, description, and ownership of the inventoried item, as well as being able to search for and display any system information.
Physical assets include all manors of furniture and equipment, whether movable (desks, chairs, computers, etc) or immovable (projectors fixed to a room). Software licenses will be managed, including who has access to which license, and where (on which computer) the software is installed. Locations are all the places in which things are stored, which includes the various types of rooms in the university, as well as lockers, and cabinet drawers. Both the contents of the location and the location’s owner are stored.
The secondary role of the software is to create a system of work orders, requests and problem tickets to support the proper movement and allocation of the inventoried items. UUIS will maintain a list of individual user permissions and access rights that prevent unauthorized access to potentially sensitive information.
The main advantage of the UUIS will be the use of all university inventory information in a clear, concise and consistent format. This will allow a smaller learning curve for students, faculty and employees in manipulating information. UUIS will be especially useful for any administrator making decisions based on the inventory of the entire university, and avoiding the use of multiple individual faculty systems.
HTTP Hypertext Transfer Protocol
IDE Integrated Development Environment IUfA Imaginary University of Arctica
RDBMS Relational database management system SRS Software Requirement Specification TBD To Be Determined
UUIS Unified University Inventory System
1.3 References
[IEEE, 1998] std 830-1998: IEEE Recommended Practice for Software Requirements Specifications by Institute of Electrical and Electronics Engineers, 1998.
1.4 Overview
Section 2 describes the needs and constraints on the UUIS software as well as the hardware systems it will run on and interface with.
Section 3 provides a detailed description of all the UUIS abilities and the requirements necessary to correctly enable those abilities.
This SRS is designed with real-world objects in mind, and relies heavily on use cases to explain the various functions associated with those objects. A list of specific functional requirements follows each section in order to delineate exactly what needs to be done by the programmer. These functional requirements allow an adequate organization and simplification of the testing phase.
Section 3 concludes with a detailed description of various physical, logical, and security constraints. This takes the form of a list of non-functional requirements.
2.
Overall Description
This section of the SRS provides a background for the requirements detailed in section 3.
2.1 Product Perspective
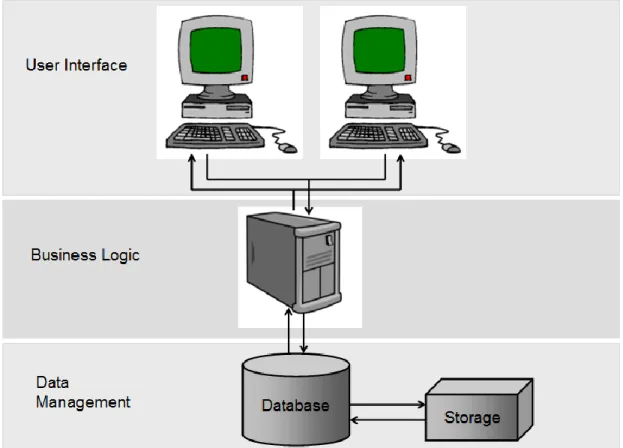
UUIS is a web-based client application that can be accessed via any web browsers over a network. It is a 3-tier solution in which the user interface, the business logic and the data management are developed and maintained as independent modules.
Figure 1 - UUIS Architecture
1. User Interface
Top layer of the application, the interface main function is to display information received from other tiers in a user-friendly format.
3. Data Management
Bottom layer of the application, the data management consists of a database server that stores all system's data. It keeps data independent from application servers or business logic.
2.1.1 System Interfaces
UUIS is a web-based client interface that will interact with the database server using TCP/IP connection.
2.1.2 User Interfaces
The user will interact with the system through a web interface supported by any computer running one of the following operating systems: Microsoft Windows, UNIX, Linux, or Apple Macintosh. The interface will run properly provided the computer has a web-browser installed (Microsoft Internet Explorer, Mozilla Firefox, etc.) and internet connection is available.
All elements of the interface will be displayed in English. However, if required, the design will support the addition of other languages.
2.1.3 Hardware Interfaces
No specific hardware requirements.
2.1.4 Memory Constraints
- Minimum memory required for Eclipse IDE installation: 189 MB; - Minimum memory required for Tomcat installation: 9 MB; - Minimum memory required for MySQL installation: 104.9 MB; - Size and quantity of stored data; and
- spec107 hard drive specifications.
2.1.5 Software Interfaces
- Apache Tomcat version 6.0.24, an open source Java web-server;
- MySQL version 5.1.43, a relational database management system (RDBMS) that runs as a server providing multi-user access to a given database;
- Java version 6; and
2.1.6 Communication Interfaces
UUIS uses Hypertext Transfer Protocol (HTTP) as client-server communication protocol. The interaction with the database server will be made using TCP/IP connection.
2.1.7 Operations
Backups for the Database of the system will be performed on a daily basis.
2.2 Product functions
The UUIS is a tool to organize the inventory needs of the IUfA. This includes:
Maintaining a list of all inventory assets, including legacy and/or universal barcodes and multiple descriptive attributes per inventory item;
Managing the current location of all inventory assets, including off-campus locations (e.g. professor’s home, in the field, on a job-site, etc.);
Managing a system of requests, approvals and confirmations to create work-orders and detail the movement of inventory assets;
Managing detailed software-licensing agreements, including installation locations;
Managing the stewardship and contents of locations (e.g. offices, lockers, labs, lab seats, desk drawers, etc.);
Maintaining a rigid set of User Permissions to ensure access to user appropriate data ONLY (searching and/or editing);
Creating a variety of reports including detailed log of system use; and
Reporting errors or problems such as: a. Broken furniture or equipment b. Missing furniture or equipment c. Expiring Warrantees
d. Room overcapacity
web browser, navigating through WebPages, filling-in and submitting forms, and the general interaction with a dynamic website.
The users should also be able to read English and understand the text to navigate through the system. Since the system does not provide any accessibility features, it is not suitable for use by people with visual disabilities.
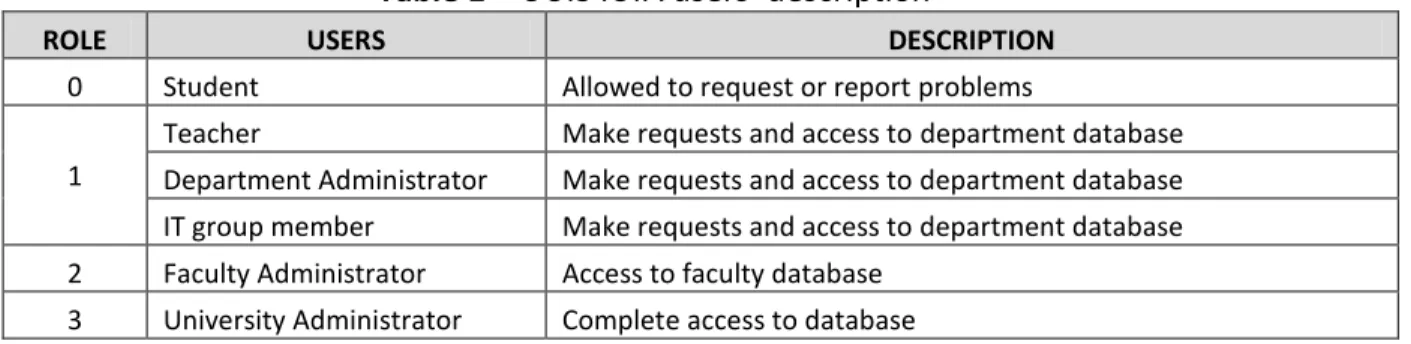
The following tables list the main type of users and stakeholders and give a brief description of their usual needs.
Table 1 – UUIS IUfA users’ description
ROLE USERS DESCRIPTION
0 Student Allowed to request or report problems 1
Teacher Make requests and access to department database Department Administrator Make requests and access to department database IT group member Make requests and access to department database 2 Faculty Administrator Access to faculty database
3 University Administrator Complete access to database
2.4 Constraints
The UUIS is a dynamic web application and it will be implemented using the PHP language. Therefore a web server (preferably Apache 2 and above) and a PHP interpreter (version 5.2 and above) are required.
2.5 Assumptions and Dependencies
The UUIS will be developed using the PHP language. Therefore, it is assumed that the system on which the UUIS will be deployed will have an Apache web server, a PHP interpreter and a MySQL Database up and running.
2.6 Apportioning of requirements
Future versions of the UUIS website will support multiple languages. Priority will be the addition of French. Other languages will be added on an as-required basis.
Bar-coding technology might be supported in future versions to add or search for physical assets in the system. Bar-coding is a technology that has proven its reliability worldwide. Its main advantage is the automation of some tasks that are manually done now by a human operator.
3.
Specific Requirements
3.1 Descriptive Requirements
3.1.1 User Interfaces
Appendix A provides a detailed description of the UUIS user interfaces.
3.1.2 Hardware, Software and Communications Interfaces
The software will be installed on three Dell PowerEdge T710 Tower Server machines that will be interconnected to each other. Different modules will be installed on each server. A fourth server will be used as a DBMS dedicated machine to which all the other three servers will have to connect in order to execute their queries and get results back. The software needed is a popular browser installed on client machines. A web server and a PHP interpreter will reside on three servers, and a RDBMS will reside on the fourth server (MySQL). The main communication protocol will be the one used for internet all over the world, TCP/IP. Requests sent will be HTTP formatted.
3.2 System Features
The following figure illustrates the partitioning of the IUfA UUIS from a use cases and additional functions standpoint.
Software management UUIS DB Add software Assign/Unassign SW license SW licence near expiry notification Generic searches Reports Search software Location management Edit location Create building Assign responsible user to Lab Requests Submit general request Submit specific request Search request View request Close general request Approve specific request Manage user permissions Authentication/ Manage account information Room utilization Others Login Logout Session variables Audits Physical asset management Add asset View asset Update asset Create group View/update/ delete group Bulk entry/edit Monitor warranty expiration Search asset View/update software View account information MAPPER Grant/revoke permission Edit default role/ permissions Update account information Change password Import users
9
3.2.1 Authentication/Manage Account Information
The Authentication/Manage Account Information feature is required in the UUIS application to ensure only legitimate users are logged on to the system and can access information. Authentication determines also what kind of access level a user is entitled to.
3.2.1.1 Use Case Model
The following figure provides the Authentication/Manage Account Information use case diagram.
View
Account
Information
Update
Account
Information
Change
Password
General user
(Role 0)
Login
Figure 3 - Authentication/Manage Account Information – Use case diagram
The following paragraphs provide the detailed description for each use case. 3.2.1.1.1 Login
Role: General users (Role 0);
Pre-condition: Unauthenticated session;
Steps:
1. The user selects the Login button accessible from the IUfA UUIS Home page; 2. The system displays the Login page;
3. The user provides username, password, and string of displayed image (CAPTCHA); 4. The user selects the Submit button;
5. The system, if the provided information is incomplete or erroneous, displays an error message to the user:
b. The system displays the Login page with blank fields;
6. The system fetch user permission level and displays IUfA UUIS main page with menus corresponding to user permission level;
7. The system:
a. Creates a new log record to the database;
b. Assigns the log entry a unique identification number (logID); c. Registers the user ID, and login date;
Post-conditions:
1. Authenticated session; and
2. A new log entry is stored in the database;
Exceptions:
1. The user cancels the login by selecting the Cancel button from the Login page: a. The system displays the IUfA Home page; and
b. The system does not store any updated information; 2. A database error is encountered:
a. The system displays an error message;
3. Invalid username, password and/or string (CAPTCHA): a. The system displays an error message.
3.2.1.1.2 View Account Information
Role: General users (Role 0);
Pre-condition: Authenticated session;
Steps:
1. The user selects the View account button under the MyProfile tab (accessible from all system pages);
2. The system displays the View Account Information page with: a. Username
b. First name; c. Last name; d. E-mail; e. Role;
Post-conditions: The system displays the View Account Information page;
Exceptions:
1. A database error is encountered:
a. The system displays an error message.
3.2.1.1.3 Update Account Information
Role: General users (Role 0);
Steps:
1. The user selects the Update account button under the MyProfile tab (accessible from all system pages);
2. The system displays the Update Account Information page with: a. Un-editable fields:
i. Username; ii. Role;
b. Editable fields (all mandatory); i. First name;
ii. Last name; iii. E-mail;
3. The user edits/updates the above fields as applicable; 4. The user selects the Submit button;
5. The system, if any of the above fields are incomplete, displays a message indicating the missing information and request the user to provide it:
a. The user selects the Return button; and
b. The system displays the Update Account Information page with current information;
6. The system displays a message with the user provided information and requesting the user to confirm the submission:
a. The user selects the Confirm button; or b. The user selects the Return button;
i. The system displays the Update Account Information page with current information;
7. The system updates the User database entry with the applicable changes;
Post-conditions:
1. The system displays the View Account Information page with updated information; and
2. The updated user information is stored in the database;
Exceptions:
1. The user cancels the update by selecting the Cancel button from the Update Account Information page:
a. The system displays the View Account Information page; and b. The system does not store any updated information;
2. A database error is encountered:
1. The user selects the Change Password button under the MyProfile tab (accessible from all system pages);
2. The system displays the Change Password page that requests the user to confirm old password once, and to enter new password twice;
3. The user enters the appropriate information and select the Submit button;
4. The system, if the provided information is incomplete or erroneous, displays an error message to the user:
a. The user selects the Return button; and
b. The system displays the Change Password page with blank fields; 5. The system:
a. Validates the old and new password;
b. Updates the User database entry with the new password;
c. Displays a confirmation message to the user that password has been successfully changed;
i. The user selects the Return button;
d. An e-mail is sent to the user with password change confirmation;
Post-conditions:
1. The system displays the Password Successfully Changed page; and 2. The updated user password is stored in the database;
Exceptions:
1. The user cancels the update by selecting the Cancel button from the Change Password page:
a. The system displays the Change Password page with blank fields; and b. The system does not store any updated information;
2. Invalid old or new passwords are entered: a. The system displays the an error message; 3. A database error is encountered:
a. The system displays an error message.
3.2.1.1.5 Logout
Role: General users (Role 0);
Pre-condition: Authenticated session;
Steps:
1. The user selects the Logout button accessible from all system pages; 2. The system displays a message requesting the user to confirm the logout:
a. The user selects the Confirm button; or b. The user selects the Return button;
i. The system displays the original system page from which the Logout button was accessed);
3. The system updates the log database entry with the logout date; 4. The system displays the IUfA UUIS Home page.
Post-conditions:
1. Unauthenticated session; and
2. The logout date is stored in the database;
Exceptions:
1. A database error is encountered:
3.2.1.2 Functional Requirements
3.2.1.2.1 Login
[F.Req.1] The system shall show the user two username and password boxes
[F.Req.2] The system shall hide the password stroke keys from the user
3.2.1.2.2 View Account Information
[F.Req.3] The system shall show the user his level of access
[F.Req.4] The system shall show the user information on his last login session.
[F.Req.5] The system shall show the user his name and e-mail account
3.2.1.2.3 Update Account Information
[F.Req.6] The system shall allow the user to change his e-mail address
[F.Req.7] The system shall allow the user to change his home address
[F.Req.8] The system shall allow the user to change his phone number
3.2.1.2.4 Change Password
[F.Req.9] The system shall ask for the actual and the new password
[F.Req.10]The system shall ask for confirmation of the new password
[F.Req.11]The system shall send an e-mail to the user notifying him of password change.
3.2.1.2.5 Logout
[F.Req.12]The system shall show a logout Button on all the pages
3.2.2 Manage User Permissions
Admin Users (Role 1 and above) of the IUfA UUIS have the capability to grant/revoke permissions. Following the request to grant or revoke permission from a Supervisor, the Admin User of each level will be able to:
1. The system shall allow the importing of data already available from a legacy data source.
2. Grant/Revoke the requested permission/s to a User; 3. Edit Default permissions to a given Role.
4. Add new Role.
3.2.2.1 Domain Model
The following figure illustrates the domain model applicable to Manage Permissions in the context of the IUfA UUIS.
3.2.2.2 Use Case Model
The following figure provides the Manage User Permissionsuse case diagram.
Figure 5 – Manage User Permission – Use case diagram
The following paragraphs provide the detailed description for each use case. 3.2.2.2.1 Grant/Revoke Permission
Role: Admin Users (Role 1 and above);
Pre-condition: Authenticated session, Admin privileges;
Steps:
1. Admin selects the Security option under the System Administration tab (accessible from all system pages);
2. The system displays the Security Administration page; 3. The Admin selects the User Permission Tab;
4. The Admin searches for target user;
5. The system displays the complete set of permissions, and whether they are Granted/Revoked for the selected user;
6. The admin selects permission to Grant/Revoke; Repeat step 3-5 until finish;
7. The user selects the Submit button; 8. The system logs the transaction;
Post-conditions:
1. The system displays the Security Administration page;
2. A new set of permissions is Granted/Revoked to a given set of user/s;
Exceptions:
a. The system displays an error message.
2. At any time, the Admin cancels by selecting the Cancel button: a. The system displays the Security Administration page; and
b. The system does not log transaction associated with the cancelled request; The system need to ensure a continuous up time all the time. If an unforeseen event happens that causes the main servers to go down, backups in another server need to be still available for access. Whenever a transaction happens in the main server like write, the secondary server needs to perform the same action.
The set of permissions in the system is restricted to the ones formally defined. There is no need for customized permissions since roles and status of everyone in the university is already known in advance.
3.2.2.2.2 Edit Default Role Permissions
Role: Admin Users (Role 1 and above);
Pre-condition: Authenticated session, Admin privileges;
Steps:
1. Admin selects the Security option under the System Administration tab (accessible from all system pages);
2. The system displays the Security Administration page; 3. The Admin selects the Role Permission Tab;
4. The Admin searches for a Role to edit;
5. The system displays the complete set of permissions, and whether they are Granted/Revoked for the selected Role;
6. The admin selects permission to Grant/Revoke; Repeat step 3-5 until finish;
7. The user selects the Submit button; 8. The system logs the transaction;
Post-condition:
1. The system displays the Security Administration page;
2. A new set of permissions is Granted/Revoked to a given set of user/s;
Exceptions:
1. At any time system fails:
a. The system displays an error message.
2. At any time, the Admin cancels by selecting the Cancel button: a. The system displays the Security Administration page; and
3.2.2.3 Functional Requirements
3.2.2.3.1 Grant/Revoke Permissions
[F.Req.1] The system shall allow Admins to search for users.
[F.Req.2] The system shall allow Admins to clear search criteria
[F.Req.3] The system shall allow Admins of a given Role, to Grant/Revoke permissions to users belonging to that given Role.
[F.Req.4] The system shall log every Transaction involving Permissions for further Audit.
[F.Req.5] The system shall allow a Admins to cancel a transaction.
[F.Req.6] The system shall allow Admins to Grant/Revoke Admin Privileges to a given user.
[F.Req.7] The system shall, upon successfully completing the report problem operation, issue an e-mail notification to the user and the Problem tracking coordinator including unique identification number and date reported.
3.2.5.3.1 Edit Default Role Permissions
[F.Req.8] The system shall allow Admins to search for Roles.
[F.Req.9] The system shall allow Admins of a given Role, to edit the default set of permissions of that given Role
[F.Req.10] The system shall log every Transaction involving Permissions for further Audit.
[F.Req.11] The system shall allow a Admins to cancel a transaction.
3.2.5.3.3 Add New Role
[F.Req.12] The system shall allow Admins to search for Roles
[F.Req.13] The system shall allow Admins to set the default set of permissions for a new Role.
[F.Req.14] The system shall log every Transaction involving Permissions for further Audit.
[F.Req.15] The system shall allow a Admins to cancel a transaction.
3.2.5.3.4 General/Miscellaneous
[F.Req.16]The system shall allow Admins to print a general user permissions report.
[F.Req.17]The system shall allow Admins to print a user permissions report by Roles.
3.2.3 Requests
All users of the IUfA UUIS have the capability to submit requests. The IUfA UUIS supports two types of requests, general and specific.
General requests are broken into two categories: a. Administrative request; and
b. Technical request.
General administrative requests are used to report problems such as: a. Malfunctioning physical asset;
b. Broken physical asset; and c. Lost physical asset.
General technical requests are used to report problems involving IT such as: a. Malfunctioning computer component;
b. Broken computer component; c. Malfunctioning network; d. Malfunctioning software;
e. Request software installation; and
f. Request a modification to one’s user profile.
General administrative requests will be monitored by a designated individual for each level (based on the requester level). General technical requests will be monitored by a Role 3 designated individual. The designated individual will take the appropriate action and close the request (and provide a closure note).
The IUfA UUIS supports the five categories of specific requests listed below: a. Move asset to location;
b. Move group to location; c. Assign equipment to user;
d. Assign storage compartment to user; and e. Assign group to user.
Specific requests that involve an intra-faculty transaction only (e.g. asset from a faculty assigned to a user of that faculty) require approval at the faculty level. Specific requests that involve a faculty to faculty transaction (e.g. asset from a faculty assigned to a user
3.2.3.1 Activity Diagram
The following figure provides the activity diagram applicable to the management of requests in the context of the IUfA UUIS.
Submit request A ll u se rs D es ig n at ed In d iv id u al F ac u lt y / U n iv er si ty ap p ro va l a u th o ri ty General or Specific? General Specific Reqts Reqts / General Monitor general requests Action
request requestClose
Reqts / General End UUIS Search / View requests Start Reqts Reqts / Specific Monitor specific requests Approve request End Reqts / Specific Approval criteria met? * U U IS
Yes requestedIssue transaction to database
UUIS
* Based on request (intra-faculty versus faculty-to-faculty) and user’s role and faculty
Note: Specific requests that meet approval criteria upon submission are immediately approved and issued to the database
3.2.3.2 Use Case Model
The following figure provides the Requests use case diagram.
Submit general request View request Search request Submit specific request Close general request Approve specific request All users Designated user Faculty user Role 2 University user Role 3
Figure 7 – Requests – Use case diagram
The following paragraphs provide the detailed description for each use case. 3.2.3.2.1 Submit General Request
Role: All users;
Pre-condition: Authenticated session;
Steps:
1. The user selects the Submit general request button under the Requests tab (accessible from all system pages);
2. The system displays the Submit general request page; 3. The user provides the following information:
5. The system, if a description is not provided, displays a message and requests the user to provide it:
a. The user selects the Return button; and
b. The system displays the Submit general request page with current information; 6. The system:
a. Assigns the request a unique identification number (request ID); b. Sets the request status to Pending;
c. Adds the request to the database including request ID, category, description, status, originator username, faculty, department and level;
d. Displays a message to the user with the request ID; i. The user selects the Return button;
Post-conditions:
1. The system displays the system page from which the Requests tab was accessed; and
2. The new request is stored in the database;
Exceptions:
1. The user cancels the request by selecting the Cancel button from the Submit general request page:
a. The system displays the original system page (from which the Requests tab was accessed); and
b. The system does not store any information associated with the cancelled request;
2. A database error is encountered:
a. The system displays an error message.
3.2.3.2.2 Submit Specific Request
Role: All users;
Pre-condition: Authenticated session;
Steps:
1. The user selects the Submit specific request button under the Requests tab (accessible from all system pages);
2. The system displays the Submit specific request page;
3. The user selects one of the following choices (radio button) and provides the applicable (mandatory) information:
a. Move asset to location: i. Barcode; and ii. Location;
b. Move group to location: i. Group ID; and ii. Location;
i. Barcode; and ii. Username;
d. Assign storage compartment to user: i. Barcode;
ii. Compartment number; and iii. Username;
e. Assign group to user: i. Group ID; and ii. Username;
4. The user selects the Submit button;
5. The system, if one or more mandatory field is missing, displays a message indicating the missing information and requesting the user to provide it:
a. The user selects the Return button; and
b. The system displays the Submit specific request page with current information; 6. The system:
a. Assigns the request a unique identification number (request ID); b. If the specific request:
i. Involves an intra-faculty transaction only (e.g. asset from a faculty assigned to a user of that faculty) and if the user holds Role 2 from that faculty or Role 3; OR
ii. Involves a faculty to faculty transaction (e.g. asset from a faculty assigned to a user from another faculty) and the user holds Role 3;
1. The system sets the request status to Approved;
2. The system issues the transaction implied by the request to the database;
iii. Otherwise:
1. The system sets the request status to Pending;
c. Adds the request to the database including request ID, category (Move asset to location, Move group to location, Assign equipment to user, Assign storage compartment to user or Assign group to user as applicable), barcode, location, group ID, username, compartment number, status, originator username, faculty, department and level;
d. Displays a message to the user with the request ID and status; i. The user selects the Return button;
Post-conditions:
1. The system displays the system page from which the Requests tab was accessed; and
b. The system does not store any information associated with the cancelled request;
2. A database error is encountered:
a. The system displays an error message.
3.2.3.2.3 Search Request
Role: All users;
Pre-condition: Authenticated session;
Steps:
1. The user selects the Search request button under the Requests tab (accessible from all system pages);
2. The system displays the Search request page;
3. The user provides the following (all optional) search information: a. Request ID;
b. Category(s) – checkbox with choices General administrative, General technical, Move asset to location, Move group to location, Assign equipment to user, Assign storage compartment to user and Assign group to user;
c. Description search string – short text;
d. Status(s) – checkbox with choices Pending, Closed and Approved; e. Barcode; f. Location; g. Group ID; h. Username; i. Originator username; j. Originator faculty; k. Originator department; l. Originator level;
m. Compartment number; and
n. Closure note search string – short text; 4. The user selects the Search button;
5. The system builds the query based on the selected parameters and issues it to the database to perform:
a. If the user has Role 0, the returned results are limited to those for which he is the originator;
b. If the user has Role 1 and above, the returned results are limited to those for which Originator level is equal or lower than the user’s role AND Originator department is the same as the user’s;
6. The system displays the Search results page with the list of requests returned by the query with:
a. Request ID; b. Category; and
c. Status;
Post-condition: The system displays the Search results page;
Exceptions:
1. The user cancels the search by selecting the Return button from the Search request page:
a. The system displays the original system page (from which the Requests tab was accessed);
2. The user triggers a modified search by selecting the Modify search button from the Search results page:
a. The system displays the Search request page with the last input value for all search information fields;
3. The user triggers a new search by selecting the New search button from the Search results page:
a. The system displays the Search request page with all search information fields cleared;
4. The user clears all search information fields by selecting the Clear search parameters button from the Search request page:
a. The system displays the Search request page with all search information fields cleared;
5. The query does not return any result:
a. The system displays a “No results found” message; 6. A database error is encountered:
a. The system displays an error message.
3.2.3.2.4 View Request
Role: All users;
Pre-condition: The system displays the Search results page with successful query results;
Steps:
1. The user selects a specific request using a radio button; 2. The user selects the View request button;
3. The system displays the Request details page with: a. Request ID;
b. Category; c. Description; d. Status; e. Barcode;
k. Originator department; l. Originator level;
m. Compartment number; and n. Closure note;
Post-condition: The system displays the Request details page;
Exceptions:
1. The user returns to the Search results page by selecting the Return button from the Request details page:
a. The system displays the Search results page with the results from the last query;
2. A database error is encountered:
a. The system displays an error message.
3.2.3.2.5 Close General Request
Role: Designated user (one for each level based on the requester’s level);
Pre-condition: The system displays the Request details page for a request of category General administrative or General technical;
Steps:
1. The user selects the Close general request button;
2. The system displays the Close general request page; 3. The user provides the following (mandatory) information:
i. Closure note;
4. The user selects the Submit button;
5. The system, if no closure note has been provided, displays a message indicating the missing information and requesting the user to provide it:
a. The user selects the Return button; and
b. The system displays the Close general request page; 6. The system, if the user is the designated user:
a. Sets the problem status to Closed;
b. Updates the request database entry with the closure note and status change; c. Displays a message to the user with the request ID and status;
i. The user selects the Return button;
Post-conditions:
1. The system displays the Request details page with updated information; and 2. The closed request is stored in the database;
Exceptions:
1. The user cancels the closure by selecting the Cancel button from the Close general request page:
a. The system displays the Request details page; and b. The system does not store any updated information;
a. Does not store any updated information;
b. Displays a message to the user stating he is not authorized to perform the operation;
i. The user selects the Return button;
c. The system displays the Request details page with previous information; 3. A database error is encountered:
a. The system displays an error message.
3.2.3.2.6 Approve Specific Request
Role: Role 2 user with matching faculty or Role 3 user;
Pre-condition: The system displays the Request details page for a request of category Move asset to location, Move group to location, Assign equipment to user, Assign storage compartment to user or Assign group to user;
Steps:
1. The user selects the Approve specific request button; 2. If the specific request:
a. Involves an intra-faculty transaction only (e.g. asset from a faculty assigned to a user of that faculty) and if the user holds Role 2 from that faculty or Role 3; OR
b. Involves a faculty to faculty transaction (e.g. asset from a faculty assigned to a user from another faculty) and the user holds Role 3;
i. The system sets the request status to Approved;
ii. The system issues the transaction implied by the request to the database; iii. Updates the request database entry with status change; and
iv. Displays a message to the user with the request ID and status; 1. The user selects the Return button;
Post-conditions:
1. The system displays the Request details page with updated information; and 2. The closed request is stored in the database;
Exceptions:
1. Upon approval, if the specific request:
a. Involves an intra-faculty transaction only (e.g. asset from a faculty assigned to a user of that faculty) and if the user does not hold Role 2 from that faculty or Role 3; OR
b. Involves a faculty to faculty transaction (e.g. asset from a faculty assigned to a user from another faculty) and the user does not hold Role 3;
2. A database error is encountered:
3.2.3.3 Functional Requirements
3.2.3.3.1 Submit General Request
[F.Req.1] The system shall allow users to submit general requests.
[F.Req.2] The system shall assist a user, through structured dialogs, to describe the general request, including category from General administrative and General technical, and description.
[F.Req.3] The system shall, prior to proceeding with the submit request operation, display the problem related information including category and description and request a confirmation from the user.
[F.Req.4] The system shall, in the event where no description is provided, display a message to the user and withhold from performing the Submit general request operation.
[F.Req.5] The system shall allow a user to cancel a Submit general request operation.
[F.Req.6] The system shall, upon performing the Submit general request operation, create and store a request record with unique identification number, category, description, status set to Pending, originator name, faculty, department and level.
[F.Req.7] The system shall, upon successfully completing the Submit general request operation, display a message to the user including the request unique identification number.
3.2.3.3.2 Submit Specific Request
[F.Req.8] The system shall allow users to submit specific requests.
[F.Req.9] The system shall assist a user, through structured dialogs, to describe the specific request, including category (mandatory data) from Move asset to location (barcode and location), Move group to location (Group ID and location), Assign equipment to user (barcode and username), Assign storage compartment to user (barcode, compartment number and username), and Assign group to user (Group ID and username).
[F.Req.10]The system shall, if one or more mandatory field is missing, display a message to the user and withhold from performing the Submit specific request operation.
[F.Req.11]The system shall allow a user to cancel a Submit specific request operation.
[F.Req.12]The system shall, upon performing the Submit specific request operation, if the request approval criterion is met (involves an intra-faculty transaction only (e.g. asset from a faculty assigned to a user of that faculty) and if the
[F.Req.13]The system shall, upon performing the Submit specific request operation, create and store a request record with unique identification number, category, user provided data, status set to Pending or Approved as applicable, originator name, faculty, department and level.
[F.Req.14]The system shall, upon successfully completing the Submit specific request operation, display a message to the user including the request unique identification number and status.
3.2.3.3.3 Search Request
[F.Req.15]The system shall allow users to search requests.
[F.Req.16]The system shall assist a user, through structured dialogs, to specify search criteria, including request ID, category(s), description search string, status(s), barcode, location, group ID, username, originator username, faculty, department and level, compartment number and closure note search string.
[F.Req.17]The system shall allow a user to clear search criteria.
[F.Req.18]The system shall display the results of a request search including, for each returned result, request unique identification number, category, and status.
[F.Req.19]The system shall limit the returned results to:
a. If the user has Role 0, those for which he is the originator;
b. If the user has Role 1 and above, those for which Originator level is equal or lower than the user’s role AND Originator department is the same as the user’s.
[F.Req.20]The system shall, upon returning no results for a request search, display a message to the user.
[F.Req.21]The system shall allow a user to cancel a request search.
[F.Req.22]The system shall allow a user to modify the search criteria of a previously executed request search.
3.2.3.3.4 View Request
[F.Req.23]The system shall allow users to select a request for viewing.
[F.Req.24]The system shall display the request details including request ID, category, description, status, barcode, location, group ID, username, originator username, faculty, department and level, compartment number and closure note.
3.2.3.3.5 Close General Request
[F.Req.26]The system shall assist a user, through structured dialogs, to provide a closure note.
[F.Req.27]The system shall, if a closure note is not provided, display a message to the user and withhold from performing the Close general request operation.
[F.Req.28]The system shall allow a user to cancel a Close general request operation.
[F.Req.29]The system shall, upon performing a Close general request operation, if the user is a designated user, update the request record including status set to Closed and closure note.
[F.Req.30]The system shall, upon successfully performing a Close general request operation, display a message to the user with request ID and status.
[F.Req.31]The system shall, upon attempting a Close general request operation, if the user is not a designated user, display a message to the user stating he is not authorized to perform the operation.
3.2.3.3.6 Approve Specific Request
[F.Req.32]The system shall allow a Role 2 user with faculty matching that of all the elements of a request and a Role 3 user to approve a specific request.
[F.Req.33]The system shall, upon performing the Approve specific request operation, if the request approval criterion is met (involves an intra-faculty transaction only (e.g. asset from a faculty assigned to a user of that faculty) and if the user holds Role 2 from that faculty or Role 3; OR involves a faculty to faculty transaction (e.g. asset from a faculty assigned to a user from another faculty) and the user holds Role 3), issue the requested transaction to the database.
[F.Req.34]The system shall, upon successfully performing an Approve specific request operation, update the request record including status set to Approved.
[F.Req.35]The system shall, upon successfully performing Approve specific request operation, display a message to the user with request ID and status.
[F.Req.36]The system shall, upon attempting a Close general request operation, if the request approval criterion is met, display a message to the user stating he is not authorized to perform the operation.
3.2.4 Physical Asset Management
The capabilities to manage (add, view, update, etc) physical assets is limited to Faculty users (Role 2) with Manage physical assets permission (for assets owned by their faculty only). University users (Role 3) with Manage physical assets permission have the capability to manage assets from all faculties.
Physical assets are defined as furniture (including storage unit) and equipment (including computer).
The physical assets management functionality allows the user to:
Add, Search, View, Update (including location) physical assets inventory records;
Assign a location to a physical asset;
Assign an equipment to a user;
Assign a storage compartment to a user;
Create groups of physical assets
View, update and delete groups of physical assets;
Assign a location to a group; and
Assign a group to a user.
3.2.4.1 Domain Model
The following figure illustrates the domain model applicable to the management of physical assets in the context of the IUfA UUIS.
1 * 1 * * 1 * 1 * 1 * * * 1 1 1 Physical asset Furniture Equipment Storage
unit compartmentStorage Computer
Location
Group
Software
User
3.2.4.2 Use Case Model
The following figure provides the Physical assets management use case diagram. Add physical asset Update physical asset Search physical asset View physical asset Physical assets manager Create group View/ update/ delete group
Figure 9 - Physical assets management – Use case diagram
The following paragraphs provide the detailed description for each use case. 3.2.4.2.1 Add Physical Asset
Role: Physical assets manager (Role 2), Physical assets manager (Role 3);
Pre-conditions:
1. Authenticated session; and
2. Faculty or University user with Manage physical assets permission;
Steps:
1. The physical assets manager selects the Add asset button under the Physical assets tab (accessible from all system pages);
2. The system displays the Add asset page;
3. The physical assets manager provides the following information:
a. Barcode (mandatory) – the barcode is to be provided by the physical asset manager at the time of creation of the asset based on the stamp that he will affix to the physical asset;
c. Purchase requisition number; d. Purchase order number; e. Legacy code;
f. Date purchased; g. Warranty expiration; h. Location;
i. Category (mandatory) – radio button with choices Furniture and Equipment; j. Manufacturer;
k. Model;
l. Furniture description (if applicable):
i. Furniture type (mandatory) from Classroom front desk, Classroom desk, Classroom chair, Classroom desk/chair unit, Lab bench, Lab stool, Lab chair, Office Desk, Office chair, Office bookshelf, Table and Storage unit; ii. Dimension;
iii. Color; and iv. Finish;
v. Additional fields specific to furniture type Storage unit:
A. Storage unit type from Locker, Filing cabinet and Shelving unit; B. Number of compartments (mandatory), and:
1. Compartment #1 user; 2. Compartment #2 user; 3. …
4. Compartment #N user; m. Equipment description (if applicable):
i. Equipment type (mandatory) from Computer, Screen, Keyboard, Mouse, Printer, Telephone, Photocopier, Projector, Screen, Amplifier, Microphone and Speaker;
ii. Serial number;
iii. Equipment assigned user;
iv. Additional fields specific to equipment type Computer: A. Computer type from Tower, Laptop and Server; B. Processor;
C. MAC address; D. Hard drive capacity;
E. Non-volatile memory; and F. Volatile memory;
4. The physical assets manager selects the Submit button; 5. The system:
b. In the case where the Physical Asset Manager is a Faculty user, if the specified Faculty differs from the Faculty in his profile, displays a message indicating the discrepancy;
i. The physical assets manager selects the Return button; and ii. The system displays the Add asset page with current information;
6. The system displays a message with the information provided by the physical assets manager requesting confirmation:
a. The physical assets manager selects the Confirm button; or b. The physical assets manager selects the Return button;
i. The system displays the Add asset page with current information; 7. The system:
a. Assigns the physical asset a unique identification number (asset ID); b. Sets the physical asset status to In-stock;
c. Adds the physical asset to the database including asset ID, barcode, owner, legacy code, date purchased, warranty expiration, manufacturer, model, category and all furniture or equipment description fields, whichever is applicable; and
d. Displays a message to the physical assets manager with the asset ID; i. The physical assets manager selects the Return button;
Post-conditions:
1. The system displays the Add asset page with all fields cleared; and 2. The new asset record is stored in the database;
Exceptions:
1. The physical assets manager cancels the physical asset addition by selecting the Cancel button from the Add asset page:
a. The system displays the original system page (from which the Physical assets tab was accessed); and
b. The system does not store any information associated with the physical asset addition;
2. A database error is encountered:
a. The system displays an error message.
3.2.4.2.2 Search Physical Asset
Role: Physical assets manager (Role 2), Physical assets manager (Role 3);
Pre-conditions:
1. Authenticated session; and
2. Faculty or University user with Manage physical assets permission;
Steps:
1. The physical assets manager selects the Search asset button under the Physical assets tab (accessible from all system pages);
3. The physical assets manager provides the following (all optional) search information:
a. Asset ID; b. Barcode;
c. Owner – Faculty;
d. Purchase requisition number; e. Purchase order number; f. Legacy code;
g. Date purchased date range; h. Warranty expiration date range; i. Location;
j. Group ID; k. Manufacturer; l. Model;
m. Category – checkbox with choices Furniture and Equipment;
n. Furniture type(s) – checkbox with choices Classroom front desk, Classroom desk, Classroom chair, Classroom desk/chair unit, Lab bench, Lab stool, Lab chair, Office Desk, Office chair, Office bookshelf, Table and Storage unit; o. Storage unit type(s) – checkbox with choices Locker, Filing cabinet and
Shelving unit;
p. Equipment type(s) – checkbox with choices Computer, Screen, Keyboard, Mouse, Printer, Telephone, Photocopier, Projector, Screen, Amplifier, Microphone and Speaker;
q. Equipment serial number; r. Equipment assigned user;
s. Computer type(s) – checkbox with choices Tower, Laptop and Server; t. MAC address;
u. Hard drive capacity range in Gbytes; v. Non-volatile memory range in Mbytes; and w. Volatile memory range in Mbytes;
x. Status(s) – checkbox with choices In-stock, Assigned, Damaged, In-repair, Lost and Retired;
4. The physical assets manager selects the Search button;
5. The system builds the query based on the selected parameters and issues it to the database to perform. In the case the Physical Asset Manager is a Faculty user, the search is limited to the Faculty in his profile, regardless of the above choice;
6. The system displays the Search results page with the list of physical asset records returned by the query with:
f. Model;
g. Furniture type (if applicable); h. Equipment type (if applicable); i. Equipment assigned user; and j. Status;
Post-condition: The system displays the Search results page;
Exceptions:
1. The physical assets manager cancels the search by selecting the Return button from the Search asset page:
a. The system displays the original system page (from which the Physical assets tab was accessed);
2. The physical assets manager triggers a modified search by selecting the Modify search button from the Search results page:
a. The system displays the Search asset page with the last input value for all search information fields;
3. The physical assets manager triggers a new search by selecting the New search button from the Search results page:
a. The system displays the Search asset page with all search information fields cleared;
4. The physical assets manager clears all search information fields by selecting the Clear search parameters button from the Search asset page:
a. The system displays the Search asset page with all search information fields cleared;
5. The query does not return any result:
a. The system displays a “No results found” message; 6. A database error is encountered:
a. The system displays an error message.
3.2.4.2.3 View Physical Asset
Role: Physical assets manager (Role 2), Physical assets manager (Role 3);
Pre-condition: The system displays the Search results page with successful query results;
Steps:
1. The physical assets manager selects a specific physical asset using a radio button; 2. The physical assets manager selects the View asset button;
3. The system displays the Asset details page with: a. Asset ID;
b. Barcode;
c. Owner – Faculty;
d. Purchase requisition number; e. Purchase order number; f. Legacy code if applicable;
g. Date purchased; h. Warranty expiration; i. Location; j. Group ID; k. Manufacturer; l. Model; m. Category;
n. Furniture description (if applicable): i. Furniture type;
ii. Dimension; iii. Color; and iv. Finish;
v. Additional fields specific to furniture type Storage unit (if applicable): 1. Storage unit type;
2. Number of compartments, and: a. Compartment #1 user; b. Compartment #2 user; c. …
d. Compartment #N user; o. Equipment description (if applicable):
i. Equipment type; ii. Serial number;
iii. Equipment assigned user;
iv. Additional fields specific to equipment type Computer (if applicable): 1. Computer type;
2. Processor; 3. MAC address; 4. Hard drive capacity; 5. Non-volatile memory; and 6. Volatile memory;
p. Status;
Post-condition: The system displays the Asset details page;
Exceptions:
1. The physical assets manager returns to the Search results page by selecting the Return button from the Asset details page:
a. The system displays the Search results page with the results from the last query;
Steps:
1. The physical assets manager selects the Update physical asset button; 2. The system displays the Edit physical asset page with:
a. Un-editable fields: i. Asset ID; ii. Barcode;
iii. Purchase requisition number; iv. Purchase order number;
v. Manufacturer; vi. Model;
vii. Category;
viii. Furniture type if applicable; ix. Storage unit type if applicable;
x. Equipment type if applicable;
xi. Equipment serial number if applicable; xii. Computer type if applicable;
b. Editable fields: i. Legacy code;
ii. Owner – Faculty; Note: Editing of this field is limited to Physical Asset Manager (Role 3);
iii. Date purchased; iv. Warranty expiration;
v. Location;
vi. Status from In-stock, Assigned, Damaged, In-repair, Lost and Retired; vii. Furniture dimension if applicable;
viii. Furniture color if applicable; ix. Furniture finish if applicable;
x. If applicable:
1. Compartment #1 user; 2. Compartment #2 user; 3. …
4. Compartment #N user; xi. Equipment assigned user;
xii. Computer processor if applicable; xiii. Computer MAC address if applicable; xiv. Computer hard drive capacity if applicable;
xv. Computer non-volatile memory if applicable; and xvi. Computer volatile memory if applicable;
3. The physical assets manager edits/updates the above fields as applicable; 4. The physical assets manager selects the Submit button;
5. The system displays a message with the information provided by the physical assets manager requesting confirmation:
b. The physical assets manager selects the Return button;
i. The system displays the Update physical asset page with current information;
6. The system:
a. Updates the physical asset database entry with the applicable changes;
Post-conditions:
1. The system displays the Asset details page with updated information; and 2. The updated physical asset record is stored in the database;
Exceptions:
1. The user cancels the update by selecting the Cancel button from the Edit physical asset page:
a. The system displays the Asset details page; and b. The system does not store any updated information; 2. A database error is encountered:
a. The system displays an error message.
3.2.4.2.5 Create Group
Role: Physical assets manager (Role 2), Physical assets manager (Role 3);
Pre-conditions:
1. Authenticated session; and
2. Faculty or University user with Manage physical assets permission;
Steps:
1. The physical assets manager selects the Create group button under the Physical assets tab (accessible from all system pages);
2. The system displays the Create group page;
3. The physical assets manager provides the following information: a. Group assets (one mandatory):
i. Asset #1 – Asset ID; ii. Asset #2 – Asset ID; iii. …
iv. Asset #N – Asset ID; b. Group location;
c. Group assigned user;
4. The physical assets manager selects the Submit button; 5. The system:
i. The physical assets manager selects the Return button; and
ii. The system displays the Create group page with current information; 6. The system displays a message with the information provided by the physical
assets manager requesting confirmation:
a. The physical assets manager selects the Confirm button; or b. The physical assets manager selects the Return button;
i. The system displays the Create group page with current information; 7. The system:
a. Assigns the group a unique identification number (group ID);
b. Adds the group to the database including group ID, asset ID(s), location if provided and assigned user if provided;
c. Updates the record for every individual asset of the group with, if provided, the group location;
d. Updates the record for every individual asset of the group with, if provided, the group assigned user;
e. Displays a message to the physical assets manager with the group ID; i. The physical assets manager selects the Return button;
Post-conditions:
1. The system displays the Create group page with all fields cleared; 2. The new group record is stored in the database; and
3. The updated physical asset records are stored in the database;
Exceptions:
1. The physical assets manager cancels the group creation by selecting the Cancel button from the Create group page:
a. The system displays the original system page (from which the Physical asset tab was accessed); and
b. The system does not store any information associated with the group creation; 2. A database error is encountered:
a. The system displays an error message.
3.2.4.2.6 View/Update/Delete Group
Role: Physical assets manager (Role 2), Physical assets manager (Role 3);
Pre-conditions:
1. Authenticated session; and
2. Faculty or University user with Manage physical assets permission;
Steps:
1. The physical assets manager selects the View/update/delete group button under the Physical assets tab (accessible from all system pages);
2. The system displays the Retrieve group page; 3. The physical assets manager provides the group ID; 4. The physical assets manager selects the Retrieve button;