Server Virtualization with Hyper-V
If there is anything that the IT industry has shown us, it must be that technologies go in and out of fashion but seem to be resurrected when their time comes again. Server virtualization is one of these topics. Mainframes did it 30 years ago, and now virtualization is becoming big in the Windows world. With Windows Server 2008, Microsoft has introduced its own native server virtualization software, called Hyper-V. In Windows Server 2008 R2, Microsoft has upgraded Hyper-V with new possibilities and higher performance. The two versions are mostly compatible, and where relevant we will note the differences.Virtualization is a huge subject. Typically, server virtualization is a game of big iron: many large multiprocessor servers, loads of memory, storage area networks, Fibre Channel networks, cluster-ing technologies, management software, and so on. In one chapter of a general-purpose book on Windows Server 2008 R2, such as this one, it is impossible to cover all of that. In this chapter, you can expect an introduction on Hyper-V, sufficient to get you to first base and enabling you to build your own small environment using only native Windows software. We address topics such as what server virtualization is and what it’s used for, how to install and use Hyper-V, the constituent com-ponents of Hyper-V and how they work together, how Hyper-V works with Windows Server Core, and how to manage Hyper-V installations, including Live Migration.
In this chapter, you will learn to:
Determine whether a server can run Hyper-V
•u
Determine when it makes sense to virtualize a server
•u
Decide which technology to use to quickly move a virtual machine between hosts
•u
Advise on a backup strategy
•u
What Is Server Virtualization?
The term virtualization is used for a lot of different things nowadays. It is used in association with applications, storage, network, servers, screen presentation, and so on. In this chapter, virtualization means the ability to run a full operating system on a software platform in such a way that the OS thinks it is running on a “real” computer. This type of virtualization is called hardware virtualization or server virtualization. So, why would you want to have that?
Chances are that you are a system administrator, responsible for a number of servers in your organization. If you have been in the business a while, you will have noticed the trend that server power tends to grow faster than the resource hunger of applications.
Nowadays, you buy a low-end server with at least 4GB and probably 8GB or more. Moreover, you buy a 64-bit capable machine. Most such servers are just idling away with 5 percent CPU usage, have multiple gigabytes of free memory, and have I/O bandwidth to spare. Clearly, this is a waste of resources. This is where virtualization helps you out.
With virtualization, you can consolidate many servers on the same hardware. Not only will these servers make more effective use of the hardware, but because you have fewer physical servers, you will use less power and rack space. Even better, with the right software, you can move virtual servers between physical servers easily, giving you a flexible configuration.
To illustrate the principle, Figure 29.1 shows one physical server running Windows Server 2008 with Hyper-V virtualization software and a number of virtual machines (VMs). The machine running Hyper-V is known as the host.
How does this work, generally speaking? Clearly, you cannot have two operating systems accessing the same hardware at the same time. One has to be in charge (that would be the host), and the other (the VM) will need to access that hardware through emulation or some other means. In principle, the same goes for the execution of CPU instructions and even memory access. Some virtualization systems can really emulate a different CPU than their own, but as you can imagine, VMs in such a system have nowhere near native performance. They need to translate each CPU instruction of the emulated system into ones that they can understand themselves. Such systems can still be useful, though, because they can solve problems that cannot be done in any other way. For instance, such systems might emulate an Intel PC on a Macintosh running a PowerPC CPU or the other way around. Another example is CCS64, which you can use to run a trusty old Commodore 64 on your Windows desktop—and quite a bit faster than the original if you want!
Modern dedicated virtualization systems like Hyper-V go out of their way to use system resources as efficiently as possible. They use real memory, and the CPU directly executes the code of the VM—with some exceptions that we will discuss later. The same argument holds for high-performance devices such as network, disk, or video interfaces. Emulation where existing hardware behavior needs to be simulated will cost you performance. Sometimes this is unavoidable, but Figure 29.1
Hyper-V on Windows Server 2008 R2 running multiple VMs
Hyper-V takes a different route. It uses its own driver architecture for each type of device to reduce such overhead as much as possible. This design tightly integrates with the computer architecture. From the VM you will see and use the same CPU that the host uses, so cross-CPU emulation is impossible. But that was not the point anyway. The point was to run a VM as fast as possible.
What Use Is Server Virtualization?
Now that you have some idea of what virtualization is about, let’s discuss what to use it for. Some important applications are testing, consolidation of servers, and disaster recovery. These all benefit from the high degree of flexibility that virtualization offers.
The technology really got started as a test method. Administrators and consultants in need of hardware for a quick test were only too happy to use an existing machine with virtualization software to run a couple of VMs. Similarly, virtualization is great for giving technology demos. Because of the low-performance requirements for demos, you can run multiple VMs on a power-ful laptop and show people how it actually works.
Testing still is a mainstay of virtualization. Larger organizations usually have multiple testing environments for various purposes. With virtualization, you can quickly add and remove VMs as required. Some organizations use a “network in a box”: multiple VMs that taken together are a functionally representative copy of (part of) the production network. Whenever a new application comes along or a new infrastructure component needs to be integrated, a “network in a box” is deployed for the project to use.
A lot of administrators have a couple of VMs for their own private use so that they can quickly test and research changes before actually applying them in a production network. For instance, as an Active Directory specialist, you might run four or five DCs plus a Vista workstation in VMs on a normal 4GB desktop that is running Windows Server 2008 with Hyper-V. You might use this to research the fine points of Active Directory replication or the effects of a Group Policy change on the Vista client.
Testing is one thing, but the largest deployments of server virtualization are no doubt in datacenters where lots of servers are consolidated. A virtualized server offers the following advantages:
Conserves resources and saves costs One host running multiple VMs saves a lot of rack space, electrical power, and cooling capacity. It would not be unreasonable to consolidate 10 or 20 lowly utilized physical machines to one host machine.
Shares hardware A host offers the same “virtual” hardware to each VM. In other words, all VMs share common hardware. This makes them predictable and makes the maintenance of drivers easy. Deploying VMs is much easier than doing the same for physical machines, mainly because drivers are no longer a factor.
Increases flexibility The same feature of identical virtual hardware makes for a high degree of flexibility. You can move VMs between hosts for load distribution or maintenance.
Joins legacy operating systems A lot of organizations will be running a mix of operating systems—not only Windows 2008 but likely also older systems running Windows 2003 or even Windows 2000. Chances are that those older systems don’t require much in the way of computing power on modern hardware. This makes them ideal candidates for consolidation. One host will have enough power for many of these legacy systems. Legacy consolidation will also benefit from the uniform virtual hardware.
In large environments with large storage area network (SAN) deployments, mirrored datacenters, and similar infrastructure, server virtualization is an asset for disaster recovery. Not only is server consolidation a benefit here, but all virtual machines have the same type of virtual hardware. You will have no driver or HAL issues when restarting a virtual machine on a new host, assuming of course that the new VM has the same configuration as the old one.
Each technology has its downside, and virtualization is no exception. Some may impact you more than others, but here are a few:
Increases complexity Virtualization adds a layer of complexity to the existing environment. You now need to know whether a given server is a VM or a physical server, or perhaps a host for VMs. Let’s take the example of a SQL Server administrator. Before, he would be responsi-ble for all the SQL Server: software, hardware, and configuration. If SQL Server is virtualized, he needs to depend on the administrators of the host server to keep his VM running. Any impact on the host will also impact the SQL Server VM.
Strains infrastructure A full-blown VM environment will need additional infrastructure: a SAN is mandatory in large environments, as is dedicated management software and a dedicated high-speed IP network.
Can cause large-scale failure If you are not specifically designing for service availability, a host is a single point of failure. If it goes down unexpectedly, for instance because the CPU overheats and shuts down, it will take all running VMs down with it.
Requires special maintenance If you have a library of offline VMs, you will need to do some form of maintenance on those as well, such as applying patches.
Creates unique security issues There are some nonobvious security considerations related to virtualization. For instance, in a SAN-based environment, you will have two additional groups of administrators who can access data in a VM: the administrators responsible for the host machines and the SAN administrators. A SQL Server administrator responsible for a VM may not be aware that those other administrators can in principle access his data at will, assuming the desire and knowledge to do so.
Requires a learning curve When you deploy a new technology, you need to learn it. While you are learning it, you will make mistakes. Some of those will impact your produc-tion environment. That’s nothing new, but it’s still a factor to consider.
Clearly, it’s a balancing act. For most organizations (but not all), the advantages will outweigh the downsides. The main point to take away here is that server virtualization has arrived and is here to stay. If your organization has not deployed it yet, chances are that you will soon.
What Do You Need to Get Started with Hyper-V?
Not surprisingly, there are hardware and software requirements for running Hyper-V. In addition, there are some intricate licensing questions involved, which we’ll discuss later in this chapter.
H
ardwarer
equirementsThe base requirements for running Hyper-V are quite simple. You need an x64-based CPU, hardware-assisted virtualization, and hardware Data Execution Prevention (DEP). Most, but
not all, computers meeting these minimum requirements will run Hyper-V. A common problem is that although these features are offered by the system, they are not enabled in the BIOS. Make sure these features are turned on. If you need to change the DEP or virtualization settings, be aware that a cold boot is required: the computer must be turned completely off. A reset or soft-ware reboot is not sufficient. Note that server hardsoft-ware from 2008 or earlier may need a BIOS upgrade as well.
Both Intel and AMD support DEP on the hardware level with modern processors, but they call it differently. Intel has the XD bit (eXecute Disable), and AMD has the NX bit (No eXecute). Look for that in the BIOS. The situation is a bit different for the virtualization extensions. Intel and AMD both created their own extensions around the same time in 2006. They roughly do the same thing but are incompatible. However, all major server virtualization products including Hyper-V support both the Intel and AMD extensions. One point to be aware of is that some BIOS systems for AMD CPUs refer to AMD-V as “SVM” or “secure virtualization.” Also, because of incompat-ibilities, some early systems featuring AMD-V cannot actually run Hyper-V or can do so only with a specific BIOS version.
If you want to be really sure that the servers you will buy will run Hyper-V, you should check directly with your vendor. They are responsible for testing that Hyper-V actually runs on their hardware. Most large vendors also participate in the “Certified for Windows Server 2008” program, which requires them to test their hardware using Microsoft-standard procedures. After the server passes the test, the vendor can submit the configuration to Microsoft for inclu-sion on the public catalog. However, not all vendors submit all of their hardware. That’s why you should ask them directly. The Microsoft catalog is at http://windowsservercatalog.com. You can specifically search for Hyper-V compatible systems.
Let’s talk about the specifics now that you know generally what features to look for. There are two things to keep in mind when selecting hardware for virtualization: VMs like a lot of memory, and disk I/O bandwidth is critical. For a low-end testing system dedicated to virtual-ization, you should probably select something with at least 8GB of memory and a single or dual CPU motherboard with quad-core CPUs.
Get as many disk spindles as you can reasonably afford. Four independent medium-capacity disks will be faster than two large-capacity disks when using multiple VMs. If you have the money for it, invest in high-RPM disks. SATA disks are OK for testing and nondemanding applications. For best performance, SCSI or SAS are better, generally speaking. Avoid a RAID-5 configuration because it is slow on write operations. RAID 0 and RAID 1 combinations are fine for low-end systems. For high-end applications, consider RAID 10. Finally, think about the net-working. The general recommendation is to have at least two NICs, one to manage the host and another for the VMs to access the network. If you expect high network throughput or iSCSI con-nections that require dedicated NICs, you will need even more.
s
oftwarer
equirementsNow that you have your hardware sorted, we’ll discuss the software side. The first thing to note is that a 64-bit version is required. Of course, this is the only option with Windows 2008 R2, but Windows 2008 also has 32-bit editions. Table 29.1 summarizes the options.
table 29.1:
Windows 2008 Editions and Hyper-V
Windows 2008 edition has hyper-V role
Windows Server 2008 (R2) Standard edition x64 Yes Windows Server 2008 (R2) Enterprise edition x64 Yes Windows Server 2008 (R2) Datacenter edition x64 Yes Microsoft Hyper-V Server 2008 (R2) Yes Windows Server 2008, any x86 edition No
Windows Web Server 2008 (R2) No
Windows Server 2008 (R2) for Itanium No
Note the specific edition named Hyper-V Server. This is basically a 64-bit version of Server Core with Hyper-V enabled by default. We will discuss it briefly later in this chapter. Its main benefit over the regular Server Core editions is that it’s available as a free download. The remain-ing editions differ in their failover clusterremain-ing capabilities and licensremain-ing models. Briefly, Standard comes with one license for a Windows-based VM and has no clustering option. Enterprise has four VM licenses and allows clustering. Datacenter is licensed per physical CPU and allows unlimited VMs with clustering.
Windows Server 2008 Versions Without hyper-V
As you can see from Table 29.1, not all editions of Windows 2008 R2 can run Hyper-V. Although that is clear enough, the situation was confused with its predecessor Windows 2008. It has Standard edition, Enterprise edition, and Datacenter editions with Hyper-V, and once again without Hyper-V at a mini-mal price difference. The reason for that was never really clear, but it is probably related to market regulation efforts. If you are buying Windows 2008, make sure you get the one with Hyper-V.
From the table it’s clear that Hyper-V is a server component. Microsoft will not release a version of Hyper-V for a client OS such as Windows 7, Vista, or XP. Also, Windows 2008 is the first server version to support Hyper-V. It will not be implemented for earlier releases of the Windows operating system. If you want to run server virtualization on any of these other platforms, you need to look at other products in the market. Finally, if you’re running Itanium servers (IA64), you should know that when Hyper-V was released, it did not run on IA64, and it probably never will.
The Hyper-V Feature Set
We’ll now cover the functionality that Hyper-V offers in Windows Server 2008 R2. Since the first version in Windows Server 2008 SP1 (remember, there never was a SP0), there have been some
quiet changes in certain limits, such as the number of supported processor cores or number of virtual machines. Those limits may well change again, so check the Microsoft site for the current feature set. For now, see Table 29.2.
table 29.2:
Windows 2008 R2 Hyper-V Feature List
FeatureWindows hyper-V Server, Standard edition enterprise edition, Datacenter edition x86 VM Yes Yes x64 VM Yes Yes IA64 VM No No Maximum number of VMs 384 384
Maximum host memory 32GB 1TB
Maximum host processors 64 cores 64 cores
Maximum VM memory 32GB 64GB
Hot-add VM memory No No
Maximum VM processors 4 per VM 4 per VM
Hot-add VM processor No No
IDE adapters 2 2
Maximum IDE devices 4 4
SCSI adapters 4 4
Maximum SCSI devices 255 255
Hot-add hard disk Yes Yes
Virtual networks Unlimited Unlimited
Maximum number of VM network cards 8 8
Hot-add virtual NIC No No
Failover clustering support No* Yes
Live Migration No** Yes
* Hyper-V Server R2 does support clustering and Live Migration. ** Live Migration is not included with Windows 2008. It’s new with R2.
There is not much difference between the editions until you really start to scale up in memory or require high availability using the various clustering options. Most of these limits are hard limits, in the sense that they cannot be exceeded. The exception is the maximum number of VMs per host. This is a soft limit, determined by the Microsoft testing labs. Perhaps the most stringent limit here is the maximum number of virtual processors, which translates to the number of physi-cal CPU cores actually used. Currently, you cannot have a VM with more than four virtual CPUs, which means that your maximum CPU power is limited. On the other hand, if you have an appli-cation that really uses all your CPUs to the maximum, then it’s probably not a great candidate for virtualization anyway. One notable missing feature is USB support, which would be great for lab situations. Microsoft’s point of view is that Hyper-V is a server role where USB is not required, so there is little chance of ever having this feature added. Another feature set that is likely to change is the type of devices that support the ability for adding or removal from a running VM. Currently, this works only with virtual hard disks. It would certainly be nice to be able to do the same thing for memory, NICs, and CPU. Microsoft is planning this for future releases.
The final two items in the list are failover clustering support and Live Migration. Briefly, failover clustering is the ability to move a running application (such as a virtual machine!) from one server to another, either on-demand or after a detected hardware or failure. Shared storage between the servers is required, using Fibre Channel or iSCSI connections. Live Migration builds on failover clustering to move VMs between hosts with subsecond downtime. The point of this feature is that online users of the VM won’t even know that the move occurred. With Live Migration, you can build a very flexible virtualization farm. We will walk you through how to set up Live Migration in the “Moving VMs: Quick Migration and Live Migration” section.
Installing the Host with a Virtual Machine
This book aims to be a practical resource for you. Although some theory is essential to fully understand Hyper-V, we can leave that for later. In this walk-through, you will learn how to install Hyper-V on Windows Server 2008, how to get a VM going, and how to connect to its console. Along the way, you will pick up practical details dealing with Hyper-V.
To get started, you need the following:
You need Hyper-V capable hardware. Remember, VMs like memory and lots of disk I/O.
•u
One NIC is required; two would be nice.
You need a version of Windows 2008 or 2008 R2 that supports Hyper-V. If you are using
•u
Windows 2008, make sure to install SP2 or newer first.
An ISO file with your Windows OS of choice will come in handy but is not strictly required.
•u
You need IP addresses to use for the host and the VM.
•u
Why You Should avoid Windows Server 2008 Sp1
The first version of Windows Server 2008 has the Hyper-V role but in a beta version. Don’t use it! Although there have been interim updates to get the Hyper-V version up to 1.0, your best option is to simply install SP2 for Windows Server 2008, which includes many additional fixes. Of course, Windows Server 2008 R2 has no such problems since it includes the production version of Hyper-V 2.0.
Installing and Configuring Hyper-V
Since you have gotten this far in the book, you know how to install a server, join it to a domain, and so on. We will skip the details for the base installation. Table 29.3 shows the suggested con-figuration for a test setup. Feel free to vary the instructions as you see fit. This walk-through uses Windows 2008 R2, but there is hardly any difference if you use Windows 2008.
table 29.3:
Hyper-V Host System
Setting Configuration
Internal memory 8GB; 4GB is the practical minimum.
Hard disks 2
×
200GB or more. One disk is acceptable for a test system, but expect low performance.Partitions Disk 1: System on C.
Disk 2: Reserved for Hyper-V on E.
Network 2
×
1Gbit highly recommended. One NIC acceptable for test. Operating system Hyper-V enabled editions of Windows 2008 R2 or Windows2008 SP2.
Installation type Full GUI to follow the examples; Server Core is discussed later. Hostname bf5 to follow the examples; anything you like is fine.
IP configuration Address: 192.168.1.54/24. Gateway: 192.168.1.1. DNS: 192.168.1.51.
Active Directory Domain-joined recommended for production. Workgroup is workable for testing, although remote management is not pos-sible because it requires Active Directory.
Just about the only thing you need to decide before you install the Hyper-V role is which NIC to use for managing the Hyper-V host. The idea is to have at least two NICs in the host, although you can do with one if you really must. Expect no performance miracles in that case. With two NICs available, dedicate one to managing the host and the second for VM network traffic. To make this obvious, one trick is the rename the network connections, as shown in Figure 29.2.
Let’s start with the installation of the Hyper-V role:
1.
Install the server using the parameters in Table 29.3 for the version, server name, IP con-figuration, and so on. Make sure to have dedicated disks or partitions for Hyper-V data.2.
Join the computer to the domain if you want to follow some of the later examples. TheAfter you install the Hyper-V host server, you are ready to install the Hyper-V role. You might want to do this using a console session and avoid Remote Desktop. During the instal-lation, the network connection will be broken once or twice because of upgraded network components.
3.
Log on to the console on the host. At this time, do not use an RDP session, but use the physical console.4.
Open Server Manager, as shown in Figure 29.3. Click Add Roles, and select the Hyper-V role. As you can see, this is a clean server without any additional roles. This is the best practice for a Hyper-V host. Any other functionality should go to the VMs. In fact, the licensing structure for VMs stipulates that you do not use the host for anything but Hyper-V. We discuss the details later.5.
Click Next to start the Hyper-V role wizard, and read the introduction to Hyper-V if you like.Figure 29.2 Renaming the net-work connections to reflect their role in the Hyper-V host
Figure 29.3 Adding the Hyper-V role using Server Manager
6.
Click Next for the NIC selection screen, as shown in Figure 29.4. This requires you to select a NIC for a virtual network. You will find the details later in this chapter, but briefly, a virtual network is a Hyper-V software network switch. For each NIC that you select here, one such switch will be created. If you have two NICs or more, you should leave one blank. An unselected NIC will not have a switch associated with it and can be used to manage the host. If you have only one NIC, select it. If you don’t select any NIC, your VMs have no easy way to communicate with the outside world, although you could correct this later. Because we remembered to give sensible names to the network connec-tions, it’s now easy to select the one we will use for VM network traffic.7.
Click Next. A confirmation screen appears telling you that a reboot might be required. In fact, count on it.8.
Click Install. This should not take longer than a minute. After it’s done, it tells you again that a reboot is needed, as shown in Figure 29.5.9.
Click Close. A dialog box offers to reboot the machine for you. Click Yes to accept its offer. The machine will reboot.10.
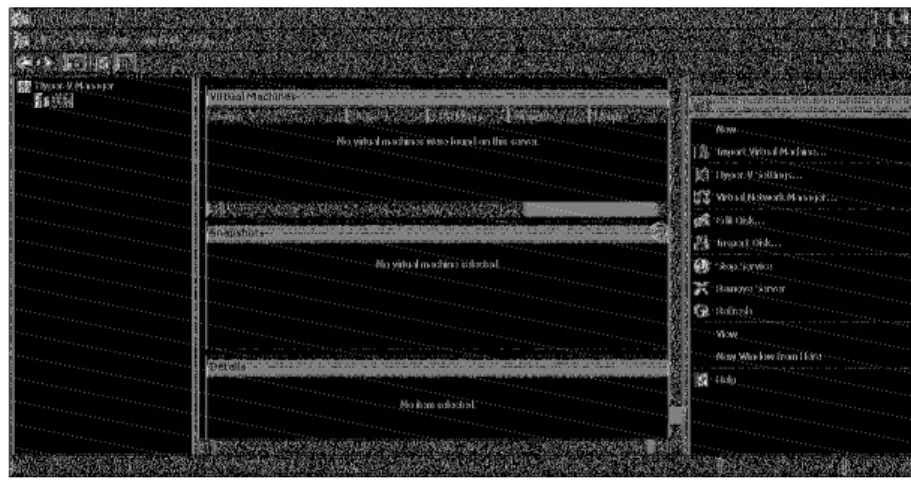
When it comes back, log on using an Administrator account. After the desktop initial-izes, the configuration process will resume. Give it some time to do its job and finalize the installation (Figure 29.6).Let’s take a look at what you’ve got now. Start the Hyper-V Manager from Administrative Tools. We have a console to administer the Hyper-V host setting with the usual layout, as shown in Figure 29.7. The left pane holds the Hyper-V host service you want to manage. Shown is the current server bf5, but you can have more than one server listed. Later, when we discuss a Server Core setup, you will add that server here.
Figure 29.4 Select one NIC to use for VM traffic. The unselected NIC is used to manage the Hyper-V host.
The middle pane has three regions:
Virtual Machines The list of VMs on this host with some relevant parameters such as its current state (running, off, saved, and so on).
Snapshots Briefly, these are point-in-time disk images, including memory and CPU states. You create a snapshot of a server if you want to be able to roll back to such an image. We will discuss this extensively later in the chapter.
Details This contains extra information on the currently selected VM—if any. Figure 29.5
The final step of the wizard tells you that all is fine and that a reboot is required.
Figure 29.6 After the reboot and logging on, the Hyper-V instal-lation wizard finalizes the instal-lation. After this, Hyper-V is ready for use.
The rightmost Actions pane is the most interesting for now. It allows you to manage various aspects of the Hyper-V setup. Some are pretty obvious, such as stopping or starting the Hyper-V Virtual Machine Management Service or removing the current server from the console. Others such as the Network Manager, Edit Disk, and Inspect Disk are not so obvious if you are new to the virtualization game. Before we go on with configuring Hyper-V, we’ll take a step back and discuss virtual disks and virtual networks.
V
irtuald
isks: t
Hes
HortV
ersionWhen you create a virtual machine, you assign virtual devices for network, video, and so on. Your VM also needs a virtual disk, of course. The question is, what disk? The physical disks are in use by the host! The solution is simple and obvious: because we are virtualizing and emulating already, use a file instead and present that to the VM as a disk. So, a virtual disk is nothing more than a very large file.
In fact, you can have multiple flavors. For test purposes, use a dynamically expanding disk. A virtual disk in this format will allocate the physical disk space it needs, and no more. For instance, you might allocate 127GB for a Windows 2008 Server VM, which only uses less than 10GB after a basic install. Every time the VM needs more disk space, the file is expanded. The expanding virtual disk makes best use of the available disk room on the host. But as you can imagine, there is a per-formance cost involved when an expansion is needed, and you run the risk of fragmentation. Also, a clear disadvantage is that you may run out of disk space on the host when dynamic virtual disk expands beyond available room. When that happens, all VMs are frozen by Hyper-V, and the event log turns red.
To get rid of overhead, you can also choose to use a fixed disk size. The full size of the virtual disk will be allocated when the disk is created. This is the recommended format for most produc-tion loads. The third flavor is a pass-through disk, where you assign a physical disk for dedicated use by a VM. This is possible when this disk is not used by the host. Pass-through disks are useful to connect a VM directly to a SAN or to an iSCSI target. Generally speaking, you will only use a pass-through disk in clustering scenarios and similar. If you don’t need them, stick with normal virtual disks and let the host mount disks on the SAN or iSCSI target.
In fact, there is one more flavor: you can have a virtual floppy disk. Interestingly, you do not have the option to connect a VM to a physical floppy drive—not that you are likely to have one. Figure 29.7
The Hyper-V man-agement console
V
irtualn
etworks: t
Hes
HortV
ersionEarly on in the server virtualization game, it was recognized that it would be very useful to have multiple types of network connections for VMs:
External This is full network access. Such a VM can communicate through the NIC of the host with the outside world. Any other network device will see the VM as if it were a normal com-puter. The only exception is the (physical) network switch connected to the host. This switch sees one host with two MAC addresses and two IP addresses. Be aware that some secure network environments may not allow this. The symptom would be that your VM can talk to your host but not to any other machine on the network even though you have specified external access. Internal This is access between the host and VM only. This is suitable for most test installations.
Private VMs are connected to each other but cannot see the host. Effectively, they are com-pletely isolated from the physical network. Again, this is suitable for testing. For instance, when you test the DHCP features of Windows 2008, you would not want to try this on the physical network. In some companies, that could get you fired! When in doubt, a private network is the safest option.
Later, this concept was expanded from virtual NICs to virtual switches with the same type of behavior. You will not be surprised to learn that Hyper-V implements them. Virtual switches are 100 percent software but are not visible outside of a host and its VMs since they are implemented in software. They deliver high-speed connections between VMs. On a virtual switch, you “plug in” virtualized NICs of VMs. A useful feature of virtual switches is that you can change their scopes. You might start a switch as internal and connect it to a physical NIC later.
Using virtual switches, you can generate quite complicated networks inside the host. Clearly, this is most useful in test situations; in production scenarios, all VMs should be able to talk to the physical network. Using three virtual switches, you could, for instance, build a classic DMZ setup: one switch for the outside interface connected to a physical NIC, one switch for the DMZ hosts, and one switch for the internal LAN.
C
onfiguringtHeH
yper-V H
ostWith those asides out of the way, we can return to configuring the Hyper-V service in the right Actions pane of the Hyper-V management console. The New Wizard and the Import Virtual Machine Wizard deal with creating VMs and virtual disks, so we’ll leave that for the next section.
The Hyper-V Settings dialog box shown in Figure 29.8 allows you to set some parameters for Hyper-V. Not many, actually. Hyper-V was really designed to run out of the box with mini-mal tuning.
Each parameter shows its current setting. The two most important parameters are the default paths for virtual hard disks and for virtual machine configurations. In this example, they have been changed to point to a folder on E, a nonsystem partition and preferably a dedicated drive. In the Hyper-V philosophy, the files for virtual disks are separate from virtual machine settings. Make sure you set them to something sensible and different from each other. By default they end up somewhere in your local profile. Microsoft should probably have made these mandatory inputs during the Hyper-V setup.
The remaining settings are all related to the way you use Hyper-V and access the VMs: Keyboard Specify how Windows special keys should behave in the VM console.
Mouse Release Key Specify what keyboard combination should be used to release input focus from a VM console.
User Credentials Specify what user ID should be used to access a VM console. By default, this is the currently logged on user. If you deselect this option, you will be required to supply a user ID and password when connecting to a VM console. These credentials can be cached, if you choose to do so.
Delete Saved Credentials If you have ever saved credentials, this dialog box has a button that will clear them.
Reset Check Boxes At various points in the Hyper-V console you can select boxes indicating that you never want to see a particular dialog box again. This option brings them all back.
Continuing the overview of the Actions pane, we have three more wizards to discuss briefly. Virtual Network Manager is the central management point for virtual switches (or networks, as Hyper-V prefers to call them). Using this wizard, you view, create, and edit networks. Networks of type External can be assigned to physical NICs. In this example, we used the Hyper-V setup wizard to assign one NIC to the VMs, as shown in Figure 29.9. Be default, the corresponding vir-tual switch is set to External. Also, the host can access this switch, meaning that traffic between the VMs and their host can use this internal virtual switch.
Figure 29.8 The Hyper-V Set-tings dialog box. Set the default folders for virtual hard disks and VMs before you do anything else.
Surprisingly perhaps, the Edit Disk Wizard cannot be used to create virtual disk. That activity is reserved for the New Wizard. The Edit Disk Wizard does allow you to change a disk from dynamic to fixed, to expand its size, and to remove blank space from the virtual disk file. The Inspect Disk dialog box inspects a virtual disk for consistency.
Now that you have an understanding of how to install and configure the Hyper-V service, we’ll turn to the heart of the matter: creating and managing virtual machines.
Configuring a Virtual Machine
At this point, you have the Hyper-V service up and running and are ready to start configuring a VM. Before you get started, check that you have all that you need:
A CD or DVD containing the operating system you want to install. A good alternative
•u
would be to use an ISO image of this CD/DVD, because an ISO image works much faster and is more convenient. In this example, we’ll use an ISO file for Windows Server 2008 R2. The server bf5 has been set up with a share hosting the ISO files: \\bf5\ISO.
A name for the new server.
•u
An idea on which network (External, Internal, or Private) you want to use the VM, and an
•u
IP address to go with it.
How much memory to use. Make sure you are not too conservative with this. If the VM
•u
needs to start swapping its memory, it puts a heavy load on the disk I/O capacity of the Figure 29.9
The virtual net-work manager after setup. The virtual switch called VM Traffic is currently the only one available for VMs.
host—capacity that would be better used to accommodate more VMs. For a base install or Windows Server 2008 R2, use 1GB.
The virtual disk type to use: dynamic for testing or fixed for production purposes.
•u
Conceptually, it takes two steps to create a VM from scratch. First you configure the virtual hardware of the VM, and then you boot the VM and start installing the operating system. The New Wizard takes care of configuring the VM.
1.
Open the Hyper-V management console, and select New New Virtual Machine. Figure 29.10 shows the first screen of the wizard, telling you briefly what a VM is for. Use the check box to skip this screen in the future. At this point, you could even use Finish to create a VM with the default settings, but that’s not a good idea. Generally, no two VMs are the same.2.
Enter the name for the VM, as shown in Figure 29.11. Note that this is the friendly name used in the management console, not the actual hostname. Of course, it would make sense to make those names (almost) the same. To follow the example, set the name to bf10. By default, this name will also be used for its first virtual disk. To be clear, bf10 is not the hostname of the VM, although it makes good sense to keep the VM name and its hostname the same. If you want the configuration of the VM in a nondefault place, select the check box and the path you want. Remember, you should have set the default while configuring the host.3.
Click Next. The Assign Memory page asks you to specify the amount of memory for the VM. Specify 1024MB, as shown in Figure 29.12, as a minimum for a Windows Server 2008 R2 VM. Make sure to use enough memory. If the OS is too low on memory, it will start swapping it to disk and slowing down other VMs using the same disk. This is a general point to keep in mind: disk I/O is a precious resource on a virtualization host. Use it wisely. Figure 29.10The start of the VM creation wizard. Select the check box to never see this first screen again.
4.
Click Next. The Configure Networking page shown in Figure 29.13 is used to specify the virtual switch to use. The default is Not Connected, which is a safe but not very useful option. Select the VM Traffic virtual switch to connect to. Remember, this switch is external and allows the VM to talk to the outside world directly.5.
Click Next for the Connect Virtual Hard Disk page shown in Figure 29.14. Here you will create a new virtual disk or assign an existing one. The defaults are good for a test setup: a new virtual disk in the default location, 127GB in size. Although the dialog box does not show it, this disk will be dynamic. If you want a fixed size disk, you must build one before you create the VM or attach it afterward. The wizard proposes a default name for the virtual disk. Accept it if you like it.Figure 29.11 Give the new VM its name.
Figure 29.12 Specify enough memory for the OS you will install.
6.
Click Next for the final options. This page basically allows you to set the initial instal-lation media: a physical or virtual (ISO) CD/DVD, a virtual floppy disk, or something from the network. In this example, you install using an ISO file. Use the radio button “Install an operating system from a boot CD/DVD-ROM” to get started. Here you see one of the great conveniences of the VM world: you can use ISO files directly, as shown in Figure 29.15. Browse to the spot where you have stored the ISO for Windows 2008 R2. Of course, if you only have the physical DVD, you can use that as well.Figure 29.13 Connect the VM to the outside world using an externally connected virtual switch.
Figure 29.14 The new virtual disk is dynamic, which means that its real-world size is roughly as large as the data it contains, much less than 127GB usually.
7.
Click Next for the summary screen. It’s slightly more than just a summary. Click Finish to let the wizard start working. After a couple of seconds, you will have a new VM.In the Hyper-V Manager, you will now have your first VM. Select this VM, and the Actions pane is extended to display specific options for the VM (named bf10), as shown in Figure 29.16. Figure 29.15
Mount an ISO file in the virtual DVD player of the VM. When starting the VM, it will boot from it.
Figure 29.16 Select a VM to see the actions that apply to it. This menu varies, depending on the power state of the VM among other things.
Click the Settings menu to take a look at the VM configuration, as shown in Figure 29.17. This is one dialog box you will see a lot in the future. There is no point in covering all items here exhaustively, but we’ll talk about the most important ones. The left pane has two sections, Hardware and Management.
The Hardware section manages all virtual hardware. The topmost entry is for the Add Hardware Wizard, although the choices are limited. You can add a SCSI controller that you can use in turn to add virtual SCSI drives. You can have up to four SCSI controllers, with 255 devices each; that should be enough. One thing to note here: you cannot boot from a virtual SCSI disk. It must be an IDE disk. However, because of the way Hyper-V implements the virtual IDE and SCSI adapters, there is no performance penalty for using IDE.
The second entry is BIOS. Contrary to some other virtualization software, there is no direct access to the BIOS screen from the VM console. If you boot the VM from the console, there is no function key to get you to a BIOS menu. Here you see again the idea that the hypervisor should run mostly out of the box with little tuning. The BIOS entry in the VM settings allows you to select the order of boot devices: disk, CD/DVD, floppy, or network. And for some reason, you can also tell the VM to turn Num Lock on or off on boot.
The Memory entry specifies the amount of memory available to the VM, as you have seen before. The Processor entry is more interesting. You can specify the number of logical processors configured for this particular VM. On boot, the VM will see that number of processors. Of course, they are not by default reserved to that particular VM. The hypervisor is the sole owner of the processors and decides which VM gets how much time. The host itself is under the control of the hypervisor in this aspect. To say this another way, you can have many more virtual CPUs in total than the number of real CPU cores.
Figure 29.17 Managing all VM parameters from the Settings dialog box
Do Not Give a Windows 2003 VM More than two CpUs
Although Hyper-V allows you to assign up to four logical CPUs to a VM, this is not always a good idea. It turns out that Windows 2003 may react badly when presented with three or four virtual CPUs on Hyper-V. Anyway, the Microsoft product team for Hyper-V supports Windows 2003 with one or two CPUs only.
Using the “Resource control” settings, you specify what percentage of the selected processors should be reserved for this VM. The grayed-out boxes tell you how much this is in terms of the full host capacity. This is a lower limit that is always available. The upper limit is set by the virtual machine limit. The VM will never use more than this particular percentage. That feature is very useful to limit misbehaving applications that use CPU resources for no good reason.
At the bottom are two check boxes to tweak processor functionality:
Migrate to a physical computer with a different processor version This is used in a situa-tion where you have clustered machines with slightly different physical CPUs. Before, such a configuration would block features such as Live Migration and Quick Migration where you move online VMs between hosts. Select the box to improve your chances. Tests show that com-patibility between CPUs of the same family is quite good, but beyond that it doesn’t really help. You will certainly not be able to do online moves between AMD and Intel systems. The feature works by disabling certain CPU instructions whose functionality varies between processors, such as SSE3, SSE4, 3dNow!, and others. The price you pay is potential lower performance, depending on your workload.
Run an older operation system, such as Windows NT This is required to run OSs that were built before the year 2000, roughly speaking. It alters the behavior of some processor instructions, notably CPUID. In the Windows 2008 version of Hyper-V, this check box was obscurely called “Limit processor functionality.” Not something you would think of using in case of trouble.
The next items on the list are the two IDE controllers. You cannot delete them. The first IDE controller is used for the virtual hard disk that you configured. As usual, you can have two IDE devices per controller. The second IDE controller has the CD/DVD drive. Using this set-ting you can change the configuration while the VM is running. Why is that useful? Well, you can mount other ISO files or connect to a physical CD/DVD drive if you want. There also is a default SCSI controller if you’re running Windows 2008 R2, but it has no devices connected.
Next are the network adapter, the COM ports, and the floppy drive. Most notable about the network adapter is that you can change its binding while the VM is running. This is equivalent to pulling the cable from a physical NIC and connecting it to another switch. One use for it is to install the operating system, patch it on Windows Update, and then connect it to an internal switch for testing. The COM ports are not quite what they seem. The do not connect to any physical COM port your server may have. Instead, they can connect only to a named pipe, which in turn must have a process behind it to talk to. Similarly for the floppy drive, it does not connect to a physical drive, but only to a file image. A virtual floppy is created using the New Wizard; then select Floppy Disk.
Continuing the discussion of the left pane, we come to the Management section. Normally you don’t need to change any settings here, since the defaults are sensible. You can change the name of the VM here, configure the Integration Services components, specify the snapshot file location (discussed later when we fully discuss virtual disks), and decide what should happen
when the host starts up or shuts down. Of these settings, the Integration Services setting deserves extra discussion.
You can only configure the Integration Services setting from the host. You have five options to choose from. All of them are enabled by default, and again, the defaults should be good for most situations:
Operating System Shutdown This allows the host to signal to the VM that it should start the regular shutdown procedure right now, as opposed to just turning off. This is a neat trick, because this allows you to shut down the host, which in turn will cleanly shut down all the VMs for you. Clearly, this works only when this option is enabled and for VMs that actually have Integration Services installed.
Time Synchronization As you probably know, this option is critical in an Active Directory domain, because Kerberos authentication relies on accurate timekeeping. If the host is a member of the same Active Directory forest as its VMs, you can make the host responsible for timekeeping of the VMs; this is the default. If the time of the host is not managed in any way, you must deselect this setting to allow the VM to manage its own time source.
Data Exchange With this option, it’s possible for the host and VM to exchange data through selected registry keys.
Heartbeat This is used by the host to keep track of the state of the VM. When heartbeats stop coming, the host signals that the VM is in trouble.
Backup (volume snapshot) This important setting enables Volume Shadow Copy Services (VSS) integration for the VM. In other words, a backup application on the host can signal the VM that it is going to be part of a backup and should make sure all its applications are ready for it.
Why accurate timekeeping Is Important
Accurate timekeeping is not just important for Kerberos. Many applications depend on good time administration to work reliably and may act strangely if time is reset into the past. If you are lucky, the application just completely stops working when its internal administration is corrupted. Jumps into the future are usually fine. After all, that is not really different from turning a server off and turning it on a year from now. The trouble starts when you set the time back to the present after a jump into the future.
To illustrate what might go wrong, consider a real-world example of a VM running an Active Directory domain controller (DC). It is running on a host that is not joined to a domain. Instead, it takes its time from a network component, a centrally located switch. During maintenance, the switch gets a new firmware update and accidentally sets the time a year ahead. The host picks this up and also sets its time a year ahead. Then the virtual DC does the same. At that point, it stops replicating with its peers because Kerberos authentication is broken.
Another problem is that the internal Active Directory administration for deleted objects goes badly wrong if the time jumps ahead too far. Some objects will be permanently deleted; others will not. The result is a badly corrupted forest. The list goes on and on, if you start thinking about it. Bottom line: in a production environment, make really sure to have a correct time synchronization configuration, especially for VMs.
We are not done discussing the Actions pane in Figure 29.16 yet. With a VM selected, you have these additional options:
Connect Used to start the virtual console. Settings To configure the VM, as discussed.
Start To boot the VM. Depending on the state of the VM, you will have more options here such as Shutdown and others.
Snapshot To create a point-in-time image of the VM.
Export To save the entire VM, including configuration and virtual hardware. Rename To give the VM another name.
Delete To remove the VM configuration, but not its virtual hard disks.
Actually, the exact items in the Actions pane vary with the power state of the VM. The previous assumes that the VM is still turned off. When a VM is running, you have additional items to turn the VM off, reset, shut down, and so on.
Installing a Virtual Machine
With the VM configured, the hard part is done. The next step is to install the operating system in the VM. When you are used to dealing with physical servers, the details of installing in a VM are a bit different.
The first question is how to connect to the console of the VM. After all, you want to see what is going on. To do that, open Hyper-V Manager, select the VM (bf10) you want to connect to, and click Connect in the lower-right corner. A virtual console opens, as shown in Figure 29.18. Another way to do this is to double-click the thumbnail at the bottom.
The virtual console has a menu bar and a button bar. Most of the functions have duplicates in the Hyper-V management console that you are already familiar with. The black screen telling Figure 29.18
Connecting to a VM shows you its console
you that the VM named bf10 is turned off is your virtual screen. When you boot the VM, this will show you the familiar messages of Windows progressing from boot to full GUI. Before you go ahead and boot the VM, there is something you need to be aware of. It’s clear how the screen works, but what about the keyboard and mouse?
The console can “capture” the keyboard and mouse. You do so by clicking the virtual screen. When captured, all input from keyboard and mouse are sent to the VM. Initially, you cannot release control from the VM by just moving the mouse. You press the key sequence Ctrl+Alt+left arrow for release. In a fully running VM with Integration Services installed, the experience is much better: you can move the mouse out of the virtual screen onto the desktop, and when that happens, the host has control of the keyboard and mouse again. There is one special case: the Ctrl+Alt+Del sequence is special. Even when the VM has control, the host will process it. To send the Ctrl+Alt+Del sequence to a VM, you can either press Ctrl+Alt+End or use the console menu Action (Ctrl+Alt+Delete).
the Virtual Console Under the hood
The Hyper-V virtual console uses the Remote Desktop Protocol (RDP) to talk to the VM, the same protocol that is used for Remote Desktop Services. The difference is that it does not use the default RDP port but instead uses TCP port 2179. When you start the virtual console from the Hyper-V Manager, it starts a client application called vmconnect.exe, located in %programfiles%\hyper-v. This application is similar to the Remote Desktop Client but additionally allows you to select the VM you want to connect to. The Virtual Machine Management Service is the listening service. When you connect to it using vmconnect.exe, it tells the client which VMs are available and makes sure the RDP traffic goes to the correct VM. In other words, this service acts as an RDP multiplexer.
Using the RDP protocol and client code means that VMConnect shares a number of keyboard shortcuts with RDP and introduces some of its own. Table 29.4 lists the most relevant ones.
table 29.4:
Hyper-V Virtual Console Keyboard Shortcuts
hyper-V Key Windows Key explanationCtrl+Alt+End Ctrl+Alt+Del The well-known three-finger salute to display the logon screen or security dialog box
Alt+Page Up Alt+Tab Switches to next program Alt+Page Down Shift+Alt+Tab Switches to previous program
Ctrl+Alt+left arrow Releases keyboard and mouse focus from the VM Ctrl+Alt+Pause Toggles full-screen mode
If you open the Media menu on the virtual console and select DVD drive, you will see that the ISO file for Windows Server 2008 R2 is mounted—assuming you are following the example
to the letter. With the DVD ready for booting, you are ready to go. You can find Start under the Action menu, but the quickest way is to just push the green power-on button. The console will display a few messages and quickly show the familiar boot screen of Windows Server 2008 R2. Click the virtual console to let it capture the keyboard and mouse. Don’t forget: to release the mouse, you need to press Ctrl+Alt+left arrow.
Install the operating system in the usual way using a full installation—not Server Core. We will get to a Server Core installation later in this chapter.
Installing Older or Unsupported Operating Systems
Hyper-V was developed to run only current and common operating systems. The programmers at Microsoft do not test with older operating systems such as Windows NT 4, Windows 98, OS/2 Warp, Linux distributions, and so on. This does not mean that such operating systems will not work as a VM on Hyper-V, but it does mean that they will not have Integration Services. They will have to rely on the legacy (emulated) devices, which will be much slower than enlightened VMs.
We tested some old operating systems, just to see what would happen. Windows NT 4 is known to run on Hyper-V, while Windows 98 does not boot. DOS 6.22 runs fine, even with network access. We took one old OS from a different vendor: OS/2 Warp from IBM. It did not install.
After the installation and final reboot, you end up with a fully running Windows Server 2008 R2 VM. If you have DHCP on the LAN connected to its virtual switch, it will be fully network enabled as well.
However, the work is not quite done. Unless your VM runs the same OS and service pack as the host system, its Integration Services will not match that of the Hyper-V host. In fact, any OS older than Windows 2008 will not have Integration Services at all. In both cases, you need to install the latest version. This is easily done using the built-in ISO file with the Integration Services software. The details may vary a bit, depending on the OS version and/or previously installed versions of Integration Services.
1.
Log on to the VM using an Administrator account.2.
Select Console Action Insert Integration Services Setup Disk.3.
After a short while, the Autoplay dialog box should offer to run Setup, as shown in Figure 29.19. If this does not happen, perhaps because Autoplay is disabled, you can run Setup directly from the virtual DVD drive in the VM.4.
Run Setup. After this, you know the drill. One or more reboots may be required.If you look through the VM using the virtual console, there is little that shows that it’s a VM. From its own point of view, it’s just another server. One place where it shows its virtual nature is in the Device Manager. This is actually a good place to check that all is well with your VM. Table 29.5 lists the names for the virtual drivers of Hyper-V. If you don’t see these, something went wrong. You might be missing a reboot, installed the wrong version of the Integration Services, or something like that.
table 29.5:
Hyper-V Devices in the VM
type of device Name
DVD/CD-ROM Msft Virtual CD/ROM ATA Device IDE/SATA disk Virtual HD ATA Device
SCSI controller Storvsc miniport
SCSI disk Msft Virtual Disk SCSI Disk Device
Display adapter Microsoft Virtual Machine Bus Video Device
Mouse HID-compliant mouse
Network adapter (enlightened) Microsoft Virtual Machine Bus Network Adapter Network adapter (legacy) Intel 21140 Based PCI Fast Ethernet Adapter or DEC PCI
Fast Ethernet DECchip 21140
System devices Many, such as the Integration Component drivers, the Virtual Machine Bus, and various filter drivers
A final word on the power states of a VM: you can boot, shut down, hibernate, suspend, and reset a physical machine. But a VM has an additional power state: it can be in a “saved state.” This feature is very nice to have in a test environment. It is similar to a hibernated state but initiated Figure 29.19
Autoplay dialog box for setting up Integration Services
from the host. This means that it always works, no matter what OS is installed in the VM. The “save state” action can be found in the usual place in the Hyper-V management console or the VM virtual console. Start the VM again, and the saved stated will be reloaded to resume exactly where you left off.
For some tests, it’s useful to freeze the VM in place. This is different from a saved state because no data is saved to disk. A freeze (or pause, as Hyper-V calls it) just stops the VM in its tracks, instantaneously. This is again a feature that is hard to find on a physical machine. Figure 29.20 shows the power state buttons on the Hyper-V console.
From left to right, you can do the following: Send a Ctrl+Alt+Del sequence to the VM.
•u
Start the VM after a shutdown or saved state.
•u
Turn off the VM directly. Windows will ask you whether you are sure you want this. It is
•u
the equivalent of pulling the plug.
Shut down the VM. This works only with properly installed Integration Services. The
•u
Hyper-V host will work with the VM to initiate a normal shutdown sequence. Quite useful! There’s no need to log on to the console anymore.
Save the current state of the VM. For test, this is probably the one we use most.
•u
Pause (or freeze) the VM. Hit the button again to resume.
•u
Reset the VM, similar to a hardware reset on a physical host.
•u
Snapshot the VM: save all current state and configuration, and bookmark it. The VM
con-•u
tinues running, but you can revert to the saved snapshot later. This is very useful, but it’s potentially dangerous, as you will see later
Revert to a saved snapshot.
•u
Understanding Hyper-V Architecture
By this time, you should have a feeling for the basic functionality of Hyper-V. You have learned what server virtualization is used for and how to set up a basic server running Hyper-V with some VMs. However, to understand what’s going on and to be able to troubleshoot problems, you need a deeper understanding of how Hyper-V was designed. In this section, you will learn more about the software architecture of Hyper-V.
CPU capabilities play an essential role in the implementation of server virtualization. The Intel/AMD model for Pentium-class processors has four privilege levels, known as rings. Ring 0 has the highest privilege. The Windows kernel and device drivers use this level. Processes in ring 0 are able to access any hardware in the system. Ring 1 and ring 2 are not normally used in current versions of Windows. Ring 3 is the lowest level. It runs normal “user” programs. In Figure 29.20
Virtual machine power state but-tons on the console
practice, this (should) mean any code that does not require kernel privileges. The trick here is that the CPU forbids any code running in a higher ring to write data or code belonging to a lower ring. In other words, it’s a hardware security feature.
Let’s take a look at the various ways that server virtualization is implemented in gen-eral. The oldest methods have a hybrid architecture that is similar to the diagram shown in Figure 29.21. The label Hybrid means that it is a merger of a normal kernel and a kernel that is aware of virtualization. The (now free) Microsoft Virtual Server product line is an example of such a hybrid architecture.
The host kernel is split in two pieces. The normal kernel runs side by side with code that takes care of all virtualization aspects related to hardware: the Virtual Machine Manager (VMM) kernel. The VMM kernel takes care of all interactions of the VMs with the host. The VMM runs in ring 0 and has full access to all hardware. The VMs have their own kernel. This kernel should believe that it’s running in ring 0, but as you can see from the diagram, it is really running in ring 1. The VMM kernel is taking care of this translation. The principle is known as ring compression. To make this work, both the host and the VM kernels need adjustments, and the VMM needs to translate certain VM requests to the host.
Contrast this with a hypervisor architecture. A hypervisor is a software layer between the hard-ware and the operating systems running on the host. This is known as the bare-metal approach: virtualization at the lowest possible level. The main purpose of the hypervisor is to create isolated execution environments (partitions) for all operating systems. In line with that function, it is responsible for arbitrating access to the hardware. Figure 29.22 illustrates the point.
Figure 29.21 Overview of a hybrid virtualiza-tion platform, where the host and the virtualization layer are on the same level
Host
Apps AppsVM AppsVM Guest
Kernel KernelGuest
VMM Kernel Host Ring 3 Ring 1 Ring 0 Hardware Layer Figure 29.22 With a hypervisor, the host operates on the same level as the VMs: atop a hypervisor layer.
Parent
Apps ChildApps ChildApps
Parent
Kernel KernelChild KernelChild
Hypervisor
Ring 3
Ring 0
Ring -1
Let’s take a look at the ring structure. You will note the addition of ring -1. This is not a man-datory feature of a hypervisor, but most modern hypervisors use it. This ring is the main feature of the CPU virtualization additions discussed earlier: Intel VT and AMD-V. It’s a new access level of even higher priority than ring 0. It allows all kernels to really run on ring 0 without the tweaking that is required in a hybrid model. This makes for a cleaner architecture, implying fewer bugs in code and ideally better performance.
The diagram uses Microsoft’s terminology for the technology. It illustrates that all VMs are created equal but that one is more equal than the others: the parent partition that is responsible for the management and high-level arbitration of all VMs. It is the default owner of all hardware resources and controls the startup and shutdown of the child partitions.
The Hyper-V hypervisor is microkernelized. As the term suggests, this means it was written to be as lean and mean as possible. It contains no drivers, no GUI code, but just enough intelligence to do its main job: manage memory and regulate access to the hardware. Other (non-Microsoft) hypervi-sors may take a different approach. In the monolithic approach, the hypervisor contains drivers and takes more responsibility for inter-VM communication. One advantage of a monolithic hyper-visor is that it theoretically can deliver a higher maximum performance because of its tighter inte-gration with drivers to access the hardware. On the other hand, if this hypervisor has no drivers for your specific hardware, you are out of luck. For mature products, this should not be a real problem, though. In the microkernel hypervisor, the drivers actually reside in the parent partition, which in the case of Hyper-V must be a Windows 2008 (R2) server. The parent partition has the drivers, so if your hardware has drivers for Windows 2008, it can work with Hyper-V.
Let’s step away from the generalities and take a look at the specifics of Hyper-V. Microsoft designed it with the following goals in mind:
The hypervisor should be as lean and mean as possible.
•u
It should be manageable using open APIs.
•u
Reliability and performance should be maximized.
•u
It should be a built-in feature of the Windows Server.
•u
What they came up with is an implementation roughly along the lines of Figure 29.23. You will probably need to look at this a couple of times before it starts to make sense. We know we did the first time.
The bottom of the diagram shows the by-now-familiar layers of the hardware and the hyper-visor. On top of the hypervisor run four VMs in this particular example. From left to right we have the parent partition and three types of child partitions. Let’s start with the parent partition.
The Hyper-V Parent Partition
The parent really has two parts. The lower block runs in ring 0, or kernel mode. It contains four blocks, three of which are new in this discussion: the VMbus, the independent hardware vendor (IHV) drivers, and the virtualization service provider (VSP). The upper block corresponds to ring 3 code, or user mode. Shown here are only the components that are relevant to Hyper-V. The parent partition must run Windows Server 2008 or newer in order to support the hypervi-sor. Depending on your needs, this can be a full GUI version or the Server Core edition.
Installation and Boot process of the hypervisor
You may wonder about this chicken and egg problem: the hypervisor needs a Windows 2008 parent to manage it, but the parent needs the hypervisor before it can do anything. What happens is this. You first install the Windows Server 2008 edition with Hyper-V, such as Standard, Enterprise, or Datacenter. At this point, there is no hypervisor. When you enable the Hyper-V role, Windows will install all required software components such as the VMbus and the VSP, but not the hypervisor. Instead, Windows installs the device driver Hvboot.sys, which will load the actual hypervisor on next boot. This can either be the %Systemroot%\System32\Hvax64.exe hypervisor for AMD processors or %Systemroot%\System32\Hvix64.exe for Intel. These files are both less than 1MB on the initial version of Windows 2008, illustrating their microkernel nature. Once loaded, the hypervisor uses the virtualization extensions of the CPU to insert itself as a ring -1 process, taking over control of the hardware. It proceeds to load the Windows 2008 kernel of the parent partition, prepared with the VMbus and VSP.
Coming back to the ring 0 part of the parent partition, you see the VMbus component at the lowest level. As the name suggests, the VMbus is used for data communication. It is 100 percent virtual, meaning that it has no hardware components. It is a point-to-point connection between Figure 29.23
Hyper-V architec-ture: the hyper-visor, the virtual machines, and their relations Kernel VSC VMBus Non-Microsoft OS Hypervisor-Aware Hypercall Kernel VSP IHV Drivers Windows 2008 VMBus Kernel VSC Windows XP, 2003, 2008, Vista VMBus Kernel Legacy Operating System Emulation Application VM Worker WMI Service VMM Service Application Application Application Application Application Windows Hypervisor Hardware Layer VM WorkerVM Worker Child 3
Parent Child 1 Child 2
User Mode