This manual applies to software version
P2.0
.
User Manual
UM6.3:SW3311:G
D2U01611002
Original — May 1998
This manual supercedes the UM6.3:SW3311:CDT issue dated
June 1997.
ã1998 Fisher-Rosemount Systems, Inc. All rights reserved. Printed in USA
The contents of this publication are presented for informational purposes only, and while every effort has been made to ensure their accuracy, they are not to be construed as warranties or guarantees, express or implied, regarding the products or services described herein or their use or applicability. We reserve the right to modify or improve the designs or specifications of such products at any time without notice.
Name: Title and Department: Company:
Years of Experience: ___ Instrumentation ___ Distributed Control
Telephone: ( ) -- Education: ____Years ____Years College ____Degree
e-mail: Job Responsibility:
Please indicate your evaluation of this manual. Attach additional sheets with comments as needed. 1. How and when do you use
this manual?
V
V
Read entire manual before attempting taskRead selected sections before attempting taskV
Read while attempting taskV
Attempt task firstV
Read as last resort 2. How well is the manual’scontentorganized? Please explain on a separate sheet.
V
Excellent— parallels product’s operation, very usableV
Good— representative of the product’s operation, usableV
Average— usable but can be improvedV
Fair— not very usable, should be improvedV
Poor— not usable, must be improvedV
No OpinionUnderstandable Applicable 3. Is the manual’s content
understandableand
applicableto the product’s operation? Please explain on a separate sheet.
V
V
Excellent— very easy to understand, very applicableV
V
Good— easy to understand, applicableV
V
Average— applicable but some sections not easy to understandV
V
Fair— not very understandable/applicable, should be improvedV
V
Poor— not understandable/applicable, must be improvedV
V
No Opinion4. How well do the manual’s
illustrationsconvey product information? Please explain on a separate sheet.
V
Excellent— very easy to understand, extremely usableV
Good— easy to understand, very usableV
Average— fairly easy to understand, usableV
Fair— not easy to understand, should be improved, not very usableV
Poor— cannot understand, must be improved, totally unusable5. Describe theamountof usable information in this manual including tables. Please explain on a separate sheet.
V
Too much information— not all required to perform taskV
Proper amount provided— not too much nor too littleV
Too little information— needed additional information to perform taskV
No OpinionSections Index
6. How well is information
cross-referencedin the manual’s individual sections and index? Please explain on a separate sheet.
V
V
Excellent— very easy to locate information, extremely usableV
V
Good— easy to locate information, very usableV
V
Average— fairly easy to locate information, usableV
V
Fair— not easy to locate information, should be improved, not very usableV
V
Poor— cannot locate information, must be improved, totally unusableV
V
Did Not UseV
V
No Opinion7. Howusefulis the Glossary?
V
UsefulV
Useful but not complete/accurateV
Not UsefulV
Did Not UseV
No Opinion8. What is youroverall impressionof this manual? Please explain on a separate sheet.
V
Excellent— met all needs, extremely usableV
Good— met most of my needs, very usableV
Average— usableV
Fair— should be revised, not very usableV
Poor— must be revised, totally unusableV
No OpinionPlease FAX or MAIL this form to: Fisher-Rosemount Systems, Inc. Technical Documentation Editor FAX Number: (512) 834-7200 8301 Cameron Road, MD#12 Attention: Technical Documentation Editor Austin, TX 78753
FISHER-ROSEMOUNT USE ONLY— forwarded to:
Contents
1
Introduction
. . . .
1
1.1 Who Should Read This Manual . . . 1
1.2 Control Desktop Revision This Manual Supports . . . 2
1.3 New this Release. . . 2
1.3.1 New for Control Desktop . . . 2
1.3.2 New for the Manual Set . . . 3
1.3.3 New Additions to the Help System . . . 4
1.4 Contents of this Manual . . . 4
1.5 Conventions Used in this Manual . . . 6
1.6 Cautions and Notes . . . 9
1.7 Control Desktop and ENVOX Documents . . . 9
1.8 Related Documents . . . 11
1.9 Electronic Documentation . . . 12
1.10 Where to Find Answers for Product and Document Questions . . . 13
2
Using the Online Help Systems
. . . .
15
2.1 Using the Built-in Help Systems . . . 15
2.1.1 Using the Online Help System . . . 15
2.1.1.1 Accessing General Help . . . 16
2.1.1.2 Accessing Context Help . . . 17
2.1.2 Using the Diagnostics Help System . . . 17
2.2 Control Desktop User--Defined Online Help . . . 18
3
Product Overview
. . . .
19
3.1 Similarities Between Control Desktop and ENVOX Software . . . 19
3.2 Differences Between Control Desktop and ENVOX Software. . . 20
3.3 Configuration with Control Desktop . . . 21
3.4 Legacy Device Support . . . 22
3.5 Exploring in Control Desktop . . . 23
4
Installing and Setting Up Control Desktop Software
25
4.1 The Stages of Installation . . . 26
4.1.1 General Information . . . 27
4.1.1.1 What You Can Install . . . 28
4.1.1.2 What Gets Installed . . . 28
4.1.1.2.1 Directory Structures . . . 29
4.1.1.2.2 ODBC Data Sources . . . 29
4.1.1.2.3 Registry Modifications . . . 29
4.1.2 Stage 1: Before You Begin . . . 30
4.1.2.1 Upgrading ENVOX Databases for Use with Control Desktop P2.0 Summary . . . 30
4.1.2.1.1 Scenario A: ENVOX P3.4 Systems . . . 32
4.1.2.1.2 Scenario B: Pre-ENVOX P3.4 Systems . . . 33
4.1.2.2 Control Desktop User Administration Overview . . . 34
4.1.2.2.1 Application User Accounts . . . 34
4.1.2.2.2 ENVOX Database User Administration . . . 35
4.1.2.2.3 Control Desktop Client Administration . . . 36
4.1.2.2.4 Diagnostics User Administration . . . 37
4.1.2.2.5 Machine User Accounts . . . 39
4.1.3 Stage 2: Match Your Scenario . . . 39
4.1.4 Stage 3: Install Control Desktop P2.0 . . . 41
4.1.4.1 Scenario A: Install Control Desktop P2.0 When P1.0 Has Not Been Previously Installed . . . 41
4.1.4.2 Scenario B: Upgrade from Control Desktop P1.0 to P2.0 . . . 42
4.1.4.3 Scenario C: Add Control Desktop P2.0, Leaving P1.0 Available . . . 44
4.1.4.4 Running Setup . . . 46
4.2 Installing Control Desktop Diagnostics . . . 49
4.2.1 Stage 1: Before You Begin . . . 50
4.2.1.1 Setting Up a Web Server . . . 50
4.2.1.1.1 Microsoft Personal Web Server Files on CD-ROM . . . 51
4.2.1.1.2 Microsoft Personal Web Server Files on the Web. . . 52
4.2.1.2 Installing CDOS P2.0 . . . 53
4.2.2 Stage 2: Installing Diagnostics on the Web Server . . . 53
4.2.2.1 Install the Diagnostics Software . . . 54
4.2.2.4.1 ISAPI Servers . . . 57
4.2.2.4.2 NSAPI Servers . . . 59
4.2.3 Stage 3: Configuring Web Browsers . . . 62
4.2.4 Stage 4: Adding Diagnostics Users . . . 63
4.2.5 Test the User’s Login . . . 64
4.3 Troubleshooting . . . 65
4.3.1 Control Desktop Troubleshooting . . . 66
4.3.1.1 Significance of Common Control Desktop Error Messages . . . 66
4.3.1.2 Significance of Common Control Designer Error Messages . . 73
4.3.2 Diagnostics Troubleshooting . . . 75
4.4 De-Installing Control Desktop P2.0 . . . 81
5
Starting Control Desktop
. . . .
83
5.1 Startup Procedure . . . 83
5.2 Login Procedure . . . 84
5.2.1 Login from Login Icon, ADMIN Option, or Right Mouse Menu . . . 84
5.2.2 Login by Double Clicking A Server . . . 85
5.3 Upgrading ENVOX Databases . . . 87
6
Licensing Control Desktop
. . . .
89
6.1 Software Licensing Procedure . . . 89
6.1.1 License File Operation . . . 90
6.1.2 Requesting Initial Licenses . . . 90
6.1.3 Requesting Additional Licenses . . . 94
6.1.4 Requesting New Hardware Licenses. . . 98
6.1.5 Activating License Keys . . . 102
6.1.6 License Activation Status Viewing . . . 104
B
Control Desktop File Structure
. . . .
113
B.1 System Files Installed with Control Desktop P2.0 Software . . . 113
B.2 ODBC Data Sources Installed with Control Desktop P2.0 Software 116
C
History
. . . .
117
Glossary
. . . .
119
Index
. . . .
131
Figures
Figure 3-1. Control Desktop System Architecture . . . 21
Figure 4-1. Control Desktop P2.0 / ENVOX P4.0 Administration Overview 35 Figure 4-2. Sample OBJ.CONF Configuration File . . . 61
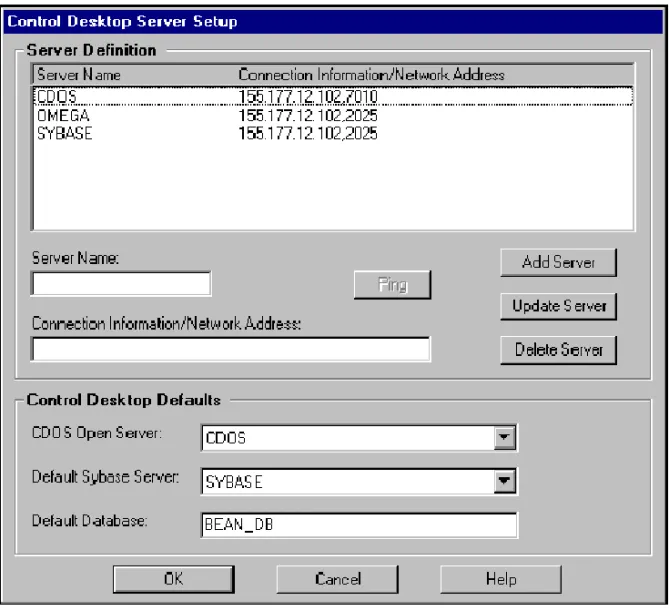
Figure 4-3. Control Desktop Server Setup Dialog Window . . . 68
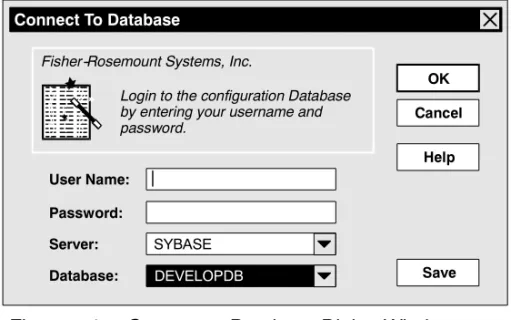
Figure 5-1. Connect to Database Dialog Window . . . 85
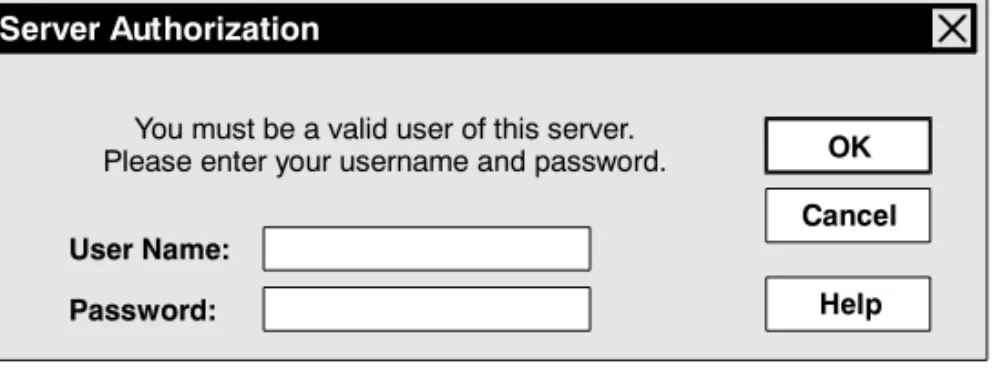
Figure 5-2. Server Authorization Login Dialog Window . . . 86
Figure 6-1. License Registration — Contact Details Dialog Window . . . 91
Figure 6-2. License Registration — License Details Tab Dialog Window . 93 Figure 6-3. Additional Licenses Request — Contact Details Dialog Window . . . 95
Figure 6-4. Additional Licenses Request — License Details Dialog Window . . . 96
Figure 6-5. New Hardware License Request — Contact Details Dialog Window . . . 99
Figure 6-6. New Hardware License Request — License Details Dialog Window . . . 101
Figure 6-7. License Activation Dialog Window . . . 103
Tables
Table 1-1. Mouse or Trackball Terms Used in This Manual . . . 7
Table 1-2. Manual Conventions. . . 8
Table 3-1. Legacy Device Support Limitations . . . 22
Table A-1. Fields in the Target Data Dialog for CHIP Devices . . . 109
Table A-2. Fields in the Primary Tab of the Target Data Dialog for Console Devices . . . 110
Table A-3. Fields in the Console Target Tab of the Target Data Dialog for Console Devices . . . 111
Figure 1-Table 1
1
Introduction
The Type SW3311 Control Desktop software is a PC-based application that accesses existing SW3150-series ENVOXr P4.0 Configuration software and databases. This manual describes Control Desktop, version P2.0, its relationship to the PC-based computer running under Windows NT 4.0, and details how the user navigates and uses the Control Desktop features.
Control Desktop connects to and uses existing ENVOX databases on the DEC VAX, DEC AXP, and HP platforms that already have an ENVOX P4.0 installed client server.
ENVOX P4.0, Control Desktop P2.0, and CDOS P2.0 are compatible. Earlier versions of these products arenot compatible with later versions. For instance, when you upgrade ENVOX software to version P4.0, and you wish to use Control Desktop, you must also upgrade Control Desktop and CDOS to P2.0.
1.1
Who Should Read This Manual
This manual is intended for configuration engineers, users, and system administrators familiar with ENVOX configuration software on DEC Open VMS systems, and with Windows NT systems for installing Control Desktop on an NT platform. A knowledge of ENVOX interfaces to a PROVOXrsystem is required. For users not familiar with using ENVOX software to configure a PROVOX system, the appropriate FRSI school is recommended.
1.2
Control Desktop Revision This Manual
Supports
This manual supports the version of Control Desktop software, P2.0, which runs on Microsoft NT version 4.0.
Only ENVOX version P4.0 software is compatible with Control Desktop version P2.0.
Note ...
1.3
New this Release
The P2.0 release of Control Desktop contains:
J Product enhancements
J A complete restructure of the manual set
J Revisions, enhancements, and restructuring of the online
help system
Control Desktop is a client application that runs on a Windows NT--based PC to provide the user interface to the ENVOX server. It replaces the ENVOX forms data entry mechanism and integrates much of the user interface into a
Windows NT--based engineering environment.
1.3.1
New for Control Desktop
The P2.0 Control Desktop release provides:
J true Explorer viewing functionality J user access functionality control
J an interface to the audit trail J configurable user options
J the ability to launch the Controller I/O View from the Plant
I/O View
J user-specific security tag sets
J the ability to drag ’n drop console list items J extended functions for the Matrix View
J a new Diagnostics module, enabling you to remotely
diagnose system problems through HTML-based Web pages using a standard Web browser
J a new Administration module, providing easy-to-use client
and database administration features
J new Item tab screens
J improved context sensitivity, especially in the right-mouse
menu
J support in the Explorers for Global Point types
J many extensions to the Control Designer module, such as
a user function feature that allows you to define your own function blocks
1.3.2
New for the Manual Set
The restructuring of the manual set reflects improvements in product usability that these enhancements generate. It also responds to customer requests to have certain pieces of information more accessible, either through expansion of the online help system, or elevating the information to a more prominent level within the manuals.
As a result, the manual set now consists of:
J Getting Started with Control Desktop(UM6.3:SW3311:G)
— this manual tells you what you need to know to install, set up, start, navigate within, and use the Control Desktop application.
J Using Control Desktop Modules(UM6.3:3311:M) — this
manual tells you how to use such Control Desktop features and utilities as Control Designer, Report Writer, Task Monitor, Client Administration, and Diagnostics, as well as how to translate control strategies into an ENVOX format. Both manuals also tell you what is in the online help system, as well as how to access it and navigate within it.
1.3.3
New Additions to the Help System
Finally, the online help systems for Control Desktop and its associated functions and utilities have been restructured and expanded to improve usability. New features include the addition of:
J a Web-based intranet segment of the help system to
support the new Diagnostics utility
J a help file for the new Administration module
1.4
Contents of this Manual
This manual contains the following Sections and Appendixes:
Section 1— Introduction: includes an overview of this manual, the intended audience, the stylistic typographical conventions used, and defines documentation available for Control Desktop configuration software.
Section 2— Using the Online Help System with Control Desktop: describes the online help system architecture, as well as providing instructions for accessing and navigating within the help system.
Section 3— Control Desktop System Overview: describes the Control Desktop software requirements and features, and the system architecture that includes the system’s structure and interfaces.
Section 4— Installing and Setting Up the Control Desktop Software: outlines the system requirements and installation considerations, and provides instructions for installing and de–installing the Control Desktop software on the client PC, moving Control Desktop to another disk, and setting up the Control Desktop parameters.
Section 5— Control Desktop Licensing: describes licensing requirements.
Section 6— Starting Control Desktop: defines startup and login procedures, and describes how to move from one server to another, as well as how to change databases, and ENVOX database upgrade requirements.
Appendix A— Targeting Points in Control Desktop: describes the procedures for targeting PROVOX points with Control Desktop.
Appendix B— Control Desktop File Structure: identifies the system files and the ODBC data sources installed with the software.
Appendix C— History: lists all Control Desktop documentation by version number and release date.
1.5
Conventions Used in this Manual
This manual uses the following conventions:
Abbreviations— The glossary of this manual contains abbreviations, their phrases, and explanations for the abbreviations.
Revision Controls— The title page lists the revision level and the printing date of this manual. When the manual is revised, the revision level and the printing date are changed.
Cross Referencing— References to other documents give the document name and document number.
Commands— Commands do not include the Return Key at the end. If the manual describes a command, assume that depressing Return is required to enter the command.
Most operating system commands require that you press the
ReturnorEnterkey after entering the command. This manual does not show these keys in command lines and assumes you use them when necessary.
Long Command Lines— This manual may present some command lines on more than one line due to margin restrictions. However, you normally should enter these commands into your workstation on a single line when possible.
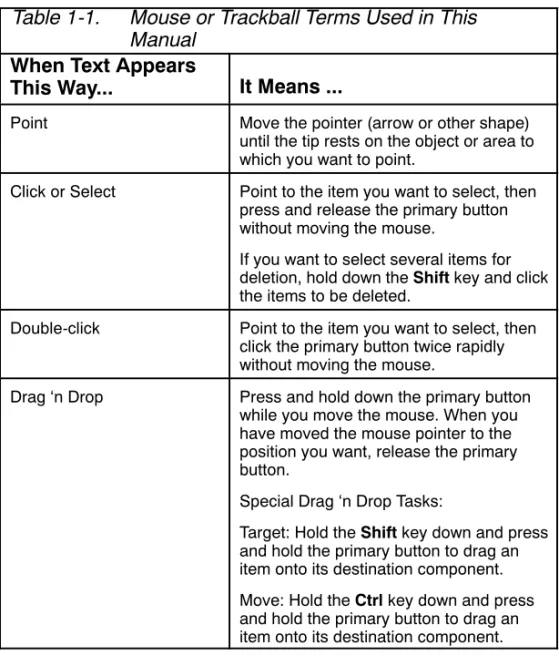
Mouse or Trackball Conventions— You can use either a two-button mouse or multi-button mouse or trackball. Since you can swap use of the left and right buttons, this manual refers to theprimarybutton (the left button) as the one used for most actions such as selections, and the right mouse button for specific actions. Table 1-1 lists terms describing actions you take with the mouse.
Table 1-1. Mouse or Trackball Terms Used in This Manual
When Text Appears
This Way... It Means ...
Point Move the pointer (arrow or other shape) until the tip rests on the object or area to which you want to point.
Click or Select Point to the item you want to select, then press and release the primary button without moving the mouse.
If you want to select several items for deletion, hold down theShiftkey and click the items to be deleted.
Double-click Point to the item you want to select, then click the primary button twice rapidly without moving the mouse.
Drag ‘n Drop Press and hold down the primary button while you move the mouse. When you have moved the mouse pointer to the position you want, release the primary button.
Special Drag ‘n Drop Tasks:
Target: Hold theShiftkey down and press and hold the primary button to drag an item onto its destination component. Move: Hold theCtrlkey down and press and hold the primary button to drag an item onto its destination component.
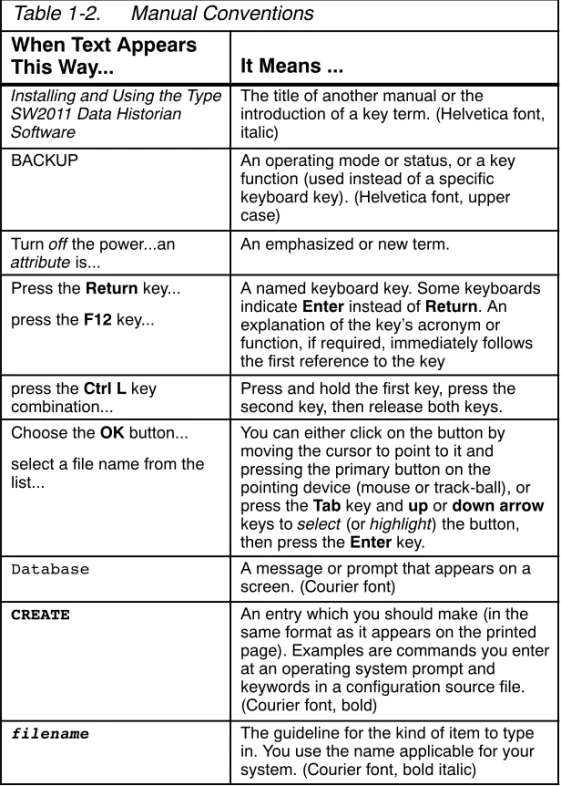
Typographic Conventions— Table 1-2 describes the type styles this manual uses to distinguish different types of information.
Table 1-2. Manual Conventions
When Text Appears
This Way... It Means ... Installing and Using the Type
SW2011 Data Historian Software
The title of another manual or the
introduction of a key term. (Helvetica font, italic)
BACKUP An operating mode or status, or a key function (used instead of a specific keyboard key). (Helvetica font, upper case)
Turnoffthe power...an
attributeis... An emphasized or new term. Press theReturnkey...
press theF12key...
A named keyboard key. Some keyboards indicateEnterinstead ofReturn. An explanation of the key’s acronym or function, if required, immediately follows the first reference to the key
press theCtrl Lkey
combination... Press and hold the first key, press thesecond key, then release both keys. Choose theOKbutton...
select a file name from the list...
You can either click on the button by moving the cursor to point to it and pressing the primary button on the pointing device (mouse or track-ball), or press theTabkey andupordown arrow
keys toselect(orhighlight) the button, then press theEnterkey.
Database A message or prompt that appears on a screen. (Courier font)
CREATE An entry which you should make (in the same format as it appears on the printed page). Examples are commands you enter at an operating system prompt and keywords in a configuration source file. (Courier font, bold)
filename The guideline for the kind of item to type
in. You use the name applicable for your system. (Courier font, bold italic)
1.6
Cautions and Notes
Cautions and Notes attract attention to essential or critical information in this manual. The types of information included in each are explained in the following:
All cautions have this form and symbol. Do not disregard cautions. They are installation, operation, or maintenance procedures, practices, conditions, statements, and so forth, which if not strictly observed, may result in damage to equipment, interruption of normal software operation, or cause a long term health hazard.
Caution ...
Notes have this form and symbol. Notes contain installation, operation, or maintenance procedures, practices, conditions, statements, and so forth, that alert you to important information which may make your task easier or increase your understanding.
Note ...
1.7
Control Desktop and ENVOX Documents
Although Control Desktop and ENVOX software are your primary configuration tool, the documentation is also a tool for getting the most value out of developing an effective
configuration. Different users require different documentation support, depending on their background and the tasks they are doing.
The documentation available for Control Desktop P2.0 and ENVOX P4.0 Configuration Software includes:
J Getting Started with Control Desktop, PN6.3:SW3311:G
(Revision A — May 1998)
J Using Control Desktop Modules, UM6.3:SW3311:M
(Revision A — May 1998)
Only ENVOX version P4.0 software is compatible with Control Desktop version P2.0. Use only the indicated manuals with Control Desktop version P2.0 and ENVOX version P4.0 software.
Note ...
Documents available for ENVOX configuration software version P4.0 includes the following items:
J Installing and Upgrading ENVOX Configuration Software
on DEC VAX and AXP Systems, PN6.1:SW3151:VMS
(Revision B — June 1998)
J Installing and Upgrading ENVOX Configuration Software
on HP-UX Systems, PN6.2:SW3153:HPX (Revision C —
June 1998)
J Using ENVOX Configuration Software, UM6.1:SW3151
(Revision J — June 1998)
J The Technical Reference to ENVOX Configuration
Software, TR1.0:SW3151 (Revision H — June 1998)
J The System manager’s Guide to ENVOX Configuration
Software, SM1.0:SW3151 (Revision E — June 1998)
J Installing and Using the ENVOX Open Database,
J Online and Web help screens: describe the menu options,
forms, and each field on the forms, and provide navigation help. The screens are embedded in the ENVOX software.
J Configuration engineering manuals: describe the functions
of the PROVOX products so that you can apply the right functions to your process. The manuals provide guidelines for using ENVOX forms specific to the associated product.
J Relational database documents: You can purchase
ENVOX software with or without the Sybase relational database. When you purchase ENVOX software with the relational database, you also receive a complete set of relational database documents.
1.8
Related Documents
Operating system manufacturers make many manuals available for their software products. Manuals that may be especially helpful when you install Control Desktop are:
J HP-UX System Administrator Tasks Manual
J OpenVMS, Version 6.1, Installation and Upgrade Manual
J OpenVMS User’s Manual
J OpenVMS DCL Dictionary: A—M
J OpenVMS DCL Dictionary: N—Z
J OpenVMS System Manager’s Manual: Essentials
J OpenVMS System Manager’s Manual: Tuning, Monitoring,
and Complex Systems
J OpenVMS System Management Utilities Reference
Manual: A—L
J OpenVMS System Management Utilities Reference
J Microsoft Windows NT Resource Kit
V Volume 1 -- Microsoft Windows NT Resource Guide V Volume 2 -- Microsoft Windows NT Networking Guide V Volume 3 -- Microsoft Windows NT Messages
V Volume 4 -- Optimizing Microsoft Windows NT
J Microsoft Windows NT Server Resource Kit
V Volume 1 -- Microsoft Windows NT Server Resource Kit
V Volume 2 -- Microsoft Windows NT Server Resource Guide
V Volume 3 -- Microsoft Windows NT Server Networking Guide
V Volume 4 -- Microsoft Windows NT Server Internet Guide
1.9
Electronic Documentation
This manual is also available in DOCVUEt Electronic Documentation which is a CD-ROM set. The CD-ROMs contain current and past Fisher-Rosemount Systems sales literature, manuals, and technical service bulletins.
DOCVUE documentation runs on OpenVMS, UNIX, and Microsoft Windows systems with the advantages of full-text searches, menus, bookmarks, browsing, and point-and-click navigation. We recommend that you call your
Fisher-Rosemount Systems representative or sales office and find out more about DOCVUE documentation.
1.10
Where to Find Answers for Product and
Document Questions
If you believe that this product is not performing as expected, or if you have comments about this manual, please contact your Fisher-Rosemount Systems representative or sales office. You may also complete and send in the Reader Evaluation Form located in the front of this manual.
We also appreciate your suggestions on ways to improve any page of the manual. Please mark your suggestions on a copy of the page and include it with the evaluation form. Thank you for providing this information.
Figure 2-Table 2
2
Using the Online Help Systems
The Control Desktop online help is your main source of information as you develop a configuration database for your process control system. The built-in help system contains extensive procedural and quantitative information about all aspects of using Control Desktop to configure your system. In addition, you can add your own help system to meet your site-specific requirements.
2.1
Using the Built-in Help Systems
Release P2.0 of Control Desktop contains two types of help systems.
J The standard Windows-based online help system
provides in-depth information on using and exploring Control Desktop and its associated modules (except for the Diagnostics module).
J The Diagnostics help system consists of HTML files that
are accessible through the Diagnostics module and provides information on using the module.
2.1.1
Using the Online Help System
You can search the help system in several ways to find the topic in which you are interested. The way you initially access the help system depends on whether you want general help or context help.
2.1.1.1
Accessing General Help
TheHelp Topicswindow appears when you press theF1
key, or select theHelp --> Contentsoption. TheHelp Topics
window contains three tabs:
J Contents— displays a list of the contents of the Control
Desktop help file. To display a topic or subtopic, either: V double--click on the topic name to open it
V select a topic name and click theDisplaybutton to open the topic
Repeat this process as often as necessary to find the information you need.
J Index— displays a list of topics based on the keyword
you enter in the search field. When you pressEnterafter you enter the keyword, the help system displays a list of topics containing that word. To display one of the topics in the list:
V double--click on the topic name to open it
V select a topic name and click theDisplaybutton to open the topic
J Find— displays every instance of the keyword you enter
in the search field. When you pressEnterafter you enter the keyword, the help system displays a more
comprehensive list of topics containing that word. The
Findtab works much like theIndextab.
The Control Desktop Help window appears when you select a topic from theContentswindow. The Control Desktop Help window has a top--level menu and a toolbar.
2.1.1.2
Accessing Context Help
In addition to theHelp Topicswindow, you can access context help that is directly related to the window or dialog box you are viewing within Control Desktop, such as valid entries, numerical ranges, and so on.
To access context help, do one of the following (some options are available only when certain dialog windows are open):
J PressShift+F1
J From theHelpmenu, select theContext Helpoption J Click on theHelpbutton
The help topic that appears relates directly to the current window or dialog box. You can view the information in the help topic and can access information it contains. You can also use the toolbar to display theHelp Topicswindow to view a different help topic.
2.1.2
Using the Diagnostics Help System
The Control Desktop P2.0 Diagnostics module has its own Web--based help system, separate from the traditional MS Windows online help system.
Once you have logged into the Diagnostics module using your Web browser, access the help system by selecting the
Helplink at the top of any Diagnostics Web page. This creates a separate Web browser window to display the Diagnostics help.
The help window is divided into two frames. The left frame contains a table of contents, and the right frame displays the text for a selected help topic.
2.2
Control Desktop User--Defined Online Help
You can add your own site-specific help file which is accessible from theHelp --> User Defined Helpin the top level menu.
You add your help file by defining a path in Control Desktop so that it recognizes your help system and then writing your help system. Once the path is defined and the help screens are written, you can open your help screens with the normal Control Desktop help menu as noted above.
To define the help file and path, use theControl Desktop Optionsdialog box. Follow this procedure:
1. SelectAdmin --> Optionsto display the Control Desktop Optionsdialog box.
2. In the dialog box, select theEdittab.
3. Enter the full path and filename of theUser--defined Help File. Alternatively, click theBrowsebutton, find the help file, and select the appropriate file.
The user--defined help file does not necessarily have to be in a standard MS Windows help format. It may be an ASCII text file, for example.
Figure 3-Table 3
3
Product Overview
Type SW3311 Control Desktop P2.0 software provides an MS Windows environment for configuration engineering functions. Control Desktop uses an MS Windows NT Graphical User Interface (GUI) and works with ENVOXrP4.0 configuration software and databases. The Windows PC client(s)
communicate with ENVOX P4.0 database servers which themselves run on the DEC OpenVMS VAX, DEC OpenVMS AXP, and HP platforms. With this GUI environment, you can use a mouse device to explore and use the Control Desktop software for your configuration activities.
3.1
Similarities Between Control Desktop and
ENVOX Software
Control Desktop P2.0 provides configuration support for current PROVOXrdevices. Control Desktop streamlines and simplifies the configuration process for the configuration engineer. Version P2.0 is the second phase in several planned iterations of Control Desktop. Each release of Control Desktop adds a number of features, many of which are also provided by ENVOX software.
Only ENVOX version P4.0 software is compatible with Control Desktop version P2.0.
Note ...
Control Desktop architecture retains the fundamental
client/server configuration found in ENVOX P4.0. Therefore, Sybase provides all of the client/server functions, and the system operates in conjunction with ENVOX P4.0. Both Control Desktop clients and ENVOX software clients access the same server and databases.
3.2
Differences Between Control Desktop and
ENVOX Software
Major differences in Control Desktop are the MS Windows graphical user interface and the capability of manipulating multiple items simultaneously. In addition, the client software contains the configuration application and Generate,
Download, and FST Translate functions, as well as a Web-based Diagnostics utility. The client manages these applications through a software layer called CDOS, which is installed with the ENVOX software.
The architecture of Control Desktop has two major components:
J The client user interface runs on a PC with the MS
Windows NT operating system.
J The Sybase server contains the ENVOX databases and
the CDOS software.
Some of the important features under this architecture are:
J Multiple clients may connect through the CDOS layer to
multiple Sybase servers.
J The client can make connections to one server at a time
with access to multiple servers possible.
J The client can browse more than one database. However,
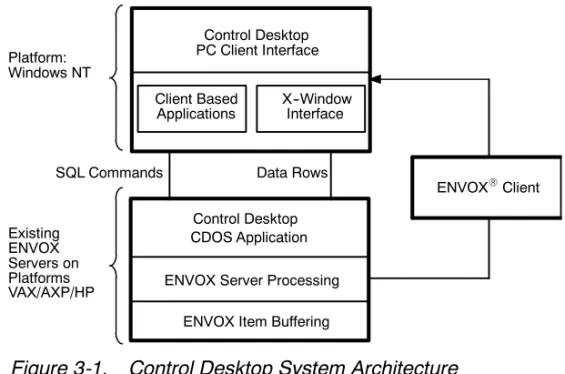
The architecture of the Control Desktop software and its interfaces with the ENVOX P4.0 software are illustrated in Figure 3-1.
X--Window Interface Client Based
Applications
ENVOX Server Processing Control Desktop PC Client Interface Data Rows SQL Commands Existing ENVOX Servers on Platforms Platform: Windows NT Control Desktop CDOS Application
ENVOX Item Buffering VAX/AXP/HP
ENVOXRClient
Figure 3-1. Control Desktop System Architecture
3.3
Configuration with Control Desktop
With Control Desktop, you configure and maintain your
PROVOX control system with the same target device functions as in ENVOX P4.0, but the use of an MS Windows NT-based client eases the tasks needed to configure your system. In Control Desktop, explorers provide a structure that enables you to graphically and rapidly search through your database to find items for configuration or change. In addition, you may set the explorer entry point to a specific device or I/O based on an item’s current tag.
Configuration in Control Desktop can be done in two ways. First, you may use a set of tabbed forms for each item that enables you to determine which configuration items need data. When you select an item type for configuration, you are
presented with a clear view of the configuration windows that need information. Second, you may use the Matrix
(spreadsheet-like) windows, which enable you to manipulate multiple items at the same time. Refer to the online help system for information and instructions on using either of these Control Desktop configuration options.
3.4
Legacy Device Support
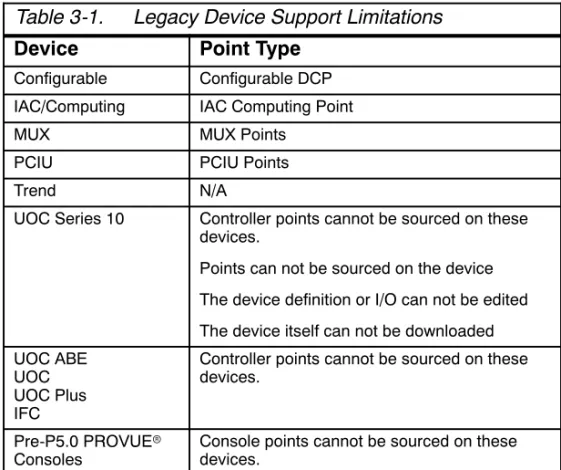
Even though Control Desktop software is designed to fully support current PROVOX devices, the product provides limited support for a number of older devices. Control Desktop
softwaredoes not support the creation, modification of source data, or download for the devices shown in Table 3-1.
Table 3-1. Legacy Device Support Limitations
Device Point Type
Configurable Configurable DCP IAC/Computing IAC Computing Point
MUX MUX Points
PCIU PCIU Points
Trend N/A
UOC Series 10 Controller points cannot be sourced on these devices.
Points can not be sourced on the device The device definition or I/O can not be edited The device itself can not be downloaded UOC ABE
UOC UOC Plus IFC
Controller points cannot be sourced on these devices.
Control Desktop software supports the Unit Operations Controller (UOC) Series 10 device in the following ways:
J The device can be viewed in the Control Desktop explorers J Points already sourced on the device can be re-targeted to
consoles
3.5
Exploring in Control Desktop
There are two main methods of exploring in Control Desktop:
J Top Level Application Menu
J Explorers
The top level menu contains options that perform the Control Desktop functions. With this menu, you can select menu options with your mouse to move around Control Desktop, as well as open Control Desktop modules such as Control Designer, and to carry out configuration activities. The menu always appears when you open Control Desktop and is always available for your use regardless of where you are located in Control Desktop.
With the Explorers, you have true MS Windows Explorer capabilities. You can move quickly to any portion of your configuration information, examine the configuration information that is related to your place in the system, and carry out configuration activities. You choose where you want to examine your configuration.
3.6
Control Desktop User Administration
Control Desktop user accounts fall into two categories:
J Application User accounts— provide user access to
specific major Control Desktop modules and control database access and capabilities.
J Machine User accounts— provide access to the Control
Desktop clients themselves
Subsection 4.1.2.2 contains complete information on user administration and accounts.
Figure 4-Table 4
4
Installing and Setting Up Control
Desktop Software
These instructions enable you to carry out the installation of Control Desktop P2.0 on a Windows NT workstation.
Fisher-Rosemount Systems recommends that you read this information fully before you start any installation. The most current version of this information is duplicated online, and is accessible from the first installation screen.
Note ...
This Section contains:
J Full installation instructions, split up into three stages, as
described in subsection 4.1.
J More general information about installation, including what
gets installed, and how to de-install P2.0, should you need to.
4.1
The Stages of Installation
You can split the installation of Control Desktop P2.0 into the following stages:
J Stage 1: Before You Begin— this includes upgrading the
ENVOX databases and finding out what Sybase and CDOS server names and addresses you are going to use for ENVOX P4.0 and CDOS P2.0 servers.
J Stage 2: Match Your Scenario— this depends on
whether you have Control Desktop P1.0 installed on your PC and, if so, whether you want to keep a version on the PC or remove it when upgrading to P2.0.
J Stage 3: Install Control Desktop P2.0— the procedure
you use depends on your scenario. It may include altering INI files, and SYBASE and PATH variables.
When the installation is completed, you can run Control Desktop to make sure the installation is successful. If it does not, there is some troubleshooting information available to help you diagnose and fix your problem.
There are some special considerations for PCs that have Control Desktop P1.0 currently installed. These are explained within stages 2 and 3 of the installation instructions.
4.1.1
General Information
This section provides general information about what you may install. Fisher-Rosemount Systems recommends that you read it before you start any installation.
Note ...
The Control Desktop P1.0 release required the PC client installation to be carried out using a specificuseraccount. Once the software had been installed under this account on a given PC, only that user account could access Control
Desktop.
The Control Desktop P2.0 release requires the PC clients to be installed using an account with Windows NT administrator privileges. The administration privileges are required to install Sybase Open Client and to set up ODBC drivers and data sources. This makes the Control Desktop Start menu icons available to all valid Windows NT user accounts on the specific PC.
The main advantages of this approach are:
J Multiple user accounts can access a single copy of Control
Desktop on a given workstation.
J Each user account has its own specific Control Desktop
working area, and its own custom user environment. User preferences are not shared.
J A user can run Control Desktop on another workstation
and keep preferences intact, because they are saved with user’s profile.
Information on application user accounts is provided in the sectionControl Desktop User Administration Overview. The installation process uses long filename formats.
4.1.1.1
What You Can Install
There are two separate installation processes you can carry out, for:
J Control Desktop P2.0— Install this onALLworkstations
that are to use the Control Desktop user interface. These instructions describe how to install Control Desktop.
J Diagnostics module— The Control Desktop Diagnostics
Web Server extensions software only needs to be installed ononePC in your network -- a PC running a Web Server. Normally your Windows NT system administrator installs this.
Once the Control Desktop Diagnostics extensions have been installed on the Web Server PC, users on any other workstation that has a Web browser can run Control Desktop Diagnostics. A Web browser (such as Internet Explorer or Netscape Navigator) is the only software required to display Control Desktop Diagnostics.
Instructions for installing Diagnostics are provided in the Installing Control Desktop Diagnosticssection.
4.1.1.2
What Gets Installed
During the Control Desktop P2.0 installation, the following components are added:
J Sybase Open Client and Net Libraries
J Sybase System 10 ODBC Driver
J Microsoft Access ODBC Driver
J Control Desktop DLLs and executables J Control Designer database and executables
4.1.1.2.1
Directory Structures
The default folder/directory structures depend on whether Control Desktop P1.0 has been previously installed on the PC. If Control Desktop P1.0 isnotinstalled on the workstation, the default locations are:
J Control Desktop Software:
C:\Program Files\FRSI\ControlDesktop
J Sybase Open Client:C:\SQL10
If Control Desktop P1.0 is installed on the workstation, the default locations are:
J Control Desktop Software:
C:\Program Files\FRSI\ControlDesktopP20
J Sybase Open Client:C:\SQL10
4.1.1.2.2
ODBC Data Sources
The following ODBC data sources are set up during the installation. These are required for Control Designer to communicate with the Open Server and the Control Designer system database:
J Control Desktop:Sybase System 10
J Control Designer P2 System DB:Microsoft Access
4.1.1.2.3
Registry Modifications
Control Desktop uses the Registry to store information it needs to run, i.e. the name of the CDOS server to use. This
information is added under the key:
HKEY_LOCAL_MACHINE\SOFTWARE\FRSI\Control Desktop\2.0
Users who modify preferences within Control Desktop have the changes saved to a similar section under
HKEY_CURRENT_USER. This allows them to move between PCs and retain their Control Desktop preferences. It also means that, for a first time user, the preferences are taken from the workstation’s setting.
4.1.2
Stage 1: Before You Begin
Before starting the installation process for Control Desktop P2.0, do the following:
J Make sure that the ENVOX databases have been installed.
J Find out and make a note of what Sybase and CDOS
server names and addresses you are going to use for ENVOX P4.0 and CDOS P2.0 servers. You need these when completing the installation, so that Control Desktop can be set up to access the correct servers.
J If you are a Control Desktop P1.0 user, decide whether
you want to be able to run version P1.0 after you have installed P2.0. In most situations,
Fisher-Rosemount Systems recommends that you do not. In addition to the above, you may find it useful to read and understand the user administration facilities available in Control Desktop P2.0 before you start the installation. Control Desktop Administration has been enhanced.
4.1.2.1
Upgrading ENVOX Databases for Use with Control
Desktop P2.0 Summary
Before you can install and use Control Desktop P2.0, you must have at least one server with ENVOX P4.0 on it. The
installation of ENVOX P4.0 should already have been carried out by a system administrator.
The information in this section is simply a summary of what should have been done already. If it hasn’t been done, an administrator must carry out these instructions. For full instructions, refer to either Installing and Upgrading ENVOX Configuration Software on HP-UX Systems
(PN6.2:SW3151:HPX), orInstalling and Upgrading ENVOX Configuration Software on DEC VAX and
DEC AXP Systems(PN6.2:SW3151:VMS), as
appropriate.
Note ...
There are two upgrade scenarios for the ENVOX P4.0 / Control Desktop P2.0 database upgrade process, depending on what version of ENVOX you currently have.
J For users with ENVOX P3.4 systems, refer to
subsection 4.1.2.1.1.
J For users with pre-ENVOX P3.4 systems, refer to
subsection 4.1.2.1.2.
(For new users of ENVOX and Control Desktop, simply install ENVOX P4.0, install Control Desktop P2.0, and use the interactive database upgrade facility from within Control Desktop to make the databases compatible with Control Desktop P2.0.)
4.1.2.1.1
Scenario A: ENVOX P3.4 Systems
If you currently have an ENVOX P3.4 system (not earlier) and want to upgrade to ENVOX P4.0, then read this section.
Note ...
To upgrade ENVOX from P3.4 to P4.0, follow these steps: 1. Run the ENVOX P4.0 installation. This displays a list of
ENVOX P3.4 databases.
2. Select the databases you want to transfer out with the PDX utility.
3. Continue with the installation, including the upgrade of Sybase and the installation of the new ENVOX
executables.
4. Open the ENVOX P4.0 administration application, create databases for PDX load, and load the saved databases from the saved PDX dumps. They are automatically upgraded to ENVOX P4.0.
The databases you have selected are automatically upgraded to the Control Desktop P2.0 version. This
automatic upgrade is triggered on a per-database basis by the existence of the P1.0 database design date stamp in a given database. That is, if the database has been
upgraded for use with Control Desktop P1.0 previously, it is automatically upgraded for use with Control Desktop P2.0. 5. Upgrade or Install to Control Desktop Open Server
(CDOS) on the workstation. Control Desktop P1.0 licenses are preserved, and will function with Control Desktop P2.0.
6. Either upgrade or install Control Desktop P2.0 clients, depending on whether or not you have Control Desktop P1.0 on the PC. The first part of the procedure involves removing Control Desktop P1.0, if you have it.
It is possible to install and run Control Desktop P2.0 without removing an existing P1.0 installation, although Fisher-Rosemount Systems recommends that you do this only if essential.
Note ...
The procedure you follow for the Control Desktop P2.0 upgrade or installation is fully described in subsection 4.1 and in the online help system.
7. (Optional) If there is an ENVOX P4.0 database that you want to use with Control Desktop that hasnotpreviously been upgraded for use with Control Desktop P1.0, then use Control Desktop to upgrade the ENVOX database for use with Control Desktop.
4.1.2.1.2
Scenario B: Pre-ENVOX P3.4 Systems
If you currently have a pre-ENVOX P3.4 system, such as P2.0, P3.0, P3.2, or P3.3, and want to upgrade to ENVOX P4.0, then read this section.
Note ...
To upgrade ENVOX from pre-P3.4 to P4.0, follow these steps: 1. Before installing ENVOX P4.0, run your existing
administration application, and use PDX to transfer out the databases.
2. Uninstall (remove) that version of ENVOX / Sybase. (The ENVOX P4.0 installation process will install Sybase System 10 and the ENVOX P4.0 executables from scratch.)
3. Install ENVOX P4.0.
4. Install Control Desktop Open Server (CDOS) P2.0 on the workstation platforms.
5. Open the ENVOX P4.0 administration application, create logical devices, create databases for PDX load, and load the saved databases from the saved PDX dumps. They are automatically upgraded to ENVOX P4.0.
6. Install Control Desktop P2.0, using the procedure
described in subsection 4.1 and in the online help system. 7. Use Control Desktop to upgrade each ENVOX database
you want to use with Control Desktop.
4.1.2.2
Control Desktop User Administration Overview
Control Desktop user accounts fall into two categories:
J Application User accounts— provide user access to
specific major Control Desktop modules and control database access and capabilities.
J Machine User accounts— provide access to the Control
Desktop clients themselves.
4.1.2.2.1
Application User Accounts
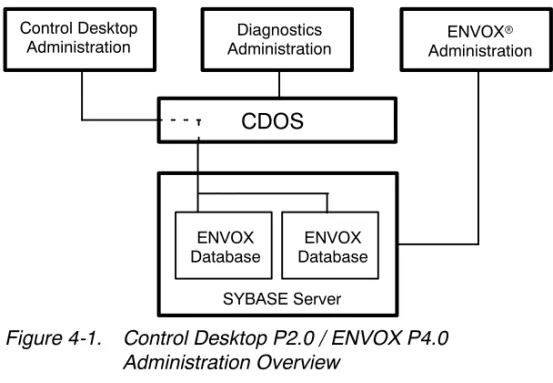
Figure 4-1 shows an overview of the Control Desktop
P2.0/ENVOX P4.0 administration facilities. The diagram shows a Sybase server in which two ENVOX user databases exist. A single Control Desktop Open Server (CDOS) is shown. It can
Control Desktop
Administration AdministrationDiagnostics AdministrationENVOXr
CDOS
SYBASE Server ENVOX
Database DatabaseENVOX
Figure 4-1. Control Desktop P2.0 / ENVOX P4.0 Administration Overview
The diagram also shows three clients, each having an administration capability. The following subsections describe each client’s administration capabilities.
4.1.2.2.2
ENVOX Database User Administration
The ENVOX P4.0 installation contains the ENVOX administration application, which runs on the ENVOX
workstation client. Its functionality is mostly unchanged from ENVOX version P3.4.
In terms of Control Desktop, the ENVOX administration utility is important in that it is required to do system administration tasks, such as creating and backing up databases. It is also used to create database users within the Sybase server. The Control Desktop Project Administrator for that database can then grant and revoke access for the database.
The system administrator can create either standard ENVOX database users for a single database, or database
administration users with privileges across all databases. For Control Desktop purposes, the ENVOX database user profile does not require database administration privileges. Instead, the Control Desktop Project Administrator for each database can create additional Project Administrators with database privileges for that particular Control Desktop database.
4.1.2.2.3
Control Desktop Client Administration
The Control Desktop Client Administration module is new to the P2.0 release. This module allows project leaders to manage their team’s access to project data without having to know the Sybase system administrator (SA) passwords. This approach allows more definition and distinction between Sybase System Administrator functions (like creating new databases and backing up existing databases) and Control Desktop Project Administrator functions (like performing project--specific tasks within a single database, such as enabling Audit Trail options, switching Verify mode on and off, and so on).
The Control Desktop Client Administration module is structured for two user roles:
J Project Administrator— can define user roles and
assign access privileges that determine which Control Desktop features that user has, such as read--only or read/write privileges. The Project Administrator can also grant and revoke user access to that database depending on the project requirements of that user.
J Project Engineer— the standard user role that is
assigned to all typical Control Desktop configuration users. A Project Engineer’s role can be customized by the Project Administrator to grant or restrict access to specific areas of the Control Desktop software.
Without a defined Project Administrator, the Control Desktop Client Administration module does not work.
Note ...
The initial role of a specific Control Desktop client user is determined by that person’s existing user profile within a specific ENVOX database. For example, if the user is a database user with database administration privileges for the ENVOX database, that user is initially granted the role of Control Desktop Project Administrator for all databases to which he or she has access.
For additional information on using the Control Desktop Client Administration module, refer to the appropriate section in the manual titledUsing Control Desktop Modules
(UM6.3:SW3311:M) and to the online help system.
4.1.2.2.4
Diagnostics User Administration
Security is always an issue on Web sites. The Diagnostics module addresses this issue by having its own specific client administration application.
The Diagnostics Client Administration application and the Control Desktop Client Administration module differ in that the Diagnostics Client
Administration application manages user accounts for the Web server, while the Control Desktop Client Administration module manages database user accounts.
The Diagnostics module does not use the configuration
database, so it can apply a different set of user characteristics. This structure allows the Diagnostics module to have its own system administration user, who has the privilege to grant access to the Diagnostics Web site for standard Diagnostics users. These users may or may not be standard Control Desktop users. These standard Diagnostics users can then be granted additional target device access as required.
The Diagnostics system administrator role is granted by supplying the CDOS administrator (CA) account password on the Diagnostics Administrator login Web page.
You can change the CA password from the
Diagnostics module to create a unique Diagnostics Administrator password. However, if CDOS is ever re-installed or upgraded, you must first set the Diagnostics Administrator password back to its original CA default password. If you do not, you can not re-install or upgrade CDOS. Instead, you must de-install CDOS, and then re-install it, which causes you to lose various Diagnostics settings.
Caution ...
For additional information on using the Diagnostics module itself, refer to the appropriate section in the manual titledUsing
Control Desktop Modules(UM6.3:SW3311:M), and to the
Web--based help system that accompanies the Diagnostics module.
4.1.2.2.5
Machine User Accounts
Control Desktop P1.0 limited a particular PC to a single user account. Control Desktop P2.0, however, allows all valid Windows NT user accounts for a particular PC to access the application. The advantages to the upgrade approach are:
J Multiple user accounts can access a single copy of Control
Desktop on a given PC.
J Each user account has its own specific Control Desktop
working area, and its own custom user environment.
4.1.3
Stage 2: Match Your Scenario
After you have prepared for the Control Desktop P2.0 installation, you need to be certain of what software is currently available on your PC and what you want to be available after installation.
There are three different scenarios, depending on whether version P1.0 of Control Desktop is currently installed on the workstation, and whether you want to leave it or remove it:
J Scenario A: Just P2.0— Install Control Desktop version
P2.0. Version P1.0 has not been installed before on this workstation.
J Scenario B: P1.0 to P2.0— Upgrade from Control
Desktop version P1.0 to version P2.0, removing version P1.0 from the workstation.
J Scenario C: P1.0 to P1.0 & P2.0— Add Control Desktop
version P2.0 to your workstation, leaving version P1.0 on the workstation.
Scenario Cis notrecommended in most situations because this scenario requires multiple servers, which may not be practical in all situations. Also, if you do not complete the server setup properly, there is a possibility that the Control Desktop P2.0
installation will overwrite your Control Desktop P1.0 database, instead of maintaining two separate databases.
Caution ...
ForScenario Cto match your situation, you must have available more than one ENVOX and CDOS server. If you have both a CDOS P1.0 server and a CDOS P2.0 server available to you, you can continue to use Control Desktop P1.0 with the CDOS P1.0 server, and can install and use Control Desktop P2.0 with the CDOS P2.0 server. Any installations of Control Desktop P1.0 will not be overwritten and will coexist with Control Desktop P2.0 installed on the same PC.
If you are to be able to run either Control Desktop P1.0 or P2.0, you will need to ensure that theSQL.INIfile (edited using Server Setup) contains both the P1.0 and the P2.0 CDOS and SYBASE server names and addresses.
Do notrun both Control Desktop P1.0 and Control Desktop P2.0 on your PC at the same time. Stop running one version before starting up the other version. Otherwise, resource requirements are likely to cause performance problems and only one copy of Control Designer can be running at any point in time.
Match the scenario carefully with your situation -- this is crucial to the installation process.
When you have matched the relevant scenario with your situation, you are ready for the install.
4.1.4
Stage 3: Install Control Desktop P2.0
Installation requires Windows NT administrator privileges. The procedure you follow for this stage varies significantly according to which scenario you chose in stage 2.Read the appropriate subsection only.Do not read the instructions that apply to the other scenarios.
The three scenarios are:
J Scenario A:Install Control Desktop P2.0 When P1.0 Has
Not Been Previously Installed.
J Scenario B:Upgrade from Control Desktop P1.0 to P2.0.
This process removes P1.0 from the workstation.
J Scenario C:Add Control Desktop P2.0, Leaving P1.0
Available. This option is not recommended for most situations.
Each of these is described below. Only read the subsection that applies to you.
4.1.4.1
Scenario A: Install Control Desktop P2.0 When P1.0
Has Not Been Previously Installed
Installing Control Desktop version P2.0 onto a PC that has not had version P1.0 previously installed onto it, is the most straightforward of the three scenarios. Simply install Control Desktop P2.0 onto the PC, under the administration account. For details on how to do this, follow the instructions in
On completion, you can run Control Desktop from the Start menu. Notice that Server Setup is also accessible from the program group in the Start menu. This can be used at a later stage to modify server information, if required. If you have any problems running Control Desktop, there is some
troubleshooting information that may be useful in subsection 4.3.
4.1.4.2
Scenario B: Upgrade from Control Desktop P1.0 to
P2.0
If you have only one CDOS server, youcan notrun both Control Desktop P1.0 and P2.0 software on your PC; therefore, you must upgrade from P1.0 to P2.0.
Control Desktop P1.0 was installed using a user’s Windows NT account. To completely remove Control Desktop P1.0 on a workstation, each user who installed Control Desktop P1.0 on the PC must remove Control Desktop P1.0 from their setup. In addition, P1.0 users must alter their SYBASE and PATH user variables.
Follow these steps to upgrade Control Desktop from P1.0 to P2.0, removing P1.0 software in the process:
1. De-install Control Desktop P1.0. This regains disk space and avoids any potential confusion in the future. Because Control Desktop P1.0 was installed using a user’s Window NT account, in order to completely remove Control
Desktop P1.0 on a PC, the first user that installed Control Desktop P1.0 on the PC must remove Control Desktop P1.0 from their setup.
To do this, using the user’s (not the administrator’s) account, from the Control Panel, selectAdd/Remove Programs, next select Control Desktop, and then click theAdd/Removebutton. At the prompt, click theYes
2. Remove the SYBASE environment variable and modify the user’s PATH, so that the values placed in the system environment during the Control Desktop P2.0 installation are used instead of the P1.0 values. You need to do this for each user who installed P1.0 on this PC.
To do this, using the user’s (not the administrator’s) account, selectSettings-->Control Panelfrom the Start Menu, next select theSystemicon, and then select the
Environmenttab. With theEnvironmenttab displayed do both of the following:
J Highlight the SYBASE variable in theUser Variables
list box, and click theDeletebutton.
J Highlight the PATH variable in theUser Variableslist,
and in theValueedit box remove the Open Client BIN and DLL folders, then click theSetbutton. The default P1.0 folders were
C:\Program Files\Frsi\Control Desktop\SQL10\BIN and C:\Program Files\Frsi\Control Desktop\SQL10\DLL (If the Open Client BIN and DLL folders are the only folders in the user’s PATH, you can remove the user’s PATH setting by clicking theDeletebutton.)
(Repeat this step for all P1.0 users.)
When the changes have been made satisfactorily, click theOK
button to apply them.
3. Under the administration account, install Control Desktop P2.0 onto the workstation. Follow the instructions in subsection 4.1.4.4. When Server Setup is launched, add P2.0 server address details to the list.
4. If more than one user has installed Control Desktop P1.0 on the PC, only the first user can de-install the software using theAdd/Remove Programsoption. Other users need to manually delete the Control Desktop P1.0 entries from the Start Menu. If the Windows directory is
C:\WINNT, a user with the Windows NT user name <NT-user-name>can delete Control Desktop P1.0 from their Start Menu by deleting the folder:
C:\WINNT\Profiles\<NT-user-name>\Start Menu\Programs\Control Desktop
In addition, if there has been more than one user who has installed Control Desktop version P1.0 on this PC, then each user needs to alter their SYBASE and PATH user variables. Each user can follow the instructions in step 3 for doing this.
On completion, you can run Control Desktop from the Start menu. Notice that Server Setup is also accessible from the program group in the Start menu. This can be used at a later stage to modify server information, if required. If you have any problems running Control Desktop, there is some
troubleshooting information that may be useful in subsection 4.3.
4.1.4.3
Scenario C: Add Control Desktop P2.0, Leaving P1.0
Available
If you have both a CDOS P1.0 server and a CDOS P2.0 server available, you can continue to use Control Desktop P1.0 with the CDOS P1.0 server, and can install and use Control Desktop P2.0 with the CDOS P2.0 server. Any installations of Control Desktop P1.0 are not overwritten and coexist with Control Desktop P2.0 installed on the same PC. Ensure that theSQL.INIfile, edited through the Server Setup module, contains both the P1.0 and the P2.0 CDOS and Sybase server names and addresses. Control Desktop P1.0 uses the same Open Client installation (and therefore same SQL.INIfile) as Control Desktop P2.0.
Do notrun both Control Desktop P1.0 and P2.0 on your workstation concurrently. Stop running one version before starting up the other version.
Note ...
Follow these steps to add Control Desktop version P2.0 to your workstation:
1. Under the administration account, install Control Desktop P2.0 onto the PC. Follow the instructions in subsection 4.1.4.4. When Server Setup is launched, the Control Desktop P1.0 settings are shown. Add Control Desktop P2.0 server address details to the list.
2. Remove the SYBASE environment variable and modify the user’s PATH, so that the values placed in the system environment during the Control Desktop P2.0 installation are used instead of the P1.0 values. You need to do this for each user who installed P1.0 on this PC.
To do this, each user must login under the user’s account (not the administrator’s account), select
Settings-->Control Panelfrom the Start Menu, next select theSystemicon, and then select theEnvironmenttab. With theEnvironmenttab displayed do both of the following:
J Highlight the SYBASE variable in theUser Variables
list box, and click theDeletebutton.
J Highlight the PATH variable in theUser Variableslist,
and in theValueedit box remove the Open Client BIN and DLL folders, then click theSetbutton. The default P1.0 folders were C:\Program Files\Frsi\Control Desktop\SQL10\BIN and C:\Program Files\Frsi\Control Desktop\SQL10\DLL
(If the Open Client BIN and DLL folders are the only folders in the user’s PATH, you can remove the user’s PATH setting by clicking theDeletebutton.)
When the changes have been made satisfactorily, click theOK
button to apply them.
(Repeat this step for all P1.0 users.)
On completion, you can run Control Desktop from the Start menu. Notice that Server Setup is also accessible from the program group in the Start menu. This can be used at a later stage to modify server information, if required. If you have any problems running Control Desktop, there is some
troubleshooting information that may be useful in subsection 4.3.