Barracuda Networks Inc. 3175 S. Winchester Blvd Campbell, CA 95008 http://www.barracuda.com
F i r m w a r e V e r s i o n 2 . x
C u d a t e l C o m m u n i c a t i o n S e r v e r A d m i n i s t r a t o r ’ s G u i d e
Copyright Notice
Copyright 2004-2010, Barracuda Networks
www.barracuda.com
v1.x-100401-01-0401
All rights reserved. Use of this product and this manual is subject to license. Information in this document is subject to change without notice. Trademarks
CudaTel Communication Server is a trademark of Barracuda Networks. All other brand and product names mentioned in this document are registered trademarks or trademarks of their respective holders.
Contents
Chapter 1 – Introduction . . . 5
Overview . . . . 6
What This Guide Covers . . . . 6
Easy Administration . . . . 6
Features of the CudaTel Communication Server . . . . 7
Energize Updates . . . . 8
CudaTel Communication Server Models . . . . 9
Contacting Technical Support. . . 11
Chapter 2 – Getting Started . . . 13
Initial Setup . . . 14
Checklist for Unpacking . . . 14
Deployment/Installation . . . 14
Install the CudaTel Communication Server . . . 15
Configure IP Address and Network Settings . . . 15
Configure the Corporate Firewall . . . 16
Initial Configuration of the System . . . 17
Configure NAT Routing . . . 17
Configure WAN . . . 17
Default Gateway. . . 17
Configure Proxy Settings . . . 17
SMTP Mail Settings . . . 18
Activate Your Subscriptions . . . 18
Update the CudaTel Communication Server Firmware . . . 19
Administrative Settings and the Web Interface . . . 21
Controlling Access to the Web Interface . . . 21
Setting the Time Zone of the System . . . 21
Event Notifications . . . 21
Basic Phone System Configuration. . . 22
Configuring Extension Blocks . . . 22
Configuring Users and Telephones . . . 22
Configuring Inbound Routing . . . 25
Configuring Inbound Call Queues . . . 25
Call Parking Extensions . . . 25
Multi-user Conferences . . . 26
Automated Attendants. . . 26
Configuring Connections to Telephone Service Providers . . . 27
Reports . . . 28
Backup Configured Phone System . . . 29
Chapter 3 – CudaTel Communication Server Concepts . . 31
Telephone Concepts and Technologies. . . 32
Inbound Routing. . . 34
Phone System Network Considerations . . . 36
Telephone Service Provider Considerations . . . 37
VoIP Telephone Service Connection . . . 37
Traditional Telephone Service Connection . . . 38
Chapter 4 – Configuring Distributed Telephone Systems 39
Emergency Service and Distributed Systems . . . 40Configuring Remote Phones . . . 41
Configuring Communication to Remote CudaTels . . . 42
Chapter 5 – Securing the CudaTel Communication Server 43
Using Firewalls to Protect Your Phone System . . . 44Deploying Behind a Firewall. . . 44
WAN Port Firewall . . . 44
Chapter 6 – Monitoring the System . . . 45
Viewing Performance Statistics . . . 46
Monitoring. . . 47
Monitoring Live Calls . . . 47
Reviewing Recorded Calls . . . 47
Monitoring Events through Email . . . 47
Reports . . . 47
Troubleshooting. . . 48
Diagnostic Tools . . . 48
Chapter 7 – Maintenance . . . 49
Updating Phone System Firmware . . . 50
Performing Phone System Backups . . . 50
Updating the Firmware on your CudaTel Communication Server . . . 50
Troubleshooting the System . . . 51
Replacing a Failed System . . . 51
High Availability Feature . . . 52
Chapter 8 – User Guide . . . 53
Managing User Options. . . 54
Initial Login . . . 54 Dashboard. . . 54 Voicemail . . . 54 Fax Management . . . 54 Address Book . . . 54 Call Forwarding . . . 54 Switchboard . . . 55
Appendix A – About the Hardware . . . 57
Hardware Compliance. . . 57
Appendix B – Limited Warranty and License . . . 59
Barracuda Networks Limited Hardware Warranty (v 2.1) . . . 59
Exclusive Remedy. . . 59
Exclusions and Restrictions . . . 60
Barracuda Networks Software License Agreement (v 2.1) . . . 60
Barracuda Networks Energize Updates and Other Subscription Terms . . . . 65
Appendix C – Outbound Routing Regular Expressions . . 73
Basics . . . 73
Sample Patterns. . . 73
Replacing and Trimming Digits . . . 75
Appendix D – Provisioning Specific Manufacturer ’s Phones 77
POLYCOM PHONES . . . 78SNOM PHONES . . . 79
CISCO PHONES . . . 80
SPA 500 Series . . . 80
SPA 3102 and SPA 8800 . . . 80
SPA 900 Series and PAP2T . . . 80
Cisco 7900 Series . . . 81
Chapter 1
Introduction
This chapter provides an overview of the CudaTel Communication Server and includes the following topics:
Overview ... .6 CudaTel Communication Server Models ... .9 Contacting Technical Support... .11
Overview
What This Guide Covers
The CudaTel Communication Server is an integrated hardware and software telephone system solution, providing a simple, feature rich system for connecting and managing voice connections established through Internet and traditional phone lines. The system can be pure VoIP (Voice over Internet Protocol) or it can blend VoIP with traditional phone service, such as analog and digital phone connections. CudaTel provides configuring and monitoring of the phone system, inbound and outbound routing of calls, and management and recording of users and phones through an easily understood administration user interface (Web Interface) over the Internet.
Depending on the model, CudaTel Communication Server can support hundreds of concurrent calls. This guide provides concepts and general guidance the administrator needs in order to best configure the CudaTel Communication Server according to the organization’s deployment needs, policies and telephony infrastructure.
Easy Administration
The powerful Web Interface of the CudaTel Communication Server allows for convenient
configuration and management of your phone system from any networked computer as soon as the CudaTel Communication Server is installed on your network. All management, routing and monitoring of phone calls can be managed from one central location.
Features of the CudaTel Communication Server
All models of CudaTel Communication Server support the following:• Unlimited number of extensions, telephones, and users. • Management of local users, and creation of user groups.
• LDAP synchronization between CudaTel and back end repository of users and extensions. • Group calling: Allows association of users/telephones permitting one ring/all ring
functionality.
• Follow-me: Allows telephone number to be forwarded to configured extensions depending on date, day, or time of day in order to locate a user.
• Networking of VoIP voice connections.
• Call Parking: Allows calls to be temporarily parked at available extension for later retrieval. • SIP telephones: Allows attachment to devices which use the SIP protocol to establish media
streams for voice or video transmission.
• Networking to analog phone lines (model 270B): Provides connection with dial tone provided by telephone company.
• Networking to digital phone lines (models 370B, 470B, 670B): Provides connections with Primary Rate Interface ISDN, which can carry voice traffic for up to 30 simultaneous digital voice calls. (PRI in North America is limited to 23 simultaneous calls).
• Trunk group support: Allows establishment of logical groups of phone lines (analog and digital) to accomplish call routing with transparency to the user.
• Inbound call queues: Keep track of incoming calls allowing them to be held and then retrieved in the order received. Can be configured so on hold callers hear announcements and/or music. • Multi-party conferences: Allow multiple callers dialing into an extension to connect, and to
communicate with each other. Can require users to provide secure PIN for access.
• Automated attendant: Provides for menu based call routing system using Interactive Voice Response (IVR) to play announcements and route calls according to caller responses. Also provides for caller to be immediately transferred to dialed extension.
• Advanced call routing: Routes inbound calls based on a simple list of actions to perform for each caller, including announcements or transfers to extensions, including conditional routing based on date, time of day, or day of week.
• Call monitoring and recording: Allows real time monitoring and recording of calls and stores call parameters including call start time, call end time, extension dialing and number dialed. • Call Detail Records (CDR)
• Call bridging: Allows any telephone in network, whether connected through Internet or through traditional POTS line to establish a voice connection with any other phone in network. • Automatic provisioning of telephone sets: Allows automatic provisioning of all supported
hard and soft phones on the network.
• Browser-based Call Control Client: Provides real-time view of telephone system and allows call routing from Web interface.
• Supports Power over Ethernet (PoE): Supports VOIP phones that can be powered via PoE Switches.
Energize Updates
Barracuda Central
To provide you with the latest features and support for your CudaTel Communication Server, Energize Updates are available around the clock to your CudaTel Communication Server from Barracuda Central.These updates are automatically made available to your CudaTel Communication Server.
Energize Updates provide your CudaTel Communication Server with the following benefits: • Access to round the clock free technical support
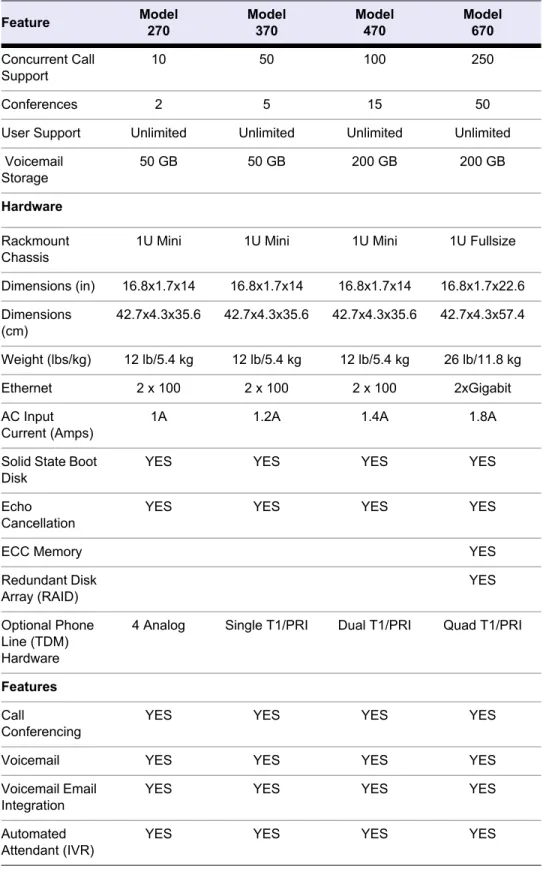
CudaTel Communication Server Models
The CudaTel Communication Server comes in a variety of models. Refer to the following table for the concurrent call capacity and features available on each model:
Table 1.1: Feature Model 270 Model 370 Model 470 Model 670 Concurrent Call Support 10 50 100 250 Conferences 2 5 15 50
User Support Unlimited Unlimited Unlimited Unlimited
Voicemail Storage 50 GB 50 GB 200 GB 200 GB Hardware Rackmount Chassis
1U Mini 1U Mini 1U Mini 1U Fullsize
Dimensions (in) 16.8x1.7x14 16.8x1.7x14 16.8x1.7x14 16.8x1.7x22.6 Dimensions (cm) 42.7x4.3x35.6 42.7x4.3x35.6 42.7x4.3x35.6 42.7x4.3x57.4 Weight (lbs/kg) 12 lb/5.4 kg 12 lb/5.4 kg 12 lb/5.4 kg 26 lb/11.8 kg Ethernet 2 x 100 2 x 100 2 x 100 2xGigabit AC Input Current (Amps)
1A 1.2A 1.4A 1.8A
Solid State Boot Disk
YES YES YES YES
Echo Cancellation
YES YES YES YES
ECC Memory YES
Redundant Disk Array (RAID) YES Optional Phone Line (TDM) Hardware
4 Analog Single T1/PRI Dual T1/PRI Quad T1/PRI
Features
Call
Conferencing
YES YES YES YES
Voicemail YES YES YES YES
Voicemail Email Integration
YES YES YES YES
Automated Attendant (IVR)
SIP Voice/Video Client Support
YES YES YES YES
SIP Provider Support
YES YES YES YES
High-Definition Audio
YES YES YES YES
Windows Active Directory Integration
YES YES YES YES
LDAP Support/User Import
YES YES YES YES
Call Recording YES YES YES YES
Performance Monitoring
YES YES YES YES
Automated Phone Provisioning
YES YES YES YES
Customizable Branding
YES
Table 1.1:
Contacting Technical Support
To contact Barracuda Networks Technical Support:
• By phone: call (408) 342-5300 if you are in the United States, or (888) 268-4772. • By email: use [email protected]
• Online: visit http://www.cudatel.com/support to create a support case.
There is also a Barracuda Networks Support Forum available where users can post and answer other users’ questions. Register and log in at http://forum.barracuda.com.
Chapter 2
Getting Started
This chapter will guide you in installing the CudaTel Communication Server and configuring the phone system to take advantage of its rich feature set.
Initial Setup ... .14
Update the CudaTel Communication Server Firmware... .19
Administrative Settings and the Web Interface ... .21
Basic Phone System Configuration... .22
Initial Setup
Checklist for Unpacking
Begin by unpacking your new CudaTel Communication Server. Consult the checklist and directions in this section for instructions on how to proceed.
Unpacking checklist:
• CudaTel Communication Server • Power cord
• Ethernet cable
• For model 270B, also included are two telephone Y-cables Required equipment for installation:
• VGA monitor (recommended) • PS/2 keyboard (recommended)
• 1U space in 19" rack or other suitable location • Climate controlled environment
• A/C power
• Uninterruptible power supply (recommended)
Deployment/Installation
The following figure shows the configuration of the CudaTel installed in the system, connecting both POTS lines (“Plain old Telephone Service”) and Internet voice connections through the firewall to IP and soft phones in the system.
Figure 2.1: The CudaTel Communication Server behind the corporate firewall
Install the CudaTel Communication Server
1. Fasten the Barracuda CudaTel Communication Server to a standard 19-inch rack or other stable location.
2. Connect a CAT5 or CAT6 patch cable from your network switch to the LAN Ethernet port on the front of the CudaTel Communication Server.
3. Connect the following to your CudaTel Communication Server: • Power cord
• VGA monitor • PS2 keyboard
4. Press the Powerbutton located on the front of the appliance
Configure IP Address and Network Settings
Wait for system to fully boot up.The login prompt for the administrative console is displayed on the monitor, and the power light on the front of the system turns on. To physically install the CudaTel Communication Server Appliance:
• At the Administrative Console prompt login enter Username: admin Password: 0000 (four zeroes)
• Use the TAB key to move and the ENTER key to select.
seconds changes the IP address to 192.168.200.200. Holding the Reset button for 8 seconds changes the IP address to 192.168.1.200. Holding the Reset button for 12 seconds changes the IP address to 10.1.1.200.
• Configure subnet mask, default gateway, and optional primary DNS and secondary DNS. (The Web interface allows updates to these settings once it is accessible.)
• Apply the network settings.
Configure the Corporate Firewall
Open up the following ports in your firewall:* Access via port 22 is required only if technical support is requested
Table 2.1:
Port Direction TCP UDP Usage
53 Out Yes Yes DNS
80 In/Out Yes No Firmware and
Documentation Updates
123 In/Out No Yes NTP
843 In/Out Yes No Flash Policy
Server 5060-5070 In/Out Yes Yes SIP Ports (Soft
Phones, Providers)
7838 In/Out Yes No Web Sockets
Initial Configuration of the System
After specifying the IP address of the system and opening the necessary ports on your firewall, you need to configure the CudaTel Communication Server from the Web interface. Make sure the computer from which you configure the CudaTel Communication Server is connected to the same network, and the appropriate routing is in place to allow connection to the CudaTel Communication Server’s IP address from a Web browser.
To configure the CudaTel Communication Server:
1. From a Web browser, enter the IP address of the CudaTel Communication Server on the address line (Example: http://192.168.200.200).
2. Login to the Web interface by entering the username admin and password 0000.
Configure NAT Routing
If your CudaTel Communication Server is behind a NAT router and you wish it to communicate via the Internet, indicate that it’s behind a NAT router on the CONFIGURATION > Network screen of the Web Interface in the LAN Interface section. Using the Auto-detect function, the External IP address may be automatically determined, or it may be set manually. (Your NAT device must support UPnP or NAT-PMP in order to auto-detect the IP.) Click on Apply Network Settings after configuring the NAT Routing information.
Configure WAN
To enable the WAN Interface on your CudaTel Communication Server, click Enabled and enter in the IP Address and Subnet Mask and Gateway in CONFIGURATION > Network > WAN Interface.
Default Gateway
The Gateway is the IP address to which all non-local traffic is routed.The CudaTel Communication Server uses a single default gateway, either through the LAN or WAN, as configured. If the default gateway is through the WAN, enter the Gateway IP Address in CONFIGURATION > Network > WAN Interface. If the default gateway is through the LAN, check Use LAN gateway as Default Gateway, in the CONFIGURATION > Network > LAN Interface which will disable the WAN Interface Gateway
field.
Static Routes
If routing of some non-local traffic requires a route other than the default gateway, the
CONFIGURATION > Static Routes allows you to Add a Static Route for this purpose, by configuring an alternate IP Address, Subnet Mask, and Subnet Gateway.
Configure Proxy Settings
If you are using a proxy server, enter the Proxy Settings using CONFIGURATION > Network > Proxy Settings to reflect the proxy server IP address, port, and login information (username and password). Click on Apply Network Settings after configuring the Proxy Settings information.
SMTP Mail Settings
SMTP mail settings must be configured using CONFIGURATION > Mail/SMTP Settings so email can be generated and delivered for Voicemail messages, Event Notifications, Faxes, and Call Recording. The CudaTel Communication Server has three configurable ways to deliver email:
• A built-in email server is provided which can be used stand alone or can relay to an existing email server. To configure the built-in email server, set Sender Address to the email address to advertise in the sender field of the email, and set From Host to the IP or host name of the mail server you wish to relay through.
If you choose to relay email through an existing email server, make sure to configure the existing mail server to allow relay from the CudaTel Communication Server’s IP Address.
• To configure email with a Smart Host, like the Barracuda Spam Firewall, supply the Sender Address and From Host (in this case From Host is the IP address or hostname of the Smart Host, for example, the Barracuda Spam Firewall). In addition, set SMTP Server Address / IP to the host name or IP address of the existing mail server, set Port to the port assigned to the smart host, usually port 25.
• To configure the CudaTel Communication Server as a client to an existing mail server, set
Sender Address to the client email address (already existing on the mail server). Set From Host
to the IP address or host name of the mail server to authenticate to. SMTP Server Address /IP is set the same as From Host. Port is the port used by the mail server. Set User Name and
Password for the Client.
Apply SMTP Settings to save the settings. For more information on configuring Event Notifications to be made through email, see Monitoring Events through Email on page 47.
Activate Your Subscriptions
After installation, your Energize Updates and other optional subscriptions must be activated for the CudaTel Communication Server to be fully functional, and continue to receive the latest updates to your firmwarefrom Barracuda Central. An Energize Updates subscription will provide access to firmware updates and new features as they become available.
Product Activation
At the top of every page, you may see a warning that your subscription has not been activated. • Click on the designated link to open up the Product Activation page in a new browser window. • On the Product Activation page, fill in the required fields and click Activate. A confirmation
page opens to display the terms of your subscription.
• Return to the CudaTel Communication Server Web interface and navigate to DASHBOARD>
System Dashboard > Updates and Support. Verify that the Energize Updates, Instant Note
Replacement Service (if purchased) and Premium Support (if purchased) all indicate active status.
• There may be a slight delay of a few minutes for the display to reflect your updated subscription status. If the status is still showing as not activated, click Refresh in the Subscription Status
section.
If your subscription status does not change within an hour, or if you have trouble filling out the Product Activation page, call your Barracuda Networks sales representative.
Update the CudaTel Communication Server Firmware
Prior to upgrading the firmware on your CudaTel Communication Server, read the release notes. Subscribers to Energize Updates will have automatic access to the latest firmware. The DASHBOARD >System Dashboard > Updates and Support screen indicates when a firmware update is available for installation by displaying an Updates Available notification directly below the firmware version number. Selecting the notification navigates to the CONFIGURATION > Updates page where the Current Installed Version of the firmware and Latest General Release firmware versions can be compared. Release notes for all versions can be reviewed, and a download of the latest firmware can be initiated.
To update the firmware on the CudaTel Communication Server:
1. Navigate to the CONFIGURATION > Updates page. The Start Download button is disabled if the CudaTel Communication Server is already up-to-date with the latest firmware.
ALWAYS read the release notes prior to downloading a new firmware version. Release notes provide you with information on the latest features and fixes provided in the updated firmware version. You can access the release notes from the CONFIGURATION > Updates page.
2. If the installed version does not match the Latest General Release: read the release notes to learn about the latest features and fixes provided in the new firmware version, and click Start Download to begin the download. Updating the firmware may take several minutes. Do not turn off the appliance during this process.
Once the download is complete, an Install button will appear.
The Install takes several minutes to complete. It is important not to power-cycle the appliance during the install. Your CudaTel Communication System will be offline during this time, so it should be scheduled to minimize the business impact.
3. Installing the update will take a few minutes and will require the CudaTel Communication System to be offline during that time. The install should be scheduled to least impact your operations. When an appropriate downtime is available, click Installto activate the newly downloaded firmware. This process will automatically reboot your system when completed, which can cause your Web interface to disconnect momentarily. This is normal and expected Note
Note
behavior, so there is no need to perform a manual reboot. A Status page displays the progress of the reboot. Once the reboot is complete, the login page will reappear.
Administrative Settings and the Web Interface
Controlling Access to the Web Interface
The CONFIGURATION > System page allows you to change the password of the administration account.
Setting the Time Zone of the System
You can set the time zone of your CudaTel Communication Server from the CONFIGURATION >
System page. The current time on the system is automatically updated via Network Time Protocol (NTP). When the CudaTel Communication Server resides behind a firewall, NTP requires port 123 to be opened for outbound UDP traffic. If you desire to use an NTP server other than the default, this can also be specified on the CONFIGURATION > System page.
It is important that the time zone is set correctly for accurate monitoring and routing of calls.
Event Notifications
Using CONFIGURATION > System Event Notifications, significant events on the CudaTel
Communication Server trigger notification by email to a configured email address within a set time interval. The threshold for email notification is configurable, providing email notification of events which meet or surpass the configured setting.
Note It is important that the time zone be set correctly because this information is used throughout the system (e.g. rule based routers branch based on system time, and call data records store the system time).
Basic Phone System Configuration
Once the corporate network is properly configured (see Initial Configuration of the System on page 17) then phone system (PBX) configuration can begin in earnest. The basic steps are:
• Gather user information
• Identify physical telephones to setup • Configure users and phones
• Configure routing features such as automated attendants, queues, and conferences • Configure telephone service providers
Configuring Extension Blocks
Extension blocks are configured on the CONFIGURATION > Extensions page. Here a block of valid dialable extensions can be configured, which can later be associated with configured people, or objects (for example, Conferences, Automated Attendants, or Phones) on the EXTENSIONS pages. An extension block of extensions 2000-2999 is created automatically in a default install.
Configuring Users and Telephones
You need a list of users and phones before continuing with your configuration.The list of users can come from your LDAP database if it is current. The list of phones can be determined by the CudaTel Communication Server by using the auto-provisioning feature, but auto-provisioning is only recommended when all existing phones on the network should be provisioned to the CudaTel Communication Server.
Using Active Directory synchronization allows the CudaTel Communication Server to synchronize to your LDAP database. To best implement your telephone system using this feature, it is
recommended that you create a group in your LDAP directory with only the telephone system users. To enable synchronization with LDAP users, navigate to CONFIGURATION > Directory
Services/LDAP page to view and configure LDAP settings. Drill down to the telephone system group you created and select it. Synchronizing now configures all of the telephone users in your system at once. The user names will be configured according to your LDAP settings, so to delete, add, or modify a user after the synchronization requires the modification to be made in the LDAP and synchronized again to your CudaTel Communication Server. The Active Directory option is only recommended when the LDAP is kept up to date.
The auto-provisioning feature allows the CudaTel Communication Server to automatically provision any SIP telephone it detects. Auto-provisioning should not be used if you have an existing VoIP system in production on your LAN because it will attempt to provision every phone detected on the network. If you are doing a "clean" install then the auto-provisioning feature will save configuration time by automatically setting up each system phone to get provisioning information from the CudaTel Communication Server. To turn auto-provisioning on, toggle the Turn Automatic Provisioning On
button in the CONFIGURATION > Phones, Automatic Provisioning screen. If auto-provisioning is not used, then you will need to manually set each phone to look for the CudaTel Communication Server
Note To use Active Directory synchronization, create a telephone group with only the telephone system users you intend to configure. Then select and synchronize only to that group to configure all of your telephone system users at once. It is important to use groups and not organizational units for this operation.
to get its provisioning information. Provisioning URLs for internal and external phones are displayed on this page as well. For detailed instructions, refer to Provisioning Specific Manufacturer’s Phones on page 77.
To manually set up users and phones, begin by hooking up phones, creating the users in the system, and provisioning the telephones. The basic steps are as follows:
• Connect telephone to network.
• Manually configure phone to get provisioning information from CudaTel Communication Server. (See Appendix D on page 77 for manufacturer specific information on connecting phones to the network).
• Add new user.
• Assign telephone to user.
Configuring Phone Settings
Some system settings must be configured for all phones in the system using the CONFIGURATION > Phones page. The Set Local Area Code setting allows seven digit dialing with this prepended area code on outbound calls. Operator Extension sets the extension to which callers are transferred when dialing “0” from a phone in the system. Ring Time Before Voicemail sets the number of seconds before transferring callers to voicemail. System phones can automatically connect via intercom with any extension by dialing **XXXX*1, where XXXX is the desired extension to connect to. This allows the caller to hear over intercom through the dialed extension. To disable this feature, so the receiving extension is not automatically picked up, check the Disable intercom check box. Users can be allowed to access their own voicemail without a password by checking the Voicemail Auto-Login.
Codecs can be set up for Incoming or Outgoing Calls, optimized for quality or bandwidth, depending on the settings. Default Codecs are enabled by default which should be suitable under most
circumstances.
Adding Phones
Connecting phones to your CudaTel Communications Server simply requires powering up the phone and connecting it to the LAN. Provisioning it manually takes two steps: set the provisioning server in the phone’s configuration to point to the CudaTel Communication Server (http://x.x.x.x/provision
where x.x.x.x is the IP address of the CudaTel), then reboot the phone. The provisioning server is the CudaTel Communications Server, and each manufacturer requires this information to be provided in its own way. For Cisco, Polycom, Snom, and AASTRA phones, see Appendix D on page 77 for instructions.
After provisioning the phone, it is unassigned, and can be viewed in EXTENSIONS > Unassigned Phones. The assigned temporary extension number will appear in this listing.
For soft phones, the CudaTel Communication Server automatically generates an authorization
Username and Password which can be copied and entered into the appropriate fields of your soft phone configuration. The phone will then appear in the EXTENSIONS > Unassigned Phones list, and can be assigned to a user.
Note Automatic provisioning should be used only to setup a system where no other VoIP phones are already in production on the LAN. CudaTel Communication Server auto-provisioning function streamlines setup of a clean install by provisioning all VoIP phones it detects on the LAN.
Adding Users and Assigning Phones to Users
To add users manually, use the EXTENSIONS > People page Add New Person option. Fill in the first name, last name, PIN, and group options. These values can be edited at any time by returning to the
EXTENSIONS > People page and selecting a user from the list, which opens an editable window of the user’s information.
To assign a phone to a user, either select by choosing a phone (assigns the temporary extension associated with this phone to the user), or select an extension for the person (directing the system to assign the first free extension, or manually entering a single extension or range of extension numbers), then click Add.
External numbers (direct inward dial numbers) which ring the assigned user extension when dialed, can be added to an existing user at any time by returning to the EXTENSIONS > People page and selecting the user from the list. This opens an editable window of the user’s information. An added external number will also be the caller ID sent out from that extension, unless overridden by the
PROVIDERS > Telephone Service Providers page Caller ID option to always use the preset caller ID. After each user is created and has a phone assigned, voicemail can be set up by dialing *98 from the configured phone and following the voice prompts. Users can be allowed to access their own voicemail without a password by checking the Voicemail Auto-Login check box on the
CONFIGURATION > Phones page. For more user information, refer to Managing User Options on page 54.
If you wish to print an Extension Guide of your system, use the Open a printable extension guide
option on CONFIGURATION > Troubleshooting > Extension Guide and use your computer’s print utility to print it.
Once the phones and users are set up, you can begin configuring queues, blocks of call parking extensions, conferences, and automated attendants. (While these system features may be created before adding and assigning users, it is recommended to configure phones and users first to allow for verification that the configuration was set up properly.)
Configuring Inbound Routing
Configuring Inbound Call Queues
A queue is a list of calls on hold, retained in the order received. A queue is associated with an extension number, where transferring a call to that extension adds the call to the queue. The order of the calls is maintained so the first call in the queue is the first one retrieved. Calls are retrieved automatically by assigned Queue Agents, or manually by dialing the associated Agent Access Extension, if configured. Queue calls receive announcements or music while on hold. Calls may be transferred to a configured extension if they are held beyond the configured Maximum Wait Time.To configure an inbound call queue, navigate to EXTENSIONS > Inbound Call Queues. Break in announcements and music on hold can also be configured for a queue. A queue name can be chosen for phone display so queue agents know the queue from which the call has been retrieved. Capacity
and Wait-time Warnings are visible on the CONFIGURATION > Inbound Call Queues page as well, indicating number of calls waiting and wait time for the queue.
Queue Agents
Assign a queue agent if calls should be routed automatically to a user’s extension when the extension is available. One or more queue agents can be added manually by entering the extensions associated with them.Calls are simultaneously sent to the number of agents configured using Agents per Call.
Agent Access Extensions
Assign an agent access extension to allow users to manually retrieve the next call from the queue. Any user may help service queued calls (when the queue is backed up, for example) by dialing the queue agent access extension, thereby retrieving the next call (the call which has been waiting the longest) from the queue for processing.
Music on Hold
Music on Hold determines what a caller in this queue will hear while on hold, silence or the default hold music. On the CONFIGURATION > Sounds and Music page, Add or Record sound files to supply additional options for Music on Hold.
Break-in Announcements
Recorded break-in announcements, sound files that can be recorded or uploaded to the CudaTel Communication Server on the CONFIGURATION > Sounds and music page, can be played at the interval you choose while the call is on hold.
Queue Timeout
To set a queue timeout, enter the Maximum Wait Time after which the call should be transferred, and a transfer extension. Calls will then automatically transfer to the configured extension if the elapsed time on hold exceeds the queue timeout setting.
Call Parking Extensions
Blocks of parking extensions, which allow calls to be parked temporarily for later retrieval, can be configured on the EXTENSIONS > Call Parking Extensions page. Click Add New Parking Extensions
block. When parking a call, simply transfer the call to the first extension in the block, and the retrieval extension number, which you can dial to retrieve the call, will be given to you. If an extension in the block is known to be free, the call can be transferred directly to that extension and retrieved by dialing it at a later time. By dialing the last extension in the parking block, the longest waiting caller in the block can be retrieved.
Multi-user Conferences
Multi-user conferences allow the connection and interaction of multiple users through a configured conference extension. Conferences can be set up on the EXTENSIONS > Multi-User Conferences
page. Use Add New Conference and supply a Conference Name, conference Extension(s), and
Waiting Music, played only when exactly one person has called into the conference. A block of extensions can be assigned as conference extensions, allowing for multiple individual conferences if desired. A call connected to the conference extension joins the conference.
An Access Code can be applied to an existing conference by selecting the conference name from the
EXTENSION > Multi-User Conferences list to edit the conference. Here, a four digit access code can be added by typing it into the two Access Code boxes, and clicking Change access code. If the boxes are left blank when selecting the Change access code button, the conference access code is deleted.
Conference Member Groups can be added, allowing members of those groups to view the conference using Call Control Client. Administrative control using Call Control Client is limited to the configured control group. Waiting Music preference and associated Conference Extensions can also be modified by editing a multi-user conference.
For information about user options while connected to a conference extension, refer to Conference Call User Controls on page 56.
Automated Attendants
Automated Attendants are extensions that can automatically attempt actions based on interactive caller inputs, or based on a configured list of actions or destinations. Two types of automated attendants can be configured to handle calls automatically. Basic Automated Attendants use sound files to elicit caller key presses and act according to them. Advanced call routers attempt each action or destination on a configured list, continuing to the next if the action fails and may attempt listed actions only if the call meets the time, day, date, or caller phone number information configured in association with that action.
Automated Attendants
A basic Automated Attendant operates by prompting a caller to interactively press a key indicating the preferred call handling. Callers are prompted by a configured sound file. Use the
CONFIGURATION > Sound Prompts page to record or upload sound files before configuring Automated Attendants.
To configure a new a Automated Attendant, on the EXTENSIONS > Automated Attendants page, select Add New...Automated Attendant. The Automated Attendant Name and Extension are configured here, as well as the sound settings for the automated attendant, which are set here by selecting from the list of configured sound files. The sounds configured on this page will be the basis for the configuration of key presses which is covered further down this page. The Greeting Sound
should inform the caller with a menu of choices and prompt the caller to press a key, indicating the reason for the call. Optionally, Short Greeting Sound can be configured with an alternate message, which will be played if the caller does not respond before the configured repeat time. If configured, this message should be an abbreviated reminder of the options for the caller. Invalid sound will be played if the caller input does not have a configured response. Exit sound will play before the call is disconnected. To save the settings, the button must be pressed.
To edit the name or extension of an existing automated attendant, or to associate actions with key presses for an existing Automated Attendant, select the Automated Attendant from the list on the
EXTENSIONS > Automated Attendants page. The key press actions are configured by left clicking on the key. An action can be associated with the key by selecting from the list of allowed actions. Allowed actions include doing nothing, going back to the menu one level up, going back to the top menu level, going to another automated attendant (to further process through another configured menu), hanging up, or transferring to an extension.
By selecting the Summary button, a list of all keys and their configured actions can be viewed. Sound file configuration can be viewed and edited from this page by selecting the Sound Files button. To enable callers to dial an extension from the Automated Attendant, select the Other Options button, and check the box allowing dial-to-extensions. If the caller is slow to respond, the Repeat settings on the Other Options screen allows configuration of seconds between message play repeats. The repeated message will be the Greeting Sound, unless a Short Greeting Sound is configured. Also configurable is the maximum number of repeats before disconnection.
Advanced Call Router
An advanced call router is an extension that can automatically attempt a list of actions, continuing to the next if an action fails. To configure a new advanced call router, on the EXTENSIONS > Automated Attendants page, select Add New...Advanced Call Router. The Router Name and Extension can be specified, and to apply the configured settings, the Add button must be pressed.
To configure an advanced router, select it from the list on the EXTENSIONS > Automated Attendants
page. A list of actions can be configured and advanced routers allow day, time, date, or caller phone number rules to be associated with each action. Actions may include calling a sequence of phone numbers or extensions, playing sound files, or accessing voicemail. Calling lists include advanced options of configurable timeouts, and call receiver confirmation. See on-line help to configure these options. If the call is not answered by the end of the calling list, a configured action is taken. The call may be transferred to a specified extension or voicemail. Other unanswered call options include waiting for a fax, paging a group, performing an echo test, sending to a gateway, or disconnecting the call. On-line help gives detailed instructions for configuring list-based routers.
Configuring Connections to Telephone Service Providers
The CudaTel Communication Server requires a connection to the outside world to properly receive and route calls. These connections may be through analog or digital lines from the telephone company, or through the Internet via accounts provided by VoIP providers. The CudaTel
Communication Server allows connection to each of these and provides bridged connections among them.
To configure your telephone service provider connections, in some cases you may need to do this after business hours, such as when migrating from a phone system (PBX) that you are replacing.
VoIP Telephone Service Connection Configuration
VoIP providers use the SIP protocol to implement voice connections over the Internet. The CudaTel supports various SIP configurations. VoIP accounts are used to set up the connections. The VoIP provider establishes an account which will be registered using the PROVIDERS > Telephone Service Providers screen. Setting up a new telephone service provider account requires the following inputs received from the VoIP provider: Name of the provider, SIP configuration of the provider (use generic unless otherwise indicated), host, port, login information (username, Authorization username, and password), Realm (if different from host). Other configuration options allow outbound calls to have a set Caller ID, optionally overriding outbound caller IDs with the configured one (check box). VoIP connections can be unidirectional, inbound calls only or outbound calls only,
automatically allow routing through any configured outbound route. If registration is required for your VoIP provider, this can be indicated for the provider, along with the expiration on the registration, if specified by your provider.Once each of these fields has been updated with the provider information, your new provider connection can be installed.
Analog Telephone Service Connection Setup
The CudaTel Communication Server (model 270B) provides the option to connect your phone system directly to traditional phone service through analog ports. To use the analog ports, simply attach incoming phone lines (from the traditional RJ14 wall phone jacks) to the analog ports. Each analog port allows the connection of up to 2 lines. To attach two lines, connect the provided Y cable to the analog port on the back of the CudaTel appliance, then two separate lines may be connected to the two plugs at the other end of the Y cable.
Selecting a port on the PROVIDERS > Telephone Service Providers page brings up the configuration screen for that port. The direction of the connection can be set to Inbound only, Outbound only, or both directions. Correspondingly, inbound and outbound voice connections can be configured on this screen. Inbound calls can be routed to any extension, including automated attendants, routers, or a user phone. Outbound routes must be configured at the bottom of this screen for any calls to be routed outbound through it. For more information on configuring outbound routes, see Outbound Routing Regular Expressions on page 73.
The CudaTel Communication Server (models 370B, 470B, 670B) can connect directly to traditional phone service through digital PRI ports. BRI is not supported. To use the digital port, simply attach the incoming PRI line (usually provided) to a PRI Port on the back of the CudaTel appliance. One (model 370B), two (model 470B), or four (model 670B) PRI connections can be made depending on your CudaTel model. The PRI ports will appear in the provider list on the PROVIDERS > Telephone Service Providers screen indicating they are connected.
Selecting a digital port on the PROVIDERS > Telephone Service Providers page brings up the configuration screen for that port. On digital ports, the port settings Signal Type and Default Caller ID
can be specified. Compatible signal types for your CudaTel Communication Server include National ISDN-2 (NI-2), Lucent 5ESS, or NorTel DMS100. When ordering new equipment, use the signaling type supported by the current phone system. If no current service exists, NI-2 is recommended. If configured to always use this caller ID, the Default Caller ID setting will override the caller ID settings for outbound calls on this port.
Outbound Faxes cannot use a Telephone Service Provider unless Allow Outbound Fax through this gateway is selected.
External numbers supplied by your Telephone Service Provider must be added as External Numbers
which implements Direct Inward Dialing. External Numbers listed for a Telephone Service Provider can be associated to an extension configured on your CudaTel Communication Server, so the designated extension will ring whenever that number is dialed. Outbound routes for the digital port must be configured for any calls to be routed outbound through it. For more information on configuring outbound routes, see Appendix D on page 77.
For more information on setting up a Telephone Service Provider, see the online help.
Reports
Call Detail Reports
Call Detail reports are collected according to the Call Recording Policy setting on the EXTENSIONS > People page, associated with each user. Call recording policy for a group can be configured by selecting an existing group on the EXTENSIONS > Groups page, and selecting Recording Policy. This
calling and called parties, call start time and duration of call. These records can be filtered by filling in a search field and time frame desired on REPORTS > Call Detail Records. For further processing, the records can be downloaded from REPORTS > Call Detail Records into a file in comma separated format (CSV).
Phone Registrations Reports
A list of Active, Inactive or Restricted Phone Registrations can be viewed on the REPORTS > Phone Registrations page.
Backup Configured Phone System
After successfully configuring the CudaTel Communication Server, backup the configuration for easy restoration later, in the event of any future failure of the phone system. To backup your phone system, refer to Performing Phone System Backups on page 50.
Chapter 3
CudaTel Communication Server Concepts
This chapter introduces the general topics that will help you understand what your CudaTel Communication Server can do and how to approach configuring the features that are important to your particular deployment and organization policies. The Getting Started chapter walks through initial setup and configuration of the system to get you up and running.
Telephone Concepts and Technologies ... .32 Call Routing... .34 Phone System Network Considerations ... .36 Telephone Service Provider Considerations ... .37
Telephone Concepts and Technologies
The following is a list of some of the terms used to describe the CudaTel Communication Server functions and features.
Table 3.1: CudaTel Terms and Concepts
Term Description
Telephone System A telephone system is a server for telephones. It allows the communication connections between hard, soft and IP phones, the Internet, and traditional phone lines. Tradition-ally, telephone systems, also called PBXs (Private Branch Exchanges), connected phone lines provided by telephone companies through traditional lines to phones -- actual hard-ware used to receive and make calls. The CudaTel is a modern phone system allowing the expansion from this tra-ditional model to include connections over the Internet. It allows for easy configuration of the system over the Internet and connection through the Internet to non-traditional phones such as soft phones and IP phones.
Phone Lines Phone Lines are the traditional lines provided by telephone companies or telephone service providers which provide dial tone. Phone lines can be connected to the CudaTel by analog ports, standard RJ14 four conductor jacks, or digital ports, which are PRI ports using standard eight conductor RJ45 jacks. Additional voice connections can be provided through the Internet, with service providers supplying accounts to establish media streams for voice or video con-nections using voice over Internet protocol (VoIP).
Grouping Phone Lines Trunk Groups are logical groupings of phone lines. Analog and/or digital lines can be associated into a trunk group to allow the routing of outbound calls through any available line in the trunk group. Users are not required to know which line the outbound call uses; as long as at least one of the trunk group lines is available, the outbound call routing is trans-parent to the user. By creating digital trunk groups, a very large pool of phone lines can be established for environ-ments such as call centers, where there is heavy telephone traffic.
Phones: Hard/Soft/ IP A telephone is a device which receives and transmits the voice connection between a user and another user or a system resource, such as voice messaging. Phones can establish connections via traditional phone lines (POTS lines) or through Internet connections (LAN or WAN). Hard phones are the traditional telephone hardware that allows direct connection through POTS (“Plain Old Telephone Ser-vice”) lines to the phone network. Soft phones are imple-mented through software on a computer, where the computer acts as your telephone, connected through the Internet to the phone network. IP Phones are hardware devices, resembling a traditional telephone, which connect to the Internet and provide the needed subset of computing functionality (connection to the Internet, display of caller information, function “buttons”, etc.). The voice connection feels as though on a traditional phone, though the connec-tion is actually made over the Internet or LAN.
Provisioning Phones The process of assigning the phone to the CudaTel Commu-nication Server. The phone is assigned an extension number and firmware updates.
Extensions/ Extension Numbers
An extension is the final destination of a routed call. It may be a phone or a system resource such as a queue, confer-ence, voice mailbox, or automated attendant. For the pur-poses of CudaTel Communication Server documentation, an extension number, the number dialed to reach an exten-sion, and the extension itself, are interchangeable terms. Grouping Users Grouping users allows assigning an extension number to be
associated to all of the grouped users. While users in a group still haver their own unique extension numbers, all phones of users in the group ring when the group extension number is dialed. This is a simple way to alert multiple users of incoming calls of common interest. The group association also allows the establishment of a default call recording policy for the whole group with one setting.
Policies Policies allow setting a default configuration for a group of users. For example, policies can be established for collec-tion of data records for a group of users.The group policy can be over-ridden by individual user settings.
Table 3.1: CudaTel Terms and Concepts
Call Routing
The CudaTel Communication Server allows local management of calls both incoming from the PSTN (public switched telephone network), or Internet, and outgoing to the PSTN or Internet. The CudaTel Communication Server is connected to the Internet (through its LAN/ WAN ports) and optionally to analog or digital phone lines, directing both inbound and outbound calls to the proper route.
Outbound Routes
Outbound routes, associated with a specific Telephone Service Provider, are specified as a list of potential dialed patterns. The patterns may be specific, such as ‘911’, or more general, such as ‘any 7 digits’. An outbound route provides the mechanism for a particular dialed sequence to be allowed. These routes direct calls fitting a defined pattern to be routed using PSTN lines, or Internet connection from the associated telephone service provider. By specifying outbound routes per provider, the administrator can direct calls to the best provider for that call type. For example, ‘411’ calls can be directed to the best information resource of the telephone service providers. To enable a particular dialed pattern to connect out, that pattern must be specified for at least one provider. For example, to enable ‘911’ dialing, the ‘911’ dialed pattern must be set as an outbound route for at least one provider. If no outbound route exists for the sequence, it will be denied connection access. For information about the use of Regular Expressions (text patterns) to set up outbound call routes, see Appendix C.
Inbound Routing
Incoming calls to the CudaTel Communication Server can be routed with a variety of options. Queues, lists of calls kept in the order received, allow calls to be held, and retrieved in the order they were received. Calls can be parked in a block of configured parking extensions. Calls can be connected with configured multi-user conferences. Automated attendants can process calls according to a list of actions. The actions can be ordered according to user input, requiring the user to choose actions off of an announced menu, or can be ordered by a simple configured list, where actions may depend on time of day, date, day of week, or caller phone number. The CudaTel Communication Server inbound call routing actions include playing recordings or transferring the call to an extension. Since each queue, call parking extension, conference, and automated attendant is an extension, a call can be directly routed to any of these once it enters the system.
Queues
Queues allow calls to be held in the order received, and answered in that order by designated queue agents as they become available to process them. A queue is assigned a logical extension number and calls transferred to that extension join the queue. Queues work on a simple first in, first out principle, such that calls are retrieved from the queue in the order they were received. While queue agents receive calls automatically from the queue when the agent is available, anyone can take calls off the queue by dialing the associated agent access extension. A queue can have a timeout which transfers calls waiting beyond the timeout period to a designated extension. The queue provides for music on hold or break in announcements at regular intervals if desired.
Parking/Retrieving Calls
Dynamic routing of calls can be accomplished by configuring blocks of call parking extensions. An incoming call (which requires paging to locate the intended call receiver, for example) can be parked
in the block of parking extensions by transferring the call to the first extension in the block. The call will be held at any available extension in the block. The retrieval extension is returned to the user who parked the call and can be passed on to the intended call receiver, once s/he is located. For example, the intended receiver can be paged with instructions to pick up the retrieval extension. Alternatively, the call could be directly transferred to an extension from the block of parking extensions if it is known to be available. In this case, the call can be retrieved by simply re-dialing that extension.
Multi-user Conferences
Multi-user Conferences can be configured so that multiple callers desiring to conference can connect with each other by dialing the designated conference extension number, and providing a conference access code, if configured.
Automated Attendant
Automated Attendants allow the configuration of a list of actions to take for each call. The order of the actions can be based on input from the caller, in response to an announcement asking for caller input. The input (key-press of a digit) is captured to determine the proper routing of the call. Advanced call routers allow a configured list of actions to be taken for each incoming call. The list may include playing messages or transferring to extensions and may take different actions depending on the time, day, date, or caller phone number. If the call remains unanswered, the CudaTel
Phone System Network Considerations
Deployment of the CudaTel Communication Server requires connection to a network. The
performance of your phone system and the ease or complexity of setup will depend, in part, on the network configuration you choose. The CudaTel Communication Server relies on the attached network to provide bandwidth, the amount of data flow available for voice connections, and to provide correct configuration information. While connecting your CudaTel Communication Server to an existing network may require less physical network configuration, it introduces some performance and complexity issues to your phone system deployment. These issues need consideration before deciding which network configuration you will implement.
Voice connections rely on adequate network bandwidth. By attaching your CudaTel Communication Server and phones to an existing network, the bandwidth available for voice connection traffic will be constrained to the existing network bandwidth available. Lack of bandwidth could negatively impact voice connection quality and reliability. Also, attaching the CudaTel Communication Server and phones to the existing network may impact other network elements vying for the same bandwidth. Any network device with its own IP address (phones and SIP devices in your system) receives configuration information from the DHCP server when connected to the network. Because phones need configuration to point to the CudaTel Communication Server as the phone server, the network will need to be configured to allow the DHCP server to correctly distinguish which network elements are phones and SIP devices so correct configuration information can be transmitted to them. Implementing a virtual LAN (VLAN) comprised only of phone system elements is one way of ensuring that phones are identified as such, and receive correct configuration information from the DHCP server when attached to an existing network.
Considering these quality and complexity issues, the ideal network setup for the CudaTel Communication Server and the phones it serves (SIP devices, IP phones) would be a dedicated physical network. Using this configuration results in high quality voice transmission, with the fewest dropped calls. This setup enables phones to get the proper configuration information without introducing added complexity into the existing network.
Best
Practice The most reliable network configuration, providing maximum performance of your phone system, is to set up a dedicated physical network for your CudaTel Communication Server and phones.
Telephone Service Provider Considerations
The CudaTel Communication Server requires a connection to the outside world for receiving and routing calls. The connection may be via the Internet through accounts provided by Internet voice connection (VoIP) providers or through physical analog or digital lines from the telephone company. The CudaTel Communication Server allows connection to each of these and provides bridged connections among them. Your phone system will need to be configured to support the phone service provider you choose, whether VoIP voice connection provider or traditional telephone company. Telephone service providers assign external telephone numbers (Direct Inward Dial numbers, or DIDs) which the CudaTel Communication Server routes to designated extensions or phones according to configuration. On outbound calls, a configured caller id can be associated with all calls routed through a telephone service provider.
VoIP Telephone Service Connection
VoIP providers use the Session Initiation Protocol (SIP) to implement voice connections over the Internet. The CudaTel Communication Server supports various SIP configurations. VoIP accounts are used to set up the connections. The VoIP provider establishes an account and provides parameters which the CudaTel Communication Server is then configured to use. Once configured, the CudaTel can route calls in and out through the VoIP connection.
Emergency Dialing Configuration
Because VoIP connections, unlike traditional phone lines, are not mapped to physical locations, Emergency call (911) routing can be problematic. To ensure proper emergency call routing over the Internet, always check with your VoIP provider. The CudaTel Communication Service allows for the configuration of sites which are identified by:
• IP address or subnet, • Inbound provider or port, • Inbound authorization account.
Calls from a configured site can be routed according to site associated settings including always sending a configured caller ID from the site, and routing dialed patterns (e.g. “911”) to a configured provider. This allows for emergency service at the associated site to be properly identified when 911 calls are made. Internet emergency service (for example: E911) requires the registration of each site in order to ensure that authorities in the locale of the caller are notified in the event of an emergency.
Warning
To ensure emergency service properly identifies a remote network element location, you must consult your VoIP provider, or register with an Internet emergency service and follow their instructions. The CudaTel Communication System does not implement 911 dialing, but rather allows for the configuration of sites to assist your VoIP or Internet emergency service provider in implementing 911 dialing for you.
Traditional Telephone Service Connection
Analog Telephone Service Connection Setup
The CudaTel Communication Server (model 270B) allows you to connect your phone system directly to traditional phone service through analog ports. Up to four analog phone lines can be attached through two analog ports on the back of the appliance.
The two RJ-14 ports are back-lit red, and
each port handles two phone lines. (The port that is back-lit green is not used.)
Thesephysical connections provide the lines through which incoming and outgoing calls can be routed. For information about maximum concurrent call count and other features, see CudaTel Communication Server Models on page 9.
Digital (PRI) Telephone Service Connection Setup
The CudaTel Communication Server (models 370B, 470B, 670B) provides the option to connect your phone system directly to traditional phone service through digital PRI ports. Up to four PRI
connections can be made depending on your model. These physical connections can provide for a large call volume to be supported. For information about maximum concurrent call count and other features, see CudaTel Communication Server Models on page 9.
Chapter 4
Configuring Distributed Telephone Systems
This chapter discusses configuration options for phone systems which are distributed across multiple locations.
Emergency Service and Distributed Systems ... 40 Configuring Remote Phones ... 41 Configuring Communication to Remote CudaTels ... 42
Emergency Service and Distributed Systems
To ensure proper emergency dialing response, the CudaTel Communication Server allows sites, locations of remote elements of your phone system, to be configured and associated one of three ways with phone system elements. The specification of the remote site can be made using IP address/Subnet mask, by inbound provider/port, or by a new inbound authorization account.
Configuring a site, allows the CudaTel Communication Server to associate configured site specific information (for example, outgoing caller id) with the remote network element. Outbound routes configured on your CudaTel Communication Server in association with a Telephone Service Provider can be associated with a specific designated site. In this case, only calls from the specified site would be allowed to route through the designated route. This allows routing of emergency calls to a site specific emergency call provider. For example, in a remote office with a VoIP phone, the emergency call outbound route could be bound to the remote site and routed to E911. With registration at E911, this routing would allow calls from the remote phone to retrieve emergency services to the remote location. Without this special outbound route for the remote site, the standard routing of 911 might result in emergency services going to the wrong place. You need to consult your VoIP or Internet emergency service provider for additional configuration setup required to implement emergency service dialing.
Warning To ensure emergency service properly identifies a remote network element location, you must
consult your VoIP provider, or register with an Internet emergency service and follow their instructions. The CudaTel Communication System does not implement emergency dialing, but rather assists your VoIP or Internet emergency service provider in implementing it.