Last edit: 8/1/2007 11:11:00 AM
© 2001-2005 St. Bernard Software, Inc. All Rights Reserved Worldwide. iPrism is a registered trademark of St. Bernard Software, Inc. .
Microsoft Corporation. All rights reserved. Microsoft, MS-DOS, MS, Windows, Windows NT/2000, Windows Terminal Server are either registered trademarks or trademarks of Microsoft Corporation in the U.S.A. and/or other countries. Other product and company names mentioned herein may be the trademarks of their respective owners.
The iPrism software and its documentation are copyrighted materials. Law prohibits making unauthorized copies. No part of this software or documentation may be reproduced, transmitted, transcribed, stored in a retrieval system, or translated into another language without prior permission of St. Bernard Software, Inc.
St. Bernard Software. Inc.
Input Rating 115/230V - 60/50 Hz, 5/2.5 A
C US
I.T.E. LISTED E171852
This device complies with Part 15 of FCC Rules. Operation is subject to the following two conditions: (1) This device may not cause harmful interference and (2) This device must accept any Interference received, including interference that may cause undesired operation. This Class A digital apparatus meets all the requirements of the Canadian Interference-Causing Equipment Regulations. Cet appareil numerique de la classe A respecte toutes ies exigences du Regiement sur le materiel brouilleur du Canada.
iPrism
®
Installation Guide
1. iPrism Overview ...4
2. iPrism Installation ...7
2.1. Quick Install Guide ...7
2.2.1. Gathering Information...8
2.2.2. Hardware Setup...11
2.2.3. The Appliance Manager...14
3. Testing iPrism ...28
3.1. Test #1: Accessing the iPrism Main Menu ...28
3.1.1. Troubleshooting Tips ...29
3.2. Test #2: Using iPrism as a Proxy Server...29
3.2.1. Troubleshooting Tips ...30
4. Familiarizing yourself with iPrism ...32
5. Deployment in Production Mode ...33
5.1. Bridge Mode Deployment...33
5.2. Proxy Mode Deployment ...36
Appendix A: Installing Other Software from the iPrism CD ...38
Appendix B: Windows XP/SP2 Firewall Configuration...39
Turning the Firewall Off...39
Configuring the Firewall to Allow the Appliance Manager to Work Properly ...39
Windows XP Firewall Software Exceptions...41
Appendix C: Configuring Your Browser for Proxy Mode...43
Internet Explorer ...43
Mozilla ...45
Appendix D: Support Information ...48
Special Considerations...48
Contacting St. Bernard Software Technical Support ...48
1. iPrism Overview
iPrism is the premier Internet access management appliance solution. This guide will help you understand the basic functions of your iPrism as well as get you started using it. Let’s start by understanding the basic functionality of your iPrism.
The iPrism system is designed to operate in one of two major modes. These are:
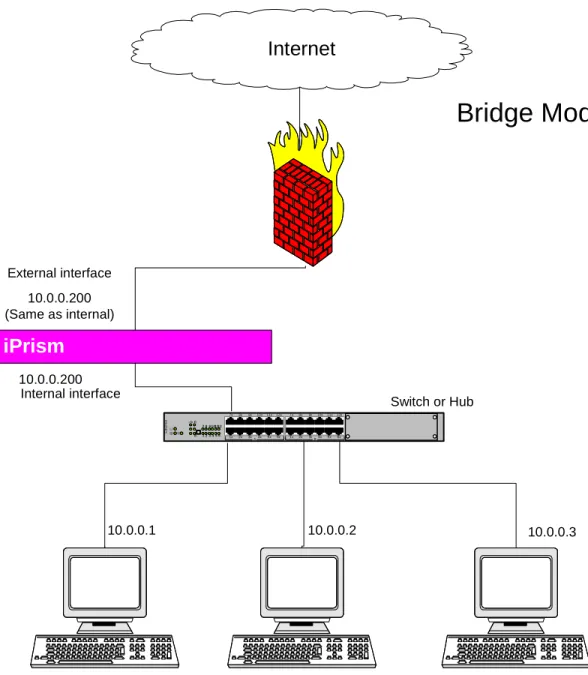
Bridge. In this mode the internal interface is connected to your local network and the
external interface is connected to the Internet.1 This means that all Internet traffic is filtered through your iPrism. The iPrism is then able to filter the Web, IM and P2P traffic. A single IP address is used by both interfaces. This is the preferred method of operating an iPrism. (See Figure 1.)
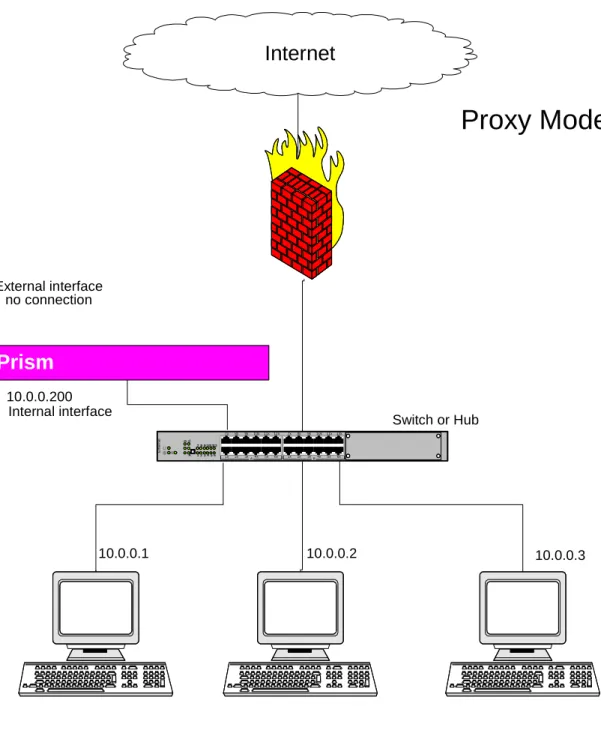
Proxy. In this mode, the iPrism acts as a filtering Web proxy. Only the internal interface is
connected to the local network, the external interface is not connected at all. This mode is useful for testing, especially when you don’t want to put a new piece of hardware in a network critical location. One limitation of proxy mode is that you can’t filter IM and P2P traffic. (See Figure 2.) This is the preferred mode to use when testing iPrism.
iPrism
1 2 3 4 5 6 7 8 9 101112 A B 12x 6x 8x 2x 9x 3x 10x 4x 11x 5x 7x 1x E th e rn e t A 12x 6x 8x 2x 9x 3x 10x 4x 11x 5x 7x 1x C Internal interface External interface Switch or HubInternet
10.0.0.1 10.0.0.2 10.0.0.3 10.0.0.200 10.0.0.200 (Same as internal)Bridge Mode
iPrism
1 2 3 4 5 6 7 8 9 101112 A B 12x 6x 8x 2x 9x 3x 10x 4x 11x 5x 7x 1x E th e rn e t A 12x 6x 8x 2x 9x 3x 10x 4x 11x 5x 7x 1x C Internal interface External interface Switch or HubInternet
10.0.0.1 10.0.0.2 10.0.0.3 10.0.0.200 no connectionProxy Mode
2. iPrism Installation
We suggest the following procedure for installing your iPrism.
1. Install the iPrism in proxy mode for testing, evaluation, and initial configuration.
2. Configure the iPrism for use with your system. This means defining whatever web, IM, and P2P filtering rules (Profiles) you wish to use and getting the iPrism to work with your authentication system. During this time your, user community can test the iPrism’s ability to filter web traffic by configuring their browser to use the iPrism as a proxy (See Appendix C: Configuring Your
Browser for Proxy Mode.)
3. After you are comfortable with using the iPrism, you can deploy it in one of the following modes:
Bridge Mode Deployment. (The preferred operating mode.) Connect the iPrism between your
internal network and the Internet. (Inside the firewall if you have one.) Enable the external interface in bridged mode.
Proxy Mode Deployment. Inform your user community that they must use the iPrism as a proxy
or create a domain policy that makes the iPrism the proxy for everyone. Then change the firewall rules to block any http traffic that does not come from the iPrism.
2.1. Quick Install Guide
This section is for people who know how to configure a network and are familiar with such terms as default route, and DNS server. The procedure outlined in this section will let you quickly get your iPrism running in proxy mode for testing and initial configuration. Note: A more detailed version of these instructions follows in the section Detailed Installation on page 8.
1. Install the hardware. (See Hardware Setup on page 11 for details). Connect the Internal network interface to your local network (inside the firewall). Leave the External and
Management interface unconnected. The iPrism and the workstation you will be using to
configure it should be on the same sub-net.
2. Fill in the information sheet. (Appendix E: Error! Reference source not found.). The iPrism can act as an http proxy, which should not be left open and/or accessible by anyone on the Internet. Therefore, the IP address for your iPrism should not be accessible from outside your local network.
3. Install the iPrism software on your workstation.
4. Start the Appliance Manager program. When the main window appears, right click on the icon for your iPrism and select System Configuration.
5. The System Configuration tool starts the IP assignment wizard and asks you for an IP address, netmask, default gateway and other network information. (If the answers are not obvious, use the slower install instructions which describe how to get the needed information.
See Detailed Installation on page 8)
6. The software will now start the full System Configuration tool. 7. Login with the user name iprism and the password setup.
8. For most screens, just accept the defaults or fill in the network values for your system. The exceptions are:
a. The Registration Information screen. You’ll need to enter your registration key here. If you have the key in a file on your local machine, you can upload it and save yourself a lot of typing.
b. The Network Topology screen. Select “iPrism uses a single interface (single IP address)”.
Now test your iPrism installation using the procedures outlined in Testing iPrism on page 28.
2.2. Detailed Installation
This section takes you step by step through the installation of your iPrism. After completing this phase your iPrism will be ready for configuration and testing. When the testing is complete and you are satisfied with the configuration, you can deploy your iPrism into a production environment.
2.2.1.
Gathering Information
The first step in the installation process is to make sure that you have all the equipment and information you need to do the install.
2.2.1.1.
Taking inventory
The following items should be included in your iPrism package. Please take a moment to verify that you have one of each. (See Figure 3.)
iPrism appliance Crossover Ethernet cable (Grey)
Power cord Ethernet cable (standard) (Black)
iPrism CD Product sheet with registration key (not
shown) Note: You may receive a product registration key through E-Mail, fax, or other method.
Console Cable2 Four Rubber Feet
2
The console cable is not a serial cable. It may look like one, but it is wired differently. It is used by iPrism technical support to diagnose problems with your iPrism. Please keep it in a safe place and use it only when directed to by technical support.
Model 1200 iPrism appliance Accessories Figure 3. iPrism inventory
2.2.1.2.
Filling in the Information Sheet
Photocopy the information sheet in Appendix E: Error! Reference source not found. and fill in the blanks. You will need this information when you install your iPrism. Instructions below will help you locate the information you need.
2.2.1.3.
iPrism Information
This section describes how to find the information you’ll need before you configure your iPrism. As you take inventory, you should fill out the information in Appendix E: Error! Reference source not
found.. (Note: You may want to glance at this sheet now. If you already know all the answers to all
the questions, you can fill out the sheet and skip to section 2.2.2 Hardware Setup on page 11.) The letters in the section below refer to the blanks in the worksheet in Appendix E: Error! Reference
source not found..
(A) iPrism Serial Number: Your iPrism serial number can be found on the back of the iPrism
appliance.
(B) Registration Key & (C) Expiration Date: Your registration key is emailed to you as well as
included with your iPrism package on a separate sheet. This key will expire with the termination of your license agreement or subscription.
The email containing the registration key will also contain the key as a file attachment. We
recommend that you save this file on your computer and use it when the iPrism Setup Wizard reaches the registration step. (You make want to store this in a safe backup location as well.)
2.2.1.4.
Getting Network Info
You will need to obtain some information about your network configuration in order to properly configure iPrism. Enter the requested information on the lines provided.
(D) IP Address and (E) netmask: The iPrism appliance requires a unique IP address on the subnet
to which it is being installed. Locate an available IP address and its netmask on your network and enter it in the blanks (D) and (E). The computer you are using for configuration and the iPrism must be connected to the same hub or switch, and must be on the same subnet. Also when configuring the iPrism you must choose network settings matching the network of your workstation.
To find your current IP settings, perform the following procedure from the setup workstation. 1. Open a command prompt: From the Start Menu, select Run, then type in cmd (Windows NT4,
2000, XP, and 2003) or command (Windows 9x, ME) 2. At the c:\> prompt, type in ipconfig /all
3. Look for the Ethernet adapter Local Area Connection. For example,
Ethernet adapter Local Area Connection:
Connection-specific DNS Suffix . : .example.com IP Address. . . : 192.168.1.10 Subnet Mask . . . : 255.255.255.0 Default Gateway . . . : 192.168.1.1
Select an IP address for iPrism on the same IP network. In this example, you can choose any
available IP address in the 192.168.1.1 – 192.168.1.254 range. (Make very sure that the IP address you choose is not in use by another system.)
Note: The computer you use to install the iPrism software and the iPrism itself, must not only be physically attached to the same hub or switch, but must reside on the same subnet as well. You must also choose network settings matching the network of your workstation.
(F) iPrism Host Name: During the setup procedure, you will be asked to assign a host name to the
iPrism appliance. The name you choose should reflect your DNS domain, for example:
iprism.example.com. You can then create an entry for iPrism in your domain DNS configuration.
(Some mail filters refuse to deliver mail from a system with no DNS entry.)
(G) Default Route (Gateway) Address: The default route refers to the IP address of the device
(usually a router) that lies between the local network (subnet) and the Internet. This address should be on the same physical network as the iPrism.
(H) Name Server (DNS): Since the iPrism and its clients tend to lookup a lot of the same host
names, you can improve efficiency and your cache hit rate by using the same DNS server for the iPrism and the machines that use it. Enter the IP Address of this DNS server in this blank.
2.2.2.
Hardware Setup
This phase describes the LED lights and connectors as well as shows you how to physically install and connect the iPrism appliance to your network using a bridged configuration. This is done in the least obtrusive way possible, allowing your network to operate normally until you are ready to make the final connection.
2.2.2.1.
Mounting the Hardware Appliance
If you have not done so already, now is a good time to take the iPrism appliance out of the box and physically mount it in its final location (for instance, a 19” rack using the provided ears).
On the Model 3000, make sure the power isolation switch on the back of the unit is turned off (0). Connect the power cord to the back of the iPrism and plug it in.
2.2.2.2.
Overview of LED Lights and Connectors
Figure 4. Model 1200 Front Panel
Figure 5. Model 1200 Rear Panel
Internal Ethernet Connector External Ethernet Connector POWER LED ONLINE LED On/Off Switch
Management Ethernet Connector
Console Port
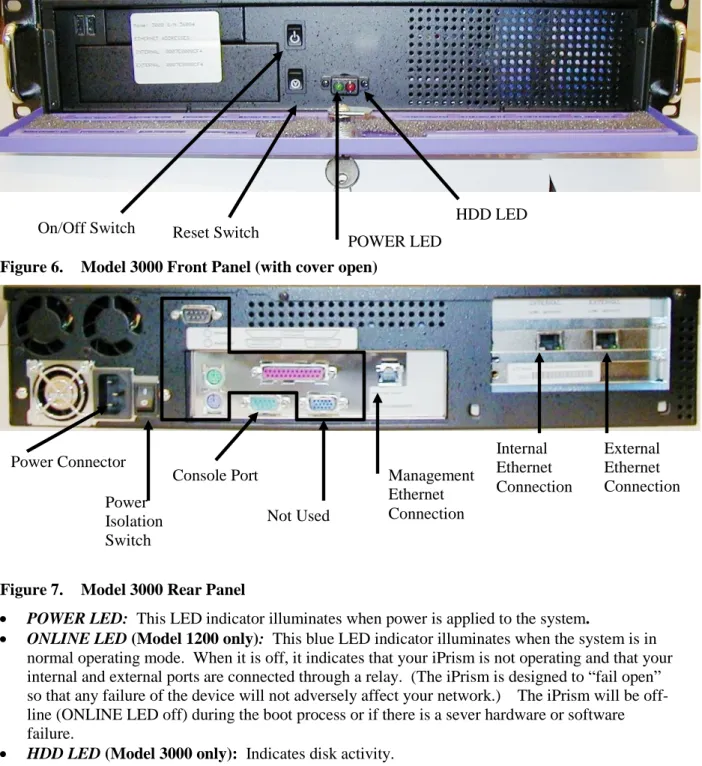
Figure 6. Model 3000 Front Panel (with cover open)
Figure 7. Model 3000 Rear Panel
POWER LED: This LED indicator illuminates when power is applied to the system.
ONLINE LED (Model 1200 only): This blue LED indicator illuminates when the system is in
normal operating mode. When it is off, it indicates that your iPrism is not operating and that your internal and external ports are connected through a relay. (The iPrism is designed to “fail open” so that any failure of the device will not adversely affect your network.) The iPrism will be off-line (ONLINE LED off) during the boot process or if there is a sever hardware or software failure.
HDD LED (Model 3000 only): Indicates disk activity.
Internal Ethernet Connector: This RJ45 connector provides auto-sensing Ethernet connectivity
to your internal network (the network iPrism will apply filtering to).
External Ethernet Connector: This RJ45 connector provides auto-sensing Ethernet connectivity
to the external network (Internet).
Management Ethernet Connector: This RJ45 connector provides a third auto-sensing 10/100
Mbps Ethernet port that can be used for out-of-band management of the iPrism. (This is used for advanced configurations only. See the Administrator’s Manual, Chapter 2, Section: Using the Management Interface for information.)
On/Off Switch: When power is not applied to the system, press this switch to power the iPrism.
When power is on you should use the Appliance Manager to shut down your system. If it is not
On/Off Switch Reset Switch HDD LED
POWER LED External Ethernet Connection Internal Ethernet Connection Management Ethernet Connection Console Port Power Isolation Switch Not Used Power Connector
possible, then pressing this switch once will tell the iPrism to perform an orderly shut down after which it will power down the iPrism. If the system does not shut down after about five minutes holding the power switch for 5 seconds powers down the iPrism instantly, although this may result in the loss of the last few minutes of logging data.
Power Isolation Switch (Model 3000 only): This switch isolates the power supply from the
incoming power. This is a “hard” power switch. The one on the front of the Model 3000 is a
“soft” power switch. This switch should be left in the on position except just before
disconnecting the power cord from the iPrism. Powering the system on and off should be done through the front switch.
Power Connector: This connects power to iPrism (115 – 230 VAC auto-sensing).
Console Port: This is a RS232 DB9 serial connector which may be used with the console cable
to connect to another computer in order to perform troubleshooting or low level management on the system. This port should only be used under the direction of the iPrism technical support staff.
2.2.2.3.
Connecting iPrism to the Internal LAN
In this configuration the iPrism is connected only to your internal LAN. This allows you to configure iPrism using any of the workstations on that network. Remember, this first installation is using proxy mode for testing, experimentation, and initial configuration.
1. Take the standard Ethernet cable (provided) and connect one end of it to the iPrism’s Internal port.
2. Connect the other end of the cable into the hub/switch that serves the local subnet.
IMPORTANT: Do NOT connect the external side of the iPrism yet. This must be done during the actual deployment of the iPrism in bridge mode. (See the section ”Deployment in Production Mode” on page 33.)
Cable Identification
If you get the cables mixed up, you can quickly tell them apart by holding one of the cables at each end so the connectors are oriented the same way. Now, look at the color-coding of the wires in each connector. If the colors are in the exact same order, it is a standard Ethernet patch cable. If some of the colors are reversed, it is a crossover cable.
The standard Ethernet patch cable provided with your iPrism is black; the cross over cable is gray.
You can also tell the difference between the two cables because the crossover cable has
“crossover” written on it.
2.2.2.4.
Powering Up
Once the Internal side of iPrism is connected to your internal LAN, you can power it up using the
On/Off switch on the backside of the unit. After turning the power switch on, please allow
approximately one minute for the Link/Activity and Link Speed lights to illuminate. This is a normal function of the iPrism initialization. When the Link/Activity and Link Speed lights are active, the iPrism is initialized and ready for configuration.
2.2.3.
The Appliance Manager
The iPrism Appliance Manager software is used to configure and manage iPrism and ePrism devices. The Appliance Manager software uses a Java-based interface, so any workstation that supports Java (version 1.4 or better) can be used. The initial installation of iPrism is easier when installing the software from the iPrism CD. However, it is possible to configure iPrism without installing the iPrism software from CD. If you are only running a non-Windows operating system or cannot use the iPrism CD, please contact St. Bernard Software technical support for assistance. Please see Appendix C:
Configuring Your Browser for Proxy Mode.
2.2.3.1.
Installing the iPrism Manager
Put the supplied CD in your system and follow the prompts to install your software. If you do not have a Microsoft Windows system available, then contact St. Bernard Software for help.
2.2.3.2.
Starting the Appliance Manager
1) Before proceeding, make sure that the iPrism is properly connected to your network and powered on. Any firewall software running on this workstation, such as the Microsoft Windows XP Firewall or Norton Internet Security, must be disabled before continuing. (See Appendix
B:Windows XP/SP2 Firewall Configuration for details on how to configure the Windows XP
firewall.)
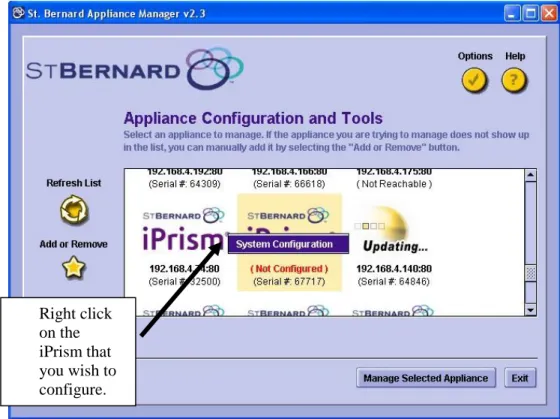
2) Double click the Appliance Manager icon on your desktop. You should see a screen similar to Figure 8.
Figure 8. Appliance Manager main screen
Right click on the iPrism that you wish to configure.
The serial number you see will vary. If you have other iPrism or ePrism systems you may see other entries in this screen. Your system will be labeled IP NOT ASSIGNED3. Right click on
the icon for your system and select System Configuration.
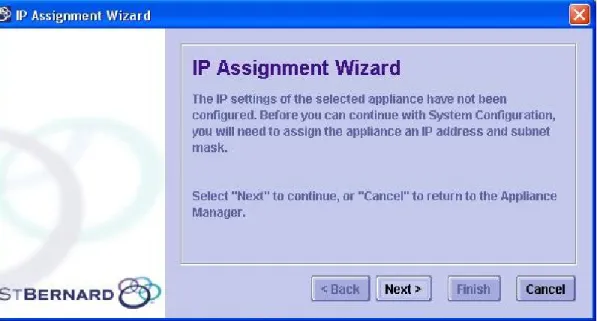
3) Since this system does not have an IP address assigned, an IP assignment wizard screen will appear. (Figure 9). Click Next to get past the welcome screen.
Figure 9. IP Assignment Wizard -- Welcome Screen
3
If you iPrism has been configured with a IP address, the IP Assignment Wizard will be skipped and the System Configuration tool will be started. (See the Administrator’s Guide for details.)
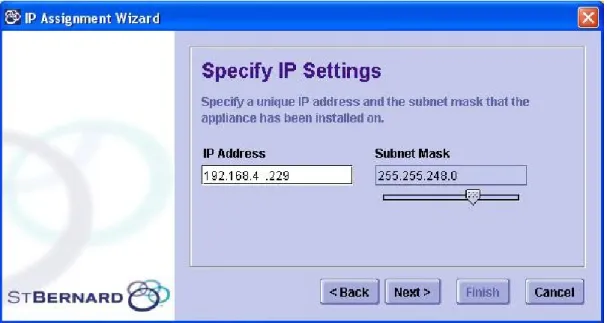
4) The IP Settings screen appears. (Figure 10).
In the IP Address field, enter the value you wrote on line D of the information sheet. In the Subnet Mask field, select the value you wrote on line E using the slider. (Note: You cannot enter a number in the Subnet Mask field. The only way to change the data in this blank is through the slider.)
Click Next to continue.
5) The configuration tool will now attempt to set the IP address. If there is an error setting the IP address, you will have to repeat step 3 to try again. If the IP address is set successfully, a
“Success” screen will be displayed as shown in Figure 11. Click Finish to complete the IP Assignment Wizard.
Figure 11. IP Assignment successful
6) After clicking the Finish button in step 5 the iPrism Manager will automatically launch the iPrism configuration software for the new iPrism. After a few moments, the login screen will appear on your system. (See Figure 12.)
In the User field, enter the word iprism in lower case.
In the Password field, enter the word setup in lower case. Click the Login button.
iprism
Figure 12. Login Screen
7) A Notice message displays as shown in Figure 13. Just click OK. This is normal.
Figure 13. Notice screen
8) The License Agreement displays. (Figure 14). Click the Agree button if you accept the terms of the license.
9) The Welcome screen displays. (Figure 15.) Leave the Configuration Mode set to the default (Start a new configuration). Click Next.
If this is not your first installation of an iPrism 5.0 system, and you have a backup of a previous configuration, you can select “Restore an archived configuration” and the system will use your existing configuration as the base for configuring the new iPrism.
These instructions assume you are starting a new configuration.
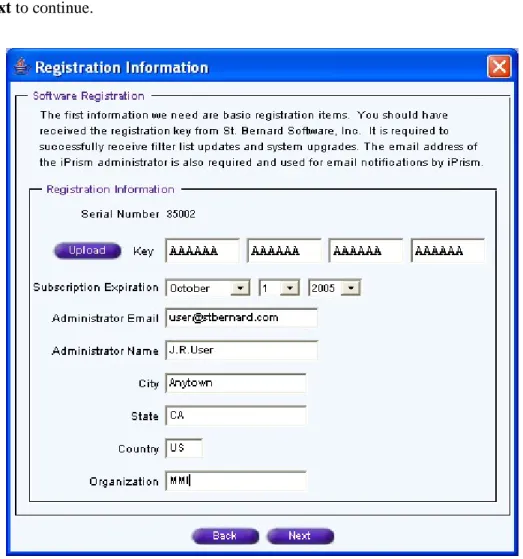
10)The Registration Information screen displays (Figure 16). Enter the following information:
Serial Number –Verify that the serial number matches the one on line A of your information sheet.
Key, Subscription Expiration – If you have your registration key stored in a local file, click
Upload to set both the Key and the Subscription Expiration. Otherwise enter these values
manually. (Information sheet lines B and C.)
Note: Uploading the registration key from a local file is the preferred method of inputting your registration key. It’s faster and less error prone than entering a long string of random characters manually.
Administrator E-Mail: Enter the E-Mail address of the primary iPrism administrator. If the
iPrism needs attention it will use this address to send out an E-Mail alert.
Administrator Name, City, State, Organization – Information about who you are. This
information is used to generate an SSL certificate which is used whenever anyone connects to the iPrism using a secure connection (https protocol).
Click Next to continue.
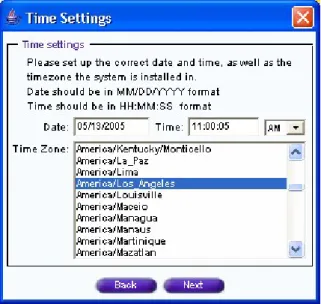
11)The Time Settings screen appears. (Figure 17.) Make sure that the date, time, and time zone match your settings. For a time zone, select the same time zone as your current location. Click
Next to continue.
Figure 17. Time Setting
12)The Maintenance Password screen appears. (Figure 18.) Input a new password for the iPrism’s master account (User = iprism). Click Next to continue.
Figure 18. Maintenance Password
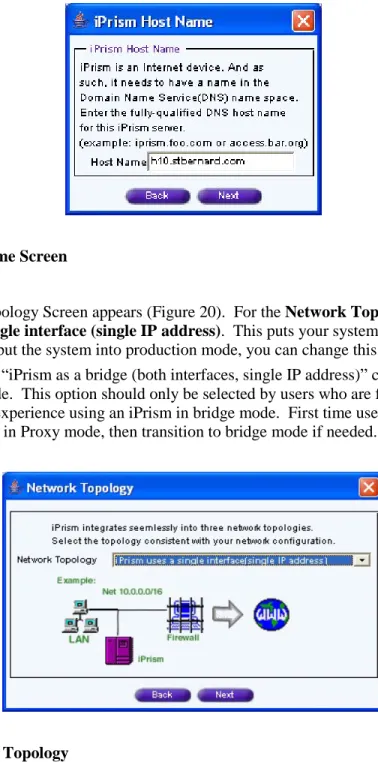
13)The Host Name dialog appears (Figure 19). Enter a fully qualified host name (one with all the dots and all the parts) and click Next.
Figure 19. Host Name Screen
14)The Network Topology Screen appears (Figure 20). For the Network Topology option, select
iPrism uses a single interface (single IP address). This puts your system into Proxy Mode.
(Later when you put the system into production mode, you can change this.) Click Next. The other option, “iPrism as a bridge (both interfaces, single IP address)” configures the system to use bridge mode. This option should only be selected by users who are familiar with their iPrism and have experience using an iPrism in bridge mode. First time users should initially setup their iPrism in Proxy mode, then transition to bridge mode if needed.
Figure 20. Network Topology
15)The IP address screen appears (Figure 21). The IP address and netmask should contain the values you set earlier, so there should be no need to change these values. The default interface mode:
auto automatically configures the speed of the internal interface. Leave this value set to the
Figure 21. IP Address Screen
16)Leave the Management Interface disabled (Figure 22). See the Administrator's Guide for information on this interface and how to use it. For now, just click Next.
17)
Figure 22. Management Interface
18)The DNS Server dialog appears. (Figure 23.) Enter the IP address of your DNS server (from line H of the worksheet) and click Next. If you need to enter more than one DNS server, separate each entry by a comma.
19)The Default Route dialog appears. (Figure 24.) Enter the IP address of the default route from line F of your worksheet. (If you have a complex network with multiple sub-nets, you may wish to read the Administrator's Manual for instruction on how to use the Advanced button to setup a series of static routes.) Click Next to continue.
Figure 24. Default Route
20)The Internal Addresses dialog appears. (Figure 25.) The default is good enough for the initial installation and can be modified later. (See the Administrator’s Guide, Chapter 9: Network Management, Section “Changing Network Interface Settings”.) Click Next.
21)The iPrism Filtering screen is displayed. (Figure 26.) The iPrism system comes with a list of pre-defined filters. Pick the one that suits your situation best. Later you can fine tune things using the system configuration tool.
If this is your first iPrism, don’t worry about picking the right filter. The default works fine in most cases, and you can made adjustments and test the results after you finish the initial configuration.
Click Next.
22)The IMP2P Filtering screen is displayed. (Figure 27) For the easiest thing to do is to accept the default and click Next.
IM and P2P filtering only works in bridge mode. We are setting up a system in proxy mode for testing. This system can not filter IM or P2P traffic. However, later if you deploy the iPrism in bridge mode IM and P2P filtering will work.
This screen lets you define the default profile for IM and P2P traffic. You can later change the filtering settings using the system configuration tool. Pick the one that fits your situation best, or just click Next and play with the settings later.
Click Next to go to the next screen.
Figure 27. IMP2P Filtering
Figure 28. Configuration Review
24)iPrism gives you one final chance to go back and modify the configuration. (Figure 29.) Click
OK.
Figure 29. Last chance notice
25)You’re done. In a couple of minutes the system should be ready for testing. Proceed with the section Testing iPrism on page 28.
3. Testing iPrism
You are now going to run some tests to verify that your iPrism has been successfully installed. If the iPrism should fail any test, do not proceed to the next test until you have resolved the problem and completed the test successfully.
3.1. Test #1: Accessing the iPrism Main Menu
In this test, you will use a web browser to access the iPrism configuration utility. This ensures that iPrism is being recognized on your network with the new network settings you entered in the setup wizard.
Before performing this test, make sure iPrism is properly connected and has had time to completely boot up (approximately 1 minute).
1. Open a web browser on one of the workstations monitored by iPrism. (It does not have to be the same workstation that you used for the software installation).
You must use a web browser to access the iPrism’s configuration interface. Supported browsers are: Internet Explorer version 5.0 (or greater), Netscape Navigator versions 4.5 (or greater), Mozilla (all versions), and FireFox (all versions).
For filtering, iPrism supports all browsers.
2. In the Address bar at the top of the browser, enter: http://x.x.x.x, replacing the x.x.x.x with the IP address you assigned to iPrism. (This is the value you entered on line D of the information sheet.)
Figure 30. iPrism Main Menu-Administrator.
3. Press the Enter key. The iPrism Main Menu-Administrator web page should display in the browser window. (See Figure 30.)
Congratulations! If you see this screen it means that iPrism is now recognized on your network. Please proceed to Test #2.
3.1.1.
Troubleshooting Tips
If you do not see the iPrism Configuration screen, but are getting a message such as “The page cannot be displayed.” Try the following procedures to resolve the issue:
Use the ping command to check to see if you can reach the iPrism and verify that you have the correct IP address.
Make sure you are entering the correct IP address in the browser. Check all the cable connections to/from iPrism.
Wait two minutes, and then try again.
3.2. Test #2: Using iPrism as a Proxy Server
In this test, you will see if iPrism works when configured as a proxy server.1. Configure your web browser to use iPrism as a proxy server. (See Appendix C:Configuring
Your Browser for Proxy Mode for instructions.)
2. Using the browser, surf to a site that should be blocked – www.stbernard.com/test2 is rated
pornography for this purpose. You should see an Access Denied page (Figure 31.)
3. Using the browser, surf to a site that should not be blocked, such as www.yahoo.com. You should be able to reach the site.
If both tests are successful, you can open your iPrism to the user community for testing. Tell your users to configure their browsers to use the iPrism as a proxy and let them test it.
3.2.1.
Troubleshooting Tips
3.2.1.1.
Access Denied Screen missing
If you do not see the Access Denied screen, try the following procedures to resolve the issue:
Try a different URL or refresh the page. If the test page you are visiting is stored in your browser cache, iPrism will not be able to block it.
Verify the proxy settings again. Make sure you entered iPrism’s IP address properly and specified a Port value of 3128.
3.2.1.2.
Unable to load webpage that is not blocked
Verify the existence and/or validity of your default gateway entry within the iPrism’s configuration manager located under the networking tab.
3.2.1.3.
Filtering error
If you get a “Filtering error”, it is most likely because the iPrism iGuard database needs to be updated; iPrism will perform a database update automatically within twenty minutes, after which you can try the test again.
You can also tell iPrism to do an immediate iGuard database update by using the appliance manager to start the System Configuration tool, then selecting the System section, and the Preferences tab. (See Figure 32.) In the System Updates section, click ASAP to download an updated filter list. (This process can take up to 20 minutes.)
Figure 32. System Preferences
If you continue to receive the filtering error, contact technical support. (In order to download the filter list, the iPrism must have access to a working Internet connection.)
4. Familiarizing yourself with iPrism
Your iPrism is now installed in a configuration that lets you configure it, test the results, run reports, and generally experiment with your system. The iPrism system has an extensive list of features for you to explore. Please consult the iPrism Administrator’s Guide for complete details.
Some of the advanced configuration options include: Using different filtering for different types of users
Using your existing LDAP or NTLM authentication service for user management. Defining time dependent filters
Creating reports and using drill-down reporting.
Using the “Management Port” to manage the iPrism on a secure sub-net.
Configuring static routes. (You may need to configure these if you have a complex internal network with many sub-nets.)
After you are comfortable with your iPrism you can then take the next step and deploy it in a production configuration.
5. Deployment in Production Mode
The first thing you need to do is decide if you are going to deploy your system in bridge or proxy mode. In the section Error! Reference source not found. at the beginning of this document you’ll find a good description of these two modes.
5.1. Bridge Mode Deployment
To convert a system from a test system using proxy mode into full filtering system in bridge mode, execute the following procedure:
1. From the Appliance Manager, start the System Configuration tool. 2. Select the System section and click the Networking tab. (See Figure 33)
Figure 33. Network Settings
3. Enable the external interface in Auto mode and check the Bridge Mode checkbox.
Note: When the iPrism is off, the internal and external interfaces are connected directly through a relay. Both interfaces must use the same mode if this feature is to work properly. If the internal and external interfaces are connected to networks of different speeds it may cause error when the iPrism is off and the two ports are directly connected.
Mode = auto
Bridge
4. Select the Exit section and click the Save and Exit button to save your changes and exit. (See Figure 34)
Figure 34. Exit section
5. Shutdown your iPrism.
6. Do not change any of the routing tables on your network. (Previous versions of iPrism required router changes for Bridge Mode deployment. With iPrism 5.0, no routing changes are necessary.)
iPrism
1 2 3 4 5 6 7 8 9 101112 A B 12x 6x 8x 2x 9x 3x 10x 4x 11x 5x 7x 1x E th e rn e t A 12x 6x 8x 2x 9x 3x 10x 4x 11x 5x 7x 1x CMove crossover cable from Firewall <> Switch to Firewall <> iPrism Internal interface External interface Switch or Hub
Internet
10.0.0.1 10.0.0.2 10.0.0.3 10.0.0.200 10.0.0.200 (Same as internal)Bridge Mode
Deployment
m o v e n e t. c o n n e ti o n to i P ri s m e x te rn a l p o rtFigure 35. Installation in Bridge Mode
8. Remove the connection between your switch and the Internet and connect it the external port of the iPrism. (See Figure 35, the big arrow).
5.2. Proxy Mode Deployment
To convert a system from a test system using proxy mode into full filtering system in production mode, execute the following procedure:
1. Configure all the workstations to use the iPrism as a proxy or define a domain policy / configuration which causes all users to use the iPrism as a proxy.
2. Configure your firewall to disallow all traffic on port 80 for all systems except the iPrism (See Figure 36.)
iPrism
1 2 3 4 5 6 7 8 9 101112 A B 12x 6x 8x 2x 9x 3x 10x 4x 11x 5x 7x 1x E th e rn e t A 12x 6x 8x 2x 9x 3x 10x 4x 11x 5x 7x 1x C Set firewall rules:a) iPrism can access the web b) Everyone else can not.
Internal interface External interface Switch or Hub
Internet
10.0.0.1 10.0.0.2 10.0.0.3 10.0.0.200 no connectionProxy Mode
Deployment
w e b tr a ff ic Uses iPrism as proxy d ir e ct w e b t ra ff ic n o t a llo w e d b y th e f ir e w a llDoes not set his proxy and crashes into the firewall. You need to inform him of the new proxy rule.
Without the proxy change he will be unable to access the web.
we b tra ffic Uses iPrism as proxy iPrism hole Dumb User Splat! iPrism web traffic
3. That’s all. The iPrism is now configured for proxy mode deployment.
Figure 36 shows an iPrism configured in Proxy mode. Only the internal interface is used. The first two workstations have been configured to use the iPrism as their proxy, so all their web traffic is sent to it.
The iPrism then filters the traffic and sends it to the Internet through a hole in the firewall. (This hole must be configured into your firewall or the iPrism will be unable to access the Internet to get web pages for the users.)
The third user (labeled “Dumb User”) hasn’t read the memo that told him to reconfigure his browser, so he tries to access the Internet directly. Since the firewall allows only the iPrism’s web traffic through, the third user is unable to surf the web.
Appendix A: Installing Other Software from the iPrism
CD
The iPrism CD also contains Adobe Acrobat Reader. You will need Acrobat Reader to view the iPrism User Guide. The guide can be accessed from the iPrism Manager folder in the Windows
Appendix B: Windows XP/SP2 Firewall Configuration
The default settings of the Windows XP firewall (part of Service Pack 2) prevents the Appliance Manager from working properly. If the Appliance Manager does not detect your iPrism or ePrism system, it may be due to the firewall preventing vital communications between the iPrism and your workstation.
When the Appliance Manager is launched, it uses a "broadcast" to discover ePrism and iPrism units. If you are not seeing any appliances, the cause may be Windows XP/SP2 is blocking broadcasts because of its built-in firewall software.
To resolve the situation, you can:
1) The simplest solution is to turn the firewall software "Off", thus allowing you to launch the Appliance Manager and discover appliances. However because the entire firewall is disabled, it may allow malicious code to enter your system. If you are behind a good firewall that makes the Windows XP firewall redundant, you may wish to just turn the Windows XP firewall off.
2) Configure the firewall to allow the Appliance Manager to run unimpeded. This is a better solution if you wish to keep the protection of the Windows XP firewall on your system. It requires a little more work than just turning off the firewall.
Turning the Firewall Off
To turn the firewall software “Off”, select
"Start > Control Panel > Windows Firewall" (default Windows XP Start Menu) or "Start > Settings > Control Panel > Windows Firewall" (Classic Start Menu) Select the "Off" radio button, and click "Ok", then launch Appliance Manager.
Configuring the Firewall to Allow the Appliance Manager to Work
Properly
When you first run the Appliance Manger you may see the "No appliances were found" message, with a "Windows Security Alert" (see Figure 37) displayed in the title bar of the window.
If you do NOT get the “Windows Security Alert”, but you DO get “No appliances were found”, continue reading and set up an “Exception” for the Appliance Manager javaw.exe program as explained below (using Add Program, see Figure 39).
Figure 37. Window Security Alert
Appliance Manager is a Java application, as indicated by the program name "javaw". If you click "Unblock", the system will create an "Exception" for the "javaw" program, allowing the Appliance Manager to run un-impeded in the future. After clicking, click "Refresh List" (Figure 38) in the Appliance Manager and the list of connected iPrism and ePrism system should appear.
Windows XP Firewall Software Exceptions
You can manually change your firewall settings or check your existing settings using the procedures outlined in this section. You do not have to perform these procedures if you’ve used the Unblock button (described above) to unblock the Appliance Manager’s access to the network. This procedure is only for people who want to do the work manually instead of letting Windows do it sem-automatically.
Open the firewall control panel:
"Start > Control Panel > Windows Firewall" (default Start Menu) or
"Start > Settings > Control Panel > Windows Firewall" (Classic Start Menu)
Click the Exceptions tab (see Figure 39). If you see an entry for javaw then your firewall is properly configured and allows the Appliance Manager to work. (This entry is added automatically if you followed the previous procedure.)
Figure 39. Windows Firewall Configuration
Figure 40. Add a Program window
Click Browse to browse for the program to add. The Add a Program window appears as shown in Figure 40. You’ll find the javaw program, which is used to run the Appliance Manager in
\Program Files\Appliance Manager\jre\bin\javaw.exe
If you wish to confirm that you have the correct javaw program in your exception list, click on the
javaw entry and click Edit. The details for this entry will be displayed (see Figure 41).
Appendix C: Configuring Your Browser for Proxy Mode
Internet Explorer
1. Select Tools -> Internet Options. 2. Click the Connections tab.
3. Click LAN Settings.
Figure 43. LAN Settings
4. Check the “Use a proxy server…” box and enter the IP address of your iPrism in the box labeled address. Enter 3128 into the port field. (Note: 3128 is the default, the iPrism administrator can change this number.)Click OK, to leave the LAN Settings, and OK again, to leave the Internet Options dialog.
Mozilla
From the main menu select Edit->Preferences. Expand the Advanced category and select the
Proxies category. Select “Manual proxy configuration” and enter the IP address of your iPrism in the
“HTTP Proxy” blank. For the port use the number 3128. (Note: 3128 is the default, the iPrism administrator can change this number.)
Firefox
1. Select the Tools -> Options menu item.
2. Click Connection Settings.
Figure 46. Firefox Connection Settings
3. Select “Manual proxy configuration” and enter the IP address of your iPrism in the “HTTP Proxy” blank. For the port use the number 3128. (Note: 3128 is the default, the iPrism administrator can change this number.)
Appendix D: Support Information
Special Considerations
These are some network conditions for which additional documentation is available from the St. Bernard Software website at http://www.stbernard.com/products/support/iprism/ . These are:
If other proxy servers are configured on the network.
If you have a wide area network serviced by a router that is also the Internet router. If you have concern about your networks ability to interact with iPrism.
Contacting St. Bernard Software Technical Support
If you are unable to resolve your issue using the manual, please contact St. Bernard Software’s iPrism support team. When contacting tech support, please be sure to include all relevant information about how iPrism is configured on your network (i.e. topology, other hardware, networking software, etc.). Make sure to have your iPrism serial number and registration key information ready. Also, in order to help our support staff solve your problem, it is helpful if you can send us a network diagram showing the basic hardware that is in use on your network.
Appendix E: Information Sheet
The information listed on this page is needed to configure your iPrism system. Refer to section
2.2.1.2. Filling in the Information Sheet on page 9 for instructions on how to obtain this information.
A) iPrism Serial Number: __________________
B) Permanent Registration Key: ___________ - ___________ - ___________ - ___________
(Not needed if you have the registration key in a file on your workstation.)
C) Permanent Key Expiration Date: _____ / _____ / _________
(Not needed if you have the registration key in a file on your workstation.)
D) iPrism IP address: _________._________._________._________
E) Subnet mask (netmask): _________._________._________._________
F) iPrism Host Name: ______________.______________.______________.______________
G) Default Gateway IP address: ________.________.________.________