RTI Connext DDS
Combined Latency and Throughput
Performance Test
Getting Started Guide
Version 5.1.0
© 2013 Real-Time Innovations, Inc. All rights reserved. Printed in U.S.A. First printing. December 2013.
Trademarks
Real-Time Innovations, RTI, DataBus, and Connext are trademarks or registered trademarks of Real-Time Innovations, Inc. All other trademarks used in this document are the property of their respective owners. Copy and Use Restrictions
No part of this publication may be reproduced, stored in a retrieval system, or transmitted in any form (including electronic, mechanical, photocopy, and facsimile) without the prior written permission of Real-Time Innovations, Inc. The software described in this document is furnished under and subject to the RTI software license agreement. The software may be used or copied only under the terms of the license agreement.
Technical Support
Real-Time Innovations, Inc. 232 E. Java Drive
Sunnyvale, CA 94089 Phone: (408) 990-7444 Email: [email protected]
Contents
1 Release Notes ...1
1.1 What’s New in 5.1.0...1
1.1.1 Change to Default Domain ID...1
1.1.2 Change in Multicast Default Configuration...1
1.1.3 Change in Functionality of Performance Test’s -enableSharedMemory Option...1
1.1.4 Reorganization of QoS Settings...2
2 Supported Platforms...2 3 Overview...3 4 Download Instructions...3 5 Installation Instructions...3 5.1 UNIX-Based Systems ...3 5.2 Windows Systems...4
6 Building the Application ...4
7 Starting the Test ...5
8 Test Parameters ...7
8.1 Spinning vs. Sleeping...15
8.2 Send-Queue Size and Queue-Full Behavior ...15
8.3 Number of Iterations vs. Latency Count...16
8.4 Warming Up ...16
8.5 WaitSet Event Count and Delay ...16
8.6 How to Measure Latency for a Given Throughput ...17
8.7 Auto Tuning and Turbo Mode ...17
9 Example Command Lines for Running the Performance Test ...18
9.1 1-1, Multicast, Best Latency as a Function of Message Size ...18
9.2 1-1, Multicast, Maximum Throughput as a Function of Message Size (with Batching) ...18
9.3 1-1, Multicast, Latency vs. Throughput for 200-byte Messages (with Batching) ...19
9.4 1-to-1, Multicast, Reliable UDPv4, All Sizes ...19
9.5 1-to-1, Unicast, Best-Effort, UDPv4, 1 Size...19
9.6 1-to-1, Multicast, Reliable, UDPv4, Batching Enabled ...19
9.7 1-to-2, Multicast, Reliable, UDPv4 ...20
9.8 2-to-1, Multicast, Reliable, UDPv4 ...20
10 Example Output...20
11 Optimizing Your OS for Network Performance...21
11.1 Optimizing Linux Systems...21
Testing Performance
This document describes how to run a combined latency and throughput test application for RTI® Connext™.
The test measures what is sometimes called "loaded latency"—latency at a given throughput level. It can help you answer questions such as:
❏
For a given publishing configuration (e.g., queue size, batching settings), sample size, and subscribing configuration (e.g., queue size, Listener vs. WaitSet) what is the through-put of my network?❏
When my network is heavily loaded, what latency can I expect?❏
For a given configuration, what is the best-case latency with no other traffic on the net-work?For examples of specific configurations, see Example Command Lines for Running the Perfor-mance Test (Section 9).
1
Release Notes
1.1
What’s New in 5.1.0
1.1.1 Change to Default Domain ID
The default domain ID has been changed from 59 to 1. 1.1.2 Change in Multicast Default Configuration
In previous releases, multicast was enabled by default and could be disabled using the command-line option -nomulticast.
Starting with release 5.1.0, multicast is disabled by default and can be enabled using the command-line option -multicast.
The command-line option -nomulticast is kept for backward compatibility. [RTI Issue ID CORE-5854]
1.1.3 Change in Functionality of Performance Test’s -enableSharedMemory Option
In this release, the effect of the command-line option -enableSharedMemory has been changed. Now it forces the application to only use the Shared Memory transport. In previous releases, this option allowed the application to use Shared Memory as well as the default transport (UDPv4).
Supported Platforms
[RTI Issue ID COREPLG-5867] 1.1.4 Reorganization of QoS Settings
In this release, the QoS settings that are not dependent on the command-line options have been moved to the perftest.xml file, in order to ease QoS modification.
[RTI Issue ID COREPLG-5919]
2
Supported Platforms
The performance test application provides makefiles/projects for the following architectures:
C++ on a UNIX-based System
x86 Red Hat Enterprise Linux 4.0 (2.6 kernel) i86Linux2.6gcc3.4.3 Red Hat Enterprise Linux 5.0 (2.6 kernel) i86Linux2.6gcc4.1.1
x64
Red Hat Enterprise Linux 4.0 (2.6 kernel) x64Linux2.6gcc3.4.5 Red Hat Enterprise Linux 5.0 (2.6 kernel) x64Linux2.6gcc4.1.1 CentOS 5.4, 5.5 (2.6 kernel)
Red Hat Enterprise Linux 5.1, 5.2, 5.4, 5.5 (2.6 kernel)
x64Linux2.6gcc4.1.2
C++ on a Windows System
x86
Visual Studio 2005 i86Win32VS2005
Visual Studio 2008 i86Win32VS2008
Visual Studio 2010 i86Win32VS2010
Visual Studio 2012 i86Win32VS2012
x64
Visual Studio 2005 x64Win32VS2005
Visual Studio 2008 x64Win32VS2008
Visual Studio 2010 x64Win32VS2010
Visual Studio 2012 x64Win32VS2012
C# on a Windows System
x86
Visual Studio 2005 i86Win32dotnet2.0
Visual Studio 2008 i86Win32dotnet2.0
Visual Studio 2010 i86Win32dotnet4.0
Visual Studio 2012 i86Win32dotnet4.5
x64
Visual Studio 2005 x64Win64dotnet2.0
Visual Studio 2008 x64Win64dotnet2.0
Visual Studio 2010 x64Win64dotnet4.0
Overview
3
Overview
The publishing side of the test writes data as fast as it can. Every few samples (configured through the command line), it sends a special sample requesting an echo from the subscribing side. It uses this ‘request -> echo’ exchange to measure round-trip latency.
As you will see in Section 8, there are several command-line options, including ones to desig-nate whether the application will act as the publisher or subscriber.
You will start multiple copies of the application (typically 1 publisher and 1 or more subscrib-ers):
❏
The publishing application publishes throughput data; it also subscribes to the latency echoes.❏
The subscribing applications subscribe to the throughput data, in which the echo requests are embedded; they also publish the latency echoes.The publisher prints the latency test results; the subscriber prints the throughput results.
4
Download Instructions
Download the test from the RTI Community Portal, http://community.rti.com/. Search for Example Performance Test for RTI Connext.
If you need help with the download process, contact [email protected].
5
Installation Instructions
5.1
UNIX-Based Systems
Follow the instructions below. You do not need administrator privileges. All directory locations in this document are meant as examples only; adjust them to suit your site.
1. Make sure you have GNU's version of the tar utility, gtar (which handles long file names) and the unzip utility, gunzip. (On Linux systems, tar generally is gtar and unzip is gun-zip. On Solaris systems, these utilities are separate.)
2. Use gunzip and gtar to extract the distribution into a directory of your choice. For exam-ple:
Building the Application
gunzip rtiperftestdds510.tar.gz gtar xvf rtiperftestdds510.tar
The performance test files will be extracted into <your extraction directory >/rtiperft-est.5.1.0.
3. Make sure the NDDSHOME variable is set to your RTI Connext installation directory, for example, /opt/rti/ndds.5.1.0.
4. Make sure the appropriate ${NDDSHOME}/lib/<architecture> directory is in the LD_LIBRARY_PATH environment variable to pick up the shared library.
The test is provided in source code only—after installation, you will need to build the applica-tion (see Section 6).
5.2
Windows Systems
Follow the instructions below. You do not need administrator privileges. All directory locations in this document are meant as examples only; adjust them to suit your site.
1. Right-click the distribution file and extract its contents into a directory of your choice. The performance test files will be extracted into <your extraction directory>/
rtiperftest.5.1.0.
2. Make sure the NDDSHOME variable is set to your RTI Connext installation directory, for example, C:\Program Files\RTI\ndds.5.1.0.
3. Make sure the appropriate %NDDSHOME%\lib\<architecture> directory is in the Path environment variable (so that it picks up the shared library). Or, you can copy the DLLs from %NDDSHOME%\lib\<architecture> into the directory where the perftest_<language> executable is once you’ve built the test (see Building the Applica-tion (SecApplica-tion 6)).
The test is provided in source code only—after installation, you will need to build the applica-tion (see Building the Application (Section 6)).
6
Building the Application
First, as described above, make sure the environment variable NDDSHOME is set to the direc-tory containing your RTI Connext installation.
To use keyed types: The performance test supports both unkeyed and keyed1 types. Out of the box, the makefiles/project files use the rtiddsgen utility to generate code for unkeyed types. To use the test with keyed types, do one of the following:
❏
Define the RTIDDSGEN_PREPROCESSOR environment variable to be "-D PERFTEST_KEYED_TYPE". Set this environment variable before compiling. Or❏
Uncomment the following line in <installation directory>/idl/test.idl:#define PERFTEST_KEYED_TYPE
1. For information about keyed and unkeyed types, please see Chapter 3 in the RTI Core Libraries and Utilities User’s Manual.
Starting the Test
Examples of how to build the application:
❏
C++ on a UNIX-based SystemFrom a command-line terminal:
$ cd rtiperftest.5.1.0/perftest_cpp $ gmake -f Makefile.<architecture>
(Where <architecture> is the architecture that you want to build.) For example, to build on a Red Hat Enterprise Linux 5 32-bit system:
$ gmake -f Makefile.i86Linux2.6gcc4.1.1
Makefiles for some architectures are included in the example. If your architecture’s makefile is not provided, you can create your own makefile based on the shipped exam-ple makefiles.
❏
C++ and C# on a Windows System1. Open the file, perftest-<architecture>.sln, in Visual Studio (where <architecture> is the architecture that you want to build).
Projects and solution files for some architectures are included in the example. If your architecture’s file is not provided, you can create your own project and solution files based on the shipped example projects and solution files.
2. For better performance, select the Mixed Platforms, Release configuration in the Standard toolbar in Visual Studio.
3. From the Build menu, select Build Solution.
❏
Java on UNIX-Based or Windows SystemsYou will need:
•
A build tool called Ant, which is available free from http://ant.apache.org/•
JDK 1.7. The latest JDK version can be found here:http://java.sun.com/javase/downloads/index.jsp
•
The JAVA_HOME environment variable must be set to the JDK installation direc-tory (because Ant uses this variable).Enter:
$ cd rtiperftest.5.1.0/perftest_java
$ ant -propertyfile ../resource/properties/dds_release.properties
7
Starting the Test
The test is provided in C++, C#, and Java. The list below identifies how to run the executables, once you have built them, and how to pass configuration parameters to them. For detailed descriptions of the test parameters, see Test Parameters (Section 8). For example test configura-tions, see Example Command Lines for Running the Performance Test (Section 9).
When running the test, keep in mind that a throughput test will necessarily place a heavy load on your network and potentially on your CPU(s) as well. For the most accurate results, and the fewest complaints from your coworkers and IT department, run the test when and where you have a subnet to yourself. The test is designed to measure latency under loaded network
condi-Starting the Test
tions; it will produce those loads itself: there is no need to produce them externally (and your throughput results may not be meaningful if you do).
❏
The C++ and C# executables are in these directories:•
<installation directory>/bin/<architecture>/Release•
<installation directory>/bin/<architecture>/Debugwhere <architecture> depends on your architecture, such as i86Linux2.6gcc4.3.4 or i86Win32VS2008.
On Windows systems: As described in Section 5.2, set your Path environment variable to the appropriate %NDDSHOME%\lib\<architecture> directory (this allows a shared library to be picked up when you run the executable). Or, copy the DLLs from %NDDSHOME%\lib\<architecture> into the directory where the perftest_<language> executable is located once you’ve built the test.
❏
The Java script that is used to run the Java example is in the <installation directory>/ scripts directory.As described in Installation Instructions (Section 5), you should have already set your LD_LIBRARY_PATH (for UNIX-based systems) or Path (for Windows systems) so that the application can pick up the native shared libraries on which RTI Data Distribution Ser-vice depends. If you have not, you can set the environment variable RTI_PERFTEST_ARCH to your specific architecture and let the run script set LD_LIBRARY_PATH or Path for you (assuming your NDDSHOME environment vari-able is already set).
For example:
•
If you are using a Windows 32-bit architecture:set RTI_PERFTEST_ARCH=i86Win32jdk
•
If you are using a Windows 64-bit architecture:set RTI_PERFTEST_ARCH=x64Win64jdk
•
If you are using the Linux i86Linux2.6gcc4.3.4jdk architecture:setenv RTI_PERFTEST_ARCH i86Linux2.6gcc4.3.4jdk
❏
Make sure java is in your path before running the java example run script.❏
The test uses XML and INI configuration files, and locates these files based on their paths relative to the directory from which the test is run. Therefore to use these configuration files:•
Change to the top-level rtiperftest.5.1.0 directory. For example:cd /opt/rti/rtiperftest.5.1.0
•
Start the test applications. You can start the publisher or subscribers first, the order does not matter. When selecting your optional parameters, choose parame-ters that allow the test to run for at least 5 seconds to get any kind of meaningful results. The longer it runs, the more accurate the results will be. Ideally, you should run the test for at least 1 minute.C++:
bin/<architecture>/Release/perftest_cpp <-pub|-sub> [parameters]
or
bin/<architecture>/Debug/perftest_cpp <-pub|-sub> [parameters]
Test Parameters
bin/<architecture>/Release/perftest_cs <-pub|-sub> [parameters]
or
bin/<architecture>/Debug/perftest_cs <-pub|-sub> [parameters]
Java:
scripts/perftest_java <-pub|-sub> [parameters]
where <architecture> depends on your architecture, such as i86Linux2.6gcc4.3.4 or i86Win32VS2008.
❏
After the publisher recognizes that the specified number of subscribers (see the-numSubscribers <count> option) are online and the subscriber recognizes that the specified number of publishers (see the -numPublishers <count> option) are online, the test begins.
8
Test Parameters
Several parameters are available; you can enter them on the command line or put them in a configuration (.ini) file. Entries on the command line take precedence. (See the
-configFile <filename> and -qosprofile <filename> options in Table 8.1 for file locations.) All parameters are optional and case-insensitive; partial matches are allowed (such as -h instead of -help).
Some parameters only make sense in the publishing or subscribing application. The parameters are presented in the following tables, based on whether they may be used in a publishing application, a subscribing application, or both:
❏
Test Parameters for Publishing and Subscribing Applications (Table 8.1) on Page 8❏
Test Parameters Only for Publishing Applications (Table 8.2) on Page 12❏
Test Parameters Only for Subscribing Applications (Table 8.3) on Page 11 As you will see in the tables, the -pub parameter specifies a publishing application and -sub specifies a subscribing application. If you do not specify -pub or -sub, -sub is assumed. For additional information on setting the parameters, see:❏
Spinning vs. Sleeping (Section 8.1)❏
Send-Queue Size and Queue-Full Behavior (Section 8.2)❏
Number of Iterations vs. Latency Count (Section 8.3)❏
Warming Up (Section 8.4)Test Parameters
Table 8.1 Test Parameters for Publishing and Subscribing Applications
Command-Line Option Entry in perftest.ini Description
-bestEffort is reliable
= <true|false>
Use best-effort communication.
Default: true (use reliable communication) For an introduction to the RTI reliability model, see the Strict Reliability design pattern in the RTI Core Libraries and Utilities Getting Started Guide. See also: Reliable Communications in the RTI Core Libraries and Utilities User’s Manual. -configFile <filename> Not applicable in .ini file
Path to a configuration file that contains command-line options.
Default: perftest.ini
-dataLen <bytes> data length = <bytes>
Length of payload in bytes for each send. Default: 100 bytes
Range: 28 - 63,000 bytes
The lower limit is the number of "overhead" bytes in the message (i.e., the timestamp, sequence number, and other meta-data used by the test); the upper limit ensures that, when the overhead of the wire protocol is added, it doesn't overflow the UDP maximum datagram size of 64KB.
If -scan is specified, this value is ignored.
-debug is debug =
<true|false>
Run in debug mode (generates more verbose logging messages, which are useful to RTI support personnel).
Default: false
-durability <0|1|2|3> durability = <0|1|2|3>
Sets the Durability kind:
•
0 - VOLATILE (default)•
1 - TRANSIENT LOCAL•
2 - TRANSIENT•
3 - PERSISTENTFor an introduction to the RTI durability model, see the Historical Data design pattern in the RTI Core Libraries and UtilitiesGetting Started Guide. See also: Mechanisms for Achieving Information Durability and Persistence, Chapter 12, in the RTI Core Libraries and Utilities User’s Manual.
-domain <ID> domain = <ID>
Domain ID.
The publisher and subscriber applications must use the same domain ID in order to
communicate. Default: 1 Range: 0-99
See Choosing a Domain ID and Creating Multiple Domains, Section 8.3.4, in the RTI Core Libraries and Utilities User’s Manual.
Test Parameters
-enableSharedMemory
enable shared memory = <true|false>
Enable the shared memory transport. Default: shared memory transport is disabled
-enableTcpOnly enable tcp only =
<true|false>
Disable all the other transports and use only TCP transport for communication.
Default: TCP transport not enabled -help Not applicable in .ini file Print this usage message and exit.
-instanceHashBuckets <n>
instance hash buckets = <n>
Number of hash buckets for instances. Default: -1 (means same as the number of instances)
Range: (actual value) > 0
-instances <int> instances = <number of instances>
Set the number of instances to use in the test. The publishing and subscribing applications must specify the same number of instances. This option only makes sense when testing a keyed data type; to do so, uncomment the line “#define PERFTEST_KEYED_TYPE” in the IDL type-definition file (<install-dir>/idl/test.idl) before compiling. Alternatively, define the RTIDDSGEN_PREPROCESSOR environment variable to "-D PERFTEST_KEYED_TYPE" before compiling. Default: 1 Range: > 0 -keepDurationUsec <usec>
keep duration usec = <usec>
Minimum duration that a sample is queued for ACK-disabled readers. Only used if the -noPositiveAcks option is specified on the publisher side.
See Disabling Positive Acknowledgements, Section 6.5.3.3 in the RTI Core Libraries and Utilities User’s Manual.
Default: 1,000 µsec (1 millisec) Range: >= 0
-multicast is multicast =
<true|false>
Use multicast to receive data. Default: do not use multicast.
-multicastAddress <address>
Currently not supported in perftest.ini
Specify the multicast receive address for receiving user data.
If unspecified, the following default values will be used according to the topic:
• latency: 239.255.1.2 • throughput: 239.255.1.1 • announcement: 239.255.1.100
-nomulticast is multicast =
<true|false>
Do not use multicast.
Note: Starting in 5.1.0, this option is no longer needed since multicast is disabled by default. It exists only to maintain backward compatibility. Default: do not use multicast
Table 8.1 Test Parameters for Publishing and Subscribing Applications
Test Parameters
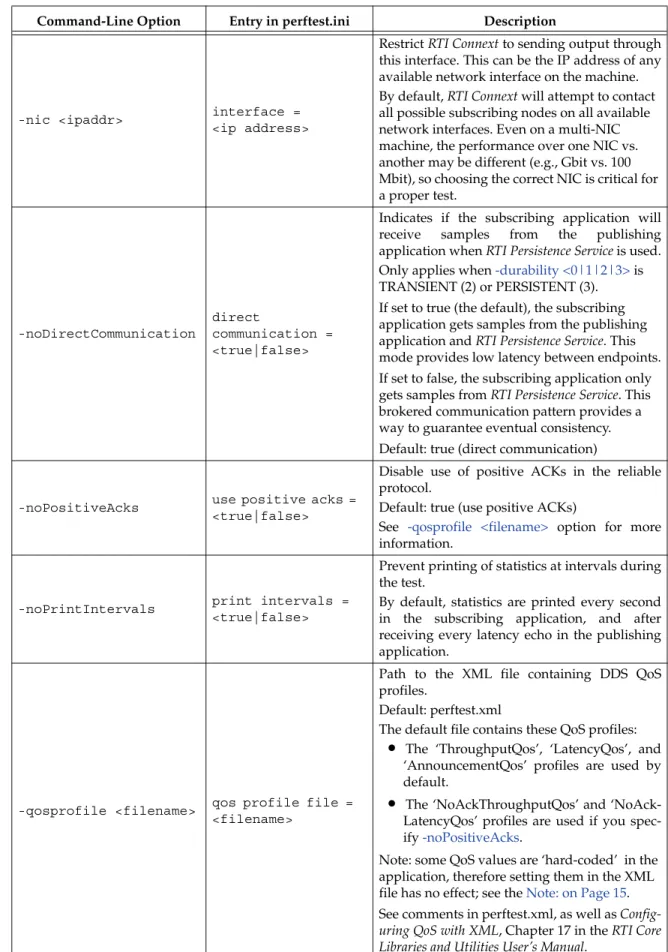
-nic <ipaddr> interface =
<ip address>
Restrict RTI Connext to sending output through this interface. This can be the IP address of any available network interface on the machine. By default, RTI Connext will attempt to contact all possible subscribing nodes on all available network interfaces. Even on a multi-NIC machine, the performance over one NIC vs. another may be different (e.g., Gbit vs. 100 Mbit), so choosing the correct NIC is critical for a proper test.
-noDirectCommunication
direct
communication = <true|false>
Indicates if the subscribing application will receive samples from the publishing application when RTI Persistence Service is used. Only applies when -durability <0|1|2|3> is TRANSIENT (2) or PERSISTENT (3). If set to true (the default), the subscribing application gets samples from the publishing application and RTI Persistence Service. This mode provides low latency between endpoints. If set to false, the subscribing application only gets samples from RTI Persistence Service. This brokered communication pattern provides a way to guarantee eventual consistency. Default: true (direct communication)
-noPositiveAcks use positive acks =
<true|false>
Disable use of positive ACKs in the reliable protocol.
Default: true (use positive ACKs)
See -qosprofile <filename> option for more information.
-noPrintIntervals print intervals =
<true|false>
Prevent printing of statistics at intervals during the test.
By default, statistics are printed every second in the subscribing application, and after receiving every latency echo in the publishing application.
-qosprofile <filename> qos profile file = <filename>
Path to the XML file containing DDS QoS profiles.
Default: perftest.xml
The default file contains these QoS profiles:
•
The ‘ThroughputQos’, ‘LatencyQos’, and‘AnnouncementQos’ profiles are used by default.
•
The ‘NoAckThroughputQos’ and ‘NoAck-LatencyQos’ profiles are used if you spec-ify -noPositiveAcks.Note: some QoS values are ‘hard-coded’ in the application, therefore setting them in the XML file has no effect; see the Note: on Page 15. See comments in perftest.xml, as well as Config-uring QoS with XML, Chapter 17 in the RTI Core Libraries and Utilities User’s Manual.
Table 8.1 Test Parameters for Publishing and Subscribing Applications
Test Parameters
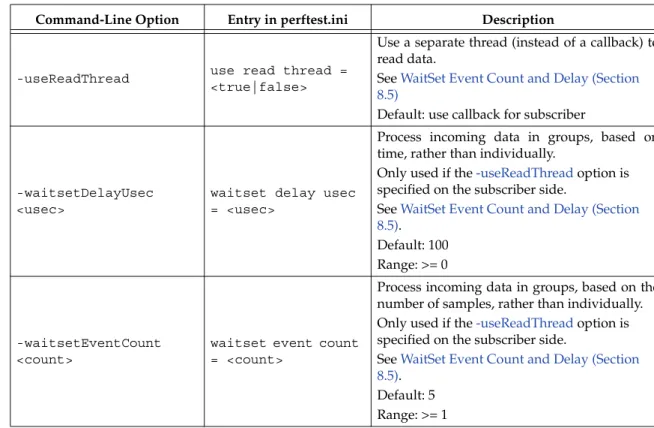
-useReadThread use read thread =
<true|false>
Use a separate thread (instead of a callback) to read data.
See WaitSet Event Count and Delay (Section 8.5)
Default: use callback for subscriber
-waitsetDelayUsec <usec>
waitset delay usec = <usec>
Process incoming data in groups, based on time, rather than individually.
Only used if the -useReadThread option is specified on the subscriber side.
See WaitSet Event Count and Delay (Section 8.5).
Default: 100 Range: >= 0
-waitsetEventCount <count>
waitset event count = <count>
Process incoming data in groups, based on the number of samples, rather than individually. Only used if the -useReadThread option is specified on the subscriber side.
See WaitSet Event Count and Delay (Section 8.5).
Default: 5 Range: >= 1
Table 8.3 Test Parameters Only for Subscribing Applications
Command-Line Option Entry in perftest.ini Description
-numPublishers <count> num publishers = <count>
The subscribing application will wait for this number of publishing applications to start.
Default: 1
-sidMultiSubTest <id> Not applicable in .ini file
ID of the subscriber in a multi-subscriber test.
Use a unique value for each subscriber running on the same host that uses the same domain ID. Default: 0
Range: 0 to n-1, inclusive, where n is the number of subscribers in a multi-subscriber test.
-sub Not applicable in .ini file Set test to be a subscriber. Default: -sub
Table 8.1 Test Parameters for Publishing and Subscribing Applications
Test Parameters
Table 8.2 Test Parameters Only for Publishing Applications
Command-Line Option Entry in perftest.ini Description
-enableAutoThrottle Not applicable in .ini file
Enables the Auto Throttling feature. See Auto Tuning and Turbo Mode (Section 8.7).
Default: feature is disabled.
-enableTurboMode Not applicable in .ini file
Enables the Turbo Mode feature. See Auto Tuning and Turbo Mode (Section 8.7). When turbo mode is enabled, -batchSize <bytes> is ignored.
Default: feature is disabled.
-batchSize <bytes> batch size = <bytes>
Enable batching and set the maximum batched message size. Default: 0, batching disabled Range: 1 to 63,000
For more information on batching data for high throughput, see the High Throughput design pattern in the RTI Core Libraries and Utilities Getting Started Guide. See also: How to Measure Latency for a Given Throughput (Section 8.6) and the BATCH QosPolicy, Section 6.5.2 in the RTI Core Libraries and Utilities User’s Manual.
-heartbeatPeriod <sec>:<nanosec>
heartbeat period sec = <sec>
heartbeat period nanosec = <nanosec>
The period at which the publishing application will send heartbeats. See Reliable Communications, Chapter 10, in the RTI Core Libraries and Utilities User’s Manual.
Default: heartbeat period sec = 0, heartbeat period nanosec = 0 (meaning use the value as specified in the XML QoS Profile, which is set to (10 millisec = 10,000,000
nanosec)). See
-qosprofile <filename>.
Range: (actual value) 1 nanosec to 1 year (31,536,000 sec.)
Test Parameters
-fastHeartbeatPeriod <sec>:<nanosec>
fast heartbeat period sec = <sec>
fast heartbeat period nanosec = <nanosec>
An alternative heartbeat period used when the publishing application needs to flush unacknowledged samples more quickly.
See Reliable Communications, Chapter 10, in the RTI Core Libraries and Utilities User’s Manual.
Default: heartbeat period sec = 0, heartbeat period nanosec = 0 (meaning use the value as specified in the XML QoS Profile, which is set to (1 millisec = 1,000,000 nanosec)). See
-qosprofile <filename>.
Range: (actual value) 1 nanosec to 1 year (31,536,000 sec). Must not be slower than -heartbeatPeriod <sec>:<nanosec>.
-latencyCount <count> latency count = <count>
Number samples to send before a latency ping packet is sent.
See Number of Iterations vs. Latency Count (Section 8.3). Default: -1 (if -latencyTest is not specified, automatically adjust to 10,000; if -latency Test is specified, automatically adjust to 1).
Range: must be <= -numIter
-latencyTest run latency test =
<true|false>
Run a latency test consisting of a ping-pong.
The publisher sends a ping, then blocks until it receives a pong from the subscriber.
Can only be used on a publisher whose pidMultiPubTest = 0 (see -pidMultiPubTest <id>). Default: false
-numIter <count> num inter = <count>
Number of samples to send. See Number of Iterations vs. Latency Count (Section 8.3) and Warming Up (Section 8.4)
If you set scan = true, you cannot set this option (see -scan).
Default: 0 (infinite)
Range: latencyCount (adjusted value) or higher (see
-latencyCount <count>)
-numSubscribers <count> num subscribers = <count>
Have the publishing application wait for this number of subscribing applications to start.
Default: 1
Table 8.2 Test Parameters Only for Publishing Applications
Test Parameters
-pidMultiPubTest <id> Not applicable in .ini file
Set the ID of the publisher in a multi-publisher test.
Use a unique value for each publisher running on the same host that uses the same domain ID. Default: 0
Range: 0 to n-1, inclusive, where n is the number of publishers in a multi-publisher test.
-pub Not applicable in .ini file Set test to be a publisher. Default: -sub
-scan scan = <true|false>
Run test in scan mode, traversing a range of sample data sizes from 32 to 63,000 bytes.
If you set scan = true, you cannot set -numIter <count>.
Default: false (no scan)
-sendQueueSize <number> send queue size = <number>
Size of the send queue.
When -batchSize <bytes> is used, the size is the number of batches. See Send-Queue Size and Queue-Full Behavior (Section 8.2). Default: 50
Range: [1,100 million] or -1 (indicating an unlimited length).
-sleep <millisec> sleep millisec = <millisec>
Time to sleep between each send. See Spinning vs. Sleeping (Section 8.1).
Default: 0
Range: 0 or higher
-spin <count> spin loop count = <count>
Number of times to run in a spin loop between each send.
See Spinning vs. Sleeping (Section 8.1).
Default: 0
Range: 0 or higher
Table 8.2 Test Parameters Only for Publishing Applications
Test Parameters
8.1
Spinning vs. Sleeping
When the publisher is writing as fast as it can, sooner or later, it is likely to get ahead of the sub-scriber. There are 4 things you can do in this case:
1. Nothing—for reliable communication, write() will block until the subscriber(s) catch up. 2. Slow the writing down by sleeping (-sleep <millisec>). This approach is friendlier to the
other processes on the host because it does not monopolize the CPU. However, context switching is expensive enough that you can't actually "sleep" for amounts of time on the order of microseconds, so you could end up sleeping too long and hurting performance. (Operating systems (including Linux and Windows) have a minimum resolution for sleeping; i.e., you can only sleep for a period of 1 or 10 ms. If you specify a sleep period that is less than that minimum, the OS may sleep for its minimum resolution.)
3. Spin in a tight loop between writes (-spin <count>). This approach will add a pause with-out giving up the CPU, making it easier to "sleep" for very short periods of time. In the test implementation, there is a very short loop that just performs some simple math to take up CPU time. The argument to -spin <count> (any number >= 0) is the number of times to go through that loop. The default is 0. If you specify something else, it should be a fairly large number (100’s or 1000’s), since spinning the loop just a few times will take negligible time. Avoid spinning on a single-core machine, as the code that would break you out of the spin may not be able to execute in a timely manner.
4. Let the publisher automatically adjust the writing rate (-enableAutoThrottle). This option enables the Auto Throttle feature introduced in RTI Connext 5.1.0 and its usage is pre-ferred over -spin <count> because the amount of spin is automatically determined by the publisher based on the number of unacknowledged samples in the send queue.
See also: Send-Queue Size and Queue-Full Behavior (Section 8.2).
8.2
Send-Queue Size and Queue-Full Behavior
In many distributed systems, a data producer will often outperform data consumers. That means that, if the communications are to be reliable, the producer must be throttled in some way to allow the consumers to keep up. In some situations, this may not be a problem, because data may simply not be ready for publication at a rate sufficient to overwhelm the subscribers. If you're not so lucky, your publisher's queue of unacknowledged data will eventually fill up. When that happens, if data is not to be lost, the publication will have to block until space becomes available. Blocking can cost you in terms of latency.
To avoid the cost of blocking, consider the following:
❏
Enlarge your publisher's queue (-sendQueueSize <number>). Doing so will mean your publisher has to block less often. However, it may also let the publisher get even further ahead of slower subscribers, increasing the number of dropped and resent packets, hurt-ing throughput. Experimenthurt-ing with the send queue size is one of the easy thhurt-ings you can do to squeeze a little more throughput from your system.❏
Enable Auto Throttling (-enableAutoThrottle). This option enables the Auto Throttle fea-ture introduced in RTI Connext 5.1.0. When this option is used, the publisher automati-cally adjusts the writing rate based on the number of unacknowledged samples in the send queue to avoid blocking.Note: The following values in the DataWriterProtocolQosPolicy are ‘hard-coded’ in the applica-tion, therefore setting these values in the XML QoS profile will have no effect:
❏
rtps_reliable_writer.heartbeats_per_max_samples is set to (sendQueueSize/10)❏
rtps_reliable_writer.low_watermark is set to (sendQueueSize * 0.10)Test Parameters
❏
rtps_reliable_writer.high_watermark is set to (sendQueueSize * 0.90)For more information on the send queue size, see the RESOURCE_LIMITS QosPolicy, Section 6.5.20 in the RTI Core Libraries and Utilities User’s Manual (specifically, the max_samples field).
8.3
Number of Iterations vs. Latency Count
When configuring the total number of samples to send during the test (-numIter <count>) and the number of samples to send between latency pings (-latencyCount <count>), keep these things in mind:
❏
Don't send latency pings too often. One of the purposes of the test is to measure the throughput that the middleware is able to achieve. Although the total throughput is tech-nically the total data sent on both the throughput and latency topics, for the sake of sim-plicity, the test measures only the former. The implicit assumption is that the latter is negligible by comparison. If you violate this assumption, your throughput test results will not be meaningful.❏
Keep the number of iterations large enough to send many latency pings over the course of the test run. (That is, keep -numIter <count> small compared to -latencyCount <count>.) Your latency measurements, and the spread between them, will be of higher quality if you are able to measure more data points.❏
When selecting -numIter <count>, choose a value that allows the test to run for at least a minute to get accurate results. Set -numIter <count> to be millions for small message sizes (<1k); reduce as needed for larger sizes (otherwise the tests will take longer and lon-ger to complete).8.4
Warming Up
When running the performance test in Java, and to a lesser extent, C#, you may observe that throughput slowly increases through the first few incremental measurements and then levels off. This improvement reflects the background activity of the just-in-time (JIT) compiler and optimizer on these platforms. For the best indication of steady-state performance, be sure to run the test for a number of samples (-numIter <count>) sufficient to smooth out this start-up arti-fact.
8.5
WaitSet Event Count and Delay
RTI Connext, and by extension, this performance test, gives you the option to either process received data in the middleware's receive thread, via a listener callback, or in a separate thread ( -useReadThread) via an object called a WaitSet. The latter approach can be beneficial in that it decouples the operation of your application from the middleware, so that your processing will not interfere with RTI Data Distribution Service's internal activities. However, it does introduce additional context switches into your data receive path. When data is arriving at a high rate, these context switches can adversely impact performance when they occur with each data sam-ple.
To improve efficiency, the test configuration parameters "waitset event count = <count>" and "waitset delay usec = <usec>" (set in the .ini configuration file) allow you to process incoming data in groups, based on the number of samples and/or time, rather than individually, reducing the number of context switches. Experiment with these values to optimize performance for your system.
For more information, see these sections in the RTI Core Libraries and Utilities User’s Manual: Receive Threads (Section 19.3) and Conditions and WaitSets (Section 4.6).
Test Parameters
8.6
How to Measure Latency for a Given Throughput
If you want to measure the minimum latency for a given throughput, you have to use the com-mand-line parameters -sleep <millisec>, -spin <count> and -batchSize <bytes> to experimen-tally set the throughput level for a given test run.
For example, suppose you want to generate a graph of latency vs. throughput for a packet size of 200 bytes and throughput rates of 1000, 10K, 20K, 50K, 100K, 500K, and Max messages per second.
For throughput rates under 1000 messages per second, use -sleep <ms> to throttle the publish-ing application. For example, ‘-sleep 1’ will produce a throughput of approximately 1000 mes-sages/second; ‘-sleep 2’ will produce a throughput of approximately 500 messages/second. For throughput rates higher than 1000 messages per second, use -spin <spin count> to cause the publishing application to busy wait between sends. The <spin count> value needed to produce a given throughput must be experimentally determined and is highly dependent on processor performance. For example ‘-spin 19000’ may produce a message rate of 10000 messages/second with a slow processor but a rate of 14000 messages/second with a faster processor.
Use batching when you want to measure latency for throughput rates higher than the maximum rates of sending individual messages. First, determine the maximum throughput rate for the data size under test without batching (omit -batchSize <bytes>). For example, on a 1-Gigabyte network, for a data size of 200 bytes, the maximum throughput will be about 70,000 messages/ sec. We will refer to this value as max_no_batch.
For all throughput rates less than max_no_batch (e.g., 70,000 messages/sec.), do not use batching, as this will increase the latency.
Use batching to test for throughput rates higher than max_no_batch: start by setting -batchSize to a multiple of the data size. For example, if the data size is 200 bytes, use -batchSize 400 (this will put 2 messages in each batch), -batchSize 800 (4 per batch), etc. This will allow you to get throughput/latency results for throughputs higher than the max_no_batch throughput rate, such as:
❏
100,000❏
200,000❏
500,000❏
millionsNote: For larger data sizes (8000 bytes and higher), batching often does not improve throughput, at least for 1-Gigabyte networks.
8.7
Auto Tuning and Turbo Mode
RTI Connext 5.1.0 includes two features that allow the middleware to auto-tune the communications to achieve better performance. These features are Auto Throttling and Turbo Mode. For more information about both features, refer to Sections 10.4, Auto Throttling for DataWriter Performance—Experimental Feature and 6.5.2.4 Turbo Mode: Automatically Adjusting the Number of Bytes in a Batch—Experimental Feature in the RTI Core Libraries and Utilities User's Manual. The performance test application includes two command-line options to enable these features: -enableAutoThrottle and -enableTurboMode.
With Auto Throttling, the publisher automatically adjusts the writing rate based on the number of unacknowledged samples in the send queue to avoid blocking and provide the best latency/ throughput tradeoff.
With Turbo Mode, the size of a batch is automatically adjusted to provide the best latency for a given write rate. For slow write rates, the batch size will be smaller to minimize the latency
pen-Example Command Lines for Running the Performance Test
alty. For high write rates, the batch size will be bigger to increase throughput. When turbo mode is used, the command line option -batchSize <bytes> is ignored.
To achieve the best latency under maximum throughput conditions, use -enableAutoThrottle and -enableTurboMode in combination.
9
Example Command Lines for Running the Performance Test
The followings are examples of how to run the performance test for different use cases.
❏
The tests below print final results only; if you want to see intermediate values, remove the -noprint argument from the command line.❏
If you are running on 2 unequal machines, i.e., one machine is faster (has better processors) than another, you will see better performance by running the Publisher on the slower machine.❏
To measure CPU usage while running these tests, use "top" or a similar utility.9.1
1-1, Multicast, Best Latency as a Function of Message Size
Publisher:
bin/<arch>/Release/perftest_cpp -pub -noPrint -nic <ipaddr> -domain <ID> -numIter <count> -latencyCount 1 -dataLen <length> -latencyTest -multicast
Subscriber:
bin/<arch>/Release/perftest_cpp -sub -noPrint -nic <ipaddr> -domain <ID> -multicast
❏
Modify -dataLen <bytes> to see latencies for different data sizes.❏
Set -numIter <count> to be >=100 for statistically better results.9.2
1-1, Multicast, Maximum Throughput as a Function of Message Size (with
Batching)
Publisher:
bin/<arch>/Release/perftest_cpp -pub -noPrint -nic <ipaddr> -numIter <count> -dataLen <length> -batchSize <bytes> -sendQueueSize <number> -multicast
Subscriber:
bin/<arch>/Release/perftest_cpp -sub -noprint -nic <ipaddr> -multicast
❏
Set -numIter <count> to be millions for small message sizes (<1k); reduce as needed for larger sizes (otherwise the tests will take longer and longer to complete).❏
To achieve maximum throughput, start by setting -batchSize <bytes> to 6400, then increase the size to see if you get better throughput.The largest valid batch size is 63000 bytes.
❏
For maximum throughput, start by setting -sendQueueSize <number> to 30; the best value will usually be between 30-50.Example Command Lines for Running the Performance Test
Note: For larger data sizes (8000 bytes and higher), batching often does not improve throughput, at least for 1-Gig networks.
9.3
1-1, Multicast, Latency vs. Throughput for 200-byte Messages (with Batching)
Publisher:
bin/<arch>/Release/perftest_cpp -pub -noPrint -nic <ipaddr> -numIter <count> -dataLen 200 -batchSize <bytes>
-sendQueueSize <number> -spin <count> -multicast
Subscriber:
bin/<arch>/Release/perftest_cpp -sub -noPrint -nic <ipaddr> -multicast
❏
Set -numIter <count> to be in the millions for high throughput tests; reduce as needed for lower throughputs (otherwise the tests will take longer and longer to complete).❏
To adjust throughput, experiment with the value of -spin <count>. For example, to get arate of 10,000 messages/sec, use ‘-spin 20000’ to see the resulting rate, then adjust up or down as needed.
9.4
1-to-1, Multicast, Reliable UDPv4, All Sizes
Publisher:
bin/<arch>/Release/perftest_cpp -pub -noPrint -sendQueueSize 32 -latencyCount 10000 -scan -multicast
Subscriber:
bin/<arch>/Release/perftest_cpp -sub -noPrint -multicast
9.5
1-to-1, Unicast, Best-Effort, UDPv4, 1 Size
Publisher:
bin/<arch>/Release/perftest_cpp -pub -noPrint -sendQueueSize 32 -latencyCount 1000 -numIter 1000000 -dataLen 1024 -bestEffort
Subscriber:
bin/<arch>/Release/perftest_cpp -sub -noPrint -dataLen 1024 -bestEffort
9.6
1-to-1, Multicast, Reliable, UDPv4, Batching Enabled
Publisher:
bin/<arch>/Release/perftest_cpp -pub -noPrint -sendQueueSize 32 -latencyCount 1000 -numIter 1000000 -dataLen 200 -batchSize 6400 -multicast
Subscriber:
bin/<arch>/Release/perftest_cpp -sub -noPrint -dataLen 200 -batchSize 6400 -multicast
Example Output
9.7
1-to-2, Multicast, Reliable, UDPv4
Publisher:
bin/<arch>/Release/perftest_cpp -pub -noPrint -pidMultiPubTest 0 -sendQueueSize 32 -numSubscribers 2 -latencyCount 1000
-numIter 1000000 -dataLen 200 -multicast
Subscriber 1:
bin/<arch>/Release/perftest_cpp -sub -noPrint -dataLen 200 -numPublishers 1 -sidMultiSubTest 0 -multicast
Subscriber 2:
bin/<arch>/Release/perftest_cpp -sub -noPrint -dataLen 200 -numPublishers 1 -sidMultiSubTest 1 -multicast
9.8
2-to-1, Multicast, Reliable, UDPv4
Publisher 1:
bin/<arch>/Release/perftest_cpp -pub -noPrint -pidMultiPubTest 0 -sendQueueSize 32 -numSubscribers 1 -latencyCount 1000
-numIter 1000000 -dataLen 200 -multicast
Publisher 2:
bin/<arch>/Release/perftest_cpp -pub -noPrint -pidMultiPubTest 1 -sendQueueSize 32 -numSubscribers 1 -latencyCount 1000
-numIter 1000000 -dataLen 200 -multicast
Subscriber:
bin/<arch>/Release/perftest_cpp -sub -noPrint -dataLen 200 -numPublishers 2 -sidMultiSubTest 0 -multicast
10
Example Output
The following is an example of the expected output from the performance test. Publisher:
perftest_cpp -pub -noPrint -domain 27 -sendQueueSize 50 -latencyCount 10000 -scan Waiting to discover 1 subscribers...
Waiting for subscribers announcement ... Publishing data...
Length: 32 Latency: Ave 396 us Std 48.9 us Min 83 us Max 538 us 50% 401 us 90% 459 us 99% 510 us 99.99% 538 us Length: 64 Latency: Ave 399 us Std 53.1 us Min 88 us Max 1062 us 50% 403 us 90% 461 us 99% 537 us 99.99% 1062 us ...
Subscriber:
bin/i86Linux2.6gcc3.4.3/Release/perftest_cpp -sub -noPrint -domain 27 Waiting to discover 1 publishers ...
Waiting for data...
Length: 32 Packets: 10000000 Packets/s(ave): 47913 Mbps(ave): 12.3 Lost: 0 Length: 64 Packets: 10000000 Packets/s(ave): 47580 Mbps(ave): 24.4 Lost: 0 ...
Optimizing Your OS for Network Performance
11
Optimizing Your OS for Network Performance
The network stacks of popular operating systems are not always tuned for maximum perfor-mance out of the box. RTI has found that the following configuration changes frequently improve performance for a broad set of demanding applications. Consider testing your network performance with and without these changes to learn if they can benefit your system.
11.1
Optimizing Linux Systems
Edit the file, /etc/sysctl.conf, and add the following:
net.core.wmem_max = 16777216 net.core.wmem_default = 16777216 net.core.rmem_max = 16777216 net.core.rmem_default = 16777216 net.ipv4.tcp_rmem = 4096 16777216 33554432 net.ipv4.tcp_wmem = 4096 16777216 33554432 net.ipv4.tcp_mem = 4096 16777216 33554432 run /sbin/sysctl -p
11.2
Optimizing Windows Systems
1. From the Start button, select Run..., then enter:
regedit
2. Change this entry: HKEY_LOCAL_MACHINE\SYSTEM\CurrentControlSet\ Services\Tcpip\Parameters
a. Add the DWORD key: MaximumReassemblyHeaders b. Set the value to 0xffff (this is the max value)
See http://support.microsoft.com/kb/811003 for more information.
3. Change this entry: HKEY_LOCAL_MACHINE\SYSTEM\CurrentControlSet\ Services\AFD\Parameters
a. Add the DWORD key: FastSendDatagramThreshold b. Set the value to 65536 (0x10000)
See http://support.microsoft.com/kb/235257 for more information. 4. Reboot your machine for the changes to take effect.