HP 9800 Computers
, 9825 CE Handbook
Part No. 09825-90039 E1082 Requires Binder No. 9282-0683
rli~ HEWLETT
a:1!.II
PACKARD9825 CE Handbook
© Copyright Hewlett-Packard Company, 1982
This document refers to proprietary computer software which is protected by copyright All rights are reserved. Copying or other reproduction of this program except for archival purposes is prohibited without the prior written consent of Hewlett-Packard Company
Hewlett-Packard Company
Chapter 1 YS25A. H ProOtlct IntorrnatlOn
<-hoptpr 2
'iK2:,·\ B I 11\ II (J1I1I1l'II(dllll~(<lIl<l(I()Il PM
( hctptPI 3
<lH2,)·\ B C'JIlfl<jllldtIIJIl
( h<lpter 4
YH25A. B 'Inllhll''ih()(J!lIlq
LlldlJ1P1 J
(IH2.") \ B IJldQIl()~t Il 'i
Chdptl'1 6 YH2St\ R I\O]U'itlTWnh
C hapteT 7 9825A B PPTlphFTdl.,
( hopterS
9S2SA B Heplot ('IIII'll! Pdlt.,
<-hap!!'r 9
LJ~25r\ H r)ld~lrdlll"
<-helpte! 10
'J82Jr\ H H d ( , I l ' l l l ' ' i
( hoptPT II
9825A/B Product Information 1-1
Chapter
1
9825A/B
Product Information
9825A1B
Common Specifications
The following specifications are common to both the 9825A and 98258 desktop computers:
Tape Cartridge
Memory capadty . . . . 250 000 bytes Read/write speed . . . . 559 mm/s (22 in./s) Search speed (bidirectional) .. 2 286 mm/s (90 in.ls) Transfer rate. . ... 2 750 bytes/s Typical rewind time. . .19 s (end-to-end) Typical erase time .. 40 s (one track) Tape length .. 42.67 m (140 ft) Size . . . 63.5 x 82.5 x 12.7 mm(2.5 x 3.25 x 0.5 in.) Verification. . . . automatic on recording
Tape cartridges are intended for nominal program or data storage; the typical life cycle is 50-100 hours, dependinj! on the app~cation. Environmental conditions of 25°C (77 F) and 20 to 50% relative humidity are most favorable for a long tape life. Tape life is decreased by a high duty cycle (percent of of time the tape is accessed during the total time the 9825 is in use), high turning resistance and continuous use for long periods of time (longer than one-half hour) It is suggested that tape transports be regularly cleaned and cartridges removed from drives after use.
For heavy usage of mass storage files, such as in consecutive file sorts or data base management applications, flexible disc drives are recommended for optimum performance and reliability.
Paper width Speed. Font.
Printer
.. 57.15 mm (2.25 in.) 180 lines/min . . 5 x 7 dot matrix; prints all
the following characters in upper- and lowercase; up to 16 characterslJine
Character Set
Maximum (max) .. Minimum (min) . Modulus (mod) . log . In .
eX
lOX
Raise to power. Random number (md) ~n (s.gn) : : . Sine (sin) Cosine (cos) . Tangent (tan) . Arcsine (asni Arccosine (acs) Arctangent (aln)
+
/ .
Power of ten round (pmd) Digit round .
Logic operators
... variable . .... variable ... 3.1 ms ... 8.6ms ... 6.7 ms ... 5.5 rns
... 7.6 ms ... 15 ms ... 1.8 rns
... 0.20 ms .. 2.5ms .. 18 ms ... 18 ms ... 13 ms ... 22 ms .. 22ms ... 15 ms ... 0.32 ms .... 0.37 rns
... 0.88 rns
... 2.5ms ... 0.74 ms ... 0.53 rns
AND, NOT, OR. XOR (exclusive or) Relational operators
= equal to
> = or = > greater than or equal to
> greater than
< = or = < less than or equal to
< less than
II or <> or >< not equal to
Built-In Functions
Mathematical and trigonometric functions and operations are included in the following with average execution times.Absolute (abs) Fraction (frc) . Integer (int) .
... 0.19 ms ... 0.37 ms . .... 0.47 ms
9825AiB Environmentalilnstallation 2-1
Chapter
2
9825A1B
Environmental/Installation
All values stated here are typical for a 9825 Desktop Computer, except where noted. These values are not meant as specifications and do not represent final approved values. Actual values will vary with individual machines depending on their memory configuration. The 9825 Tech-nical Data Sheet is the only official specification of expected performance.
Environmental Range
Operating temperatures 5°C to 40°C ambient Storage temperature ... -40°C to 65°C Ambient humidity. . .... <80%
Height. Width Depth. Weight:
.... 129.5 mm (5.1 in.) . ... 383.5 mm (15.1 in.)
... 495.3 mm (19.5 in.)
Net ... 12.3 kg (27 lb) Shipping ... 24.5 kg (54 lb)
Cube ... 0.12 m3 (4 ft3)
SizelWeight
Power Requirements
Source. 110 V +5%, -10%
120 V +5%, -10% 220 V +5%, -10% 240 V +5%, -10% Note: Voltage is switch-selectable.
Line frequency ... 48 to 66 Hz Consumption ... 1. 7 A @ 100V
1.5A@120V 0.8A@220V 0.75A@240V
Maximum Power Consumption
Voltage line Current TrueRMS
Setting Voltage (Amps) Voltamps Watts BTU/hr
100 105 1.74 182 142 482 120 126 1.54 194 146 500 220 231 0.83 190 144 490 240 250 0.78 193 145 494
Power Line Susceptability
The 9825A1B is type tested to withstand a transient of the following parameters:
2-2 9825A/B Environmental/Installation
9825A1B
Installation
Power Cords
Connector Voltage Current Option HP
Country of Use End View Rating Rating Number Part Number
Great Britain, 88IMa"
Cyprus, Nigeria,
&
Rhodesia, and 250 13A 900 8120-1351
Singapore
"SCII2
Australia,
(@
New Zealand 250 lOA 901 8120-1369
CEE 7-YII
Europe, Egypt,
W
250 10 902 8120-1689Saudi Arabia
•
•
E 0
United States, NEMA IHap Canada, Japan,
ttJ
125 15A 903 8120-1378Mexico, Taiwan, Phillipines
NEM" 8-lap
United States
flJ
L L 250 15A 904 8120-0698E
n
SEY 1011Switzerland
(0'
~
'0)
250 lOA 906 8120-2104Voltage Selector Switches
~~
~ l'~:~::'l
~~
~'J
1
:::j}:9
100 valls 120volls
~Joot
~ l:::~:::l
1.5A
~Joot
ID
t:~:j}:::l
1.5A
982SA/B Configuration 3-1
Chapter
3
9825A1B
Configuration
9825 Mainframe Configurations
The following table lists the various configurations of the 9825 family of desktop computers. Memory and option ROMs shown for each refer to what the product consisted of at time of sale.
OPTION
STANDARD
001
002
003
Product/Option
982SA
RWM Size Plug-In Option ROMs
8K Bytes 16K Bytes 24K Bytes 32K Bytes 982SA, Opt. 001
982SA, Opt. 002 982SA, Opt. 003
982SS 24K Bytes 98210A and 98214A or 98216A
982SB 982ST
24/32K Bytes 64K Bytes
9825A1S
Memory Switch Settings
8K BYTE BOARDS A22 16K BYTE BOARDS A23
BOARDS CLIP POSITION BOARDS CLIP POSITION
70(-
-)
1 0
-so
60·
70(·
-)
0 1
.40
so
70{-
-)
6070·
o~
1 1
-so
so
60(_
·)40 70
-0 2 _60
0
5070
-
~~
PROCESSOR All RWM SWITCHES
~
~
Lf'
3-2 9825A/B Configuration
9825 Software Compatability
Listed below are HP applications packs and the equipment required to use them.
Recommended
Part No. Description Equipment tt
ENGINEERING
09825- AC Circuit Analysis Required: 72 or 7225
12500 Calculates the frequency response of linear circuits, induding the effects of Optional: 66B or 71 component tolerances.
09825- 6800 Miaoprocessor Assembler Req:66Bor71
12510 Provides means for developing 6800 Microprocessor assembly language Opt: 83, 84 programs; indudes Editor, Assembler and routines for transferring source
program and object code.
09825- Wavefonn Analysis Req: 72 or 7225
12520 Provides capability to process digital signal data to achieve frequency domain and time domain measurements. Contains routines for single and double waveform analysis and Fourier series coeffidents for equally or unequally spaced data.
MA1HEMATICS
09825- General Utility Routines Req:M
100l! Contains a rollection of math sort, 9871 plot and 9866B plot routines and Opt: 7225, 66B or 71 a self-teaching tape; induded with each 9825 Desktop Computer.
09825- Linear Programming Package Opt: 66B or 71,
13750 Determines an alternative among a large number of possibilities; e.g., mixing 85M and MS products/raw material, optimizing time/profit in manufacturing, flow analysis.!
optimization. MISCELLANEOUS
09825- Documentation Package Req:66Bor71
10020 Has programs for annotated listings, indented listings, extended cross referendng, program romparison and calculating check sums without listing.
09825- Terminal Emulator Package Req: 9825B with SP or 10040 Provides a program to dosely emulate a teletype-like terminal and a program 9825T, 98036A
to allow entry of an entire line into the display, to edit the line and then Opt. 001 Serial send the entire edited line to the computer. Interface
Opt: 66B
09876- 987619825 Utility Routines Req: 76
10010 Allows the 9825 to produce specialized outputs on the 9876 Thermal Graphics Printer: function plots, scatter plots, bar charts, user-defined characters, title pages with 1.5-inch characters and banners with 6-inch characters.
09825- Model 9030 System Exerciser Req: 2240 Opt. 001
10200 Verifies proper functioning of Model 9030 Measurement and Control System with 98034 induding self tests, analog input calibration tests, and testing of all I/O
channels. STATISTICS
09825- Stat. Vol. 1 General Statistics Opt: 72 1500) Provides 19 separate basic statistical analysis routines.
09825- Stat. Vol. 2 Analysis of Variance and Regression Analysis Opt: 72 15010 Provides five different analysis of variance programs, three regression
analysis programs and three distribution functions.
09825- Stat. Vol. 3 Nonparametrics Req: Nothing besides 15020 Contains ten nonparametric programs for single and paired samples. 9825BIT
09825- Statistical Ubrary 1 Opt: 72
15030 Contains Volumes 1, 2 and 3, complete with program cartridges and overlays.
09825- Stepwise Regression R"'I. 71
15040 Performs complete regression analysis using one of four methods for selecting Opt: 69 variables: stepwise, forward, backward or manual; transformations and
residual analysis are induded.
EQUIPMENT CODE KEY 2240 2240 Measurement and Control Proressor REMARKS 98668 1bermal L1ne Pnnter
f:R IWAA Card Reader
n 9871A Charactet- Impact Pnnter
83 9883A/2748BTape ReaderSubsystm'i 84 9884A Tape Punch
85M 9885M Fle:ublt'Dl!ic Dme.\tastec
A complete package includes aU printed materia.l and
rt'\:orded tapes and ills...:. asSO("'.atN .nth the SlJftv..are
n 9872 Plotter
76 9876 Printer
7225 7225 Plotter wr17600A Opt. 003 Personahty Module (9862 Plott@'r will work but 15 out of producbon)
M Matrix ROM f\.iS 9885MF1exibieDiscROM
sr Systems Programrrung ROM
ORDERING INFORMA noN
All software orden; and furt:heT I1lfonnabon requests
9825A/B Troubleshooting 4-1
Chapter
4
9825A1B
Troubleshooting
Troubleshooting Checklist
Here's a list of checkpoints to be verified when a 9825 doesn't seem to work correctly. Several items are identified and their respective page number in the 9825 CE Handbook are shown for reference.
Checkpoint Power Source
Correct Voltage Correct Frequency Proper Receptacle Contact Proper Grounding Noise/Interference Free Power Cord
Correct Connector Polarity Wiring Continuity Plugged in (Both ends) Mainframe Configuration
Power Selector Switches Voltage Select Correct Power Switch On . Fuse, correct size, rating and type Power Supply
Output Voltages within Specifications Power Harnesses connected to all assemblies Processor
Clock Frequency within Specifications All Memory Switches set correct (9825A/S only) Memory and peripheral busses connected Memory
9825A/S
Correct Jumper Positions on A22 and A23 Correct Option ROM for Application 9825B/T
A24 RWM Size Switch Set Correct for Application A24 9862-9872 Plotter Switch Set Correct for Application Correct Option ROM for Application
Keyboard, Ribbon Cables Connected Tape
Good Fuse on A61 Ribbon Cables Connected Data Cartridge Not Damaged Clean Read-Write Head Sense Lamps On Printer
Proper Paper Installed Correctly Print Head Correctly Aligned Paper Advance Set Correct Correct Wire Connections Display
Connected to KDP board Interfacing-Good fuses on A71
4-2 9825A1B Troubleshooting
Checkpoint
General Situations Wiring,
Ground Wires Properly Connected Ribbon Cables Correctly Installed Insulation Intact
Tight Connections on PC Boards and Wiring
PC Assemblies
Clean Edge Connectors Cooling
Air Filter Clean Proper Fan Operation
Cleanliness-all areas clean, no contamination Software-program compatible with configuration
Page
9R25AIB Troubleshooting 4-3
9825A1B
Flow Charts
By using these flow charts, a given set of symptoms, and valid test results you should be able to
list probable causes. Lists are shown in the flow charts; the top !tern ill ~dch iist is the most iikeiy
cause. These flow charts cannot diagnose all possible problems. Use of the System Test Tape is indicated where necessary.
n
C\J
~
j
~l!l
l ~i
fi
j·r
j
9 ;~
i
!i
;
~ E!'f~
Ei
~j ~ !
t! ;
~
J:I
c"':.3 [~ ~1
i
~
i
i
~
'ii • 0 111 i
~
ii
I-
s I ~ • c~
Ii
~~:g~~
(j) a. :I
~
!
;;{!
i
:I
If
~
~
[image:13.384.40.360.125.558.2]j
~Figure 4-1. Flow Chart 1
4-4 9825A1B Troubleshooting
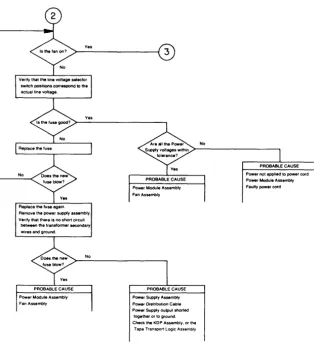
Ves
No
Replace the fuse again
Remove the power supply assembly. Verify that there is no short circuit
between the transformer secondary
wires and ground.
3
PROBABLE CAUSE Power Supply Assembly
Power OistnbuttOn Cable
Power Supply output shorted together or to ground Check the KDP Assembly, or the
[image:14.383.21.335.65.419.2]Tape Transport Logic Assembly
Figure 4-2. Flow Chart 2
PROBABLE CAUSE KDPAssembly Processor Assembly Power Supply Assembly Power Distribution Ceble Read/Write Memory Assembly Memory Cable System ROM ROM Interface Assembly Tape Transport Logic Assembly
1/0 cable
9825A/B Troubleshooting 4-5
x
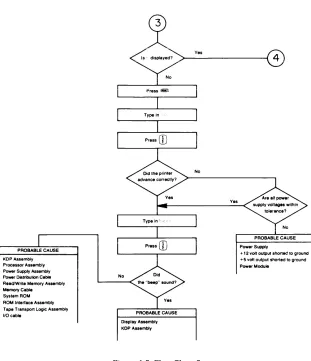
~ diSPlaye~> _ _ y_es _ _ _ _ _ _ _
--I@)
y
No
Display Assembly KDP Assembly
[image:15.378.47.358.45.406.2]No
Figure 4-3. Flow Chart 3
Yes
Power Supply
PROBABLE CAUSE
Printer Assembly KDP Alsembly IIOeable Processor Assembly SystemAOM ROM Intertace Alsembly Memory Cable
PROBABLE CAUSE
Tape Transport Assembly Tape Transport logic Assembly Proceseor A . . . mbly
110 Cable
PROBABLE CAUSE
Display Assembly
KDP Assombly II0Cabio
Processor Assembly
System ROM
ROM Interface Assembly
Memory Cable
PROBABLE CAUSE
Read/Write Memory Assembly Processor Assembly
9825A/B Diagnostics 5-1
Chapter
5
9825A1B
Diagnostics
9825A1B
System Test
This covers the use of the 9825A/B System Test Tape in testing the operation of the 9825A!B
without interfaces or peripheral products connected. For interface or peripheral tests, refer to their product section of the handbook.
Procedure
To Test the Calculator
1. Turn the calculator ON.
2. The following display should be seen.
~---~
3. Insert the Test Cartridge so that the label on the cartridge faces the back
of the calculator.
4. Press:
880CD
800CD
5. The following display should be seen.
.11"'1 ... .... . :,,:
( f
The symbol
\l
is used in this booklet to indicate that the shift key should be helddown while the next key is pressed. Example:
5-2 9825A1B Diagnostics
6 The following tests are available on the Test Cartridge:
8
R/W Memory Test8
ROM Test8
Processor Test8
T ape Cartridge Test8
Printer Test8
Display Testo
Key Switch Test8
Abort (clears the calculator)Run each of these tests by typing-in the test number followed by
8.
Refer tothe next sections of this booklet for detailed information about each test.
At the end of each test the following display will be seen:
(~
type-in the next test number followed by
t:::J.
If the wrong key is pressed while typing the test number press
!r::\
8°·,,·u.
and~
then type the correct test number
If errors are printed or if the results are not as described for the tests. press
and then repeat the test If there are still errors. contact the nearest HP Sales
and Service Office for assistance: office locations are listed at the back of the
9825 Operating and Programming Reference
9825A/B Diagnostics 5-3
Test Descriptions
f \ . . _
U
RtW Memory TestThe following display and printout should be seen.
! ... :: .... : ... :: ... :: ... :
.. " . : : ... : .
c
~:)t<
c:; i . ..! f-! rl:~ L i F: H ~:; ~~:; E'? ~j t:::
t::
Ci ~:i F~U F: A ::;
~:; t.. ::::! ~) j....E; Ci
fi
F: Li
r\
H ~:; ~:; r~.F~
...
~:~ t:·~E j':1 U
i? ic.
~:; IC: Ci (1 F:
L..E T
E.
Memory Location 9825A
70k Std.
60k Opt. 001
50k Opt. 002
40k Opt. 003
30k nfa
20k nfa
10k nfa
02k nfa
20 to 80 seconds
}
This information will vary depending on the memory
options installed (see table below).
98258 98258 9825T
Std. Std. Std.
Std. Std. Std.
Std. Std. Std.
Std* Std* Std.
nfa nfa Std.
nfa nfa Std.
nfa nfa Std.
nfa nfa Std.
*
This memory location is enabled by jumper.5-4 9825A1B Diagnostics
8
ROM TestThe following display and printout should be seen.
!":
..
::....
:' .. :".!",:
io.:
, . ~ ..
5 seconds
This information will
} vary depending on the
ROM(s) installed (see table below).
Errors will be printed here If NONE
} is printed for errors. the ROM(s) are
operating properly.
ROM Numbers and Titles
ROM Address 9825A/S 98258 9825T
Flex. Disc 30K Opt· Opt.' Opt
Genl 10 32K Opt Std Std
Plotter(62 or 72) 3L1K Opt Std Std
Matrix or
Sys. Prg 3GK Opt.
2 Opt.2 OpP
Adv. Prg L10K Opt Std. Std
Ext LO L12K Opt Std Std
Ext. I/O L1L1K Opt Std Std
Strings L1GK Opt Std Std
Sys Prg 50K nia na Std
Flex. Disc 5GK n1a n/a Opt·
1 Orly ~he 98217A 80M ear be Irs:alled Ir 'he 9825A S ard B However el:iler :re
98217A or :re 98228A F:ex,b:e Dsc ROMs ce rs'a'ied Ir 're 9825T "'he
98228A IS Irs:a"ed Ir ~he 9825T I: resloes a: :he 30K ard 56K 10ed'IOr'S
2 Either 'he "'"a:r / or :he S,s'errs 110~.~ rrav be Irs:a11ed Ir :he 9825A
S B =GCV'r::~'e's Lu: never both
9825AiB Diagnostics 5-5
o
Processor TestThe following printout should be seen.
If there are no errors printed the processor is operating properly
8
Tape Cartridge TestThe fol/owing display and printout should be seen.
[:
. .~
Remove the Test Cartridge and insert a scratch cartridge*, then press
E3
After about 45 seconds the fol/owing display and printout should be seen.
Remove the scratch cartridge, re-insert the Test Cartridge, and then press
E~.
"The scratch cartridge must be a known·good unprotected tape cartridge which does not contain wanted Information
5-6 9825A/B Diagnostics
o
Printer TestThe following display and printout should be seen during the printer test.
P P I t·n E PTE ::; T
================
================
================
...
~.X N ((
to
r
ri
t.
(I"l ;: ....
L! f-·T·1
8f~SA,j.A,J.CI':'UCltE(.;::::: £~:~:~
!
"#r·~:~.:'()
*+~- .. /
I~ABCDEFGHI
.JKLt·1t·~OPOPST'-"· ...
~·~::<\·Z [ f ]l_
~
o.bcdE·f·3hi..i
klr'lno
P .::J. r ::;. t U I .... 1 .. .1 >:: ./ Z fl!
"*::
f-PP I t·H E
F.:TE::;T
COt'lPLETE
The printout should duplicate the above sample.
9825A/B Diagnostics 5-7
8
Display TestThe following printouts and displays should be seen. Each display should be
checked for missing or extra display dots
5 seconds, this display may flicker
3 seconds
3 seconds
20 seconds
20 seconds
.: .... :.::.: ... :: :
. . . ' "
20 seconds
. . .
:: :) :,";:'" :",:::::.,;,
20 seconds
U .:, .:::
r>!.-
r .. l ··.· ; r:. ::: 1 i ..:Ci!"'IF
1E
!E
Pressing:
8 -
will stop the display test, to allow more viewing time.8 -
again, will continue the display test.8 -
will abort the display test.5-8 9825AiB Diagnostics
o
Key Switch TestThe following display and printout should be seen.
Check the keys for proper operation by pressing each key as it is called for by the
display. Remember to press
@
before pressing0.
Leave shift key lockeduntil display reads
Press
8
(to unlock shift) before pressing0 .
The key sequence called for by the display is shown below.
Start
c-\-"m.~'''---, ("'~"I ,-U~~
8 8 8 B 8 8 8 B B a
GJQJGJGJGJC5d~<;;
r----ceAA",," ~ ~8 8 8 B 8 8 8 B 8 8
GJGJGJGJ~~<;;
QQwwmmmmmwwG
8@80Q
~8
0 0 0 8 8 8 8 0 0
c=J
8
(0
8 0
0.
~0000000080Q
0800Q
<;;800880000uCD8 (118088
<;;(
)
8
~~
8
8 0 0
8
EndAn error message will be printed if
• the wrong keys are pressed four times In succession.
9825A/B Diagnostics 5-9
If a key completely fails to operate, press any other key four times to continue the test.
After the last key (RESULT) is pressed the following printout should be seen.
~
1c0
Abortf: E \' E: Ci A F' D T
t
>::; Tc:
0 1'1 F' LET E
Pressing
W
C:'~1
will abort the Calculator Test and return the calculator tonormal operation
Test Modifications
A group of tests can be run in succession by typing-in more than one test number
before pressing
8.
The tests will run in numerical order regardless of theorder in which they are typed.
Examples'
runs tests 1,2,3, and 4
5-10 9825A/B Diagnostics
9825A1S
Extended Test Package
These tests work only on the 9825A/S. They do not work on the 98258/T.
Setup: 1. Turn off power to the 9825A/S.
2. Remove Plug-In Option ROMs. 3. Remove Interface cables. 4. Insert Test ROM and Test RAM.
5. Tab on Extended Test Cartridge should be in RECORD.
Mode One Tests: Automatic Test sequence;
ROM TEST RIWTEST REMOVE CART
INSERT CART
CART PASSED
PRINTER TEST
DISPLAY TEST
is printed and displayed. is printed and displayed.
is displayed if EIT cartridge is in. Remove car-tridge and press ( CONTINUE) .
is displayed if EIT cartridge is out. Insert EIT
cartridge and press ( CONTINUE) .
is printed. Cartridge inlout switch test passed. Cartridge test information is displayed and test results are printed.
is displayed. Print out is 10 groups of
/ / / / 1 / / 1 / / 1 / / / /
is printed. Display shows the following: 32 block cursors for six seconds. 32 vertical bars for 2 seconds. 32 horizontal bars for 2 seconds. 4 thirty-two character groups, 20 sec. ea. END OF MODE 1 TEST is displayed when finished.
Programmed Tests: Test programs should be entered after completion of Mode 1. They are entered by typing and storing program lines as shown in this example:
0: cancel (Clears previous test program.)
1: (TestSYntax) (SeebelowfortestsYntax) 2: c)'cle
3: test
(Optional, I"lill test continuous.) (Must be the last line.)
9825A/B Diagnostics 5-11
Test syntax for programmable tests:
Area to
I
Test T est Syntax, Parameters Error Displays/Printouts RWM r/w No. of times, Blk. designator ASE blk. add. - Address short
Number of times must be 1 if DBE blk. add. - Data bus short more than 1 block is tested. BE blk. add. - Byte operation Blk. designators: 4 (40K) R/\.lJ add. bit - ReadlVJiite (~~1ax. of 5)
5 (50K) Execute rwres to list 6 (60K) errors. rwres cannot
7 (70K) be programmed.
Sys. ROM rmt No. of times, chip designator ERROR chip - Chip designator with ROM Chip designators 0-11. error is printed. Display dsply No. of times [, "B" 1 Look for missing dots in LED display.
If ,"B" used, test runs once. Press ( CONTINUE) to hold current display. (No. of times) times 2 is the Press ( CONTINUE) again to continue. display time in seconds.
Printer print number of times Look for missing dots in printout. Tape tape file number, No. of times ERROR FAULT ERROR FAULT
or 1 U12-9 13 Hole Sense
Uses the ctape file number, No. of times 2 IRG Signal 14 Clear Flag
Extend. 3 MVG Line 15 Tape Drive
Test Ctg. The ctape test checks the 4 RW Protect 16 Flag Clear cartridge in/out switch on 5 Servo Fail 17 Tach Pulse the first pass. 6 CIN Switch 18 IRGBit
7 Ctg Protect 19 Status Line File 1 is a short test. 8 Status Line 20 Flag Stuck File 13 is a long detail test. 9 Hole Detect 21 Flag Clear
10 Direction 22 Tach Fast 11 Tach Pulse 23 IRG Detect 12 Gap Detect 24 GAP Status Test trr
ROM Allows any program to return Return control back to Test ROM.
5-12 9825A/B Diagnostics
Special Tests: Tests should be performed after completion of Mode 1. They are performed by typing and executing the statements shown below:
Test syntax for Special Tests.
These require the Test ROM, Test RAM. and Extended Test Cartridge.
Area to Test Syntax to Execute.
Test and Parameters Error Displays/Printouts Proc. & trkUdp6 ( EXECUTE) Error types are output to printer. Sys. ROM
Test Follow printed directions.
Key BID trkl;ldb3 ( EXECUTE) Printout if keyswitch fails, or wrong key kbt ( EXECUTE) pressed 4 times in succession. Press any Display shows key to press. other key 4 times to continue with test. Option trkUdb4 ( EXECUTE) First 16 errors printed. Failed address and
RWM rwt Option number ( EXECUTE) bit numbers are shown. Option trkl;ldbl0 ( EXECUTE)
ROM After test program loads, then execute this statement:
rmvfy [lD number[,ID number]] Printout lists addresses of words that do Instructions are given. not verify.
Without ID numbers. all ROMs are tested.
ROM ID# ROM ID# 9885 M/S 12 Ext. 110 17,18 Gen. 110 13 String 19 9862 Plot 14 9872 Plot 20 Matrix 15 Sys. Pgm. 21 Adv. Pgm. 16 Test ROM 22,23
Option update ID number [,ID number] This is used to store correct bit patterns
ROM from new, revised Option ROMs on the
Update Must include at least 1 ID. ETP tape. It is then used to test the Option Use ID numbers above. ROM.
Add-on trkUdp8 ( EXECUTE) Error printout lists name of ROM; PINs
ROM printed out should not be ordered.
Test Follow displayed instructions.
General trkUdpll ( EXECUTE) Errors are output to printer and are the Test A Follow displayed instructions. same for all other tests.
9825AiB Diagnostics 5-13
Control Keys Test
1. Turn on calculator, insert extended test cartridge.
2. Type! , .. , 1., press
m
3. Press @ill (~); the display should be ::. d f 0:::
4. Press
CD;
the test program should load.5. Press~; the display should be :." c· 'j' •
6. Press I!!!!!I; the cartridge should rewind.
7. Check the operations of the user-definable keys by performing the key strokes shown
below:
!!lliID0i:J008
!!lliID0i:J08
8. Press CI!D
0
(lower case)CD;
the printout should be:t' 1: ·:':'l·':"F: f 2: ·· .. 2
f 3: 3
9. Press
§
!!lliID
CD;
the display should be 0: "C 0 t·i T POL H r'1 'y' T E :::; T:~.:
2 j,"!;:::i (c.:[ " ; , and the shift-lock LED should be on.10. Press C!!!: until the cursor is over the letter H.
11. Press character Ii!iffiI
12. Press
0
~
0·
13. Press C!!r: until the cursor disappears, then press mID until the cursor is in the space to
the left of the word T E :::; T.
14. Press ~ S
8;
display should be f:H ....15. Press CD; display should be 0; "Ccr'HPCL t:::E'y':::; H~:::;T :~.: 2nd (c:i. ".
16. Press CD; the display should be 1: " DE LET E T HI::::; L I t·i E :~.: 1. ~::. t r- c· :i.
17. Use the C!!r: or mID key to move the cursor over the letter D.
18. Press
CD®00®0
fi!ffiI; display should be 11-.19. Press CD; the display should be 2; "DE:LETF TH I 0::; ! :r r'~E' '.' :1.:::.
20. Press line @!ill!) ; the line should delete.
5-14 9825A/B Diagnostics
22. Press the display key G::J five times. The first four presses should cause the display to
shift left, revealing, ~', and ~ ~. at the right
hand side. The fifth press should not change the display.
23. Press the display key G::J five times. The first four presses should shift the display back
through F" .. , : J : , and to its original position. The fifth press should not
change the display.
24. Press~; display should be
25. Press~; display should be <F·:·:····
26. Press either
8
key; the shift-lock LED should go out.27. Press
8;
follow the instructions given on the printer and display. There will be fourgroups of instructions listed by the printer.
28. After doing all the steps in all four groups, type
29. Press
CD;
printer will start printing rows of brackets.30. Press~; printer should stop immediately.
31. Repeat steps 29 and 30 to verify the program will start again after a reset.
32. Type ,..·.c,(;t ::::::=::, press
CD;
display should be ,::: ,",,..i ,",·F -;- ,:::." tMainframe Statements Test
This is a short test of some processor actions which are not checked by the Control Keys Test and a bit-for-bit check of the mainfram ROMs. To run the test, follow this procedure:
1. Type' ... i<
2. Press
CD
3. After the calculator makes the ROM checks, follow the instructions given by the printer.
4. Many "beeps" should be audible when the display shows c!; e c k
Add-On ROM Test
This test checks for the proper functioning of the Extended 110 ROM, General 110 ROM, String
ROM, and Advanced Programming ROM. Instructions for running the test will appear on the
display and printer. The tests can be completed in less than 30 seconds, and the printer will
log any errors. To run the test, follow this procedure:
1. With power off, Insert the ROMs to be checked.
2. Turn power on and insert test cartridge.
9825A/B Adjustments 6-1
Chapter
6
9825A1B
Adjustments
9825A1B
Sequence of Adjustments
Adjustments for the 9825A/B desktop computer should be performed in the following order: 1. Power Supply Voltages;
+
12 Supply first, then+
7 Supply.2. Processor Clock Frequency. 3. Printer print head alignment. 4. Printer paper advance. 5. Printer Intensity.
9825A1B
Power SupplyAdjustments
The following tools are needed to adjust the power supplies:
Digital Multimeter (DMM) 1/8 inch flat tip screwdriver
1. Turn off the 9825A/B and remove the following: a. Interface Cards.
b. Plug-In Option ROMs.
2. Turn on the 9825A/B and let it warm up for 10 minutes. No programs should be running, only the lazy "T' should be displayed.
3. Refer to the diagram below, locate the
+
12 and+
7 volt test points and adjustments. 4. Ground DMM on the power supply heat sink or power module sheet metal.5. Usethe DMM and adjust the
+
12 then the+
7 volt supplies as follows:+
12 Volt, adjust Rll, ...+
11.95 to+
12.05 VDC+
7 Volt, adjust R16, ...+
6.9 to+
7.1 VDCNote
6-2 9825A B Adjustments
9825A/B
System Clock Frequency Adjustment
CAUTION
THE CLOCK IS SET AT THE FACTORY; IT IS NOT NORMALLY ADJUSTED IN THE FIELD. IT IS NOT TO BE ADJUSTED INDIS-CRIMINATELY. IF THE CLOCK FREQUENCY EXCEEDS ITS TOLERANCE. ERRATIC OPERA nON PRODUCING RANDOM ERRORS COULD RESULT.
The following tools are needed for adjusting the system clock:
Alignment tool. Frequency counter.
l. Measure the clock frequency at the "01" test point using the counter.
2. Adjust the clock frequency to 6.0 MHZ plus or minus 0.1 MHZ.
Note
If a counter is not available, key in and run this program:
0: dsp I; wait 10780; beep; JMP (1+10->1)=60
1: beep; IAlait 100; beep; dsp "DONE'" end
This program will beep every 10 seconds if clock frequency is 6.0 MHZ. The double beep
should occur at 60 seconds, plus or minus 1 second.
9825A1B
Printer Adjustments
The folloWing tools are needed for printer adjustments:
1 Printhead Alignment Fixture 2 Printhead Alignment Tool 1 1116 inch hex wrench 1 Adjustment Gage. ··GO·· 1 Adjustment Gage, "NO-GO" 1 Small bottle of enamel paint 1 1/8 inch flat tip screwdriver
9825A/B Print Head Alignment:
98240-67901 8710-0693
8750-0350 8750-0351
Install printer on alignment fixture. load paper in printer.
2. Loosen set screws with 116" hex wrench.
3. Turn on 9825 and fixture. insert alignment tools in holes.
4. Adjust print head until print across paper is darkest and even.
5. Turn off fixture and tighten set screws. don't overtighten.
982SAlB Adjustments 6-3
9825A/B Paper Advance Adjustment:
1. Install printer on alignment fixture, load about 6 feet of paper.
2. Turn on 9825 and fixture and verify the printout looks like this:
IIIIIII111111111
3. If not, adjust the paper advance until the above pattern is printed.
4. Lift printer off fixture and insert the white "GO" and yellow "NO-GO" gages between
the lower foam pad and solenoid, holding them in place while printer is running, until the following printout occurs;
With "GO" gage inserted, normal printout. With "NO-GO" gage inserted, compressed printout.
5. Turn fixture and 9825 off and seal paper advance with paint.
9825AiBPrinter IntenSity Adjustment:
1. Reassemble the 9825. Turn it on, store, and run this test program
0: prt UZZZZZZZZZZZZZZZZII ;JfrlP 0
2. Observe the print intensity and adjust the potentiometer by the speaker on the KDP (A33) board until the print does not get darker as the adjustment is increased.
3. Back the adjustment off about 1/8 turn.
9825A/B Supported Peripherals 7-1
Chapter
7
9825A1B
Supported Peripherals
Ilntedace C.,d
Peripherals II Configurations
9825A/S 98258/T
Plug-In Other
I
Plug-In OtherROM ROM
Printers
2631A, Opt. 825 98034A/B Gen.I!O
2631B, Opt. 825 98034A/B Gen. 110
9866A/B Opt. 025 98036A, Opt. 066 Gen.l!O
9871A, Opt. 025 98032A, Opt. 071 Gen.IiO
9871A. Opt 001 98034A1B
9876A, Opt. 025 98034A/B
Plotters
7225A w117600A,
Opt. 025 98032A, Opt. 62 9862A Int Switch 9872
722f>A wil7601A.
Opt. 025 98034A/B
7245B, Opt. 025 98034A/B
9862A, Opt 025 98032A, Opt 064 9862A Int. Switch 9862
9872B/S, Opt 025 98034A/B
Mass Storage
9875A, Opt 025 98034A/B
9877A, Opt. 025 N/A
9885M, Opt. 025 98032A, Opt. 025
9885S 09885-61607
9895A, Opt. 025 98034A/B
Miscellaneous
2748B, Opt. 002 98032A, Opt. 083
9863A
9869A, Opt 025 98032A, Opt 069
9874A Digitizer,
Opt 025 98034A/B
9878A 1/0 Expander 9878A
9883A, Opt. 025 98032A, Opt. 083
9884A, Opt. 025 98032A, Opt. 084
Real Time Clock 98035A
Data Terminals 98036A
BCD Input 98033A
Serial 110 Interface 98036A
Parallel 110 98032A
9825AiB Replaceable Parts 8-1
Chapter
8
9825A1B
Replaceable Parts
Field Repair Philosophy
The 9825 mainframe assemblies are divided into three repair catagories:
C = Component Repair X= Exchange
Assembly Description XCR
Case Parts Power A51 Processor All A12 Memory A05 A12 A22 A23 A24 A25 98210A 98211A 98212A 98213A 98214A 98215A 98216A 98217A 98224A 98228A Internal Peripherals A33 A41 A61 A71 Printer Transport Keyboard Keyboard
Covers, wire harnesses, ribbon cable assemblies not part of PC boards, air filter, fasteners, fan, power switch, and other mechanical items
Power Module
Power Supply
9825A/S Processor Assembly 9825B/T Processor Assembly
9825A/SSystem ROM Assembly ROM Interface Assembly 9825A/S 8K Byte RWM Assembly 9825A/S 16K Byte RWM Assembly 9825B/T 24/32K Byte RWM/ROM Assembly 9825T 32K Byte RWM Assembly
9825A Option ROM Strings-Adv. Prog. 9825A/B Option ROM Matrix
9825A Opt. ROM 9862 Plotter-Gen. 110 9825A Opt. ROM Gen. 1/0Ext. I/O 9825A Opt. ROM 9862-Gen. 1I0-Ext.1I0 9825A Opt. ROM 9872 Plotter-Gen. 110 9825A Opt. ROM 9872-Gen. 1I0-Ext.1I0
9825A1B Opt. ROM 9885 Flex Disc Dr. 9825A/B Opt. ROM Systems Programming 9825T Opt. ROM 9885/9895 Flex Disc
KDP Assembly
Single Line Display Assembly Tape Control Logic Assembly 110 Interface Assembly Thermal Printer Assembly Tape Transport Assembly
Keyswitch Assembly (New style) Keyswitch Assembly (Old style)
R R X X X X R X X X X R R R R R R R R R R X X X R C X C R R=Replace Comments
Should be replaced as an assembly. Component repair is not recom-mended.
Without large metal heat sink.
With hinges/spacers. With hinges/spacers.
Without hinges/spacers Without hinges/spacers Without hinges/spacers Without hinges/spacers
KDP Chips and speaker may be component level repaired
With hinges/spacers. Fuse may be replaced.
Without sheet metal. EaT/BOT Lamp may be replaced with kit. Keyswitches and Shift Lock LED
Replace with new style
8-2 9825AiB Replaceable Parts
9825B/T
Service Kits
Four Service Kits are used in support of the 9825B/T:
"A" FSI, 94-99%, 09825-67199 "B" FSI, 81-93%, 09825-67198
"e"
FSI, 0 - 80%, 09825-67197 "D" PSp, Tools, 09825-67100The following is a sequential list of parts and tools in the 9825B/T Service Kits. The right hand column shows the kit the part/tool is in.
Qty. c/D Part Number Description Kit
1 7 1813-0051 Print Head C
1 5 2110-0545 Fuse Holder Cap C
1 2 3100-3364 Power Switch C
2 4 3101-0469 Keyswitch (Spacebar) C
5 4 3104-2390 Keyswitch (All other keys) C
1 4 3160-0209 Fan A
1 9 4208-0110 Air filter C
1 8 5040-7433 Keycap Removal Tool D
1 3 5061-0751 Platen Assembly C
1 4 5061-0752 Paper Sensor Assy. C
1 4 8120-2725 Cable Assy. (A33 to A41) C
1 7 8120-3130 Cable Assy., Monitor Bus (9825T only) C
1 2 8500-1251 Tape Head Cleaner (4 oz.) D
1 9 8520-0023 Cotton Swab (pkg. of 10) D
1 6 8710-0580 Connector Extractor D
1 8 8710-0693 Alignment Tool (print head) D
1 8750-0350 Paper Advance Gage, YELLOW, "GO" D 1 8750-0351 Paper Advance Gage, WHITE, "NO-GO" D 1 5 9100-4096 Transformer-Stator (Printer solenoid) A 1 1 9222-0662 Conductive Bag, 8" x 10" D 1 5 9222-0682 Conductive Bag, 10" x 14" D
1 9 09815-20602 Paper Spindle (pC tool) D
1 4 09815-69902 (RSTRD-67902) Tape Xport Assy. (without sheet metal) C
1 6 09825-61601 Cable Assy., 110 Bus B
1 7 09825-61602 Cable Assy., Memory Bus A
1 8 09825-61603 Cable Assy., Power (Module to A51) A 1 9 09825-61604 Cable Assy .. Tape Logic to Analog C 1 7 09825-61610 Cable Assy., A12 to A11/A17 ground wire C 1 8 09825-61611 Cable Assy., Thermistor (Printer) C
1 8 09825-66512 ROM Interface Assembly A
1 6 98240-67901 Printer Alignment Fixture D
1 9 09825-69517 (RSTRD-66517) 9825B Processor Assembly C 1 8 09825-69524 (RSTRD-66524) 9825B 24/32K Byte RWM/ROM Assembly B
Qty. C/D 9 3 3 2 3 2 6 6 Part Number 09825-69533 09825-69541 09825-69551 09825-69561 09825-90036 09825-90037 09825-90200 09825-91030 98240-67901
9825A/B Replaceable Parts 8-3
Description
(RSTRD-66533) KDP Assembly (RSTRD-66541) Single Line Display
I n r - r r t r ' \ rrr-r-<f \ n r L I ___ ~J..L L __ J. _" _1 \
I
\n.::> 1 nU-UUJJ.l} (RSTRD-66561) Tape Cant. Logic Assembly rUW~1 '::>Upply \Wllli ll~al ~llIK}I
9825A1B System Exerciser TapeI
9825A/B Systems Test BookletI
9825AiB Operating & Programming Manual
9825A/B Service Manual Printer Alignment Fixture
Kit C A B C D D D D D
For support and repair of the 9825A/S computers, the following assemblies should be obtained and carried in kits as indicated:
Qty. C/D Part Number Description
09825-69511 09825-69905 09825-69522 09825-69523 98219-67900
(RSTRD-66511) 9825A/S Processor
(RSTRD-67905) 9825A/S System ROM
(RSTRD-69522) 9825A 8K Byte RWM Assembly (RSTRD-66523) 9825A 16K Byte RWM Assembly
9825A/S Extended Test Package
8-4 9825A1B Replaceable Parts
9825A1B
Replacement Parts
Parts lists show new part numbers. Total Quantity (TQ)column shows number of parts per 9825. A "V" in the TQ column indicates quantity varies with options installed or application.
Assembly Reference
CD HP TQ Description
level Designator Part No.
1 A05 5 09825-67905 1 9825A System ROM Drawer 2 9 09825-66514 1 9825A System ROM Assembly 2 4 5040-8156 1 Plastic Case. Top Piece 2 5 5040-8157 1 Plastic Case. Bottom Piece 2 0 0624-0311 6 #4-20 82 Flat Head Tapping Screw
2 0 7120-5875 1 System ROM Drawer Label
1 Al1 7 09825-66511 1 9825A Processor Assembly .2 6 09825-66510 1 9825A Processor Assembly (without
hybrid microprocessor) 2 7 09825-67907 1 9825A/B Hybrid Microprocessor 1 A12 8 09825-66512 1 ROM Interface Assembly 1 2 09835-04704 1 ROM Interface Assy Insulator 1 7 09825-61610 1 Ground Cable. ROM Interface Assy
Plug-In Option ROMs 1 6 98210-67902 V 9821OA. Strings-Adv. Programming
1 7 98211-67902 V 98211A. Matrix
1 8 98212-67902 V 98212A. 9862 Plotter-General 1/0
1 9 98213-67902 V 98213A. GeneralliO-Extended 1/0
1 0 98214-67902 V 98214A. 9862 Plot-Gen I/O-Ext 1/0 1 1 98215-67902 V 98215A. 9872 Plotter-General 110
1 2 98216-67902 V 98216A. 9872 Plot-Gen 1I0-Ext I/O 1 3 98217-67902 V 98217 A, 9885 Flex Disk Drive
1 2 98224-67902 V 98224A, Systems Programming 1 6 98228-67902 V 98228A. 9885/9895 Flex Disk Drive
1 A14 6 09825-67914 1 Power Module,Transformer Assembly 1 A17 3 09825-66517 1 9825B Processor Assembly .2 2 09825-66516 1 9825B Processor Assembly (without
hybrid microprocessor) 1 A22 0 09825-66522 \ V 9825A 8K-Byte RWM Assembly 2 4 5020-8330 V 9825A 8K-16K Assy. Shorting Clip 1 7 5040-7721 V Full Hinge for A22.23.24.25,61 1 8 0380-0630 V 0.75 inch Nylon Snap-In Spacer 2 4 2360-0115 V #6-32 Pan Head Mach. Screw 0.312""
1 6 09825-67906 V Dummy RWM Assembly
2 5 5040-7787 V Half Hinge
1 A23 1 09825-66523 --- V 9825A 16K-Byte RWM Assembly 1 A24 2 09825-66524 ' 1 9825B 24/32K-Byte RWM/ROM Assy 1 A25 3 09825-66525 " 1 9825T 32K-B,1e RWM Assembly 1 7 09825-61602 1 Memory Cable Assembly (IDA Bus) 1 6 09825-61601 1 I-a Cable Assembly (laD Bus) 1 7 8120-3130 1 9825T Monitor Bus Cable Assy 1 A33 3 09825-66533 1 KDP Assembly Iwith KDP Chip)
2 3 1818·2508 I KDP Chip
2 1818-2513 V KDP Chip. Katakana
:. J Jlu\J-VL.-tO i ,)tJtdr.t!
I I 09835-04703 I KDP Assembly Insulator 1 4 2200-0521 9 #4-40 Pan Head Mach. Screw 250" 1 A41 3 09825-66541 • I Single line Display Assembly 2 8 1990-0553 8 Four Character LED Display IC
1 8 09825-21102 1 SLD Heat Sink
9825A/B Replaceable Parts 8-5
Assembly Reference CD HP TQ Description
level Designator Part No.
A51 09825-66551 Power Supply Assembly
()QQIJr;. ()11rt0 Pm.!""£r Supply Hf:~t S:rok
6040-0265
I
Silicone Heat Sink Compound 2360-0115 V #6-32 Pan Head Mach. Sere'.'.' .312"2360-0316 3
I
#6-32 Flat Hd. Mach. Screw .250" 09825-67914 Transformer Enclosure Assy. (Power) 09825-61603I
Power Distribution Cable Assembly.:; 1251-0334 PC Edge Connector Assembly 2 x 18 3 1251-2262 PC Edge Connector Assembly 2 x 10 3 1251-2500 PC Edge Connector Assembly 2 x 6
0360-1610 3 Solder Lug
2110-0003 V Fuse. 3 Amps NB (100-120 Volt) .3 2110-0043 V Fuse. 1.5 Amps NB (220-240 Volt)
3 2110-0543 Fuse Holder
2110-0545 Fuse Holder Cap 3101-2298 Slide Switch. Voltage Selection
50iM-m9 EMI Filter Housing 09825-67911 Power Switch. Off-On 09825-67200 Fan, with connector
A61 09825-66561 Tape Transport Logic Assembly 09825-61604 Tape Transport Control Cable
2110-0002 Fuse, 2.0 amps. NB 09815-67902 Tape Transport Drive.PC Assembly 09825-01214 Tape Transport Mounting Bracket
Assembly Fig.8-x CD HP TQ Description
level Reference Part No.
Case Parts
1 3 5040-8155 4 Plug-In Option ROM Door 2 5 1460-1626 4 Option ROM Door Spring 3 6 1600-0514 4 Option ROM Door Clip 4 2 09825-68025 1 9825B Keyswitch Assembly ASCII 4 09825-68026 1 9825B Keyswitch Assembly Katakana
3101-2390 Keyswitch, except Space Bar Switch 3101-0469 Spacebar Keyswitch
5 6 09825-64415 1 9825A Display Insert (Includes Transport door) 5 7 09825-64416 1 9825B Display Insert (Includes Transport door) 6 1 5040-8187 1 Eject Button
7 8 5040-7813 1 Display Window 8 5 09825-67913 1 Shell Assembly 9 9 09815-20602 1 Printer Paper Spindle 10 9 2360-0368 2 #6-32 Pan Head Mach. Screw .375" 11 2 5041-1403 3 1;0 Slot Door
12 4 5040-8362 1 Fan Bracket 13 9 4208-0110 1 Foam Dust Filter 14 9 7120-6450 1 Filter Housing Label 15 4 5040-8289 1 EMI Filter Housing 16 2 5040-8287 1 Power Switch Bezel 17 3 5040-7727 1 Printer Tear Bar 18 4040-16')7 V 'J825K[ ROM Drawer Plug 19 3 09825-64412 V 9825A Bezel 19 7 09825-64432 V 9825B Bezel 20 9 09825-64434, 1 Base
21 3 0403-0106 5 Rubber Foot
8-6 9825AIB Replaceable Parts
9825NB
Upgrade and Miscellaneous Kits
Product Reference CD HP TQI Description
Number Designator Part No. Kit
98251F 9825AiS to 9825 T Upgrade Kit
A24 09825-66524 24'32K-Byte RWMiROM Assembly A25 09825-66525 30K-Byte RWM Assembly
4040-1697 Plug for Language ROM Slot 8120-3130 Monitor Bus Cable Assembly 5040-7787 Half Hinge. for A25 5040-7721 Full Hinge. for A24 0380-0630 Nylon PC Board Spacer 2360-0332 Screw
7121-0464 Label. 62K-Bytes 7121-0463 Label. 9862A Plotter 7121-0256 Label. Display Insert 7121-0257 Label. Processor Board 7120-8568 Label. Caution 8755-0053 File, Flat
98251-90000 Instructions. Upgrade Kit 09825-90036 Cartlidge. System Test 09825-90037 Manual. System Test 09825-90035 Cartlidge. 9885M Bootstrap 09825-87901 9825B Manual Kit
98252F 9825B to 9825T Upgrade Kit
A25 09825-66525 30K-Byte RWM Assembly 8120-3130 Monitor Bus Cable Assembly 5040-7787 Half-Hinge. for A25 0380-0630 Nylon PC Board Spacer 2360-0332 Screw
7121-0464 Label. 62K-Bytes 7121-0463 Label, 9862A Plotter 7120-8568 Label. Caution 98252-90000 Instructions. Upgrade Kit
09825-67960 Keyboard Upgrade (ASCII)
0624-0314 Self -Tapping Screw 0624-0324 15 Screw. Tapping. #4-20 09825-64433 Bezel. Keyboard SIS 0982568025 Keyswitch Assembly-9825 Std 09825-90034 Installation Note
1600-0859 Plug-In ROM Guide Spring 7120-8568 Label. Caution Notice
09825-67962 Keyboard Upgrade (Katakana)
0624-0314 Self-Tapping Screw 0624-0324 15 Screw. Tapping. #4-20 09825-64433 Bezel. Keyboard SIS 09825-68026 Keys\l.;tch Assembll,'-9825 Katakana 09825-90034 Installation Note
1600-0859 Plug-In ROM GUIde Spring
98221F 9fl25A 8K-Byte Memory Upgrade
Obsolete A22 09825-66522 8K-Byte RWM Assemblv
.~040-7787 Half Hinge 5040-7721 Full Hinge
u,j1\U-Ub,jU boaro ,::, u pport
2360·0332 Scre\. ... ·
7120-4927 Label. 9825 Opt 001 7120-5162 Label. 9825 Opt 002
98222F 9825A 16K-Byte Memory Upgrade
O~..,()h?t(? l\2~ M82'i-li6S2~ lliK-St1e RWM Assemb!v 5040-7787 Half Hinge 5040-7721 Full Hinge 0380-0630 Board Support 2360-0332 Screw
7120-4927 Label. 9825 Opt 001 7120-5162 Label. 9825 Opt 002
Address
77777 76550
70000
60000 56000 54000 52000 50000 46000 44000 42000 40000 36000 34000 32000 30000
20000
04000 02000 00000
9825A!B Diagrams 9-1
Chapter
9
9825A1B
Diagrams
9825A Memory Map
9825A/Std 9825A/Opt. 1 9825A/Opt. 2 9825A/Opt. 3
Stolen RWM Base Page RWM
I
I
I
I
A22 RWM A22I RWM
I A23 RWM
A23
I
RWMI
I
I
A23
I
RWM
A23 RWM
Strings-Adv. Prgm. Option ROM
Extended 110 Option ROM
Extended 110 Option ROM
Advanced Programming Option ROM Matrix Option ROM 9862 or 9872 Plotter Option ROM
General 110 Option ROM
9885 Flex. Disc Drive Option ROM
System ROM System ROM System ROM System ROM
Compiler ROM Tables Processor Registers/Basepage ROM
Note: Option ROMs in addresses 40000-46000 cannot be used in the 9825A Opt. 003.
9-2 9825A/B Diagrams
98258 Memory Map
Address 77777 76550 70000 60000 560001 54000 52000 500002 46000 44000 42000 40000 360003 340004 320005 300006 20000 10000 04000 02000 00000 Notes:
9825B/24K 9825B/32K
Stolen Base Page RWM
A24RWM
Strings ROM Ext. 110 ROM Ext. 1I0ROM Adv. Pgm. ROM
A24RWM
Mtrx. Or Sys. Pgm. Opt. ROM 9872 or 9862 Plot. ROM
Gen. 110 ROM 9885 Op. ROM
I
System ROM
Compiler ROM Tables Proc. Reg. IBasepage ROM
9825T Memory Map
Sys.lOpt. ROM7
RWM
Stolen Base Page RWM
9895 Op. ROM
Sys. Pgm. ROM Strings ROM Ext. liO ROM Ext. 1/0 ROM Adv. Pgm. ROM
Matrix ROM 9862172 Gen. 1/0 ROM 9885 Op. ROM
I
System ROMA24
A25
Compiler ROM Tables Proc. Reg'/Basepage ROM
19895 Opt. ROM is in the 98228A Plug-In Option ROM. It functions only with the 9825T configuration with a Rev. B or higher A12 assembly 2 Systems Prog. ROM is on the A24 board in a 9825T configuration. Enabled by the A25 board; addresses differ from the 98224A Option ROM 3 Matrix ROM is in the 98211A Plug-In Option ROM for both Band 1's. The 98224A Plug-In Option ROM must be used in a 9825B for Sys
Prog. Either the 98211A or 98224A Plug-In may be used In a 98258. but not at the same time. they use the same address space 4 A sWitch on the A24 board selects 9872 or 9862 plotter ROM
5 General I a ROM is on the A24 board
9825AiB References 10-1
Chapter
10
9825A1B
References
9825 Documentation References
Product
Number Name
9825A/B Operating & Programming Ref. (replaces 09825-90000)
110 Control Reference QUick Reference
The above 3 are available in a 9825B Manual Kit System Test Booklet
Error Codes Booklet Service Manual CE Handbook
Self-Study Maintenance Training Course (HP use only) 9825A Extended Test Manual (for use with 9825AIS only) 98210A' Strings-Adv. Programming ROM (replaces 09825-90020/21)
98211A Matrix ROM
98212A' SlH62 Plotter-General 110 ROM (replaces 09825-90023/24) 98213A ' GeneralllO-Extended 110 ROM (replaces 09825-90024/25) 98214A ' Extended 110 ROM (replaces 09825-90025)
98215A' 9872 Plotter-General I/O ROM (replaces 09825-90022/26) 98216A' 9872 Plotter-Gen.lExt. 110 ROM (replaces 09825-90026) 98217 A 9885 Flex. Disc Drive ROM (replaces 09885-90000) 98224N Systems Programming ROM (replaces 09825-90027) 98228A 9885/9895 Flex. Disc Drive ROM
98251F 9825A to 9825T Memory Upgrade Installation Note 98252F 9825B to 9825T Memory Upgrade Installation Note
98034B Ground Connection Upgrade Installation Note I Documentation Binder
1 These OptIOn ROMs are built into the 9825B·T calculators. They are plug-in Option ROMs for the 9825A 5 2 This Option ROM is built into the 9825T but must be a plug-in for the 9825A!S and B
HP
Part Number
09825-90200 09825-90210 09825-90012 09825-87901 09825-90037 09825-90015 09825-91030 09825-90039 5955-6117 09825-90032 09825-90200 09825-90022 09825-90210 09825-90200 09825-90200 09825-90210 09825-90210 09825-90220 09825-90210 09825-90220 98251-90000 98252-90000 09825-90098 9882-0885
10-2 9825AB References
9825A1B
Customer Training Courses
Name of Course
9825A/B Service Training 9825AiB Operating & Programming
9825A/B 110 Programming
Where Conducted at Customer Site Various Field Offices Various Field Offices
Error Codes
HP Part Number 09825-30100
98524A 98525A
An error in a program sets the program line counter to line O. Press the continue key to continue the program from line O. Execute the continue command with a line number to continue at any desired line (such as: cont 50).
00 01 02' 03' 04 05 06' 07' 08
09
10' 11 12' 13 14 15 16 17 18 19 System error.Unexpected peripheral interrupt.
Unterminated text.
Mnemonic is unknown.
Mnemonic not found because disc may be down. (9825 only)
System is secured.
Operation not allowed: line cannot be stored or executed with line number.
Syntax error in number.
Syntax error in input line.
Internal representation of the line is too long (gives cursor sometimes).
gto, gsb, or end statement not allowed in present context.
Attempt to execute a next statement either from keyboard while for/next loop using same variable is executed in program or from program while for/next loop using same variable is executed from keyboard. Attempt to call function or subroutine from keyboard.
gto or gsb statement requires an integer.
Integer out of range or integer required; must be from - 32768 thru
+
32767.Line cannot be stored: can only be executed.
ent statement not allowed in present context.
Program structure destroyed.
Printer out of paper or printer failure.
String Variables ROM not present for the string comparison. Argument in re-lational comparison not allowed.
Parameter out of range.
Incorrect parameter.
20 21 22 23 24 25 26 27 28 29 30 31 32 33 34 35
36
37 38 39 40 41 42 43 44 45 46 479825A/B References 10-3
Missing ROM or binary program. The second number indicates the missing ROM. In the program mode, the line number is given instead of the ROM number. Displayed number and missing item:
1 Rinnry Progrnm
4 Systems Programming ROM
5 9826 HPL Extension
6 Strings ROM
8 Extended lIO ROM
9 Advanced Programming ROM 10 Matrix ROM
11 Plotter ROM 12 GeneralllO ROM 17 Disc ROM
Line is too long to store.
Improper dimension specification.
Simple variable already allocated.
Array already dimensioned.
Dimensions of array disagree with number of subscripts.
Subscript of array element out of bounds. P-number reference is negative.
Undefined array.
ret statement has no matching gsb statement.
Cannot execute line because a ROM or binary program is missing.
Special function key not defined.
Non-existent program line.
Improper data type.
Non-numeric value in for statement or in fts or fti function.
Data types do not match in an assignment statement.
Display overflow due to pressing a special function key.
Improper flag reference (no such flag).
Attempt to delete destination of a gto or gsb statement.
Display buffer overflow caused by dsp statement.
Insufficient memory for subroutine return pointer. Memory overflow during function or subroutine call.
Insufficient memory for variable allocation or binary program.
Insufficient memory for operation.
Memory overflow while using for statement or while allocating local p-numbers.
No cartridge in tape transport.
Tape cartridge is write protected. (Slide record tab to other position for re-cording. )
Unexpected Beginning-Of-Tape (BOT) or End-Of-Tape (EaT) marker encoun-tered.
Tape transport failure.
Verify has failed.
Attempted execution of idf statement without parameters or mrk statement when tape position is unknown.
Read error in file body.
10-4 9825AIB References
48 49 50
51
or52
53
54
55
5657
58
59 60 61 62 63 64 65End-Of-Tape (EaT) encountered before specified number of files were marked.
File too small.
Idf statement for a program file must be last statement in the line. get or chain statement should be the last statement in a line.
Memory configuration error for attempted ldm statement. For example, a ROM present when memory was recorded is now not present (see error 20), or attempting to load a memory file recorded on a 9825A into a 9825B.
Memory files are not compatible between the 9825A and 9825B. Only the program portion can be recovered by loading the memory file into the original machine and doing a ref. This program file can then be loaded into any 9825 with the ldf statement.
Negative parameter in cartridge statement.
Binary program to be loaded is larger than present binary program and variables have been allocated.
Illegal or missing parameter in a cartridge statement. Data list is contiguous in memory for a cartridge statement. Improper file type.
Invalid parameter in ref statement;
"SE"
or "DB" expected.Attempt to record a program or special function keys which do not exist. Attempt to load an empty file or the null file (type = 0).
The line referenced in an Idf or Idp statement does not exist. If the line
contain-ing the Idf or Idp statement has been overlaid by the load operation, the line number in the display may be incorrect.
Specified memory space is smaller than cartridge file size.
Cartridge load operation would overlay subroutine return address in program; load not executed.
Disc load operation would overlay gsb return address: load not executed.
Attempt to execute Idk, Idf (program file), or Idp during live keyboard state-ment.
get, chain or getk not allowed from live keyboard mode or during an ent statement.
File not found.
File specified in the previous fdf statement does not exist.
Default values associated with errors 66 thru 77 when flag 14 is set are explained in the
prngrnmming rhnpter of the npprClting nnd programming manual
66 67 68 69 70 71
Division by zero.
A mod B, with B equal to zero. Square root of negative number.
Tan (n
*
1T/2 radians).Tan (n
*
90 degrees).Tan (n
*
100 grads).where n is an odd integer. In or log of a negative number. In or log of zero.