USING
is more than just a book: it’s the fastest, easiest way to
gain the technology skills you’re looking for!
Don’t just read about it: see it, hear it, with step-by-step video tutorials and
valuable audio sidebars delivered through theFree Web Editionthat comes
with everyUSINGbook. For the price of the book you get online access
anywhere with a web connection—no books to carry, updated content, and the benefi t of video and audio learning.
How Do You Get Access to the Free Web Edition?
Simply visitquepublishing.com/using for information about how to
register your USING book or eBook.
About the USING Web Edition
The Web Edition of every USING book is powered by Safari
allowing you to access the video tutorials and valuable audio sidebars. Plus, you can search the contents of the book, highlight text and attach a note to that text, print your notes and highlights in a custom summary, and cut and paste
directly from Safari Books Online.
Brien Posey
Senior Acquisitions Editor Loretta Yates Development Editor Mark Cierzniak Managing Editor Sandra Schroeder Senior Project Editor Tonya Simpson Copy Editor Water Crest Publishing Indexer Brad Herriman Proofreader Language Logistics Technical Editor JoAnn Paules Publishing Coordinator Cindy Teeters Cover Designer Anna Stingley Designer Anne Jones Compositor Mark Shirar Copyright © 2011 by Pearson Education, Inc.
All rights reserved. No part of this book shall be reproduced, stored in a retrieval system, or transmitted by any means, electronic, mechanical, photocopying, recording, or otherwise, without written permission from the publisher. No patent liability is assumed with respect to the use of the information contained herein. Although every precaution has been taken in the preparation of this book, the publisher and author assume no responsibility for errors or omissions. Nor is any liability assumed for damages resulting from the use of the information contained herein.
ISBN-13: 978-0-7897-4296-9 ISBN-10: 0-7897-4296-4
The Library of Congress Cataloging-in-Publication Data is on file.
Printed in the United States of America First Printing: August 2010
Trademarks
All terms mentioned in this book that are known to be trademarks or service marks have been appropriately capitalized. Que Publishing cannot attest to the accuracy of this informa-tion. Use of a term in this book should not be regarded as affecting the validity of any trade-mark or service trade-mark.
Warning and Disclaimer
Every effort has been made to make this book as complete and as accurate as possible, but no warranty or fitness is implied. The information provided is on an “as is” basis. The author and the publisher shall have neither liability nor responsibility to any person or entity with respect to any loss or damages arising from the information contained in this book or from the use of the programs accompanying it.
Bulk Sales
Que Publishing offers excellent discounts on this book when ordered in quantity for bulk pur-chases or special sales. For more information, please contact
U.S. Corporate and Government Sales 1-800-382-3419
[email protected]
For sales outside of the U.S., please contact International Sales
Contents at a Glance
Introduction1 An Introduction to Publisher 2010
2 Getting Started with Publisher 2010
3 Working with Visual Elements
4 Designs and Layouts
5 Working with Longer Documents
6 Tables
7 Finalizing Your Publisher Document
8 Printing Your Documents
9 Publishing Online
10 Bulk Mailing Techniques
Media Table of Contents
To register this product and gain access to the Free Web Edition and the audio and video files, go to quepublishing.com/using.
Chapter 1: An Introduction to Publisher 2010
Show Me Media 1.1—Installing Microsoft Office 2010 . . . .14
Show Me Media 1.2—Uninstalling Microsoft Office 2010 . . . .16
Tell Me More Media 1.3—How Different Is Publisher 2010 from Publisher 2007? . . . .20
Chapter 2: Getting Started with Publisher 2010 Show Me Media 2.1—Creating a New Document . . . .22
Show Me Media 2.2—Grid Guides . . . .27
Show Me Media 2.3—Using Ruler Guides . . . .31
Show Me Media 2.4—Creating a Document from a Template . . . .44
Show Me Media 2.5—Saving Your Document . . . .49
Tell Me More Media 2.6—Do You Really Need Guides and Rulers? . . . .50
Chapter 3: Working with Visual Elements Show Me Media 3.1—Creating a Text Box . . . .54
Show Me Media 3.2—Working with Fonts . . . .59
Show Me Media 3.3—Picture Styles and Shapes . . . .62
Show Me Media 3.4—Fill Effects . . . .70
Show Me Media 3.5—Creating 3-D Shapes . . . .75
Tell Me More Media 3.6—Avoiding Visual Element Overkill . . . .83
Chapter 4: Designs and Layouts Show Me Media 4.1—Creating a Calendar . . . .88
Show Me Media 4.2—Creating a Postcard . . . .91
Show Me Media 4.3—Creating a Custom Color Scheme . . . .95
Show Me Media 4.4—Using WordArt . . . .100
Tell Me More Media 4.5—More Design Ideas . . . .107
Chapter 5: Working with Longer Documents Show Me Media 5.1—Linking Text Boxes . . . .112
Show Me Media 5.2—Creating Master Pages . . . .116
Show Me Media 5.3—Importing Word Documents . . . .120
Show Me Media 5.4—Text Wrapping . . . .128
Tell Me More Media 5.5—Keeping Large Documents Reasonable . . . . .137
Chapter 6: Tables Show Me Media 6.1—Creating a Table . . . .143
Show Me Media 6.2—Formatting Tables and Cells . . . .155
Show Me Media 6.3—Importing Spreadsheets . . . .159
Show Me Media 6.4—Creating a Chart . . . .165
Tell Me More Media 6.5—The Practicality of Using Spreadsheet Data in Publisher . . . .165
Show Me Media 7.2—Adding Metadata . . . .179
Show Me Media 7.3—Adding Business Information . . . .180
Show Me Media 7.4—Design Checking . . . .185
Tell Me More Media 7.5—Final Thoughts on the Design Checker . . . .185
Chapter 8: Printing Your Documents Show Me Media 8.1—Choosing a Color Model . . . .197
Show Me Media 8.2—Using Spot Color . . . .200
Show Me Media 8.3—Using the Pack and Go Wizard . . . .204
Tell Me More Media 8.4—Considerations for Commercial Printing . . . . .206
Chapter 9: Publishing Online Show Me Media 9.1—Creating a Simple Website . . . .210
Show Me Media 9.2—Adding Elements to a Web Page . . . .218
Show Me Media 9.3—Creating a Full-Blown Website . . . .222
Tell Me More Media 9.4—Your Options for Web Development . . . .231
Chapter 10: Bulk Mailing Techniques Show Me Media 10.1—Filtering . . . .239
Show Me Media 10.2—A Basic Mail Merge . . . .245
Show Me Media 10.3—E-mail Merge . . . .251
Tell Me More Media 10.4—The Importance of Reviewing Your Documents Before Merging Business Data . . . .256
v
Table of Contents
Introduction . . . .1
1 An Introduction to Publisher 2010 . . . .5
What Is Microsoft Publisher? . . . .7
Getting Started . . . .8
System Requirements . . . .8
Minimum Hardware Requirements for Office 2010 . . . .9
System Requirements for Publisher 2010 . . . .10
Operating System Requirements . . . .10
My Recommendations . . . .10
Verifying Your System’s Hardware . . . .11
Installing Office 2010 . . . .12
What’s New in Publisher 2010 . . . .16
The Ribbon . . . .16
How Documents Are Displayed . . . .18
Going Backstage . . . .18
Printing . . . .18
PDF and XPS Support . . . .18
Image Controls . . . .19
Minor Improvements . . . .20
What’s Up with Web Mode? . . . .20
2 Getting Started with Publisher 2010 . . . .21
Using Publisher for the First Time . . . .21
Creating a New Document . . . .21
Page Margins . . . .22
Custom Margins . . . .23
Grid Guides . . . .25
Built-In Guides . . . .27
Ruler Guides . . . .27
High-Precision Guides . . . .29
Using Multiple Ruler Guides . . . .30
Enabling and Disabling Rulers . . . .32
Enlarging Rulers . . . .32
Changing the Units of Measurement . . . .33
Moving Rulers . . . .33
Moving the Zero Mark . . . .35
Page Orientation . . . .37
Page Backgrounds . . . .40
Templates . . . .40
Web-Based Templates . . . .41
Locally Installed Templates . . . .43
The Anatomy of a Template-Based Document . . . .44
Changing Templates . . . .45
Creating a Custom Template . . . .45
Saving Your Documents . . . .47
Alternative Document Types . . . .47
Creating a New Document . . . .49
Opening a Publisher Document . . . .50
3 Working with Visual Elements . . . .51
Text Boxes . . . .51
Creating a New Text Box . . . .52
Entering Text into a Text Box . . . .53
Fonts . . . .54
Purchasing Fonts . . . .54
Typography . . . .56
Installing a Font . . . .56
Previewing a Font . . . .57
Formatting Pictures . . . .60
Transparency . . . .60
Picture Styles and Shapes . . . .62
Changing a Picture . . . .62
Picture Captions . . . .63
Changing a Caption’s Color . . . .64
Going Beyond Simple Colors . . . .65
Gradients . . . .66
The Texture Tab . . . .67
Patterns . . . .68
Photos . . . .68
Tint . . . .70
Clip Art . . . .71
Clip Art Key Words . . . .72
Copyright Issues . . . .73
Shapes . . . .74
Adding a 3-D Effect . . . .75
Coloring a Shape . . . .76
Layering . . . .77
Other Objects . . . .79
vii
Drawings . . . .80
Equations . . . .82
4 Designs and Layouts . . . .85
Calendars . . . .85
Additional Customizations . . . .87
Postcards . . . .90
Greeting Cards . . . .92
Additional Visual Elements . . . .92
Color Schemes . . . .93
Word Art . . . .96
Creating Building Blocks . . . .105
5 Working with Longer Documents . . . .109
Text Boxes Revisited . . . .110
Formatting . . . .110
Linking Text Boxes . . . .111
Navigating Text Boxes . . . .112
Layout Strategies . . . .113
Master Pages . . . .113
Additional Master Page Options . . . .117
Importing Microsoft Word Documents . . . .118
Adding Images to the Document . . . .120
Word Documents with Images . . . .125
Wrapping Text Around Images . . . .125
Irregularly Shaped Images . . . .129
Formatting Text Boxes . . . .132
Text Fitting . . . .132
Text Direction . . . .133
Hyphenation . . . .134
Alignment . . . .134
Columns . . . .134
Word Art Lite . . . .135
Drop Cap . . . .135
Number Styles . . . .137
6 Tables . . . .139
What Are Tables? . . . .139
Creating Tables . . . .140
Formatting Tables . . . .141
Fill Effects . . . .143
Borders . . . .143
Table Rotation . . . .146
Text Wrapping . . . .147
Cell Alignments and Margins . . . .148
Table Design . . . .151
Table Formats . . . .151
Table Layout . . . .151
Inserting Rows and Columns . . . .152
Deleting Rows and Columns . . . .153
Diagonals . . . .153
Merging and Splitting Cells . . . .153
Importing Excel Spreadsheets . . . .155
Importing a Spreadsheet . . . .156
Importing Excel Charts . . . .160
Importing an Existing Chart . . . .165
7 Finalizing Your Publisher Document . . . .167
A Visual Inspection . . . .167
Proofreading Techniques . . . .168
Adjusting Document Spacing . . . .169
Use a Compact Font . . . .169
Text Boxes . . . .170
Overlapping Frames . . . .171
Coming Up Short . . . .172
Test Printing the Document . . . .176
Document Metadata . . . .177
Working with Metadata . . . .178
The Design Checker . . . .181
Creating PDF and XPS Files . . . .185
8 Printing Your Documents . . . .187
Design Checking Your Document . . . .187
Printing Documents Yourself . . . .188
Basic Printing . . . .188
Professional Printing . . . .190
What Will the Job Cost? . . . .191
How Long Will It Take? . . . .192
How Long Will It Take to Correct Printing Mistakes? . . . .192
Is There Anything That You Won’t Print? . . . .192
In What Format Should Materials Be Submitted? . . . .193
ix
Color Models . . . .193
Grayscale . . . .194
RGB . . . .194
HSL . . . .195
CMYK . . . .195
PANTONE . . . .195
Choosing a Color Model . . . .196
Offset Printing . . . .196
What a Printing Company Expects . . . .201
Packaging Your Print Job . . . .202
How to Save on Printing Costs . . . .204
Stock . . . .204
File Preparation . . . .205
Quantity . . . .205
Ink Colors . . . .205
Deadlines . . . .205
Use the Correct Printing Device . . . .206
9 Publishing Online . . . .207
Creating a Website . . . .208
The Anatomy of a Web Page . . . .210
Enhancing a Web Page . . . .212
More Hyperlinking Techniques . . . .214
Bookmarks . . . .217
Editing Hyperlinks . . . .219
Changing a Hyperlink’s Appearance . . . .219
Using a Web Template . . . .220
Working with the Template . . . .221
Previewing Your Website . . . .221
The Web Tab . . . .222
Hot Spot . . . .222
Navigation Bar . . . .223
Form Controls . . . .225
HTML Code Fragment . . . .226
Web Page Options . . . .226
Publishing Your Website . . . .228
Acquiring a Domain Name . . . .229
Choosing a Hosting Company . . . .229
DNS Entries . . . .230
10 Bulk Mailing Techniques . . . .233
Mail Merge . . . .233
Creating the Recipient List . . . .235
Adding Merge Fields to Your Document . . . .241
Performing the Mail Merge . . . .243
Alternative Data Sources . . . .245
Email Merge . . . .248
The Recipient Experience . . . .251
Snail Mail . . . .251
Index . . . .257
xi
About the Author
Brien Poseyis a seven-time Microsoft MVP who is best known for writing about
topics related to enterprise networking. In his nearly two decades of IT work, Posey has published thousands of technical articles and written or contributed to over three dozen books on a variety of subjects.
In addition to writing, Brien routinely speaks at IT conferences and engages in vari-ous consulting projects.
Prior to going freelance, Posey was a CIO for a national chain of hospitals and healthcare facilities. He has also previously served as a network engineer for the United States Department of Defense at Fort Knox.
When Brien isn’t writing, he enjoys traveling to exotic destinations with his wife, shredding waves in his Cigarette boat, and scuba diving.
Dedication
I would like to dedicate this book to my wife, Taz, for her continued love and sup-port throughout my writing career. Writing even a short book is a time-consuming process, but the extremely short deadlines involved in creating this book meant a month of barely even seeing Taz. I am incredibly grateful to be married to someone who is so understanding of my crazy schedule.
Acknowledgments
I would like to thank the following people:
Laura Taylor and Troy Thompson of Relevant Technologies (www.RelevantTechnolo-gies.com)
Shamir Dasgupta, Jeremy Broyles, and Billy Brown at Xpressions Interactive (www.xpressions.com)
I would also like to thank Loretta Yates from Pearson Education for making this project as easy on me as possible.
Finally, I want to thank Taz, Junior, Melinda, Shawn, and Kelly for taking me to the beach last weekend, and helping me to clear my head so that I could finish this book. Watching Junior chase sand crabs in the dark was a hoot!
xiii
We Want to Hear from You!
As the reader of this book, youare our most important critic and commentator. We value your opinion and want to know what we’re doing right, what we could do better, what areas you’d like to see us publish in, and any other words of wisdom you’re willing to pass our way.
As an associate publisher for Que Publishing, I welcome your comments. You can email or write me directly to let me know what you did or didn’t like about this book—as well as what we can do to make our books better.
Please note that I cannot help you with technical problems related to the topic of this book. We do have a User Services group, however, where I will forward specific techni-cal questions related to the book.
When you write, please be sure to include this book’s title and author as well as your name, email address, and phone number. I will carefully review your com-ments and share them with the author and editors who worked on the book.
Email: [email protected]
Mail: Greg Wiegand Associate Publisher Que Publishing 800 East 96th Street Indianapolis, IN 46240 USA
Reader Services
Introduction
Those of you who know me (or my work) know that I am best known for the books and articles that I have written about enterprise networking products, such as Exchange Server and Office Communications Server. Even so, I decided to take a break from the norm and write a book on Microsoft Publisher 2010.
The reason why I decided to write this book is because I have always thought that Publisher was, without a doubt, the most underrated of all the products in the Microsoft Office Suite. Publisher has been around since 1991, and yet relatively few people seem to use it. In fact, when I was in college, I was required to take a class on using Microsoft Office, but the instructor didn’t even acknowledge the exis-tence of Publisher. I have always thought that the seeming lack of interest was odd, because you can do some really cool things with Publisher.
I have to confess that Publisher is the only Microsoft Office products that I can real-ly say that I enjoy using. Don’t get me wrong—Word, Excel, Outlook, and the other Office applications are great tools. I couldn’t do my job without them. The thing is that when I am working with Word, Excel, or Outlook, the task at hand feels like work. Let’s face it: Most of the Microsoft Office products are really geared toward producing business documents, and really, how much fun is that?
Publisher, on the other hand, allows for a much higher degree of creativity and expression than the other Microsoft Office products do. I have found creating Pub-lisher documents to be a rather enjoyable process, and the end result is always highly satisfying. Needless to say, I jumped at the chance to write a book on Publisher 2010.
Before I get started, I want to take this opportunity to put your fears at rest. I realize that some of you might have panicked when you realized that you bought a book that was written by someone who normally writes hard-core technical material. I’ll let you in on a little secret....
Over time, I have discovered that many of my readers are in the same boat I am. They need to learn about something new but don’t have the time or the desire to dissect a complex explanation. Therefore, I have always tried to break down com-plex material and present it in as simple of a manner as possible, and I will use this same approach in writing about Publisher 2010.
Yes, Publisher does have a bit of a learning curve, but I promise to make it as pain-less as I possibly can. Please understand that I don’t use this approach because I think that my readers are stupid, or as a way of insulting anyone’s intelligence. It’s just that I know that most people are busy, so I try to keep things simple as a way of respecting my reader’s time. With that said, I hope you enjoy the book.
How This Book Is Organized
This book introduces you to Microsoft Publisher 2010, and shows you how to use it to do everything from creating simple documents to creating highly customized documents that are based on your business data. Additionally, you will learn numerous best practices for working with Publisher 2010, and you will learn about when it is appropriate to use Publisher as opposed to one of the other Microsoft Office applications. Using Microsoft Publisher 2010 offers you the following:
• It discusses the overlap between Publisher and Microsoft Word, and when it is appropriate to use each application.
• It discusses both the benefits and limitations associated with using Publisher 2010.
• It discusses the interaction between Publisher 2010 and other Microsoft products.
• It explains key concepts in detail for novice users, but also covers topics of interest to those who already have experience in using Publisher.
• It offers real-world examples that you can relate to.
Using This Book
This book enables you to customize your own learning experience. The step-by-step instructions in the book give you a solid foundation in using Publisher 2010, while rich and varied online content, including video tutorials and audio sidebars, provide the following:
• Demonstrations of step-by-step tasks covered in the book
3
A b o u t t h e U s i n g We b E d i t i o n
• Practical advice and suggestions
• Direction for more advanced tasks not covered in the book
LET ME TRY IT
Let Me Try It tasks are presented in a step-by-step sequence so you can easily follow along.
SHOW ME
Media—This Is the Title of a Show Me VideoShow Me videos walk through tasks you’ve just got to see—including bonus advanced techniques.
TELL ME MORE
Media—This Is the Title of a Tell Me More RecordingTell Me More audio delivers practical insights straight from the experts.
Special Features
More than just a book, your Using product integrates step-by-step video tutorials and valuable audio sidebars delivered through the Free Web Editionthat comes with every Using book. For the price of the book, you get online access anywhere with a web connection—there are no books to carry, content is updated as the technology changes, and you receive the benefit of video and audio learning.
About the Using Web Edition
The Web Edition of every Using book is powered by Safari Books Online, allowing you to access the video tutorials and valuable audio sidebars. Plus, you can search the contents of the book, highlight text and attach a note to that text, print your notes and highlights in a custom summary, and cut and paste directly from Safari Books Online.
1
An Introduction to Publisher 2010
Installing Microsoft Publisher 2010 is a breeze.
Once installed, you can begin exploring all the
new features.
Microsoft Office 2010 is the latest version of their flagship productivity suite. Among the applications included in the Microsoft Office Suite is Publisher 2010.
Although Microsoft Publisher 2010 is brand new, the Microsoft Publisher franchise has been around for a long time. The first version of Publisher was released in 1991. Computer-based desktop publishing has been around for even longer, though.
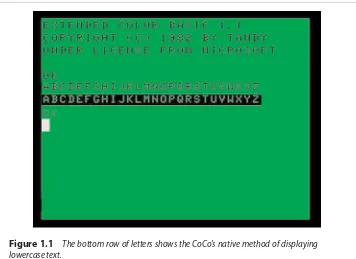
I will never forget the first time that I was exposed to desktop publishing. When I was a kid back in the 1980’s (wow, I feel old!), I saved up the cash that I made mow-ing lawns and bought a Radio Shack TRS-80 Color Computer 2.
I always thought that the software that was available for the Color Computer (bet-ter known as the CoCo) did the machine a big disservice. Although the CoCo was just as well equipped as the Commodore 64 and the PCs of the time, there wasn’t very much software available for it. What little software you could buy really wasn’t very good. Amateur CoCo enthusiasts routinely created freeware that was far bet-ter than most of the commercial applications that were available.
One afternoon, I was killing time at Radio Shack when a new application caught my attention. I can’t seem to recall the name of the application, but it was a desk-top publisher.
One thing that you have to understand about the CoCo is that although it had plenty of processing power, word processing wasn’t exactly its strong point. In fact, the word processing software that I had would not even display lowercase letters (although it could print them). Capital letters were displayed as black characters against a green background. Lowercase letters were displayed onscreen as green capital letters on a black background (a negative image of a capital letter). You can see what this effect looked like in Figure 1.1.
Figure 1.1 The bottom row of letters shows the CoCo’s native method of displaying lowercase text.
columns and that you could add images to your documents was the icing on the cake. I absolutely had to buy the application right then and there.
As soon as I got home from the store, I popped the disk into my computer and loaded the program. I had no idea how to use a desktop publisher, so I decided to load the sample document that the program came with, just so that I could see if the program could really produce documents like the ones shown on the box.
To make a long story short, the document that was displayed onscreen did indeed match the one that was shown on the box. Unfortunately, though, it took the com-puter half an hour to even load the document.
As I began to get my feet wet, it became painfully obvious that desktop publishing wasn’t quite ready for prime time (at least not on the CoCo). Even the simplest actions, such as switching fonts, incurred wait times of several minutes. It didn’t take me long to discover that creating rich documents on my CoCo just wasn’t practical.
7
W h a t I s M i c r o s o f t Pu b l i s h e r ?
for a computer user group that he was starting. Being that the group would be filled with geeks who could truly appreciate what the desktop publishing software could deliver, I decided to give my software another try.
Creating the newsletter was a grueling process, but when I was done, I was extremely satisfied with the results of my hard work. There was just one teensy problem that I hadn’t counted on—the desktop publishing software wasn’t com-patible with my printer. Because a new printer wasn’t in my budget, I had to throw in the towel.
It’s absolutely amazing how much things can change in the span of 20 years or so. Microsoft Publisher 2010 is infinitely more powerful than the desktop publishing software that I ran on my CoCo so long ago. More importantly, though, Publisher makes creating and printing high-quality documents absolutely painless. Any rea-sonably equipped PC is more than adequate for running Microsoft Publisher.
What Is Microsoft Publisher?
If you read the preceding section, you know that Microsoft Publisher is a desktop publishing application. As was the case with the desktop publishing software that I ran on my CoCo back in the ’80s, Microsoft Publisher enables you to create rich documents that use a variety of visual elements, such as fonts and images.
If you have never worked with any of the previous versions of Publisher before, you might be wondering what makes Publisher so special. After all, Microsoft Word also enables you to create elaborate documents that contain a variety of visual ele-ments. So what makes Publisher different from Word?
I will be the first to admit that there is a lot of overlap between the two applica-tions. If you need to create a simple document containing text and a few images, then you could use either program. The similarities end there, though.
Microsoft Word is a word processor. Its main job is to enable you to create text-based documents. You can include images or other visual elements in a Word doc-ument if you like, but these types of functions are not Microsoft Word’s primary focus.
In contrast, Microsoft Publisher focuses more on page layout and visual appeal than it does on providing the best possible environment for composing or editing text. Yes, you can compose and edit text in Publisher, but Publisher isn’t exactly the tool of choice for writing long, text-based documents.
page of the book they will end up being printed on, nor do I care about this para-graph’s position on the printed page. My goal is only to write the words that you are reading right now (and to capture a few screenshots along the way), and Microsoft Word is by far the best tool for the job.
Once I finish my work, though, I have to send my manuscript and my screen cap-tures to the book’s publisher. It is their job to lay out the book’s pages in a mean-ingful way. In doing so, they will use either Microsoft Publisher or a similar applica-tion to take the raw text and graphics that I have sent to them and turn it into the book that you are reading right now. Although Microsoft Word could technically be used to lay out a book, a desktop publishing application is a better tool for the job because it provides much better control over the page layout and the publication’s final appearance than what is possible using Microsoft Word.
Getting Started
If the entire concept of desktop publishing seems foreign to you, don’t worry. As I explained earlier, there was a time when I didn’t know how to use a desktop pub-lisher either!
My plan for this book is to use this chapter to show you how to install Publisher 2010. The next few chapters are designed to get you up and running quickly. I show you simple techniques that you can use to create professional-looking docu-ments. Toward the end of the book, I discuss some of the more advanced tech-niques, such as mail merge. I also discuss professional printing and show you how to use Publisher as a tool for creating websites.
System Requirements
For as long as I can remember, Microsoft has always provided a list of both mini-mum and recommended hardware requirements for their products. In many cases, a computer that was equipped with the minimum hardware requirements just wasn’t practical for actually using the application in an efficient manner.
Microsoft has taken a completely different approach to defining the hardware requirements for Office 2010. According to a Microsoft blog post (http://
blogs.technet.com/office2010/archive/2010/01/22/office-2010-system-requirements.aspx), many of Microsoft’s customers found having two separate lists of hardware requirements to be confusing. For example, if an application has a stated minimum requirement of 1 GB of memory but a recommended requirement of 2 GB, when do you really need 1 GB or 2 GB?
9
S y s t e m R e q u i r e m e n t s
should provide adequate performance to users who are using Microsoft Office 2010 to complete a small job. As always, though, higher performance hardware will generally provide a better experience.
Minimum Hardware Requirements for Office 2010
The stated minimum hardware requirements vary slightly depending on the edition of Microsoft Office 2010 that you are running.I have chosen to list the minimum hardware requirements for Microsoft Office Professional Plus 2010. I chose this particular edition because it has the most strin-gent set of requirements (although not by much). Here are the minimum hardware requirements:
• CPU: 500 MHz
• Memory: 256 MB
• Hard Disk: 1.5 GB of available space
• Display: 1024 ×768
• A DirectX 9.0c-compliant video card with 64 MB of video memory
In addition to these general requirements, there are a number of other feature spe-cific requirements and recommendations that do not directly affect Publisher. Here are the additional requirements:
• If you are going to use the inking feature, you will need Windows XP Tablet PC Edition (or later).
• Speech recognition requires a close talk microphone and a sound card.
• Instant Search requires Windows Desktop Search 3.0.
• Some of Outlook’s features are available only when connected to an Exchange mailbox.
• Many of the collaboration features require connectivity to a SharePoint server.
• Internet Explorer 6 or higher is required for Internet-related features.
• Outlook’s instant search feature requires a minimum of 1 GB of memory.
• Word 2010 will not enable grammar and contextual spelling checks unless the computer is equipped with at least 1 GB of memory.
• The Silverlight plug-in is required for some web features.
You can find Microsoft’s full list of hardware requirements at
System Requirements for Publisher 2010
Interestingly, Microsoft publishes an entirely separate list of system requirements for each of the Office 2010 applications. That way, if you only want to install a sin-gle application rather than the entire Office suite, you will know what hardware is required.
Microsoft also lists some other requirements that come into play if you use only certain features. These requirements include the following:
• A sound card and a close talk microphone (for speech recognition)
• Windows XP Tablet PC Edition (for inking)
• Internet Explorer 6 (for web-based features)
• Internet connectivity and a Windows Live ID (to share templates and building blocks)
Operating System Requirements
Now that I have talked about the hardware that is required to run Office 2010, I want to talk about the operating system requirements. Office 2010 is the first ver-sion of Microsoft Office to offer native 64-bit support. Don’t get me wrong.... It was possible to run Office 2007 on a 64-bit system, but Office 2007 was a 32-bit applica-tion and was unable to take advantage of the 64-bit architecture. Microsoft will be offering both 32-bit and 64-bit versions of Office 2010. The 32-bit version will run on both 32-bit and 64-bit versions of Windows. The 64-bit version requires a 64-bit Windows operating system, though.
Microsoft Office 2010 is officially supported on the following operating systems:
• Windows 7
• Windows Vista (with SP1 or higher)
• Windows Server 2008
• Windows Server 2008 R2
• Windows XP with SP3 (32-bit only)
• Windows Server 2003 R2 with MSXML 6.0 (32-bit only)
My Recommendations
11
S y s t e m R e q u i r e m e n t s
optional requirements into account. That being the case, I wanted to give you my take on the system requirements.
If you are running Office 2007 on your PC right now, you probably will have no trouble running Office 2010. The CPU and memory requirements are identical for both Office 2007 and Office 2010. You will just have to make sure that your com-puter has enough free hard disk space to load Office 2010 and that you have a decent graphics card. If your computer is running Windows Vista or Windows 7 and the Aero interface is enabled, you probably have the graphics card requirement covered.
So what if you aren’t running Office 2007 right now? If your computer is less than five years old, it will probably be sufficient to run Office 2010, but you do need to take the time to check its hardware capabilities.
Regardless of whether your system is old or new, and in spite of Microsoft’s stated minimum requirements, I would recommend that your PC be equipped with a min-imum of 1 GB of memory. Today, memory is cheap, and almost every new PC comes with more than 1 GB of memory. Having at least 1 GB of memory will enable you to get the maximum benefit from Office 2010, and adding extra memory goes a long way toward improving a computer’s performance.
Verifying Your System’s Hardware
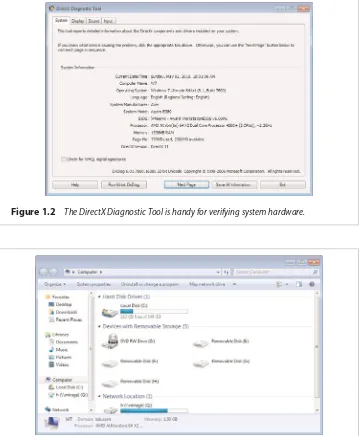
There are lots of different ways that you can check the hardware that is installed in your computer. Probably the easiest way is to use the DirectX Diagnostic Tool, which is built into Windows. You can access this tool by entering the DXDIAG com-mand at the computer’s Run prompt.
As you can see in Figure 1.2, the System tab provides you with information about your computer’s CPU and the amount of memory that is installed. You can also veri-fy your DirectX version from this tab.
The DirectX Diagnostic Tool’s Display tab tells you the system’s current display reso-lution. It also provides you with an estimate of the total amount of video memory that is installed in the system.
Figure 1.2 The DirectX Diagnostic Tool is handy for verifying system hardware.
Figure 1.3 The Computer window shows how much disk space is available.
Installing Office 2010
[image:28.432.37.396.68.504.2]13
I n s t a l l i n g O f f i c e 2 0 1 0
or an in-place upgrade from Office 2007. I will show you how to perform a clean installation first. If you happen to have Office 2007 currently installed, you can still perform a clean installation, but I recommend upgrading instead because doing so will preserve your customizations.
LET ME TRY IT
Performing a Clean Installation
Performing a clean installation of Office 2010 is simple. To do so, follow these steps:
1. Insert your Microsoft Office 2010 installation DVD and run Setup.exe if necessary.
2. Click the I Accept the Terms of This Agreement check box.
3. Click Continue.
4. At this point, Setup will ask you if you want to go ahead and install Office 2010, or if you want to customize the installation. You don’t have to make any customizations unless you want to, but go ahead and click the Cus-tomize button so that you can see what options are available to you.
5. The customization screen, shown in Figure 1.4, enables you to choose the components that you want to install, and to provide a custom file location. If you want to make any customizations, do so now.
6. When you are done making any desired customizations, click the Install Now button.
7. When the installation process completes, click Close.
LET ME TRY IT
Upgrading from Office 2007
SHOW ME
Media 1.1—Installing Microsoft Office 2010Access this video file through your registered Web edition at
my.safaribooksonline.com/9780132182591/media
The process of upgrading from Office 2007 to Office 2010 is similar to performing a clean installation. To upgrade, follow these steps:
1. Insert the installation DVD.
2. Run Setup.exe if necessary
3. When prompted, select the I Accept the Terms of This Agreement check box.
4. Click Continue.
5. If Windows contains a previous version of Microsoft Office, you will receive a prompt asking you if you want to upgrade or customize, as shown in Figure 1.5.
6. You can click the Upgrade button to begin the installation process. How-ever, I recommend clicking the Customize button instead just to see if there is anything that you want to change.
7. After reviewing the customization options and making any desired cus-tomizations, click the Upgrade button.
8. When the installation process completes, click the Close button.
15
I n s t a l l i n g O f f i c e 2 0 1 0
Figure 1.5 You have the option of performing an upgrade or a custom installation.
LET ME TRY IT
Uninstalling Office 2010
Because I just showed you how to install Office 2010, it probably seems a bit odd to be talking about uninstalling it so soon. Occasionally, though, the need may arise to uninstall Office 2010, so I wanted to go ahead and show you how to do so.
The actual method that you must use to uninstall Office varies depending on the version of Windows that you are using. The following procedure is based on Win-dows 7. This procedure works slightly differently in WinWin-dows XP and Vista.
To remove Office 2010, follow these steps:
1. Click the Windows Start button and choose the Control Panel option.
2. When the Control Panel opens, click the Uninstall a Program link.
3. Select Microsoft Office from the list of installed programs, as shown in Figure 1.6.
4. Click the Uninstall button.
5. When asked if you want to remove Microsoft Office 2010, click Yes.
6. When the process completes, click Close.
Figure 1.6 Select the option for Microsoft Office 2010 and click the Uninstall button.
SHOW ME
Media 1.2—Uninstalling Microsoft Office 2010Access this video file through your registered Web edition at
my.safaribooksonline.com/9780132182591/media
What’s New in Publisher 2010
Now that you have Office 2010 up and running, you are probably curious as to how Publisher has changed since the previous version. Although there are some things that have changed, Publisher 2010 isn’t vastly different from its predecessor.
The Ribbon
17
W h a t ’s N e w i n Pu b l i s h e r 2 0 1 0
Figure 1.7 This is what Publisher 2007 looked like.
To see how Publisher 2010 compares to Publisher 2007, take a look at Figures 1.7 and 1.8. Figure 1.7 shows what Publisher 2007 looked like. When compared to this image, Publisher 2010’s new ribbon really stands out in Figure 1.8.
How Documents Are Displayed
In Microsoft Publisher, every visual element exists within a box. Text is placed with-in a text box, and there is also a box that surrounds every image that you with-include with-in your Publisher document. These boxes do not appear when the document is print-ed; they are necessary when working with the Publisher document because they provide control over individual visual elements.
In Publisher 2007, complex documents often took on a very messy appearance because the boxes surrounding every single visual element were all displayed onscreen. In Publisher 2010, Microsoft decided to clean up things a bit by hiding most of these boxes. Now, the only box that is displayed is the one surrounding the visual element that is currently selected. All of the other boxes are hidden until you need them.
Going Backstage
Another cosmetic feature that is new to Publisher 2010 is something called back-stage view. The backback-stage is merely an area that is linked to Publisher’s File menu. It is designed to provide access to things like opening, saving, printing, and sharing documents. The backstage is also where you will find various customization options and access to online help. You can see what the backstage area looks like in Figure 1.9.
Printing
Another area where Microsoft has made a lot of improvements is in printing Pub-lisher documents. Now when you get ready to print a document like the one shown in Figure 1.10, Publisher shows you a large preview of what the document will look like when printed.
As you can see in the figure, there are a number of print options located just to the left of the preview. As you select a different set of print options, the preview will change to reflect the options that you have chosen.
PDF and XPS Support
19
W h a t ’s N e w i n Pu b l i s h e r 2 0 1 0
Figure 1.9 The backstage area provides access to common document functions.
Figure 1.10 The backstage area provides access to common document functions.
Image Controls
My favorite of these new image controls is the capability to replace one picture with another, while still retaining the image size and the overall document layout. Similarly, you can now create picture placeholders as a way of reserving a place in a document for an image that will be inserted later. Once the image is added to the document, it will take on the size and shape of the placeholder.
Publisher 2010 enables you to crop images into nonrectangular shapes. You also can now add captions to images. In fact, Publisher provides an entire gallery of captions that you can choose from.
Finally, Publisher 2010 enables you to hide objects that are in the scratch area. Some of the other new features include Smart Guides, Live Preview, and improved page navigation.
Minor Improvements
Besides the improvements I have already mentioned, Microsoft has made a few minor improvements to the merge process in an effort to make it easier to merge business data into Publisher documents.
Another minor improvement worth mentioning has to do with building blocks (which were previously referred to as the Content Library) and templates. Microsoft is in the process of forming an online community in which users will be able to share building blocks and templates that they have created with other Publisher users.
What’s Up with Web Mode?
One Microsoft TechNet article (http://technet.microsoft.com/en-us/library/
ee694636(office.14).aspx) states that “Creating new web sites and web publications is not available in Publisher 2010.” This article indicates that this capability has been removed from Publisher, although you can still edit Web content that was created in a previous version of Publisher.
If you have already flipped through this book, you know that I have written an entire chapter on using Publisher to create a website. As it turns out, Publisher 2010 contains some fairly rich web development capabilities. I will say, however, that most of the web development options are not accessible unless you create your web page from a web template.
TELL ME MORE
Media 1.3—How Different Is Publisher 2010 from Publisher 2007?2
Getting Started with Publisher 2010
This chapter shows you the basics of creating
Publisher documents.
Now that you have installed Microsoft Office 2010, I will show you how to use Pub-lisher. In this chapter, I create a new Publisher document and show you how to lay out your document. We won’t actually add any visual elements to the document until the next chapter.
Using Publisher for the First Time
Upon opening Microsoft Publisher, you are taken to the screen shown in Figure 2.1. Publisher’s initial screen enables you to choose from numerous templates. The built-in templates make it easier to create specific types of documents. For exam-ple, there are templates for creating brochures, business cards, calendars, and more.
Although templates are one of Microsoft Publisher’s most useful features, I won’t cover them in detail right now. A template lays the groundwork for creating various types of documents. In doing so, templates use some elements that may be unfa-miliar to you. So I want to start by showing you how some of these elements work within a blank document. After I do, I’ll return and discuss templates in more detail later in this chapter.
Creating a New Document
As mentioned in the previous section, a template expedites the document creation process. Let’s create a new document by using one of the blank templates.
Double-click on the blank 8.5 x 11-inch template. When you do, you will be taken to the Main Publisher interface, as shown in Figure 2.2. The Publisher interface is similar to Microsoft Office applications.
Figure 2.1 Microsoft Publisher enables you to create documents from numerous predefined templates.
preview is less than impressive because our document is only one page in length. If a document spans multiple pages, though, the preview area makes it easier to locate an individual page within the document.
SHOW ME
Media 2.1—Creating a New DocumentAccess this video file through your registered Web edition at
my.safaribooksonline.com/9780132182591/media.
Page Margins
If you look at Figure 2.2, notice the blue rectangle that appears on the page. This rectangle represents the page margins. By default, Publisher sets the margins to half an inch.
23
[image:39.432.37.398.62.302.2]Pa g e M a r g i n s
Figure 2.2 Main Publisher interface. Note the menu commands at the top.
You might wonder why Microsoft displays the margins at all if it’s so easy to ignore them. Margins exist because many printers are not capable of printing all the way to the edge of the page. Even if your printer can print on page edges, most printed documents don’t look right without margins. Therefore, Microsoft Publisher dis-plays the margins on the screen in an effort to help you create an aesthetically pleasing (and fully printable) document.
Custom Margins
In most cases, the default half-inch margins are acceptable. If you need to adjust the margin size, though, select the Page Design tab, and then choose the Margins option from the toolbar. Publisher then displays several different margins that you can choose from. This menu also gives you the option of creating custom margins.
Figure 2.3 The Layout Guides dialog box enables you to create custom margins.
Figure 2.4 Margin customizations work differently for two-page layouts.
25
G r i d G u i d e s
Figure 2.5 Grid lines can make it easier to lay out a Publisher document.
Grid Guides
As you begin laying out your new Publisher document, you might find that it is tough to place the various design elements on the screen in the exact location. One solution to this problem is to divide the page into a grid.
LET ME TRY IT
Dividing a Page Into a Grid
To divide a page into a grid, follow these steps:
1. Go to Publisher’s Page Design tab.
2. Click the Margins icon.
3. Choose the Custom Margins option from the Margins menu.
4. When the Layout Guides dialog box appears, select the Grid Guides tab.
Figure 2.6 You have the option of increasing line spacing.
As you can see in the figure, Publisher gives you the option of specifying the num-ber of rows and the numnum-ber of columns that you want to display on the page. Pub-lisher is quirky about setting up rows and columns, as it creates twice as many rows or columns as you specify. Publisher uses two separate lines to separate the row or column from the one next to it. By default, the lines that publisher creates are a 10th of an inch apart from each other. To rectify this quirk, notice in Figure 2.5 the option to set the spacing for rows and columns. You can increase the spacing to make the lines that separate rows and columns much farther apart. There is also a check box that you can use to add a centerline between the lines that separate rows and columns.
In a default layout, it can be difficult to see that the line separating rows and columns are double lines with spacing between them. As you increase the spacing, though, the double lines become more obvious.
27
R u l e r G u i d e s
Built-In Guides
Having an onscreen grid is handy when placing various design elements within your document. Sometimes, though, you may already have an idea of what your finished document should look like, and a generic grid can only get in the way.
Sometimes, onscreen grids can be counterproductive for another reason. As you begin learning the basics of creating Publisher documents, you will see that the screen becomes cluttered with design elements. That isn’t to say that your finished document will be cluttered, though. Each design element that you add to your document exists within a box. If you put enough of these boxes on the screen at the same time, things start to look too busy. If you throw in a grid too, then you have a mess.
As you have already seen, Microsoft makes the use of grid guides optional. Although it’s nice to turn off the grid guides when you aren’t using them, you may occasionally find that you do need the grid guides but you don’t want the entire document page cluttered with them. For example, you might only need a grid guide on a certain portion of the page. You can accomplish this by using one of the built-in grid guides.
LET ME TRY IT
Choosing a Grid Guide
To access the alternative sets of grid guides, follow these steps:
1. Select Publisher’s Page Design tab.
2. Click on the Guides icon, found on the toolbar.
3. Select the grid guide that you want to use. You can see the available grid guides in Figure 2.7.
SHOW ME
Media 2.2—Grid GuidesAccess this video file through your registered Web edition at
my.safaribooksonline.com/9780132182591/media.
Ruler Guides
Figure 2.7 Publisher includes a variety of grid guides.
Sometimes, though, you might find that design element placement requires a higher degree of precision than what any of the grid guides can provide. In these situations, use a ruler guide.
A ruler guide is similar to the grid guides that I have already talked about, but with one major difference. Ruler guides are linked to rulers that border the page. As such, you can move a ruler guide to any spot on the page, with a high degree of precision.
LET ME TRY IT
Enabling Ruler Guides
To enable ruler guides, follow these steps:
1. Go to Publisher’s Page Design tab.
2. Click the Guides icon.
3. Choose the Add Horizontal Ruler Guide command from the Guides menu.
4. Click the Guides icon.
29
R u l e r G u i d e s
Figure 2.8 Ruler guides initially look like grid guides.
The page is now divided into four segments, as shown in Figure 2.8. Although the lines shown in the figure look the same as the grid guides that I have already shown you, they are instead linked to the rulers that appear above and to the left of the document. Click the lines and drag them into the desired position by using markers that will appear on the rulers as you begin moving the guide lines.
High-Precision Guides
Even though dragging and dropping ruler guides works pretty well, drag and drop isn’t exactly a high-precision operation.
LET ME TRY IT
Setting High-Precision Guides
If you need to set the ruler guides with a higher degree of accuracy, you can do so by completing the following steps:
1. Select Publisher’s Page Design tab.
3. Choose the Ruler Guides command from the Guides menu.
4. When the Ruler Guides dialog box appears, select either the Horizontal or the Vertical tab, depending on which ruler guide you want to position.
5. Enter the desired ruler guide position, as shown in Figure 2.9.
6. Click OK.
Using Multiple Ruler Guides
Having a horizontal and a vertical ruler guide can be very handy, but when it comes to creating more advanced documents, you might need to do a lot more measuring. Fortunately, you can create additional ruler guides on an as-needed basis using the same steps that we already performed.
LET ME TRY IT
Creating Additional Ruler Guides
If you want to create an additional horizontal ruler guide, you can do so by com-pleting these steps:
1. Select Publisher’s Page Design tab.
2. Click the Guides icon, located on the toolbar.
3. Choose the Add Horizontal Ruler Guide option from the Guides menu.
31
R u l e r G u i d e s
Figure 2.10 You can control the location of multiple ruler guides.
Earlier, I showed you how to use the Ruler Guides dialog box to precisely position a ruler guide. You can use this same technique, even after creating multiple ruler guides.
In Figure 2.10, there is a page containing two horizontal ruler guides. The Ruler Guides dialog box displays the current position of each of the ruler guides. To move a ruler guide, select the listing for the guide’s current position, enter a new posi-tion, and click the Set button. If you want to completely remove a ruler guide, sim-ply select the listing that displays the guide’s current position, and then click the Clear button. As you would expect, you can use the Clear All button to remove all the ruler guides from the page.
SHOW ME
Media 2.3—Using Ruler GuidesAccess this video file through your registered Web edition at
Enabling and Disabling Rulers
The rulers should be enabled by default when you use Publisher, but it is always possible that for whatever reason, the rulers might not appear on the screen (espe-cially if you are borrowing someone else’s computer). Likewise, I have known of at least one person who found the rulers to be a distraction and wanted them gone. That being the case, I want to take a moment and show you how to turn the rulers on and off.
You can hide the rulers by right-clicking on a ruler, and then choosing the Rulers command from the resulting shortcut menu, which you can see in Figure 2.11. Upon doing so, the rulers will immediately disappear.
Getting the rulers back can seem a little bewildering because there are no rulers to right-click, and there are no ruler options on the Publisher menus. If you want to unhide the rulers, just right-click in the approximate area in which the rulers used to exist. This causes Publisher to display the same menu that you saw in Figure 2.11. Now, just choose the Rulers command and the ruler returns.
Enlarging Rulers
You have probably noticed in the screen captures that the rulers can be small. This isn’t usually a problem if you have a large monitor, but if you have bad vision, a small monitor, or both, you might be looking for a way to enlarge the rulers.
Publisher does not enable you to enlarge the rulers directly. However, you can enlarge your view of the document, which has the effect of enlarging the rulers in the process. There is a slide bar in the lower-right corner of the screen that you can use to adjust the document size.
33
[image:49.432.38.395.241.475.2]R u l e r G u i d e s
Figure 2.12 You might want to change the unit of measurement.
Changing the Units of Measurement
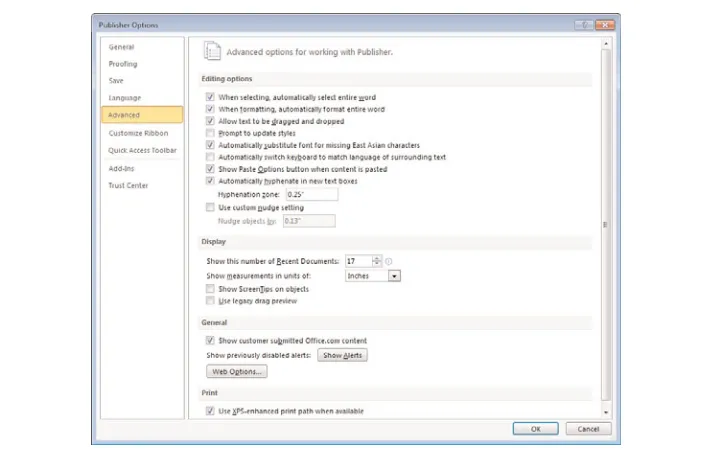
By default, Publisher’s rulers measure documents in inches. This is fine for many of you, but you might want to measure your documents in centimeters. Similarly, if you are using Publisher to create web content, you might want to measure the document in pixels.
To change the way that Publisher measures your documents, choose the Options command from the File menu. When the Publisher Options dialog box appears, click the Advanced link. When you do, you will find an option to change the units of measurement within the Display section, as shown in Figure 2.12. As you can see in the figure, you can set the ruler to display Inches, Centimeters, Picas, Points, or Pixels.
Moving Rulers
Figure 2.14 You can move the rulers independently of each other.
Although there is nothing wrong with the default behavior, some people may pre-fer to position the rulers so that they are directly against the document page (or even on the document page). Publisher enables you to drag the rulers to a new position, but to do so, hold down the Shift key. If you forget to hold down Shift, Publisher will create a new grid guide instead of moving the ruler.
You can move the rulers individually, as shown in Figure 2.14, but you don’t have to. If you prefer to move both rulers together, simply hold down the Shift key and then drag the rulers from the upper-left corner where they intersect with each other. You can see the results of such a move in Figure 2.15.
35
R u l e r G u i d e s
Figure 2.15 The rulers can be moved together.
Moving the Zero Mark
In all the previous screen captures, both rulers have placed the zero mark in the upper-left corner of the page. This is easiest to see in Figure 2.15 because the rulers are placed against the edge of the page. In the earlier screen captures, the zero mark is located in the same position, but the fact that the ruler displays negative numbers to the left of the zero mark can be distracting.
In most cases, placing the zero mark at the upper-left corner of the page makes a lot of sense. By doing so, it becomes very easy to measure any point on the entire page. When you get into some of the more advanced document designs, though, you may find yourself doing a lot of math.
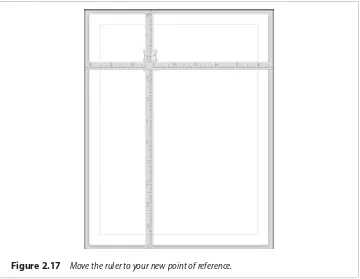
To give you an idea of what I am talking about, take a look at Figure 2.16. In this fig-ure, I have drawn an arrow on the page. If you look at the banner along the bottom of the Publisher window, you can see that the top-left corner of this object is at 2.63 inches horizontally by 1.78 inches vertically. Additionally, you can see that the object itself (the box containing the arrow) is 0.55 inches wide by 0.88 inches tall. Now here comes the tricky part....
Imagine that our design required another object to be placed EXACTLY 1.38 hori-zontal inches to the right and 4.27 vertical inches from the existing object. Although it would take some work, you could calculate the new object’s location based on the previous object’s location and on the new object’s required proximity to the existing object. In some cases, however, using math won’t help you.
Figure 2.16 The banner along the bottom of the Publisher window tells you the currently selected object’s size and position.
The easiest way to deal with this problem is to move the ruler, and then set the lower-right corner of the arrow as our zero mark. After doing so, it becomes simple to locate the position for the next object that we want to create because all the measurements are based on a common frame of reference.
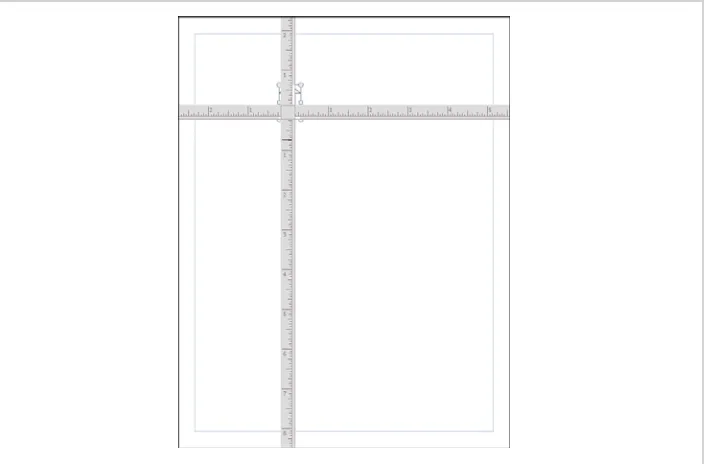
Begin the process by holding down the Shift button, and then dragging the rulers to the location that you want to use as a frame of reference. As you can see in Figure 2.17, even though we have moved the rulers, the zero mark remains in the upper-left corner of the page.
37
[image:53.432.37.397.62.341.2]Pa g e O r i e n t a t i o n
Figure 2.17 Move the ruler to your new point of reference.
Page Orientation
Everything so far has been geared toward showing you how to lay out a page so that you can create a document. Sometimes, though, you might find that you have to make some changes to the page itself.
LET ME TRY IT
Changing the Page Orientation
One such change involves switching the page orientation. So far we have been working with a blank document in portrait format, but we can easily switch to landscape mode. To do so, follow these steps:
1. Select Publisher’s Page Design tab.
2. Click the Orientation icon, found on the toolbar.
Figure 2.18 Re-zeroing the rulers can make it easier to find certain points within a document.
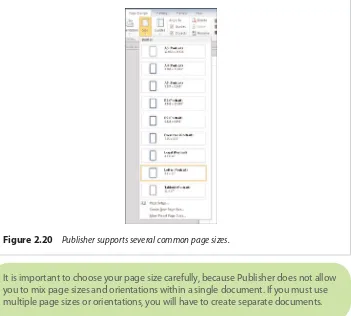
Page Sizes
[image:54.432.44.397.63.295.2]The blank document we are creating is presently formatted to fit on an 8.5 ×11 sheet of paper. Even though this is a standard document size, it is far from being the only page size that Publisher supports. Depending on the type of document you are creating, you may occasionally have to set a different page size before you begin creating your document.
39
[image:55.432.45.396.296.612.2]Pa g e S i z e s
Figure 2.20 Publisher supports several common page sizes.
LET ME TRY IT
Changing Page Sizes
To do so, follow these steps:
1. Select Publisher’s Page Design tab.
2. Click the Size icon, found on the toolbar.
3. Choose the desired page size from the Size menu.
As you can see in Figure 2.20, Publisher supports several common page sizes. The most common page sizes are displayed directly on the Sizes menu, but there is also a More Preset Page Sizes option that you can select if you can’t locate the page size that you need. Publisher contains presets for most standard paper sizes, but if you need something unusual, you can use the Create New Page Size option to set up a custom page size.
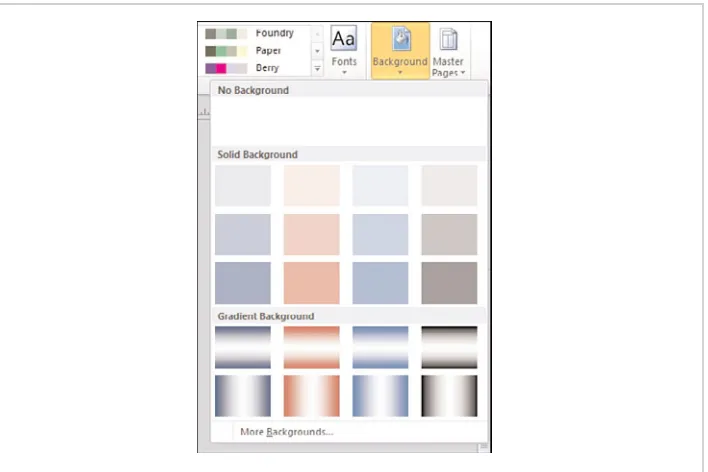
Page Backgrounds
So far, all the screen captures that I have included in this chapter have shown Pub-lisher documents in which the page is displayed as a white piece of paper. Keep in mind, though, that the page background isn’t really white. The white background simply represents an absence of color. This means that if you put a piece of blue paper into the printer and print a Publisher document, Publisher isn’t going to turn the blue paper white.
LET ME TRY IT
Changing Page Backgrounds
You aren’t stuck using an empty background, though. Publisher will enable you to fill in a document’s background. To do so, follow these steps:
1. Go to Publisher’s Page Design tab.
2. Click the Background icon, located in the toolbar.
3. Choose the background that you want to use from the Background menu.
If you look at Figure 2.21, you can see that Publisher really doesn’t initially give you very many choices when it comes to page backgrounds. You can opt for a solid background, a gradient background, or no background. It might also initially appear that you are limited to using red, blue, and gray as background colors.
All is not what it seems, though. The bottom of the Backgrounds menu contains an option labeled More Backgrounds. Choosing this option enables you to fill the background with any color you choose, a gradient color, a gradient made of multi-ple colors, patterns, pictures, and more.
I’m not going to go into all the individual fill options right now because I will be covering each option in detail in the next chapter when I talk about shapes and captions. For right now, I at least wanted to make you aware of the fact that these options exist.
Templates
41
[image:57.432.44.398.108.344.2]Te m p l a t e s
Figure 2.21 You can choose a page background from the Backgrounds menu.
The first thing that you need to understand about the templates shown in Figure 2.22 is that aside from the blank templates you have already been using, most of the templates that are shown in the figure aren’t really templates, but rather tem-plate categories. To see what I mean, choose the Brochures temtem-plate. When you do, you will be taken to the screen shown in Figure 2.23.
Web-Based Templates
The Brochure template isn’t really a template at all, but rather a collection of tem-plates for creating various types of brochures. Also notice in the figure that some of these templates are installed locally, whereas others are available on Office.com. If you select an Internet-based template, the column on the far right displays a pre-view of the template and provides you with a bit of summary information about it. If you like what you see, you can click the Download button located just beneath the preview.
Figure 2.22 Templates make it easier to create certain types of documents.
43
[image:59.432.46.397.155.411.2]Te m p l a t e s
Figure 2.24 Clicking on a template displays a preview.
Locally Installed Templates
As was the case with web-based templates, clicking on a locally installed template causes a preview of the template to be displayed in the column on the far right. As you can see in Figure 2.24, Publisher gives you a few more options for locally installed templates than you have for web-based templates.
This figure shows that Publisher gives you the option of selecting a different color scheme for use with the template. You also have the option of selecting a different font scheme. A font scheme is a collection of three different fonts that will be used within the document that you are creating from the template.
The Business Information section enables you to automatically insert information about your business. I talk about this feature in more detail in a later chapter.
The Form section enables you to optionally include a form within the document that you are creating. Publisher offers several different predefined forms. In the case of a brochure, you can include an order form, a response form, or a sign-up form.
When you have selected the options that you want to use with the template, click the Create button, and Publisher will create a new document based on your tem-plate. You can see an example of such a document in Figure 2.25.
SHOW ME
Media 2.4—Creating a Document from a TemplateAccess this video file through your registered Web edition at
my.safaribooksonline.com/9780132182591/media.
The Anatomy of a Template-Based Document
The document shown in Figure 2.25 is an actual Publisher document. You can view it, print it, and edit it, just as if you had created the document from scratch.
[image:60.432.36.397.178.444.2]As you look at this document, there are a few things that should look familiar to you. For starters, notice that our template-based document contains a margin
45
Te m p l a t e s
offset just like our blank document did. There are also four vertical ruler guides present on the document. These ruler guides help to point out where the brochure will eventually be folded.
Besides the margins and ruler guides, the document contains a variety of text and graphic elements, all of which I discuss in the next c