by David Kay and
William “The Ferrett” Steinmetz
Paint Shop
Pro
®
8
FOR
Paint Shop
Pro
®
8
FOR
by David Kay and
William “The Ferrett” Steinmetz
Paint Shop
Pro
®
8
FOR
909 Third Avenue New York, NY 10022 www.wiley.com
Copyright © 2003 by Wiley Publishing, Inc., Indianapolis, Indiana
Published by Wiley Publishing, Inc., Indianapolis, Indiana
Published simultaneously in Canada
No part of this publication may be reproduced, stored in a retrieval system or transmitted in any form or by any means, electronic, mechanical, photocopying, recording, scanning or otherwise, except as permit-ted under Sections 107 or 108 of the 1976 Unipermit-ted States Copyright Act, without either the prior written permission of the Publisher, or authorization through payment of the appropriate per-copy fee to the Copyright Clearance Center, 222 Rosewood Drive, Danvers, MA 01923, (978) 750-8400, fax (978) 646-8700. Requests to the Publisher for permission should be addressed to the Legal Department, Wiley Publishing, Inc., 10475 Crosspoint Blvd., Indianapolis, IN 46256, (317) 572-3447, fax (317) 572-4447, e-mail:
Trademarks:Wiley, the Wiley Publishing logo, For Dummies, the Dummies Man logo, A Reference for the Rest of Us!, The Dummies Way, Dummies Daily, The Fun and Easy Way, Dummies.com and related trade dress are trademarks or registered trademarks of Wiley Publishing, Inc., in the United States and other countries, and may not be used without written permission. All other trademarks are the property of their respective owners. Wiley Publishing, Inc., is not associated with any product or vendor mentioned in this book.
LIMIT OF LIABILITY/DISCLAIMER OF WARRANTY: WHILE THE PUBLISHER AND AUTHOR HAVE USED THEIR BEST EFFORTS IN PREPARING THIS BOOK, THEY MAKE NO REPRESENTATIONS OR WAR-RANTIES WITH RESPECT TO THE ACCURACY OR COMPLETENESS OF THE CONTENTS OF THIS BOOK AND SPECIFICALLY DISCLAIM ANY IMPLIED WARRANTIES OF MERCHANTABILITY OR FITNESS FOR A PARTICULAR PURPOSE. NO WARRANTY MAY BE CREATED OR EXTENDED BY SALES REPRESENTA-TIVES OR WRITTEN SALES MATERIALS. THE ADVICE AND STRATEGIES CONTAINED HEREIN MAY NOT BE SUITABLE FOR YOUR SITUATION. YOU SHOULD CONSULT WITH A PROFESSIONAL WHERE APPRO-PRIATE. NEITHER THE PUBLISHER NOR AUTHOR SHALL BE LIABLE FOR ANY LOSS OF PROFIT OR ANY OTHER COMMERCIAL DAMAGES, INCLUDING BUT NOT LIMITED TO SPECIAL, INCIDENTAL, CON-SEQUENTIAL, OR OTHER DAMAGES.
For general information on our other products and services or to obtain technical support, please contact our Customer Care Department within the U.S. at 800-762-2974, outside the U.S. at 317-572-3993, or fax 317-572-4002.
Wiley also publishes its books in a variety of electronic formats. Some content that appears in print may not be available in electronic books.
Library of Congress Control Number: 2003101874
ISBN: 0-7645-2440-2
Manufactured in the United States of America
10 9 8 7 6 5 4 3 2 1
1O/SS/QV/QT/IN
About the Authors
David Kayis a writer, engineer, and aspiring naturalist and artist, combining professions with the same effectiveness as his favorite business establish-ment, Acton Muffler, Brake, and Ice Cream (now defunct). Dave has written more than a dozen computer books, by himself or with friends. His titles include various editions of Microsoft Works For Windows For Dummies, WordPerfect For Windows For Dummies, Graphics File Formats,and
The Internet: Complete Reference.
In his other life, as the Poo-bah of Brightleaf Communications, Dave writes and teaches on a variety of subjects. He and his wife, Katy, and golden retriever, Alex, live in the wilds of Massachusetts. In his spare time, Dave studies animal and human tracking and munches edible wild plants. He also has been known to make strange blobs from molten glass, sing Gilbert and Sullivan choruses in public, and hike in whatever mountains he can get to. He longs to return to New Zealand and track kiwis and hedgehogs in Wanaka. He finds writing about himself in the third person like this quite peculiar and will stop now.
Dedication
Some of the people who helped bring this book to market include the following:
Acquisitions, Editorial, and Media Development
Project Editor:Rebecca Whitney Acquisitions Editor:Terri Varveris Technical Editor:Lee Musick Editorial Manager:Carol Sheehan Media Development Manager:
Laura VanWinkle
Media Development Supervisor: Richard Graves
Editorial Assistant:Amanda M. Foxworth Cartoons:Rich Tennant
www.the5thwave.com
Production
Project Coordinator: Nancee Reeves Layout and Graphics: Seth Conley,
Carrie Foster, Tiffany Muth
Proofreaders:Laura Albert, David Faust, Andy Hollandbeck, Angel Perez, Carl Pierce, Kathy Simpson, TECHBOOKS Production Services
Indexer: TECHBOOKS Production Services
Publishing and Editorial for Technology Dummies
Richard Swadley,Vice President and Executive Group Publisher Andy Cummings,Vice President and Publisher
Mary C. Corder,Editorial Director Publishing for Consumer Dummies
Diane Graves Steele,Vice President and Publisher Joyce Pepple,Acquisitions Director
Composition Services
Contents at a Glance
Introduction ...1
Part I: Getting the Picture...7
Chapter 1: Opening, Viewing, and Saving Image Files ...9
Chapter 2: Capturing Pictures from Paper, Camera, or Screen ...29
Part II: Painting the Picture ...51
Chapter 3: Choosing Colors, Styles, and Textures ...53
Chapter 4: Painting, Spraying, and Filling ...75
Chapter 5: Painting with Pictures ...101
Part III: Improving Appearances ...109
Chapter 6: Retouching Touchy Spots ...111
Chapter 7: Finessing Photos with Adjustments ...125
Chapter 8: Creating Artsy Effects ...143
Chapter 9: Adjusting Color By Bits ...161
Chapter 10: Laundering Your Image for Brightness, Contrast, and Color ...169
Part IV: Changing and Adding Content...185
Chapter 11: Getting Bigger, Smaller, and Turned Around ...187
Chapter 12: Selecting Parts of an Image ...197
Chapter 13: Moving, Copying, and Reshaping Parts of Your Image ...217
Chapter 14: Layering Images ...235
Chapter 15: Adding Layers of Text or Shapes ...257
Part V: Taking It to the Street...277
Chapter 16: Printing ...279
Chapter 17: Creating Web Images ...289
Chapter 18: Automating Paint Shop Pro ...305
Part VI: The Part of Tens ...311
Chapter 19: Ten Perplexing Problems ...313
Chapter 20: Ten Fast Fixes for Photo Failures ...319
Table of Contents
Introduction...1
What Can You Do with This Book? ...1
Is This the Book for You? ...2
How Is This Book Organized? ...2
Part I: Getting the Picture ...3
Part II: Painting the Picture ...3
Part III: Improving Appearances ...3
Part IV: Changing and Adding Content ...4
Part V: Taking It to the Street ...4
Part VI: The Part of Tens ...4
Icons Used in This Book ...5
Shortcuts and Conventions in this Book ...5
Part I: Getting the Picture ...7
Chapter 1: Opening, Viewing, and Saving Image Files . . . .9
Opening Image Files ...10
Nifty browser tricks for opening and managing files ...10
Helpful hints for opening files by name and location ...12
Secrets of opening a file by double-clicking ...14
Viewing and Zooming an Image ...14
Zooming an image in the window ...15
Working on several images at a time ...16
Saving a Changed Image File ...16
Saving the Image First As a Paint Shop Pro File ...17
Saving a Copy of Your File As Another File Type ...19
Using Native and Foreign File Types ...19
Paint Shop Pro files (PspImage or PSP) ...20
BMP ...21
TIFF ...21
GIF ...21
JPEG ...22
PNG ...23
Using Vector File Types (Drawing Files) ...23
Opening vector files ...24
Saving vector files — not ...24
Converting or Renaming Batches of Files ...24
File Types and “Action Required” Messages about Colors ...26
Chapter 2: Capturing Pictures from Paper, Camera, or Screen . . . . .29
Connecting to Your Scanner or Camera ...29
Scanning into Paint Shop Pro ...30
Getting the most from your scanning software ...32
Forever plaid: Scanning printed images ...37
Straightening crooked scans ...38
Getting Images from a Digital Camera ...41
Downloading and Opening Photos ...42
Making E-Mail-Ready Photos ...44
Shrinking Photo Download Times ...44
Capturing Images from Your PC Screen ...45
Preparing to capture ...45
Making the capture ...47
Part II: Painting the Picture...51
Chapter 3: Choosing Colors, Styles, and Textures . . . .53
Choosing Paint ...57
Choosing a basic color or a recently used pattern ...59
Choosing a recently used color ...60
Choosing a color from your picture ...61
Choosing a Color More Precisely ...61
Precise color using the color wheel ...62
Additional shades of basic colors ...63
Precise color adjustments — by the numbers ...64
Working with 256 Colors or Fewer ...65
Working with Style: Beyond Plain Paint ...66
Choosing a style ...66
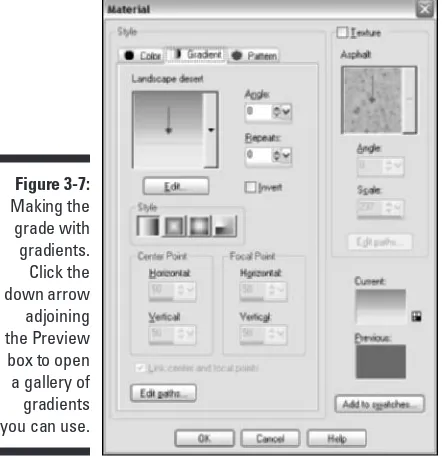
Choosing gradients ...67
Painting with gradients ...69
Choosing and making patterns ...69
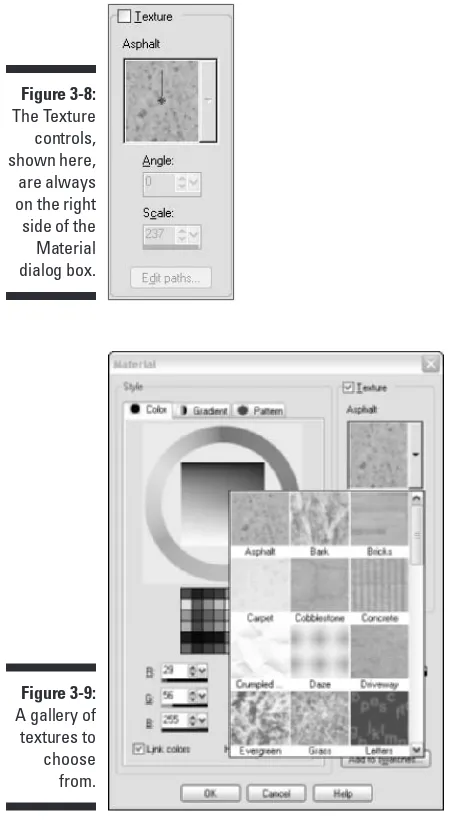
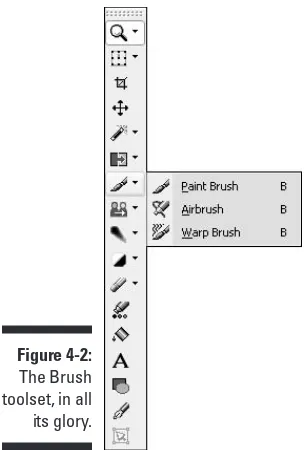
Applying a Texture ...70
Storing Custom Materials to Use Again ...72
Using a Stored Material ...72
Deleting a Stored Material ...73
Chapter 4: Painting, Spraying, and Filling . . . .75
Choosing the Tool for the Job ...76
The Brush toolset...77
The Eraser toolset ...78
The Flood Fill tool ...79
Using Basic Artist’s Tools: Paint Brush, Airbrush, and Eraser ...79
Painting with the Paint Brush or Airbrush tool ...80
Erasing with the Eraser tool ...81
Controlling Strokes, Sizes, Shapes, and Spatters: Tool Options ...84
Using convenient controls on the Tool Options palette ...86
Making lines wider or narrower: Size ...87
Shaping clicks, lines, and line ends: Shape ...87
Painting with a softer or harder edge: Hardness ...88
Making paint thinner or thicker: Opacity ...88
Getting speckles of spray: Density ...89
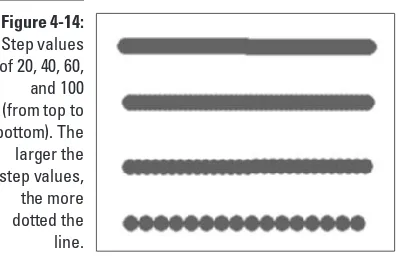
Making lines more or less dotty: Step ...90
Coloring within the Lines by Using Selection ...91
Replacing Colors ...91
Filling Areas ...93
Filling a selected area with solid color ...93
Filling with a gradient, pattern, or texture ...94
Blend modes ...95
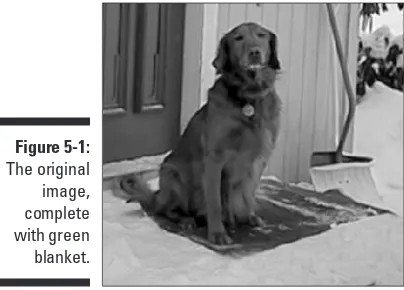
Alex, the Saintly Dog ...96
Warping Your Picture ...99
Chapter 5: Painting with Pictures . . . .101
Cloning Alex the Dog ...102
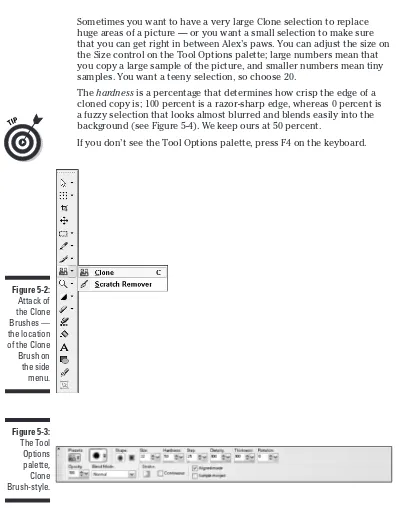
Other Clone Brush options ...105
Cloning versus selection ...105
Painting with Picture Tubes ...106
Basic tubing ...107
Adjusting basic tube behavior ...108
Part III: Improving Appearances...109
Chapter 6: Retouching Touchy Spots . . . .111
Adjusting Your Retouch and Hue Strokes ...112
The Friendly Finger of the Retouch Toolset ...112
Softening ...112
Smudging ...114
Other Retouch tools ...115
The Color Madness of the Hue Toolset ...115
Lightening and darkening ...115
The rest of the Hue toolset ...117
The Scratch Remover Tool ...117
The Red-Eye Remover ...119
Reconstructing the pupil ...120
Outlining problem pupils ...122
Replacing pupil and iris ...123
Chapter 7: Finessing Photos with Adjustments . . . .125
The One Step Photo Fix ...126
Using the Adjustment Dialog Boxes ...126
Correcting Lighting Color ...128
Correcting Contrast and Brightness ...129
Intensifying (or Dulling) Colors ...130
Removing JPEG, Moiré, and Other Patterns ...131
Unearthing JPEG artifacts ...132
Don’t want no moiré ...132
Unlacing your interlacing ...133
Rubbing Out Scratchiness ...133
Bringing into Soft Focus ...134
Correcting for a Specific Color ...135
Sharpening, Edge Enhancing, or Blurring ...137
Sharpening ...137
Edge enhancing ...138
Blurring ...138
Removing Noise (Speckles) ...139
Chapter 8: Creating Artsy Effects . . . .143
Try ’Em On: Browsing the Effects ...145
3-D: Holes, Buttons, and Chisels ...146
Art and Artistic Effects: Simulating Traditional Art Media and Beyond ...147
Example 1: Topography ...148
Example 2: Brush strokes ...149
Geometric, Distortion, and Image Effects: Curls, Squeezes, Wraps, and Waves ...150
Illumination Effects: Sunbursts and Flares ...152
Reflection Effects: Mirrors and Patterns ...153
Texture Effects: Bumpy Surfaces from Asphalt to Weaves ...155
Relating texture effects to the Material box’s textures ...155
Using texture effect controls ...156
Example 1: The Fur texture effect ...157
Example 2: The Texture texture effect ...157
Common Adjustments ...159
Framing Your Effects ...160
Chapter 9: Adjusting Color By Bits . . . .161
Mastering the Color Illusion ...162
Understanding why the trick works ...162
Fiddling with the mix ...162
Using Hue, Saturation, and Lightness ...164
Color Depth and Number of Colors ...165
Checking your image’s color depth ...165
Increasing color depth to use more tools ...166
Chapter 10: Laundering Your Image for Brightness,
Contrast, and Color . . . .169
Using the Adjustment Dialog Boxes ...170
Making adjustments ...171
Proofing or previewing your adjustments ...172
Getting Brighter, Darker, or More Contrast-y ...172
Laundering Lights, Mediums, and Darks Separately ...173
Laundering for Lightness, Color Intensity, and Hue ...175
Lightness: Brightening without bleaching ...176
Saturation: Getting more or less intense ...177
Hue-ing and crying ...177
Altering an Overall Tint ...177
Going Gray with a Tint: Colorizing ...178
Going Totally Gray or Negative in One Step ...179
Using More Sophisticated Color Adjustments ...179
Levels ...180
Curves ...181
Posterize ...182
Threshold ...182
Part IV: Changing and Adding Content ...185
Chapter 11: Getting Bigger, Smaller, and Turned Around . . . .187
Getting Sized ...188
Proportioning ...189
Dimensioning ...189
Avoiding degradation ...190
Trimming (Cropping) Your Edges ...191
Getting Turned Around, Mirrored, or Flipped ...192
Rotating ...193
Mirroring and flipping ...193
Taking on Borders ...194
Achieving a Particular Canvas Size ...194
Chapter 12: Selecting Parts of an Image . . . .197
Selecting an Area ...198
Selecting a rectangle or other regular shape ...200
Selecting by outlining: The Freehand tool ...201
Selecting by color or brightness: The Magic Wand tool ...203
Modifying Your Selection ...206
Moving the selection outline ...206
Adding to or subtracting from your selection ...207
Expanding and contracting by pixels ...208
Removing specks and holes ...208
Selecting similar areas ...209
Feathering for More Gradual Edges ...210
Antialiasing for Smoother Edges ...212
Selecting All, None, or Everything But ...212
Selecting Alex, and Only Alex ...213
Avoiding Selection Problems in Layered Images ...215
Chapter 13: Moving, Copying, and Reshaping
Parts of Your Image . . . .217
Floating, Moving, and Deleting Selections ...218
Cutting, Copying, and Pasting from the Windows Clipboard ...219
Cutting and copying ...219
Pasting ...220
Pasting to create a new picture: As New Image ...221
Pasting on an existing image: As New Selection ...221
Pasting for maximum flexibility: As New Layer ...222
Removing the background or other colors from your selection ...223
Tips for natural-looking pastes ...225
Resizing, Rotating, Deforming, and Perspective-izing ...226
Preparing for deformation ...227
Doing the deformation ...228
Other handy deformities ...232
Chapter 14: Layering Images . . . .235
Putting Layers to Work for You ...235
Getting Layers ...236
Calling a Pal for Help: The Layer Palette ...237
Creating a New, Blank Layer ...238
Working on Layers ...241
Seeing, Hiding, and Rearranging Layers ...242
Pinning Layers Together: Grouping ...242
Using Layers to Separate or Combine Images ...244
Combining entire images ...244
Separating image parts into layers ...244
Copying, cutting, and pasting with layers ...245
Copying entire layers from one image to another ...247
Blending images by making layers transparent ...248
Blending images in creative ways ...249
Creating and Using Adjustment Layers ...250
Creating an adjustment layer ...251
Choosing the type of adjustment layer you need ...252
Applying adjustments to only certain areas ...252
Using Vector Layers ...253
xvii
Table of Contents
Chapter 15: Adding Layers of Text or Shapes . . . .257
Keeping Track of Objects and Layers ...258
Adding and Editing Text ...259
Creating, placing, and editing text ...259
Bending text to follow a line or shape ...262
Drawing Lines and Shapes ...263
Straight, single lines ...264
Freehand lines or shapes ...265
Connecting dots ...266
Connecting dots with curved lines ...267
Adding preset shapes ...268
Dragging a shape ...268
Picking at Your Nodes ...270
Changing Colors and Other Properties ...272
Controlling Your Objects ...274
Selecting and grouping vector objects ...274
Deleting, copying, pasting, and editing ...275
Positioning, arranging, and sizing by hand ...275
Part V: Taking It to the Street ...277
Chapter 16: Printing . . . .279
Fitting Your Print to the Paper ...279
Printing in Grayscale and Other Options ...281
Printing an Image ...282
Printing Collections or Album Pages ...282
Fooling with the pictures and layout ...285
Saving and reusing your template ...285
Printing at Different Speeds or Qualities ...286
Speed, size, and ink ...286
Printer and image resolution ...286
Chapter 17: Creating Web Images . . . .289
Making Images Download Faster ...289
Exporting Images for the Web ...290
Choosing features and file types ...291
Creating GIF files ...292
Creating JPEG files ...295
The JPEG Wizard ...297
Doing Common Webbish Tricks ...297
Creating buttons ...297
Creating Interactive Web Pages from Graphics ...298
Creating image slices ...298
Entering the links ...300
Optimizing the cells ...301
Saving and reloading your work ...301
Saving the result as a Web page ...302
Making rollovers ...302
Chapter 18: Automating Paint Shop Pro . . . .305
Saving Tool and Effect Settings As Presets ...305
Scripting 101 ...307
Recording a script ...307
Running a script ...308
Advanced scripting ...309
Part VI: The Part of Tens ...311
Chapter 19: Ten Perplexing Problems . . . .313
“The Tool or Command Doesn’t Do Anything” ...313
“Paint Shop Pro Keeps Asking Me Confusing Questions!” ...314
“The Tool or Palette Just Isn’t There!” ...315
“The Image Is the Wrong Size Inside or Outside Paint Shop Pro” ...315
“The Paint Doesn’t Come Out Right” ...316
“New Text Appears Whenever I Try to Change Text” ...316
“The Text or Shape Comes Out the Wrong Color, Texture, or Pattern” ...317
“The Magic Wand Tool Doesn’t Select Well” ...317
“The Tool Works, but Not Like I Want” ...318
“Paint Shop Pro Doesn’t Open Images!” ...318
Chapter 20: Ten Fast Fixes for Photo Failures . . . .319
Rotating Right-Side Up ...319
Getting the Red Out ...320
Photos without Enough Flash ...321
Photos with Too Much Flash ...322
Revealing Dark Corners ...322
Removing Unwanted Relatives ...323
Adding Absent Relatives ...325
Zapping Zits ...326
Making Gray Skies Blue ...326
Making Colors Zippier ...327
Introduction
C
ongratulations! Brilliant person that you are, you use Paint Shop Pro! Thousands of other brilliant people also use Paint Shop Pro, and for one intelligent reason: It does darned near anything you could want it to do, from fixing photographs to animating Web graphics, and — unlike certain more famous programs — it doesn’t set you back a week’s salary.Guided by that same intelligence, you’re probably asking yourself, “Is a book available that gives me what I want, quickly, without dragging me through a tutorial? One with an attractive yellow-and-black cover so that it doesn’t get lost in the clutter on my desk? Preferably cheap?”
Welcome to Paint Shop Pro 8 For Dummies,the attractive, inexpensive, yellow-and-black book that lets you get great graphics out of Paint Shop Pro without making you feel like you’re going back to school in an attractive, yellow-and-black school bus.
What Can You Do with This Book?
Books are useful, elevating things. Many people use them to elevate their PC monitors, for example. With that fate in mind, this book has been created to serve an even higher purpose: to enable you to do the kind of graphics stuff you really want to do. Here’s a smattering of what you can do with the help of this book:
Download photos from a digital camera.
Fix up fuzzy, poorly exposed, or icky-colored photos.
Print album pages or other collections of photos.
Paint, draw, or letter-in all kinds of colors, patterns, and textures.
Draw using lines and shapes that you can go back and change later.
Apply cool special effects to photos and drawings.
Change colors of objects.
Combine photos with other images.
Alter the content of photos and other images.
Add wanted relatives to Wanted posters.
Retouch unsightly relatives on Wanted posters.
Create transparent and other Web page graphics.
Is This the Book for You?
Is this the Paint Shop Pro book for you? It depends. If, like us, you tend to leave chocolate fingerprints from your bookstore biscotti on the books you’re browsing, it’s definitely yours now.
In addition, this book is for you if
You find most computer books boring or useless
You need solutions rather than lessons
You find parts of Paint Shop Pro 8 confusing
You haven’t ever done much with graphics programs
You have used other Windows programs
You need Paint Shop Pro for business or home use
You really like bulleted lists
How Is This Book Organized?
Computer software “manuals” document features because that’s the easiest way to write one: “The File menu presents the following choices. . . .” If features on the File menu exactly matched what you had in mind, that would be great — but how are you to know to use the Clone Brush tool when what you’re really looking for is the “Fix Uncle Dave’s hair transplant scars” tool?
Some computer books are organized into lessons, teaching you how features work. They give you examples of basic tasks and then more complicated ones. Along the way — before too long, you hope — you find an example resembling what you had in mind.
You don’t have to read the book in any order. Just skip to the section or chap-ter you need. Go right to the index, if you want — or the Rich Tennant car-toons! In detail, this book is organized as described in this section.
Part I: Getting the Picture
This part puts you in the picture and puts your picture in Paint Shop Pro. Chapter 1 puts you in the picture, explaining how to get control over all the various doo-dahs floating around the Paint Shop Pro screen. The chapter also gives quick synopses of what the various tools do, which is particularly useful for anyone who needs just a few hints to get going — and it tells you how to open an image file, create a new image, or save an image as various file types. Chapter 2 tells you how to get existing images into Paint Shop Pro, whether it’s from a scanner, a digital camera, or a PC screen. This chapter also gives you hints on how to do something your relatives will love: Squeeze files so that they download quickly.
Part II: Painting the Picture
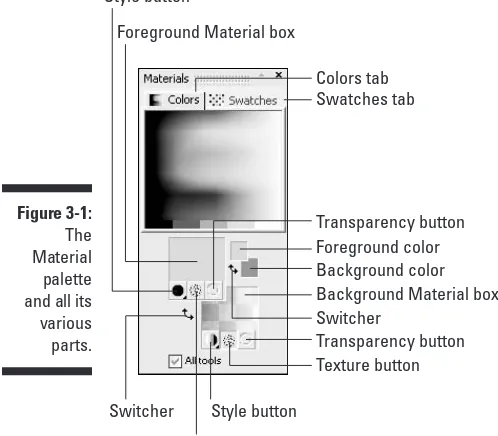
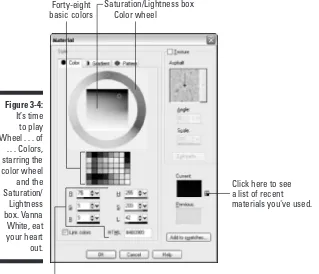
Part II is for anyone who plans to paint, draw, or otherwise doodle in Paint Shop Pro. Chapter 3 addresses the new Paint Shop Pro Materials box, showing you how to not only get the color you want but also paint in the wild gradi-ents, patterns, and textures that Paint Shop Pro 8 offers. Chapter 4 tells you how to use the basic Paint Shop Pro painting tools and also how to control the way the Paint Shop Pro paint tools work: brush size, spray patterns, brush shapes, paint density, and more. Chapter 5 shows you how to do something you have seen only in cartoons: Make images flow right off a paint brush. We explain two features that are useful for retouching: the Paint Shop Pro Picture Tubes tool (a kind of spreadable clip art) and the Clone Brush tool.
Part III: Improving Appearances
When you have an image that needs some sprucing up, Part III is the place to turn. Chapter 6 shows you how to use the Paint Shop Pro hand tools to brush away wrinkles from portraits, fix scratches, and remove red eye. Chapter 7 gives you nearly instant ways to correct overall photo problems, such as bad exposure, poor color, or blurry, speckly, and dim grayish images. In addition, we discuss the fabulous One-Step Photo Fix! Chapter 8 takes you to fun and exotic lands of artistic effects, where you can twist, make three-dimensional buttons, do cutouts, or make an image look like it was done in neon or bur-nished copper! Chapter 9 helps you cope with the inescapable reality that, yes, you really are using a computer, and if you want the most from Paint
Shop Pro, you need to understand just a little about how it deals with color. Chapter 10 shows you how to fine-tune the quality of an image for contrast, brightness, and color and tackle the more subtle problems of certain photos.
Part IV: Changing and Adding Content
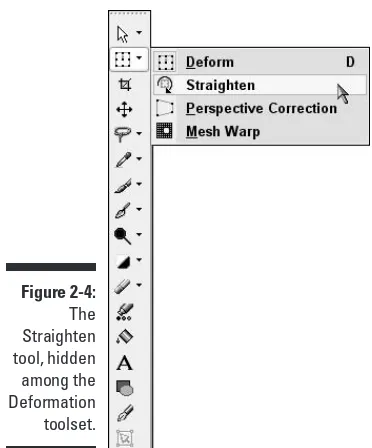
Part IV opens the door to a brave (and fun) new world: changing the content of an image. Chapter 11 shows you how to change the size, proportion, orien-tation, and rotation of an image. (Straightening an image, however, is covered in Chapter 2, with the scanning information.) This chapter also shows you how to crop an image to get the composition you want or flip the image into a mirror image. Chapter 12 gives you one of the key tricks for changing con-tent: selecting parts of an image. Because Paint Shop Pro has no idea where cousin Suzie begins and her husband ends, it’s up to you to tell Paint Shop Pro “Suzie’s the one in white” or to outline her by hand, when you want to abstract her into a solo portrait. Chapter 13 shows you ways to move, copy, or reshape the parts you select. Need a flock of jumping sheep when you have only a few? Clone your sheep like Dolly! Chapter 14 shows you how to divide images into layers or use layers to combine images. Layers are power-ful tools that make later editing much easier and produce stunning image overlays. Chapter 15 lets you add layers of easily edited text and shapes to an image, using the Paint Shop Pro 8 expanded vector graphics tools.
Part V: Taking It to the Street
All this fooling around in Paint Shop Pro is great, but in the end you probably want an image to appear somewhere else: on a piece of paper, on the Web, or as part of an animation. Chapter 16 shows you how to best fit an image on paper. It also tells you how to print multi-image pages for photo albums, col-lages, or portfolios. Chapter 17 tells you how to get exactly the image file you want for the Web and gives you tips for getting the fastest-downloading images with the least sacrifice in quality. Lastly, when you have found how to do what you want in Paint Shop Pro, Chapter 18 shows you two new tricks that Paint Shop Pro 8 has put in, scripting and presets, that save you oodles of time in the long run.
Part VI: The Part of Tens
Icons Used in This Book
This icon points out important issues or tidbits of information you want to be sure to remember. Just remember to look for the Remember icon.
An all-purpose workhorse, this icon offers advice or shortcuts that can make your life a whole lot easier.
Skip over this one if you want. This icon marks geekfest stuff you don’t really need to know, but might find interesting.
Tread lightly when you see this icon because something unpleasant could happen if you proceed without following this cautionary note.
Shortcuts and Conventions in this Book
This book doesn’t have many conventions. It does, however, employ one basic shortcut that is a convention in all For Dummies books:
Rather than say “Click the word File on the menu bar and then click the word
Openon the menu that drops down,” this book says “Choose File➪Open.” This method saves time, saves trees, and keeps you from falling asleep. (The underlined letters you see in numbered steps are the same ones you find in all Windows programs. They indicate that if the mouse breaks, you can press the Alt key on the keyboard along with the underlined letter’s key to get the same result as though you had clicked the word with the mouse.)
(Oh, yes, please buy the book now. Thanks.)
If you feel inclined, drop us some e-mail. Dave’s at [email protected], and William’s at [email protected]. We’re just two guys with no special connections to Jasc (the company that makes Paint Shop Pro) and no helpers, so we may not be able to answer your questions — but we’ll try.
Part I
N
eed to get in the picturequickly? Do you need to get a picture quickly into or out of Paint Shop Pro? Start here.The Paint Shop Pro screen has more controls, tools, and objects floating around in it than the space shuttle has. In Chapter 1, we (briefly) summarize what all this stuff does, help you bring the various floating windows under your control, and show you how to use fundamental features, like the command history and undo/redo features. If you already have some experience with graphics programs, read Chapter 1 for a fast way to discover the unique Paint Shop Pro quirks and features.
Chapter 1
Opening, Viewing, and Saving
Image Files
In This Chapter
Opening and browsing image files
Zooming in and out
Saving image files
Reading image information
Working with different image types
Using vector file types
Converting or renaming batches of files
Working with file types and color messages
Downloading images from the Web
I
mages, like documents, music, or any other lump of stuff you work with on a computer, are usually stored somewhere as files. After you have an image as a file on a CD, your PC, or your computer network, Paint Shop Pro can probably open it. If the image is on a camera, you may need to download it to your PC first — see Chapter 2.Images, like children, are easy to deal with in small quantities and variety — but in large quantity and variety, they’re challenging to manage. Paint Shop Pro gives you lots of tricks for keeping an eye on all your graphical progeny, from browsing and previewing them to zooming in or out or saving them as a different type of file.
and foreign file types,” later in this chapter, if someone gives you a file that behaves oddly. Fortunately, although you need to be aware that images come in a variety of file types, most of the time you don’t have to give a hoot. Paint Shop Pro can crack open most popular types of image file.
Opening Image Files
Paint Shop Pro gives you three ways to open a file:
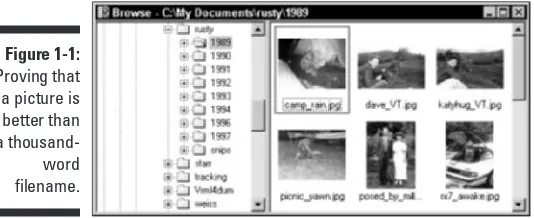
Browsing (“I’ll know it when I see it”): Choose File➪Browse or press Ctrl+B. The browser window opens, as shown in the following section, in Figure 1-1. You open folders in the left panel, and double-click tiny pic-tures in the right panel to open them.
Opening (“I know its name and where it lives”):Choose File➪Open; or, click the Open button on the Tool Bar, or press Ctrl+O. The Open dialog box appears, as shown a couple of sections from here, in Figure 1-2.
Double-clicking (“There it is — open it”): If you see a file listed and it displays a Paint Shop Pro icon (a tiny, artist’s palette), double-click that puppy and Paint Shop Pro should start up and display the image. That’s all you need to know — well, at least most of the time, that’s all. The following sections give you some additional tricks and tips for opening files in those three ways.
If you can see the image, but aren’t sure where the image file is, see Chapter 2. Images that appear in some document (a Web page, a Microsoft Word docu-ment, an Adobe Acrobat document) may not be stored as a file on your com-puter. (Or, if they are, they may be very hard to find.) You may need to capture the image off your screen.
For some files, Paint Shop Pro has to translate the image file into a form it can use. Translation may especially be necessary for vectorimage files, such as DXF and WPG. To translate, Paint Shop Pro needs additional information from you: specifically, how many pixels wide and high you want the image to be. See the section “Using Vector File Types (Drawing Files),” later in this chapter for more information.
Nifty browser tricks for opening
and managing files
Press Ctrl+B.
Click the Browse icon, as shown in the margin.
Choose File➪Browse.
If the Open dialog box is open already, click the Browse button. Figure 1-1 shows the Browse window, with the sort of images you see next. (Paint Shop Pro may take a few seconds to display all the images.) To close the window when you’re done, choose File➪Close or press Ctrl+F4.
The left side of the Browse window looks and works like Windows Explorer. Click a folder to see its contents (thumbnail images of the graphics files in that folder). If the folder contains more folders, a + sign appears to its left. To open that folder, click the + sign; to close it, click the – sign that now appears where the + sign did.
On the right side of the window are the thumbnail images with their file-names. Here are some ways to make good use of your thumbnails:
To open an image file:Double-click the image.
To check image type, size, and date: Pause your cursor over any thumbnail. Paint Shop Pro displays the information near your cursor. For more detail, right-click the thumbnail and choose Information from the menu that appears.
To manually rearrange thumbnails: Drag them where you want them.
To move an image to a different folder:Drag the thumbnail from the right pane to your destination folder in the left pane.
To copy a file to a different folder:Drag the thumbnail to another folder while holding the Ctrl key down.
[image:32.531.77.344.215.324.2]To create a new folder: In the left panel, click the folder in which you want to create a new folder. Choose File➪Create New Folder, and in the Create New Folder dialog box that appears, type your new folder’s name.
Figure 1-1: Proving that a picture is better than a thousand-word filename.
To delete a file:Right-click its thumbnail and choose Delete from the menu that appears.
To rename a file:Right-click its thumbnail, choose Rename from the drop-down menu, and enter a new name in the Rename File dialog box that appears.
To select several files for opening, moving, copying, or deleting:Hold down the Ctrl key and click their thumbnail images. To select a series, left-click the first (or last) image; then hold down the Shift key and click the last (or first) image. Follow the instructions in the preceding bullets for opening, moving, copying, or deleting files.
To sort your thumbnails in different ways, follow these steps:
1. Right-click the blank area to the right of the pictures and choose Sort from the context menu that appears.
The Thumbnail Sort dialog box appears.
2. Choose Ascending or Descending sort order from the Primary Sort tab.
3. Choose what to sort by in the Sort Conditions area: file attributes, such as date, or image attributes, such as dimensions (size).
4. To sort within a sort (such as by filename within each file date), click the Secondary Sort tab and again choose a sort order and what to sort by.
5. Click OK to sort.
Helpful hints for opening files
by name and location
If you think that you know the name of your file and the disk and folder where it lives, you can choose the fastest route to opening the file. Choose the familiar old File➪Open command (every program has one) or press Ctrl+O or click the File Open button on the toolbar (as shown in the margin of this paragraph). Paint Shop Pro adds a few special features for working with images, however. Figure 1-2 shows the Open dialog box that appears.
To make sure that you’re opening the right file:Click to enable the Show Preview check box. Then click any file, and a preview appears in the Preview window, as shown in Figure 1-2. The Preview feature may slow you down. The computer takes a little extra time to display a pic-ture, so you may want to disable the check box if you have big pictures and don’t really need previews.
To switch to the browser:Click the Browse button.
To open more than one file at a time: Hold down the Ctrl button while clicking filenames, and then click the Open button. Or, to open a bunch of image files listed sequentially in the Open dialog box, click the first file, hold down the Shift button, click the last file, and then click the Open button.
To open a commonly used or favorite folder:Click the Favorites button. That’s the rightmost button (refer to Figure 1-2) on the dialog box toolbar. From the drop-down list that appears, choose the My Pictures folder, the My PSP8 Pictures folder (in My Documents on your hard drive), or the Paint Shop Pro 8 folder (in My Programs on your hard drive.) You can add a folder to the list. Just open that folder in the Open dialog box, click the Favorites button, and choose Add Current from the drop-down menu. To remove a folder, choose Remove and then choose the folder from the list that drops down.
To trim down the list of files to show just one type (if you’re looking for a GIF file, for example): Click the Files of Type selection box and choose that type from the many file types Paint Shop Pro can read.
Go to a favorite folder
Preview appears here Click to see preview
Figure 1-2: The Preview option makes opening the right file easier, if slower.
If the file you want isn’t listed, make sure that the wrong file type isn’t chosen in the Files of Type selection box. File type choices are “sticky,” in that if you previously chose to display only GIF files, the next time you use the Open dialog box it displays only GIF files. If you’re looking for a JPG file now, you don’t see it! Choose All Files under Files of Type to see all files again.
To see information on image width, height, and color depth: Read the Image Information area after you click your file.
To see more information about an image you have clicked, such as date or file size:Click the Details button.
Secrets of opening a file
by double-clicking
If you see an image file listed on your computer — in a My Computer or Windows Explorer window, for example — and it displays the Paint Shop Pro palette icon, you can open it in Paint Shop Pro by double-clicking that icon. If you have several images you want to open, double-click each of them sepa-rately, and they all get a separate window in Paint Shop Pro. You don’t end up with multiple copies of Paint Shop Pro running.
If you have an image file that Paint Shop Pro doesn’t open when you double-click it, three things could be responsible:
The file doesn’t have an extension, like .jpg or .gif. This problem often happens when someone sends you a file from a Macintosh computer. Use the browsing or File➪Open technique described in the preceding sections.
Paint Shop Pro can’t open the file. Paint Shop Pro can open many differ-ent types of files, but not all of them.
Paint Shop Pro may not be configured to open that file type. See the nearby sidebar, “Making Paint Shop Pro open the right file types when you double-click.”
Viewing and Zooming an Image
Zooming doesn’t change the size of an image (in pixels or in inches). It only changes how big Paint Shop Pro displays the image onscreen.
Zooming an image in the window
The basic way to zoom in (enlarge the view) or zoom out (see the big picture) is to use the Zoom tool. Click the tiny down arrow on the top button on the Tools toolbar, as shown in the margin of this paragraph. Buttons in Paint Shop Pro 8 are what we call “tool groups” from which you choose a tool.
15
Chapter 1: Opening, Viewing, and Saving Image Files
Making Paint Shop Pro open the right file types
when you double-click
Two problems can occur with double-clicking as a way of opening image files:
Paint Shop Pro may open files that you would prefer to be opened by some other program. For example, if you’re running AutoCAD or another AutoDesk program, you may prefer that the AutoDesk program open DXF files because they’re one of AutoDesk’s own file types.
Paint Shop Pro may fail to open image files that you want it to open. For example, you may install new software for a new digital camera, and, suddenly, when you double-click JPG files, some program other than Paint Shop Pro opens the file.
These problems usually occur when you have more than one graphics program. The latest one installed may grab all the file types for itself. Both problems can be solved the same way. Follow these steps to determine which files are opened (or not) by Paint Shop Pro:
1. Chose File➪Preferences➪File Format Associations.
The File Format Associations dialog box appears. This box directs Windows to open certain file types using Paint Shop Pro.
2. Click the check boxes to enable or disable the file types you want opened by Paint Shop Pro.
To disable all check boxes, click Remove All. To enable all check boxes, click Select All. (After that, you can enable or disable check boxes manually, if you like.) To have Paint Shop Pro open only the file types that aren’t opened by any other program, click Select Unused.
3. Click OK.
Here, you get a choice of the Pan tool (the arrow) or the Zoom tool (the mag-nifying glass). Click the Zoom tool. Your cursor changes to a magmag-nifying glass icon. Then click with it on the image in this way:
Click (left-click) to zoom in.
Right-click to zoom out.
To see the image at its actual size (100 percent), press Ctrl+Alt+N or choose Window➪View Full Size.
Paint Shop Pro 8 also lets you magnify a portion of the image, rather than have to enlarge the whole thing to see a detail. With either the Pan or Zoom tool selected, choose View➪Magnifier or press F11. Move your cursor over an area of the image, and a special 5x Zoom window shows you a close-up view of that area. Repeat the command or press F11 again to remove the magnifier.
Working on several images at a time
You can open several images at a time in Paint Shop Pro. Each one gets its own window. Having several images open is useful for tasks such as cutting and pasting between images. To help manage those windows, use the com-mands on the Paint Shop Pro Window menu. That menu contains the usual suspects of nearly all Windows programs: Cascade, Tile (Horizontally or Vertically), or Close All to close all image files.
Remember that Paint Shop Pro tools and commands apply to only the image window that’s active(the one with the colored title bar). Click an image window’s title bar to make that window active and bring it to the front.
Saving a Changed Image File
After you’re done modifying an image in Paint Shop Pro, you need to save it. Saving an image in Paint Shop Pro is often just as easy as saving a Microsoft Word document, for example. Choose File➪Save or click the Save button on the standard toolbar (the diskette icon) or press Ctrl+S.
Paint Shop Pro quietly saves, in most instances, an image as the same type (format) of file (JPG, for example) that it was when you opened it. It may, however, raise a warning, depending on what changes you have made — see the following sidebar, “When Paint Shop Pro offers a merger.”
Saving the Image First As
a Paint Shop Pro File
If you bake a pie, you can (a) save it in a nice Tupperware pie carrier if you’re taking it to a community supper (b) wrap it in plastic and freeze it if you’re planning ahead for a holiday or (c) mush it into a little plastic bag and put it at the bottom of your backpack if you’re going hiking. In all cases, you still have tasty pie — but stored in ways that are appropriate for particular uses, and not appropriate for others.
Likewise, you can save an image as many different types of file. Some types are good for one purpose, and others for another. The choice depends on what you (or the people you give the file to) intend to do with the image. Another person, for example, may have Photoshop but not Paint Shop Pro, and so may want a Photoshop file instead. Or, you may need a JPG, GIF, or PNG file for putting on a Web page (which doesn’t display many of the other image file types).
17
Chapter 1: Opening, Viewing, and Saving Image Files
When Paint Shop Pro offers a merger
Paint Shop Pro lets you do some sophisticatedmodifications to an image, like adding fancy text, shapes, or overlaying images. To simplify this sort of image work, Paint Shop Pro keeps some stuff on separate layers. (That way, you can fool with your changes without messing up the original.)
Not all file types (like JPG) can handle layered images. So, if you start with a JPG image, put text on it, and try to save it as a JPG image file, Paint Shop Pro will have to combine all those layers into one single layer, called a merged image. Paint Shop Pro pops up the dialog box shown in this figure.
We suggest that you decline this merger: Click No. Then save your file as a Paint Shop Pro image. If you must have an image of a certain type (for example, a JPG or PNG file for a Web
The best idea, however, is to first save the image as a Paint Shop Pro (PSP) type of file, even if it started out life as a different type. Paint Shop Pro files are a good choice because, among other things, they save layers and any cur-rent selection you may have made during the editing process. Most other file types don’t save that stuff. Some file types are “lossy” (like most JPG vari-eties), which means that they may even lose quality. PSP files are sort of the Tupperware solution.
After you have taken the precaution of making a Paint Shop Pro file, if you (or the people to whom you’re giving the file) also need a different type of file, save a copy as that other type of file. If you make subsequent changes to the image, always make the changes to the Paint Shop Pro file and then make copies of that file in the various file types you may need.
To save any image as a Paint Shop Pro file, first look at the filename on the title bar, in the upper-left area of the Paint Shop Pro window. (The filename appears after the words Jasc Paint Shop Pro.) The filename should end in a period and three letters; if not, see the following sidebar “How the FPX can I see the TIF, JPG, DXF, and other extensions?!”
If the filename has the extension .psp or .PspImage, simply choose File➪Save or click the Save button on the toolbar. You’re done! (Your image was a Paint Shop Pro file already; you just updated that file with your latest changes.) If the filename ends in anything other than .psp or.PspImage, follow these steps:
1. Choose File➪Save As.
The Save As dialog box appears.
2. Click the Save as Type box and select the Paint Shop Pro Image option.
3. Select a folder and type a name for the file.
Do this exactly as you would to save a file in any other Windows program. To save an image in a personal favorite folder, click the Favorites button, the rightmost button on the Save dialog box’s toolbar. In the drop-down list that appears, you can choose the My Documents folder. (We don’t recommend saving in the Temp, or temporary, folder.) To add your own favorite folder to the list, first open that folder in the Save dialog box. Then click the Favorite Folders button and choose Add Current from the drop-down menu. To remove a folder, choose Remove and then select the folder from the drop-down list.
4. Click the Save button.
Saving a Copy of Your File
As Another File Type
After saving the image as a Paint Shop Pro file (see the preceding section), if you also need the image in a different file type, follow these steps:
1. Choose File➪Save Copy As.
The Save Copy As dialog box appears.
2. Select the file type you want from the Save as Type box.
If you want to save the file as a Paint Shop Pro file, but in a form that earlier versions of Paint Shop Pro can read, click the Options button. The Save Options dialog box appears; choose the version you want, and then click OK.
If you’re saving the file as a non-PSP file, the Options button may be grayed-out (disabled). If not, it provides access to variations on your chosen format that can sometimes be useful, like reducing the file size or putting the file in a particular form that somebody needs. The follow-ing section provides a few examples of options.
3. Click the Save button.
When you save a copy in a different file type, the open file isn’t affected. It remains whatever file type it was. If you have used layers (or floating selec-tions) and save a copy as something other than a Paint Shop Pro file, Paint Shop Pro may have to merge (combine) those layers into a single image. The program displays a dialog box to warn you if it needs to merge layers into a single image. That merge doesn’t happen to the Paint Shop Pro image you’re working on, only to the file copy you’re creating. Don’t worry — just click Yes to proceed.
Using Native and Foreign File Types
You often have to open or create files that are not a Paint Shop Pro file, and knowing something about the file types can be helpful. The next sections describe a few of the most popular file types. Each file type is identified by the three-letter ending (extension) it uses. For example, Paint Shop Pro files end with the extension .psp or .PspImage.
Most of the time, you don’t have to do anything special to open a particular file type or to save your work as that type of file — but, then again, some-times you do. Paint Shop Pro, in most cases, simply asks you a few questions to resolve any problems when opening or saving a foreign file type.
Paint Shop Pro files (PspImage or PSP)
PspImage is the native Paint Shop Pro 8 file type and is probably the best choice for storing your own images. (It’s the metaphorical Tupperware stor-age solution, if you have been following our pie storstor-age metaphor.) When you save your work as a Paint Shop Pro file, you can save everything just as it is, including any areas you have selected with the Paint Shop Pro selection tools, plus your various kinds of layers, palettes, tool settings (like current brush width), transparency, and other advanced features. You can pick up almost exactly where you left off. Paint Shop Pro files can have any color depth you choose. (See Chapter 9 to understand what we mean by color depth.). PspImage is the latest and greatest of the Paint Shop Pro native formats; ear-lier versions used the PSP extension.
Programs other than Paint Shop Pro or Animation Shop don’t often read Paint Shop Pro files, however. You may need to save a copy of your image in a dif-ferent file type for someone who uses other software. Also, earlier versions of Paint Shop Pro can’t read later Paint Shop Pro files (Paint Shop Pro 7 can’t read Paint Shop Pro 8 files, for example.) To create Paint Shop Pro 5.0, 6.0, or 7.0 files using Paint Shop Pro 8, see the instructions for saving a copy of your image in the section “Saving a Copy of Your File as Another File Type,” earlier in this chapter.
”How the FPX can I see the TIF, JPG, DXF,
and other extensions?!“
Image files are often referred to by the three-or-more letter ending (extension)at the end of their filenames. The file polecat.tif, for example, is a
TIF(or TIFF) file. On many computers, Windows is set up to hidethese extensions, which makes your life harderwhen using Paint Shop Pro. If, when you go to open a file in Paint Shop Pro, the files don’t appear to end with a period and three-letter extension (such as .psp, .bmp, or .pcx), Windows is hiding valuable information from you.
BMP
BMP files are Windows bitmapfiles; that is, they were designed by Microsoft for storing images, and many programs under Windows can read and write them. BMP files can have color depths of 1, 4, 8, or 24 bits. (Set your color depth by using Colors➪Decrease Color Depth or Colors➪Increase Color Depth; see Chapter 9 for details.)
BMP files that are 24-bit can be quite large. When you save a file as BMP, you can click the Options button in the Save As, or Save Copy As, dialog box to choose higher compression (make smaller files). Under Encoding (in the Options dialog box that appears), select RLE and then click OK. (RLE stands for Run-Length Encoding,a way of making image files smaller.) Now, when you save the file, Paint Shop Pro asks your permission to switch to a 256-color (8-bit) version of the BMP file. The resulting file is much trimmer than the original, although the color quality may diminish slightly.
TIFF
TIFF (or TIF) stands for Tag Image File Format (which, of course, tells you nothing useful). Many graphics programs on the PC and Macintosh can read and write TIFF files, so it’s a good choice of file type when you don’t know what kinds of files the other person can read.
TIFF files can be quite large unless you compress them. To compress a TIFF file, click the Options button when using the Save As or Save Copy As dialog box. Then choose the LZW Compression option in the Compression area of the Options dialog box that appears. LZW gives you the best compression and compatibility with most other programs. (No image quality is lost by using LZW compression in TIFF files.)
For advanced users, TIFF is a good choice because it’s capable of storing information not only in RGB primaries, but also CMYK (used for some high-quality printed images). It can also store advanced data for color accuracy, such as gamma.
GIF
The Web uses CompuServe GIF images all over the place. GIF is the most pop-ular of three common file types used on the Internet. (JPG and PNG are the other two.)
Many programs read GIF files. (Older programs may read only the older GIF standard, GIF87, rather than the newer GIF89a. Paint Shop Pro lets you choose which standard to use when saving a GIF file — just click the Options button in the Save As or Save Copy As dialog box.)
GIF is the metaphorical “frozen-pie” option if you’re following our pie metaphor; saving your work as GIF means that it loses something, but per-haps not enough to matter. GIF images have a maximum color depth of 256 colors, which allows fairly realistic images. That number of colors, however, isn’t enough to enable Paint Shop Pro to do all operations, so it may at some point suggest that you let it increase the number of colors. (See “ File Types and ‘Action Required’ Messages About Colors,” later in this chapter.) GIF enables you to use some special features, such as a transparent color
(which lets the background of Web pages show through), and interlaced dis-play(in which the entire image gradually forms as it is downloaded from the Web). GIF can use fewer colors than 256 if you want to save file size and, therefore, save people who view your file on the Web downloading time. A special Paint Shop Pro tool called the GIF Optimizer can help you set trans-parency and otherwise optimize the image for Web use. See Chapter 17 for details of creating images for the Web using this tool.
Some GIF files contain a whole series of images to be displayed as an anima-tion. You can view these images using Animation Shop; Paint Shop Pro shows you only the first image of the series.
JPEG
JPEG (or JPG) stands for Joint Photographic Experts Group, which sounds impressive. JPEG images are common on the Web for color photographs and other realistic color images because their files are small (relative to other file types) and download quickly.
The disadvantage of JPEG is that it usually uses something called lossy com-pression,which means that the image quality is reduced a bit, especially around sharp edges like text. Storing an image as a JPEG is kind of like stuff-ing a pie into a baggie in your backpack for a hike. The basic taste and nutri-tion are still there, and it doesn’t take up lots of space, but because of the squeezing involved, the product may lose some of its appeal.
Click the Options button; in the Save Options dialog box that appears, drag the Compression Factor slider to the left for higher quality but larger files, or to the right for lower-quality and smaller files.
The geeks at the Joint Photographics Experts Group have also come up with a new, lossless variety of JPEG format. To save your files in this maximum-quality-but-largest-file-size format, select Lossless in the Save Options dialog box.
If you’re reading JPEG files, Paint Shop Pro offers an effect that removes some image distortions, called artifacts,that result from compression (see Chapter 7).
As with GIF, Paint Shop Pro offers a special tool, the JPEG Optimizer, for adjusting JPEG images for the Web. See Chapter 18 for details of fine-tuning JPEG images with this tool.
PNG
PNG (Progressive Network Graphics) was designed to take over for GIF on the Web, although it is catching on slowly. It does have some advantages over GIF and accomplishes the same functions as GIF, so it may yet take over. Because its main use is Web graphics, we discuss it a bit more in Chapter 18.
Using Vector File Types (Drawing Files)
Graphics images come in two main flavors: raster(also called bitmap) and
vector. Here are the differences between them:
Raster (bitmap) images are made up of dots (pixels).Most computer images are of this kind, and Paint Shop Pro is principally designed for this kind of image. It both reads and writes a wide variety of raster images.
Vector images are made up of lines, shapes, filled areas, and text.You can change text, lines, and shapes more easily if they’re stored as vectors than if they’re stored as bitmaps. Although Paint Shop Pro is principally designed for raster images, it allows you to create vector layers that con-tain lines, text, and preset shapes. Images stored as .psp files recon-tain any vector graphics you create. Paint Shop Pro can read certain vector image files other than its own .psp files, but converts them to rasters.
Vector files are typically created by popular drawingsoftware (as opposed to
paintingsoftware). AutoCAD, for example, a popular drafting application, writes DXF (Drawing eXchange Format) files. Corel Draw writes CDR files, and Corel WordPerfect uses WPG files. Many other vector file types are in use, too.
Like Paint Shop Pro files, some other file types can also contain a mix of vector and bitmap graphics. These include Windows Enhanced Metafiles (EMF, a Microsoft Windows standard), Computer Graphics Metafiles (CGM, a standard by the American National Standards Institute), PICT (a Macintosh standard), and embedded PostScript (EPS, by Adobe). Some files (like embed-ded PostScript) may contain in some cases both a bitmap and a vector ver-sion of the same image.
Opening vector files
Paint Shop Pro can open many kinds of vector (or mixed vector and bitmap) files. You can also copy drawings, using the Windows clipboard, from most vector programs that run under Windows, and paste the images into Paint Shop Pro.
Whether you’re opening or pasting vector images, however, Paint Shop Pro converts them into bitmap images. To do the conversion, it pops up a Meta Picture Import dialog box that wants you to enter a width and height for this resulting bitmap image, in pixels. (Any dimension information in the original file doesn’t survive the translation, so Paint Shop Pro needs some help from you.)
Select the Maintain Original Aspect Ratio check box if you want to keep the same proportions as the original image. Because Paint Shop Pro is translating between two different kinds of image data, it may make a few mistakes that you have to clean up afterward.
Saving vector files — not
You can’t save pure vector-type image files, such as DXF, in Paint Shop Pro. You can, however, save your work as one of the file types that contains a mix of vectors and bitmaps, such as EPS or CGM.
In those instances, PSP simply stores a bitmap image and leaves the vector part blank. Because no vector data is stored, a program that handles only vector graphics may not be able to read the file.
Converting or Renaming Batches of Files
To copy a bunch of files to a new file format, follow these steps:
1. Choose File➪Batch Processing➪Convert.
2. In the Batch Conversion dialog box that appears, hold down the Ctrl key and click the files you want to convert, to select them.
3. Near the bottom of the dialog box, click the down arrow at the right end of the Type selection box and select the file type you need the files to be.
4. To put the newly generated files in a different folder, click the Browse button and choose a new folder.
5. Click the Start button.
In a few seconds or minutes, you have copies in the new file type you need. To give a bunch of files similar names, differing only by a number (as in hawaii01, hawaii02) take these steps:
1. Choose File➪Batch Processing➪Rename.
2. In the Batch Rename dialog box that appears, hold down the Ctrl key and click the files you want to convert, to select them.
3. Click the Modify button.
The Modify Filename Format dialog box appears. The idea is to combine various naming and numbering elements into a sort of formula for Paint Shop Pro to follow. For example, hawaii50is a “custom text” element of our choosing, followed by a two-digit “sequence.”
4. Click an element in the left panel to choose the first part of the new name, such as Custom Text.
5. Click the Add button to add that element to your formula, which gets assembled in the right panel.
Depending on what kind of element you choose, a one-line text box appears on the right for you to make a choice or enter some text. We stick with our simple example. If you have chosen Custom Text, type your text (hawaii, for example) in the Custom Text box that appears. If you have chosen Sequence, type a starting number in the Starting Sequence box that appears; use as many digits as you need for the batch (type 01for 100 images). For today’s date, choose a date format.
6. Repeat Steps 4 and 5 to add more elements. Make sure that one of your elements is Sequence, or else you’re asking the impossible: for each file to have the same name.
The order in which you add elements on the right is the order in which they appear in the filenames.
7. Click OK. When the Batch Rename dialog box returns, select the files to be converted.
The files are all renamed, and each name includes a different number.
File Types and “Action Required”
Messages about Colors
When you try to use certain Paint Shop Pro features or save your work in a non-PSP format, you may get an “Action required” message from Paint Shop Pro, especially for images not originally in the Paint Shop Pro file format. For example, you may open a GIF file and want to use one of the Paint Shop Pro commands on the Adjust or Effects menu. Or, perhaps you want to add a raster layer to that GIF file. Paint Shop Pro gives you an error message like the one shown in Figure 1-3.
Don’t worry — be happy; just click OK. The issue is that certain file types, like GIF, can handle only a limited number of colors (have limited “color depth”) and many Paint Shop Pro features work only on images able to handle as many as 16 million colors. Paint Shop Pro is offering to create a 16-million-color image for you so that it can apply the tool you want to use.
If you get one of these messages, if you later save your work in the original, color-limited file type (GIF, for example), you also get a message requesting permission to reduce the number of colors back down to whatever that type of file can handle. Simply click OK in whatever dialog box or boxes result, and you will probably be happy with the result.
If you’re a professional and are picky, you understand what’s going on and can take the necessary steps to control the result. You can always change the number of colors manually by choosing Image➪Increase Color Depth or Image➪Decrease Color Depth. You find more about color depth in Chapter 9.
Obtaining Image Files from the Web
The Web is a grab bag of goodies for graphics gurus. Here’s how to get your hands on these fabulous fruits.
One of the best ways to get graphics is to find a Web site offering them free and clear. Most of these sites provide instructions for downloading those image files. To save an image that you’re viewing in your Web browser, use the following methods:
Right-click the image and, on the pop-up menu that appears, look for Save Picture As or a similar choice. You’re prompted for the location on your hard disk where you want the image saved.
Right-click the image and, on the pop-up menu that appears, choose Copy. This choice copies the image to the Windows Clipboard; open Paint Shop Pro and press Ctrl+V to paste the image as a new image. (Choose the Edit➪Paste command to see ways to paste the image into another open image.) Save the image by choosing File➪Save.
A fair number of graphics images on the Web have transparent portions, especially their backgrounds. The transparent parts of these types of image have a hidden color (typically white), and that color may become visible in Paint Shop Pro. See Chapter 18 for more information about transparency in Web images.
Most Web images are one of only a few different file types: GIF, JPEG, or PNG. GIF and some PNG images are palette images,with a limited number of colors (typically, 256 colors). As a result of this color limitation, you may see some of the “Action Required” messages discussed in the preceding section. Many animations on the Web are GIF files. You should open animated GIF files in Animation Shop, not Paint Shop Pro (which displays only the first frame of the animation). Some animations are, however, in a private vector format (Flash) that neither Animation Shop nor Paint Shop Pro can read.
Chapter 2
Capturing Pictures from Paper,
Camera, or Screen
In This Chapter
Scanning images from paper
Getting better scans
Scanning printed images
Downloading pictures from digital cameras
Using TWAIN software
Making e-mail-ready photos
Capturing images from the screen
W
here do your pictures come from? From your new digital camera? From a piece of paper? Or, from your PC screen?Ironically, most people don’t paint pictures in Paint Shop Pro. They get an image from somewhere and then mess around with it. This chapter tells you how to get that image into Paint Shop Pro.
Connecting to Your Scanner or Camera
In this chapter, our instructions assume that you’re using the longtime stan-dard, the TWAIN software interface. However, the instructions also give general scanning tips for everyone, regardless of what form of connection you use.
Scanning into Paint Shop Pro
With scanners almost as cheap as a carton of paper, scanning is one of the most popular ways to get an image into a PC. Many people are surprised that scanning is a more involved process than they expect. Getting an image from
paper isn’t quite as simple as putting an image onpaper — unless quality isn’t all that important.
If your PC is equipped with more than one TWAIN-based image-acquiring device (scanners or cameras, for example), you need to tell Paint Shop Pro which one you’re using before going through the following steps. Choose File➪Import➪Twain➪Select Source. The Select Source dialog box appears. Select your scanner (source) and then click Select.
In most instances, these steps scan an image from a properly installed scan-ner that has a TWAIN interface (although your scanning software may differ):
1. Launch the scanning software that came with your scanner.
To do that, choose File➪Import➪TWAIN➪Acquire. (If your scanner uses WIA, choose File➪Import➪Scanner or Camera.)
Remarking on TWAIN
Mark Twain loved high-tech gadgets (such astypesetting machines, the computers of his day). Although he’ll never meet his namesake, the TWAIN interface, we think that he would have loved the happy accident of having his pen name associated with today’s high-tech scan-ners. (Incidentally, TWAIN, despite its capital-ization, isn’t an acronym, although some wags have suggested that it stands for Technology Without An Interesting Name.)
TWAIN is a go-between that links scanners, cameras, and other image sources to PC image-processing software, like Paint Shop Pro. Scanners are made by different manufacturers