Part No. 118352-A Rev. A September 1997
Marketing Release 5.1
Quick-Start Guide for
Remote Access
4401 Great America Parkway 8 Federal Street
Santa Clara, CA 95054 Billerica, MA 01821
118352-A Rev. A ii
Copyright © 1997 Bay Networks, Inc.
All rights reserved. Printed in the USA. September 1997.
The information in this document is subject to change without notice. The statements, configurations, technical data, and recommendations in this document are believed to be accurate and reliable, but are presented without express or implied warranty. Users must take full responsibility for their applications of any products specified in this document. The information in this document is proprietary to Bay Networks, Inc.
The software described in this document is furnished under a license agreement and may only be used in accordance with the terms of that license. A summary of the Software License is included in this document.
Trademarks
Bay Networks is a registered trademark and Remote Annex, Quick2Config, RouterMan, SN, SPEX, Switch Node, System 5000, Bay Networks Press, and the Bay Networks logo are trademarks of Bay Networks, Inc.
Microsoft, MS, MS-DOS, Win32, Windows, and Windows NT are registered trademarks of Microsoft Corporation.
All other trademarks and registered trademarks are the property of their respective owners.
Restricted Rights Legend
Use, duplication, or disclosure by the United States Government is subject to restrictions as set forth in subparagraph (c)(1)(ii) of the Rights in Technical Data and Computer Software clause at DFARS 252.227-7013.
Notwithstanding any other license agreement that may pertain to, or accompany the delivery of, this computer software, the rights of the United States Government regarding its use, reproduction, and disclosure are as set forth in the Commercial Computer Software-Restricted Rights clause at FAR 52.227-19.
Statement of Conditions
In the interest of improving internal design, operational function, and/or reliability, Bay Networks, Inc. reserves the right to make changes to the products described in this document without notice.
Bay Networks, Inc. does not assume any liability that may occur due to the use or application of the product(s) or circuit layout(s) described herein.
iii 118352-A Rev. A
SUCH PORTIONS OF THE SOFTWARE ARE PROVIDED “AS IS” AND WITHOUT ANY EXPRESS OR IMPLIED WARRANTIES, INCLUDING, WITHOUT LIMITATION, THE IMPLIED WARRANTIES OF
118352-A Rev. A iv
Bay Networks, Inc. Software License Agreement
NOTICE: Please carefully read this license agreement before copying or using the accompanying software or installing the hardware unit with pre-enabled software (each of which is referred to as “Software” in this Agreement). BY COPYING OR USING THE SOFTWARE, YOU ACCEPT ALL OF THE TERMS AND CONDITIONS OF THIS LICENSE AGREEMENT. THE TERMS EXPRESSED IN THIS AGREEMENT ARE THE ONLY TERMS UNDER WHICH BAY NETWORKS WILL PERMIT YOU TO USE THE SOFTWARE. If you do not accept these terms and conditions, return the product, unused and in the original shipping container, within 30 days of purchase to obtain a credit for the full purchase price
1. License Grant. Bay Networks, Inc. (“Bay Networks”) grants the end user of the Software (“Licensee”) a personal, nonexclusive, nontransferable license: a) to use the Software either on a single computer or, if applicable, on a single authorized device identified by host ID, for which it was originally acquired; b) to copy the Software solely for backup purposes in support of authorized use of the Software; and c) to use and copy the associated user manual solely in support of authorized use of the Software by Licensee. This license applies to the Software only and does not extend to Bay Networks Agent software or other Bay Networks software products. Bay Networks Agent software or other Bay Networks software products are licensed for use under the terms of the applicable Bay Networks, Inc. Software License Agreement that accompanies such software and upon payment by the end user of the applicable license fees for such software.
2. Restrictions on use; reservation of rights. The Software and user manuals are protected under copyright laws. Bay Networks and/or its licensors retain all title and ownership in both the Software and user manuals, including any revisions made by Bay Networks or its licensors. The copyright notice must be reproduced and included with any copy of any portion of the Software or user manuals. Licensee may not modify, translate, decompile, disassemble, use for any competitive analysis, reverse engineer, distribute, or create derivative works from the Software or user manuals or any copy, in whole or in part. Except as expressly provided in this Agreement, Licensee may not copy or transfer the Software or user manuals, in whole or in part. The Software and user manuals embody Bay Networks’ and its licensors’ confidential and proprietary intellectual property. Licensee shall not sublicense, assign, or otherwise disclose to any third party the Software, or any information about the operation, design, performance, or implementation of the Software and user manuals that is confidential to Bay Networks and its licensors; however, Licensee may grant permission to its consultants, subcontractors, and agents to use the Software at Licensee’s facility, provided they have agreed to use the Software only in accordance with the terms of this license.
v 118352-A Rev. A
118352-A Rev. A vi
THE FOREGOING WARRANTIES AND LIMITATIONS ARE EXCLUSIVE REMEDIES AND ARE IN LIEU OF ALL OTHER WARRANTIES EXPRESS OR IMPLIED, INCLUDING WITHOUT LIMITATION ANY WARRANTY OF MERCHANTABILITY OR FITNESS FOR A PARTICULAR PURPOSE. Licensee is responsible for the security of its own data and information and for maintaining adequate procedures apart from the Software to reconstruct lost or altered files, data, or programs.
4. Limitation of liability. IN NO EVENT WILL BAY NETWORKS OR ITS LICENSORS BE LIABLE FOR ANY COST OF SUBSTITUTE
PROCUREMENT; SPECIAL, INDIRECT, INCIDENTAL, OR
CONSEQUENTIAL DAMAGES; OR ANY DAMAGES RESULTING FROM INACCURATE OR LOST DATA OR LOSS OF USE OR PROFITS ARISING OUT OF OR IN CONNECTION WITH THE PERFORMANCE OF THE SOFTWARE, EVEN IF BAY NETWORKS HAS BEEN ADVISED OF THE POSSIBILITY OF SUCH DAMAGES. IN NO EVENT SHALL THE LIABILITY OF BAY NETWORKS RELATING TO THE SOFTWARE OR THIS
AGREEMENT EXCEED THE PRICE PAID TO BAY NETWORKS FOR THE SOFTWARE LICENSE.
5. Government Licensees. This provision applies to all Software and
documentation acquired directly or indirectly by or on behalf of the United States Government. The Software and documentation are commercial products, licensed on the open market at market prices, and were developed entirely at private expense and without the use of any U.S. Government funds. The license to the U.S. Government is granted only with restricted rights, and use, duplication, or disclosure by the U.S. Government is subject to the restrictions set forth in subparagraph (c)(1) of the Commercial Computer Software––Restricted Rights clause of FAR 52.227-19 and the limitations set out in this license for civilian agencies, and subparagraph (c)(1)(ii) of the Rights in Technical Data and Computer Software clause of DFARS 252.227-7013, for agencies of the Department of Defense or their successors, whichever is applicable.
6. Use of Software in the European Community. This provision applies to all Software acquired for use within the European Community. If Licensee uses the Software within a country in the European Community, the Software Directive enacted by the Council of European Communities Directive dated 14 May, 1991, will apply to the examination of the Software to facilitate interoperability. Licensee agrees to notify Bay Networks of any such intended examination of the Software and may procure support and assistance from Bay Networks.
7. Term and termination. This license is effective until terminated; however, all of the restrictions with respect to Bay Networks’ copyright in the Software and user manuals will cease being effective at the date of expiration of the Bay Networks copyright; those restrictions relating to use and disclosure of Bay Networks’ confidential information shall continue in effect. Licensee may terminate this license at any time. The license will automatically terminate if Licensee fails to comply with any of the terms and conditions of the license. Upon termination for any reason, Licensee will immediately destroy or return to Bay Networks the Software, user manuals, and all copies. Bay Networks is not liable to Licensee for damages in any form solely by reason of the termination of this license.
vii 118352-A Rev. A
foregoing, Licensee, on behalf of itself and its subsidiaries and affiliates, agrees that it will not, without first obtaining all export licenses and approvals required by the U.S. Government: (i) export, re-export, transfer, or divert any such Software or technical data, or any direct product thereof, to any country to which such exports or re-exports are restricted or embargoed under United States export control laws and regulations, or to any national or resident of such restricted or embargoed countries; or (ii) provide the Software or related technical data or information to any military end user or for any military end use, including the design,
development, or production of any chemical, nuclear, or biological weapons. 9. General. If any provision of this Agreement is held to be invalid or
unenforceable by a court of competent jurisdiction, the remainder of the provisions of this Agreement shall remain in full force and effect. This Agreement will be governed by the laws of the state of California.
118352-A Rev. A viii
vii 118352-A Rev. A
Contents
About This Guide
Before You Begin . . . ix
Conventions . . . x
Acronyms . . . xi
Ordering Bay Networks Publications . . . xi
Bay Networks Customer Service . . . xii
How to Get Help . . . xiii
Quick-Start Guide for Remote Access Concentrators QuickStart . . . 1
Task 1: Order Line Provisioning . . . 3
Task 2: IP Addresses . . . 3
Task 3: Boot Sequence. . . 3
Task 4: Software Image . . . 4
Task 5: Install RAC Software . . . 4
Task 6: Install the RAC . . . 4
Task 7: RAC Configuration . . . 5
Task 8: Boot the RAC . . . 8
Task 9: Configure the Switch Type . . . 9
Task 10: Set Switch Parameters . . . 10
Task 11: Configure Basic Security . . . 10
Task 12: Reboot the RAC . . . 11
Task 13: Customizing the RAC . . . 11
Roadmap . . . 12
Installing and Configuring the RAC . . . 12
Customizing the RAC . . . 15
118352-A Rev. A Contents
ix 118352-A Rev. A
About This Guide
This guide provides instructions for installing Bay Networks
®Remote
Access Concentrator (RAC) hardware and software. The instructions are
summarized in a list of tasks that tell you what information and tools are
required to install and boot a RAC using factory defaults. This guide also
includes a roadmap to instruct you as to which tools and information
along with which document describes a particular function or task in more
detail.
Before You Begin
Before using this guide, you must order line provisioning through your
telco.
If you want Go to
Summarized instructions for installing the software
images, tools, and the RAC.
QuickStart on
page -1
A list of tasks and related tools and documentation.
Roadmap on
page -12
To list all documents supporting Remote Access
Concentrators.
118352-A Rev. A About This Guide
x
Conventions
This manual uses the following printing conventions:
Convention: Represents:
special type In examples,special type indicates system output.
special type Boldspecial type indicates user input.
In command examples, this notation indicates that pressing enters the default value.
bold Bold indicates commands, pathnames, or filenames that must be entered as displayed.
italics In the context of commands and command syntax, lowercase italics indicate variables for which the user supplies a value.
[ ] In command dialog, square brackets indicate default values. Pressing selects this value. Square brackets appearing in command syntax indicate optional
arguments.
{ } In command syntax, braces indicate that one, and only one, of the enclosed value must be entered.
| In command syntax, this character separates the different options available for a parameter.
Notes provide important information.
Warnings inform you about conditions that can have adverse effects on processing.
Cautions notify you about dangerous conditions.
Return
Return
xi About This Guide
118352-A Rev. A
Acronyms
ACP
Access Control Protocol
BootP
Bootstrap Protocol
bfs
block file system
CLI
Command Line Interface
erpcd
expedited remote procedure call deamon
IP
Internet Protocol
MIB
Management Information Bases
RAC
Remote Access Concentrator
RARP
Reverse Address Resolution Protocol
ROM
Read Only Memory
SNMP
Simple Network Management Protocol
telco
Telephone Company
TFTP
Trivial File Transfer Protocol
VCLI
Virtual Command Line Interface
WAN
Wide Area Network
Ordering Bay Networks Publications
To purchase additional copies of this document or other Bay Networks
publications, order by part number from Bay Networks Press
™at the
following numbers:
•
Phone--U.S./Canada: 888-422-9773
•
Phone--International: 510-490-4752
•
FAX--U.S./Canada and International: 510-498-2609
118352-A Rev. A About This Guide
xii
Bay Networks Customer Service
You can purchase a support contract from your Bay Networks distributor
or authorized reseller, or directly from Bay Networks Services. For
information about, or to purchase a Bay Networks service contract, either
call your local Bay Networks field sales office or one of the following
numbers:
Information about customer service is also available on the World Wide Web at support.baynetworks.com.
Region Telephone number Fax number
United States and
Canada
800-2LANWAN; then enter
Express Routing Code (ERC) 290,
when prompted, to purchase or
renew a service contract
508-916-8880 (direct)
508-916-3514
Europe
33-4-92-96-69-66
33-4-92-96-69-96
Asia/Pacific
61-2-9927-8888
61-2-9927-8899
xiii About This Guide
118352-A Rev. A
How to Get Help
If you purchased a service contract for your Bay Networks product from
a distributor or authorized reseller, contact the technical support staff for
that distributor or reseller for assistance.
If you purchased a Bay Networks service program, call one of the
following Bay Networks Technical Solutions Centers:
Technical Solutions Center Telephone number Fax number
Billerica, MA
800-2LANWAN
508-916-3514
Santa Clara, CA
800-2LANWAN
408-495-1188
Valbonne, France
33-4-92-96-69-68
33-4-92-96-69-98
Sydney, Australia
61-2-9927-8800
61-2-9927-8811
118352-A Rev. A About This Guide
1 118352-A Rev. A
Quick-Start Guide for Remote
Access Concentrators
T
his Quick-Start guide describes how to install and configure Remote
Access Concentrator (RAC) hardware and software using factory
defaults. After installing the RAC, you can customize it for your specific
requirements.
This guide is written for experienced users who install and maintain RACs
and have completed the prescribed Bay Networks courses. You can
choose either the quick-start procedure or the roadmap.
The information is presented as follows:
•
Quick-Start-- Provides summarized instructions for installing
the software images, tools, and the RAC.
•
Roadmap -- Provides a list of tasks and related documentation
for each task.
•
Related Documentation -- Lists all documents supporting
Remote Access Concentrators.
QuickStart
118352-A Rev. A
Quick-Start Guide for Remote Access Concentrators
[image:18.612.159.480.114.569.2]2
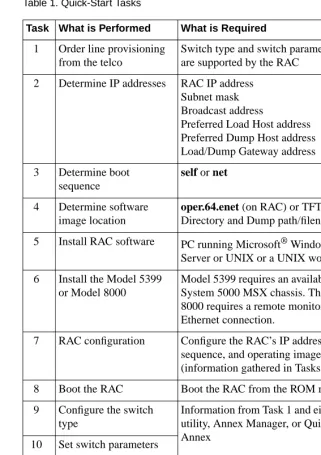
Table 1. Quick-Start Tasks
Task What is Performed What is Required
1
Order line provisioning
from the telco
Switch type and switch parameters that
are supported by the RAC
2
Determine IP addresses
RAC IP address
Subnet mask
Broadcast address
Preferred Load Host address
Preferred Dump Host address
Load/Dump Gateway address
3
Determine boot
sequence
self or net
4
Determine software
image location
oper.64.enet (on RAC) or TFTP Load
Directory and Dump path/filename
5
Install RAC software
PC running Microsoft
®Windows NT
®Server or UNIX or a UNIX workstation
6
Install the Model 5399
or Model 8000
Model 5399 requires an available slot in a
System 5000 MSX chassis. The Model
8000 requires a remote monitor and an
Ethernet connection.
7
RAC configuration
Configure the RAC’s IP addresses, boot
sequence, and operating image
(information gathered in Tasks 2-4)
8
Boot the RAC
Boot the RAC from the ROM monitor
9
Configure the switch
type
Information from Task 1 and either the na
utility, Annex Manager, or Quick2Config
Annex
10
Set switch parameters
11
Set basic security
cli and vcli
12
Reboot RAC
Issue boot command
13
Customizing the RAC
The na utility, Annex Manager, or
3 Quick-Start Guide for Remote Access Concentrators
118352-A Rev. A
Task 1: Order Line Provisioning
The lines are ordered through the telco before the RAC is installed.
Typically this is done after the sales order is placed. The supported switch
types and switch parameters are described in Provisioning WAN Lines
for Remote Access Concentrators. You should have the switch type and
parameter values before continuing with the install.
Task 2: IP Addresses
You must be prepared to enter the following addresses during the
configuration procedure:
•
Internet address
•
Subnet mask
•
Broadcast address
•
Preferred load host
•
Preferred dump host
•
Load/Dump gateway address
Task 3: Boot Sequence
118352-A Rev. A
Quick-Start Guide for Remote Access Concentrators
4
Task 4: Software Image
Determine the software image location (RAC or load host). The software
image is shipped with the RAC and is stored in flash memory. Typically
you would select to load from flash memory, but you can also load from
a TFTP load directory from a load host.
Task 5: Install RAC Software
Follow the software install procedures for the operating system you are
using. For detailed installation procedures, refer to Installing Remote
Access Concentrator Software for Windows and Windows NT and
Installing Remote Access Concentrator Software for UNIX.
Task 6: Install the RAC
Install the Model 5399 or Model 8000 RAC. The Model 5399 is installed
in a System 5000 MSX chassis and receives signal and power from the
backplane connectors. The model 8000 RAC is a standalone chassis that
requires the following cables:
•
Ethernet
•
Console
•
Synchronous (if used)
•
Power
5 Quick-Start Guide for Remote Access Concentrators
118352-A Rev. A
The Model 8000 console terminal is configured as follows:
•
9600 baud
•
8 data bits
•
No parity
•
1 stop bit
•
XON/XOFF flow control
Detailed installation instructions are in the Model 5399 Remote Access
Concentrator Hardware Installation Guide and Installing the Model 8000
Remote Access Concentrator.
Task 7: RAC Configuration
To configure the RAC, it must be in ROM monitor mode. The Model
5399 is accessible through the slot selection menu on the System 5000
MSX console. Press the Reset button on the Model 8000. When all the
lights flash, press the Reset button again.
A few minutes may pass before the ROM monitor (monitor::)
prompt appears.
Once the RAC is in ROM monitor mode, perform the following tasks:
•
Set the network address
•
Set the operating image
•
Configure the interface sequence
118352-A Rev. A
Quick-Start Guide for Remote Access Concentrators
6
Set the Network Address
This section uses the IP addresses established in Task 2. To set the network
addresses:
1. At the ROM monitor prompt, enter addr and respond to the prompts as shown in the example. To accept the default shown in brackets, press the Return key.
For illustration purposes, this example shows a RAC on an Ethernet
network with the IP address 192.9.200.62. The host system address
is 192.9.200.55. The router gateway address would be 192.9.200.1
for this subnet to access other subnets.
monitor:: addr
Enter Internet address:: 192.9.200.62 Enter Subnet mask [255.255.255.0]:: Enter Broadcast address 192.9.200.55
Enter preferred Load Host address:: 192.9.200.55 Enter Preferred Dump Host [0.0.0.0]::192.9.200.55 Enter Load/Dump Gateway address:: 192.9.200.45 Select type of IP packet encapsulation (ieee802/ ethernet) [<ethernet>]::
Load Broadcast y/n [y]::
2. After you enter the address path names, enter ad -d to verify the IP address.
7 Quick-Start Guide for Remote Access Concentrators
118352-A Rev. A
Set the Operating Image
The default operating image is shipped with the RAC and is stored in
flash memory. Verify or set the operating image as follows:
1. At the ROM monitor prompt, enter image and respond to the prompts as shown in the example. To accept the default shown in brackets, press the Return key.
monitor:: image
Enter Image name [(ip) “oper.64.enet”, (mop) “OPER_64_ENET.SYS”]::
Enter TFTP Load Directory[““]::
Enter TFTP Dump path/filename:: 192.9.200.62
2. After you enter the image name, enter im -d to verify the operating image.
3. After you verify the operating image, set the interface sequence.
Configure the Interface Sequence
The interface sequence determines the order or method in which the RAC
boots. You can configure the RAC for network, self-boot, or both. To set
the sequence:
1. At the ROM monitor prompt, enter seq. The system responds:
Enter a list of 1 to 4 interfaces to attempt to use for downloading code or upline dumping. Enter them in the order they should be tried, separated by commas or spaces. Possible interfaces are:
Ethernet: net
SELF: self
Enter interface sequence [net]::
If the RAC is configured for self-boot, copy the configuration
(config.annex) file from the server to the RAC using FTP. Do this after
you boot the RAC.
118352-A Rev. A
Quick-Start Guide for Remote Access Concentrators
8
3. Save the changes you made to the RAC:
a) For the 5399 RAC, exit the ROM monitor by entering
Ctrl T. This brings you back to the System 5000 Slot
Selection Menu.
b) Enter s to select the supervisory Module main menu.
c) Enter m to select Module Information Menu.
d) At the Enter slot # (1-14): prompt enter the slot number
and press Return. Then type d to set all the changes you
made as the default.
Enable the allow_snmp_sets Parameter
If you plan to use Annex Manager or Quick2Config to configure and
manage the RAC, you must enable the allow_snmp_sets parameter. To
enable this parameter:
1. At the console monitor prompt, enter allow_snmp_sets. 2. Enter Y when you are asked if you want to enable this
parameter.
Task 8: Boot the RAC
Issue the boot command to boot the RAC. After the RAC boots, choose
which tools you want to use to complete the remaining configuration
tasks. The remaining tasks in this book use admin commands from the
console monitor, but you can also use na, Annex Manager, or
9 Quick-Start Guide for Remote Access Concentrators
118352-A Rev. A
Task 9: Configure the Switch Type
You must configure the switch type using the information collected in
Task 1 before connecting the network cables to the WAN ports. To
configure the switch type:
1. After the RAC boots, enter cli at the console monitor prompt. (If you are configuring a 5399, connect to the slot the 5399 is installed in using the Slot Selection menu before entering the cli command.)
2. Enter admin as follows:
annex: su
Password:
The default root password is the RAC’s IP address.
Annex# admin
3. Using the set wan command, enter the switch type. The example below shows how you set the switch for AT9. Enter the switch type from the telco information. (For more information about switch types, refer to
Provisioning WAN Lines for Remote
Access Concentrators
.)admin: set wan=1 switch_type AT9
You may need to reset the appropriate port, Annex subsystem or reboot the Annex for changes to take effect.
118352-A Rev. A
Quick-Start Guide for Remote Access Concentrators
10
Task 10: Set Switch Parameters
Using the switch parameters gathered from Task1, configure the switch.
View the existing WAN parameters by entering sho wan=all all. Set the
WAN parameters to be compatible with those provided by the telco. For
information on setting WAN parameters, refer to Managing Remote
Access Concentrators Using Command Line Interfaces.
Make sure the WAN parameters are compatible with those provided
by the telco. The telco may temporarily disable lines connected to
improperly configured devices. For more information on WAN
parameters, refer to
Remote Access Concentrator Software
Reference
.
Task 11: Configure Basic Security
You should configure basic security on the RAC. That is, you should
enable CLI and VCLI security to prevent unauthorized access to the RAC
through the console monitor or through a Telnet session. To enable
security:
1. Set the enable_security parameter to yes and set up the security host:
set annex enable_security y
set annex pref_secure1_host <ip address>
2. Set CLI port security: set port cli_security y
If you set CLI security, make sure that you have a valid login name
and password. Once the RAC is rebooted you will be prompted for a
user name and password when you enter cli at the console monitor
prompt.
3. Set VCLI port security:
11 Quick-Start Guide for Remote Access Concentrators
118352-A Rev. A
Task 12: Reboot the RAC
After making configuration changes, you must reboot the RAC for the
changes to take effect. After you reboot the RAC:
1. Connect the cables to the WAN interface ports on the front (Model 5399) or back (Model 8000) of the RAC.
2. Test the RAC by dialing in to it.
Task 13: Customizing the RAC
After installing and booting the RAC, you can customize RAC parameters
(for example security or port parameters) using one of the following tools:
•
CLI interface (see Managing Remote Access Concentrators
Using Command Line Interfaces)
•
Annex Manager (see Managing Remote Access
Concentrators Using Annex Manager)
118352-A Rev. A
Quick-Start Guide for Remote Access Concentrators
12
Roadmap
The roadmap provides a series of tasks which you must perform in
sequential order to install, configure, and boot a RAC. Refer to the
specified documentation for detailed instructions. The roadmap can be
divided into two distinct areas: installation and configuration and
customization.
Installing and Configuring the RAC
This portion of the roadmap lists the tasks you must perform to install
and configure the RAC and the documentation needed to perform these
tasks.
Task
Documentation
Prepare to install the Model 5399 or
Model 8000 RAC
- Confirm that all WAN provisioning
requirements are met:
- IP address
- Boot type (net or self)
- Image location (TFTP or local)
- Confirm required platforms:
- PC running Windows or UNIX
- DEC Alpha (Windows NT 4.0)
- Workstation running UNIX
See the provisioning information
provided by your telco.
For Windows, see
Installing Remote
Access Concentrator Software for
Windows and Windows NT.
For UNIX, see
Installing Remote
Access Concentrator Software for
UNIX.
Install RAC software on the server:
-UNIX
- Install RAC Software
- Install Annex Manager (optional)
-Windows
- Install na
- Install server tools
13 Quick-Start Guide for Remote Access Concentrators
118352-A Rev. A
Task
Documentation
Install the Model 5399 or
Model 8000:
- Model 5399
- Configure jumpers
- Install module in hub
- Verify installation
- Model 8000
- Install chassis
- Connect Ethernet cables
- Connect console terminal
- Verify installation
Model 5399 Remote Access
Concentrator Module Hardware
Installation Guide
Installing the Model 8000 Remote
Access Concentrator
Initialize the Model 5399 and Model
8000 RAC:
- Manual initialization
- Set IP address (addr)
- Set boot image (image)
- Set boot sequence (seq)
-Auto initialization
-BOOTP
-RARP
Configure the RAC boot type:
- Boot using BFS
- Boot using TFTP
- Self-boot
118352-A Rev. A
Quick-Start Guide for Remote Access Concentrators
14
Task
Tools and Documentation
Configure WANs:
- Set switch type
- Set WAN parameters
- Connect WAN interface
UNIX Tools
- Annex Manager
- na utility
Managing Remote Access
Concentrators Using Command
Line Interfaces
Managing Remote Access
Concentrators Using Annex
Manager
Annex Manager online Help
Windows Tools
- Quick2Config Annex
- na utility
15 Quick-Start Guide for Remote Access Concentrators
118352-A Rev. A
Customizing the RAC
This portion of the roadmap describes how to customize the RAC for your
specific needs and services. You set parameters and services using the
tools available on the Windows or UNIX platform.
Task
Tools and Documentation
Configure basic security:
- ACP
- RADIUS
- Filters
UNIX Tools
- Annex Manager
- na utility
Managing Remote Access
Concentrators Using Command
Line Interfaces
Remote Access Concentrator
Software Referenc
e
Managing Remote Access
Concentrators Using Annex
Manager
Annex Manager online Help
Windows Tools
- Quick2Config Annex
- na utility
Using Remote Access Concentrator
Server Tools for Windows NT
Quick2Config Annex online
Windows Help
Change RAC configuration settings:
- Automated Firmware Download
(AFD)
- Setting/changing parameters
Configure hosts and servers:
- Specify load and dump hosts
- Configure the RAC
- Event logging
- File servers
- Name servers
- Customize the RAC
- Using erpcd
Configure calls and global ports:
- Defining call types
- Setting call default values
Configure digital modems:
- Busying out modems and
channels
118352-A Rev. A
Quick-Start Guide for Remote Access Concentrators
16
RAC Reference Documentation
In addition to this guide, the following documentation supports the Model
5399 and Model 8000 RAC:
Model 5399 Remote Access Concentrator Hardware Installation Guide
(166-024-162) -- Describes how to install the Model 5399 RAC, set the
IP address, and make the RAC operational using factory defaults.
Installing the Model 8000 Remote Access Concentrator
(118353-A Rev. A) -- Describes how to install the Model 8000 RAC, set
the IP address, and make the RAC operational using factory defaults.
Provisioning WAN Lines for Remote Access Concentrators
(118354-A Rev. A) -- Describes the information you need to provision
WAN lines for Remote Access Concentrators. The guide provides several
switch types and switch parameters which must be negotiated through
the telco before installing the RAC.
Installing Remote Access Concentrator Software for UNIX
(118355-A Rev. A) -- Describes how to install Remote Access
Concentrator software on a UNIX server. This book provides examples
of the installation script as well as information about installing a particular
security regime.
Installing Remote Access Concentrator Software for Windows and
Windows NT
(118356-A Rev. A) -- Describes the procedures for installing
Server Tools, the Network Administrator (na) utility, and Quick2Config
Annex on a host server running Windows software.
Managing Remote Access Concentrators Using Command Line
17 Quick-Start Guide for Remote Access Concentrators
118352-A Rev. A
Using Remote Access Concentrator Server Tools for Windows NT
(118358-A Rev. A) -- Describes how to select and configure a security
regime, and how to use erpcd to configure RAC security.
Managing Remote Access Concentrators Using Annex Manager
(118359-A Rev. A) -- Describes how to use Annex Manager to configure
and manage the Remote Access Concentrator.
Remote Access Concentrator Software Reference
(118360-A Rev. A) -- Provides reference descriptions of all CLI
commands and all na and admin parameters.
Remote Access Concentrator SNMP MIB Reference
118352-A Rev. A
Quick-Start Guide for Remote Access Concentrators