QMS$ SmartWriter$
User's Guide
. Version 2.2
Publication Number
1720453
August 1986
QMS~ is a registered trademark of QMS, Inc.
SmartWriter~ is a registered trademark of QMS, Inc.
Diablo~ is a registered trademark of Xerox Corp.
Qume~ and Sprint
e
are registered trademarks of Qume, Inc.Epson~ is a registered trademark ofEpson America, Inc. FX-80™ is a trademark of Epson America, Inc.
Paper+ TM is a trademark of QMS, Inc.
Centronics~ is a registered trademark of Centronics Data Com-puter Corp.
,JiOi
Lotus ™ is a trademark of Lotus Development Corp. Wordstar TM is a trademark of Micro Pro International Corp.
Multimate TM is a trademark of Multimate International Corp.
Microsoft Word™ is a trademark of Microsoft Corp.
Displaywrite™ is a trademark of International Business Machines, Inc. Symphogr TM is a trademark of Lotus Development Corp.
Xywrite is a trademark of XyQuest Inc.
Proprietary Statements
Proprietary Statement
The digitally encoded software included with the QMS SmartWriter is ©Copyrighted 1985 by QMS, Inc., All Rights Reserved. This software may not be reproduced, modified, displayed, transferred, or copied in any fonn or in any manner or on any media, in whole or in part, without the express written pennission of QMS, Inc.
Copyright Notice
This manual is ©Copyrighted 1986 by QMS, Inc., All Rights Reserved. This manual may not be copied in whole or in part, nor transferred to any other media or language, without the express written permission of QMS, Inc.
Manual Notice
QMS, Inc. reserves the right to make changes to this manual and to the equipment described herein without notice. Considerable effort has been made to insure that this manual is free of inaccuracies and omissions. However, QMS,Inc. makes no warranty of any kind in-cluding, but not limited to, any implied warranties of merchantability and fitness for a particular purpose with regard to this manual. QMS, Inc. assumes no responsi-bility for, or liaresponsi-bility for, errors contained in this manual or for incidental, special, or consequential damages aris-ing out of the furnisharis-ing of this manual, or the use of this manual in operating the equipment, or in connection with the performance of the equipment when so operated.
Notices
Warning
This equipment generates, uses, and can radiate radio fre-quency energy and if not installed and used in accordance
with the Instruction Manual may cause interference to ra-dio communications. It has been tested and found to comply
with the limits for a Class A computing device pursuant to Subpart J of Part 15 of FCC rules, which are designed to provide reasonable protection against such interference when operated in a commercial environment. Operation of this equipment in a residential area is likely to cause in-terference in which case the user at his own expense will be required to take whatever measures may be required to correct the interference.
Laser Safety
This printer is certified as a Class 1 laser product under the U.S. Department of Health and Human Services (DHHS) Radiation Performance Standard according to the Radiation Control for Health and Safety Act of 1968. This means that the printer does not produce hazardous laser radiation. Since radiation emitted inside the printer is completely con-fined within protective housings and external covers, the laser beam cannot escape from the machine during any phase of user operation.
Contents
Introduction
Overview ... 1-1 Objectives of This Manual ... 1-1 Intended Audience ... 1-1 Prerequisite Skills and Knowledge ... 1-2
Section rorIIlat ... 1-2
Manual Organization ... 1-2
Conventions Used in This Manual ... 1-5
The Basics
Overview ... 2-1
Objectives ... 2-1
Key Tenns ... 2-1
Unpacking ... 2-1
Inspection ... 2-2
Printer ... 2-2
Returning Merchandise ... 2-3 Printer Familiarization ... 2-4 Printer Set-Up ... 2-7
Some Preliminaries ... 2-7
Print Cartridge Installation ... 2-10
Fixing Assembly Cleaner Installation ... 2-13 Paper Tray Installation ... 2-14
Installation
Overview ... 3-1
Objectives ... 3-1
Key Tel1l1s ... 3-1
Finding a Good Location ... o • • • • • • • • • • • • • • • • • • • • • 3-2 Installing tlle ~nter ... 3-5
The Printer Interface Cable ... 3-5
wading Paper ... 3-7
Test Your Printer Operation .. ' ... 3-11 Status Summary Sheet ... 3-12
General Operation
Overview ... 4--1
Objectives ... 4--1
Prerequisites ... 4--1
Key Tel1l1s ... 4--2
The Keypad ... 0 • • • • • • • • • 0 • • • • • • • • • • • • • • • • • • • • • • 4--2
Function Keys ... 4--3
Configuration Keys ... 4--5
The Display Window ... 4--7
Status Codes and ,Error Messages ... 4-8 ~g Paper ... 4--10
Automatic Paper Feed ... 4--10
Manual }(eed .••..•...•.••••••...•.••...•...• 4--11
Printing ... 4--13
Double-Sided Printing ... ; ... 4-14
Print Density ... 4--15
Fonts - Resident, Download and Cartridge ... 4-16
Resident and Download ... 4-16
Optional Font Cartridge ... 4-17
Selecting a Font ... 0 0 0 0 0 ... 0 . 4-18
Software Commands ... 4-19
Choosing an Emulation Mode
Overview ... 5-1
Objectives ... 5-1
Prerequisites ... 5-2
Key Terms ... ' ... 5-2
Printer Emulation ... 5-2
Replacing an Existing Printer ... 5-3
Adding a Printer to an Existing System ... 5-3
Word Processors and Other Software ... 5-4
The Printer in a New System ... 5-4
~ere to lJcHJk Next ... 5-5
Mter Configuration ... 5-5
Configuration Options
Overview ... 6--1
Prerequisites ... 6--1
Key Terms ... 6--1
GROUP A - ANSI Mode Options ... 6--3
GROUP C - Selecting Current Font ...
6-6
GROUP D - Diablo Emulation Options ... 6--9
GROUP E - Epson Emulation Options ... 6--11
GROUP L - Select Default Landscape Fom ... 6--13
GROUP P - Select Default Portrait Font ... 6--15
GROUP Q - Qume Emulation Options ... 6--16
GROUP 0 - System Function Options ... 6-20
GROUP 1 - Selecting Emulation Mode .. o • • • 0 . 6--24
GROUP 1 - Selecting Page Size/Orientation . 0.6--24
GROUP 2 - Copy Count (1 to 9 copies) '0' .... 6--26
GROUP 3 - Copy Count (multiples of 10) ... 6--26
GROUP 4 - Page Margin Settings ... 6--27
GROUP 5 - Common Interface Options ... 6-31 GROUP 6 - Serial Interface Options ... 6-33 GROUP 7 - Parallel Interface Options ... 6-37 GROUP
8 -
Printer Alignment ... 6-39 GROUP 9 - Factory Settings ... 6-41Seven Special Commands
Overview ... 7-1 Prerequisites ... 7-1 Key Terms ... 7-1 Transmitting Control Characters ... 7-3 Command Fonnat Defined ... 7-4
Numeric Parameters Defined ... 7-7
Summary
of Commands ... 7-7QMSSFO ...
7-8
QMSPGO ... 7-9 QMSFcrL ... 7-10 QMSCCNT ... 7-11 QMSMOD ... 7-12 QMScrL ... 7-13 QMSRED ... 7-14 Changing the Command Translation Table ... 7-15 Important Considerations ... 7-15 Changing the Font Translation Table ... 7-16 Important Considerations ... 7-16 Command Parameters ... 7-17
Useful Hints
Suppress Blank Pages ... 8-2 Don't Print Status Summary Sheet ... 8-2 Data Light ... 8-3 Addressable V.s. Printable Areas ... 8-3 Lost Data Upon Power-Up ... 8-3 Epson Graphics - Page Orientation ... 8-3 Diablo - Using Proportional Spacing ... 8-4 Qume - Using Proportional Spacing ... 8-4 Current Font in Epson Emulation Mode ... 8-4
Diablo 630 Emulation Mode
Overview ... 9-1 Objectives ... 9-2 Prerequisites ... 9-2 Key Tenns ... 9-2 Summary of Supported Diablo Commands ... 9-4
Unsupported Diablo Commands ... 9-6 Supported Diablo Commands ... 9-8 Single Character Commands ... 9-8 Formatting Commands ... 9-13 Print Position Commands ... 9-1'9 Special Printer Features ... 9-21 Word Processing Command Sequences ... 9-24 Extended Character Set ... 9-31
Epson FX-80 Emulation Mode
Overview ... 10--1 Objectives ... 10--2 Prerequisites ... 10--2 Key Tenns ... 10--2 Summary of Supported Epson Commands ... 10-4 Unsupported Epson Commands ... 10-6
Supported Epson Commands ... 10-7
Print Width Commands ... 10-8
Print Quality Commands ... 10-11
Selecting Print Modes ... 10-19
Paper Feed Commands ... 10-21
Fonns Control Commands ... 10-24
Fonnatting Commands ... 10-25
Special Printer Features ... 10-30
Graphics Mode ... 10-34
Graphics Pin Combination Patterns ... 10-38
Plotter Graphics 0 0 • • 0 0 • • • 0 0 0 0 0 . 0 0 0 • • 0 • • • • • • • • • 0 • • • 10-39
User-Defined Characters ... 0.' ••••••••••••••••••• 10-39 Graphics Using 7-Bit Systems ... 0 " • • • • • 0 • • • • • 10-41
Control Codes Redefined ... 10-42
Double High, Double Wide Letters .... 0 0 • • • • • • • 10-43
()o~ Characters ... 1~
Qume Emulation Mode
Overview ... 11-1
Objectives ... 11-2
Prerequisites ... 11-2
Key Terms ... 11-2
Summary of Supported Qume Commands ... 11-4
Unsupported Qume Commands ... 0 • • • • 11-6
Supported Qume Commands ... 11-7
Single Character ()ommands ... 0 . . . 11-7
Formatting ()ommands ... 11-10
Print Position Commands ... 11-18
Print Quality Commands ... 11-26
Maintenance and Troubleshooting
Overview ... 12-1
Objectives ... e • • • • • • • • • • • • • • • • • • • • • • • • • • • • • • • • • • • • • • 12-1 Prerequisite Knowledge ... 12-1
Key Terms. e • • • • • • • • • • • • • • • • • • • • • • • • • • • • • • • • • • • • • • • 12-2 User Maintenance ... 12-2 Print Cartridge ... _ ... 12-2
When to Replace a Print Cartridge ... 12-3 How to Replace the Print Cartridge ... 12-4 Fixing Assembly Cleaner ... 12-4
Replacing the Fixing Assembly Cleaner ... 12-5 Cleaning the Fixing Roller ... 12-5
Corona Wires ... 12-5
Cleaning the Primary Corona Wire ... 12-6 Cleaning the Transfer Corona Wire ... 12-7
Cleaning the Transfer Guide ... 12-8 The Separation Belt ... 12-9
Cleaning the Separation Belt ... 12-9
Replacing the Separation Belt ... 12-10
Clearing a Paper Jam ...•... 12-12
Troubleshooting ... 12-16
Error Codes ... 12-16
The Diagnostic Page ... 12-18 Print Quality Problems ... 12-19
Placing a Service Call ... 12-23
Printer Specifications
Printer Specifications ... 13-1
Addressable Areas ... 13-3
Printable Areas ... 13-3
Parallel Interface Cable Specification ... 13-4 Serial Interface Cable Specifications ... 13-7
Appendix A - Font Information
Appendix B - ASCII Conversion Table
Appendix C - Configuration Summary
Glossary
Introduction
II
Overview
The QMS SmartWriter represents the latest technology in laser printing, quiet operation and flexibility. You can customize your QMS SmartWriter to work with many word processing packages or you can write programs using the commands supported by the SmartWriter. The QMS printer features Diablo, Qume and Epson em-ulation modes, graphics capabilities, the ability to access an international character set and a variety of font sizes and styles.
The QMS SmartWriter also supports ANSI X3.64 mode, downloadable fonts, font cartridges, and the ability to use these features in either portratit or landscape orientation on a page.
Objectives of This Manual
The objectives of this manual are (1) to familiarize you with the physical features of the QMS SmartWriter; (2) to teach you how to install the SmartWriter; (3) to show you how to operate the keypad and use the features that you will need daily; (4) to make the QMS SmartWriter be the printer you want it to be; (5) to help make your QMS SmartWriter work with a word processor; (6) to explain the maintenance tasks which will keep your QMS printer operating well; and (7) to make you aware of possible error messages or problems and what to do about them.
Intended Audience
The QMS SmartWriter User's Guide is written for
Prerequisite Skills and Knowledge
No prerequisite skills or knowledge is needed for in-stalling or operating the QMS SmartWriter. Some knowl-edge of your computer and word processor or other soft-ware package may be required. Refer to your computer or software manuals if needed.
Section Format
The fonnat for the remaining sections of this manual will be as follows:
Section Overview Chapter Objectives Key Terms defined
Detailed descriptions or Step-by-Step Instructions Errors and Consequences
This section format is designed to present all necessary information simply and logically. To ensure efficiency and ease of learning, the same basic format is followed in each section of the manual.
Manual Organization
The
QMS SmanWriter User's Guide
is designed to helpyou learn about and use the QMS SmartWriter. The in-formation in the manual is explained in the order you will need it. Related material is cross-referenced by section number and subject.
Here is an overview of each section:
• Section 1 • Introduction
This section gives you ~e objectives of the man-ual. Standard format and manual conventions used in the rest of the manual are also explained. Use Section 1 as an overview and blueprint to the QMS
SmartWriter User's Guide.
The information in• Section 2 • The Basics
The
first
part of this section advises you aboutun-packing your QMS SmartWriter. It includes the items which should be included in the shipment and what to do if anything is damaged or missing. The next part of this section familiarizes you with the physical features of the QMS printer. The final pages of this section, called Printer Set-up, cover
pre-installatio~ steps. The infonnation in Section 2 is intended for all users.
• Section 3 • Installation
Installation instructions tell you how to connect your QMS SmartWriter to your computer, load the pa-per cassette and print a Status Summary Sheet. The information in Section 3 is intended for all users.
• Section 4 • General Operation
This section is divided into two parts. The first por-tion covers operating the front panel keypad. You need this skill to configure your QMS printer. The second part of Section 4 covers operating fea-tures that you will use on a daily basis. These include double-sided printing, selecting manual or cassette-feed paper and adjusting the print density. Printer Operation also includes the printer error and status messages which may appear in the display window. The information in this section is intended for all users.
• Section 5 • Choosing an Emulation Mode
This section helps you decide how you want to use the QMS SmartWriter with your word processor or other software packages.
• Section 6 • Configuration Options
This section includes all configuration options.
• Section 7 • Seven Special QMS/ANSI Commands
This is an important section for all users. Seven software commands explained in this section al-low you to change fonts, change emulation modes,
change page orientation, change paper source, change the copy count, access the Extended Printer Con-trols, and redefine command/control characters and font tables. These commands may be used from any emulation mode.
• Section 8 • Useful Hints
This section provides information about printer fea-tures that have very useful applications. Explana-tions and special notes that you should be aware of are also included.
• Section 9 • Diablo Emulation Mode
This section explains the supported software com-mands of Diablo Emulation Mode. Unsupported commands are also listed.
• Section 10 • Epson Emulation Mode
This section explains the supported software com-mands of Epson Emulation Mode. Unsupported commands are also listed.
• Section 11 • Qume Emulation Mode
This section explains the supported software com-mands of Qume Emulation Mode. Unsupported commands are also listed.
• Section 12 • Maintenance
This section covers both maintenance and trouble-shooting. Occasional maintenance is necessary to keep your printer printing smoothly. If you run into difficulties, check the information under "Trou-bleshooting" in the second half of this section. ''Trou-bleshooting" also covers error messages which may appear in the QMS SmartWriter display window. The information in this section is intended for all users.
• Section 13 • Printer Specifications
• Appendix A - Font Information
This section begins with an explanation of fonts. Width tables for each of the resident fonts are also included. This provides a quick reference for the letters, symbols, size and style of each resident SmartWriter font.
• Appendix B - ASCn Conversion Table
ASCn values are shown with the equivalent Hex, Decimal, Octal and Binary values in this conversion table.
• Appendix C • Configuration Summary
Appendix C summarizes the configuration Groups and Options that are explained in detail in Section
6.
• Glossary
The QMS SmanWriter User's Guide has a Glossary in addition to defining key tenns in each section.
• Index
Conventions Used in This Manual
bold type indicates section or subsection headings, key tenns or important considerations.
italicized type is used for manual titles.
~oxiU
are used to indicate a key from the front pan!'ll eyp a display in the keypad display window or a particular command fonnatbullets (.) are used to itemize or list
CAPITAL LE1TERS indicate a special comment or note.
sents a variable "decimal value" (taken from the "Dec-imal" column of the ASCn CONVERSION TABLE in
The
Basics
II
Overview
This chapter includes 1) unpacking and inspection in-structions, 2) illustrations to help familiarize you with the QMS SmartWriter, and 3) pre-installation tasks.
Objectives
The purpose of this section is (1) to identify the con-tents of the SmartWriter shipping container and what to do if anything is damaged or missing; (2) to explain, with illustrations, the inside and outside features of the SmartWriter; (3) to indicate which parts need occasional maintenance for smooth operation; and (4) to guide you through pre-installation tasks such as removing the ship-ping spacers and inserting the print cartridge.
Key Terms
Print Cartridge -
A disposable cartridge containingdry toner and a print drum.
Font Cartridge -
An optional means of having morefonts available for use.
Unpacking'
The following items should be enclosed in the QMS SmartWriter shipping container:
1. QMS SmartWriter User's Guide
2. Output Stacker Tray (see Figure 2.1)
3. Manual Feed Tray (see Figure 2.2)
4. Paper Cassette (see Figure 3.4)
5. QMS SmartWriter
NOTE: You will have to make or purchase an
in-terface cable. See Section 3 for cable information.
Keep the shipping carton and packing materials until you have inspected the contents. Check the contents against the packing list. If there is any evidence of external damage, do not try to use the printer. Contact the car-rier immediately and begin a damage claim procedure. Inform your distributor/dealer of the problem.
Inspection
Take the time now to inspect the contents of the printer container. Be sure that you have all the parts and that nothing is damaged.
Printer
Remove the foam packing and locate the handles on the front and rear of the printer (see Figure 3.2 in Section 3). Lift the printer aut of the shipping container. Always
use the HANDLES when LIFTING the SmartWriter.
Returning Merchandise
If you ever have to to return the QMS SmartWriter, repack the equipment carefully in order to prevent further damage. Return the printer to the dealer or distributor from whom you purchased the printer.
Printer Familiarization
[image:22.407.35.353.132.560.2]You need to become "visually" familiar with the physical features of the SmartWriter before you try to install it. Use the Figures in this section as a guide. Spending time now to review the Figures will payoff when you start to install and use the printer.
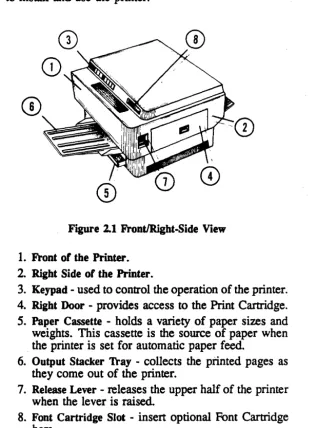
Figure 2.1 FrontlRight.Side View
1. Front of the Printer.
2.
Right Side of the Printer.3. Keypad· used to control the operation of the printer. 4. Right Door - provides access to the Print Cartridge.
5. Paper Cassette - holds a variety of paper sizes and weights. This cassette is the source of paper when . the printer is set for automatic paper feed.
6. Output Stacker 'Iray - collects the printed pages as they come out of the printer.
7. Release Lever -releases the upper half of the printer when the lever is raised.
Figure 2.2 RearlLeft-Side View
1. Rear Panel of Printer.
2. Manual Feed Tray - allows you to manually feed pages/ envelopes into the printer, one at a time. 3. Rear Door - opens to provide access to the Cassette
Feed Area in case of a paper jam.
4. Left Side.
5. Test Print Button - press to print the SmartWriter's engine self-test page.
6. Interface Connection Area - connector for plugging the interface cable from your host computer into the SmartWriter.
7. Print Density Adjustment Dial - adjusts the darkness of the print.
8. Power Cord - provides AC power to the QMS SmartWriter when plugged into a standard 120V 160HZ
outlet.
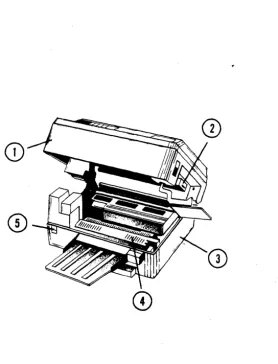
Figure 2.3 Raised View
1. Upper Half of the Printer.
2. Print Cartridge -contains toner, photosensitive drum, and the Primary Corona wire.
3. Lower Half of the Printer.
4. Fixing Assembly Cover -"lift to remove jammed pa-per, clean the fixing rollers, and replace the Fixing Assembly Cleaner.
Printer Set-up
Printer set-up is an important pre-installation step. Set-up involves removing spring spacers and installing the Print Cartridge, Fixing Assembly Cleaner, Paper Trays, "a'ftd the Paper Cassette.
Some Preliminaries
1. Raise the upper half of the printer by lifting the green Release Lever (Figure 2.4).
Figure 2.4 Opening The Printer
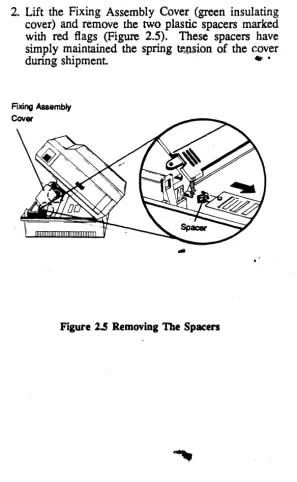
2.
Lift the Fixing Assembly Cover (green insulating cover) and remove the two plastic spacers marked with red flags (Figure 2.5). These spacers have simply maintained the spring~n.sion of the r.overduring shipment .. •
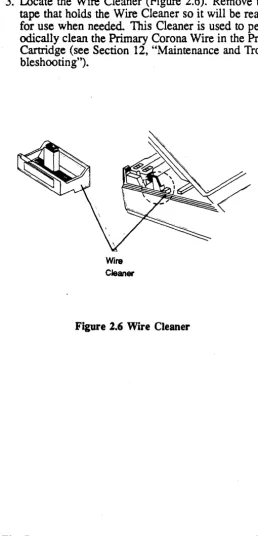
[image:26.403.41.338.43.525.2]3. Locate the Wire Cleaner (Figure 2.6). Remove the tape that holds the Wire Cleaner so it will be ready for use when needed. This Cleaner is used to peri-odically clean the Primary Corona Wire in the Print Cartridge (see Section 12, "Maintenance and Trou-bleshooting").
The Basics
[image:27.402.95.354.60.597.2]Wire Cleaner
Figure 2.6 Wire Cleaner
Print Cartridge Installation
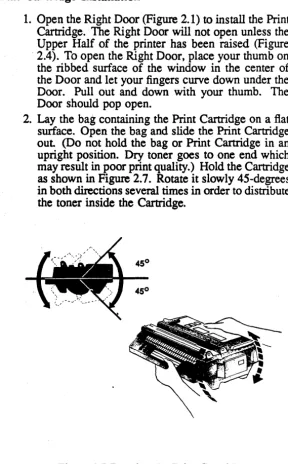
1. Open the Right Door (Figure 2.1) to install the Print Cartridge. The Right Door will not open unless the Upper Half of the printer has been raised (Figure ·2.4). To open the Right Door, place your thumb on the ribbed surface of the window in the center of the Door and let your fingers curve down under the Door. Pull out and down with your thumb. The Door should pop open.
2. Lay the bag containing the Print Cartridge on a flat surface. Open the bag and slide the Print Cartridge out (Do not hold the bag or Print Cartridge in an upright position. Dry toner goes to one end which may result in poor print quality.) Hold the Cartridge as shown in Figure 2.7. Rotate it slowly 45-degrees in both directions several times in order to distribute the toner inside the Cartridge.
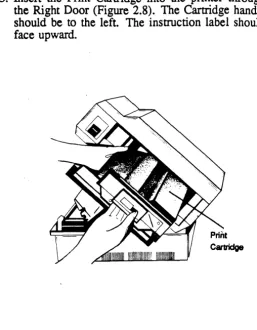
[image:28.401.26.314.61.525.2]3. Insert the Print Cartridge into the printer through
the Right Door (Figure
2.8).
The Cartridge handle should be to the left. The instruction label should face upward.Figure 2.8 Inserting the Print Cartridge
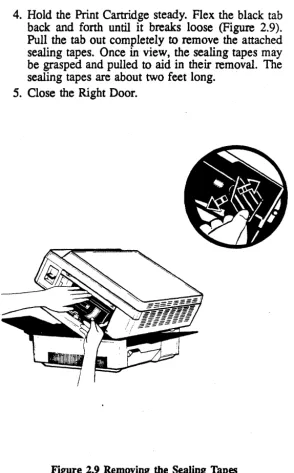
[image:29.401.98.355.61.391.2]4. Hold the Print Cartridge steady. Flex the black tab back and forth until it breaks loose (Figure 2.9). Pull the tab out completely to remove the attached sealing tapes. Once in view, the sealing tapes may be grasped and pulled to aid in their removal. The sealing tapes are about two feet long.
[image:30.407.36.331.38.512.2]5.
Close the Right Door.Fixing Assembly Cleaner Installation
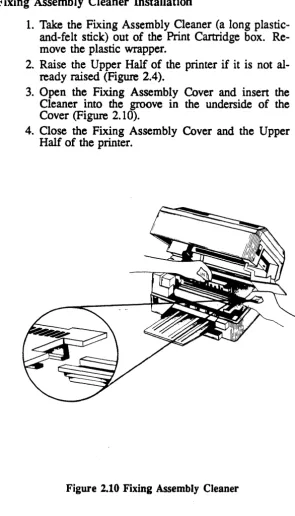
1. Take the Fixing Assembly Cleaner (a long plastic-and-felt stick) out of the Print Cartridge box. Re-move the plastic wrapper.
2. Raise the Upper Half of the printer if it is not al-ready raised (Figure 2.4).
3. Open the Fixing Assembly Cover and insert the Cleaner into the groove in the underside of the Cover (Figure 2.10).
4. Close the Fixing Assembly Cover and the Upper Half of the printer.
Figure 2.10 Fixing Assembly Cleaner
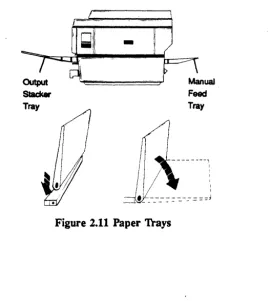
[image:31.399.73.368.54.570.2]Paper Tray Installation
The SmanWriter has two paper trays: the Output Stacker Tray (see Figure 2.1), and the smaller Manual-feed Tray (see Figure 2.2). The Output Stacker Tray is used to col-lect the printed pages as they come through the printer. The Manual-feed Tray is used to guide the paper into the printer for manual feed. Both trays are installed by
fit-ting plastic pegs into the appropriate holes
as
described below.1. Locate the Output Stacker Tray. Move to the front of the printer. Hold the tray so that the wide end is toward the front of the printer. The sliding exten-sion attached to the Output Stacker Tray should be on the underside. There is
an
installation nub on each side of the tray. Insert the pegs, one side at atime, into the slots directly above the front handle of the printer.
[image:32.407.69.341.288.589.2]-Tray Tray
2. Locate the Manual-feed Tray. Move to the rear of the printer. Hold the tray so that the installation brackets are toward the rear of the printer. The top of the tray has raised lines along the surface. Install the tray by inserting the installation pegs on the outside edges of the rear handle into the holes in the installation brackets of the tray.
Installation
II
Overview
The installation instructions begin with guidelines for finding a good work station for your printer. Next, you must determine whether you have a parallel or serial interface so that you may buy or make the right type of interface cable.
The actual installation involves connecting the interface cable to your computer and SmartWriter and plugging in the power cord.
The next step is to fill the paper cassette and perfonn a Printer Operation Check. This operation check will de-termine if all the connections have been properly com-pleted.
This section is concluded with an explanation of the Sta-tus Summary Sheet that will be printed if the SmartWriter is correctly installed.
Objectives
This section is intended to (1) guide you in choosing a good work location for your printer; (2) guide you in obtaining the correct interface cable; (3) tell you how to connect your printer to your terminal or computer; (4) enable you to check your printer for proper operation; and (5) to show you a sample Status Summary Sheet and explain what it means.
Key Terms
Parallel - Refers to the means of transferring data along parallel lines or wires.
Printer Interface Cable -
Used to connect your com-puter to your printer so that they can communicate with each other.Serial -
Refers to the means of transferring datase-quentially along a single wire or line.
Status Summary Sheet -
Shows the current fontsand selected printer options. This page is automatically printed each time you power up your SmartWriter printer.
Finding a Good Location
The location you pick for the QMS SmartWriter should meet the following requirements:
• The line voltage should not vary more than 10 per-cent from the voltage marked on the Print Engine nameplate (inside), and a ground connection should be available.
• The room temperature should be SO to 90 degrees Fahrenheit, and the relative humidity 20 to 80 per-cent.
• The printer should not be installed where it might be exposed to water damage or variations in tem-perature/humidity, e.g., near water faucets, boilers, humidifiers, refrigerators, air conditioners, etc.
• The printer should not be exposed to open flames, dust, ammonia fumes, or direct sunlight.
• The location should be well ventilated
• The printer should be installed on a sturdy, level surface.
(Refer to the Printer Specifications in Section 13 for more details.)
AT LEAST 17.5cm (7in.)
--
..
..
.-\
1/
47.5cm (18.7in)
-E
u
II)
"
40cm ----. (15.75in.)
\0001\.1---
AT LEAST 105cm (41.5in)---.,~Figure 3.1 Sp~ce Requirements
Installation
E
u
IX) o
[image:37.402.90.363.102.380.2]Once a suitable location is found, remove the paper trays and carry the printer using the HANDLES as shown in Figure 3.2. Remove the paper trays before lifting the printer by the handles. Always use the HANDLES when LIFTING the printer.
I~
[image:38.406.46.335.52.493.2]Installing the Printer
The installation of the SmartWriter involves (1) connect-ing an interface cable between your computer and printer and (2) plugging in the power cord.
The Printer Interface Cable
The SmartWriter is available with two types of interfaces: Centronics parallel or RS-232C serial.
You will need to purchase or make the cable to connect your computer to the SmartWriter. Section 13, "Printer Specifications," lists the specifications for both parallel and serial interface cables.
Follow each of the steps below in order to properly con-nect your computer system and the SmartWriter. The ffiM PC is used as the example computer in the direc-tions. Consult your particular computer manual or dis-tributor for additional information on connecting your computer to a printer.
1. Buy a Centronics parallel or RS-232 serial interface cable from your local computer dealer or make an interface 'cable if you know how. See the cable specifications given in Section 13, "Printer Speci-fications." H you ordered your SmartWriter with a parallel interface, you need a parallel interface ca-ble. If you ordered a serial interface, you need a serial interface cable.
2. Locate and examine the interface connectors (po~) on both the computer and the printer. Figure 3.3 shows the interface connectors for an
mM
PC and a QMS SmartWriter.3. Connect the DB 25 parallel male end or the serial female end of the cable to your mM PC. It will only fit in one direction. (A different computer may require a different cable connector. Your distributor can help you.)
•
PC Connector
Parallel (Female Connectol
_~
c::: .•
J;::::7
Printer Connector
Parallel (Female Connector)
Fipre 3'.3 Interface Connectors
4. Connect the other end of the interface cable to your SmartWriter. Be sure the cable is not twisted. 5. Make sure that both ends of the interface cable are
securely connected
6.
Now, plug the printer power cord into an appro-priate wall outlet and your printer connections are completed.7. Read the instructions that follow for filling the
Loading Paper
The procedure for loading paper into the Paper Cassette is as follows:
1. Locate the Paper Cassette that corresponds to the desired paper size being used (the size of the cas-sette is given on the foil label on its right side). Make sure the. position of the adjustment bar (Fig-ure 3.4) corresponds with the paper length specified for the cassette.
1. Paper Cassetta
2. AquBtment Bar
3. Foil Label
Figure 3.4 Paper Cassette
2. Place the paper in the paper cassette (Figure 3.5). The side of the paper on which printing will occur should be face down in the paper cassette with the top edge of the paper pointing in the direction of the arrow in Figure 3.5. Special instructions for printing two-sided copies are given in Section 4, "General Operation."
\~
I I .
3. Push the paper under the paper-control clips (Figure 3.6). Do not overfill the paper cassette. About 100 sheets of 20 pound paper is best
Figure 3.6 Paper-Control Clips
4. Insert the Paper Cassette in the slot under the front paper tray and handle (Figure 3.7). The end with the paper control clips is inserted first.
Test Your Printer Operation
Now that your printer is loaded with paper, you can do some simple tests to confirm that your SmartWriter is working correctly. Follow the instructions below.
1. Locate the Power Switch on the front of the printer. Turn the printer ON by pressing the half of the switch marked with a "I". This will start a two
minute printer ·warm-up cycle beginning with about 15 seconds of self tests.
The Display Window on the pri~ keypad (on the front panel) will first display ~ and then
I
PUI
(power Up). The printer displaysIs.s.1
during the self tests andI
PUI
during the rest of the warm-up period.When the wann-up period is over the printer will automatically print a Status Summary Sheet A
I\tA.Jo<Printer Active) will appear in the Display m w when the Status Summary Sheet is print-ing.
The contents of the Status Summary Sheet are ex-plained later in this section.
2. Check the Status Summary Sheet to see that all the characters are clear and well-formed. There should be no noticeable blotches, streaks, or fade spots. NOTE: After inserting a new Print Cartridge, sev-eral pages may need to be printed before good print quality is achieved.
If a Status Summary Sheet did not print, tum the printer off, go back to Step 1 and repeat the Steps. If you don't get a Status Summary Sheet after
peating these steps, check the Display Window. A list of all the Display Window messages is given in Section 4, "General Operation." Also, see the Troubleshooting portion of Section 12 for help.
4. Press the Test Print Button located on the left side-and toward the back of the printer.
The printer will print a page with a striped pattern. This is the printer's self-test page of the print en-gine.
5.
Check the page for smears or any faded areas. Notice the size of the white margins on this page. The print engine cannot print in these margin areas. (However, the scan alignment may be positioned differently. See Group 8, Options 1-4 in Section 6.)Status Summary Sheet
Each time the printer is powered on, a Status Summary Sheet is printed. The finnware Version of your printer and current selected options such as emulation mode, paper size, margins and page orientation are printed. on the Status Summary Sheet The number, orientation and name of each of the 7 resident SmartWriter fonts are also printed on the upper half of this page.
SmartWrlter (1M) Version: 2.2 Date: 0~/28/88
PEf'NED rONTS ANQ gYfA1AY$
NymQar or ' . n t a t 'on Nome' VeC'lOD Iyo". "yte, 10 ~andSCage EDP RF 19508 380 Portral t EPSON COMPRESSED RF 22028 381 Pprtralt EPSON ELITE RF 32382 382 Portral t EPSON PICA RF 32580
~o~ Portrait Q-TYPEW~ITER MEDIUM RF 27388 ~~~ Portrait Q-TYPEWRITER ITALIC RF 27878 722~ Portrait CL.AIBORNE L.IGHT RF 28882 • C • Cartridge. 0 • Download. R • ReSI~ent. F • Font. 0 • Overla~
NumDer of D~tes aval laDle for download fonts and overla~s • 78112
Q ."'1! CPNf I qu •• ! I QN
EMULATION: Eoson FX80 ORIENTATION: Portrait POWfR-UP DEFAULT ~ONTS: Portrait. 382 LandSeage • 10 PAGE PAR~TERS:
ToO Margin BottCllll Margin. Left Margin Rlont Margin
Units of lengtn are In Inenes. 0.00 Cnaraeters/Unlt. 10.00 11.00 Lines/Unit 8.00 0.21 Page Size • Letter 1.21 COO~ Count 1 INTERFACE: RI232C Serial
.800 Baud. 8 Oata Bits. No Parity. 1 StoD l i t InDut Duffer size. 1112 D~tes
ENAILED OPTIONS:
A1 A2 A3 AI 01 E3 14 18 Q1 07 12 14 18 21 41 41 11 12 53 84 II .7 •• •• ." ec 71 78 83 Ie .7 •• .1 •• ••
NumD.r of oaoe. orlntad Dy tnl. engln. to date. 1318
Figure 3.8 Status Summary Sheet
General
Operation
Overview
II
Operating the QMS SmartWriter involves learning to use the keypad, learning how to use the supported software commands, learning how to do one and two-sided print-ing, selecting manual or automatic paper feed, and ad-justing the print density.
Objectives
The objectives of this section are to (1) explain the func-tion of each keypad key; (2) to teach you how to operate the SmartWriter keypad; (3) to make you aware of the messages which may appear in the display window and explain what each message means; (4) to explain how to
use both manual and automatic paper feed; (5) to teac~ you how to adjust print density; (6) to explain how to correctly insert and remove the optional font cartridge; (7) to explain how to select a font for printing; and (8) to make you aware of the software commands available on the SmartWriter.
Prerequisites
Be sure that you have completed the Printer Set-up in-structions in Section 2 before you try operating the SmartWriter.
Key Terms
Keypad - U sed to select the desired printer features. The keypad is located on the front panel of the SmartWriter.
Display Window - The LED diSplay on the keypad
~
shows the status of the printer or displays error messages.Group - The main category used to 'select printer fea-tures. Each Group is subdivided into Options.
Options - The printer features (choices) within a Group that may be selected using the keypad.
Emulate - Refers to the ability of the SmartWriter to imitate or "appear to be like" another printer. The SmartWriter is able to respond to most of the same com-mands as Diablo, Qume and Epson printers.
Option Mode - The printer state ot status that allows you to select features through the front panel keypad.
Warm Restart - When the printer reinitializes to the new keypad options selected.
The Keypad
The keypad on the front panel of the printer (shown in Figure 4.1) is used to select different printer operations .. Rub your finger lightly over the keypad. Find the slight "bubble" in the center of each key. To select a particular printer operation, ybu press this bubble until you feel it click.
Figure 4.1 The Keypad
1. Online Key 6. Option Key 2. Manual Feed Key 7. Toggle Key
3. Form Feed Key 8. LED Display Window 4. Test Key 9. Data Light
5. Group Key
Three keys, I ONLINE L
k
MANUAL FEED I and I TOGGLE Lhave light indicators W lch let you mow when they are
"enabled" or on.
There are two types of keys on the printer's keypad, (1) Function Keys and (2) Configuration Keys.
Function Keys
There are four function keys. These four keys are grouped together on the left-hand side of the keypad. Each key is used to perfonn the particular function that is printed on the key itself. The status of a key is either "enabled" (on) or "disabled" (off).
An explanation of the four function keys follows:
I
ONLINEI
KeyThis key allows you to change the status of the printer: either on-line or off-line with your computer. When this key's green indicator light is lit, the printer is under computer control (on-line with the computer). When this key is pressed again, the light will go out which means that the printer is off-line.
When you want to print something other than a Status Summary Sheet or Test Pages, the green indicator light must be lit (meaning the printer is on-line).
NOTE: In order to use the rest of the keys on the keypad, the printer must be off-line.
I
MANUAL FEEDI
KeyThis key is used to switch from automatic (cassette) pa-per feed to manual papa-per feed. The printer must be taken off-line before you can select manual paper feed.
When manual paper feed is selected, the green indicator on this key will light up. If the indicator light is off, the paper source is from the cassette paper tray. When the printer is first turned OOt the paper feed method is set for
automatic (cassette) feed (the default).
If you use this ~ MANUAL FEED
I
key while pages are printing, the QS SmartWriter Will change the paper feed method for all pages in the print buffer that have not yet begun to print.NOTE: There is also a software command available that allows you to select manual feed without using the key-pad. See "Software Commands" later in this section.
I
FORM FEEDI
Keyafter all pages of data in the buffer have printed If there is a partial page of data remaining in the print buffer, it will be printed on the ejected page.
NOTE: Pressing this key will not cause a blank page to eject if you chose to suppress blank pages using Group 0, Option·7 (See Section 6),
I
TESTl
KeyThis key is used to print test pages. Take the printer off-line first Any data that is in the printer buffer when this key is pressed will print before the test pages. The test pages consist of examples of the Standard Fonts in your printer.
Configuration Keys
The remaining three keys on the printer keypad are called Configuration Keys. You will use all three keys to select (or configure) the printer capabilities (known as Config-uration Options). When you use these keys to select par-ticular Configuration Options, you are in "Option Mode."
The Configuration Options are separated into main cat-egories called "Groups." Each Group has from 1-15 sub-categories called "Options."
Remember, in order to use these Configuration Keys, the
I
ONLINEl
Key light must be off.I
GROUPI
KeyThis key is used to enter Option Mode at Group A, Op-tion O. It is also used to progress through the different Group letters (A, C, d, E, L, P, q) and numbers (0-9)
until you reach the desired Group. The Group letter or number appears in the left digit of the keypad's two-digit Display Window.
When you go from one Group to the next, the Option number (right digit in the Display Window) is reset to zero.
I
OPTIONI
KeyThis key is used to enter Option Mode at the Group and Option that was most recently accessed. It is also used to progress through the Option numbers until you reach the desired Option. The Option numbers are displayed in the right digit of the keypad's two-digit Display Window.
I
TOGGLEI
Key
Press this key when you want to enable or disable the particular Group and Option that is displayed in the key-pad's Display Window.
As you progress through the Options of a articular Group, the green indicator light on the TOGGLE Key indicates whether the displayed Option IS ena (lit)
or disabled (not lit). You can check the status of a particular Option by progressing through the Option let-ters/numbers to see which are enabled or disabled. Some Groups may have only one Option enabled at a time. Other Groups require that more than one Option be en-abled to perform a particular function.
If a particular Option is currently disabled, pressing the
I
TOGGLEI
Key will enable it. The green indicator lights up to vlsu8lly confinn that the change was made. The same is true if the Option is enabled and you want to disable it.Once you have selected (enabled or disabled) ay the 0f, tions you intend to change, you must press the GROUP
Key to disflay any Group letter or number and press e
just made. This will cause a warm restart which means that the printer will read the changes that you made.
NOTE: The one exception to toggling a zero Option in order to save your changes is when you change current font numbers. The change is immediate once you have entered the font number.
Anytime you toggle a zero Option, you will erase the current font number that you just entered. This infor-mation is repeated in Section 6, under Group C where the procedure for changing current font numbers is ex-plained.
Pressing the
I
TOGGLEI
Key has no effect at all if you are not in OptionMOde.
The Display Window
The keypad also has a Display Window which displays printer status codes and error message codes. Table 4.1 lists the status codes and error messages. The error mes-sages are explained in Section 12, "Maintenance and Troubleshooting. "
The second function of the Display Window is to show the Groups and Options when configuring the printer in "Option Mode." The Configuration Options used to emulate (imitate) a Qume, Diablo· or Epson printer are explained in Section 6.
Note that due to the nature of the Display Window, Groups D and Q are lowercase d and q instead of upper-case. To avoid confusing Group q and Group 9, remem-ber that Group q follows Group P and Group 9 follows Group 8.
The Data Light
n
in the bottom right-hand comer of the Display WiruIOw indicates that data is currently being received by the printer.Display Meaning
CE Controller Error
CO Cartridge Out (No print cartridge installed)
dA Download Active (a font has been downloaded, printer is active) dF Download Font being received
di Download Idle (download font, printer idle) FE Font Error (no font in system)
iE Interface Error
PA Printer Active (data has been . received; printer has data that has not been printed)
PE Printer Error
PI Printer Idle (ready to receive data)
PJ Paper Jam
PO Paper Out (empty paper cassette
or no paper on Manual Feed Tray when Manual Feed selected)
PU Power-Up self-tests in progress
UP User Pause
8.8. Display Window test (at power-up) Engine test in progress
NOTE: "D"s, "r's and "Q"s are displayed in lowercase. Error codes are discussed in Section 12, "Maintenance and Troubleshooting."
[image:56.407.35.344.35.350.2]Example: Using the Configuration Keys
ACTION DISPLAY
SmartWriter has been powered-on
[fTI
and is on-line; green light inI
ONLINEI
key is lit.
Pressing the
I
ONLINEI
key once[fTI
takes the printer off-line; the greenlight in the key will go out. The dis-play does not change.
Pressing the
I
GROUPI
key once pre- ~ pares the printer to accept a changeto its configuration. This is Group A Option O.
Pressing the
I
GROm key again willleo I
display the next 0 e configurationgroups.
Each press of the
I
GROUPI
key will@]]
[[Q]
display the next group 1D thisse-quence: A, C, d, E, L, P, q, 0, 1, 2, 3, 4, 5, 6, 7, 8, 9.
Pressing the
I
OPTIO~
key incre-III]
ments the OptIon num r in the
dis-play. .
H
an
Option is "enabled" when its number i dis Ia the green light in the TOGGLE key will be lit. If not, at ptton 's status is "disabled."(continued on next page)
ACTION
To change the status of an Option once its number is displayed, press the
I
TOGGLEI
key.To store the changes rat
YO~lhavemade, first press the GROUP key once. This displays the
zero
ption (wann restart) of the next Group in sequence.And then, press the
I
TOGGLEI
key. The printer will automattcatIy per-form a wann restart, go back on-lineand print a Status Summary Sheet (depending on the status of Group
0
Option 8.)
Feeding Paper
DISPLAY
There are two methods of feeding paper through the printer: (1) automatic (cassette) feed, which you used when you printed a Status Summary Sheet in Section 3, and (2) manual feed. These two methods have very different operating prpcedures.
Automatic Paper Feed
1. Paper Cassette 2. Adjustment Bar 3. Foil Label
Figure 4.2 Paper Cassette
Nominal print speed is 8.1 sheets per minute (6.9 for legal size). Of course, as with all printers, actual print speed depends on the amount of printing being done on the page. Before attempting to print usin cassette-feed make sure the green light is out on the MANUAL FEED
Key.
Manual Feed
The manual-feed method gives you complete control of the paper-feed operation. Manual feed is very useful for envelopes and double-sided printing. The paper weight can range from 11 to 33 pound for single-sided printing, and from 16 pound to 33 pound for double-sided print-ing. The procedure for using manual feed on the printer is as follows:
1. Check the indicator light on the
I
MANUAL FEEDI
Key. The green light on this key must be on to use manual feed
2. If the light is already on, go to Step 4. If the green light is not on, take the SmartWriter off-line by
pressing the
!3NLINEI
Key. The
I
ONLINEI
indio
cator light w go out. The printer must be taken off-line before any other keys on the keypad can be enabled.
3.
Press theI
MANUAL FEEDI
Key until this indicator light goes on. This mdicates that manual feed is now enabled4.
Put the printer back on-line by pressing theI
ONLINEI
Key until the indicator light goes on. The pnnter must be on-line before it can perfonn any function other than keypad selection.
5.
Align one sheet of paper lengthwise with thearrow
on the Manual-Feed. tray, and insert the sheet into the printer until the paper stops (Figure 4.3). The side of the paper to be printed should be facing up. NOTE: The printer will expect manually-fed paper that is the same size as the paper cassette in use. You can change this by selecting a different paper size through the keypad (Group 1, Options 4-6.)
These keypad options
are
explained in Section6.
(paper size may also be selected using a software command. See "Software Commands" later in this section.)
Printing
;---~-- - Manual
[image:61.401.159.312.56.332.2]I
Figure 4.3 Manual Feed Feed Guide
Printing can be· done on regular copier-type paper or on pre-printed fonns using either manual or cassette feed Material is nonnally printed on one side of the paper only. However, double-sided and overlay printing are also possible. NOTE: The print engine will not print any closer than approximately 5 millimeters to the top, left and bottom edges of the paper, and approximately 8 millimeters to the right edge of the paper.
Double-Sided Printing
Double-sided printing is possible using manual feed. The procedure for the first side is the same as normal manual-feed printing. To print on the back, simply turn the sheet over and insert it back into the printer (Figure 4.4). If the paper curls after the first pass, uncurl it before inserting
it into the printer again. Special care must be taken to ensure the print on the second side is oriented as desired.
Top
, ,
-I
I
Bottom' - - - -
-Top
,
I
Bottom
I
I
[image:62.404.35.325.175.570.2]- _ /
Print Density
The Print Density Adjustment Dial (Figure 4.5) is used to adjust the darkness of the print. Turning the dial to your left darkens the print; turning it to your right lightens the print.
NOTE: When the dial is set for darker printing, more toner than nonnal is applied to the paper. This affects the number of copies you can expect to get from a single toner cartridge. The cartridge life indicator may give you an erroneous reading. The voltage required by the printer will also be affected when the dial is set for darker printing. More voltage is required to properly adhere the toner to the paper.
Print Density Adjustment Dial
Figure 4.5 Adjusting Print Density
Fonts -
Resident,Download and Cartridge
On the SmartWriter, there are three sources of fonts for you to choose from: resident fonts (which came in the printer when you bought it), download fonts (available on various media) or optional QMS Font Cartridges.
Resident and Download Fonts
The QMS SmartWriter has seven "resident" fonts - fonts (or "typefaces") that are installed in the printer and that are available whenever the printer is powered-on. The names and numbers of these fonts are printed on the Status Summary Sheet.
Download fonts are fonts that are stored in some fonn outside the printer and then "downloaded" (copied) into the SmartWriter's memory when the correct command is issued. (This command is the QMSDLF Download Font command and is explained in the QMSIANSI X3.64
Programming Manual.) Download fonts remain in the SmartWriter's memory until they are deleted by a spe-cial software command (see "Software Commands") or until the printer is powered-off. Fonts may also be down-loaded from the optional Font Cartridges into the SmartWriter's memory. Depending on the available ca-pacity of the memory, all fonts in a cartridge can be copied into memory (using the Epson command
<ESC>:
or the QMS/ANSI
QMSCFO
command) and the car-tridge can be removed from the carcar-tridge slot. Another Font Cartridge can then be inserted in the slot. This pro-cess may continue until the capacity of the memory is reached.Therefore, if either the maximum number of fonts or the maximum number of bytes is exceeded, no more fonts or overlays will be accepted into memory.
Optional Font Cartridges
The optional Font Cartridges enhance the flexibility of the QMS SmartWriter by providing you with additional fonts in an easily accessible fonn. Whenever a Font Cartridge is in the cartridge slot, its fonts are considered resident fonts by the printer. Copying the contents of one (or more) cartridges into the SmartWriter's memory (using the Epson <ESC>: command or the QMS/ANSI
Q MSCFO command) will still allow you to insert an-other cartridge into the slot This Epson copy command gives you the capability of using two or more Font Car-tridges simultaneously. (NOTE: The same limitations on the font capacity of the printer apply to Font Cartridge fonts.)
The SmartWriter must be off-line before pu ;sta~ the
font cartridge. The indicator light on the ONLINE key on the front panel keypad will be off when e printer is off-line. Insert the cartridge into the slot in the front right comer of the SmartWriter as shown in Figure 4.6 below. Then, press the
I
ONLINEI
key to put the printer back online.The SmartWriter must be off-line before you remove the font cartridge. Then, slowly pull the cartridge out of the slot and put the printer back online.
Figure 4.6 Installing the Font Cartridge
Selecting a Font
A font may be selected by using either the SmartWriter keypad or by using a software command.
Selecting a font via the keypad involves taking the printer off-line and using the Group C Options. These Options are explained in Section 6. When a font is selected in this manner, it will remain in effect until a new font is chosen, a warm restart (Option 0 of any Group) is perfonned, or the printer is powered-off.
is available in the printer's memory. The Epson com-mands for selecting Elite, Compressed or Pica (default) Print Widths select from the three Epson fonts (font 380, 381 or 382). When a font is selected using either of these font selection methods, it will remain in effect until you change it.
Printing a Status Summary Sheet
A Status Summary Sheet is printed every time the printer is powered-on. You may also print one by perfonning a warm restart of the printer (refer to Option 0 of any Configuration Group in Section 6). (NOTE: Group 0 Option 8 can be set to suppress the printing of a Status Summary Sheet at wann restart.)
Software Commands
Software commands are commands sent to the SmartWriter that are issued directly from your tenninal's keyboard The software commands that the SmartWriter responds to are explained in detail in Sections 7, 9, 10, and 11. In particular, the commands in Section 7 are very useful. These commands, the Seven Special QMS/ANSl Commands, are:
• QMSSFO - Select Fonts or Overlays. This com-mand can be used in place of the Group C Options that select a cur .. rent fonl Parameters included in this command also allow you to delete fonts or overlays from the printer memory .
• QMSPGO - Select Page Orientation. This com-mand allows you to select between portrait and landscape orientation for printing. Use this instead of Group 1 Option 3.
• QMSFCfL - Paper Feed Control. Using this com-mand you can select manual or cas-sette paper feed without taking the printer off-line. Use this instead of the
I
MANUAL FEEDJ
key and Group 1 Options4, 5,
and .• QMSCCNT - Copy Count. This command allows you to specify the number of copies
to print from 1 to 5000. This com-mand can take the place of all Op-tions in Groups 2 and 3.
• QMSMOD - Select Emulation Mode. With this command, more than one emulation mode may be used in a document thereby allowing you to mix printing capabilities of different modes. This takes the place of Group 1 Options 1 and 2.
• QMSCIL - Extended Printer Control. This com-mand allows you to pause the printer, enter Hex Dump Mode, print a Sta-tus Summary Sheet, or print the Font Test Pages.
If your word processor will not allow you to embed ASCII control characters, you may wish to use the fol-lowing BASIC program to redefine the <ESC> charac-ter to the " .. " character. This file can be sent to the printer once during a power-on cycle and will remain in effect until the Command Translation Table is reset or until the printer is powered-off. (NOTE: The "tilde," is CBR$ (126). Be sure to include the space before the tilde.)
LPlUNT CBR$(27);"[O;O;94;27 _"
After this program is sent to the printer, any " ,," that the printer receives will be translated into an " character. Now whenever you see <ESC> in this manual, you will
only need to type A . For example, sending the following
command to the printer would cause a Status Summary Sheet to print (this is an example of the QMSCTL com-mand):
"[2 r
The " in the command would be understood by the printer to be 'an <ESC>. Redefining the <ESC> char-acter gives you easy access to all the supported software commands of the SmartWriter 150 listed in Section 7 of this manual and in the QMSIANSI X3.64 Programming Manual.
Choosing an
Emulation Mode
Overview
II
This section explains what an emulation mode is and what factors must be considered when selecting an em-ulation mode. The QMS SmartWriter may be used in place of the following printers:
• Diablo 630 and Xerox 1730 Printers
• Qume Sprint 9/45, 9/55 and 11 Plus Printers
• Epson FX-80 Printer
The discussions in this section will help you determine whether you want the QMS SmartWriter to emulate (im-itate) a Diablo, Qume or Epson printer. The SmartWriter is by no means limited to emulating only one of these printers. Each Emulation Mode, like each printer, has certain features or capabilities that may prove more use-ful for your particular needs. You may, if you wish, use all three modes - there are software commands (QMSMOD) and keypad configuration options (Group 1 Options 1 and 2) that allow you to easily switch be-tween the three Emulation Modes and the ANSI X3.64 Mode.
Objectives
In this section, we (1) explain why the QMS SmartWriter can replace other printers; (2) describe how and why your word processor and/or other software packages affect which printers your SmartWriter may replace; (3) explain what factors need to be considered if the SmartWriter is replacing an existing printer or being added to an
isting system; and (4) explain what factors need to be considered when installing a whole new system.
Prerequisites
No prerequisite knowledge or skills are needed for this section. However, a general understanding of word pro-cessors and other software packages is helpful.
Key Terms
Emulate - Refers to the ability of the SmartWriter to imitate or "appear to be like" another printer.
Configure - To select particular options that cause your printer to respond in a specific manner.
Software - Programs and routines which enable com-puters to function in a desired manner.
Compatible - The ability of a device, such as a printer, to work with another device, such as a particular com-puter model or software package.
Word Processor - A type of software package which simplifies writing, editing and formatting letters, memos, articles and reports. Some word processors are very sim-ple to use but have many limitations (can only handle paragraphs or pages of text). Others are more complex but allow you to perform a variety of functions such as rejustify paragraphs, search for an item of data and check spelling.
Printer Emulation
unique set of commands which enable them to perfonn the same functions.
The QMS SmartWriter emulates most of the commands of the Diablo, Qume, and Epson printers. This allows you to substitute the SmartWriter for any of the above printers and get the superior print quality of a laser printer.
In addition to the three "emulation" modes, there is a fourth mode of operation referred to as ANSI Mode. Although this is not truly an emulation mode, ANSI Mode commands provide you with extensive spacing, positioning, and graphics controls as well as the ability to define and download fonts and overlays. Refer to the accompanying QMSIANSI X3.64 Programming MaTUl(lI
for details of the ANSI commands.
Replacing an Existing Printer
If your QMS SmartWriter is replacing a Qume, Diablo or Epson printer, or any printer that is compatible with
these three printers, you will probably want to customize your SmartWriter to be like the printer being replaced. For example, if you are replacing an Epson printer, you will most likely want the QMS SmartWriter to emulate an Epson printer so that you can continue to use the same word processing package and print your old files.
Adding a Printer to an Existing
System
If the QMS SmartWriter is to be an additional printer in a system that also uses Diablo, Qume or Epson printer, you will probably want the SmartWriter to emulate the printer you already have. For example, if you already have a Diablo printer and you want to add the QMS SmartWriter and keep th~ Diablo, you will most likely want the SmartWriter to emulate a Diablo printer. That way, you can print your files from either printer and continue to use the same word processing package.
Word Processors and Other Software
Word Processors are s