Luca Battistella
Bachelor graduation project for Creative Technology at the University of Twente
Main supervisor: M. Cabrita, PhD Critical observer: Dr. A. M. Schaafstal
Abstract
As an extension to the existing VIREP project, a new virtual relaxation environment has been designed for the use in CBP treatment that makes use of VR. This environment makes use of the Zephyr BioHarness 3 to gather data from the user to display biofeedback (of the heart rate and respiratory rate) in the environment in an immersive way. Two initial prototypes were created and then tested for their intuitivity and provided level of relaxation with ten participants. The results showed that heart rate was easy to interpret, but the respiratory rate was not responsive enough to be completely intuitive. Feedback from the evaluation of the prototypes was taken into consideration, and a final prototype was created. However, due to not having implemented a script that captures the data from the sensor in real-time to be fed to the application, manual input is at this point needed for the final prototype to properly and automatically show biofeedback. The final prototype could be improved by implementing such a script and testing the result with end users to properly judge the efficiency of the designed environment.
Acknowledgement
This project was supervised by M. Cabrita, one of the founders of the VIREP project, who provided insight and expertise that greatly assisted the research and design of this project. Not only did she give useful advice in terms of content, but she also motivated me working on the project by setting strict deadlines (thank you).
I would also like to show my gratitude to Roessingh Research and Development for providing a work space and a setup to test the application in VR.
I thank the participants that helped me conduct my user tests for their great feedback on the prototypes.
I want to thank the University of Twente, for giving me the opportunity to do this graduation project as a final project in the Creative Technology bachelor.
Table of Contents
Abstract ... 1
Acknowledgement ... 1
Chapter 1: Introduction ... 6
Situation ... 6
Challenge ... 6
Chapter 2: State of the art ... 8
Biofeedback ... 8
The use of biofeedback for treatment of chronic pain in patients ... 8
Alternative relaxation methods for chronic pain patients ... 8
Relaxation training ... 8
Mindfulness meditation ... 8
Motivation for using biofeedback ... 9
Similar existing applications ... 9
Conclusion on currently available applications ...12
Relaxation in VR ...12
The effect of sense of presence on pain experience ...12
Biofeedback and immersion ...12
Factors that influence sense of presence ...12
Application in a Virtual Environment ...13
Chapter 3: Methods and Techniques ...14
Technologies ...14
Process ...14
Brainstorm ...14
Prototyping ...14
Iterative design ...14
User tests ...14
Conclusive prototype...14
Chapter 4: Ideation ...15
Chapter 5: Specification ...21
Properties found through ideation ...21
Chapter 6: Realisation ...22
Phase 1: prototype #1 ...22
Phase 2: prototype #2 ...23
Phase 3: sensor integration ...24
About the Zephyr ...25
Integration ...25
Problem encounter ...25
Solution...25
Phase 4: polishing the prototypes for a draft user test ...25
Phase 5: final changes to the initial prototypes ...28
Making the bubbles look like bubbles ...29
Changing the fog to a more intuitive interface...29
Chapter 7: Evaluation ...31
Evaluating relaxation and intuitivity ...31
Methods ...32
Baseline ...32
Inducing stress ...32
Biofeedback loop ...32
Choosing the better prototype ...32
Room set-up ...33
Walkthrough ...33
Results ...34
Prototype #1 versus Prototype #2 ...34
Summarized feedback ...35
Implementable feedback ...35
Future ideas (not feasible for the final prototype) ...36
Conclusions ...37
Chapter 8: Realisation of the final prototype ...38
Implementing evaluation feedback ...38
Vertical movement ...38
Improving the gems ...38
Improving the audio ...39
Chapter 9: Discussion ...40
Project design ...40
Findings ...40
Recommendations for future work ...40
Improvements on the final prototype ...40
Recommended research ...41
Chapter 10: Conclusion ...42
Appendix 1: initial brainstorm ...43
Appendix 2: Questionnaire for participants ...45
Questions ...45
Appendix 3: information sheet ...46
Appendix 4: consent form ...47
References ...48
List of figures
Figure 1: Guided Meditation VR screen capture. Reprinted from Guided Meditation VR review: relax in virtual reality, on The Ghost Howls, retrieved March 22, 2018, from https://skarredghost.com/2017/04/22/guided-meditation-vr-review-relax-in-virtual-reality/ ... 9Figure 2: Flutter VR screen capture. Reprinted from Flutter VR, on Runaway, retrieved March 22, 2018, from http://www.runawayplay.com/games/flutter-vr/ ...10
Figure 3: yoku: Forest Meditation and Relaxation screen capture. Reprinted from Shinrin-yoku: Forest Meditation and Relaxation, on What’s on Steam, retrieved March 22, 2018, from http://www.whatsonsteam.com/Games/774421.htm ...10
Figure 4: Nevermind screen capture. Reprinted from ‘Nevermind’ Review: A Cerebral Dive Into Fear And Frustration, on Upload, Retrieved March 22, 2018, from https://uploadvr.com/nevermind-vr-review/ ...11
Figure 5: IntelliSense screen capture. Reprinted from IntelliSense HRV, on Google Play, Retrieved March 22, 2018, from https://play.google.com/store/apps/details?id=com.merlindigital.heartrate ...11
Figure 6: Inhaled state (top view)...16
Figure 7: Exhaled state (top view) ...16
Figure 8: Prototype for what floating assets might look like ...17
Figure 9: Sketch of possible breathing visualisation ...17
Figure 10: Schematic representation of a ripple effect around the user (top view) ...18
Figure 11: Schematic representation of a ripple effect around the user (side view) ...19
Figure 13: A threshold is set in between a heart rate is considered too high ("High Heart Rate Min"
and "High Heart Rate Max") ...23
Figure 14: Cubes that surround the user, moving towards and away from the centre...24
Figure 15: Fog appears when the body signals of the user get too high, indicating that they should focus to become relaxed again ...24
Figure 16: Floating gems replace the cubes from prototype #1 ...26
Figure 17: Floating bubbles now move with the breathing of the user, which feels more natural ...26
Figure 18: The colour of the fog can be changed but will be fixed in the final prototype ...27
Figure 19: The colour of the fog can be changed but will be fixed in the final prototype ...27
Figure 20: The further the heart rate is from the baseline, the thicker the fog will be, indicating that the user should focus on becoming calm ...28
Figure 21: Reflections of the floating assets on the floor have been considered but were removed due to possible hardware constraints...28
Figure 22: The bubble assets have been updated to more like bubbles ...29
Figure 23: The fog has been replaced by a vignette that is layered over the view of the user ...30
Figure 24: Schematic overview of the room used for testing ...33
Figure 25: Distribution of experience in developing VR applications in Unity among the participants ...34
Chapter 1: Introduction
Situation
Roessingh Research & Development are taking part in a project that focuses on therapy for Chronic Back Pain (CBP) patients. This therapy utilises Virtual Reality (VR) to be able to manipulate the environment to suit the needs of therapists for these CBP patients. In this virtual environment, the patients are to do exercises to learn to cope with their pain in stressful situations. Depending on the specific therapy and the patient’s progress, the stress that is caused by this virtual environment can be increased. To give the patients a means to get away from the stress they’re experiencing, a virtual space is added to the therapy environment in which the patient can come to rest in-between exercises.
This relaxation environment is currently built into the application; however, it needs to be redesigned. The aim of this environment is to help patients to be more focused on their body, and to make it easier for them to accept the pain and minimize stress that otherwise worsens this pain. To help the patients to focus, the implementation of biofeedback is being considered. To get a better understanding of how VR can be used to relax, and how biofeedback will influence their therapy, existing applications will be investigated, and new ideas will be explored.
Challenge
The goal of this project is to implement biofeedback into the relaxation room so that users, the chronic back pain patients that will be working with this solution, can track the reaction of their body, and act accordingly. The implementation must be done in a way that will provide measurable results. To get to know how biofeedback can be implemented, it is important to first find out what biofeedback entails. Questions like “What is biofeedback?”, and “Is it effective?” are important for pinning down what needs to be implemented. It will also be investigated what methods are currently used, to see if these methods could be improved.
Once these things are known, it will be interesting to see whether and how these things could be achieved using other methods. Forms of meditation will be explored, and other ways to make patients more mindful of their body will be considered, and these methods will be compared to be able to pick the most suitable one for integration in the project.
To understand what impact VR has on relaxation, it will be investigated what VR-specific applications are currently available. There will also be looked at clues for using biofeedback in current VR applications.
Finally, the aspects of relaxation through biofeedback or other methods and VR will be combined into a conclusion for what to implement in the relaxation room that will be created.
To summarize, questions that will be researched in the second chapter of this paper are:
● What is biofeedback?
● What are alternative methods for making patients relaxed or more mindful?
● How can Virtual Reality (VR) induce relaxation with the help of biofeedback?
○ What is the relation between sense of presence in a VE and relaxation?
○ What factors influence the sense of presence in a VE?
Chapter 2: State of the art
Biofeedback
The Oxford dictionary defines biofeedback as follows (Definition of biofeedback in English, 2018): “A process whereby electronic monitoring of a normally automatic bodily function is used to train someone to acquire voluntary control of that function.”
Gartha (1976) describes biofeedback as “... a process [that] involves the ‘reading’ of certain signals from the autonomic nervous system.”
Altogether, it is evident that biofeedback utilizes methods to obtain and display functions that are autonomous to our bodies. As is suggested in the paper by Gartha (1976), its clinical application is certainly forthcoming.
The use of biofeedback for treatment of chronic pain in patients
The effects of using biofeedback training on patients with chronic pain are positive. It can lead to positive (pain-related) outcomes on both the short and long term (Sielski, Rief, & Glombiewski, 2017). This is further backed by Frank, Khorshid, Kiffer, Moravec, & McKee, (2010), saying that biofeedback training is efficacious for people with chronic pain. The fact that biofeedback training is a very active process makes the patient very involved in learning to interpret the signals and act accordingly. Sielski et al. (2017) even state that greater proportions of feedback might lead to a reduction in depression, and longer treatments are more effective for reducing disability. The very mindful nature of biofeedback training seems to help patients be more aware of their bodies, and this makes it possible for them to have more control over their pain. This leads to the conclusion that biofeedback might indeed be a very useful addition to the relaxation room.Alternative relaxation methods for chronic pain patients
Relaxation training
Relaxation training is another form of training that aids chronic pain patients in reducing the severity of their pain. It was found highly successful in several studies (Shaw & Ehrlich, 1987; Stuckey, Jacobs, & Goldfarb, 1986), with subjects experiencing less intense, and less frequent pain after relaxation training (Shaw & Ehrlich, 1987). In comparison to EMG biofeedback and placebo, relaxation training provided more positive pain-related outcomes in eight out of fourteen conditions, with EMG biofeedback having favourable results in one condition (Stuckey, Jacobs, & Goldfarb, 1986). Even though these sources are heavily outdated, it still provides a good view on the efficacy of relaxation training, since this is something that can be done today in the same way it could back in the 1980’s. To conclude, relaxation training is a solid method for chronic pain treatment.
Mindfulness meditation
concluded to be effective, but not significantly. Thus, it is by no means a better option than relaxation training for treating chronic pain.
Motivation for using biofeedback
To account for different personal characteristics that cause for personal preferences to be a possible issue with meditation (for the type of meditation for instance), biofeedback would be a solid choice. It only requires the interpretation of signals that can be explained by the therapist and more importantly, in contrast with meditation and relaxation techniques, it can provide user-specific feedback that can be measured. This is an important factor that differentiates the use of biofeedback from relaxation or meditation training, since data on i.e. heart rate and variability might give more insights on the effects of certain features implemented in a VE. Since it is also a requirement for the solution on the relaxation room to be measurable, biofeedback provides the best solution.
Similar existing applications
[image:10.612.133.481.353.550.2]Currently, there are several applications that claim to provide relaxing experiences in VR. Some are more scientifically substantiated than others, but by looking at the available material, a good viewpoint can be established on the availability of these applications.
Figure 1: Guided Meditation VR screen capture. Reprinted from Guided Meditation VR review: relax in virtual reality, on The Ghost Howls, retrieved March 22, 2018, from
https://skarredghost.com/2017/04/22/guided-meditation-vr-review-relax-in-virtual-reality/
Figure 2: Flutter VR screen capture. Reprinted from Flutter VR, on Runaway, retrieved March 22, 2018, from http://www.runawayplay.com/games/flutter-vr/
Flutter VR is another application that is marketed with the claim to be a very relaxing experience. Even this is not reflected by having meditation techniques implemented, the creators specifically state that the experience is made for relaxation through relaxing activities, like catching butterflies.
Figure 3: Shinrin-yoku: Forest Meditation and Relaxation screen capture. Reprinted from Shinrin-yoku: Forest Meditation and Relaxation, on What’s on Steam, retrieved March 22, 2018, from http://www.whatsonsteam.com/Games/774421.htm
[image:11.612.137.477.340.531.2]Figure 4: Nevermind screen capture. Reprinted from ‘Nevermind’ Review: A Cerebral Dive Into Fear And Frustration, on Upload, Retrieved March 22, 2018, from https://uploadvr.com/nevermind-vr-review/
Nevermind VR is one of the few VR applications that is widely available and uses biofeedback. This application however, stands apart from the works described above, since this is an action game. This is a very novel concept, but the use of this application is completely different. It is, however, interesting to see the ways in which the biofeedback is implemented in the game: the water level of a water filled room rises and lowers depending on the input, and certain other environmental effects change depending on the body signals of the user.
Figure 5: IntelliSense screen capture. Reprinted from IntelliSense HRV, on Google Play, Retrieved March 22, 2018, from https://play.google.com/store/apps/details?id=com.merlindigital.heartrate
[image:12.612.152.466.395.574.2]Conclusion on currently available applications
Most of the applications that are mentioned above, make use of meditation to make the user more relaxed. Only one of these, the IntelliSense application, is specifically very interesting because it is very similar to what the goal is for the relaxation environment in this project. However, it is very clear that IntelliSense makes use of big graphs that are displayed for the user to interpret. Taking the same approach for the relaxation environment would be odd, since the rest of the VIREP training environment uses no such HUD. Instead, it would be more fitting to integrate the biofeedback information into the surroundings in the form of wooden signs with info on them, or completely integrated into the environment (in the form of moving objects or nature). In the next segment of this chapter, the role of sense of presence will be investigated to find out if implementing biofeedback in an unobtrusive way might be more beneficial.
Relaxation in VR
The effect of sense of presence on pain experience
The sense of presence a patient feels is closely interrelated with the analgesic distraction provided by a VE. The effectiveness of the distraction is influenced by the sense of presence, but it is found that anxiety and positive emotions directly impact the pain experience (Triberti, Repetto, & Riva, 2014). Additionally, interaction with “anxious” and “relaxing” VE’s produces anxiety and relaxation, respectively (Riva, et al., 2007). Thus, a VE that is designed for relaxing will inherently induce a more relaxed state of mind in the patient, which should cause the experienced pain to be reduced in comparison to a possibly stressful VE that might be encountered in the VIREP project. Furthermore, Riva et al. (2007) conclude that emotional state and level of presence have a circular interaction, where on the one hand “emotional” VE’s produce a greater sense of presence, and on the other hand the emotional state is influenced by the level of presence. From this, it takes a logical step to assume that a combination of an immersive (producing a good sense of presence) and relaxing VE would be optimal in trying to achieve a strong analgesic effect. In conclusion, the VE should be both immersive and relaxing, and not only just either.
Biofeedback and immersion
Initially, implementing biofeedback would seem easiest with UI overlays that provide the necessary information for the patient to see Heart Rate, Respiratory Rate etc. in the form of graphs and similar easy-to-read charts. Introducing biofeedback in this form however, would probably be very immersion-breaking, taking away from sense of presence. Since an immersive VE is desired, other ways of implementing biofeedback might have to be researched. To find out in what ways sense of presence can be generated and retained, factors that influence the sense of presence will be investigated.
Factors that influence sense of presence
influence the form or content of the mediated environment (or control factors) (Scheumie, Straaten, Krijn, & Mast, 2001). All these factors must be considered, but the designer has influence only on the sensory and control factor.
A more recent study shows that increased levels of user-tracking, use of stereoscopic visuals and wider fields of view (FOV) of visual displays prove to be more impactful than improvements to other features of immersive systems, like the audio-visual content’s quality, and significantly so (Cummings & Bailenson, 2016). This justifies the use of the HTC Vive with the VIREP project, since the hardware implements all in its system: high quality user tracking, among the best stereoscopic Head Mounted Displays (HMDs) with great FOV for current technology.
Since two of the factors that Cummings & Bailenson (2016) describe are related to the sensory factors and one (user-tracking) to the control factors, the importance of the controllable factors that influence sense of presence can be ranked as follows:
Most important controllable factors: o Sensory factors o Control factors Less crucial factors:
o Audio-visual content
In conclusion, if the quality of the produced sensorial information is high enough, and the user can interact with or influence the environment to a certain extent, the most crucial factors that influence sense of presence have been tackled. The designer should keep in mind that the individual users will have distinct characteristics that might influence the sense of presence.
Application in a Virtual Environment
The use of biofeedback is justified, and because sense of presence also affects pain perception, it would be beneficial to implement biofeedback in a way that is unobtrusive to the user. The way it can be implemented without reducing the sense of presence will be investigated later on in this thesis. However, since the importance of audio-visual content is less important than sensory and control factors, the difference between having unobtrusive biofeedback and biofeedback on the basis of graphs might not be so significant. It will have to be tested whether users feel more relaxed and able to anticipate on their bodily signals with obtrusive and unobtrusive biofeedback.
Chapter 3: Methods and Techniques
Technologies
Because this graduation project builds on the existing VIREP project, the technologies used have been established beforehand. In the VIREP project, the HTC Vive has been chosen as the VR system, and the environments in the original project are made in Unity 3D, a game engine that can be used for creating applications and games. Finally, the sensor that is being used in the VIREP project for after-session monitoring is the Zephyr BioHarness 3.
These same systems and technologies will be used in designing the improved relaxation environment, to truly provide an extension of the project with the prototype that will result from this research.
Process
To design a new relaxation environment, some steps need to be adhered to, in order to have a structured design process.
Brainstorm
Diverge, then converge. In the ideation phase of this project, ideas will be generated through brainstorming. A successful brainstorm can be achieved by first diverging in terms of ideas, to let all the possibilities reach the table. Then, to get a starting point, the best ideas are chosen and built upon. This way, a basis is set for the design of the relaxation environment.
Prototyping
To explore how well certain ideas work, brainstorming will be closely followed up by prototyping. Prototyping is the creation of quick, specific prototypes, that can test the effectiveness of certain ideas. Because these prototypes are quick and low on effort, they can be discarded easily and can be good learning tools.
Iterative design
Once the initial prototypes have a working basis, these can be expanded upon. Once new features are added, these need to be reviewed and edited if necessary. By going through the design process in stages, features that might pose problems in later stages can be dealt with before they pose a problem.
User tests
Once one or several prototypes are developed far enough for them to be shown to and tested by users, this is a great way of finding out what possible end-users think of a certain design. These user test can be used to generate feedback for improving the design of the prototype(s).
Conclusive prototype
Chapter 4: Ideation
In this chapter, the choices faced will be considered, and the chosen solution will be motivated. To get to know where to start, the first question asked was as follows:
What to visualise: Biofeedback that reflects body signals or should the VE guide the body?
Since this is not a guided meditation application but one that provides biofeedback, the environment will (mainly) reflect the signals that the body provides (respiratory rate, heart rate). The goal is to enable the user to mindfully influence their body and learn about it in the process, so that they can use this knowledge to help themselves to relax. Because of this, the ideas generated will be based off of ways to intuitively show what is happening with your body.
Solution: Biofeedback will be visualised to reflect the body signals of the user.
What followed was that the style of the virtual environment had to be decided upon.
How to visualise: Should the environment be natural or abstracted?
A natural environment helps to relax by itself. However, making assets that look realistic is hard. Especially because there’s a difference between believable and realistic. The question is how important realism is. In contrast, by using abstract shapes, prototyping becomes much faster and easier to edit. Especially in the beginning phases where functionality is more important, abstract assets will be easier to work with. Abstract assets could still represent natural assets. Plants that move in the wind can be represented by thin, long boxes that display the same behaviour, reminding the viewer of those natural elements.
Possible solutions:
• For a natural environment, free assets from the Unity Asset Store could be used
• (Only) the Skybox could be made a natural environment
• Some of the less detailed assets could be made in Maya 3D
• Don’t use a natural environment
From literature, it became clear that the main things that influence the immersion of users are the Field of View, Depth of Field, and things that are all incorporated in the HTC Vive from the start. This means that it might not matter all that much how immersive the environment is. This would lead to the conclusion that for this project, an abstracted environment should work effectively.
Solution: The virtual environment should be abstracted, but the Skybox could still be a natural environment, to create a blend between real and abstract/surreal.
How will the respiratory rate be represented?
Sinusoidal movement generally emulates breathing patterns very well. However, sinusoidal movements could be implemented in several ways. Two obvious options would be horizontal and vertical movement.
Possible solutions:
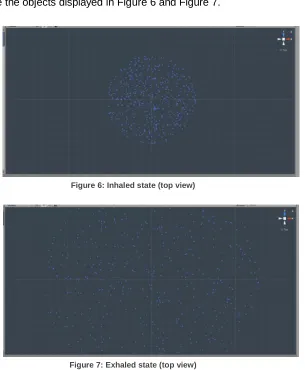
[image:17.612.173.478.243.613.2]• Horizontal movements would represent the breathing of the user, with wind moving away from the user’s avatar in the virtual environment when they breathe out, and wind moving towards the avatar when they breathe in. This can be visualised by making objects move the way they would when influenced by wind (tilting, stretching, moving towards and away from avatar). The assets could also simply move towards and away from the user as a natural way of displaying the more condensed air inside of the user’s lungs, which would look something like the objects displayed in Figure 6 and Figure 7.
[image:17.612.176.474.271.418.2]Figure 6: Inhaled state (top view)
Figure 7: Exhaled state (top view)
Figure 8: Prototype for what floating assets might look like
• Another idea might be to let the application draw floating patterns in the shape of random “lung threads”, where the lines get drawn away from the user’s avatar when breathing in, and they would fade away reversely when breathing out. This way it represents the lungs filling with air when breathing in, and letting the air go when breathing out. It might look something like this:
Figure 9: Sketch of possible breathing visualisation
[image:18.612.150.488.369.613.2]Solution: Both vertical and horizontal movements will be tested for representing the respiratory rate.
How will the heart rate be represented?
To provide feedback on the heart rate of the user, something intuitive must be used to represent it. When people think of heart rate, they generally think of the “gaduck, gaduck” sound that it’s accompanied with. Because of this, it seems only reasonable that sound might be important in assisting visuals to represent the heart rate.
Options:
• A low drum sound to represent every (other) heartbeat
• A typical heartbeat sound might be most intuitive
However, using sound (at all) might make it hard for the patient to communicate with their therapist, so maybe all feedback should at least also be understandable with only visuals.
Alternatives:
• Short shaking (possibly to accompany the sounds)
• Amplitude of movements could be influenced by heart rate, but this might be too unintuitive
• The assets could increase in size a little bit and then go back to their original size. This would be to simulate a heart pumping.
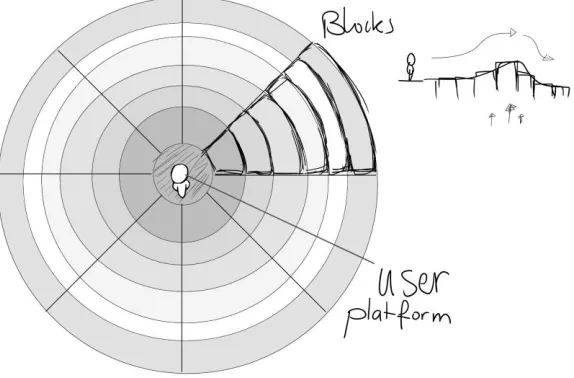
[image:19.612.183.470.449.638.2]• Another idea might be to have the user stand on a platform, surrounded by blocks that spread in circles around the user. These blocks can move along with the breathing of the user to create a ripple effect. Small ripples could be added that represent the heart rate as well. In Figure 10 and Figure 11, a side view and top view of a schematic representation of this idea are shown.
Figure 11: Schematic representation of a ripple effect around the user (side view)
Solution: For horizontally moving assets, pulses through the surrounding assets could be used, and for vertically moving assets, an increase/decrease in size would be preferred.
Now that visualisations and representations for the data have been chosen, there should be indicators if the users’ signals are too high, or over baseline.
What visualisations could indicate signals over baseline?
To indicate to a user that their current heart rate or respiratory rate is too high (according to their own baseline, which can be set), the environment will send signals to the user. This can be done in multiple ways:
Options:
• Make the environment change colour depending on how high their signals are
• Add an audible noise (rumbling) that intensifies as the signals get higher
The downsides of using both of these, is that the user might already feel that their bodies are working hard. To tell them with visuals and audio might only increase the stress they’re experiencing. On the other hand, having the environment “scream” to them might be a good motivator for the user to learn how to calm down their body. A middle ground would be to have the colour not be too overwhelming, but have it present to inform the user about their current state compared to baseline.
Solution:The environment will change its colour depending on how high the user’s signals are compared to their baseline. This will go accompanied by a rumbling noise that intensifies as the signals get higher.
Some more general ideas have been thought about, like colour use and multiple environments for the user to choose from.
What should be kept in mind when adding colour to the environment?
Colour could have a subtle influence on the relaxed state of the viewer. Colours have always had associations with them in terms of things they represent. This is why these should be kept in mind when designing the assets for the environment.
• Assets in colours that ease the mind. o Light blue
o Pastel colours
• “Happy” colours might work, too
• Vivid, beautiful colours. (This might be too “screaming”)
• Hypnotic patterns (in the skybox), might add a sense of surreality
Solution: Keep in mind that colour could have subtle effects, but don’t let colours hold you back on ideas that come up.
Should multiple environments be made?
Basically, it would be ideal if the user could choose the surrounding they like to be in most. However, this would require a lot of time and attention, and is something that can’t be done within the time that’s available. Especially because the things that will be in those environments will still have to be tested.
Chapter 5: Specification
Properties found through ideation
Gathered through ideation, the preferred solutions would sum up to a virtual environment with the following properties:
1. Biofeedback will be visualised to reflect the body signals of the user.
2. The virtual environment should be abstracted, but the Skybox could still be a natural environment, to create a blend between real and abstract/surreal.
3. Both vertical and horizontal movements will be tested for representing the respiratory rate.
4. For horizontally moving assets, pulses through the surrounding assets could be used, and for vertically moving assets, an increase/decrease in size would be preferred. 5. The environment will change its colour depending on how high the user’s signals are
compared to their baseline. This will go accompanied by a rumbling noise that intensifies as the signals get higher.
And two things should be kept in mind:
• Colour could have subtle effects, but don’t let colours be an obstacle for ideas.
• The result of this project will be one finished working prototype.
For all these properties to be implemented, each user should have their individual baseline set through recording their bio signals, determining their relaxed state. This entails that the heart rate of the user should stay between certain values for the environment to reflect the relaxed state of the user, and anything above that would imply a more stressed out or physically active state.
Solutions
From the properties needed and the options presented, it is derived that there will have to be 2 prototypes. These will have to be tested and compared to learn which of the two is more intuitive and relaxing for the user, and thus has more potential for being effective for use in CBP therapy.
The first prototype will have assets that are floating in a vertical direction, up and down, to represent the breathing rate (as shown in Figure 8) and will have its assets inflate and deflate on each heartbeat.
Chapter 6: Realisation
Phase 1: prototype #1
In the first phase of realisation, the basis is set for the first prototype that has vertically moving assets. A script is written with variables that can control how many assets are floating around, and how far these assets can maximally go from the user at the centre. For the vertical movement, a sine function is chosen since these simulate breathing patterns very well. As this is a first prototype, the assets used are simply cubes. The up-and-down movements are controlled by a variable that states the amount of breaths per minute, which can be changed in real time.
A free skybox is downloaded and imported from the asset store to get a relaxed atmosphere through simple means. In Figure 12, the first prototype is shown in this first phase.
In this first prototype, a heartbeat sound is added to get an idea of whether the heartbeat variable works, the inflating/deflating effect will be added in phase 4. The heartbeat will sound on every beat, while the heart rate is read in the same manner as the respiratory rate, namely through a variable that states the heart beats per minute.
[image:23.612.151.459.379.540.2]The last thing that is added in this first phase is a rumbling sound that gets louder as the heartbeat gets too high. The heart rate must be within a threshold that can be seen in Figure 13, between which the rumbling sound will linearly grow louder, up to a maximum. In phase 2, colour will be added to the environment when this happens.
Figure 13: A threshold is set in between a heart rate is considered too high ("High Heart Rate Min" and "High Heart Rate Max")
Phase 2: prototype #2
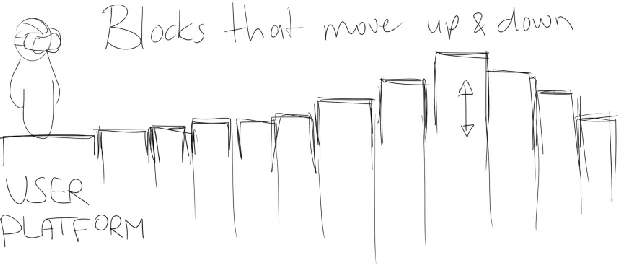
In the second phase, the second initial prototype is created. At this point, the prototype features cubes that float level with the user. These cubes get initialised randomly inside a circle surrounding the user, up to a radius that is to be defined through a variable. A screen capture of these blocks is shown in Figure 14.
Figure 14: Cubes that surround the user, moving towards and away from the centre
The visualisation of the heartbeat is also implemented in this prototype. On every heartbeat, all cubes momentarily move up and down, back to their vertical starting position. However, this is done with a latency that is dependent on the distance to the user. This way, with the right values in place, it can be made to look like a ripple that originates from the centre.
Finally, this prototype has implemented fog. This purple (colour can be changed as of phase 4) fog starts appearing once the body signals reach a certain value, and up to a given point, the fog keeps increasing with the signals. This is a visual indicator for the user that their heart rate is above their “recommended value”, thus too high for them to be in a relaxed state. As the user’s heart rate gets lower, the fog disappears. The fog as of this state can be seen in Figure 15.
Figure 15: Fog appears when the body signals of the user get too high, indicating that they should focus to become relaxed again
Phase 3: sensor integration
[image:25.612.153.458.413.574.2]About the Zephyr
The Zephyr BioHarness 3 will be used to sense the user’s heart and respiratory rate. It’s a device that connects through Bluetooth and is capable of sensing multiple things, including the aforementioned, as well as temperature and movement.
Integration
In phase 3, the implementation of the Zephyr sensor is explored. The goal is to implement a real time biofeedback loop, using the data from the sensor. To provide these data in real time, a connection must be made between the BioHarness and the Unity scene through a C# script. If the script manages to pick the needed data from the stream, the variables that control the heart rate and respiratory rate can be updated in real time. The idea is to see if there are existing modules that can connect to a heart rate sensor through Bluetooth, to this way gather the data from the sensor for direct use in the prototype.
Problem encounter
Searches on the worldwide web provided several basic solutions for a Bluetooth connection through a C# script. Sadly, most of these were on “regular” Bluetooth. Apparently, the Zephyr makes use of so called “Low Energy” Bluetooth, or BLE (Bluetooth low energy). It appears that BLE connections happen differently from regular Bluetooth connections. This made it so that solutions to connect through BLE were scarce. One possible (free) solution was found on the Unity Asset Store: The Windows and HoloLens Heart Rate Monitor Plugin. However, even with the plugin, a connection couldn’t be made with the Zephyr.
Personal expertise in the area is lacking, so writing a script from scratch seems too complicated for the time available.
Solution
The bare minimum for testing the virtual environments that have been made is that participants can view biofeedback in (near-)real time. A possible “plan b” for achieving this working state, is to read the sensor data through a separate application that is provided with the Zephyr sensor, and manually copy the values into the Unity prototype as they change. This is far from perfect for a final prototype, but for testing purposes, it might come close enough. At least for the participants to get an idea of what the environment should do, and hopefully enough for them to provide feedback. The preferred outcome however, is that for the final prototype, a real time solution can still be implemented (by use of a script).
Phase 4: polishing the prototypes for a draft user test
Figure 16: Floating gems replace the cubes from prototype #1
Secondly, prototype #2 also got an asset swap. Instead of the pointy, heavy cubes, there are now bubbles floating along with the breathing of the user. This change was implemented because several people that viewed the prototype remarked that cubes were too pointy and therefor too intimidating for having them move towards the user relatively fast. The interaction with these new assets feels much more natural than heavy cubes that get moved by breathing. In Figure 17, the bubbles can be seen, floating around the user platform.
Figure 17: Floating bubbles now move with the breathing of the user, which feels more natural
The colour of the fog that appears when the user’s signals are over baseline can now be changed. The colours that were added in are Red, Blue, Green, Yellow, and Purple. These colours can be changed while the application is running, but one colour will be chosen for the final prototype. In Figure 18 and Figure 19, two different colours for the fog can be seen. The further the heart rate is from the baseline, the thicker the fog will become, as can be seen in Figure 20. This warns the user that they should focus on becoming calmer.
[image:28.612.154.462.178.338.2] [image:28.612.152.460.367.527.2]Figure 18: The colour of the fog can be changed but will be fixed in the final prototype
Figure 20: The further the heart rate is from the baseline, the thicker the fog will be, indicating that the user should focus on becoming calm
Finally, a particle effect is added around the centre to create an extra sense of depth, and to make the direct environment just a little more interesting and pretty.
It has been considered to add a so-called reflection probe, so that the floating assets also get a reflection of the surface of the floor. However, doing this while maintaining a premium look would require a high reflection texture resolution. This can be done but doing so would put a lot of strain on the GPU, and the possible lag that occurs in the running program is not worth it. Besides, the computer this application would be run on might not have the capable hardware. So, after testing this out, the choice has been made to remove this functionality.
Figure 21: Reflections of the floating assets on the floor have been considered but were removed due to possible hardware constraints
Phase 5: final changes to the initial prototypes
After the previous phase, a single user test was done as a draft user test. The goal of this draft user test was to get an outside look on the prototypes, to identify problems for real user testing. From this draft user test, several things were concluded:
[image:29.612.153.461.419.580.2]● Changing the respiratory rate in the inspector would make the assets jump from place to place, this transition needs to be smoothed out
● The bubbles don’t look like bubbles, more like metallic balls.
If these problems can be tackled, the participants for the user tests will be less distracted from what needs to be tested. If all participants were to note the same problems, that could lead away from what is important in the tests.
Making the bubbles look like bubbles
[image:30.612.142.472.265.423.2]To get the bubbles to look like bubbles, a few different shaders were tested to see which one got the most believable result. Once the right shader had been chosen, the texture for the soapiness of the bubble had to be added. The result is visible in Figure 22.
Figure 22: The bubble assets have been updated to more like bubbles
Changing the fog to a more intuitive interface
Chapter 7: Evaluation
Evaluating relaxation and intuitivity
To evaluate the prototypes in the current state, tests will be performed to validate the effectiveness of the properties of the prototypes. The two goals that these prototypes should achieve are as follows:
- The prototype should induce relaxation
- The prototype should present the biofeedback to the user in an intuitive way.
Since there are two versions in need of testing, each individual participant will be asked to test both versions and indirectly (through separate questions about each one) compare the two, so that an overall winner can be declared.
To test the relaxing and intuitive properties, about 10 people will be asked for testing. These ten people will have ranging experiences with VR, and diverse backgrounds. Since there are two prototypes, half the amount of people will get to see prototype #1 first, and the other half will get to see #2 first, to rule out that one of them gets an unfair advantage.
The two different prototypes have the properties that are shown in Table 1.
Represented signal Prototype #1 Prototype #2
Breathing Visual component
Vertical movements (floating gems) Horizontal movements (bubbles) Audible component - -
Heart Rate Visual component
Quick increase/decrease of size
Pulses going through the bubbles
Audible component
Heartbeat sounds Heartbeat sounds
Over baseline Visual component
A blur is layered over the visuals and a red vignette will start to appear.
A blur is layered over the visuals and a red vignette will start to appear.
Audible component
Rumbling that increases with higher difference with
baseline
Rumbling that increases with higher difference with
Preview
Table 1: Properties per prototype
Methods
Baseline
For the prototypes to work properly, a baseline must be set per user. This baseline is based on the heart rate of the user because the prototypes make use of the heart rate to set the threshold for when the heart rate gets too high.
To set this baseline, a participant will be asked to equip the sensor, sit down, and do abdominal breathing for a full minute. The first half minute will be for making sure the patient is relaxed, and during the second half, the average heart rate will be determined.
Inducing stress
To simulate the behaviour of patients that are training with the VIREP project, the participants will have to have an increased heart rate and respiratory rate. This is needed because the patient would only enter the relaxation room in times of stress, to cool down. At those times, their heart rates will be increased. That’s why the participants will have to get some form of stimuli to increase these rates. Since the prototypes work on solely the heart rate and respiratory rate, it doesn't really matter if the test person is stressed or not, as long as these ratings are increased.
A simple and safe way of increasing heart and respiratory rates is physical exercise. Jumping jacks can be done in place and work very effectively for increasing these rates. These can be done with the sensor equipped, but without the VR headset, as it would be uncomfortable, unstable, and unsafe that way. Therefore, the participant will do jumping jacks directly before entering the virtual environment.
Biofeedback loop
As stated in the Realisation chapter under phase 3, the tests will be done without having the fully integrated biofeedback loop. Instead, a separate application will be used to read the incoming data from the sensor, and the values of the heart- and respiratory rate will be changed manually in the prototypes, to provide the participants biofeedback in near-real time. This is not optimal, but for this test, it will be enough to give the participants an idea of what the prototypes do.
Choosing the better prototype
possible to determine whether one prototype is more effective than the other, or they might be equally effective. The questions are attached as appendix 2.
Room set-up
[image:34.612.70.531.164.367.2]For the execution of the tests, a meeting room is reserved that will be set up as depicted in Figure 24.
Figure 24: Schematic overview of the room used for testing
Walkthrough
What follows is a detailed walkthrough that will be followed for each participant:
1. The participant enters the testing room and takes a seat, so their body can start calming down for the baseline measurement.
2. The user gets informed as to what they’re about to experience with an information sheet (appendix 3).
3. The user will sign the informed consent form (appendix 4). 4. The user’s age and study background are written down. 5. The baseline of the user will be set.
a. The user equips the sensor.
b. The user will do abdominal breathing for one minute. The second half of the minute will be used to define the average heart rate in a relaxed state.
6. The user now stands up and does jumping jacks for about half a minute to get their heart pumping. The heart rate will be monitored to see when the heart rate is substantially increased, at which point the participant will be asked to stop.
7. The VR headset will now be put on.
8. The user should naturally calm down, and they will see the environment reflect this.
9. When the user’s signals are back around baseline, the four questions that are stated above will be asked, and the answers will be noted.
10. The user then takes off the VR headset.
12. The sensor is unequipped.
13. The user gets the opportunity to ask questions or make remarks. 14. The participant is thanked, and then leaves.
Results
Prototype #1 versus Prototype #2
[image:35.612.117.493.249.483.2]The test pool consists of ten people, made up of three females and seven males of the ages between 19 and 22. The experience in Unity and VR development is quite differing over all, which is good. This way, the test results will be minimally influenced by bias over the systems used. The distribution of experience with developing applications in Unity for VR purposes among the participants can be seen in Figure 25.
Figure 25: Distribution of experience in developing VR applications in Unity among the participants
The intuitivity of the heart rate (HR) and respiratory rate (RR) representations got graded by each participant, as well as the level of relaxation induced in the test person. Prototype #1 has gotten higher average grades than Prototype #2, apart from the HR intuitivity, which is equal. The grades are listed in Table 2.
HR intuitivity RR intuitivity Relaxation level Average grade Standard Deviation Average grade Standard Deviation Average grade Standard Deviation
Prototype #1 8.3 1.64 6.8 1.48 6.9 0.88
[image:36.612.69.546.148.252.2]Prototype #2 8.3 1.30 6.3 2.23 5.7 1.47
Table 2: Average grades and standard deviation per prototype on a scale of 1 (low score) to 10 (high score) for the intuitivity of the heart rate and respiratory rate and the level of relaxation
What can be concluded from this, is that most participants found Prototype #1 more relaxing, and slightly more intuitive than Prototype #2. To see what caused this and use this to improve our final prototype, feedback that’s been given as an answer to question #4 on the questionnaire will be considered.
Summarized feedback
Prototype #1
• Assets that move too close are intimidating
• The shape and colour of the gems are a little sharp and cold
Prototype #2
• Assets that move too close are intimidating
• The bubbles should act/move more like bubbles
• The bubbles invite to try and pop them, but you can’t
• Because the bubbles are transparent, you see a lot of them which makes it feel like you’re being ganged up on
Feedback on shared components
• Heartbeat sounds are stressful
• Add ambient music
• Make the breathing directly visible instead of using the bpm
• Change the environment to be more familiar (grassy field / city)
• Change the colour scheme to greens/blues
• Make the sky change in terms of colour or displayed time of day
Implementable feedback
used now without changing the whole prototype. The elements that could be implemented are as follows:
Vertical over horizontal movements
Vertical movements seemed easier to estimate than horizontal movements moving towards/away from a person. This is probably caused by the fact that distance is easier to measure in a plane that’s perpendicular to our line of sight than in depth. This leads to the conclusion that vertical movements are easier to understand, so the vertical movement (script) will be used for the final prototype.
More distance between the user and moving assets
The assets that will eventually be used shouldn’t come too close to the user. The user needs to be able to take their distance and observe what is happening with their bodies.
Tuned down heartbeat audio
Since the heartbeat sound is too intrusive. To improve this, the same sample could be edited to sound more distant and have a less punchy bass. This might be a clever idea because the sound really helped people identify the heartbeat representation, so it shouldn’t be completely removed.
Ambient music
Soothing, ambient music can be added to subconsciously calm the user down.
Changing the gem’s colour and mesh to be less pointy
Depending on which asset will be used in the final prototype (gems or bubbles), the colour and sharpness of the gems would have to be rounded more and changed to a more soothing colour.
Future ideas (not feasible for the final prototype)
What follows is a list of ideas based on the feedback that cannot be implemented before the end of this project but would make great additions or alternatives to the methods used.
Real-time respiratory rate
The respiratory rate should be visualised in real time. This would not only improve the readability, it would also make it easier to understand what’s being represented by a certain movement based on respiration, as the user can directly interact with the way the objects are moving by changing their breathing pattern. If time constraints and a lack of scripting skills weren’t in the way, this improvement would have the highest priority.
Changing the surrounding setting
Conclusions
Results
Prototype #1 has proven to possess more potential than #2. While the respiratory rate is still not optimally readable, #1 provides a more relaxed atmosphere than #2. This is mostly due to the assets of #2 moving towards the user, which induces an uncomfortable, pressured feeling that stresses out the user, more than it relaxes them. This leads to the choice of taking Prototype #1 as a starting point for the final prototype. Furthermore, some of the proposed changes will be implemented; for example, the volume of the heartbeat audio will be tuned down in such a way that the heart rate will stay intuitively understandable, but the sound is not as intrusive anymore.
Natural vs. abstract
Chapter 8: Realisation of the final prototype
Implementing evaluation feedback
The final prototype takes into consideration the feedback provided by participants of the user tests to make changes for improvement over the two initial prototypes.
Vertical movement
As mentioned in the Implementable Feedback section under the results of the Evaluation chapter, prototype #1 has been chosen as a basis for the final prototype. This is because the vertical movements to represent the breathing rate are easier for the user to estimate than the horizontal movements of prototype #2.
Improving the gems
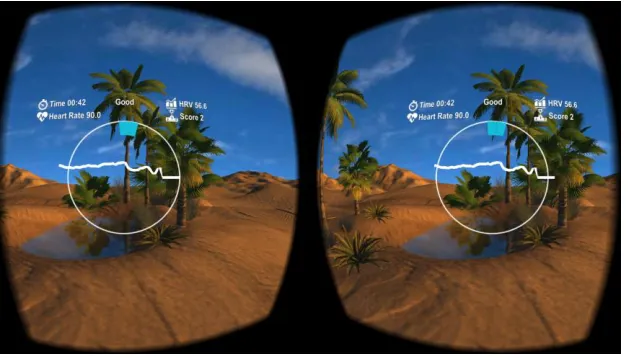
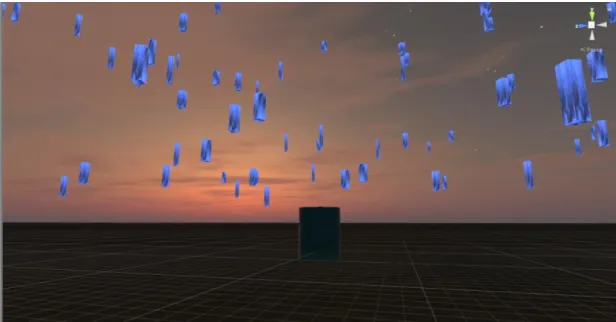
[image:39.612.105.510.372.600.2]The models for the floating gems have also been improved to be more rounded, and their colour is a little warmer than before. This, in combination with the fact that the gems won’t spawn too closely to the user anymore, should make the objects less intimidating. This provides the user with the physical space to take distance from their body signals, to safely adapt their physiological actions to become more relaxed. In Figure 26, a screen capture of the final prototype in use can be seen, showing the improved gems.
Figure 26: Screen capture of the final prototype with implemented changes
Improving the representation of respiration
displaying the respiration state would only be possible if the sensor data could be automatically accessed by the C# script of the prototype in real-time, there are still other ways to improve the representation of the respiration. The user must be able to tell if their respiration rate is high or low compared to their relaxed state, and only the speed of the movements up and down will not be enough to clearly communicate that. However, a rotation around the gem’s Y-axis could help communicate this. If the gems would all rotate around this axis, it would be easier for users to estimate the difference in speed at which it turns than to judge the speed at which they move over a long distance (up and down). Because the gems will rotate faster when the breathing rate is high, a user will see more movement and unrest in the objects, reflecting that their breathing rate is too high. So, this improvement supports the representation of the respiration.
Improving the audio
Chapter 9: Discussion
Project design
The user tests that were conducted could have provided more data proving the relaxation of the participants. For example, the time it took for a participant to become relaxed could have been measured to provide data that would have given a more solid look at the effectiveness of the relaxation environment. This could have been compared to the results of an evaluation of the final prototype, to have a measurable difference.
Also, the participants for the user tests should have been more varied in terms of age and background. It is unclear whether this might have skewed the results of the tests.
Ideally, the final prototype would have been user tested to be able to confirm that the changes made improved the prototype to provide intuitive biofeedback in a relaxing environment. Without those, the effectiveness of the final prototype can only be guessed at. If the process would have been planned in such a way that a final user test could be conducted, it would have given more meaning to this final prototype.
Findings
Even though the final prototype has not been tested, it can be assumed that the prototype does provide improved relaxation over the initial two prototypes. Because the evaluation of the two prototypes yielded positive results in the form of a grade on a scale of 1 to 10, it is reasonable to speculate that, with the most negatively graded properties removed or improved, the final prototype does provide the desired intuitivity and relaxation.
Recommendations for future work
Improvements on the final prototype
The most important improvement for the final prototype, would be to write a working C# script that gathers the sensor data through Bluetooth, so that the real-time sensor data could be used for displaying biofeedback. Two problems would be solved with this:
1) The application would work as intended. The fact that the final prototype does not have a working data gathering script makes its use rather limited, as sensor data has to be copied manually into the prototype. With a working script in place, the application could run without manual interference.
2) The breathing rate could be made more responsive. By using the real-time data from the sensor, the vertical position of the objects in the relaxation environment can be mapped to the expansion of the chest of the user. This way, the user will see the changes in their breathing patterns immediately, providing more accurate biofeedback.
Recommended research
Apart from improving the functionality of the final prototype, research could be done on whether there is a difference in effectiveness of using an abstracted environment as opposed to a nature filled environment. It would be fascinating to find out whether a natural environment would be preferred due to personal preference or would indeed intrinsically imbue more relaxation in the user.
Chapter 10: Conclusion
Appendix 1: initial brainstorm
Immersion, Relaxation, Biofeedback
Colours
- Pastel > relaxing - Natural > relaxing
- Vivid > beautiful, maybe too “screaming”? - Mesmerizing \
- Hypnotizing => too distracting? - Relaxing /
- Hypnotic patterns that change speed according to feedback > might be too “intimidating” - Skybox with these things?
- Changeable surroundings? -- too much work Shapes
- Organic <> Geometric > reason for Organic: natural and therefor relaxing.
> reason for Geometric: contrast, medical, “official”, sense of authority
- Realistic <> Abstract > reason for Realistic: Immersion and a natural feel.
> reason for Abstract: contrast, different, not too straight forward. But why could this be beneficial? It’s definitely easier to create and to test around with (prototyping), and it reminds the user that they’re in VR for a reason.
- Floating Balls -- \
- Floating Gem-shaped Boxes -- \=> just some ideas
- Floating things that hover up and down > easy to combine with breathing patterns or heart rate
- Open space <> Closed space (room) > clear distinction between “free” (relaxed) and “chained” (stressed). Not clear whether a closed space would discourage becoming relaxed.
- Room walls that are less transparent when the person is uncomfortable and disappear if the person is at ease > when the person knows this, they might try to become relaxed. Sounds
- Music > proven to help synchronize heart rate and respiratory rate
- Soft white noise > some natural buzz. Might be unnecessary because the user will be in a room with natural sounds etc, and maybe music already.
- Water - Wind - Birds - Sea
- Rumbling (to reflect unease)
- Work in tandem with visuals, but in a way that vision reflects, and the sounds provide a solid ground to synchronise with (so the sound is subtle but leading).
- Heart rate is often associated with the *gaduck, gaduck* sound. By using a heavy drum that beats every first *gaduck*, feedback might be reflected this way.
- For breathing, the sound is leading, for heart rate the sound is reflecting. For skin conductance, colour might change, as it isn’t something people associate with a certain sound.
Heart Rate
- Speed at which objects move Up/Down > this might be more suitable for respiratory rate as your body makes the same
movement. Feedback > Stimulating or reflecting?
- Following feedback, or displaying desired heart rate/etc.?
Appendix 2: Questionnaire for participants
Questions
1. In which way do you think your body signals are represented? 2. On a scale of 1 to 10, how intuitive do you find the representations?
(1 - not at all intuitive ←→ 10 - very intuitive)
3. On a scale of 1 to 10, how well does this environment help you in becoming more relaxed? (1 - not at all relaxing ←→ 10 - very relaxing)
Appendix 3: information sheet
19/06/2018
Welcome, and thank you for coming!
You will be testing 2 virtual environments. These environments will reflect your body signals. The goal of these tests is to determine which of two prototypes should be picked to continue in a graduation project that revolves around creating a relaxation environment in VR, for the use in Chronic Back Pain treatment.
You will be wearing a sensor that tracks your heart rate and respiratory rate. These data will not be stored. You will be asked to answer 4 questions per environment. Only your age and study background will be recorded, to make sure the test pool is diverse.
You will be asked to do some light physical exercises.
If you have any questions, feel free to ask them
Hopefully this information is sufficient.
Luca Battistella
Contact: [email protected]
Appendix 4: consent form
Please tick the appropriate boxes Yes No
Taking part in the study
I have read and understood the study information dated 19/06/2018, or it has been read to me. I have been able to ask questions about the study and my questions have been answered to my satisfaction.
O O
I consent voluntarily to be a participant in this study and understand that I can refuse to answer questions and I can withdraw from the study at any time, without having to give a reason.
O O
Use of the information in the study
I understand that personal information collected about me that can identify me, such as my age and study background, will not be shared beyond the study team.
O O
Signatures
_____________________________ ____________________ ________
Name of participant Signature Date
I have accurately read out the information sheet to the potential participant and, to the best of my ability, ensured that the participant understands to what they are freely consenting.
Luca Battistella ____________________ ________
Name of researcher Signature Date
Study contact details for further information: