FortiOS™ Handbook
Install and System Administration for FortiOS 5.0
Install and System Administration for FortiOS 5.0 April 9, 2014
01-502-142188-20130423
Copyright© 2014 Fortinet, Inc. All rights reserved. Fortinet®, FortiGate®, FortiCare® and FortiGuard®, and certain other marks are registered trademarks of Fortinet, Inc., and other Fortinet names herein may also be registered and/or common law trademarks of Fortinet. All other product or company names may be trademarks of their respective owners. Performance and other metrics contained herein were attained in internal lab tests under ideal conditions, and actual performance and other resultsmay vary. Network variables, different network environments and other conditions may affect performance results. Nothing herein represents any binding commitment by Fortinet, and Fortinet disclaims all warranties, whether express or implied, except to the extent Fortinet enters a binding written contract, signed by Fortinet’s General Counsel, with a purchaser that expressly warrants that the identified product will perform according to certain expressly-identified performance metrics and, in such event, only the specific performance metrics expressly identified in such binding written contract shall be binding on Fortinet. For absolute clarity, any such warranty will be limited to performance in the same ideal conditions as in Fortinet’s internal lab tests. Fortinet disclaims in full any covenants, representations,and guarantees pursuant hereto, whether express or implied. Fortinet reserves the right to change, modify, transfer, or otherwise revise this publication without notice, and the most current version of the publication shall be applicable.
Technical Documentation docs.fortinet.com Knowledge Base kb.fortinet.com Customer Service & Support support.fortinet.com Training Services training.fortinet.com
Page 3
Table of Contents
Change Log... 12
Introduction... 13
Before you begin... 13
How this guide is organized... 13
Differences between Models and Firmware ... 15
Differences between Models ... 15
Differences between Firmware Versions ... 15
Using the web-based manager ... 16
Web-based manager overview ... 16
Web-based manager menus and pages ... 16
Using information tables ... 17
Using column settings ... 18
Entering text strings ... 18
Entering text strings (names) ... 18
Entering numeric values... 19
Enabling or disabling options... 19
Dashboard ... 19
Adding dashboards and widgets ... 20
System Information widget ... 20
License Information widget... 26
FortiGate unit Operation widget... 28
System Resources widget ... 28
Alert Message Console widget ... 28
CLI Console widget... 28
Session History widget ... 29
Top Sessions widget... 29
USB Modem widget... 29
Advanced Threat Protection Statistics widget... 29
Features widget ... 29
RAID monitor widget... 30
Basic configurations ... 31
Changing your administrator password... 31
Changing the web-based manager language... 32
Changing administrative access ... 32
Changing the web-based manager idle timeout... 32
Switching VDOMs ... 32
Connecting to the CLI from the web-based manager ... 32
Using the CLI ... 34
Connecting to the CLI... 34
Connecting to the CLI using a local console ... 34
Enabling access to the CLI through the network (SSH or Telnet) ... 35
Connecting to the CLI using SSH ... 36
Connecting to the CLI using Telnet ... 37
Command syntax... 38
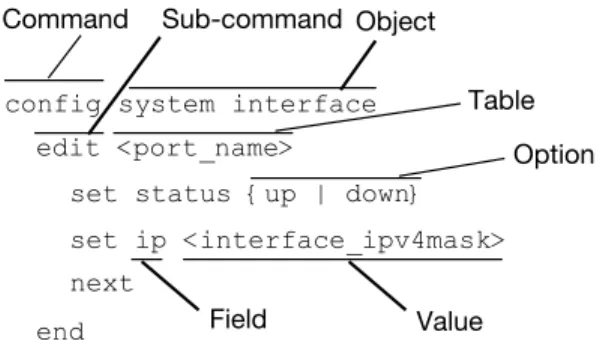
Terminology ... 38
Indentation ... 39
Notation ... 39
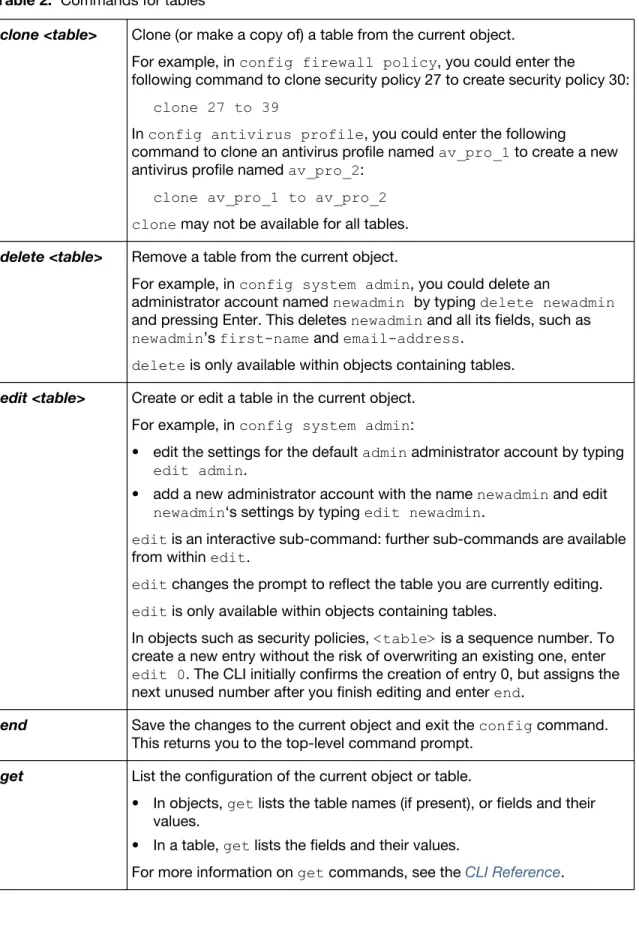
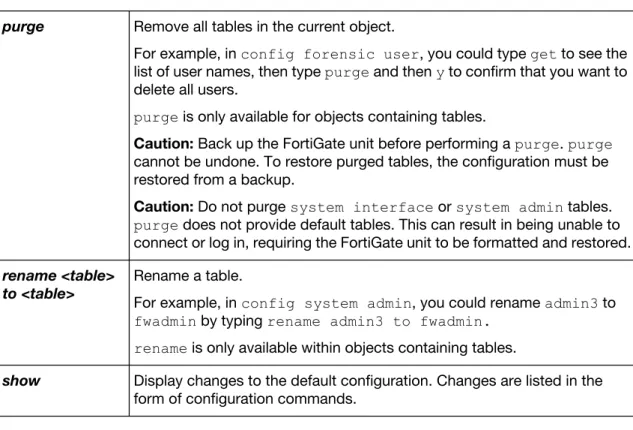
Sub-commands ... 41
Example of table commands ... 43
Permissions ... 44
Tips ... 45
Help... 45
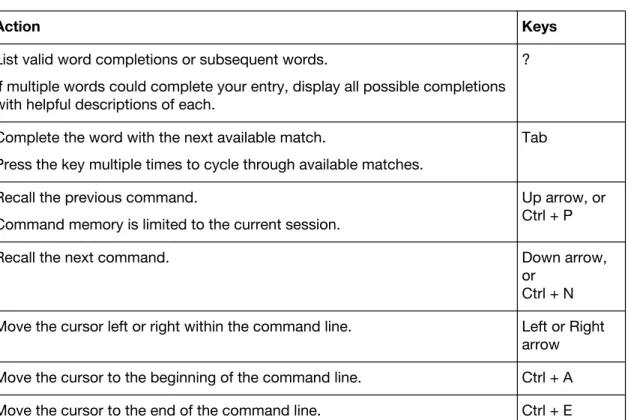
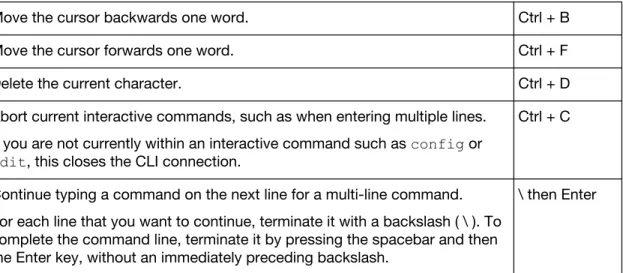
Shortcuts and key commands ... 45
Command abbreviation ... 46
Adding and removing options from lists ... 46
Environment variables... 47
Special characters ... 47
Using grep to filter get and show command output ... 48
Language support and regular expressions ... 49
Screen paging ... 51
Baud rate ... 52
Editing the configuration file on an external host... 52
Using Perl regular expressions ... 52
Basic Administration ... 55
Connecting to the FortiGate unit ... 55
Connecting to the web-based manager ... 55
Connecting to the CLI ... 56
System configuration ... 56
Setting the time and date... 56
Configuring FortiGuard ... 57 Passwords ... 58 Password considerations... 58 Password policy... 59 Lost Passwords ... 60 Administrators... 60 Adding administrators... 60
LDAP Admin Access and Authorization... 61
Monitoring administrators ... 62
Table of Contents Page 5 Install and System Administration for FortiOS 5.0
Security Precautions ... 65
General Settings ... 70
Administrative port settings ... 70
Password policies ... 70
Feature Select ... 70
Configuration backups... 71
Backup and restore a configuration file using SCP ... 72
Restoring a configuration... 74
Configuration revisions ... 75
Restore factory defaults... 75
Firmware ... 75
Downloading firmware ... 76
Testing new firmware before installing ... 76
Upgrading the firmware - web-based manager... 78
Upgrading the firmware - CLI ... 78
Installing firmware from a system reboot using the CLI ... 79
Reverting to a previous firmware version - web-based manager ... 81
Reverting to a previous firmware version - CLI... 81
Configuration Revision... 82
Backup and Restore from a USB key ... 82
Backup and Restore an encrypted config file from a USB key ... 83
Controlled upgrade ... 83
Best practices... 85
Hardware ... 85
Environmental specifications ... 85
Grounding ... 86
Rack mount instructions ... 86
Shutting down... 87 Performance ... 87 Firewall... 87 Intrusion protection... 88 Antivirus ... 88 Web filtering ... 89 Antispam ... 89 Security ... 89
FortiGuard ... 90
FortiGuard Services ... 90Next Generation Firewall... 90
Advanced Threat Protection ... 91
Other Services ... 91
Support Contract and FortiGuard Subscription Services... 92
FortiCloud ... 92
Detection during update ... 92
Antivirus and IPS Options ... 93
Manual updates ... 93
Automatic updates... 94
Push updates ... 94
Push IP override... 95
Web filtering ... 96
Web Filtering and Email Filtering Options... 97
URL verification... 97
Email filtering ... 98
Security tools ... 98
URL lookup ... 98
IP and signature lookup ... 98
Online virus scanner... 99
Malware removal tools ... 99
FortiSandbox ... 99
Troubleshooting ... 99
Web-based manager verification ... 99
CLI verification ... 101
Port assignment ... 101
FortiCloud... 103
FortiCloud Features ... 103
Simplified central management for your FortiGate network ... 103
Hosted log retention with large default storage allocated ... 103
Monitoring and alerting in real time ... 103
Customized or pre-configured reporting and analysis tools... 103
Maintain important configuration information uniformly ... 103
Service security... 103
Registration and Activation... 104
Registering with Support ... 104
Registering and Activating your FortiCloud account ... 104
Enabling logging to FortiCloud ... 105
Logging into the FortiCloud portal ... 106
Upgrading to a 200Gb subscription ... 106
The FortiCloud Portal... 106
Using FortiCloud ... 107
Cloud Sandboxing ... 108
Interfaces ... 109
Physical... 109
Interface settings ... 111
Table of Contents Page 7 Install and System Administration for FortiOS 5.0 Virtual Switch ... 117 Loopback interfaces ... 118 Redundant interfaces... 118 One-armed sniffer ... 119 Aggregate Interfaces... 120
DHCP addressing mode on an interface ... 121
PPPoE addressing mode on an interface ... 122
Administrative access ... 124
Wireless ... 124
Interface MTU packet size ... 125
Secondary IP addresses to an interface... 126
Virtual domains ... 126
Virtual LANs ... 127
Zones ... 128
Probing Interfaces... 129
Central management... 131
Adding a FortiGate to FortiManager ... 131
FortiGate configuration ... 131
FortiManager configuration... 132
Configuration through FortiManager ... 133
Global objects ... 133
Locking the FortiGate web-based manager ... 133
Firmware updates ... 133
FortiGuard... 134
Backup and restore configurations... 134
Administrative domains ... 134
Monitoring ... 136
Dashboard ... 136 Widgets ... 136 FortiClient software... 137 sFlow... 137 Configuration ... 138 Monitor menus ... 138 Logging ... 138 FortiCloud ... 139 FortiGate memory ... 139FortiGate hard disk ... 139
Syslog server ... 140
FortiAnalyzer ... 140
Sending logs using a secure connection ... 141
Packet Capture ... 142
SNMP... 144
SNMP configuration settings ... 145
Gigabit interfaces ... 147
SNMP agent... 147
SNMP community ... 148
Enabling on the interface ... 149
Fortinet MIBs... 150
SNMP get command syntax... 151
VLANs ... 153
VLAN ID rules... 154
VLAN switching and routing ... 154
VLAN layer-2 switching... 154
VLAN layer-3 routing... 157
VLANs in NAT mode ... 160
Adding VLAN subinterfaces ... 160
Configuring security policies and routing ... 162
Example VLAN configuration in NAT mode ... 163
General configuration steps... 164
Configure the FortiGate unit ... 165
Configure the VLAN switch ... 170
Test the configuration ... 171
VLANs in transparent mode... 171
VLANs and transparent mode... 171
Example of VLANs in transparent mode... 174
General configuration steps... 174
Configure the FortiGate unit ... 175
Configure the Cisco switch and router ... 178
Test the configuration ... 180
Troubleshooting VLAN issues... 180
Asymmetric routing ... 180
Layer-2 and Arp traffic ... 181
Forward-domain solution... 182
NetBIOS ... 183
STP forwarding ... 183
Too many VLAN interfaces ... 184
PPTP and L2TP ... 185
How PPTP VPNs work... 185
FortiGate unit as a PPTP server... 187
Configuring user authentication for PPTP clients ... 187
Enabling PPTP and specifying the PPTP IP address range ... 188
Adding the security policy ... 189
Table of Contents Page 9 Install and System Administration for FortiOS 5.0
Configuring a port-forwarding security policy ... 191
Testing PPTP VPN connections ... 192 Logging VPN events ... 192 Configuring L2TP VPNs ... 192 Network topology ... 194 L2TP infrastructure requirements ... 194 L2TP configuration overview ... 194 Authenticating L2TP clients ... 195
Enabling L2TP and specifying an address range ... 195
Defining firewall source and destination addresses ... 195
Adding the security policy ... 196
Configuring a Linux client ... 196
Monitoring L2TP sessions... 197
Testing L2TP VPN connections ... 197
Logging L2TP VPN events ... 197
Advanced concepts... 198
Dual internet connections (redundant Internet connections)... 198
Redundant interfaces... 198
Load sharing ... 201
Link redundancy and load sharing... 201
Single firewall vs. multiple virtual domains ... 201
Single firewall vs. vdoms... 202
Modem... 204
USB modem port ... 204
Modes ... 204
Additional modem configuration... 206
Modem interface routing... 206
DHCP servers and relays... 207
DHCP Server configuration... 207
DHCP in IPv6 ... 208
Service ... 208
Lease time... 208
DHCP options ... 209
Exclude addresses in DHCP a range... 209
DHCP Monitor... 209
Breaking a address lease... 210
Assigning IP address by MAC address ... 210
DNS services ... 210
DNS settings ... 210
Additional DNS CLI configuration ... 211
DNS server ... 211
Recursive DNS ... 212
FortiClient discovery and registration ... 213
FortiClient discovery ... 214
FortiClient Registration ... 214
IP addresses for self-originated traffic... 214
Administration for schools ... 215
Security policies... 215
DNS... 216
Encrypted traffic (HTTPS) ... 216
FTP... 216
Example security policies ... 216
UTM security profiles ... 217
Logging ... 218
Tag management ... 219
Adding and removing tags... 219
Reviewing tags... 220
Tagging guidelines ... 220
Replacement messages list ... 221
Replacement message images... 221
Adding images to replacement messages... 221
Modifying replacement messages ... 222
Replacement message tags ... 222
Administration replacement message ... 224
Alert Mail replacement messages... 225
Authentication replacement messages... 225
Captive Portal Default replacement messages... 226
Device Detection Portal replacement message... 226
Email replacement messages ... 226
Endpoint Control replacement message ... 226
FTP replacement messages ... 226
FortiGuard Web Filtering replacement messages ... 226
HTTP replacement messages... 226
IM replacement messages... 227
NNTP replacement messages ... 227
Spam replacement messages ... 227
NAC quarantine replacement messages ... 227
SSL VPN replacement message ... 227
Web Proxy replacement messages ... 227
Traffic quota control replacement messages ... 228
MM1 replacement messages... 228
MM3 replacement messages... 228
MM4 replacement messages... 228
MM7 replacement messages... 228
Table of Contents Page 11 Install and System Administration for FortiOS 5.0
Formatting the disk ... 229
Setting space quotas ... 229
CLI Scripts ... 229
Uploading script files ... 230
Rejecting PING requests ... 230
Opening TCP 113 ... 231
Obfuscate HTTP responses... 231
Session helpers ... 232
Viewing the session helper configuration ... 232
Changing the session helper configuration ... 233
Changing the protocol or port that a session helper listens on... 233
Disabling a session helper ... 235
DCE-RPC session helper (dcerpc)... 236
DNS session helpers (dns-tcp and dns-udp)... 236
File transfer protocol (FTP) session helper (ftp) ... 236
H.245 session helpers (h245I and h245O) ... 236
H.323 and RAS session helpers (h323 and ras) ... 237
Alternate H.323 gatekeepers ... 237
Media Gateway Controller Protocol (MGCP) session helper (mgcp)... 237
ONC-RPC portmapper session helper (pmap) ... 238
PPTP session helper for PPTP traffic (pptp) ... 238
Remote shell session helper (rsh) ... 239
Real-Time Streaming Protocol (RTSP) session helper (rtsp) ... 240
Session Initiation Protocol (SIP) session helper (sip) ... 240
Trivial File Transfer Protocol (TFTP) session helper (tftp) ... 240
Oracle TNS listener session helper (tns) ... 241
Change Log
Date Change Description
2014-04-09 Updated the “FortiCloud” chapter.
2014-03-12 Added note to “Entering text strings (names)”.
2014-03-07 Added CAPWAP to “Interface configuration and settings”. Added “Probing Interfaces” section. Edits throughout the document to bring the content up to date for 5.0.6.
2014-02-10 Added a note to “System Resources widget”. Updated “Interface MTU packet size” section. 2013-12-05 Added “Differences between Models and Firmware”, updated “SNMP get command syntax”,
updated “Using grep to filter get and show command output”. 2013-09-17 Added “Detection during update”.
2013-09-11 Added: “Change Log,” “Advanced Threat Protection Statistics widget,” “Features widget,” “Adding and removing options from lists,” “Feature Select”, “FortiCloud”.
Page 13
Introduction
Welcome and thank you for selecting Fortinet products for your network protection.
This guide describes a number of administrative tasks to configure and setup the FortiGate unit for the first time, best practices and sample configuration tips to secure your network and the FortiGate unit. It also includes numerous topics covering components of FortiOS that can be used to configure your network and firewall.
Before you begin
Before you begin using this guide, please ensure that:
• You have administrative access to the web-based manager and/or CLI. • The FortiGate unit is integrated into your network.
• Firmware, FortiGuard Antivirus and FortiGuard Antispam updates are completed.
How this guide is organized
This guide contains the following sections:
Differences between Models and Firmware highlights key differences that exist between FortiGate models and firmware versions.
Using the web-based manager provides an overview of the web-based manager interface for FortiOS. If you are new to the FortiOS web-based manager, this chapter provides a high level overview of how to use this method of administration.
Using the CLI provides an overview of the command line interface (CLI) for FortiOS. If you are new to the FortiOS CLI, this chapter provides a high level overview of how to use this method of administration.
Basic Administration describes the simple setup requirements an administrator should do to get the FortiGate unit on the network and enabling the flow of traffic.
Best practices discusses methods to make the various components of FortiOS more efficient and offers suggestions on ways to configure the FortiGate unit.
FortiGuard discusses the FortiGuard network services and configuration examples.
FortiCloud discusses the FortiCloud hosted security management and log retention service. Interfaces describes the FortiGate interface options and configuration choices.
Central management describes how to configure the FortiGate unit to use FortiManager as a method of maintaining the device and other features that FortiManager has to facilitate the administration of multiple devices.
Monitoring describes various methods of collecting log data and tracking traffic flows and tends.
VLANs discusses the implementation of virtual local area networks (VLANs) in FortiOS and how to configure and use them.
PPTP and L2TP describes these virtual private network (VPN) types and how to configure them. Session helpers describes what session helpers are and how to view and configure them.
Advanced concepts describes more involved administrative topics to enhance network security and traffic efficiency.
Page 15
Differences between Models and Firmware
This section examines some of the key differences that exist between different FortiGate models and different versions of the FortiOS 5.0 firmware. It is important to keep these differences in mind when reading the FortiOS 5.0 Handbook, in order to understand how the documentation relates to your specific FortiGate unit.Differences between Models
• There are certain features that are not available on all models. For example, the Switch Controller, which allows a FortiGate unit to manage a FortiSwitch unit, is only available on FortiGate models 100D, 140D, 200D, 240D, 600C, 800C, and 1000C.
Other features may be available only through the CLI on models, while other models have options in the web-based manager. For example, SSL content inspection is a CLI-only feature on FortiGate models 20C, 30C, and 40C, while models 60C+ have options in the web-based manager.
For more information about some of the features that vary by model, please see the Feature/Platform Matrix.
• Naming conventions may vary between FortiGate models. For example, on some models the interface used for the local area network is called lan, while on other units it is called internal. • Menus may vary by model. For example, on some FortiGate units, the menu option Router is
not available. Instead, routing is configured by going to System > Network > Routing.
Differences between Firmware Versions
• Many changes are introduced in new patches to the FortiOS 5.0 firmware. For more information about these changes, please see What’s New for FortiOS 5.0 and the FortiOS
Release Notes.
• In FortiOS 5.0 Patch 3, Feature Select was added, which controls which menus are visible in the web-based manager. If a feature you wish to use does not appear in the web-based manager, go to System > Config > Features to ensure that the feature has not been turned off.
• Menu names may change between firmware versions. For example, In FortiOS 5.0 Patch 3, the features formerly known UTM Security Profiles was renamed Security Profiles.
• Menus may move between firmware versions. For example, in FortiOS Patch 5, Endpoint Control moved from being part of the User menu to having a menu option of its own, found at User & Device > Endpoint Protection.
• Options may also be removed in a firmware patch. For example, in FortiOS Patch 5, the Client Reputation Monitor was removed. Client Reputation results can now be found in the Threat History widget.
Using the web-based manager
This section describes the features of the web-based manager administrative interface (sometimes referred to as a graphical user interface, or GUI) of your unit. This section also explains common web-based manager tasks that an administrator does on a regular basis. The following topics are included in this section:
• Web-based manager overview
• Web-based manager menus and pages • Entering text strings
• Dashboard
• Basic configurations
Web-based manager overview
The web-based manager is a user-friendly interface for configuring settings and managing the FortiGate unit. Accessing the web-based manager is easy and can be done by using either HTTP or a secure HTTPS connection from any management computer, using a web browser. The recommended minimum screen resolution for properly displaying the web-based manager is 1280 by 1024. Some web browsers do not correctly display the windows within the
web-based manager interface. Verify that you have a supported web browser by reviewing the Knowledge Base articles: Microsoft Windows web browsers supported by Fortinet products web-based manager (GUI) web browsers and Mac OS browsers for use with Fortinet hardware web-based manager (GUI).
The web-based manager also provides the CLI Console widget, which enables you to connect to the command line interface (CLI) without exiting out of the web-based manager.
Web-based manager menus and pages
The web-based manager provides access to configuration options for most of the FortiOS features from the main menus. The web-based manager contains the following main menus:
System Configure system settings, such as network interfaces, virtual domains, DHCP and DNS services, administrators, certificates, High Availability (HA), system time, set system options and set display options on the web-based manager.
Router Configure static, dynamic and multicast routing and view the router monitor.
Policy Configure firewall policies, protocol options and Central NAT Table. Firewall Objects Configure supporting content for firewall policies including scheduling,
Using the web-based manager Page 17 Install and System Administration for FortiOS 5.0
Using information tables
Many of the web-based manager pages contain tables of information that you can filter to display specific information. Administrators with read and write access can define the filters.
Using page navigation
Some pages contain information and lists that span multiple pages. At the bottom of the page is the page navigation controls that enables you to move between pages.
Figure 1: Page controls
Adding filters to web-based manager lists
Filters are used to locate a specific set of information or content within multiple pages. These are especially useful in locating specific log entries. The specific filtering options vary, depending on the type of information in the log.
To create a filter, select Filter Settings or the filter icon in a column heading. When a filter is applied to a column, the filter icon becomes green. Filter settings are stored in the unit’s configuration and will be maintained the next time that you access any list for which you have added filters.
Filtering variables can include: a numeric range (such as 25-50), an IP address or part of an address or any text string combination, including special characters.
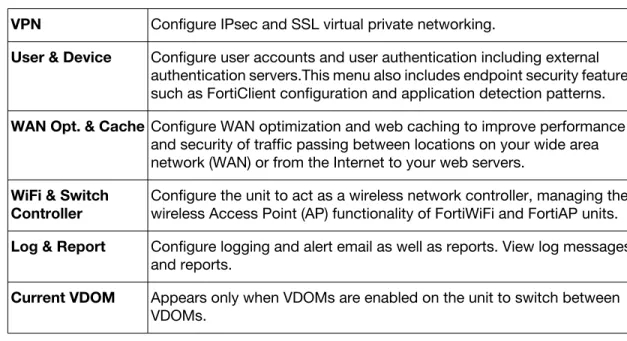
VPN Configure IPsec and SSL virtual private networking.
User & Device Configure user accounts and user authentication including external authentication servers.This menu also includes endpoint security features, such as FortiClient configuration and application detection patterns. WAN Opt. & Cache Configure WAN optimization and web caching to improve performance
and security of traffic passing between locations on your wide area network (WAN) or from the Internet to your web servers.
WiFi & Switch Controller
Configure the unit to act as a wireless network controller, managing the wireless Access Point (AP) functionality of FortiWiFi and FortiAP units. Log & Report Configure logging and alert email as well as reports. View log messages
and reports.
Current VDOM Appears only when VDOMs are enabled on the unit to switch between VDOMs.
First Page
Previous Page Total Number of Pages
Current Page
(enter a page number to display that page)
Last page Next page
Note that the filtering ignores characters following a “<“ unless the followed by a space. For example, the filtering ignores <string but not < string. Filtering also ignores matched opening and closing (< and >) characters and any characters between them. For example, filtering will ignore <string>.
For columns that contain only specific content, such as log message severity, a list of terms is provided from which options can be selected.
Using column settings
Column settings are used to select the types of information which are displayed on a certain page. Some pages have a large amounts of information is available and not all content can be displayed on a single screen. Also, some pages may contain content that is not of use to you. Using column settings, you can display only that content which is important to your
requirements.
To configure column settings, right-click the header of a column and select Column Settings. Any changes that you make to the column settings of a list are stored in the unit’s configuration and will display the next time that you access the list.
To return a page’s columns to their default state, select Reset All Columns, located at the bottom of the Column Settings menu.
Entering text strings
The configuration of a FortiGate unit is stored in the FortiOS configuration database. To change the configuration, you can use the web-based manager or CLI to add, delete, or change configuration settings. These changes are stored in the database as you make them.
Individual settings in the configuration database can be text strings, numeric values, selections from a list of allowed options, or on/off (enable/disable) settings.
Entering text strings (names)
Text strings are used to name entities in the configuration. For example, the name of a firewall address, administrative user, and so on. You can enter any character in a FortiGate
configuration text string except, to prevent Cross-Site Scripting (XSS) vulnerabilities, the following characters:
“ (double quote), & (ampersand), ' (single quote), < (less than) and > (greater than) Most web-based manager text string fields make it easy to add an acceptable number of characters and prevent you from adding the XSS vulnerability characters.
There is a different character limitation for VDOM names and hostnames. For both, the only legal characters are are numbers (0-9), letters (a-z, A-Z), and special characters - and _.
From the CLI, you can also use the tree command to view the number of characters that are allowed in a name field. For example, firewall address names can contain up to 64 characters. When you add a firewall address to the web-based manager, you are limited to entering 64
Using the web-based manager Page 19 Install and System Administration for FortiOS 5.0
characters in the firewall address name field. From the CLI you can enter the following tree command to confirm that the firewall address name field allows 64 characters.
config firewall address tree -- [address] --*name (64) |- subnet |- type |- start-ip |- end-ip |- fqdn (256) |- cache-ttl (0,86400) |- wildcard |- comment (64 xss) |- associated-interface (16) +- color (0,32)
The tree command output also shows the number of characters allowed for other firewall address name settings. For example, the fully-qualified domain name (fqdn) field can contain up to 256 characters.
Entering numeric values
Numeric values set various sizes, rates, numeric addresses, and other numeric values. For example, a static routing priority of 10, a port number of 8080, or an IP address of 10.10.10.1. Numeric values can be entered as a series of digits without spaces or commas (for example, 10 or 64400), in dotted decimal format (for example the IP address 10.10.10.1) or, as in the case of MAC or IPv6 addresses, separated by colons (for example, the MAC address
00:09:0F:B7:37:00). Most numeric values are standard base-10 numbers, but some fields (again, such as MAC addresses) require hexadecimal numbers.
Most web-based manager numeric value fields make it easy to add the acceptable number of digits within the allowed range. CLI help includes information about allowed numeric value ranges. Both the web-based manager and the CLI prevent you from entering invalid numbers.
Enabling or disabling options
If a configuration option can only be on or off (enabled or disabled), the web-based manager presents a check box or other control that can only be enabled or disabled. From the CLI you can set the option to enable or disable.
Dashboard
The various dashboard menus provides a way to access information about network activity and events, as well as configure basic system settings. You can easily add more dashboards and edit existing ones to easily view the content you need.
Each information “chunk” is found within a widget. Widgets provide an easy and quick way to view a variety of information, such as statistical information or network activity. There are a selection of widgets to choose from by selecting the Widgets option.
Administrators must have read and write privileges for adding and configuring dashboards and widgets.
Adding dashboards and widgets
Dashboards that you create are automatically added under the default status and usage dashboards. You can add, remove, or rename a dashboard, regardless of whether it is default. You can also reset the Dashboard menu to its default settings by selecting Reset Dashboards. If VDOMs are enabled, only the dashboards within Global are available for configuration. To add a dashboard
1. Go to System > Dashboard > Status.
2. Select Dashboard, located at the top left of the page. 3. Select Add Dashboard.
To add a widget to a dashboard, select Widget located at the top left of the dashboard page.
System Information widget
The System Information widget shows status information on the FortiGate unit and provides the access point to update the firmware and backup the configurations.
Host Name The name of the FortiGate unit. For details on changing the name, see Changing the FortiGate unit’s host name.
If the FortiGate unit is in HA mode, this information is not displayed. Serial Number The serial number of the FortiGate unit. The serial number is specific to
that FortiGate unit and does not change with firmware upgrades. Operation Mode The current operating mode of the FortiGate unit. A FortiGate unit can
operate in NAT mode or Transparent mode. Select Change to switch between NAT and transparent mode. For more information, see Changing the operation mode.
If virtual domains are enabled, this field shows the operating mode of the current virtual domain. The Global System Status dashboard does not include this information.
HA Status The status of High Availability (HA) within the cluster. Standalone indicates the FortiGate unit is not operating in HA mode. Active-Passive or Active-Active indicate the FortiGate unit is operating in HA mode. Select Configure, to change the HA configuration.
Cluster Name The name of the HA cluster for this FortiGate unit. The FortiGate unit must be operating in HA mode to display this field.
Cluster Members The FortiGate units in the HA cluster. Information displayed about each member includes host name, serial number, and whether the FortiGate unit is a primary (master) or subordinate (slave) FortiGate unit in the cluster.
The FortiGate unit must be operating in HA mode with virtual domains disabled to display this information.
Virtual Cluster 1 Virtual Cluster 2
The role of each FortiGate unit in virtual cluster 1 and virtual cluster 2. The FortiGate unit must be operating in HA mode with virtual domains enabled to display this information.
Using the web-based manager Page 21 Install and System Administration for FortiOS 5.0 Changing the FortiGate unit’s host name
The host name appears in the Host Name row, in the System Information widget. The host name also appears at the CLI prompt when you are logged in to the CLI and as the SNMP system name.
To change the host name on the FortiGate unit, in the System Information widget, select Change in the Host Name row. The only administrators that can change a FortiGate unit’s host name are administrators whose admin profiles permit system configuration write access. If the FortiGate unit is part of an HA cluster, you should use a unique host name to distinguish the FortiGate unit from others in the cluster.
Changing the operation mode
FortiGate units and individual VDOMs can operate in NAT or Transparent mode. From the System Information dashboard widget, you can change the operating mode for your FortiGate unit or for a VDOM and perform sufficient network configuration to ensure that you can connect to the web-based manager in the new mode.
NAT mode
In NAT mode, the FortiGate unit is visible to the network that it is connected to and all of its interfaces are on different subnets. Each interface that is connected to a network must be configured with an IP address that is valid for that subnet.
You would typically use NAT mode when the FortiGate unit is deployed as a gateway between private and public networks (or between any networks). In its default NAT mode configuration, System Time The current date and time. Select Change, to configure the system time.
For more information, see Configuring system time.
Firmware Version The version of the current firmware installed on the FortiGate unit. Select Update to upload a different firmware version. For more information, see Changing the firmware.
System Configuration
The time period of when the configuration file was backed up. Select Backup to back up the current configuration. For more information, see Backing up the configuration.
To restore a configuration file, select Restore. For more information, see Restoring your firmware configuration.
Current Administrator
The number of administrators currently logged into the FortiGate unit. Select Details to view more information about each administrator that is currently logged in
If you want to changed the current administrator’s password, see Changing the currently logged in administrator’s password. Uptime The time in days, hours, and minutes since the FortiGate unit was
started or rebooted.
Virtual Domain Status of virtual domains on your FortiGate unit. Select Enable or Disable to change the status of virtual domains feature.
If you enable or disable virtual domains, your session will be terminated and you will need to log in again.
Explicit Proxy Load Balance
The status of each feature. Select Enable or Disable to change the status of the feature. When enabled, the menu option appears.
the FortiGate unit functions as a router, routing traffic between its interfaces. Security policies control communications through the FortiGate unit to both the Internet and between internal networks. In NAT mode, the FortiGate unit performs network address translation before IP packets are sent to the destination network.
For example, a company has a FortiGate unit as their interface to the Internet. The FortiGate unit also acts as a router to multiple subnets within the company. In this situation, the FortiGate unit is set to NAT mode and has a designated port for the Internet, wan1, with an address of 172.20.120.129, which is the public IP address. The internal network segments are behind the FortiGate unit and invisible to the public access, for example port 2 has an address of
10.10.10.1. The FortiGate unit translates IP addresses passing through it to route the traffic to the correct subnet or to the Internet.
Transparent Mode
In transparent mode, the FortiGate unit is invisible to the network. All of its interfaces are on the same subnet and share the same IP address. To connect the FortiGate unit to your network, all you have to do is configure a management IP address and a default route.
You would typically use the FortiGate unit in transparent mode on a private network behind an existing firewall or behind a router. In transparent mode, the FortiGate unit also functions as a firewall. Security policies control communications through the FortiGate unit to the Internet and internal network. No traffic can pass through the FortiGate unit until you add security policies. For example, the company has a router or other firewall in place. The network is simple enough that all users are on the same internal network. They need the FortiGate unit to perform application control, antivirus, intrusion protection, and similar traffic scanning. In this situation, the FortiGate unit is set to transparent mode. The traffic passing through the FortiGate unit does not change the addressing from the router to the internal network. Security policies and security profiles define the type of scanning the FortiGate unit performs on traffic entering the network. To switch from NAT to transparent mode
1. From the System Information dashboard widget select Change beside Operation Mode. 2. From the Operation Mode list, select Transparent.
3. Enter the Management IP address and Netmask. This is the IP address to connect to when configuring and maintaining the device.
4. Enter the Default Gateway. 5. Select OK.
To change the transparent mode management IP address
1. From the System Information dashboard widget select Change beside Operation Mode. 2. Enter a new IP address and netmask in the Management IP/Network field as required and
select OK.
Your web browser is disconnected from the web-based manager. To reconnect to the web-based manager browse to the new management IP address.
To switch from transparent to NAT mode
1. From the System Information dashboard widget select Change beside Operation Mode. 2. From the Operation Mode list, select NAT.
3. Enter valid IP address and netmask for the network from which you want to manage the FortiGate unit. 4. Select the interface to which the Interface IP/Netmask settings apply
Using the web-based manager Page 23 Install and System Administration for FortiOS 5.0
6. After the FortiGate unit switches to NAT mode, you may need to go Router > Static Route and edit this default route.
For low-end FortiGate units, go to System > Network > Routing. 7. Select OK.
Configuring system time
The FortiGate unit’s system time can be changed using the System Information widget by selecting Change in the System Time row.
System Time The current system date and time on the FortiGate unit.
Refresh Update the display of the FortiGate unit’s current system date and time. Time Zone Select the current system time zone for the FortiGate unit.
Set Time Select to set the system date and time to the values. Synchronize with
NTP Server
Select to use a Network Time Protocol (NTP) server to automatically set the system date and time. You must specify the server and
synchronization interval.
FortiGate units use NTP Version 4. For more information about NTP see http://www.ntp.org.
Server Enter the IP address or domain name of an NTP server. To find an NTP server that you can use, see http://www.ntp.org.
Sync Interval Specify how often the FortiGate unit should synchronize its time with the NTP server.
Enable NTP Server Select to make the FortiGate unit an NTP server that client computers can ping for time synchronization. When selected, the Listen on Interfaces option appears. Add the interfaces the FortiGate unit will listen for time requests.
Daylight savings time is enabled by default. You can disable daylight savings time using the CLI commands:
config system global set dst disable end
Changing the firmware
To avoid losing configuration settings you should always back up your configuration before changing the firmware image.
Also, when updating firmware, you should first refer to Supported Upgrade Paths for FortiOS Firmware to help ensure a successful upgrade.
Administrators whose admin profiles permit maintenance read and write access can change the FortiGate unit’s firmware. Firmware images can be installed from a number of sources including a local hard disk, a local USB disk, or the FortiGuard Network.
To change the firmware, go to System > Dashboard > Status > System Information widget and select the Update link on the Firmware Version row.
Upgrade From Select the firmware source from the drop down list of available sources. Firmware Version This appears only when selecting FortiGuard Network is selected from
the Upgrade From drop-down list. Select a firmware version from the drop-down list.
If downgrading the firmware on the FortiGate unit, select the check box beside Allow Firmware Downgrade.
Upgrade File Browse to the location of the firmware image on your local hard disk. This field is available for local hard disk and USB only.
Allow Firmware Downgrade
Select to confirm the installation of an older firmware image (downgrade).
This appears only when selecting FortiGuard Network is selected from the Upgrade From drop-down list.
Upgrade Partition The number of the partition being updated.
This field is available only if your FortiGate unit has more than one firmware partition.
Boot the New Firmware
By default, this is enabled. Select to disable the FortiGate unit’s reboot process when installing a firmware image to a partition.
This option enables you to install a firmware image to a partition without the FortiGate unit rebooting itself and making the firmware image the default firmware that is currently running.
You need to register your FortiGate unit with Customer Support to access firmware updates for your model. For more information, go to http://support.fortinet.com or contact Customer Support.
Backing up the configuration
Administrators can back up the FortiGate unit’s configuration file from the System Information widget. Select Backup in the System Configuration row, to back up the firmware configuration file to a local computer, USB disk or to a FortiManager unit.
You should always back up your configuration whenever you make any modifications to the device configuration or performing any firmware updates or changes.
Local PC Select to back up the configuration file to a local management computer.
FortiManager Select to back up the configuration file to a FortiManager unit. The Central Management settings must be enabled and a FortiManager unit connected with the FortiGate unit so that the FortiGate unit can send the configuration file to the FortiManager unit.
Using the web-based manager Page 25 Install and System Administration for FortiOS 5.0 Formatting USB
The FortiGate unit enables you to back up the configuration of the device to a USB flash drive. The USB flash drive must be formatted as a FAT16 disk.
To formate the USB flash drive, either use the CLI command exe usb-disk format. or within Windows at a command prompt, enter the command
format <drive_letter>: /FS:FAT /V:<drive_label>
where <drive_letter> is the letter of the connected USB flash drive and <drive_label> is the name to give the USB drive.
Remote FortiManager backup and restore options
After successfully connecting to the FortiManager unit from your FortiGate unit, you can back up and restore your configuration to and from the FortiManager unit.
A list of revisions is displayed when restoring the configuration from a remote location. The list allows you to choose the configuration to restore. To use the FortiManager unit as a method of backup and restore of configuration files, you must first configure a connection between the two devices. For more information, see Central management.
Remote FortiGuard backup and restore options
Your FortiGate unit can be remotely managed by a central management server that is available when you register for the FortiGuard Analysis and Management Service. FortiGuard Analysis and Management Service is a subscription-based service and is purchased by contacting support.
After registering, you can back up or restore your configuration. FortiGuard Analysis and Management Service is useful when administering multiple FortiGate units without having a FortiManager unit. Using this service, you can also upgrade the firmware. Upgrading the firmware is available in the Firmware Upgrade section of the backup and restore menu.
USB Disk Select to back up the configuration file to a USB key that is connected to the FortiGate unit.
Full Config Select to backup the full VDOM configuration. This appears only when the FortiGate unit has VDOM configuration enabled.
VDOM Config Select to backup the only the VDOM configuration file. This option backs up only the configuration file within that VDOM. Select the VDOM from the drop-down list, and select Backup.
Encrypt
configuration file
Select to enable a password to the configuration file for added security.
Password Enter the password that will be used to restore the configuration file. Confirm Re-enter the password.
When restoring the configuration from a remote location, a list of revisions is displayed so that you can choose the configuration file to restore.
Restoring your firmware configuration
Administrators can restore a configuration file that was backed up using the System Information widget. If the configuration file was encrypted, you will need the password to restore the configuration file.
Local PC Select to back up the configuration file to a local management computer.
FortiManager Select to back up the configuration file to a FortiManager unit. The Central Management settings must be enabled and a FortiManager unit connected with the FortiGate unit so that the FortiGate unit can send the configuration file to the FortiManager unit.
To enable central management, go to System > Admin > Settings. USB Disk Select to back up the configuration file to a USB key that is connected
to the FortiGate unit.
Filename Select Browse to locate the configuration file.
Password If a password was set when saving the configuration file, enter the password.
Viewing online administrators
The System Information widget enables you to view information about the administrators logged into the FortiGate unit. To view logged in administrators, in the System Information widget, select Details.
Changing the currently logged in administrator’s password
Use the System Information widget, to change your password. To do this, select the Change Password option in the Current Administrator row.
License Information widget
The License Information widget displays the status of your technical support contract and FortiGuard subscriptions. The FortiGate unit updates the license information status indicators automatically when attempting to connect to the FortiGuard Distribution Network (FDN). FortiGuard Subscriptions status indicators are green if the FDN was reachable and the license was valid during the last connection attempt, grey if the FortiGate unit cannot connect to the
The FortiGuard-FortiManager protocol is used when connecting to the FortiGuard Analysis and Management Service. This protocol runs over SSL using IPv4/TCP port 541 and includes the following functions:
• detects FortiGate unit dead or alive status • detects management service dead or alive status
• notifies the FortiGate units about configuration changes, AV/IPS database update and firewall changes.
Using the web-based manager Page 27 Install and System Administration for FortiOS 5.0
When a new FortiGate unit is powered on, it automatically searches for FortiGuard services. If the FortiGate unit is configured for central management, it will look for FortiGuard services on the configured FortiManager system. The FortiGate unit sends its serial number to the
FortiGuard service provider, which then determines whether the FortiGate unit is registered and has valid contracts for FortiGuard subscriptions and FortiCare support services. If the FortiGate unit is registered and has a valid contract, the License Information is updated.
If the FortiGate unit is not registered, any administrator with the super_admin profile sees a reminder message that provides access to a registration form.
When a contract is due to expire within 30 days, any administrator with the super_admin profile sees a notification message that provides access to an Add Contract form. Simply enter the new contract number and select Add. Fortinet Support also sends contract expiry reminders. You can optionally disable notification for registration or contract inquiry using the config system global command in the CLI. Selecting any of the Configure options will take you to the Maintenance page.
Support Contract Displays details about your current Fortinet Support contract.
FortiGuard Services Displays your current licenses for services from FortiGuard. Select Renew to update any of the licenses.
FortiCloud Displays details about your current FortiCloud subscription. If the green Activate button appears, select it to either create a new account or add the FortiGate unit to an existing account.
If you have already activated FortiCloud, the name of the Account will be listed. Select Launch Portal to view your FortiCloud account in a web browser.
Information on the current Type and Storage is also listed. You can select Upgrade to change the type of your FortiCloud account. FortiClient Software Displays FortiClient license details and the number of Register and
Allowed FortiClient users. You can select Details for more information about the current FortiClient users.
FortiToken Mobile Displays the number of Assigned and Allowed FortiTokens.
SMS Displays the number of Sent and Allowed SMS messages. You can select Add Messages to configure a new SMS message.
Virtual Domain Displays the maximum number of virtual domains the FortiGate unit supports with the current license.
For high-end models, you can select the Purchase More link to purchase a license key through Fortinet technical support to increase the maximum number of VDOMs.
• If Not Registered appears, select Register to register the FortiGate unit.
• If Expired appears, select Renew for information on renewing your technical support contract. Contact your local reseller.
• If Registered appears, the name of the support that registered this FortiGate unit is also displayed. The various types of contracts that you currently have and the expiry date for each type.
• You can select Login Now to log into the Fortinet Support account that registered this FortiGate unit.
FortiGate unit Operation widget
The Unit Operation widget is an illustrated version of the FortiGate unit’s front panel that shows the status of the FortiGate unit’s network interfaces. Interfaces appears green when connected. Hover the mouse pointer over an interface to view further details.
Icons around the front panel indicate when the FortiGate unit is connected to a FortiAnalyzer or FortiManager device, or FortiClient installations. Select the icon in the widget to jump to the configuration page for each device. When connected to one of these devices, a green check mark icon appears next to the icon. If the device communication is configured but the device is unreachable, a red X appears.
System Resources widget
The System Resources widget displays basic FortiGate unit resource usage. This widget displays the information for CPU and memory in either real-time or historical data. For FortiGate units with multiple CPUs, you can view the CPU usage as an average of all CPUs or each one individually.
This widget also is where you reboot or shutdown the FortiGate unit.
The options to reboot or shutdown the FortiGate unit are not available for an admin using the prof_admin profile.
Use the Refresh icon when you want to view current system resource information, regardless of whether you are viewing real-time or historical type format.
To change the resource view from real-time to historical, or change the CPU view (for multiple CPU FortiGate units), select the Edit icon (visible when you hover the mouse over the widget). When viewing CPU and memory usage in the web-based manager, only the information for core processes displays. CPU for management processes, is excluded. For example, HTTPS connections to the web-based manager.
Alert Message Console widget
The Alert Messages Console widget helps you monitor system events on your FortiGate unit such as firmware changes, network security events, or virus detection events. Each message shows the date and time that the event occurred.
You can configure the alert message console settings to control what types of messages are displayed on the console.
To configure the Alert Message Console
1. Locate the Alert Message Console widget within the Dashboard menu. 2. Select the Edit icon in the Alert Message Console title bar.
3. Select the types of alerts that you do not want to be displayed in the widget. 4. Select OK.
Using the web-based manager Page 29 Install and System Administration for FortiOS 5.0
The two controls located on the CLI Console widget title bar are Customize, and Detach. • Detach moves the CLI Console widget into a pop-up window that you can resize and
reposition. Select Attach. to move the widget back to the dashboard’s page.
• Customize enables you to change the appearance of the console by selecting fonts and colors for the text and background.
Session History widget
The Session History widget displays the total session activity on the device. Activity displays on a per second basis. Select the Edit icon in the title bar (which appears when you hover the mouse over the widget) to change the time period for the widget.
Top Sessions widget
The Top Sessions widget polls the FortiGate unit for session information for IPv4 or IPv6 addresses, or both. Rebooting the FortiGate unit will reset the Top Session statistics to zero.
When you select Details to view the current sessions list, a list of all sessions currently processed by the FortiGate unit.
Detailed information is available in System > Monitor > Sessions. Use the following table to modify the default settings of the Top Sessions widget.
USB Modem widget
The USB modem widget enables you to monitor the status of your USB modem, and configure it as needed.
Advanced Threat Protection Statistics widget
The Advanced Threat Protection Statistics widget displays a count of detected malware and files scanned for these types of intrusions. It also displays statics on the number of files sent to FortiSandbox and the results from sandboxing.
Features widget
The Features widget displays a number of Basic Features and Security Features and whether or not each feature is currently enabled or disabled. Options for features that are disabled will not appear in the web-based manager.
For Security Features, several Preset options are available, which can be selected from the dropdown menu in the widget:
• UTM enabled all security features and should be chosen for networks that require full protection from FortiOS. UTM is the default setting.
• WF enables web filtering features.
• ATP enables protection against viruses and other external threats. • NGFW enables application control and protection from external attacks.
RAID monitor widget
The RAID Monitor widget displays the current state of the RAID array and each RAID disk. This widget does not display unless the FortiGate unit has more than one disk installed and is not available for FortiOS Carrier.
Array status icon Displays the status of the RAID array.
Positioning the mouse over the array status icon displays a text message of the status of the array.
Disk status icon There is one icon for each disk in the array.
Positioning the mouse over the disk status icon displays the status of the disk, and the storage capacity of the disk.
RAID Level The RAID level of this RAID array. The RAID level is set as part of configuring the RAID array.
Status bar The bar shows the percentage of the RAID array that is currently in use. Used/Free/Total Displays the amount of RAID array storage that is being used, the
amount of storage that is free, and the total storage in the RAID array. The values are in gigabytes.
RAID disk configuration
The RAID disk is configured from the Disk Configuration page.
• Green with a check mark shows a healthy RAID array.
• Yellow triangle shows the array is in a degraded state but it is still functioning. A degraded array is slower than a healthy array. Rebuild the array to fix the degraded state.
• A wrench shows the array is being rebuilt.
• Green with a check mark shows a healthy disk.
• Red with an X shows the disk has failed and needs attention.
RAID level Select the level of RAID. Options include:
• RAID-0 — (striping) better performance, no redundancy
• RAID-1 — (mirroring) half the storage capacity, with redundancy • RAID-5 — striping with parity checking, and redundancy
Available RAID level options depend on the available number of hard disks. Two or more disks are required for RAID 0 or RAID 1. Three or more disks are required for RAID 5.
Changing the RAID level will erase any stored log information on the array, and reboot the FortiGate unit. The FortiGate unit will remain offline while it reconfigures the RAID array. When it reboots, the array will need to synchronize before being fully operational.
Using the web-based manager Page 31 Install and System Administration for FortiOS 5.0
Basic configurations
Before going ahead and configuring security policies, users, and security profiles, you should perform some basic configurations to set up your FortiGate unit.
Changing your administrator password
By default, you can log in to the web-based manager by using the admin administrator account and no password. It is highly recommended that you add a password to the admin
administrator account. For improved security, you should regularly change the admin
administrator account password and the passwords for any other administrator accounts that you add.
Status The status, or health, of RAID array. This status can be one of: • OK — standard status, everything is normal
• OK (Background-Synchronizing) (%) — synchronizing the disks after changing RAID level, Synchronizing progress bar shows percent complete
• Degraded — One or more of the disks in the array has failed, been removed, or is not working properly. A warning is displayed about the lack of redundancy in this state. Also, a degraded array is slower than a healthy array. Select Rebuild RAID to fix the array.
• Degraded (Background-Rebuilding) (%)— The same as degraded, but the RAID array is being rebuilt in the background. The array
continues to be in a fragile state until the rebuilding is completed. Size The size of the RAID array in gigabytes (GB). The size of the array
depends on the RAID level selected, and the number of disks in the array.
Rebuild RAID Select to rebuild the array after a new disk has been added to the array, or after a disk has been swapped in for a failed disk.
If you try to rebuild a RAID array with too few disks you will get a rebuild error. After inserting a functioning disk, the rebuild will start.
This button is only available when the RAID array is in a degraded state and has enough disks to be rebuilt.
You cannot restart a rebuild once a rebuild is already in progress.
Note:If a disk has failed, the number of working disks may not be enough for the RAID level to function. In this case, replace the failed disk with a working disk to rebuild the RAID array.
Disk# The disk’s position in the array. This corresponds to the physical slot of the disk.
If a disk is removed from the FortiGate unit, the disk is marked as not a member of the array and its position is retained until a new disk is inserted in that drive bay.
Status The status of this disk. Options include OK, and unavailable. A disk is unavailable if it is removed or has failed.
To change an administrator’s password, go to System > Admin > Administrators, edit the administrator account, and then change the password.
For details on selecting a password, and password best practices, see “Passwords” on page58.
For information about resetting a lost administrator’s password, see docs.fortinet.com/sysadmin.html.
Changing the web-based manager language
The default language of the web-based manager is English. To change the language, go to System > Admin > Settings. In the Display Settings section, select the language you want from the Language drop-down list.
For best results, you should select the language that the management computer operating system uses.
Changing administrative access
Through administrative access, an administrator can connect to the FortiGate unit. Access is available through a number of services, including HTTPS and SSH.The default configuration allows administrative access to one or more of the unit’s interfaces as described in the
QuickStart Guide.
To change administrative access 1. Go to System > Network > Interface. 2. Select the interface.
3. Select the administrative access type or types for that interface. 4. Select OK.
Changing the web-based manager idle timeout
By default, the web-based manager disconnects administrative sessions if no activity occurs for five minutes. This prevents someone from using the web-based manager if the management PC is left unattended.
To change the idle timeout
1. Go to System > Admin > Settings.
2. In the Administration Settings section, enter the time in minutes in the Idle Timeout field 3. Select Apply.
Switching VDOMs
When VDOMs are enabled, a menu appears in the left column called Current VDOM. This menu displays a drop-down list that lists the configured VDOMs.
To switch to a VDOM using the Current VDOM menu, select the VDOM that you want to switch to from the drop-down list. You are automatically redirected to that VDOM.
VDOMs are enabled on the System Information Dashboard Widget.
Using the web-based manager Page 33 Install and System Administration for FortiOS 5.0
To connect to the CLI console, go to System > Dashboard > Status and select inside the window of the CLI Console widget to automatically connect. For more information on using the CLI, see “Using the CLI” on page34.
Logging out
Select the Logout icon to quit your administrative session. If you only close the browser or leave the web-based manager to surf to another web site, you remain logged in until the idle timeout (default 5 minutes) expires. To change the timeout, see “Changing the web-based manager idle timeout” on page32.
Using the CLI
The command line interface (CLI) is an alternative configuration tool to the web-based manager. While the configuration of the web-based manager uses a point-and-click method, the CLI requires typing commands or uploading batches of commands from a text file, like a configuration script.
This section also explains common CLI tasks that an administrator does on a regular basis and includes the topics:
• Connecting to the CLI • Command syntax • Sub-commands • Permissions • Tips
Connecting to the CLI
You can access the CLI in two ways:
• Locally — Connect your computer directly to the FortiGate unit’s console port. Local access is required in some cases:
• If you are installing your FortiGate unit for the first time and it is not yet configured to connect to your network, unless you reconfigure your computer’s network settings for a peer connection, you may only be able to connect to the CLI using a local serial console connection. For more information, see “Connecting to the CLI” on page 56. • Restoring the firmware utilizes a boot interrupt. Network access to the CLI is not
available until after the boot process has completed, making local CLI access the only viable option.
• Through the network— Connect your computer through any network attached to one of the FortiGate unit’s network ports. The network interface must have enabled Telnet or SSH administrative access if you will connect using an SSH/Telnet client, or HTTP/HTTPS administrative access if you will connect using the CLI Console widget in the web-based manager.
Connecting to the CLI using a local console
Local console connections to the CLI are formed by directly connecting your management computer or console to the FortiGate unit, using its DB-9 or RJ-45 console port. To connect to the local console you need:
• a computer with an available serial communications (COM) port
• the RJ-45-to-DB-9 or null modem cable included in your FortiGate package • terminal emulation software such as HyperTerminal for Microsoft Windows
Using the CLI Page 35 Install and System Administration for FortiOS 5.0
The following procedure describes connection using Microsoft HyperTerminal software; steps may vary with other terminal emulators.
To connect to the CLI using a local serial console connection
1. Using the null modem or RJ-45-to-DB-9 cable, connect the FortiGate unit’s console port to the serial communications (COM) port on your management computer.
2. On your management computer, start HyperTerminal.
3. For the Connection Description, enter a Name for the connection, and select OK.
4. On the Connect using drop-down list box, select the communications (COM) port on your management computer you are using to connect to the FortiGate unit.
5. Select OK.
6. Select the following Port settings and select OK.
7. Press Enter or Return on your keyboard to connect to the CLI.
8. Type a valid administrator account name (such as admin) and press Enter.
9. Type the password for that administrator account and press Enter. (In its default state, there is no password for the admin account.)
The CLI displays the following text: Welcome!
Type ? to list available commands.
You can now enter CLI commands, including configuring access to the CLI through SSH or Telnet. For details, see “Enabling access to the CLI through the network (SSH or Telnet)” on page
35.
Enabling access to the CLI through the network (SSH or Telnet)
SSH or Telnet access to the CLI is accomplished by connecting your computer to the FortiGate unit using one of its RJ-45 network ports. You can either connect directly, using a peer
connection between the two, or through any intermediary network.
If you do not want to use an SSH/Telnet client and you have access to the web-based manager, you can alternatively access the CLI through the network using the CLI Console widget in the web-based manager.
You must enable SSH and/or Telnet on the network interface associated with that physical network port. If your computer is not connected directly or through a switch, you must also configure the FortiGate unit with a static route to a router that can forward packets from the FortiGate unit to your computer. You can do this using either a local console connection or the web-based manager.
Bits per second 9600
Data bits 8
Parity None
Stop bits 1