Wiring and Installation
31.25 kbit/s, Voltage
Mode, Wire Medium
Application Guide
F
OUNDATION™fieldbus
F
OUNDATIONFieldbus Application Guide
31.25 kbit/s Wiring and InstallationAG-140 Revision 1.0
This application guide has been prepared to aid understanding of the application considerations
of the F
OUNDATIONfieldbus.
The guide begins with a brief overview of 31.25 kbit/s wiring topologies.
The main portion of the guide provides practical guidance for the planning, design, and
installation of the 31.25 kbit/s fieldbus.
I sincerely hope that this information proves useful to you. Please contact the Fieldbus Foundation
if you need additional information about this exciting new technology.
David A. Glanzer
Quality Director
For additional information please contact:
Fieldbus Foundation
9390 Research Boulevard
Suite II-250
Austin, TX 78759
USA
Voice: 512 794 8890
Fax: 512 794 8893
Visit our World Wide Web Site:
http://www.fieldbus.org
DISCLAIMER OF WARRANTIES
This document is provided on an “as is” basis and may be subject to future additions, modifications, or corrections. The Fieldbus Foundation hereby disclaims all warranties of any kind, express or implied, including any warranty of merchantability or fitness for a particular purpose, for this document. In no event will the Fieldbus Foundation be responsible for any loss or damage arising out of or resulting from any defect, error or omission in this document or from anyone’s use of or reliance on this
1.0 PURPOSE . . . 1
2.0 SCOPE . . . 1
3.0 INTRODUCTION . . . 1
4.0 GETTING STARTED . . . 2
4.1 Building the Network . . . 2
4.2 Adding to the Network . . . 5
4.3 Spurs . . . 6
4.4 Repeaters . . . 7
4.5 Mixing Cables . . . 7
4.6 Shielding (Screening) . . . 8
4.7 Polarity . . . 10
4.8 DC Power for Two-Wire Field Devices . . . 11
4.9 Intrinsic Safety . . . 13
4.10 Live Wire . . . 13
4.11 What Not to Connect . . . 13
4.12 Connecting to Higher Speed Fieldbus Networks . . . 13
4.13 What If It’s Not Wired Correctly? . . . 13
5.0 FIELDBUS TOPOLOGIES . . . 14
5.1 Point-to-Point Topology . . . 14
5.2 Bus with Spurs Topology . . . 14
5.3 Daisy-Chain . . . 15
5.4 Tree Topology . . . 15
5.5 Combinations of the Above . . . 15
6.0 FIELDBUS COMPONENTS AND CHARACTERISTICS . . . 16
6.1 Cable . . . 16
6.3 Connectors (Optional) . . . 17
6.4 Couplers (Optional) . . . 17
6.5 Terminators . . . 17
6.6 Power Supplies . . . 18
6.7 Intrinsic Safety Issues . . . 18
6.8 Grounding, Shields, Polarity . . . 18
6.9 FOUNDATIONDevice Types . . . 19
6.10 Special Communications Devices (Repeaters, Bridges, and Gateways) . . . 19
6.11 Maximum Cable Segment Lengths and Elements per Segment . . . 20
7.0 EXAMPLE FIELDBUS APPLICATIONS . . . 21
7.1 Waste Treatment Plant Example . . . 21
7.2 Paper Mill Retrofit Example . . . 24
8.0 QUESTIONS AND ANSWERS . . . 27
9.0 DEFINITIONS . . . 29
10.0 TROUBLESHOOTING . . . 31
10.1 Fieldbus Equipment with Built-in Diagnostics . . . 31
10.2 Reduction to Known Working State . . . 31
10.3 Addressing and Polarity . . . 31
10.4 Works On Bench But Not in Network . . . 31
10.5 Open Trunk . . . 31
10.6 Handheld Master Works At One End of Trunk But Not Other End . . . 32
10.7 Working Network Suddenly Stops . . . 32
10.8 Test Equipment . . . 32
11.0 REFERENCES . . . 33
11.1 Documents . . . 33
1.0 PURPOSE
This manual is intended to be used by Instrument Engineers, Instrument Technicians, Electricians, and Installers of 31.25 kbit/s wiring and associated components for FOUNDATIONfieldbus applications.
2.0 SCOPE
This manual provides application notes and advice for wiring and installation of 31.25 kbit/s FOUNDATIONfieldbus networks. It is based on the current approved definition of the Fieldbus Foundation Physical Layer. It is based also on the appropriate IEC and ISA Physical Layer Standards which are identified in Section 10.0 of this document.
This manual does not cover the following:
• Guidelines for design of control loops using fieldbus • Loading or timing issues related to fieldbus
communications
• Information related to other Physical Layer options such as:
• 1.0 Mbits/s Speed • 2.5 Mbits/s Speed
• Current Mode Connection (AC Power Inductive Connection) • Fiber Optic Medium
• Radio Medium
• Information related to non-fieldbus specific issues • General information on industry standard practices. These issues will be addressed in additional Fieldbus Foundation documents in the future.
3.0 INTRODUCTION
This Application Note is intended to provide guidelines for wiring and installing a FOUNDATIONfieldbus network. Such a network is defined as a digital, two-way, multi-drop communication link among multiple intelligent field devices and automation systems, as defined by the Fieldbus Foundation Specifications. A fieldbus segment is made up of one or more segments. Each segment typically contains several active devices, a required power supply (for bus-powered devices), and special terminators located at the end of each segment. For simplicity, this document will normally discuss fieldbus networks with just one segment. Because FOUNDATION fieldbus is a purely digital protocol, the rules for installing and maintaining fieldbus wiring are considerably different from traditional 4-20 mA wiring. This document will present some guidelines for installing a fieldbus network. Section 4.0 of this document tells you how to get started. It presents the basic concepts behind building and adding to a fieldbus network pointing out some of the differences between a fieldbus network and traditional 4-20 mA current loop wiring. This section goes on to explain spurs, repeaters, mixing different cable types, shielding, polarity, intrinsic safety, and connecting to other networks. Section 4.0 is
recommended for readers who have not worked with a fieldbus network before.
Several different basic fieldbus topologies are possible. These different topologies are defined and explained in Section 5.0.
In Section 6.0, the concepts introduced in Section 4.0 are explained in more detail. This section is
recommended as a reference.
Section 7.0 presents some application examples of how fieldbus might be installed in a plant.
Section 8.0 includes answers to some commonly asked questions about fieldbus and Section 9.0 gives a
definition of most technical terms used in this document. Section 10.0 provides some troubleshooting tips for fieldbus networks.
The information in this manual is based on Physical Layer Standards developed by the International Society for Measurement and Control (ISA) and the International Electrotechnical Commission (IEC). These standards are identified in Section 11.0.
4.0 GETTING STARTED
Fieldbus is not difficult to understand and install. In this section, we’ll explain what to do and give you a few easy rules that should cover most installations.
If you’ve read the IEC fieldbus standard, you know it’s full of rules about things like cable lengths, cable types, terminators, and so on. The first thing to learn is that some of the rules can be bent. If you’re three minutes late at the dentist, you can probably still get in. If you’ve got 1950 m (6396 ft.) of fieldbus cable instead of 1900 m (6232 ft.), your fieldbus should work. There are only a few rules that are absolute. We’ll tell you which ones. The justification for this philosophy is that fieldbus, like most digital communication schemes, is subject to performance variation based on a large number of factors. Not all of these factors are likely to be at “worst case” simultaneously.
4.1 Building the Network
In analog installations, two wires usually carry a signal voltage or current to or from the field area. The voltage or current on the wire pair represents one process variable. In fieldbus the wire pair is called a
network. It can carry many process variables, as well as other information. If you’ve got a cable with 9 wire pairs, you can make nine fieldbus networks — if you need that many. This definition of a network is purposely narrow and includes only 31.25 kbit/s devices and signaling. Devices operating at 31.25 kbit/s are sometimes referred to as H1 devices. Figures 4.1-1 and 4.1-2 show how to make a fieldbus network from an analog wire pair. In Figure 4.1-1 a current loop connects an analog 4-20 mA field device to a control system. Figure 4.1-2 shows the same wire pair turned into a fieldbus network. The only changes are: 1. The control system’s 4-20 mA interface is replaced
with one that “talks” FOUNDATIONfieldbus. We called it a FOUNDATIONFieldbus Interface (FFI). This FFI could, in fact, be in a personal computer or a PLC. 2. The analog field device is replaced with one that
talks FOUNDATIONfieldbus.
3. A terminator is added at the FFI end of the wire pair. Another terminator is added at the field device end of the wire pair. The FFI may have a built-in terminator so that you don’t have to add one. Check the manufacturer’s specifications to be sure.
The first thing to learn is that some of the rules can be bent.
Notice that neither wire is grounded. This is one of the absolute rules of fieldbus.
DCS
Wire Pair
Current
To A/D
Converter
Analog
4-20 mA
Field
Device
+
+
-
-Figure 4.1-1
F
OUNDATIONFieldbus
Interface
FFI
Wire Pair
Signals
Terminator
Terminator
Fieldbus
Digital
Field Device
T
T
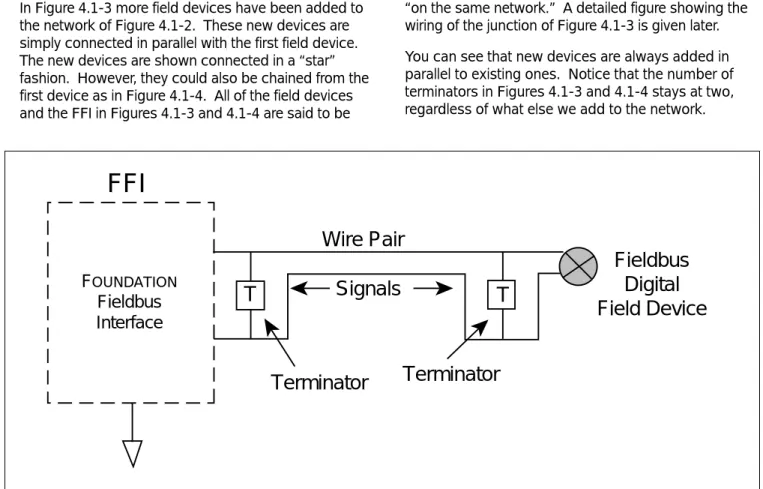
In Figure 4.1-3 more field devices have been added to the network of Figure 4.1-2. These new devices are simply connected in parallel with the first field device. The new devices are shown connected in a “star” fashion. However, they could also be chained from the first device as in Figure 4.1-4. All of the field devices and the FFI in Figures 4.1-3 and 4.1-4 are said to be
“on the same network.” A detailed figure showing the wiring of the junction of Figure 4.1-3 is given later. You can see that new devices are always added in parallel to existing ones. Notice that the number of terminators in Figures 4.1-3 and 4.1-4 stays at two, regardless of what else we add to the network.
Figure 4.1-2 Simple Fieldbus Network
FOUNDATION Fieldbus Interface
FFI
Wire Pair
Signals
Terminator
Terminator
T
T
FD
FD
FD
FD
FD = Field Device
Figure 4.1-3To answer this we need to define a trunk. A trunk is the longest cable path between any two devices on the network. Once we’ve identified this stretch of cable, all other connections to it are called spurs. (More about spurs later.) The terminators should be placed at the ends of the trunk. We’ve assumed in Figures 4.1-3 and 4.1-4 that the FFI is further from the group of field devices (in cable length) than they are from each other. This rule on location of terminators is one that can be bent. In Figure 4.1-3, for example, we haven’t bothered to find the longest cable path. Instead, the
terminator was placed at the junction of the group of field devices. We’ve assumed that all of the field devices were about the same distance (in cable length) from the junction. Had one of them been a lot longer than the others, then we would move the terminator out to that device.
In Figure 4.1-4 we kept moving the terminator out to the farthest field device each time we added a device. However, if we are adding to an existing network and all of the field devices to be added are located on one short stretch of cable (100 m (328 ft.) or less), then the terminator could have been left in its original position at the first device.
FOUNDATION Fieldbus Interface
FFI
T
T
FD
FD
FD
FD
Terminator
Terminator
FD = Field Device
Figure 4.1-4Fieldbus Network With Chained Devices Speaking of terminators,
4.2 Adding to the Network
We can add to the network by tapping into the trunk at any point or by extending it. Suppose we want to add a field device near the middle of the trunk of Figure 4.1-3, and a bridge to a high-speed network at the FFI end. The result might be that of Figure 4.2-1 Notice that the terminator at the FFI end has been moved to the new end of the trunk. We can have a total of 32 devices on each segment of a network (even more with repeaters), with some restrictions. These restrictions will be considered next.
One restriction is the total wire pair length in a given segment. This is the sum of the trunk length and spur lengths. In Figure 4.2-2, we’ve assigned some length numbers to the network of Figure 4.2-1.
The total length is found as:
Trunk Length 600 m (1968 ft.) Spur 1 Length 50 m (164 ft.) Spur 2 Length 10 m (32.8 ft.) Spur 3 Length 10 m (32.8 ft.) Spur 4 Length 30 m (98.4 ft.) Total Length 700 m (2296 ft.)
This total is limited according to the type of cable used. See Figure 6.1-1 for a summary of length versus type of cable. For a total cable length of 700 m (2296 ft.), we should be using either of types A or B cable. Another restriction is spur length. This is considered next.
FD
FD
FD
FD
FD
FOUNDATION Fieldbus InterfaceFFI
Bridge
FD = Field Device
T
T
Figure 4.2-1FD
FD
FD
FD
FD
FOUNDATION Fieldbus InterfaceFFI
Bridge
FD = Field Device
T
T
200 m 100 m 300 m 50 m 10 m 10 m 30 m Figure 4.2-2Segment Lengths for New Fieldbus Network
4.3 Spurs
If you have a choice about the length of a spur, shorter is better. The total spur length is limited according to the number of spurs and number of devices per spur. This is summarized in Table 6.11-1. A spur can be up to 120 m (393.6 ft.) in length if there are few of them. If there are 32 spurs, they should be 1 m (3.28 ft.) or less. The spur table is not absolute. It merely tries to establish some density of devices x length.
(Note: This density isn’t constant across all lengths and numbers of spurs.)
To some extent we can interpolate. Suppose, for example, we have one device per spur and 25 spurs. Going strictly by the table, we’re stuck with a length of one meter.
If we could get rid of just one device, the table tells us we could have 30 m (98.4 ft.). In this case it’s
reasonable to assume that, for 25 devices, we could have something less than 30 m (98.4 ft.) but more than 1 m (3.28 ft.).
A more common situation is to have all but one of the devices satisfying the table. For example, suppose we’ve got 14 devices, each with its own spur of exactly 90 m; and a 15th device with a spur of 10 m (32.8 ft.). Are we in trouble? Not likely. Our density of spurs x length is 1270 m (4165 ft.). At 14 devices the table allows us a density of 1260 m (4132 ft.) i.e. 14 devices x 90 m (295 ft.) per spur. We’ve exceeded the table density by about 8%, which should be OK. Or suppose we’ve got 25 spurs of 1 m (3.28 ft.) each and one spur of 120 m (393 ft.), connected in the star configuration of Figure 4.1-3. In this case it’s
reasonable to assume that the one long spur is part of the trunk and that we actually have 25 one-meter (3.28 feet) spurs and one “spur” of zero length. In this case we may want to move the terminator to the end of the 120 m ( 393 ft.) cable section.
FD
FD
FD
FD
FOUNDATION Fieldbus InterfaceFFI
FD = Field Device
T
T
T
T
2nd Trunk
1st Trunk
Repeater
Figure 4.4-1Adding a Repeater to the Network
4.4 Repeaters
What if you need a lot more than 1900 m (6232 ft.) of cable? You can do it by using a repeater. The repeater takes the place of one of the field devices. But it means you get to start fresh. You can add another 1900 m (6232 ft.) of cable, as illustrated in Figure 4.4-1. Notice that a new trunk has been created so that we have to add more terminators. The first trunk has 4 devices, one of them being the repeater. The 2nd trunk has 2 devices, one of them being the repeater. You can use up to 4 repeaters in series between any two devices to get a total length of 9500 m (6232 ft.). In addition to increasing the length of a network, repeaters can be used to increase the number of devices in a network beyond the limit of 32 on one segment. Using repeaters, the maximum number of devices in a network could be increased to 240.
4.5 Mixing Cables
Occasionally you might need to mix cable types. The maximum lengths for the two types are determined according to a formula:
LX / MAXX + LY / MAXY < 1
where: LX = length of cable X LY = length of cable Y
MAXX = maximum length for X alone MAXY = maximum length for Y alone As an example, suppose we want to mix 1200 m (3936 ft.) of type A cable with 170 m (557 ft.) of type D. Then we have: LX = 1200 m (3936 ft.) LY = 170 m (557 ft.) MAXX = 1900 m (6232 ft.) MAXY = 200 m (656 ft.) 1200 / 1900 + 170 / 200 = 1.48
Since the result is > 1 we shouldn’t do it. The formula shows that 170 m (558 ft.) of type D and 285 m (935 ft.) of type A would be OK, since this gives a value of exactly 1.
This idea is easily extended to four cable types. The formula for four types is
LV/MAXV + LW/MAXW + LX/MAXX + LY/MAXY < 1 Note that it doesn’t matter where in the network the two (or more) types of cable are.
For communications purposes, the combined lengths of cable should work OK but this is probably not the only limitation. In systems of bus-powered devices, for instance, it may not be possible to supply devices at the opposite end of the bus from the power supply with the operating voltage and current they require -simply due to the effects of Ohms Law and the cable resistance.
For example, using a bus made from 190 m (623 ft.) of Type “A” and 360 m (1181 ft.) of Type “C” cable (which is allowed from the formula) and a fieldbus power supply having a 24V output, then the overall (loop) resistance of the bus will be 2*((0.19*24)+(0.36*132)) = 104 Ohms. So, to provide a voltage of at least 9V at the far end, the bus can supply a maximum current of 1000*(24-9)/104 = 144 mA to bus-powered devices connected at this far end. Assuming each device consumed about 14 mA, then there could be 10 devices on this segment. There are ways of improving this - for example, with a 32V
output fieldbus power supply (if anyone makes them) -but it illustrates the need to consider Ohms Law effects. Another solution, of course, is to use a repeater as discussed in Section 4.4.
4.6 Shielding (Screening)
So far, we’ve only talked about wire pairs. A fieldbus network can be built using only unshielded wire pairs (type C cable). If these are placed in conduit or laid against a metal surface, there may be sufficient shielding that nothing further need be done.
However, for best performance, fieldbus cables should be shielded. Common multi-conductor (multi-core) “instrument” cable can be used. This has one or more twisted pairs, an overall, metalized shield, and a shield wire. An example is the single-pair cable illustrated in Figure 4.6-1. Lugs have been added to the wires in anticipation of connecting them to a terminal block. You can also use cable that has individually shielded pairs. For new installations, ask cable vendors for “fieldbus cable.”
Figure 4.6-1
Single-Pair Fieldbus Cable
When using shielded cable, connect each spur’s shield to the trunk shield and connect
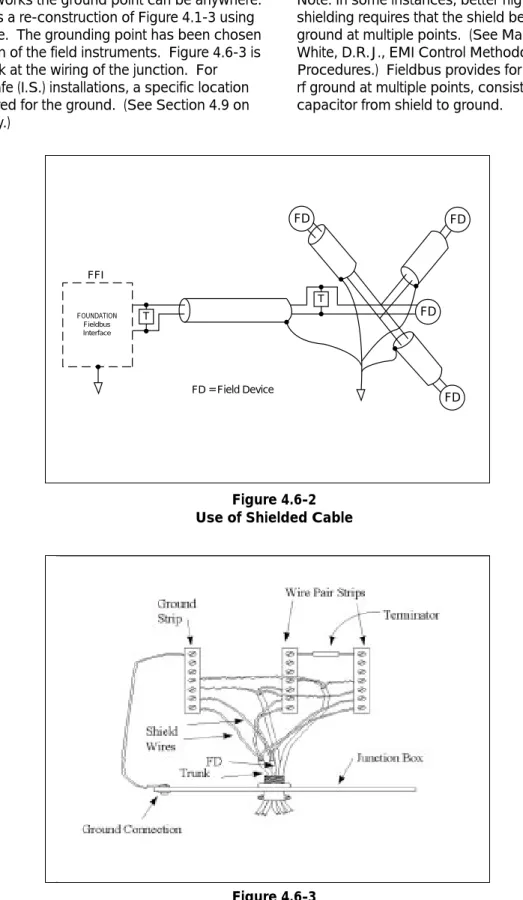
For most networks the ground point can be anywhere. Figure 4.6-2 is a re-construction of Figure 4.1-3 using shielded cable. The grounding point has been chosen as the junction of the field instruments. Figure 4.6-3 is a detailed look at the wiring of the junction. For intrinsically safe (I.S.) installations, a specific location may be required for the ground. (See Section 4.9 on intrinsic safety.)
Note: In some instances, better high-frequency EMI shielding requires that the shield be connected to ground at multiple points. (See Mardiguian, M., and White, D.R.J., EMI Control Methodology and
Procedures.) Fieldbus provides for this by allowing an rf ground at multiple points, consisting of a small capacitor from shield to ground.
FOUNDATION Fieldbus Interface FFI T T FD FD FD FD FD = Field Device Figure 4.6-2 Use of Shielded Cable
Figure 4.6-3
4.7 Polarity
The Manchester signal used by fieldbus is an
alternating voltage that changes polarity once or twice per bit. In unpowered networks only this alternating voltage exists. In powered networks the alternating voltage is superimposed onto the DC voltage being used to power the devices. In either case, the fieldbus receive circuits look at only the alternating voltage. Positive voltage swings have one meaning, negative swings have the opposite meaning. Therefore, the fieldbus signal is polarized. Field devices must be connected so that they all see the signal in correct polarity. If a field device is connected “backwards” it will see an inverted version of the alternating voltage and won’t be able to communicate.
Now that we know that fieldbus is polarized, it may be a surprise to learn that there are non-polarized field devices. You can connect them in either polarity across the network. The non-polarized devices are invariably network-powered, which provides a clue as to how they can work with either polarity: They effectively sense the network DC voltage. In so doing they “know” which terminal is which. Another step up in sophistication is a device that implements automatic polarity detection and correction. It will correctly receive a message of either polarity!
If you build a fieldbus network to accept all possible devices, you must take the signal polarity into
account. All of the (+) terminals must be connected to each other. Similarly, all of the (-) terminals must be connected to each other. Color-coded wire makes this relatively easy. Polarized devices should always be marked or have keyed connectors. Non-polarized devices might not be marked.
It may be possible to select devices with the intention of never having to consider polarity. But it may be safer to build polarity into the network at the outset and accept as a bonus any devices that can be blindly connected. This approach also lets you expand the network with polarized devices if you need them later on.
Bus powered field devices may also be polarized with respect to device power. These devices are designed so that signal polarity and power polarity are the same. Connecting the +DC to the (+) terminal automatically insures correct signal polarity. Non-polar bus powered field devices accept both signal and power of either polarity.
FOUNDATION Fieldbus Interface
FFI
Wire Pair
Signals
Terminator
Terminator
T
T
FD
FD
FD
FD
FD = Field Device
Fieldbus Power Supply + -Figure 4.8-1Adding a Power Supply to the Network
4.8 DC Power for Two-Wire Field Devices
Some field devices draw operating power from the fieldbus network in much the same way as 2-wire analog field devices. The power supply is connected to the network in the same way as a field device (or other communicating device). All of the same rules apply, except that you don’t have to count the power supply as one of the 32 field devices. If we add a power supply to the network of Figure 4.1-3, it might look something like that of Figure 4.8-1. Another spur near the FFI has been created to add the power supply. Of course we could have put it toward the field end of the trunk.
The power supply is specially designed for fieldbus. Some fieldbus equipment will have a built-in power supply so that you don’t need to add one. You should consult manufacturers’ specifications.
If you have 2-wire field devices in your network, you have to make sure they have enough voltage to operate. Each device should have at least 9 volts. You need to know:
1. The current consumption of each device. 2. Its location on the network.
3. The location of the power supply on the network. 4. The resistance of each cable section.
5. The power supply voltage.
The voltage at each field device is determined through straightforward DC circuit analysis. This will be done for the example network in Figure 4.2-2.
It is assumed that a 12 volt power supply is built into the FFI and that type B cable is used throughout. One of the field devices on a 10 m (32.8 ft.) spur is also assumed to be separately powered (a 4-wire device). The other of the field devices on a 10 m (32.8 ft.) spur draws 20 mA. The remaining three field devices draw 10 mA each. The bridge is separately powered and draws no network current.
We can’t use just any off-the-shelf power supply, because it would short-circuit
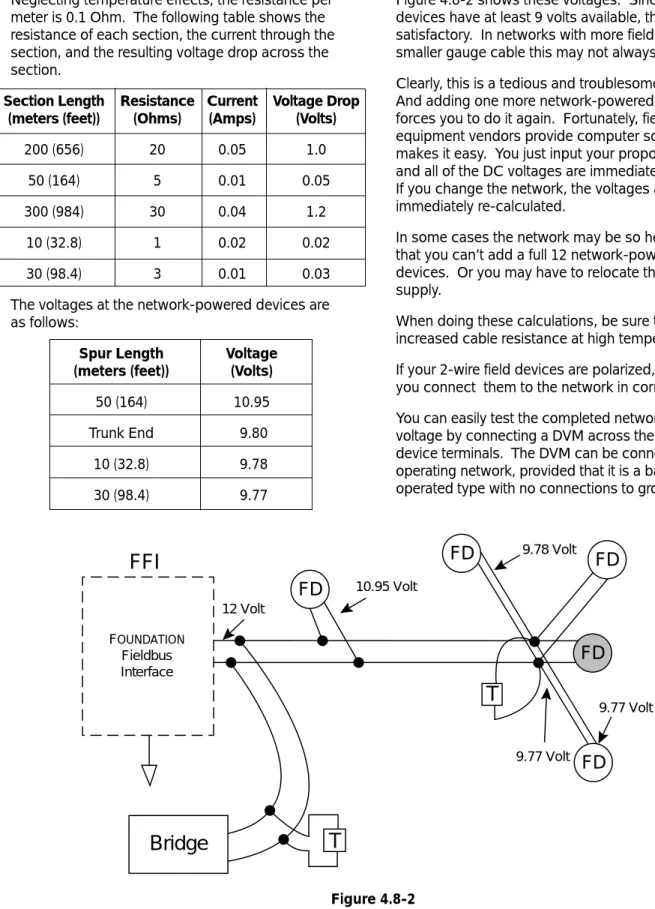
Neglecting temperature effects, the resistance per meter is 0.1 Ohm. The following table shows the resistance of each section, the current through the section, and the resulting voltage drop across the section.
Section Length Resistance Current Voltage Drop (meters (feet)) (Ohms) (Amps) (Volts)
200 (656) 20 0.05 1.0 50 (164) 5 0.01 0.05 300 (984) 30 0.04 1.2
10 (32.8) 1 0.02 0.02 30 (98.4) 3 0.01 0.03 The voltages at the network-powered devices are as follows:
Spur Length Voltage
(meters (feet)) (Volts)
50 (164) 10.95 Trunk End 9.80
10 (32.8) 9.78 30 (98.4) 9.77
Figure 4.8-2 shows these voltages. Since all field devices have at least 9 volts available, this should be satisfactory. In networks with more field devices or smaller gauge cable this may not always be the case. Clearly, this is a tedious and troublesome process. And adding one more network-powered field device forces you to do it again. Fortunately, fieldbus equipment vendors provide computer software that makes it easy. You just input your proposed network and all of the DC voltages are immediately presented. If you change the network, the voltages are
immediately re-calculated.
In some cases the network may be so heavily loaded that you can’t add a full 12 network-powered field devices. Or you may have to relocate the power supply.
When doing these calculations, be sure to account for increased cable resistance at high temperatures. If your 2-wire field devices are polarized, make sure you connect them to the network in correct polarity. You can easily test the completed network for sufficient voltage by connecting a DVM across the 2-wire field device terminals. The DVM can be connected to an operating network, provided that it is a battery-operated type with no connections to ground.
12 Volt 10.95 Volt 9.78 Volt 9.77 Volt 9.77 Volt
FD
FD
FD
FD
FD
FOUNDATION Fieldbus InterfaceFFI
Bridge
T
T
Figure 4.8-24.9 Intrinsic Safety
If you’re installing intrinsically safe field devices, there are more things to consider. The number of field devices may be limited due to power limitations. A special fieldbus barrier and special terminators may be required. The amount of cable may be limited due to its capacitance or inductance per unit length. An excellent source for additional information on the subject of Intrinsic Safety is the “Application Guide for Intrinsic Safety.” This document is available from the Fieldbus Foundation. Refer to Product Code AG-163 when ordering.
4.10 Live Wire
Fieldbus devices are designed for connection to a live network. This is done so that the network need not be shut down to service a device. Devices are designed so that they aren’t harmed by this. However, the communication can suffer. To ensure minimal disruption to communication, take care to insulate each network wire immediately after it is disconnected from the device; and take every precaution against either wire coming into contact with any other conductor.
4.11 What Not to Connect
Although it’s probably obvious, you can’t connect non-fieldbus devices to the network. Examples would be light bulbs, analog 4-20 mA field devices, other
networks, etc. If it doesn’t say “Fieldbus” somewhere on it, then it’s suspect. (A battery-operated voltmeter can be temporarily connected to check voltages.) If a device is capable of several optional wiring
arrangements, then:
4.12 Connecting to Higher Speed Fieldbus Networks
So far we’ve been discussing only 31.25 kbit/s fieldbus networks. These networks may be part of a larger network operating at speeds of 1.0 or 2.5 Mbit/s. The 31.25 kbit/s network must never be connected directly to a higher speed network. A special device called a bridge must be placed between them. The bridge will have a 31.25 kbit/s port and a high speed (i.e. 1.0 Mbit/s or 2.5 Mbit/s) port to facilitate these connections. The bridge must be counted as one of the 32 field devices on each network.
4.13 What If It’s Not Wired Correctly?
The nature of digital communication systems
(including fieldbus) is that they slow down if you don’t have things quite right. That’s because a given device has to keep sending the same message until it gets through. If a master device or bus analyzer tells you that there are numerous retries, this is a clue that something’s wrong. Note: You don’t have to worry that something will be misprogrammed. The built-in error detection prevents this.
Remember: If either wire is grounded or if the two wires touch each other, nobody can talk!
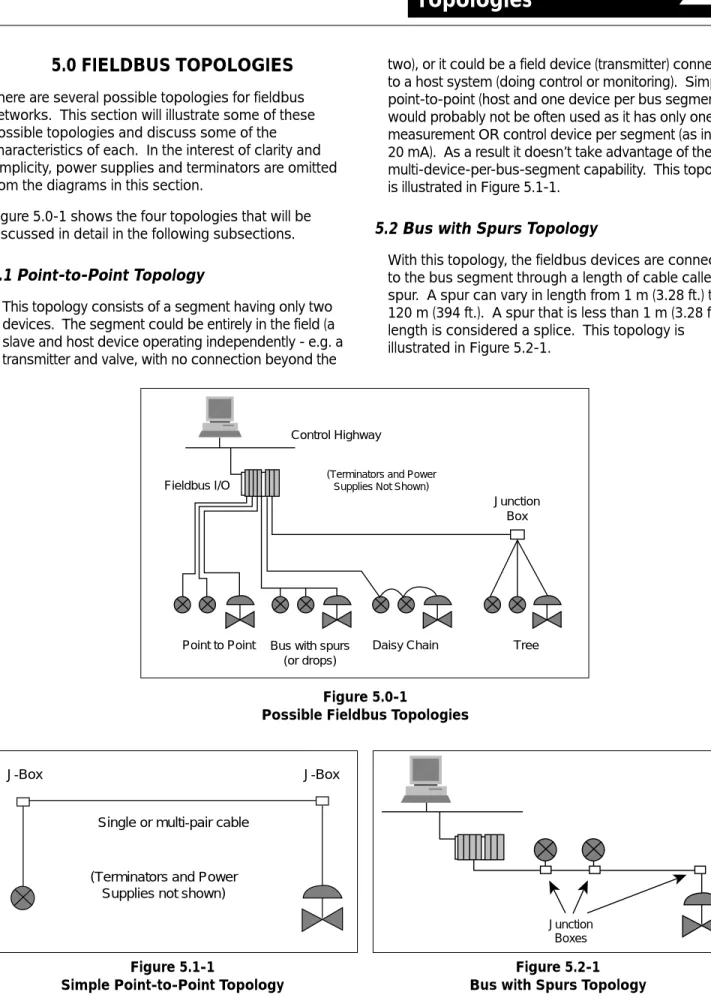
5.0 FIELDBUS TOPOLOGIES
There are several possible topologies for fieldbus networks. This section will illustrate some of these possible topologies and discuss some of the characteristics of each. In the interest of clarity and simplicity, power supplies and terminators are omitted from the diagrams in this section.Figure 5.0-1 shows the four topologies that will be discussed in detail in the following subsections.
5.1 Point-to-Point Topology
This topology consists of a segment having only two devices. The segment could be entirely in the field (a slave and host device operating independently - e.g. a transmitter and valve, with no connection beyond the
two), or it could be a field device (transmitter) connected to a host system (doing control or monitoring). Simple point-to-point (host and one device per bus segment), would probably not be often used as it has only one measurement OR control device per segment (as in 4-20 mA). As a result it doesn’t take advantage of the multi-device-per-bus-segment capability. This topology is illustrated in Figure 5.1-1.
5.2 Bus with Spurs Topology
With this topology, the fieldbus devices are connected to the bus segment through a length of cable called a spur. A spur can vary in length from 1 m (3.28 ft.) to 120 m (394 ft.). A spur that is less than 1 m (3.28 ft.) in length is considered a splice. This topology is
illustrated in Figure 5.2-1.
Point to Point Bus with spurs Daisy Chain Tree (or drops)
Fieldbus I/O
Junction Box Control Highway
(Terminators and Power Supplies Not Shown)
Figure 5.0-1
Possible Fieldbus Topologies
Figure 5.1-1
Simple Point-to-Point Topology
J-Box J-Box
Single or multi-pair cable
(Terminators and Power Supplies not shown)
Figure 5.2-1 Bus with Spurs Topology
Junction Boxes
Figure 5.4-1 Tree Topology Junction Box Junction Box Fieldbus Host Terminate Here Figure 5.3-1 Daisy Chain Topology
Fieldbus Interface
Figure 5.5-1 Mixed Topology
Point to Point Tree Bus with spurs
Fieldbus I/O Junction Box Control Highway Terminate Here 5.3 Daisy-Chain
With this topology, the fieldbus cable is routed from device to device on this segment, and is interconnected at the terminals of each fieldbus device. Installations using this topology should use connectors or wiring practices such that disconnection of a single device is possible without disrupting the continuity of the whole segment.
This topology is illustrated in Figure 5.3-1.
5.4 Tree Topology
With this topology, devices on a single fieldbus segment are connected via individual twisted wire pairs to a common junction box, terminal, marshaling panel, or I/O card (sometimes called “Chicken Foot”). This topology can be used at the end of a home run
cable. It is practical if devices on the same segment are well separated, but in the general area of the same junction box. When using this topology, the maximum spur length must be taken into consideration.
Maximum spur lengths are discussed in Section 6.0. This topology is illustrated in Figure 5.4-1
5.5 Combinations of the Above
Combinations of the above must follow all the rules for maximum fieldbus segment length, and include the length of spurs in the total length calculation. Although probably unlikely, the following figure indicates a combined topology that could occur.
An example of a configuration combining these topologies is given in Figure 5.1-1.
Figure 6.1-1
Fieldbus Cable Types and Maximum Lengths
6.0 FIELDBUS COMPONENTS
AND CHARACTERISTICS
This section presents a detailed look at the following fieldbus segment components:Cable Terminal Blocks Connectors (optional) Couplers (optional) Terminators Power Supplies I. S. Barriers
Measurement & Control Devices Host Devices
Bridges & Repeaters
6.1 Cable
Various types are useable for fieldbus. The table in Figure 6.1-1 contains the types of cable identified by the IEC/ISA Physical Layer Standard.
The preferred fieldbus cable is specified in the IEC/ISA Physical Layer Standard, Clause 22.7.2 for
conformance testing, and it is referred to as type “A” fieldbus cable. (This cable will probably be used in new installations.)
Other types of cables can be used for fieldbus wiring. The alternate preferred fieldbus cable is a multiple, twisted pair cable with an overall shield, hereafter referred to as Type “B” fieldbus cable. (This cable will probably be used in both new and retrofit installations where multiple fieldbuses are run in the same area of the user’s plant.)
A less preferred fieldbus cable is a single or multiple, twisted pair cable without any shield, hereafter referred to as Type “C” fieldbus cable. The least preferred fieldbus cable is a multiple conductor cable without twisted pairs, but with overall shield, hereafter referred to as Type “D” fieldbus cable. Types “C” and “D” cables will mainly be used in retrofit applications. They will have some limitations in fieldbus distance as compared to the Type “A” and “B.” This may preclude the use of Type “C” and “D” cables in certain
applications.
Additional information on determining allowable cable lengths is given in Sections 4.2 through 4.5.
Type Cable Description Size Max Length
Type A Shielded, twisted pair #18 AWG 1900 m (.8 mm2) (6232 ft.) Type B Multi-twisted-pair with shield #22 AWG 1200 m
(.32 mm2) (3936 ft.) Type C Multi-twisted pair, without shield #26 AWG 400 m
(.13 mm2) (1312 ft.) Type D Multi-core, without twisted pairs #16 AWG 200 m
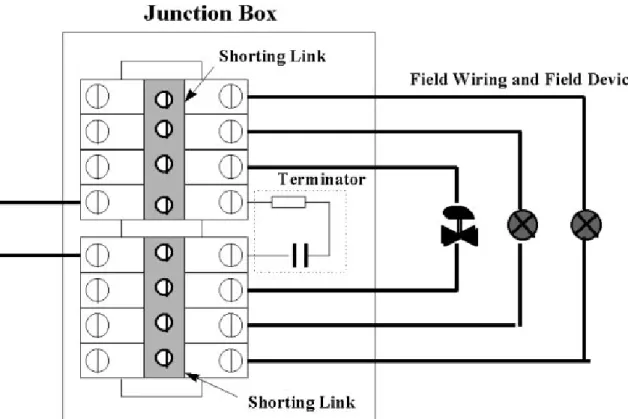
6.2 Terminal Blocks
Terminal blocks can be the same terminal blocks as used for 4-20 mA. The terminal blocks typically provide multiple bus connections, such that a device can be wired to any set of bus terminals.
Figure 6.2-1 indicates one method of connecting and terminating a fieldbus segment to several field devices at a junction box using the type of terminal blocks that have been used in the past. Today, there are terminal block systems especially designed for fieldbus that make wiring considerably easier.
6.3 Connectors (Optional)
Standard fieldbus connectors are specified in Annex B of the ISA Physical Layer Standard and Annex A of the IEC Physical Layer Standard. They will not be
discussed in detail here.
They are useful for installations where devices may be periodically disconnected and/or moved, and could be used for convenient connection of a temporary device (e.g. “handheld” configuration device) at a frequently used location.
6.4 Couplers (Optional)
Fieldbus couplers are specified in the IEC/ISA Physical Layer Standards, and provide one or several points of connection to a fieldbus segment. In general, for the fieldbus technology covered by this document, the end user will not need to be
concerned with couplers. Please refer to the references (para 7.1) for further details.
6.5 Terminators
A terminator is an impedance matching module used at or near each end of a transmission line. There need to be two (and ONLY TWO) terminators per bus
segment. The terminators prevent distortion and signal loss, and are typically purchased and installed as a pre-assembled, sealed module. The user/installer need not be concerned about or assemble individual electrical resistors and capacitors. Various mechanical and electrical configurations will incorporate terminators into terminal blocks, I.S. Barriers, power supplies, fieldbus interface cards, etc.
Figure 6.2-1
6.6 Power Supplies
Power supplies are designated as the following types per the referenced Fieldbus Foundation Physical Layer Profile Specification:
type 131 Non-I.S. Power supply intended for feeding an I.S barrier. Output voltage depends on barrier rating.
type 132 Non-I.S. Power supply not intended for feeding an I.S. barrier. Output voltage is 32 VDC Max.
type 133 I.S. Power supply. Complies with the recommended I.S. parameters. For fieldbus use, a power supply impedance matching network is required. This is a resistive/inductive network that is either external or built into the fieldbus power supply.
Power supplies may be configured to provide dual-redundancy as long as they meet the IEC/ISA Physical Layer Standards requirements. It is not acceptable, for example, to merely parallel two power supplies.
6.7 Intrinsic Safety Issues
Any fieldbus segment used in a potentially flammable atmosphere must meet the applicable requirements of the relevant regulatory agencies of the local area. This will normally involve using an I.S. barrier or galvanic isolator.
The I.S. barriers are designed and certified to meet all of the Physical Layer requirements. This document will not address I.S.-specific issues in detail, as the appropriate standards and documents are referenced. Please see par 7.1 for reference to detailed documents on I.S. issues. Additional information on the subject of Intrinsic Safety is also given in the Fieldbus
Foundations’ publication AG-163 entitled “Application Guide on Intrinsic Safety”.
6.8 Grounding, Shields, Polarity
Grounding: It is the assumption of this application
note that grounding rules used in conjunction with the installation and maintenance of the Fieldbus Physical Layer will follow current standard practices based on company/plant standards and applicable international standards (see references, par 7.1).
Fieldbus devices shall not connect either conductor of the twisted pair to ground at any point in the network. The Fieldbus signals are applied and preserved differentially throughout the network, and grounding either conductor would be expected to cause all devices on that bus to lose communication for the period the conductor is grounded.
Shields:The Shield of the fieldbus cable is, by
standard practice, typically grounded at only one point along the length of the cable, and shall not be used as a power conductor.
It is standard practice in some plants to ground the same shield at more than one point over the length of the cable run. This practice may be acceptable in 4-20 mA DC control loops, but can cause interference in a fieldbus system. If a multi-point grounding scheme is used as standard practice, the
requirements for and location of grounds for cable shields should be re-visited.
There may be specific requirements for I.S. installations. Please refer to the documents referenced in Section 6.7 for more detail. Polarity: All systems addressed by this application
note may be polarity sensitive. Based on the referenced physical layer standards, there is not a requirement for devices to be polarity insensitive, although some devices may be designed as polarity insensitive. The medium (twisted pair) is required to indicate polarity, and polarity shall be maintained at all connection points (per the physical layer standard).
6.9 FOUNDATIONDevice Types
The eight types of 31.25 kbit/s fieldbus devices (as designated by the referenced Fieldbus Foundation Physical Layer Profile Specification) are categorized in Figure 6.9-1 below.
Note: Bus powered devices require a compatible power supply. See Section 6.6 of this document. FOUNDATIONdevices will be labeled with their Fieldbus Foundation type.
From a communications standpoint, any of the eight device types can coexist on the same fieldbus segment. However, in I.S. applications, device power requirements and approvals must be taken into consideration. This, in effect, eliminates four of these types.
6.10 Special Communications Devices (Repeaters, Bridges, and Gateways)
Other devices such as repeaters, bridges, and gateways may be connected to a bus segment. They will have two wire connections (or may be separately powered) and will appear just as any other device on the segment.
Repeaters are active bus powered, or non-bus powered devices, used to extend a fieldbus network. A maximum of four (4) repeaters and/or active
couplers can be used between any two devices on a fieldbus network (IEC/ISA Physical Layer Standard, Section 22.2.2, “Rule 3”). Using four repeaters, the maximum distance between any two devices on that network is 9500 metres (31,168 ft. or 5.9 miles) as indicated in Figure 6.10-1.
A Bridge is an active bus powered, or non-bus powered device, used to connect fieldbus segments of different speeds (and/or physical layers - e.g. wire, optical fiber,..) together to form a larger network.* A Gateway is an active bus powered, or non-bus powered device, used to connect a fieldbus segment or segments to other types of communications protocols (e.g. Ethernet, RS232, ..).*
* It is beyond the scope of this application note to discuss these devices in detail. Refer to other
Fieldbus Foundation publications for more information on these topics.
Figure 6.10-1
Maximum Use of Fieldbus Repeaters Figure 6.9-1
Fieldbus Device Types
Clause 11 Standard Signaling Clause 22 Low Power Signaling
Bus Powered Separately Bus Powered Separately
Powered Powered
I.S. Type 111 Type 112 Type 121 Type 122
Figure 6.11-1
Recommended Maximum Spur Length, m(ft)
6.11 Maximum Cable Segment Lengths and Elements per Segment
The maximum lengths indicated in the specifications are recommendations, containing a safety factor, to provide assurance that the suggested maximum lengths will not cause communications problems. The recommended segment length depends on:
• Cable type/characteristics/wire gage • Topology
• Number and type of devices
Cable types were discussed in Section 6.1 and the different topologies were presented in Section 5.0. Most likely, there will be a mixture of cable types in any fieldbus segment. The conservative approach is to use the shortest maximum length based on all the
cable types and the maximum bus segment length values from the table given in Figure 6.1. A less conservative approach is to use the techniques discussed in Section 4.5.
Allowable spur lengths for either bus or tree topology are dependent on the number of communication elements on the fieldbus.
Figure 6.11-1 relates the recommended number of communication elements to spur length. Maximum spur lengths are the same for Types A, B, C, and D cables. The table assumes one communication element per spur. When a spur with passive trunk coupler has more than one communication element, the length of that spur should be reduced by 30 m (98 ft.) per communication element. As the recommended maximum total spur length is 120 m (394 ft.), the maximum number of communication elements per spur should be 4.
Total Devices 1 Device per Spur 2 Devices per Spur 3 Devices per Spur 4 Devices per Spur
25-32 1 (3) 1 (3) 1 (3) 1 (3)
19-24 30 (98) 1 (3) 1 (3) 1 (3)
15-18 60 (197) 30 (98) 1 (3) 1 (3)
13-14 90 (295) 60 (197) 30 (98) 1 (3)
1-12 120 (394) 90 (295) 60 (197) 30 (98)
• Source: IEC-1158-2 and ISA S50.02-1992 Part 2, Annex C (informative). NOTE: These lengths are “recommended” and are not required.
7.0 EXAMPLE FIELDBUS APPLICATIONS
This section presents two actual examples of how a fieldbus network might be designed and implemented.7.1 Waste Treatment Plant Example
A diagram of a typical water treatment plant is shown in Figure 7.1-1. This diagram has been previously published by the Fieldbus Foundation. In this
application, waste water of variable pH is to be mixed with acid or base to neutralize it before discharging it into a river. The control building is located near a river, which is about 800 m (1/2 mile) from the nearest road. The longest distance between any two plant facilities at the river is 182 m (600 ft.). The acid and base materials are transferred from trucks that are on or near the road. A P&ID diagram for the plant is given in Figure 7.1-2.
There are basically 2 control requirements:
1. Controlling filling and emptying of the acid and base storage tanks.
2. Controlling the movement of the waste water and adjusting its pH.
The plant designer chooses to use one network for each of these control functions and to use a personal computer as the fieldbus host and monitor.
The choice of the number of networks is dependent on: 1. Fieldbus topology rules (the things we’ve been
discussing).
2. Control Logistics (see below).
3. Personal preference (what works best for you). Control logistics is generally outside the scope of this discussion. Briefly, however, it deals with making it easy for a feedback signal to get to where it’s
supposed to go. For example, flow transmitter FT101 and pH transmitter AT102 both provide feedback to valves IP103A and IP103B (see Figure 7.0-2). So it helps if all four of these devices are on the same network. The control is implemented by telling each IP to be a “subscriber” and each transmitter to be a “publisher.” Control logistics also deals with making sure that feedback signals get there on time, which may limit the number of devices or traffic on a network.
Figure 7.1-1
Figure 7.1-2
P & ID Diagram for Waste Treatment Plant
The plant designer assigns devices to the two networks as follows:
Fieldbus Device Network 1 Network 2
VALVES CV-108 CV103A CV-109 CV103B PUMPS 15 13 16 14 18 19 MOTORS 17 XMITTERS LT-108 FT101 LT-109 AT102 AT103A AT103B LT104 AT105 AT106A AT106B TT107 NOTATION: CV = control valve LT = level transmitter AT = analytical (pH) transmitter TT = temperature transmitter
The resulting networks are shown in figure 7.1-3. Network 1 is “Segment #1.” Network 2 is “Segment #2.” The network cable is identified in each case by a squiggly line that connects to each of the network devices. Network 1 starts out at the Control Room PC and snakes its way over to valve CV-108. From there it goes to each of the Network 1 devices and finally ends up at pump 18. Similarly Network 2 starts out at the PC and goes to pumps 13 and 14. It ends up at temperature transmitter TT107.
Now let’s see how things are starting to stack up in terms of the topology rules. First, look at the number of devices: 9 for Network 1 and 15 for Network 2
(Remember to count the PC in both networks). Both are within the limit of 32. What about Network 2 and the limit of 12 network-powered devices? We haven’t said yet which devices, if any, are network-powered. Let’s assume the two control valves of Network 2 are separately powered. That leaves us with 13 devices — just over the limit. Rather than add another network, the plant designer has decided to exceed the limit by 1 device. Power calculations show that this should be OK. How about total length? Let’s neglect spurs for the moment. Network 1 has to reach to the road because pumps 18 and 19 are located at the road. So its length is 800 m (2624 ft.). Network 2 snakes around to various devices that are spaced, at most, 182 m (597 ft.) from each other. We assume that there could be as much as 250 m (820 ft.) here. Network 1 could use cable types A or B, while Network 2 could use types A, B, or C.
Since this is a new installation, the plant designer has chosen to use type A cable inside conduit throughout; and to use a bus arrangement. That is, the trunk cable snakes around to and is connected directly to each of the devices. There either are no spurs or their length is insignificant.
Last, but not least, are the terminators. Four are required. On Network 1 one of the terminators is located at the PC. The other is located at pump 18. For Network 2, one terminator is located at the PC. The other is located at transmitter TT107. The plant designer has chosen PC cards (one for each network) that have built-in terminators, so that terminators don’t need to be added at the PC end. At the field end of Network 1 a terminator is added across the network inside the wiring compartment of pump 18. At the field end of Network 2 the wiring compartment of TT107 is not large enough to hold the terminator. Instead, the wiring of TT107 is completed in a junction box and the terminator is placed in the junction box.
Figure 7.1-3
Figure 7.2-1
Diagram of Typical Paper Mill
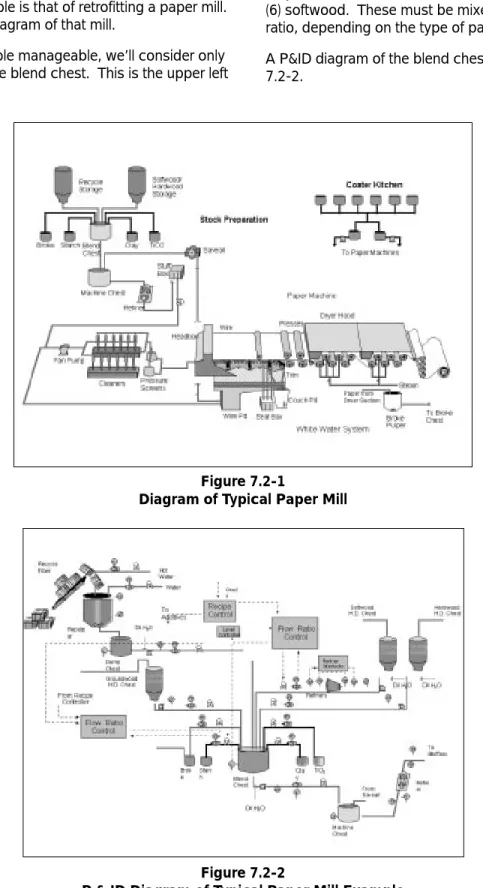
7.2 Paper Mill Retrofit Example
The second example is that of retrofitting a paper mill. Figure 7.2-1 is a diagram of that mill.
To keep the example manageable, we’ll consider only the operation of the blend chest. This is the upper left
area of Figure 16. It mixes together 6 ingredients: (1) recycle fiber, (2) broke, (3) starch, (4) clay, (5) TiO2, and (6) softwood. These must be mixed in a controlled ratio, depending on the type of paper to be produced. A P&ID diagram of the blend chest is shown in Figure 7.2-2.
Figure 7.2-2
There are 13 control elements consisting of one level transmitter, 6 flow transmitters, and 6 valves. In the existing plant, these are all connected through 4-20 mA wire pairs to a DCS which sets the blend chest level and controls the mixing ratios. The wire pairs are all brought to a junction box. A multi-pair cable connects the junction box to the DCS. Figure 7.2-3 shows a wiring diagram, along with cable gauges and estimates of the wire length.
The basic plan is to remove the 13 field devices and replace them with fieldbus equivalents. The DCS
4-20 mA interfaces would also be replaced. The 13 independent wire-pairs are to be replaced with one fieldbus network, if possible, assuming the user is comfortable with six valves on one bus. The existing device-to-junction box cables would be left in place. One of the 13 wire pairs in the home run cable would be used as the connection from the junction box to the DCS. The remaining 12 wire pairs in this cable
become spares. The proposed wiring diagram is shown in Figure 7.2-4.
Figure 7.2-3
The existing cable is already fieldbus type B, which means that the total length can be 1200 m (3936 ft.). In Figures 7.2-3 and 7.2-4 the cable shields have been left out for clarity. The existing total of 890 m (2919 ft.) is OK. Also, for 14 devices (Remember to count the DCS as a device) the allowed spur length is 90 m (295 ft.), which means that each 30 m (98 ft.) cable from junction to device can be considered a spur. The home run becomes the trunk. To complete the wiring, one terminator would be placed inside the junction box. Another would be placed at the DCS.
With topology constraints apparently satisfied, the plant manager proceeds with the plan and orders the field devices. Unfortunately, each is a 2-wire device with a current consumption of 20 mA. The total current is then 0.26 amp. Since #26 gauge cable has a resistance of 0.26 ohm/meter, the voltage drop in the home run cable will be 33.8 volts. This is too high a voltage drop. The #26 cable was fine for a single 4-20 mA device, but it
doesn’t work for multiple fieldbus devices! An unusual solution in this instance would be to connect a repeater with a fieldbus power supply at the junction box. Since each spur has less than an ohm of resistance, the cable voltage drop becomes insignificant and each field device has almost the full supply voltage.
Another solution is to back off from the plan of making a single network. Assuming a 24 volt supply, each existing pair can supply power to about 3 devices (60 mA x 0.26 ohm/meter x 890 meter = 14 volts). Five networks would be required for 13 devices. At the control end, we can’t connect the 5 pairs together in an attempt to get back to one network. This would grossly exceed the 1200 m (3936 ft.) length limit. We can, however, combine all 5 networks at the H2 level by connecting each pair through a bridge to a single H2 network. Or, one could connect each of 4 pairs by a repeater to the 5th pair, to form a single H1 network.
Figure 7.2-4
8.0 QUESTIONS AND ANSWERS
Q:
How can I get more specific information on how to start - relative to my particular plant, application, and installed hardware?A:
Contact the Fieldbus Foundation (see references -par 8.0) or your suppliers of choice. Training courses, additional reference materials, and consulting services are available to provide more detailed information on specific products from the appropriate supplier.Q:
Where do I get the specs?A:
The specifications (and additional documents) are available from the Fieldbus Foundation. Standards documents are available from the ISA and IEC.Q:
Where can I buy the correct wire, terminals, terminations, and other items required to install a fieldbus?A:
The Fieldbus Catalog available from the Fieldbus Foundation contains references to the mostcomprehensive list of suppliers, devices, services, and other fieldbus related items.
Q:
Where can I go to get assistance in planning and installing a Fieldbus Physical Layer for a “trial application” in my plant?A:
Your current suppliers of measurement and control should be able to discuss “Field Trial” opportunities, and test installations of fieldbus technology that are most suited to your specific industry, product, and plant application. The Fieldbus Foundation Catalog could also assist you in finding appropriate fieldbus device suppliers for your application.Q:
Can I use my installed wire?A:
Very likely. The IEC/ISA Physical Layer Specification was purposely written such that existing plant wire would work for fieldbus. The specification was purposely written in a conservative fashion, so that installed wire in reasonably good condition should offer totally acceptable performance. In some cases(especially for very long wire runs, and/or many devices at the end of a segment), the user may choose to install new type “A” fieldbus wire to minimize the effects of resistance and capacitive unbalance which may come into play using types “B” through “D” cable.
Q:
How can I determine if the installed wire will work? Is there a test? Is there any test equipment I can rent, buy,...?A:
A number of suppliers are developing products for simulating and testing fieldbus signals and devices. In addition, suppliers of hand-held communicationsnetwork test equipment are currently developing fieldbus communications test devices that can be used to verify the quality of potential or operating fieldbus segments (Please refer to the Fieldbus Foundation Catalog).
Q:
Can I add new wire, and mix it with installed wire in the same fieldbus segment?A:
YES! The suppliers of fieldbus cable will be able to provide assistance in the form of data sheets, training, and services.Q:
How many devices can I put on one segment?A:
It depends on several factors. The maximum number is 32 devices on one segment. Depending on individual device power requirements (consult the device manufacturer, as each device may have different power requirements), a maximum of six (6) I.S. bus powered devices can be on the same segment. These are worst case numbers for maximum length. (Add information based on curves from IS note (type A cable).)Q:
Can FOUNDATIONfieldbus be redundant?A:
The Physical Layer supports bus redundancy. And, as with analog or smart I/O and devices, there are a number of other possibilities. Multiple devices used to take the same measurement could operate on the same or different fieldbus segments, and use different I/O card cages and power supplies depending on the level of redundancy desired. The initial H1 implementations do not support redundancy, but the H2 implementations are expected to do so.Q:
I need a 2 mile long network. How do I handle this requirement?A:
The Physical Layer specification recommends a maximum length of 1900 m (6234 ft.) for type A (fieldbus) wire. If this is not sufficient, up to 4 repeaters can be used to extend the total length to five times 1900 m (6234 ft.), for a total of 9500 m (31,168 ft. or 5.9 miles).Q:
I need optical (or radio) capability. Does fieldbus have that? (if not - when?)A:
The IEC/ISA Physical Layer Standard provides for both radio and fiber optic communications modes. It is expected products will be made available at some time in the future.Q:
What happens if the bus gets shorted?A:
A temporary short (across the bus, or bus to ground) will temporarily disrupt communications on the whole bus segment, just as it would for other analog or digital communications. However, the fieldbus protocol is error detecting and correcting, and will not cause erroneous control or indication based on a temporary or permanent short (or open). Measurement and control devices and systems designed to be used with fieldbus are expected to have fail safe ability at least as capable as current state of the art devices and systems.Q:
What happens if the bus gets grounded on one side (or at one end)?A:
A temporary short to ground may temporarily disrupt the bus, but any errors will be detected and handled by the fieldbus protocol. A permanent short to ground could disrupt the bus until the ground is removed (just as with present analog or digital communications).Q:
What happens if a field device gets attached to the wrong wire pair?A:
One of the major advantages of the fieldbus protocol is that there is no requirement to “ring out” each wire pair, and insure that each pair is connected to the correct instrument. In the case of the same segment, all devices are connected in parallel to the same pair of wires (maybe via a junction box).In the case of devices on different bus segments, the fieldbus protocol will detect each new device as it is connected to the bus.
Q:
Can I use my conventional (non-fieldbus) power supplies for fieldbus loops?A: The IEC/ISA Physical Layer Standard specifies a power supply with particular impedance characteristics. Power supplies meeting these specifications can be purchased, or an external impedance matching network can be added to an existing power supply
Q:
I don’t understand “termination”. What is it, why do I need it, and is placement critical?A:
Termination is the addition of the appropriatefieldbus “terminator” at (or near) the end of each fieldbus segment. The “terminator” has the same characteristic impedance as the bus, and is required to preserve the integrity of the signal. It is especially important on long segments, and placement is critical — one should be connected to the bus as close as possible to each end of the segment. Some devices (especially I/O and/or fieldbus test/simulation PC cards) include the option of using an internal terminator. It is important to know in this case whether it is connected.
9.0 DEFINITIONS
The following include some of the definitions listed in ISA-S50.02 Part 2, Section 6.0.
Balanced transmission line: A pair of wires carrying an
AC analog or digital signal which is applied and preserved differentially, with both sides isolated from ground. Both ends must be terminated.
Bus: The trunk and all devices connected to it.
Bus powered device: Device that receives its operating
power via the fieldbus signal conductors.
Connector: Optional coupling device employed to
connect the wire medium to a fieldbus device or to another section of wire (e.g. at a junction box).
Coupler: Physical interface between trunk and spur or
trunk and device.
Current mode: The serial, inductively coupled
communications mode of the Physical Layer described in Clause 13 of the IEC/ISA Physical Layer Standard.
Galvanic isolator: A special device used to insure that
the circuit using one will not provide any current flow if shorted to ground or power (within design limits).
H1: The 31.25 kbit/s fieldbus communications speed. H2: One of two possible “High Speed” fieldbus
communications speeds. Can be either 1.0 Mbit/s or 2.5 Mbit/s.
Intrinsic Safety: Design methodology for a circuit or an
assembly of circuits in which any spark or thermal effect produced under normal operating and specified fault conditions is not capable under prescribed test conditions of causing ignition of a given explosive atmosphere.
NOTE: This definition is taken from EN 50 020 :1977 (Intrinsically Safe Electrical Apparatus).
Intrinsic Safety Barrier: Physical entity that limits
current and voltage into a hazardous area in order to satisfy Intrinsic Safety requirements.
Isolation: Physical and electrical arrangement of the
parts of a signal transmission system to prevent electrical interference currents within or between the parts.
NOTE: This definition is taken from IEEE Std 100-1984.
Low Power Signaling: The communications mode
(addressed by this manual and the IEC/ISA Physical Layer Standard, Part 2), which complies with the proposed Clause 22 change to the MAU specification -in essence, active devices optionally draw less current when not in a “transmitting” mode, thereby allowing more bus-powered devices without increasing the power available to the bus. This is especially helpful for an I.S. segment (as the total power in the I.S. area is limited), or for extremely long segments, where the ability to operate devices at the “end” of the wire could be limited by the power supply and wire resistance.
MAU: The “Media Attachment Unit”, or interface
circuitry, between the bus and the rest of the communications circuitry in a fieldbus device. This circuitry is responsible for the communications of signals to and from the bus, and for drawing the required operating current for the fieldbus device from the bus wires (in a bus powered device).
Medium: Cable, optical fiber, or other means by which
communication signals are transmitted between two or more points.
Network: All of the media, connectors, and associated
communication elements by which a given set of communicating devices are interconnected.
Repeater: Device used to extend the range over which
signals can be correctly transmitted and received for a given medium.
Segment: The section of a fieldbus that is terminated
in its characteristic impedance (by a “terminator”). Segments can be linked by repeaters to form a complete fieldbus network.
Separately powered device: Device which has power
wiring separate from its fieldbus wiring.
Shield: Surrounding earthed metallic layer to confine the
electric field within the cable and to protect the cable from external electrical influence.
NOTE: Metallic sheaths, armors, and earthed concentric conductors may also serve as a shield.
Spur: Branch line (i.e., a link connected to a larger one at
a point on its route) that is a final circuit.
NOTE: This definition is taken from IEEE Std 100-1984.
Standard Power Signaling: The communications mode
described in par 3.3 of this manual and in the IEC/ISA Physical Layer Standard, Part 2, which complies with the Clause 11 MAU specification - in essence, active
devices draw the same current whether in a
“transmitting” or “non-transmitting” mode. This is also addressed in Clause 22.
Terminator: A matching network used at, or near, the
end of a transmission line, which has the same characteristic impedance of the line. It is used to minimize signal distortion in the form of “reflected waves” which can cause data errors.
Topology: The shape of the network; Tree, Daisy Chain,
etc.
Transmission Line: A pair of wires having a specified
characteristic impedance, which is used to conduct an AC (sometimes digital) signal between two points. Terminators may be required at each end of the line to prevent distortion and signal errors.
Transmitter: An active fieldbus device, containing
circuitry which applies a digital signal on the bus.
Trunk: Main communication highway acting as a source
of main supply to a number of other lines (spurs). NOTE: This definition is taken from IEEE Std 1001984 -modified.
Voltage mode: The communications mode addressed
by this manual (see par. 2.0), and of the IEC/ISA Physical Layer Standard, Clause 2. The fieldbus signal is applied and detected using parallel, voltage sensing.
1 Mbit/s: The lower of the two “high speed” (or “H2”)
fieldbus communications speeds.
2.5 Mbit/s: The higher of the two “high speed” (or “H2”)
fieldbus communications speeds.
31.25 kbit/s: The low speed (or “H1”) fieldbus
10.0 TROUBLESHOOTING
Here are some guidelines on what to do if a fieldbus network isn’t working.“Isn’t working,” in the context of this document, means that the network is either dead (no apparent
communication) or slow (too many communication retries). Or one or more devices on an otherwise
working network appear dead or slow. These conditions may be caused by incorrect installation, incorrect setup (incorrect commissioning), or malfunctioning devices. Other problems, such as a device transmitting bogus data (with correct fieldbus protocol), are not Fieldbus Physical Layer problems and are outside the scope of this document.
10.1 Fieldbus Equipment with Built-in Diagnostics
You may want to insist that your fieldbus field devices have at least rudimentary diagnostic ability; such as maintaining and divulging a count of erroneous messages they’ve received during a given period. A master with proper software can then determine whether one or more devices are having a problem communicating. This can be helpful in tracking down a problem.
If, for example, a device indicates that 10 out of every 100 messages it receives have errors (and are consequently discarded), the signal at that device should probably be examined to see whether it is too small or is distorted.
10.2 Reduction to Known Working State
Although it may be obvious, a powerful technique is to reduce the size of the network until you get down to something that works. At the junction box, for example, you can disconnect major sections of the network. When you’re satisfied that what is left works, then add the sections back one at a time to try to locate the offending section. Then begin picking the offending section apart just as you did the whole network.
Remember that connecting and disconnecting things from the live network may cause momentary communication problems. Don’t confuse these with the network problem you’re trying to find.
10.3 Addressing and Polarity
Incorrect addressing makes a device appear dead. It’s like saying, “Hello Charles,” to someone named Fred. Make sure you have ruled this out before you begin looking for installation problems.
A polarized device connected backwards may also appear dead.
10.4 Works On Bench But Not in Network
If a field device works on the test bench but not in the network, this can be due to addressing. If this device has the same address as another device already on the network, then it will appear to work when removed from the network and to fail when reconnected. Another possibility is that the device has
malfunctioned and is causing heavy loading of the network. Other devices may or may not communicate with this device connected. The loading is not
apparent when the device is by itself but causes excessive loading when added to an already loaded network. This can be examined using an oscilloscope. The scope must be a differential type (or battery operated) and must be set to AC coupling to view the wave packets (one packet = one message) traveling on the network. If you see that the packets become greatly attenuated when the offending device is connected, then suspect that it has failed.
10.5 Open Trunk
If the trunk has become open at some point, either through accident or careless maintenance; the network may appear to work some of the time and not at other times, depending on whether devices try to communicate across the break. Master software will probably be capable of quickly providing a list of devices that are “there” versus those that have disappeared. This narrows down the location of the break.
Other evidence of a break can be gathered with an oscilloscope. (The scope must be of a type and must be set up as described earlier.) A break means that only one terminator will be present, which will usually cause almost double the normal signal level.
10.6 Handheld Master Works At One End of Trunk But Not Other End
Suppose that a master connected at end A of the trunk talks to devices also connected at end A, but the same master connected at end B of the trunk can’t talk to devices connected at end B. This may indicate that the network is shorted or shorted to ground or too heavily loaded at the non-working end (end B). Or it may mean that one of the trunk conductors is continuous throughout the trunk, but the other is broken with one side of the break open and the other side of the break shorted to the other trunk conductor.