FlexCycler
2
Thermal Cycler
Manufacturer: Biometra GmbH Rudolf-Wissel-Str. 30 37079 Göttingen Germany Phone: + 49 (0) 551 / 50 68 6-0 Fax: + 49 (0) 551 / 50 68 6-66 Email: [email protected]
Service: Analytik Jena AG Life Science Konrad-Zuse-Str. 1 07745 Jena Germany Phone: + 49 (0) 3641 / 77-94 11 Fax: + 49 (0) 3641 / 77-76 77 76 Email: [email protected]
General information about Analytik Jena AG
Contents
1 Introduction ... 5
1.1 Intended use ... 5
1.2 Special features of the FlexCycler2 ... 5
1.2.1 Block exchange system ... 5
1.2.2 Temperature uniformity ... 5 1.2.3 Heated lid ... 5 1.2.4 Operation ... 6 1.2.5 Software options ... 6 1.2.6 User management ... 6 1.2.7 Housing ... 6 1.2.8 USB functions ... 7 1.3 Technical specifications... 7 1.4 Legal information ... 8 1.4.1 PCR license information ... 8 1.4.2 Liability ... 8 2 Safety instructions ... 10
2.1 Meaning of the symbols used in the operating manual ... 10
2.2 Safety symbols on the FlexCycler2 ... 10
2.3 General safety instructions ... 11
3 Installation ... 13
3.1 Scope of delivery ... 13
3.2 Unpacking and inspection ... 13
3.3 Setting the operating voltage ... 13
3.4 Commissioning ... 14
3.5 Automatic power-on self test ... 14
4 First steps ... 15
4.1 Front view ... 15
4.2 Rear view ... 15
4.3 Exchanging the block module ... 16
4.4 Control unit ... 17
4.5 The High Performance Smart Lid (HPSL) ... 17
Closing the lid ... 17
Opening the lid ... 18
5.1.3 LOG IN menu ... 20
5.1.4 BLOCK menu/QUICK-START function ... 21
5.1.5 SYSTEM menu ... 22
5.1.6 PROGRAM menu ... 22
5.2 Software ... 23
5.2.1 Log in ... 23
5.2.2 Logging in a user ... 23
5.2.3 Creating a new user directory ... 25
5.2.4 Logging in as a supervisor ... 25
5.2.5 Deleting a user directory ... 26
5.3 Creating a new program ... 27
5.3.1 Creating a program ... 27
5.3.2 Selecting the block type ... 27
5.3.3 Heated lid settings ... 28
5.3.4 Setting the lid temperature ... 29
5.3.5 Entering the temperature and hold time for a step ... 29
5.3.6 Defining a loop ... 30
5.3.7 Cooling the samples after the run ... 31
5.3.8 Programming a pause ... 31
5.3.9 Saving the program ... 32
5.3.10Programming the temperature gradient ... 33
5.3.11Programming a linear gradient ... 34
5.4 Setting program options ... 35
5.4.1 Setting the heating and cooling rate ... 36
5.4.2 Changing the hold time in cycles Δt(s) ... 36
5.4.3 Changing the temperature in cycles ΔT(°C) ... 37
5.5 Editing programs... 37
5.5.1 Inserting a step ... 38
5.5.2 Deleting a step ... 39
5.5.3 Copying the program ... 40
5.6.7 Skipping a program step... 49
5.7 Stop the program ... 50
5.7.1 Stopping a program in pause ... 51
5.8 USB functions ... 51
5.8.1 Connecting the USB stick with the thermal cycler ... 51
5.8.2 Opening the USB folder... 52
5.8.3 Deleting a program in the USB folder ... 52
5.8.4 Copying the program from the USB folder ... 53
5.8.5 Copying a program to the USB folder ... 54
5.8.6 Maximum number of programs in the USB folder ... 55
6 System settings ... 56
6.1 User configuration ... 56
6.1.1 Setting the language... 56
6.1.2 Changing the PIN code ... 57
6.1.3 Deleting a user directory... 57
6.2 System configuration ... 58
6.2.1 Setting the acoustic signal ... 58
6.2.2 Setting the contrast ... 59
6.2.3 Setting the date and time ... 59
6.2.4 Defragmenting the memory ... 59
6.2.5 Setting the screen saver ... 60
6.3 System information ... 60
6.3.1 System information ... 61
6.3.2 Viewing/saving the log files from the last nine runs ... 61
6.4 SERVICE menu... 62
6.4.1 Displaying log files of the "Power-on" self test ... 62
6.4.2 Performing an extended self test ... 63
6.4.3 Displaying log files of the extended self test ... 64
6.4.4 Displaying the error history ... 65
6.4.5 Creating an info file for Analytik Jena Service ... 65
6.5 Contacting Analytik Jena ... 66
6.6 Supervisor system settings ... 66
6.6.1 Changing a user's PIN code ... 66
6.6.2 Deleting a user directory (user account) ... 67
6.6.3 Changing the supervisor PIN code ... 67
6.6.4 Setting the boot language ... 68
The FlexCycler2 control panel ... 69
Log in ... 69
Creating, modifying and saving programs ... 70
The FlexCycler2 programming table ... 70
Starting, pausing and stopping programs ... 72
8 Troubleshooting ... 74
8.1 Slow heating and cooling ... 74
8.2 Auto restart ... 74
8.3 Auto restart without recognizable cause ... 74
8.4 Adjusting protocols of other thermal cyclers ... 75
8.5 Loosening the lid wheel in case of blockage ... 75
9 Maintenance and care ... 76
9.1 Cleaning and decontamination ... 76
9.2 Service and repair... 76
9.3 Firmware update ... 76
9.4 Spare parts ... 76
10 Order numbers for FlexCycler2 and block modules ... 77
11 Service ... 78
11.1 Device return information ... 78
11.2 Packaging the thermal cycler ... 79
12 Disposal ... 80
13 Declaration of conformity ... 81
14 Warranty ... 82
15 Index ... 83
Figures
Figure 1 Voltage selector switch on the bottom of the device ... 13Figure 2 Front view of the FlexCycler2 ... 15
1
Introduction
1.1
Intended use
The FlexCycler2 is a thermal cycler designed for multiplying nucleic acids by means of PCR. The FlexCycler2 is licensed for this type of application (research use only). It performs cycli-cally repeated temperature changes to create the adequate environmental conditions. With the help of enzymes for DNA amplification (polymerases) as well as additional required components in an aqueous solution, nucleic acid sequences can be copied in suitable reac-tion tubes. The device can further be used for other applicareac-tions such as ligareac-tion, nucleic acid digestion by means of restriction enzymes, bisulfite conversion or protein crystallog-raphy, all of which require exact temperature control.
1.2
Special features of the FlexCycler
21.2.1
Block exchange system
Thanks to the Quick-X-Change technology, the block modules in the FlexCycler2 can be exchanged in just a few seconds. The built-in quick block exchange system works without using additional tools or screw connections. Just lift the block exchange lever, remove the block to be exchanged, insert the new block and lower the lever to establish the connection to the base unit. The device automatically detects and installs the newly inserted block. Thanks to the block exchange function of the FlexCycler2 the device configuration can be changed within a few seconds, if necessary. But not only single block modules are available; there are also the twin block modules that feature two independently controllable blocks and heated lids. With the twin block modules you can run two different programs at the same time, allowing an even more flexible operation. Optionally, blocks with additionally featuring the gradient function are available. These can be used for the quick and comfortable optimi-zation of new PCR assays.
1.2.2
Temperature uniformity
All FlexCycler2 blocks feature high-quality platinum sensors with a temperature accuracy of ± 0.1 °C.
1.2.3
Heated lid
The heated lid of the FlexCycler2 features the High Performance Smart Lid (HPSL) technol-ogy, which guarantees the formation of a homogeneously tempered air cushion between the samples. The device therefore offers an excellent temperature uniformity over the whole block and reproducible PCR conditions regardless of the positioning of the samples. At the same time, an integrated friction clutch makes sure that the contact pressure always remains the same, even if the shape and height of the plastic ware change. The uniform distribution of the pressure on all tubes/wells ensures that the reaction tubes are securely closed during
1.2.4
Operation
With the clearly structured FlexCycler2 operating software, temperature programs can be programmed in a well-arranged table format (Easy Spreadsheet Programming (ESP)). All necessary parameters can be entered in an easy-to-navigate window. There is no need to call up subwindows to set variables for specific program functions or to toggle between sev-eral windows. Optionally, with the single touch of a button the temperature profile can be displayed graphically and parameters modified. The FlexCycler2 has a memory capacity for more than 300 programs.
For a clear overview, the FlexCycler2 has a user-specific quick-start option that displays the five most recently used or edited programs. The user who is logged in to the system is pre-sented a list from which the desired program can be started directly by pressing the start key on the front panel. The FlexCycler2 also features a multiblock selection tool for starting and stopping programs. Therefore, programs can also be started and ended on several blocks at the same time.
1.2.5
Software options
Aside from programming temperature protocols, the software features several other useful functions. It has an extended self test, is able to display run log files for GLP-complient doc-umentation of PCR runs and can create service info files in service cases. When the extend-ed self test is active, the FlexCycler2 automatically tests itself and summarizes the results in a clearly structured report. If a section of the test has been failed, the user receives a corre-sponding message.
1.2.6
User management
The FlexCycler2 manages up to 30 different user directories that can optionally be protected by a PIN code. Users are not able to change temperature programs of other users in pro-tected directories. In addition to normal user directories, the supervisor (administrator) there is a second user level with extended rights. The supervisor has his own menu for managing the system and is able to delete user directories. (This also includes protected directories.) The supervisor can also select the boot language of the system.
1.2.8
USB functions
The USB functions can be used to exchange temperature programs between different FlexCycler2 devices, save run log files for documenting PCR runs and create service info files (SINF) in service cases. For this purpose, the device has a USB A port for connecting standard USB sticks. The USB B port at the rear of the FlexCycler2 can be used to copy software updates from a connected computer easily and conveniently. It is not necessary to open the thermal cycler or remove parts to update the instrument.
1.3
Technical specifications
Order number 844-00062-x844-00063-x 844-00060-x 844-00061-x FlexCycler2 twin 48
FlexCycler2 twin 48G FlexCycler 2 96 FlexCycler2 96G Capacity 2 x 48 x 0.2 ml tubes,
2 x 6 x strips of 8 0.2 ml or 2 x 48 well micro titer plates
96 x 0.2 ml tubes, 6 x strips of 8 0.2 ml or 96 well micro titer plates
Block material Aluminum Aluminum
Block coating Anodized silver Anodized silver
Block exchange Quick-X-change Quick-X-change
Block exchange time under 10 s under 10 s
Maximum heating rate* 4.5 °C/s 4.0 °C/s
Maximum cooling rate* 4.5 °C/s 4.0 °C/s
Average heating rate* 3.5 °C/s 3.0 °C/s
Average cooling rate* 3.5 °C/s 3.0 °C/s
Mamium gradient span** 20 °C 30 °C
Temperature uniformity Twin 48
95 °C: ± 0.60 °C within 15 s 70 °C: ± 0.30 °C within 15 s 55 °C: ± 0.25 °C within 15 s Twin 48G 95 °C: ± 0.70 °C within 15 s 70 °C: ± 0.40 °C within 15 s 55 °C: ± 0.15 °C within 15 s 95 °C: ± 0.60 °C within 15 s 70 °C: ± 0.40 °C within 15 s 55 °C: ± 0.20 °C within 15 s Temperature range 3 °C – 99 °C Gradient temperature range 20 °C – 99 °C Control accuracy +/- 0.1 °C
Software Quick-start of the last 5 programs, program preview, toggle be-tween program table and graphical programming, graphical gra-dient input, variable heating and cooling rates, extended self test, service files for remote diagnosis, USB functions such as saving programs, run log files or SINF files.
Display ¼ VGA screen, 320 x 240 pixels Auto restart function Yes
Smart lid technology Yes
Lid temperature range 30 °C – 99 °C
Power consumption 600 watt
Operating voltage 100, 115, 230 V, 50 – 60 Hz
Weight 15.0 kg 15.3 kg
Dimensions (width x
height x depth) 26.4 cm x 28.9cm x 40.0 cm 26.4 cm x 47.9cm x 40.0 cm with open lid Noise emissions Very low
Interfaces USB A, USB B
Environmental
condi-tions 15 °C – 35 °C, 70 % air humidity, max 2000 m NN * measured in the block
** Only for gradient enabled block modules. For twin block modules the left block (block 1) is gradient enabled.
1.4
Legal information
1.4.1
PCR license information
Purchase of the FlexCycler2 conveys a limited non-transferable immunity from suit for the purchaser’s own internal research and development and applied fields other than human in vitro diagnostics under one or more of US Patents Nos. 5,038,852, 5,656,493, 5,333,675, 5,475,610, and 6,703,236, or corresponding claims in their non-US counterparts, owned by Applera Corporation.
No right is conveyed expressly, by implication or by estoppel under any patent claim, rea-gents, kits, or methods such as 5´ nuclease methods, or under any other apparatus or sys-tem claim, including but not limited to US Patent No. 6,814,934 and its non-US counterparts, which describe and claim thermal cyclers capable of real-time detection.
Further information on purchasing licenses may be obtained by contacting the Director of Licensing, Applied Biosystems, 850 Lincoln Centre Drive, Foster City, California 94404, USA. Analytik Jena AG
Konrad-Zuse-Strasse 1 07745 Jena
Warranty and liability claims are excluded for personal injury and property damage due to one or several of the following causes:
use of the FlexCycler2 other than intended
improper commissioning, operation and servicing of the device
modifications of the equipment without prior consultation with Analytik Jena AG
unauthorized intervention in the equipment
operation of a faulty device
use of other than original spare parts, wearing parts or consumables
improper repairs2
Safety instructions
2.1
Meaning of the symbols used in the operating manual
CAUTION! Hazard area!
Indicates a potentially hazardous situation which, unless avoided, may result in light or minor injuries.
CAUTION! Risk of electric shock! Do not touch!
Indicates a hazardous situation which, unless avoided, may result in electric shock or dam-age to the device (short-circuit).
ATTENTION
Indicates a potentially hazardous situation which, unless avoided, may cause damage to the device or items in its vicinity.
IMPORTANT
Indicates application hints and other especially useful information without any resulting haz-ardous or damaging situations.
2.2
Safety symbols on the FlexCycler
2Damaged or missing safety symbols can cause incorrect actions leading to personal injury or material damage. Do not remove safety symbols! Replace damaged safety symbols immedi-ately!
The following safety symbols are attached to the inside of the heated lid and the rear of the device:
CAUTION! Hazard area!
Proceed with care when handling samples and working with the FlexCycler2.
CAUTION! Hot surfaces!
There is a risk of burning at the heated lid, the thermal block, the samples, and the rear of the device.
2.3
General safety instructions
Carefully read the operating instructions before using the FlexCycler2.
Intended use
The FlexCycler2 is designed for incubating samples with alternating temperatures and is to be used for this purpose only.
Local regulations
Local safety regulations that apply to the use of this device (e.g., work protection regulations, accident prevention regulations, and accident avoidance regulations) must be observed. References to potential dangers in the handbook do not replace the work protection regula-tions which must be observed.
Requirements for the operating personnel
The FlexCycler2 may only be operated by qualified personnel, who have received additional training for this type of work. The instruction also includes conveying the contents of this user manual.
Any work on electrical equipment may only be carried out by qualified electricians.
CAUTION! Risk of burns!
The thermal block, the samples and the heated lid reach high temperatures. There is a risk of burns during contact. Do not touch the heated lid!
The rapid heating of the thermal block can cause liquids to boil explosively. This is why you always need to wear goggles during operation! Before starting a program close the lid of the device.
Ensure that the lid is securely closed before starting the program!
The samples can reach high temperatures. Do not touch hot sample tubes or plates and do not open them or boiling liquid might splash out!
Only use plates and tubes that are suitable for high temperatures (as of 100°C), fitwell into the thermal block (no shaking) and whose lids seal tightly!
CAUTION! Risk of electric shock! Do not touch!
Do not use the FlexCycler2 if there is any visible damage to the block, housing, ca-bles or any other components.
Before starting the device, make sure that the voltage selector on the bottom is set to the right mains voltage (see section "Setting the operating voltage" p.13).CAUTION! Safety instructions during operation
When handling pathogenic, radioactive or infectious samples, the relevant safety regulations must be observed. For details contact the safety officer responsible for your location.
The FlexCycler2 must not be operated with flammable, explosive or volatile sub-stances.
Do not place your fingers between the block and lid when opening or closing the lid. Risk of crushing!
If only few samples are being incubated, 2 additional (empty) tubes of the same height must be placed at each corner of the block. If the number of tubes in the block is too low, there is a risk of the tubes being damaged.
Before opening the lid, reduce the contact pressure (see section "The High Per-formance Smart Lid (HPSL)" p. 17). It is not necessary to use oil between the sam-ples and the block to create a better heat exchange.If you do wish to use oil, never use silicone oil but mineral oil instead.
Make sure that the ventilation slots at the bottom and rear of the device are unob-structed and not clogged with dust or other materials. Risk of overheating!
If the FlexCycler2 has been moved, allow the device to adjust to room temperature before switching it on for the first time (1 to 6 hours).
Place the device at a minimum distance of 10 cm between the rear of the device and the wall or other objects. Risk of overheating!
The device has been built and certified according to safety standard EN 61010-1. Do not modify the device in any way. Any modification of the device will lead to a loss of warranty and the EN 61010-1 certificate and poses a potential risk.
Place the FlexCycler2 on a solid, non-flammable surface in a secure, dry environ-ment. For details please refer to the environmental conditions in the section "Technical specifications" p. 7.CAUTION! Safety instructions for maintenance and transport
The FlexCycler2 does not contain any parts that can be serviced or repaired by the operator. Do not open the housing of the thermal cycler! Service and repair work should be performed by Analytik Jena AG Service or by trained qualified personnel.3
Installation
3.1
Scope of delivery
1. Base unit with exchangeable block module 2. Mains cable
3. Operating instructions
3.2
Unpacking and inspection
Unpack and carefully check the device. Immediately report any damage to Analytik Jena AG. Do not attempt to operate the device if there is any visible damage.
Keep the original box for possible return. The FlexCycler2 must always be transported in its original packaging. If the packaging is no longer available, please contact Analytik Jena AG.
3.3
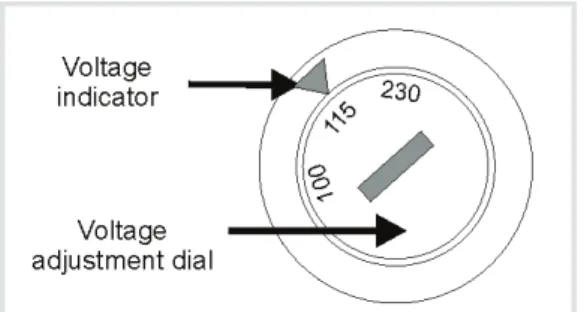
Setting the operating voltage
CAUTION! Risk of electric shock! Do not touch!
Before commissioning the device, make sure that the voltage selector setting on the bottom of the device corresponds to the mains voltage in your laboratory.
The FlexCycler2 can be operated at 100, 115 or 230 volts. Set the operating voltage by turn-ing the dial on the bottom of the FlexCycler2 to the desired voltage. You can do so with a coin.
3.4
Commissioning
CAUTION! Danger of electric shock!
Prior to commissioning, please make sure that the operating voltage set on the device is the same as the mains voltage (see section "Setting the operating voltage" p. 13).
ATTENTION! Do not cover the air vents!
Ensure that the air vents are clear. Insufficient ventilation may cause the device to overheat.
Make sure that there are no objects underneath the device (e.g. paper) that may be sucked against the ventilation slot thus interfering with ventilation.
Place the device at a minimum distance of 10 cm between the rear of the device and the wall or other objects.
Place the FlexCycler2 on a solid dry surface.
If the FlexCycler2 has been moved, allow the device to adjust to room temperature before switching it on for the first time (1 to 6 hours).
Connect the FlexCycler2 with a grounded mains outlet using the provided mains cable.Make sure that the mains switch and the mains cable are accessible. This is im-portant if the device needs to be disconnected from the mains voltage.
The display contrast can be adjusted according to the respective lighting conditions (see section "Setting the contrast" p. 59).3.5
Automatic power-on self test
When the device is switched on, it displays a serial number and software version and per-forms a self test. During this test, it checks whether all important functions are working properly.
The results from the initial self test are saved on the thermal cycler and can be accessed again later (see section "Displaying log files of the "Power-on" self test" p. 62).
4
First steps
4.1
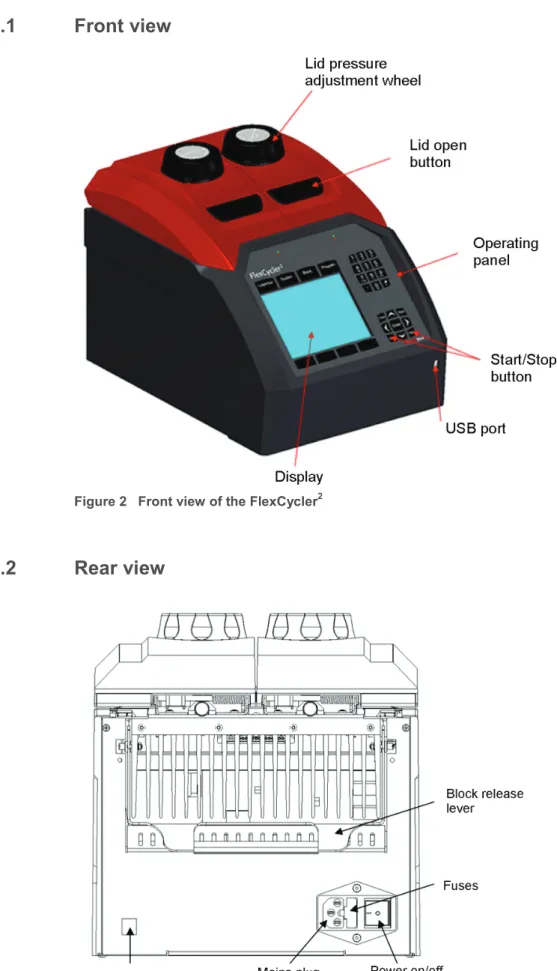
Front view
Figure 2 Front view of the FlexCycler2
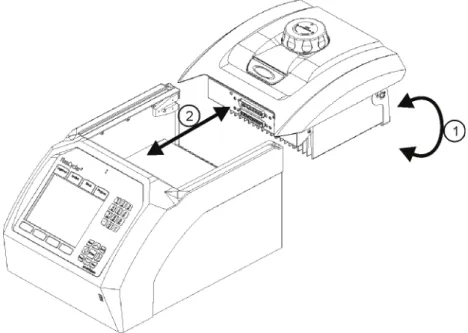
4.3
Exchanging the block module
ATTENTION! Do not touch the contacts!
Avoid touching the plug contacts on the block or the device. It is possible that the electronic system may be damaged due to electrostatic discharge.
1. Switch off the device when exchanging the block.
2. Flip up the lever on the rear of the device (1) and slowly pull the block module back (2). 3. As soon as the plug connection at the front is released, the module can be lifted up (or
back) and out.
For installing a block module, proceed in reverse order:
4. Carefully insert the module into the device from the rear / top and slowly push it forward, until the plug clicks into the contacts (2).
5. Carefully push the lever on the rear down (1) until the module is firmly connected to the device.
6. Switch on the FlexCycler2. During start-up the module is automatically recognized and the block format and serial number are displayed.
4.4
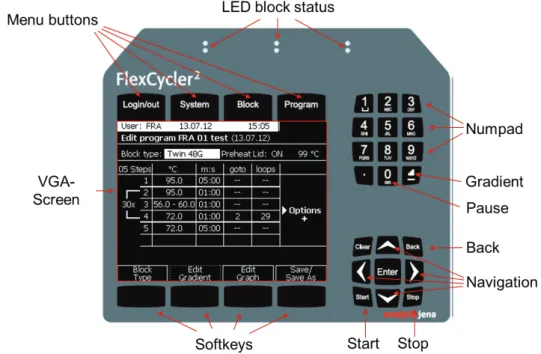
Control unit
Figure 5 Setup of the control unit
4.5
The High Performance Smart Lid (HPSL)
The FlexCycler2 has a height-adjustable lid for optimal contact pressure on the samples.
Closing the lid
1. Place the samples in the block, then close the lid until you feel the button in the front click into position.
2. Turn the lid wheel clockwise until the friction clutch activates (you will hear a clicking noise).
ATTENTION!
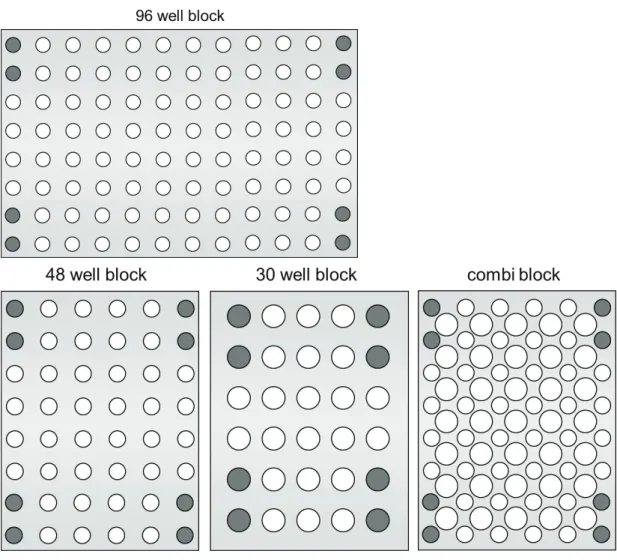
The strength of the lid contact pressure has been designed for a fully loaded block. If only a few samples are to be used in the block, please place an additional two (empty) tubes of the same height in the four corner positions of the block. Otherwise the sample t may be dam-aged from excess contact pressure (see also Figure 6 below).
Attention!
Figure 6 Diagram for inserting empty tubes into different block systems
Opening the lid
ATTENTION! Never open the lid under pressure!
Always follow the sequence below when opening the lid. If the lid is opened under pressure, the locking mechanism may be damaged.
1. Reduce the contact pressure of the lid completely by turning the lid wheel anticlockwise until there is no resistance.
5
Operation
5.1
User interface
The user interface of the FlexCycler2 has four menu buttons above the screen and four
softkeys below the screen.
5.1.1
Menu buttons
The four menu buttons are for quick access to the four main menus of the FlexCycler2. These are:
the LOGIN/OUT menu
the SYSTEM menu
the BLOCK menu
the PROGRAM menuThe active menu is indicated by a graphical link to the corresponding menu button on the top edge of the screen.
In this example the PROGRAM menu is active.
The four menu buttons always have the same function. In contrast, the function of the soft-keys changes depending on the software menu that is being accessed.
5.1.2
Softkeys
There are four softkeys below the screen.
In contrast to the menu buttons the function of the softkeys changes depending on the pro-gram window (context-sensitive). The current function of the softkeys is always shown in the bottom row of the screen.
5.1.3
L
OG INmenu
After switching on (and booting) the FlexCycler2, the LOG IN menu is displayed automatically. If the device is already switched on and is in another menu, press the [LOG IN/OUT] menu button above the screen to log into or out of the thermal cycler.
To log in, select a user from the list or create a new user. The initials of the currently logged-in user will be shown logged-in the status llogged-ine at the top of the screen:
5.1.4
B
LOCKmenu/Q
UICK-
STARTfunction
The BLOCK menu displays data on the current status of the sample block. This section is particularly important during the run, because this is where the progress and remaining time are displayed.
Press the [BLOCK] menu button above the screen access the block menu. The display differs depending on whether a block module with an individual block or a twin block module is in-stalled:
Monoblock Twinblock
For twin block systems, the FlexCycler first displays an overview screen with the status of the two blocks. Each block can be active with a running program or free. Select block 1, block 2 or all blocks with the corresponding softkeys. The view changes to the overview of the last used programs as with the Monoblock.
If the block is free (i.e. no program is running) up to five programs are listed that were last started on the block or edited by the user who is logged in to the system. The FlexCycler2 here offers a comfortable quick-start function. Select the desired program from the list and press the [START] key on the control unit (see section "Control unit" p. 17). The correspond-ing program is started immediately.
To display a program prior to starting, press the [VIEW PROGRAM] softkey. The programmed parameters and the calculated duration of the program are listed:
Note:
5.1.5
S
YSTEMmenu
Press the [SYSTEM] menu button above the screen.
The SYSTEM menu can be used to access the basic settings of the thermal cycler and to query protocol data and service files.
The protocol files from the automatic start-up test can be called up here (see section "System settings" p.56).
5.1.6
P
ROGRAMmenu
Press the [PROGRAM] menu button above the screen.
The PROGRAM menu is used to create and edit programs. There is an individual directory for saving programs for every user. The user directory is marked by initials. The programs from foreign, PIN code-protected user directories can be read, but they cannot be changed. If necessary, a program can be copied from another user directory to the current user directory and edited there.
5.2
Software
The arrow keys can be used for navigation on all screens. The [LEFT] and [RIGHT] key have additional functions in some menus. These additional functions shall be pointed out inthis manual.
The [RIGHT] arrow key moves the cursor into the next field.
This key can also be used to confirm a data entry: During programming the entered value is accepted when the [RIGHT] key is pressed and the cursor jumps to the next field.
In the directory tree, the [RIGHT] key moves the cursor into the next lower directory structure.
The [LEFT] key moves the cursor to the previous field. On most screens the [LEFT] key is the same as the Back key.
In the directory tree, the [LEFT] key moves the cursor into the previous, higher directory structure.
5.2.1
Log in
The FlexCycler2 manages up to 30 user directories. Every user has his or her own directory into which the programs are saved. Programs from foreign, PIN code-protected user directo-ries can be read, but they cannot be changed. If a user wants to modify another user's pro-gram, he can copy it to his own directory and edit it there.
Every user is identified by his name and his 2 or 3-digit initials. The initials are adopted to the system as an identification code for the individual user directory.
Every user directory can be protected by a PIN code (1 – 7 digits). If you do not wish to have your directory PIN-code protected, leave the "ENTER PIN" field empty and continue with [E N-TER].
Note:
Without a PIN code to protect the user directory, the data in your directory can be modified or deleted by others.
5.2.2
Logging in a user
Select a user with the arrow keys or enter the initials. The cursor automatically jumps to the field that begins with the corresponding letters.
Press the [LOG IN] softkey and enter your PIN code. If you are not using a PIN code for the user directory, the following screen will not appear.
Confirm the PIN number with the [PIN-CODE OK] key. The current user is displayed:
To continue programming or to start a program, press one of the menu buttons above the display.
5.2.3
Creating a new user directory
Press the [LOG IN/OUT] menu button above the screen.
To create a new user, press the [NEW USER] softkey.
Enter a name and the 2-3-digit initials. Enter a personal PIN code. Repeat the entry.
Note:
The PIN code is optional. If you do not wish to protect your user directory by a PIN code, leave the "ENTER PIN" field empty and continue with [USER-DATA OK].
Note:
Without a PIN code to protect the user directory, the data in your directory can be modified or deleted by others.
Note:
You can change your PIN code at any time in the SYSTEM menu (see section "Changing the PIN code" p. 57).
5.2.4
Logging in as a supervisor
The supervisor (administrator) can make global changes to the device settings. This includes the boot language of the system and deleting user directories.
The factory setting for the supervisor PIN code is 000 000 0 (entered without spaces).
5.2.5
Deleting a user directory
Users are able to delete their own user directories in the SYSTEM menu (see section "Deleting a user directory" p. 57).
In addition, the supervisor can delete any user directory, regardless of whether the directory is PIN code-protected or not. To do so, log in as a supervisor (see section "Logging in as a supervisor" p. 25) and select the "DELETE uSER" option in the SYSTEM menu (see section "Deleting a user directory (user account)" p. 67).
Select the user whose directory you wish to delete and press the [OK] key to confirm. This is particularly useful if an employee has left the group without deleting his user directory and programs.
Note:
Deleting a user directory also automatically deletes all programs in the corresponding direc-tory. Make sure that you copy all important programs you would like to keep into another
5.3
Creating a new program
5.3.1
Creating a program
Log in to your user directory (see section "Logging in a user" p. 23). Press the [PROGRAM] menu button above the screen to get into the PROGRAM menu of the FlexCycler2.
Press the [NEW PROGRAM] softkey.
The programming table opens.
5.3.2
Selecting the block type
The FlexCycler2 automatically detects the installed block module during the start-up process (block format, with/without gradient function). When creating a new program this module is accepted as default.
Select the correct block type from the list and press [SELECT]. A "G" stands for gradient-capable blocks. In this example the standard block type is the "TWIN 48G".
5.3.3
Heated lid settings
With the standard settings the lid is preheated to the programmed temperature before the actual program starts. It is also possible to deactivate preheating the lid (PREHEAT LID:OFF). In this case the program already starts whilst the lid is still heating up.
Press the [PREHEAT ON/OFF],softkey to switch between the two settings.
Confirm the entry with [ENTER] or press the [RIGHT] arrow key to jump to the next entry field.
Note:
The recommended setting is "PREHEAT ON"
Note:
In the "PREHEAT ON" mode the block is kept constantly at 25°C whilst the lid heats up. After the heated lid has reached the target temperature, a 40 s equilibration period follows before
5.3.4
Setting the lid temperature
Thanks to the High Performance Smart Lid technology much lower lid temperatures can be used than was common in the past. The advantage here is that a local overheating of the samples in the center of the block by heat radiation from above is prevented. The homoge-neous heat cushion that forms in the High Performance Smart Lid leads to a considerably higher temperature uniformity between the samples compared to conventional heated lids.
Enter the desired lid temperature and confirm with [ENTER].
Note:
The recommended lid temperature for typical PCR reactions is 99.0°C.
5.3.5
Entering the temperature and hold time for a step
All steps of a program are entered in a well-structured table. Numbers can be entered via the number pad. To navigate within the table use the arrow keys and the [ENTER], [BACK] and [CLEAR]keys.
Number pad for entering numeric values.
Use the arrow keys to navigate in the table.
Every entry must be confirmed with [ENTER]. The cursor automatically jumps to the next field. You can also adopt an entry with the [RIGHT] arrow key.
Use the [CLEAR]key to undo wrong entries. The previously entered value is removed. Alternatively, entries can be overwritten if the cursor is in the corresponding field.
Enter the temperature for the first step and press the [RIGHT] arrow key or [ENTER]. The cur-sor jumps into the next column. Here, enter the hold time for this step.
Note:
When entering the time for a step minutes and seconds can but do not have to be separated by a period. The numbers can also be entered without a separating period.
Example:
To enter a time for a step of 2 min and 30 s, type "2", "3", "0". Depending on the column heading the time is shown as 02:30 (m:s).
Note:
Minutes can be entered faster by adding a period after the number.
Example: Enter "2", "•" to program a hold time of 2 minutes.
5.3.6
Defining a loop
A loop is generally defined by two parameters: The target for the return ("GOTO") and the number of returns ("LOOPS"). The parameters for a loop are entered in the last step of the loop.
Place the cursor on the last step of the loop to be programmed (in the example: step 4). Enter the target for the loop in the "GOTO" row (in the example: step 2).
Enter the number of returns in the "LOOPS" row and confirm with [ENTER]. The loop is indicat-ed by a bracket on the left side of the table.
Note:
The total number of loops displayed in the bracket is the result of the number of returns plus 1.
5.3.7
Cooling the samples after the run
The samples can be cooled at a constant temperature after the program has ended. Enter the desired target temperature and the time "0" in the corresponding step. The software in-terprets the value "0" as an entry for the pause step and displays it as such (see also section "Programming a pause" p. 31). When this step is reached, the device keeps the
pro-grammed temperature for an unspecified time.
Note:
To increase the service life of the Peltier elements we recommend sample incubation at a
temperature of 15°C after the program has ended. The frequently used temperature of 4°C
shortens the life of the Peltier elements of the device.
5.3.8
Programming a pause
If you want the FlexCycler2 to hold a specific temperature over an undefined period of time, enter the value "0" as the hold time. After confirming the entry with [ENTER] the word "PAUSE" is displayed. The pause function is used, for example, for PCR protocols with manual hot start (open the heated lid, insert the samples, press [CONTINUE] to go to the next step of the program) or for cooling the samples after the reaction is over (see section "Cooling the sam-ples after the run" p. 31).
IMPORTANT
If you are using the pause function make sure that you stop the program properly in the last step after taking out the samples (see section "Ending a program in pause" p. 51). If the device is shut down without stopping the program it will interpret this as a power failure and continue with the pause step when it is started again.
5.3.9
Saving the program
Press the [SAVE/SAVE AS] key.
The first free program number is selected automatically. If you wish to save the program under a different number, use the arrow keys to select the number or enter it with the numer-ic keys.
Press the [EDIT NAME] softkey and enter a name for the program.
The program number, name and date are shown in the directory tree.
5.3.10
Programming the temperature gradient
Gradients can be programmed directly in the program table or with the [EDIT GRADIENT] soft-key.
The easiest way of defining a gradient is to enter the temperatures of the left and right block side separated by a dash (example 40 – 60). Acknowledge with [ENTER].
Alternatively, you can move the cursor to the "°C" column and press the [EDIT GRADIENT] softkey.
FlexCycler2 twin 48G FlexCycler2 96G
Here, you can enter the temperature for column 1 and column 8 of the block (twin 48G) or for column 1 and 12 (mono 96G).
The [UP] or [DOWN] arrow keys can be used to fine-adjust the gradient. Press
the arrow keys to increase or reduce the entered temperature in 0.1 °C
steps.
Note:
Programs with gradient steps can only be started on blocks with gradient function. Please note that for twin block modules only the left block (block 1) features the gradient function. If you attempt to start a gradient program on a block without gradient function, a corresponding message appears:
5.3.11
Programming a linear gradient
Press the [EDIT LINEAR GRADIENT] softkey.
FlexCycler2 twin 48 G FlexCycler2 twin 96 G
FlexCycler2 twin 48 G FlexCycler2 twin 96 G
5.4
Setting program options
Additional parameters, such as time and temperature increments, can be defined for every step and the heating and cooling rate can be adapted. You can find these parameters by moving the cursor all the way to the right in the programming table, to the column titled "O P-TION".
An additional section of the table will open up:
To get back to the programming table, move the cursor to the left. If any parameters have been changed under "Option", the table view will display an additional "+" sign in the "O P-TION" column.
5.4.1
Setting the heating and cooling rate
The average heating and cooling rate can be set in the (°C/s) column.
Note:
The value in the (°C/s) column defines the speed with which the current step is reached.
This means that if heating (or cooling) should be adapted to a speed of 1 °C/s between step 2 and step 3, a value of 1.0 must be entered in step 3.
Note:
If the speed is to be reduced for the whole program the heating or cooling rates of all steps must be adjusted. The configuration then also only applies to this specific program.
5.4.2
Changing the hold time in cycles Δt(s)
To compensate for a loss in enzyme activity during longer protocols, the hold time of a spe-cific step can be increased between cycles (within a loop). Enter the desired hold time in-crease in the Δt(s) column of the corresponding step. During each cycle the hold time will be increased by the value entered here.
5.4.3
Changing the temperature in cycles ΔT(°C)
For some applications it makes sense to start with a high temperature and lower the temper-ature from cycle to cycle. This technique is also known as "touch down".
To lower the temperature from cycle to cycle in a specific step, enter a negative temperature
value into the ΔT(°C) column. The temperature will change by the entered value with every
cycle.
Note:
Make sure that the step is within a loop. Otherwise, an entry in the ΔT(°C) column will be without effect.
5.5
Editing programs
Programs can be edited in the tabular or graphical mode. You can switch between the two alternative modes with the softkeys. The graphical mode is particularly useful for the quick adjustment of existing programs. The programs can then be saved under a new name (see section "Editing programs in the graphical mode" p. 42).
Note:
It is not possible to change the active program during operation. All changes must be made before starting the program. The program must be saved for the changes to become effec-tive. The only way to apply changes to a running program is the skip function for skipping steps (see section "Skipping a program step" p. 49 ).
5.5.1
Inserting a step
Move the cursor to the step in front of which you wish to insert a new step.
Press the [INSERT/DELETE STEP] softkey.
Press the [INSERT STEP] softkey.
Note:
In the example the step was inserted within a loop. The loop now has 4 steps. (The existing loop is automatically updated).
5.5.2
Deleting a step
Move the cursor to the step to be deleted and press the [INSERT/DELETE STEP] softkey.
Press the [DELETE STEP] softkey to delete the marked step.
Confirm the choice with [OK].
The total number of steps is now reduced by one step.
Note:
5.5.3
Copying the program
Press the [PROGRAM] menu button and the [OPEN DIRECTORY] softkey.
Move the cursor to the program to be copied.
Press the [COPY PROGRAM] softkey.
The next free memory space in the user folder is automatically selected for saving the copy. With the arrow keys or by entering the corresponding number on the number pad of the op-erating panel, any other location can be chosen.
5.5.4
Deleting a program
Select the program to be deleted.
Press the [DELETE PROGRAM] softkey.
Confirm with [OK].
The memory space is now free.
Note:
Only programs from a user's own directory or from non-PIN code-protected directories can be deleted. Deleting programs cannot be undone.
5.5.5
Editing programs in the graphical mode
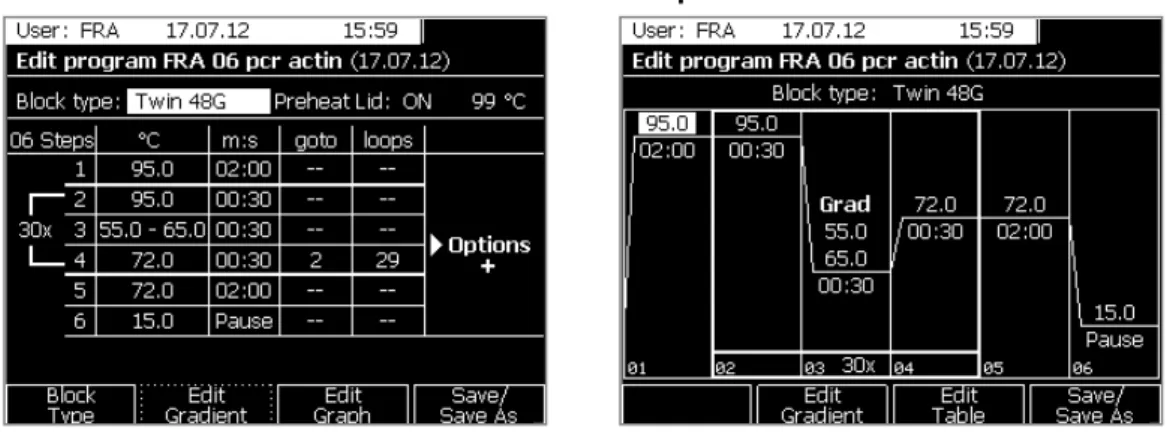
Programs are usually created in the table view, which permits the fast programming of new steps. The graphical mode also offers a schematic representation of the temperature profile. You can switch between the table view and the graphical mode with the [GRAPH] or [TABLE] softkey.
Table view Graphical mode
To change parameters in the graphical mode, please move the cursor to the corresponding field and enter the new value. After confirming the entry with [ENTER] the graphical mode will be updated.
Note:
For an ideal representation the temperature stages are distributed on the display with maxi-mum distances. This means that the location of the stages does not correspond to the effec-tive temperatures.
Note:
To define loops switch to the table view (press [EDIT TABLE]).
Note:
To insert or delete steps switch to the table view (select[EDIT TABLE]).
Note:
To change a gradient or to enter a new gradient press the [EDIT GRADIENT] softkey (see sec-tion "Programming the temperature gradient" p. 33). Alternatively, you can switch to the table view for programming a gradient. The function for programming gradients is only available if a gradient-capable block is inserted at the device or if a gradient-capable block type is se-lected in the programming table (see section "Selecting the block type" p. 27).
5.6
Starting a program
On the user interface of the FlexCycler2 there is a [START] key for starting programs (see section "User interface" p. 19).
5.6.1
Selecting a program for the start
Any user can start any program, including programs from protected directories of other users. Press the [PROGRAM] menu button above the display.
Open the corresponding directory [OPEN DIRECTORY] and select the program to be started.
For devices with Monoblock the selected program can be started directly by pressing the [START] key on the user interface
Note:
When starting programs with the appendix "GRAD" and that include a gradient step, a tempo-rary adjustment to the currently used block type may be necessary (the saved program will not be modified). The following table provides an overview of the possible adjustments made by the FlexCycler2:
Cause Example Adjustment
Maximum gradient range for the selected block is exceeded.
A program for the 96 well gra-dient block type with a pro-grammed temperature
range > 20°C is to be started
on a 48 well gradient block and therefore exceeds the
The temperature range of the gradient will be reduced based on the average temperature of the maximum permissible value. If the average temperature of the programmed gradient is, for
ex-A block without gradient function has been se-lected.
A program for the 96 well gra-dient block type or 48 well gradient block type is started on a block without gradient function.
The gradient will be deleted and the average temperature will be used for this step. If the average temperature of the programmed gradient is, for example, 60°C,
this value will be used for the step.
If adjustments are necessary to start a program, the following message will appear briefly (5s):
The message describes the reason for the adjustment and for which block the started pro-gram is being adjusted.
5.6.2
User-specific quick-start of programs
The FlexCycler2 records the last five started or edited programs for each user individually. With the quick-start function, these programs can be selected conveniently and started im-mediately.
Press the [BLOCK] menu button above the display.
Twinblock only: Select one or both blocks.
Select one of the programs with the cursor and press the [START] key on the control unit.
Note:
When starting programs with the appendix "GRAD" and that include a gradient step, a tempo-rary adjustment to the currently used block type may be necessary. The saved program will not be modified. See also section "Selecting a program for the start" p. 43.
5.6.3
Program preview
Before starting a program, you can check it in a preview mode. Press the [VIEW PROGRAM] softkey (see section "User-specific quick-start of programs" p. 44).
Note: In this menu it is not possible to edit the program.
The [LATEST PROGRAM LIST] function will take you back to the list of programs last used by the currently logged-in user (see section "User-specific quick-start of programs" p. 44 ). The FlexCycler2 provides the option for both tabular and graphical program preview. Press [VIEW GRAPH] or [VIEW TABLE], to switch between both modes.
Table view Graphical mode
If the program has a programmed gradient, it is also possible to open a preview showing the shape of the gradient. Press [VIEW GRADIENT] to change to the gradient preview.
FlexCycler2 twin 48 G FlexCycler2 twin 96 G
5.6.4
Display during a run
After the program has been started, the following screen will be shown:
Monoblock Twinblock
The status of a block can be free, active or paused. The user who started the program and the calculated remaining runtime are displayed. If you are using a Twinblock device, the status of both blocks will be shown.
Aside from the remaining runtime, there is other information that can be called up for a run-ning program. The software offers the following basic view options:
[TIME] Remaining runtime display
[GRAPH] Graphical representation of the program [TABLE] Tabular representation of the program
Remaining time Graphical representation
Tabular representation Gradient view
Twinblock only: To display the remaining time, press [OVERVIEW TIME] and to display the temperature of both blocks press [OVERVIEW TEMPERATUR.].
Overview time Overview temperature
Note:
The screen always shows the average temperature of the block. This also applies for gradi-ent steps.
5.6.5
Pausing the program
Twinblock only: To pause a program in the current step select the corresponding block with the softkeys [BLOCK 1] or [BLOCK 2].
Press [PAUSE BLOCK /SKIP STEP].
Press [BLOCK PAUSE].
The block status displayed is now "PAUSE". It is shown alternating with the elapsed time since pause has started.
5.6.6
Continuing the program
To continue the program and end the pause press the [CONTINUE] softkey.
5.6.7
Skipping a program step
Twinblock only: To skip a program step select the corresponding block with the softkeys [BLOCK 1]or [BLOCK 2].
Press [PAUSE BLOCK /SKIP STEP].
The current step is skipped. The program continues with the next step.
5.7
Stop the program
To stop an active program press the [STOP] key on the control unit.
Twinblock only: To stop a program step select the corresponding block with the softkeys [STOP BLOCK 1], [STOP BLOCK 2] or [STOP ALL BLOCKS].
Confirm stopping the program with [OK].
5.7.1
Stopping a program in pause
If a program is stopped during a pause (for example when incubating the samples at room temperature) this program should still be stopped properly before switching off the
FlexCycler2.
Note:
If the FlexCycler2 is switched off during pause mode without stopping the program first, the software registers this as a power failure and saves the event to the run log files and error reports.
5.8
USB functions
The USB connection on the front of the device (see section "Front view" p. 15) can be used to transfer programs with a USB stick.
5.8.1
Connecting the USB stick with the thermal cycler
Plug the USB stick into the intended connection at the front of the device. If no USB stick is connected to the FlexCycler2 the message "NO DISKDRIVE FOUND" appears if the attempt is made to read memory content.
Note:
5.8.2
Opening the USB folder
Log in to your personal user directory and go to the PROGRAM menu (see section "PROGRAM menu" p. 22).
Use the [UP] and [DOWN], arrow keys to switch to the "USBDRIVE" directory. After selecting the USB drive the memory content of the USB stick is read automatically and the message "READING FILE LIST" appears.
Note: Deleted programs cannot be restored.
5.8.4
Copying the program from the USB folder
To copy a program select the program from the list and press [COPY PROGRAM] (see section "Opening the USB folder" p. 52). Select a memory space in your user directory and press [SAVE COPY]. To stop the copying process press [CANCEL].
The name of the program to be copied can be changed before saving. Press the [EDIT NAME] softkey and enter a name for the program. Confirm your entry with [OK] or press [CANCEL] to cancel the modification of the name.
5.8.5
Copying a program to the USB folder
To copy a program to the USB stick, select the user directory and press [COPY PROGRAM].
In the next window, press [SAVE COPY TO USB].
The system will display a message screen on the copying progress.
5.8.6
Maximum number of programs in the USB folder
The maximum number of programs on the USB stick is 48. If this limit is exceeded, a corre-sponding message is shown.
6
System settings
To change the basic FlexCycler2 settings press the [SYSTEM] menu button above the screen (see section "User interface" p. 19).
The main window of the SYSTEM menu opens. Use the cursor keys to select a menu item and press [SELECT].
6.1
User configuration
This is an option for using user-specific parameters.
Select a menu item with the cursor keys and press [SELECT] or [OVERVIEW] to return to the main window.
6.1.2
Changing the PIN code
With this option you can change the current user's PIN code.
First, enter your current PIN code, then enter the new PIN code and repeat the entry. Con-firm the entries with [PINOK].
Note: If you have forgotten your PIN code, you can ask the administrator to reset it (see section "Changing a user's PIN code" p. 66).
6.1.3
Deleting a user directory
Users can delete their own user directories if they are logged in to the thermal cycler.
Important:
Deleting a user directory deletes all programms as well. Always make sure to copy all im-portant programs to a different directory before deleting a user directory.
Note:
6.2
System configuration
In this menu you can set the beep, screen contrast, date and time and the screen saver. The menu also has a function for memory defragmentation.
Use the cursor keys to select a menu item and press [SELECT] or [OVERVIEW] to return to the main window of the SYSTEM menu.
6.2.1
Setting the acoustic signal
Switch the beep to OFF/ON and confirm with the [SAVE] softkey.
The beep sounds if the program is paused or stopped. The beep can be stopped by pressing any key (except for the [STOP] key on the control unit).
6.2.2
Setting the contrast
The screen contrast can be set individually for each user.
You can move the bar for changing the contrast with the arrow keys. Accept the setting with [SAVE CONTRAST].
The default setting for the contrast is the middle position [DEFAULT CONTRAST].
6.2.3
Setting the date and time
Set the current date and time and confirm with [SET DATE AND TIME].
6.2.4
Defragmenting the memory
As the memory gets fuller, programs are deleted and new programs created, new data is stored fragmented in the memory over time. This may reduce the access speed to the memory and cause the software to react slower to user commands. By defragmenting the memory the saved information is sorted and stored in a sequence that allows faster access to the program functions.
Confirm your selection with [OK] and wait for the defragmentation process.
6.2.5
Setting the screen saver
Set the screen saver to OFF or ON and adjust the screen saver wait time as required. Ac-cept the settings with [SAVE].
The default setting is screen saver ON with a wait time of 30 minutes [DEFAULT].
6.3
System information
In this menu you can access information on the device and run log files of the latest five runs. The different types of information that can be accessed are described in the following sec-tions.
6.3.1
System information
Under this menu item information on the system, such as the serial number, block type and current software version of the device is displayed.
System info Hardware info
In addition, the software version numbers of several hardware components can be accessed via the [HARDWARE INFO]function. Press [SYSTEM INFO]or [HARDWARE INFO] to switch be-tween the two windows or press [OVERVIEW] to return to the main menu.
6.3.2
Viewing/saving the log files from the last nine runs
During each run, information is protocolled by the thermal cycler. The log files of the last nine runs can be called up in this menu.
Select a program from the list using the cursor keys and press [VIEW RUN-LOGFILE]. To save an individual run log file on a USB stick that is connected to the FlexCycler2 press [RUN -LOGFILE TO USB]. The [ALL LOGFILES TO USB] function can be used to export all saved run log files at once.
The run log file saves several sets of information that are relevant for the last run. To view the steps of the used program press [VIEW PROGRAM]. To display an overview of all messag-es for this run prmessag-ess [VIEW MESSAGES]. To export the selected run log files to a USB stick press [SAVE LOGFILE TO USB].
The messages are displayed sorted by time and date. If a power failure exceeds 30 minutes
a pause step at 4 °C (freeze step) is started automatically as soon as the power returns. Press [VIEW FREEZE PROG], to display the freeze step.
6.4
S
ERVICEmenu
6.4.2
Performing an extended self test
In addition to the automatic power-on self test, you can perform an extended device test. During the extended self test, the Flex Cycler2 checks the parameters of different compo-nents and functions and saves the results in a log file. The test therefore offers the user im-portant and useful information on whether the device is operating within specifications. To initiate an extended self test, press [EXECUTE SELFTEST]. The extended self test takes approx. 30 minutes. During the test, no program can run on the device.
Within specific intervals, the device displays a message prompting the user to perform an extended self test (message 729):
You can confirm that you have read the message by pressing [QUIT]. If the FlexCycler2 is switched off without having performed the extended self test, the message is displayed again the next time the device is switched on.
6.4.3
Displaying log files of the extended self test
The results of the extended self test are stored in the device. To call up the results of the test, access the log files in the menu under [VIEW LOGFILE OF EXTENDED SELFTEST] and open them by pressing [SELECT].
The next window summarizes the current status of all important components.
Press [MORE RESULTS] to display data on the run time of the device.
6.4.4
Displaying the error history
This menu shows the software and hardware error history.
Note:
Serious errors, that would impair the function of the device, are displayed as messages on the user interface and require user interaction.
6.4.5
Creating an info file for Analytik Jena Service
This function creates an info file with technical details that serves as a remote diagnosis tool for Analytik Jena Service. Service info files can be transferred to a USB stick that is connect-ed to the FlexCycler2 thermal cycler or to a PC. To save the files to a USB stick select [SINF-File to USB]. To save the files to a computer, connect the FlexCycler2 to a computer with a serial cable (full handshaking mode) and start the hyper terminal. Enter "SINF" into the input mask of the hyper terminal to start the file transfer.
Send the SINF (service info file) to Analytik Jena Service by email (see section "Contacting Analytik Jena" p. 66).
6.5
Contacting Analytik Jena
This screen shows the Analytik Jena contact information.
6.6
Supervisor system settings
The administrator (supervisor) has access to a special system menu with some special func-tions.
6.6.1
Changing a user's PIN code
The supervisor can change the PIN code of every user directory. To do so, select the user directory from the selection list and press [SELECT USER].
6.6.2
Deleting a user directory (user account)
The supervisor can delete user directories regardless of whether these are PIN code pro-tected or not. Select the correct user directory from the list and press [SELECT USER].
Confirm deleting the directory with [OK].
The directory and the programs in it are deleted.
6.6.3
Changing the supervisor PIN code
The supervisor account is PIN code-protected. The supervisor PIN code is originally set to 0000000. Enter a new PIN code and repeat the entry. Confirm your entry with [PIN OK].
Note:
Write down the supervisor PIN code and keep the note at a safe place. If the supervisor PIN code has been lost, it can only be reset by the Analytik Jena Service or an authorized Analytic Jena dealer.
6.6.4
Setting the boot language
The language for the display during boot-up can be set by the supervisor. Use the arrow keys to select the language and press [SELECT LANGUAGE].
The default language is English [DEFAULT LANGUAGE].
6.6.5
Deleting all user directories (user accounts)
The supervisor can delete all user directories and the programs in them at once. Confirm your selection in the security prompt by pressing [OK] to delete all directories.
7
Quick reference guide
Safety instructions
Do not open the device unless you have been authorized to do so! Before switching on the device, make sure that the voltage selector on the bottom is set to the right mains voltage (110 V, 115 V or 230 V, see section "Setting the operating voltage" p.13).
The block and lid can reach high temperatures during operation. There is a risk of burning from touching these components.
The samples are heated up quickly and may come to an explosive boil. Wear goggles when handling hot samples. Make sure that the lid is closed securely before starting the program! The use of oil between the samples and the block is NOT necessary to achieve an improved heat exchange. If you do wish to use oil, never use silicone oil but mineral oil instead. Ensure that the air vents are clear.
Insufficient ventilation may cause the device to overheat.
The FlexCycler
2control panel
Log in
Press [NEW USER] to create a new user.You can select the language for the control panel (German or English). The language setting is saved individually for each user.
Press [SELECT LANGUAGE] to select the preferred language.
To define the language for the screens during boot-up, log in as a supervisor and select "SET BOOT LANGUAGE" in the supervisor SYSTEM menu. Use the arrow keys to select the language and press [SAVE].Creating, modifying and saving programs
To create a new program or modify an existing program press the [PROGRAM] menu button.
Select the desired user directory and press [OPEN DIRECTORY].
Press [NEW PROGRAM] or select an existing program and press [EDIT PROGRAM], to get to the programming window.Use the arrow keys to move through the programming table. The active field in which entries can be made is highlighted white. The assignment of the soft keys on the FlexCycler2 control panel changes context depending.
The lid temperature can be set in the status view under [-- °C] in a range between 30°C and 99°C.
Enter a temperature [°C] and a time [m:s] into the programming table for every step in your PCR protocol. To program a temperature for a specific time enter "0" under [m:s] and press <ENTER>. The word "PAUSE" is displayed.Note:
Minutes and seconds can be entered separated by a period or one after the other. For 2
minutes 30 seconds, for example, enter "2", "•", "3", "0" or "2", "3", "0".
To insert or delete a program step move the cursor to the corresponding position in the program table and press [INSERT/DELETE STEP].Select [DELETE STEP] or [INSERT STEP], to insert or delete a step. The position in which the step is inserted or deleted is highlighted.
Confirm deleting or inserting the step with [OK] in the next window.
To program a loop, specifya) which step the program is to go back to [GOTO] and
b) how often he loop is to be repeated [LOOPS]. The loop is indicated with brackets on the left side of the program table.
To program special functions such as temperature increments, time increments or heat-ing and coolheat-ing rates, repeatedly press the [RIGHT] arrow key to open the options table. The new table will be displayed:Note:
Set the temperature to 15 °C instead of 4 °C
at the end of a run. This increases the life time of the instrument.
– To change the annealing temperature in a loop from step to step, enter a
tempera-ture increment with a negative or positive sign under ∆T(°C).
– To change the incubation time in a loop from step to step, enter a time increment
with a negative or positive sign under ∆T(°C).
– The ramping rate (heating and cooling rate) is preset depending on the block type.
To adjust the ramping rate, enter a value in steps of 0.1°C under [°C/S].
Only for blocks with gradient function: To define a gradient, entera) two temperatures, separated by a minus sign, for the left and right side of the block
under [°C] (e.g. 55-65°C) or