ANSYS Installation and
Configuration Guide for
Windows
ANSYS Release 9.0 002094 November 2004 ANSYS, Inc. is a UL registered ISO 9001: 2000 Company.Configuration Guide for
Windows
ANSYS Release 9.0
ANSYS, Inc. Southpointe 275 Technology Drive Canonsburg, PA 15317 ansysinfo@ansys.com http://www.ansys.com (T) 724-746-3304 (F) 724-514-9494October 2002 ANSYS 7.0 001686 May 2003 ANSYS 7.1 001790 October 2003 ANSYS 8.0 001903 April 2004 ANSYS 8.1 001979 November 2004 ANSYS 9.0 002094
Copyright and Trademark Information
Copyright © 2004 SAS IP, Inc. All rights reserved. Unauthorized use, distribution or duplication is prohibited.
ANSYS, DesignSpace, CFX, DesignModeler, DesignXplorer, ANSYS Workbench environment, AI*Environment, CADOE and any and all ANSYS, Inc. product names referenced on any media, manual or the like, are registered trademarks or trademarks of subsidiaries of ANSYS, Inc. located in the United States or other countries. ICEM CFD is a trademark licensed by ANSYS, Inc. All other trademarks and registered trademarks are property of their respective owners.
ANSYS, Inc. is a UL registered ISO 9001: 2000 Company. ANSYS Inc. products may contain U.S. Patent No. 6,055,541.
Microsoft, Windows, Windows 2000 and Windows XP are registered trademarks of Microsoft Corporation. Inventor and Mechanical Desktop are registered trademarks of Autodesk, Inc.
SolidWorks is a registered trademark of SolidWorks Corporation.
Pro/ENGINEER is a registered trademark of Parametric Technology Corporation.
Unigraphics, Solid Edge and Parasolid are registered trademarks of Electronic Data Systems Corporation (EDS). ACIS and ACIS Geometric Modeler are registered trademarks of Spatial Technology, Inc.
FLEXlm License Manager is a trademark of Macrovision Corporation.
This ANSYS, Inc. software product and program documentation is ANSYS Confidential Information and are furnished by ANSYS, Inc. under an ANSYS software license agreement that contains provisions concerning non-disclosure, copying, length and nature of use, warranties, disclaimers and remedies, and other provisions. The Program and Documentation may be used or copied only in accordance with the terms of that license agreement.
ANSYS Installation and Configuration Guide for Windows ... 1
1. Installation Prerequisites ... 1
1.1. Additional Hardware and Software Requirements ... 2
2. ANSYS Pre-Installation Instructions ... 2
2.1. Installing from the Media ... 3
2.2. Downloading the Installation Files ... 3
3. Installing ANSYS ... 3
3.1. Exporting/Sharing the ANSYS Directory ... 6
3.2. Using the Universal Naming Convention (UNC) to Avoid Problems in Your Network ... 6
3.3. Setting the /3GB Switch ... 8
3.4. Registering the License Server ... 8
4. Post-Installation Procedures ... 9
5. Running the ANS_ADMIN Utility ... 11
6. Translated Message File Installation ... 11
7. Uninstalling ANSYS ... 12
8. Connection Product Installation ... 13
8.1. Setting Environment Variables ... 14
8.1.1. Environment Variable for Pro/ENGINEER ... 14
8.2. Configuring ANSYS Connection for Pro/ENGINEER ... 14
8.2.1. The protk.dat File ... 16
8.2.2. Configuring Connection for Pro/ENGINEER - the config.anscon File ... 17
8.3. Unigraphics Troubleshooting ... 17
9. Installation Troubleshooting ... 18
9.1. Using the ansys_pid Utility ... 18
9.2. Dial-up Adapter ... 18
9.3. The Launcher is Excessively Slow to Start ... 19
9.4. Display Problems on Windows XP ... 19
9.5. System-related Error Messages ... 19
9.6. ANS_ADMIN Error Messages ... 20
9.7. Launcher Error Messages ... 20
Configuring Distributed ANSYS and the Distributed Solvers ... 21
1. Prerequisites for Running Distributed ANSYS or the Distributed Solvers ... 21
1.1. MPI Software ... 22
1.2. Using MPICH ... 23
1.2.1. Configuration for Windows Systems Running MPICH ... 24
2. Setting Up the Environment for Distributed ANSYS or the Distributed
Solv-ers ... 24
2.1. Using the mpitest Program ... 28
2.1.1. Running a Local Test ... 28
2.1.2. Running a Distributed Test ... 28
2.2. Other Considerations ... 31
3. Running a Distributed Job ... 32
List of Tables
1. Operating System Requirements ... 12. Product Support ... 1
ANSYS Installation and Configuration
Guide for Windows
1. Installation Prerequisites
ANSYS 9.0 is supported on the following Windows platforms and operating system levels. For up-to-date information on hardware platforms or operating systems that have been certified, go to http://www.ansys.com/services/hardware_support/. (This URL is case-sensitive.)
Table 1 Operating System Requirements
Compilers* Platform/Operating System
Intel Fortran v7.1 Intel C++ v7.1 Intel IA-64 bit / Windows XP 64-bit Edition Version 2003
Compaq Visual FORTRAN 6.6 A MS VC++ 6.0 (Service Pack 5) Intel IA-32 bit / Windows XP Home or Professional (Build 2600)
Version 5.1
Intel IA-32 bit / Windows 2000 Version 5.0 (Build 2195)
* Compilers are required only if you will be using User Programmable Features.
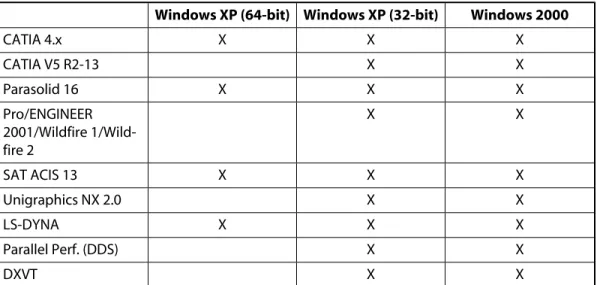
Table 2 Product Support
Windows 2000 Windows XP (32-bit) Windows XP (64-bit) X X X CATIA 4.x X X CATIA V5 R2-13 X X X Parasolid 16 X X Pro/ENGINEER 2001/Wildfire 1/Wild-fire 2 X X X SAT ACIS 13 X X Unigraphics NX 2.0 X X X LS-DYNA X X Parallel Perf. (DDS) X X DXVT
1.1. Additional Hardware and Software Requirements
• Pentium-class or Itanium-class system with the correct OS installed • A minimum of 512 MB of RAM (1GB of RAM for Itanium systems)On some systems, you can use the /3GB switch to allocate additional RAM to the application and less to the Windows kernel. See Section 3.3: Setting the /3GB Switch for more information.
• 700 MB free on the hard drive, 1 GB for Itanium systems; SCSI hard drive recom-mended for improved performance. However, a minimum of 50 MB of disk space must be available on the operating system drive (typically C:\) for all installations, regardless of where you install the product.
• Double-speed CD-ROM drive
• Windows XP 64-bit, Windows XP 32-bit, or Windows 2000-supported graphics card, capable of supporting 1024x768 High Color (16-bit) and a 17-inch monitor compatible with this type of graphics card
• Microsoft Mouse or a mouse compatible with Windows XP 64 bit, Windows XP 32 bit, or Windows 2000
• Approximately twice as much swap space as memory. The amount of memory swap space on the system may limit the size of the ANSYS model that can be created and/or solved.
• TCP/IP for the license manager (see the ANSYS, Inc. Licensing Guide for more inform-ation on TCP/IP)
Although TCP/IP is included as part of the operating system, it is often not installed by default. When TCP/IP is installed, it must be bound to a network adapter. On machines that are connected to an internal network, TCP/IP must be bound to a network card such as an Ethernet adapter. The vast majority of systems using TCP/IP will fall into this category. On machines that connect to the internet or corporate intranet through a modem, TCP/IP can be bound to the Remote Access Service. Also, the Autodial option of the Internet Options must be disabled so that the machine does not attempt to connect to the Internet every time ANSYS is run. See the ANSYS, Inc. Licensing Guide for more information.
2. ANSYS Pre-Installation Instructions
You will need to install ANSYS either from the installation media or from files downloaded from our website at www.ansys.com. Instructions for both methods follow.
You must have an account with administrator privileges to install ANSYS.
2.1. Installing from the Media
To install ANSYS from the installation media, simply place the CD in your CD drive. If autorun is enabled, the installation will begin automatically. If autorun is disabled, choose
Start>Run and type D:\autoexec (replace D with the letter of your CD drive). Continue
with the steps in Section 3: Installing ANSYS .
2.2. Downloading the Installation Files
To download the installation files from our website, you will need to be a TECS customer. 1. Go to www.ansys.com and go to the customer portal.
2. Select Get Software > Software Download.
3. Find the product you want to install and click Download.
4. Select the platform(s) you want to install. You can select up to four platforms to download at one time. File size and an approximate download time is provided for each platform. Click Continue. If you have pop-ups disabled, you will need to hold down the Ctrl key when you click Continue.
5. Double-click the file you want to download. Each platform you selected will ap-pear in a separate download window. This file will be in a compressed format. You will need to uncompress it after downloading.
6. Choose Save and save the file to a temporary directory. When downloading the installation files, you will need approximately three times as much disk space as the downloaded file size.
7. Uncompress the file and follow the instructions in Section 3: Installing ANSYS . After you've installed the product, you will be able to delete both the compressed file and the uncompressed installation files.
3. Installing ANSYS
This section explains how to install ANSYS and the license server.
Installing ANSYS Follow the steps below for an ANSYS product installation. 1. Choose an installation option. You can select ANSYS products or the license
directly to the next section, Installing the License Manager. If you choose to install the products, continue with the next step.
2. A dialog box appears listing the hardware requirements. Click Next.
3. The ANSYS License Agreement dialog box appears. After reading the license agreement, if you accept, click Yes.
4. In the Choose Destination Location dialog box, you indicate the directory name where ANSYS 9.0 is to be installed. To choose the default, click Next.
We recommend that you choose the default directory. The default installation assumes that the installation directory for ANSYS is \Program Files\Ansys Inc\V90\ANSYS, located on the drive in which the operating system resides. 5. Select the components to be installed. Click the box next to the components
that you want to install, and click Next. You can select as many components as you wish to install.
The default installation installs all components except the customization tools, Connection for Pro/ENGINEER, and Connection for CATIA V5. You must manually select customization tools, Connection for Pro/ENGINEER, and Connection for CATIA V5 to use those options.
6. Select the ANSYS program folder. We recommend that you choose the default, ANSYS 9.0.
7. A dialog box appears listing the installation option, directory, and the program folder name. Click Next to begin installing. The installation process begins. 8. A message box appears reminding Connections users of additional setup or
configuration tasks that must be completed.
9. The option for running the license manager installation appears. Verify that the
Run the Licensing setup box is checked and click Next. When you have com-pleted the licensing setup, or if you elected not to install the license manager, you will be prompted to complete the Hardware and Operating System Survey. Verify that the Take the ANSYS Survey box is checked and click Next to complete the survey.
Although the survey is optional, ANSYS, Inc. will use the information collected to better meet our customers' computing needs. If you are installing multiple platforms, you only need to fill out the survey once.
You must run the licensing setup to complete the installation.
1. Place the CD in your CD drive. If autorun is enabled, the installation will begin automatically. If autorun is disabled, choose Start>Run and type D:\autoexec
(replace D with the letter of your CD drive).
Note — You can also run LicenseSetup.bat from the root of the CD and proceed directly to the section Installing the License Manager
2. Choose Install License Manager Only.
A message box appears asking if this system is a license server machine. Answer
Yes if this system if designated to be the administrator of ANSYS licenses. Answer
No if this system is to be configured as a client system requesting ANSYS licenses from an ANSYS FLEXlm license server machine.
3. If you answered Yes to the previous step, then a message box appears indicating that you have chosen to install the ANSYS license manager. You will be asked whether you have your license file.
- If you have your license file, you can continue with the installation.
- If you do not have your license file, you can exit the installation or continue the installation without your license file. If you continue the installation without your license file, you will not be able to run ANSYS until you install the license file by using the ANSLIC_ADMIN utility. See Section 3.4: Register-ing the License Server later in this guide for more information about obtainRegister-ing your license file.
If you have a license file, enter it now.
- If your license file already exists, select the "Browse for the location of an existing license file" option and click Next. Enter the location and name of your license file. You must enter the complete path where the license file is located. Click Next.
- If you need to create your license file, select the "Create a license file with Notepad" option and click Next. You automatically enter Notepad, where you can type or copy/paste in your license file. When finished, choose
File>Save and then File>Exit.
The license manager will be started; a reboot is not necessary.
4. If you answered No to Step #2, then you will be asked whether you want to configure this system to be a client system.
You may be asked to enter the port number. You may also be asked to choose the number of servers, followed by the hostname for each license server.
3.1. Exporting/Sharing the ANSYS Directory
If you are using one machine as a file server, you need to first install ANSYS on the file server machine and then share the \Ansys Inc directory so that all users can access the program. You need to configure the specific machines that will be running ANSYS from this file server:
1. Go to every Windows system on the network from which ANSYS will be run and run the ANS_ADMIN utility from that location.
2. Choose the Configuration options > Configure a machine option. (You must be logged in with administrator privileges.) Individual machine configuration is a very short process. Use the ANS_ADMIN utility for this step. If you have ques-tions about using the ANS_ADMIN utility, see the online help available with the utility.
3.2. Using the Universal Naming Convention (UNC) to Avoid
Problems in Your Network
After you install ANSYS on a file server, use the UNC path instead of a drive letter to identify the ANSYS installation directory. This will avoid problems for machines on the network configured to run ANSYS from the file server.
Note — UNC paths can be used in the protk.dat file. However, if you experience problems when using the UNC paths, replace the UNC paths with drive letters in the Pro/ENGINEER configuration files. See the section Section 8.2.1: The protk.dat File for more information.
The ANSYS directory should first be shared out to allow access by other systems on the network. The ANSYS installation directory should be shared out at the \Program Files\Ansys Inc level and be given a share name.
The UNC name consists of the machine name of the file server, preceded by two back-slashes, followed by the share name. For example, a typical UNC name for an installation drive is:
\\<machine name>\<share name>\V90\Ansys
1. In the Control Panel, double-click the Network icon. The Network window appears. 2. Choose the Identification tab. The name that appears in the Computer Name
field is the machine name of the server. On the file server, edit the following files:
• menulist90.ans (located in the \gui\en-us\uidl subdirectory) • ans_ext.tbl (located in the \lib\<platform> subdirectory) • tlbrlist.ans (located in the \gui\en-us\toolbars subdirectory
Substitute the UNC name (\\<machine name>\<share name>) for any occurrence of
C:\Program Files\Ansys Inc. The drive letter may vary depending on where the operating system resides.
Note — If the system that shares the ANSYS directory should go down, all systems that have connected to that directory will be unable to run ANSYS.
The following example describes how to share the ANSYS installation directory, substitute the UNC name, and configure a machine over the network to run ANSYS. In this example, the file server machine is named ANSYSSERVER and the share name given to the ANSYS installation directory is ANSYS.
1. On the file server ANSYSSERVER, create a share for the directory C:\Program Files\Ansys Inc.
In Windows Explorer, right click on the \ANSYS Inc folder. Select Sharing..., then select Shared As and type in a share name of ANSYS.
2. On the file server ANSYSSERVER, modify the menulist90.ans, tlbrlist.ans, and
ans_ext.tbl files, replacing all occurrences of C:\Program Files\ANSYS Inc with
\\ANSYSSERVER\ANSYS.
3. Go to each machine on the network that will be running ANSYS from the file server ANSYSSERVER. On each machine, browse the network to find the machine ANSYSSERVER. Open that machine and navigate to \ANSYS\V90\bin\intel. Open
ans_admin.exe to run the ANS_ADMIN utility. Choose the Configure machine
option. When prompted for the ANSYS installation directory, enter:
\\ANSYSSERVER\ANSYS INC\V90\Ansys
When prompted for the ANSYS licensing directory, enter:
3.3. Setting the /3GB Switch
On some 32-bit Windows systems, you can allocate additional memory to an application (such as ANSYS) via the /3GB switch. Normally, Windows allocates 2 GB of memory for the Windows kernel and 2 GB for the application. When /3GB is enabled, the OS reduces the potential memory allocated to the kernel and makes 3 GB of memory available to ANSYS.
Applicable systems are:
Windows XP (except Home Edition) Windows 2000 Advanced Server
Be aware when using the /3GB switch that you will not be able to specify an ANSYS -m
setting any higher than was possible without this switch. However, with this switch en-abled, ANSYS can dynamically allocate more memory; dynamic memory allocation is the recommended memory allocation method.
To enable this memory allocation, add the /3GB parameter to the startup line of the
boot.ini file and reboot the system. The boot.ini file may be hidden. To view hidden files, go to Windows Explorer or My Computer and select Tools>Folder Options>View. Under Hidden files and folders, check Show hidden files and folders.
Windows 64-bit systems already have the capability to address greater amounts of memory, so the /3GB switch is not applicable to those systems.
3.4. Registering the License Server
Follow this procedure to register your license server information if you are a new user or if you add or change a license server machine. See the ANSYS, Inc. Licensing Guide for more information on selecting license servers and on using the ANSLIC_ADMIN utility.
1. Select the machines that will be your license servers and install ANSYS 9.0. 2. Use the ANSLIC_ADMIN utility to register license server information on each
li-cense server.
3. Return the resulting file to your ANSYS sales representative. ANSYS, Inc. or your sales representative will then supply you with your license keys. This file is located in Program Files\Ansys Inc\Shared Files\Licensing\licserver.info by default. 4. Use the ANSLIC_ADMIN utility to enter your license key and start the license
4. Post-Installation Procedures
After ANSYS is installed, you need to establish some system settings, including pathnames and environment variables. See your operating system documentation for specific in-structions on setting paths and environment variables. The pathname to the procedure files (which run the executables) is already set on each machine so the users can run ANSYS from the DOS command line. See the ANSYS Operations Guide for more information on running ANSYS from the command line.
1. Add the following path to all ANSYS users' User Paths (right click My Computer
and choose Properties> Advanced> Environment Variables and add a new user variable):
C:\Program Files\ANSYS Inc\V90\ANSYS\bin\<platform>
2. Set the following ANSYS environment variables based on the behavior you want. To set environment variables:
Windows XP: Choose Start>System Tasks>View System Information. Select the Advanced tab and click on the Environment Variables button. Click New
and enter the desired value in the value field.
Windows 2000: Choose Start>Settings>Control Panel and select System. Click on the Advanced tab, then click the Environment Variables button. Select either New or Edit (first highlight the environment variable if it already exists). Type the name in the Variable Name field and the desired setting in the Variable Value field. Click OK.
• The ANSYS90_DIR environment variable sets the location of the ANSYS dir-ectory hierarchy. The default value is c:\Program Files\Ansys Inc\V90\ANSYS. You probably will not need to reset this variable, unless you change the loc-ation of the installed files.
• ANSYS90_PRODUCT - set this to the correct product variable to run ANSYS to start with the correct ANSYS product without specifying the -p command modifier each time.
• ANSYS90_ALTPRODS - set this to specify alternate product choices with the priority you wish. If no licenses are available for your first product choice, the ANSYS program will automatically cascade through the specified altern-ative until it finds an available license. Use only in conjunction with the AN-SYS90_PRODUCT environment variable. Separate each product with a colon (:) on UNIX platforms or with a semicolon (;) on Windows platforms.
• ANS_CONSEC - set this to YES to disable ANSYS dialog boxes and allow multiple jobs to run consecutively without waiting for user input. Settings for ANS_CONSEC are:
GPF Dialog Box on Error Batch Dialog Box
Value of ANS_CONSEC Yes No Not defined/default No No YES Yes Yes NO
If you will be running Parallel Performance for ANSYS and using the DDS solver, the ANS_CONSEC must NOT be set to NO.
• ANSYS_LOCK - set to ON (default) to create file locks to prevent users from opening a new job with the same name and in the same directory as the current job.
• ANSYS90_DTM - set to ON to automatically activate the ANSYS LS-DYNA Drop Test Module (default = OFF).
• ANSYS90_PPFA - set to ON to automatically activate the Parallel Performance for ANSYS product (default = OFF).
• UGII_ROOT_DIR - defines the Unigraphics root directory. If Unigraphics is installed after ANSYS, the root directory must be appended to the system PATH. You must do this manually prior to running the Connection for Unigraphics product.
• ANSYS90_MAT161 - set this environment variable to 1 to enable use of the LS-DYNA *MAT_COMPOSITE_MSC material (requires an LS-DYNA MAT_161 license).
• ANSYS90_MAT162 - set this environment variable to 1 to enable use of the LS-DYNA *MAT_COMPOSITE_DMG_MSG material (requires an LS-DYNA MAT_162 license).
3. Set the license manager to start automatically at boot time. For platform-specific instructions, see Table 4.1: “License Manager Automatic Startup Instructions” in the ANSYS, Inc. Licensing Guide.
4. Designate server(s) for license checkout and establish necessary user privileges (recommended but not required). For information on these tasks, see the ANSYS, Inc. Licensing Guide.
6. Verify the ANSYS installation by logging out as root and logging back in as a regular user and then selecting each option from the Start menu to verify that they each start and run correctly. The license manager must be started before you can verify the installation.
7. Run the ANS_ADMIN utility (Start>Programs>ANSYS Release 9.0>Utilit-ies>ANS_ADMIN Utility) to properly configure ANSYS (depending on the products you are running) or relink ANSYS.
8. Set the home directory. To set a home directory in Windows, you need to set a
HOMEDRIVE environment variable to the desired drive letter (including the colon) and a HOMEPATH environment variable to the desired path. For example:
HOMEDRIVE=C:
HOMEPATH=\Users\Mine
If you require verification of the ANSYS program, ANSYS, Inc. offers Quality Assurance programs for some ANSYS products. If you are interested in this service, go to ht-tp://www.ansys.com/services/quality_assurance/quality_services.htm or call the ANSYS, Inc. Quality Assurance Group at (724) 746-3304
5. Running the ANS_ADMIN Utility
You may need to run the ANS_ADMIN utility to configure other products (such as Con-nection products) or to relink ANSYS if you use the customization tools. For more inform-ation on individual options available with this utility, see the online help accessible from
Help buttons on the utility dialog boxes. You do not need system administrator privileges to run ANS_ADMIN, but you will need them to run some options. If certain options are grayed out, you do not have the necessary system administrator privileges necessary for that option, or the corresponding product may not be installed.
ANS_ADMIN is available only for 32-bit platforms.
To run the ANS_ADMIN utility, choose Start>Programs>ANSYS 9.0>Utilities>ANS_AD-MIN Utility.
6. Translated Message File Installation
If your ASD has supplied you with message files translated into your local language, use the following procedure to install and access these files from within ANSYS:
1. Create an appropriately named subdirectory to hold the message files. For ex-ample, if your local language is French, create a directory in the following location:
\Program Files\Ansys Inc\V90\ANSYS\docu\fr
2. Copy the message files (msgcat.90, msgidx.90, and msgfnm.90) into the newly created subdirectory.
3. Access these message files by using the -l command line option. For example:
ansys90 -l fr
Or, when you are running ANSYS from the ANSYS launcher, choose the Language Selection option and then pick the desired language.
You must create a newly translated message file for each release of ANSYS because error messages may occur in a different order for each release.
7. Uninstalling ANSYS
You must have an account with administrator privileges to uninstall ANSYS. To remove ANSYS from your system, follow these steps:
1. Click on the Start menu.
2. Select Settings and then click Control Panel. 3. Double-click Add/Remove Programs. 4. Select ANSYS 9.0.
5. Click on the Add/Remove button.
This procedure removes the ANSYS program from your system but will not remove the ANSYS licensing components. Before proceeding with the following steps to remove the ANSYS licensing components from your system, make certain that there are no ANSYS, Inc. products on this machine or any other machines on the network that rely on these ANSYS licensing components.
Perform these steps ONLY if this system is an ANSYS FLEXlm License Manager server machine:
1. In the ANSYS FLEXlm License Manager program folder, click on the FLEXlm LMTOOLS utility.
2. Once in the LMTOOLS utility, select Configure Using Services and highlight ANSYS FLEXlm License Manager, listed in the box.
3. Select the Start/Stop/Reread tab. ANSYS FLEXlm License Manager should be highlighted. Click on the Stop Service button.
4. Select the Configure Services tab and highlight ANSYS FLEXlm License Manager. Click on the Remove Service button.
5. Exit the LMTOOLS utility. On all systems, follow these steps:
1. Delete the \Licensing subdirectory located under \Program Files\ANSYS Inc\Shared Files.
2. Remove the ANSYS FLEXlm License Manager program folder from the Start
menu.
3. Remove the ANSYSLIC_DIR environment variable.
8. Connection Product Installation
All ANSYS Connection products are included with the ANSYS release media. Select the Connection products you want to run during the installation process. To run an ANSYS Connection product, you need to:
1. Ensure that the product is properly licensed. 2. Set the necessary environment variables.
3. Run the ANS_ADMIN utility if using Connection for Pro/ENGINEER
For complete information about the files you can import and the platforms supported by ANSYS Connections, see Introduction to Import of the ANSYS Connection User's Guide.
Caution: Be sure to install ANSYS and the Connection products from the same CD release. If you attempt to run the latest ANSYS Connection product on a ma-chine that is running an earlier release of ANSYS, the Connection may fail, or vice versa.
ANSYS Connection for Pro/ENGINEER requires you to run ANSYS, Pro/ENGINEER and Connection for Pro/ENGINEER on the same machine. ANSYS Connection for Unigraphics requires you to run ANSYS, Unigraphics, and Connection for Unigraphics on the same machine. ANSYS Connections for CATIA, SAT, and Parasolid do not require any additional CAD installation.
Note for Sites Installing ANSYS Connection for Unigraphics
If Unigraphics is installed after ANSYS, the Unigraphics root directory (defined by theUGII_ROOT_DIR environment variable) must be appended to the system PATH. This must be done manually prior to running the Connection for Unigraphics product.
8.1. Setting Environment Variables
Most environment variables are set during product installation. In general, you will not need to reset these variables. Check the manuals for the individual CAD products for in-formation about environment variables and their settings.
8.1.1. Environment Variable for Pro/ENGINEER
ANSYS_PROE_CMD
Specifies the name of the .bat file which launches Pro/ENGINEER on the system. The path to the executable should be already set if the Pro/ENGINEER installation path has been defined for the PATH environment setting.
Default = proewildfire
8.2. Configuring ANSYS Connection for Pro/ENGINEER
Before using the Connection for Pro/ENGINEER, you must run the ANS_ADMIN utility's
Configure Connection for Pro/E option.
All Pro/ENGINEER users must have copies of the protk.dat file and the config.anscon
(Connection for Pro/E) files. The config.anscon file is placed in the ANSYS 9.0 installation directory. The protk.dat file is placed in the Pro/ENGINEER installation directory when you run applicable ANS_ADMIN utility option. This file defines the name of the executable, the path to the executable, the path to the message file, and the current revision of Pro/ENGINEER. Pro/ENGINEER 2001 with a date code of 2001240 or higher must already be installed before configuring Connection for Pro/E. To run the appropriate ANS_ADMIN
option, follow these steps:
1. Select the ANS_ADMIN utility.
2. Select Configuration options and press OK to continue.
3. Select Configuration Connection for Pro/E and press OK to continue.
4. Select a licensed ANSYS product, the name of your graphics device and the size of the workspace on your platform in megabytes. Select OK to continue.
ANS_ADMIN displays a confirmation message that the config file was successfully created.
5. Select OK to continue. ANS_ADMIN displays the following dialog:
6. Enter the name of the Pro/ENGINEER installation path and the language (character set) used with Pro/ENGINEER. Select OK to continue. If a protk.dat file already exists, ANS_ADMIN displays a message similar to the following:
SUCCESS
Entries for Connection for Pro/E have been appended to \<ProE_install_dir>\<proe_platform>\text\usacii\protk.dat
Caution: Check the protk.dat file for duplicate definitions. If you have installed other Pro/ENGINEER products before, you may have duplicate entries for the name of the executable and the revision. During the in-stallation, ANSYS copies the protk.dat file to the Pro/ENGINEER installa-tion directory, or if a protk.dat file already exists, the information is ap-pended. Edit the protk.dat file and delete any duplicate definitions. The new file should have the following entries for the current release of this product, but may contain additional definitions if other Pro/ENGINEER products are in use:
name ac4pro90
exec_path <drive>:\Program Files\Ansys Inc\V90\ANSYS\ac4 \bin\pro\<platform>\ac4pro.exe
text_path <drive>:\Program Files\Ansys Inc\V90\ANSYS\ac4 \data\pro\text
revision 24.0 STARTUP dll end
Note — Pro/ENGINEER cannot process UNC paths. Always use drive letters rather than UNC paths in the Pro/ENGINEER configuration files.
7. Select EXIT to close ANS_ADMIN.
More information about the protk.dat and config.anscon files follow.
8.2.1. The protk.dat File
Pro/ENGINEER uses the protk.dat file to locate related executables such as the Connection for Pro/ENGINEER. This section describes this file in detail.
During the Connection for Pro/ENGINEER installation, the protk.dat file is installed in one of the following locations, depending on whether a protk.dat file already exists in the Pro/ENGINEER installation directory:
• <proe_install>\<proe_platform>\text\<lang> • <proe_install>\<proe_platform>\text\
By default, the protk.dat file for Pro/ENGINEER 2001 contains the following information for Windows:
name ac4pro90dll
exec_path C:\Program Files\Ansys Inc\v90\ANSYS\ac4\bin\pro\Intel\ac4pro.exe text_path C:\Program Files\Ansys Inc\v90\ANSYS\ac4\data\pro\text
STARTUP dll delay_start FALSE allow_stop TRUE revision 24.0 end
If a protk.dat file exists in the Pro/ENGINEER working directory, this file must be updated to contain the information listed above. You may copy the protk.dat file into the Pro/ENGINEER working directory and should modify the file whenever Pro/ENGINEER is upgraded. Do not delete any of these lines. If you modify this file, do not enter a carriage return after the END line. The file may be customized with other information. If these lines are deleted, or if the protk.dat file is not present in any of the directories in the search path, Pro/ENGINEER will not load.
Pro/ENGINEER searches for the protk.dat file in the following locations:
1. Pro/ENGINEER working directory (directory from which Pro/E was launched) 2. <proe_install>\<proe_platform>\text\<LANG>
3. <proe_install>\<proe_platform>\text\
The <proe_platform> variable is the name that Pro/ENGINEER gives to its platform direct-ories. Pro/ENGINEER platform names are similar, but not identical, to the ANSYS platform names:
Pro/ENGINEER Platform <proe_platform>
ANSYS Platform < plat-form>
Hardware Platform
i486_nt Intel
Intel
8.2.2. Configuring Connection for Pro/ENGINEER - the
con-fig.anscon File
Users who launch ANSYS from Pro/ENGINEER will need the information from the con-fig.anscon file. This file is installed for all users in the \ac4\data\<platform> subdirectory. Here is a sample config.anscon file:
ANSYS_CMD "<drive>:Program Files\Ansys Inc\V90\ANSYS\bin\<platform>\ansys.exe" ANSYS_GRAPHIC_DEVICE win32
ANSYS_SOLVER Frontal** ANSYS_SELECTED_LAYERS 1-256** ANSYS_GEOMETRY_TYPE Solids Only** ANSYS_NEUTRAL_FORMAT Yes
ANSYS_PRODUCT_NAME ANSYS
**These variables are not supported by Pro/ENGINEER and are ignored by Pro/ENGINEER. See Setting ANSYS Configuration Parameters in the ANSYS Connection User's Guide for more information about the config.anscon file.
8.3. Unigraphics Troubleshooting
Here is a message Unigraphics users may see during the installation, and the action you can try to fix the problem:
WARNING: If you are licensed to run the Connection for Unigraphics, the
Unigraphics root directory (UGII_ROOT_DIR) must be appended to the system PATH. This must be done manually prior to running the Connection for Unigraphics.
Choose OK to close this window and continue the installation. When the installation is done, set the UGII_ROOT_DIR environment variable to the directory that stores the Unigraphics executable. Append the directory to the PATH command.
9. Installation Troubleshooting
This section lists problems and error messages that you may encounter while installing and/or running the ANSYS program. After each situation description or error message is the user action required to correct the problem.
For information on licensing-related errors, see the Chapter 7, “Troubleshooting” section of the ANSYS, Inc. Licensing Guide.
In addition, this appendix describes the ansys_pid utility, which is useful for troubleshooting some problems.
9.1. Using the ansys_pid Utility
You can use the Gather Diagnostic Information option of the ANSLIC_ADMIN utility to query the system for various pieces of information that may be needed for
troubleshooting certain problems. The underlying utility, ansys_pid, collects information about the system as well as about ANSYS licenses.
ansys_pid sends all of the information that it collects to the log area. At times it may be necessary to provide the information for technical support. Use the Write to File button at the bottom of the ANSLIC_ADMIN to write a file. Then forward the file to the appro-priate person.
9.2. Dial-up Adapter
If you have configured TCP/IP to be bound to the dial-up adapter rather than an Ethernet card, you may see a dial-up dialog box appear on a particular Windows machine every time you run ANSYS. To correct the problem, do one of the following:
1. Go to Start>Settings>Control Panel>Internet Options.
2. Click on either the Connection or Autodial tab (you will only see one of these). • If Connection, turn offConnect to Internet as Needed option or select the
Never dial a connection option. • If Autodial, turn off the Autodial box.
9.3. The Launcher is Excessively Slow to Start
If the launcher takes an excessively long time to startup (Windows only), make sure the hostnames in the ansyslmd.ini file and in the ANSYSLMD_LICENSE_FILE and the
LM_LICENSE_FILE environment variables are typed correctly and that the hosts specified by the hostnames exist. Also verify that the port number is correct.
If the launcher is excessively slow to start (more than 60 seconds), AND you have LSF in-stalled, you may not have an LSF license. In this case, set the ANS_LAUNCH_IGNORELSF
environment variable to 1 to bypass the LSF check. To resume the LSF check once you have an LSF license, set ANS_LAUNCH_IGNORELSF to 0 (or unset it).
9.4. Display Problems on Windows XP
Windows XP includes a feature called Windows Ghosting that may cause ANSYS graphing or plotting problems in 3-D mode on some XP systems. If this problem occurs, follow the procedure below to turn Windows Ghosting off for ANSYS:
1. Open the file ansys90.sdb, located in Program Files\Ansys Inc\V90\AN-SYS\bin\intel.
2. A Compatibility Database Installer dialog box stating "Installation of ANSYS90 complete" will be displayed. Click OK.
To reset Windows XP Windows Ghosting for ANSYS, follow the procedure below: 1. Open a DOS command prompt and type the following command:
sdbinst /U "%ANSYS90_DIR%\bin\intel\ansys90.sdb"
2. A Compatibility Database Installer dialog box stating "Uninstallation of AN-SYS90 complete" will be displayed. Click OK.
9.5. System-related Error Messages
***Error, ANSYS90_DIR environment variable is not set. This is a fatal error – exiting.
This message indicates that the ANSYS90_DIR environment variable was not set where necessary for licensing. This environment variable should be set to the install-ation directory.
9.6. ANS_ADMIN Error Messages
Grayed out optionsIf certain options are grayed out, your account may not have the necessary system administrator privileges necessary to run those options or the specified product may not be installed (such as Connection for Pro/ENGINEER or Customization Tools).
9.7. Launcher Error Messages
Some of the more common error messages follow. See the ANSYS, Inc. Licensing Guide
for licensing-related launcher messages.
***Cannot create required <profile> file. Therefore, cannot write to profile
inform-ation during this launcher session.
If you see this error, you cannot add or modify profile information during this launcher session. Verify that you have write access to the directory and restart the launcher session. Typically, this directory is C:\Documents and Settings\<user name>\Application Data\Ansys\v90\launcher on Windows or
~/.ansys/v90/launch-er/ on UNIX.
***No ANSYS product installations found.
Verify your ANSYS product installation. If the desired ANSYS product was not installed, install it.
***LSF Submittal error. Job <name> could not be submitted.
Verify that you have LSF properly installed, configured, and running. For more inform-ation, please contact your LSF vendor or go to http://www.platform.com.
Configuring Distributed ANSYS and
the Distributed Solvers
This section explains how to configure your network/cluster to run either Distributed ANSYS or the distributed solvers (DDS, DPCG, DJCG) under sequential ANSYS. It is import-ant that you follow these steps in order to run successfully in a distributed environment. For more information on using Distributed ANSYS, see the Distributed ANSYS Guide. For more information on using the distributed solvers in sequential ANSYS, see the discussion on Parallel Performance in ANSYS in the ANSYS Advanced Analysis Techniques Guide. You will need a Parallel Performance for ANSYS (PPFA) license on each machine in your network or cluster to run either Distributed ANSYS or the distributed solvers.
Parallel Performance for ANSYS cannot be added onto the following products: • University and ANSYS ED
• Prep/Post products • ANSYS LS-DYNA • ESP products • Batch children
1. Prerequisites for Running Distributed ANSYS or the
Distributed Solvers
Your system must meet the following requirements to run either Distributed ANSYS or the distributed solvers (DDS, DPCG, DJCG) under shared-memory ANSYS.
• Homogeneous network: All machines must be the same type and OS level. • You must be able to remotely log in to all machines, and all machines in the cluster
must have identical working directory structures. Working directories should not be NFS mounted to all machines. Do not use mapped drive letters on Windows. • For Distributed ANSYS, all machines in the cluster must have ANSYS installed. For
distributed solvers under shared-memory ANSYS, you can install just the distributed solvers on the slave machines. The master machine must have a full ANSYS install-ation.
• You will need at minimum one PPFA license for each job.
• All machines must have the same version of MPI software installed and running. You can run the system's native MPI (typically installed with the OS), or MPICH (installed with an ANSYS installation, where supported). The table below shows the native MPI software and version level for each platform.
If you plan to use only the AMG solver in shared-memory ANSYS, MPI software is not required. It is required only for the distributed solvers. If you are using only the AMG solver, skip the rest of this document and continue with Using the Parallel Performance for ANSYS Add-On in the ANSYS Advanced Analysis Techniques Guide.
1.1. MPI Software
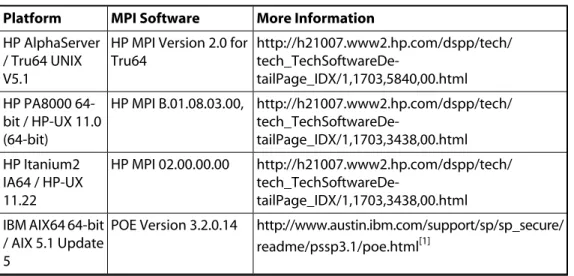
The MPI software you use depends on the platform. The following table lists the type of MPI software required for each platform. For questions regarding the installation and configuration of the MPI software, please contact your MPI vendor.
The distributed solvers running under shared-memory ANSYS run on all of the platforms listed in the table below. Distributed ANSYS runs on the following platforms:
HP PA8000 / HP Itanium2 (native MPI only; no MPICH) SGI (native MPI and MPICH)
Intel IA-32 Linux (MPI/Pro and MPICH) Intel IA-64 Linux (MPICH only; no native MPI)
Table 1 Platforms and MPI Software
More Information MPI Software Platform http://h21007.www2.hp.com/dspp/tech/ tech_TechSoftwareDe-tailPage_IDX/1,1703,5840,00.html HP MPI Version 2.0 for
Tru64 HP AlphaServer / Tru64 UNIX V5.1 http://h21007.www2.hp.com/dspp/tech/ tech_TechSoftwareDe-tailPage_IDX/1,1703,3438,00.html HP MPI B.01.08.03.00, HP PA8000 64-bit / HP-UX 11.0 (64-bit) http://h21007.www2.hp.com/dspp/tech/ tech_TechSoftwareDe-tailPage_IDX/1,1703,3438,00.html HP MPI 02.00.00.00 HP Itanium2 IA64 / HP-UX 11.22 http://www.austin.ibm.com/support/sp/sp_secure/ readme/pssp3.1/poe.html[1] POE Version 3.2.0.14 IBM AIX64 64-bit
/ AIX 5.1 Update 5
More Information MPI Software Platform http://www.sgi.com/software/mpt/overview.html MPI 4.3 (MPT 1.8) with array services 3.5 SGI 64-bit /IRIX64 6.5.23m http://www.sun.com/hpc/communitysource/ HPC CLUSTERTOOLS 5.0 Sun UltraSPARC 64-bit / Solaris 8, UltraSPARC III and IV 64-bit / Solaris 8 http://www.mpi-softtech.com MPI/Pro 1.6.5
Intel IA-32 Linux / RedHat AS 2.1 Kernel 2.4.9
See MPICH discussion, below. MPICH-1.2.5
Intel IA-64 Linux / RedHat AS 2.1 Kernel 2.4.18 and AMD Opter-on 64-bit Linux / SuSE Kernel 2.4.21
Contact your Fujitsu vendor Parallelnavi 2.1
Fujitsu SPARC64 IV / Solaris 8
http://www.mpi-softtech.com MPI/Pro 1.6.5
Intel IA-32 bit / Windows XP Home or Profes-sional (Build 2600) Version 5.1, Win-dows 2000 Ver-sion 5.0 (Build 2195)
[1] Not downloadable -- this is an informational file only.
1.2. Using MPICH
As an alternative to using the native versions of MPI listed above, you can also use MPICH. MPICH is installed automatically when you install ANSYS on UNIX platforms. MPICH is included on the installation media on Windows platforms; see Configuration for UNIX/Linux Systems Running MPICH for details.
If you are running on a 64-bit Linux platform (Intel IA-64 or AMD Opteron), you must use MPICH. We do not support a native MPI version for either of these platforms. We do not support an MPICH version for the HP, Sun, and IBM platforms.
1.2.1. Configuration for Windows Systems Running MPICH
As an alternative to MPI/Pro, you can use MPICH-1.2.5. MPICH is also included on the ANSYS media under \MPICH\Setup.exe. Follow the instructions below to install it on your system. You will need to install MPICH on all systems to be used in the distributed run. See http://www-unix.mcs.anl.gov/mpi/mpich/ for more information.
1. Insert the CD in your CD drive. Choose Start>Run and type D:\MPICH\Setup.exe
(replace D with the letter of your CD drive).
2. Exit all running Windows programs and click Next.
3. The Software License Agreement screen appears. Read the agreement, and if you accept, click Yes.
4. Choose the destination for installation. To choose the default installation location, click Next. To change the default installation location, click Browse to navigate to the desired location, and click Next.
5. On the Select Components screen, select the default options, then click Next. 6. On the Start Copying Files screen, verify that the information is correct and click
Next to continue the installation.
7. The Setup Complete dialog box appears. Click Finish.
8. Run C:\Program Files\MPICH\mpd\bin\MPIRegister.exe and enter your login and password.
If you are using MPICH and running the distributed solvers in shared-memory ANSYS, you will need to use an alternate ANSYS script and executable when using the distributed solvers. For MPICH, use the ansddsmpich script and the ansddsmpich.exe executable. See the ANSYS Advanced Analysis Techniques Guide for more information.
1.2.2. Configuration for UNIX/Linux Systems Running MPICH
As an alternative to MPI/Pro, you can use MPICH-1.2.5. MPICH is also included on the ANSYS media under /MPICH/Setup.exe and is installed automatically when you install ANSYS. See http://www-unix.mcs.anl.gov/mpi/mpich/ for more information.
2. Setting Up the Environment for Distributed ANSYS or
the Distributed Solvers
After you've ensured that your cluster meets the prerequisites and you have ANSYS and the correct versions of MPI installed, you need to configure your distributed environment
using the following procedure. This procedure applies to both Distributed ANSYS (on supported platforms) and to the distributed solvers running under shared-memory ANSYS.
1. Obtain the machine name for each machine on the cluster. You will need this name to set up the Configure Cluster option of the ANS_ADMIN utility in Step 3.
Windows:
Right-click on My Computer, left-click on Properties, and select the Network Identification or Computer Name tab. The full computer name will be listed. Note the name of each machine (not including the domain).
UNIX/Linux:
Type hostname on each machine in the cluster. Note the name of each
ma-chine. You will need this name to set up the .rhosts file, as well as for the
ANS_ADMIN utility.
2. (UNIX/Linux only) Set up the .rhosts file on each machine. The .rhosts file lists all machines in the cluster. The machines should be listed using their complete system name, as taken from uname. For example, an .rhosts file for a two-machine
cluster might look like this:
golinux1.ansys.com jqd golinux2 jqd
Change/verify .rhosts file permissions on all machines by issuing:
chmod 600 .rhosts
Verify communication between machines via rsh (e.g., rsh golinux2 ls). You
should not be prompted for a password. If you are, check the .rhosts permissions and machine names for correctness.
If you plan to run the distributed solvers on one machine with multiple processors in a shared memory environment, you need to have the MPI software installed, but you do not need the .rhosts file.
3. Configure the hosts90.ans file. Use the ANS_ADMIN utility to configure this file. You can manually modify the file later, but we strongly recommend that you use
ANS_ADMIN to create this file initially to ensure that you establish the correct format.
Windows:
UNIX/Linux:
/ansys_inc/v90/ansys/bin/ans_admin90
Choose Configuration options, and then click Configure Cluster. Choose the
hosts90.ans file to be configured and click OK. Then enter the system name (from Step 1) in the Machine hostname field and click Add. On the next dialog box, enter the system type in the Machine type drop-down, and the number of processors in the Max number of jobs field for each machine in the cluster. The working directory field also requires an entry, but this entry is not used by Dis-tributed ANSYS or the disDis-tributed solvers. The remaining fields do not require entries.
The hosts90.ans should be located in your current working directory, your home directory, or the apdl directory.
4. For running Distributed ANSYS with MPICH: The ANSYS90_DIR and the dynamic load library path (e.g., LD_LIBRARY_PATH) must be set by the appropriate shell startup script in order to run Distributed ANSYS with MPICH. Use the following scripts (supplied with ANSYS) to configure the distributed environment correctly for MPICH.
For csh or tcsh shells, add the following line to your .cshrc, .tcshrc, or equivalent shell startup file:
source /ansys_inc/v90/ansys/bin/confdismpich90.csh
For sh or bash shells, add the following line to your .login, .profile, or equivalent shell startup file:
. /ansys_inc/v90/ansys/bin/confdismpich90.sh
As a test, rsh into all machines in the cluster (including the master) and verify that the ANSYS90_DIR and the LD_LIBRARY_PATH are set correctly. For ex-ample:
rsh master1 env | grep ANSYS90_DIR
The output should read:
ANSYS90_DIR=/ansys_inc/v90/ansys
and
rsh master1 env | grep LD_LIBRARY
LD_LIBRARY_PATH=/ansys_inc/v90/ansys/lib/<platform>:/ansys_inc/v90/ansys/ syslib/<platform>:/ansys_inc/v90/commonfiles/Tcl/lib/<platform>
Note — Adding these confdismpich90 lines to your shell startup file will place the required ANSYS load library path settings in front of any existing system load library settings and will likely affect other applications, in-cluding native MPI. If you have problems running other applications after including these scripts, you will need to comment out these lines to run the other applications.
5. On UNIX/Linux systems, you can also set the following environment variables: • ANSYS_RSH - This is the remote shell command to use in place of the default
rsh.
• ANSYS_NETWORK_START - This is the time, in seconds, to wait before timing out on the start-up of the client (default is 15 seconds).
• ANSYS_NETWORK_COMM - This is the time to wait, in seconds, before timing out while communicating with the client machine (default is 5 seconds).
ON IBM systems:
• LIBPATH - on IBM, if POE is installed in a directory other than the default (/usr/lpp/ppe.poe), you must supply the installed directory path via the
LIBPATH environment variable:
export LIBPATH=nondefault-directory-path/lib
On SGI systems:
• On SGI, in some cases, the default settings for environment variables
MPI_MSGS_PER_PROC and MPI_REQUEST_MAX may be too low and may need to be increased. See the MPI documentation for SGI for more information on settings for these and other environment variables.
• On SGI, when you install the SGI MPI software, you must also install the array 3.2 software (available from the Message Passing Toolkit 1.3 distribution). The array daemon must be running on each system you plan to use for the distributed solvers. Update the /usr/lib/arrayd.conf file to list each system on which you plan to run the distributed solvers. The local hostname of the machine must be listed first in this file.
To verify that these environment variables are set correctly on each machine, run:
rsh machine1 env
On Windows systems only (for running the distributed solvers):
• If Windows running MPICH: Add C:\Program Files\MPICH\mpd\bin to the
PATH environmental variable on all Windows machines (assuming MPICH was installed on the C:\ drive). This line must be in your path for distributed processing to work correctly.
2.1. Using the mpitest Program
The mpitest program is a ping program to verify that MPI is set up correctly. The mpitest program should start without errors. If it does not, check your paths, machines file,
.rhosts file, and permissions; correct any errors, and rerun.
When running the mpitest programs, you must use an even number of nodes. The fol-lowing examples use two nodes. To change the number of nodes, edit the scripts.
2.1.1. Running a Local Test
On Windows:
mpirun -np 2 "C:\Program Files\ANSYS Inc\V90\ANSYS\bin\platform\mpitest.exe"
On UNIX:
/ansys_inc/v90/ansys/bin/mpitest90
Note — If you are using MPICH, run mpitestmpich instead of mpitest.
2.1.2. Running a Distributed Test
On Windows running MPI/Pro:
1. Create a file named machines in your local/home directory. Open the machines
file in an editor.
2. Add your master and slave machines in your cluster. For example, in this cluster of two machines, the master machine is gowindows1. List the machine name
has four processors and gowindows2 has two, the machines file would look like this: gowindows1 gowindows1 gowindows1 gowindows1 gowindows2 gowindows2
Note — You can also simply list the number of processors on the same line: gowindows1 4.
3. From a command prompt, navigate to your working directory. Run the following:
mpirun -np x -mf machines "C:\Program Files\ANSYS Inc\V90\ANSYS\bin\platform\mpitest.exe"
where x is the number of processors in your machines file (6 in this example).
On Windows running MPICH::
1. Create a file named machines in your local/home directory. Open the machines
file in an editor.
2. Add your master and slave machines in your cluster. For example, in this cluster of two machines, the master machine is gowindows1. List the machine name
separately for each processor (CPU) on that machine. For example, if gowindows1
has four processors and gowindows2 has two, the machines file would look like
this: gowindows1 gowindows1 gowindows1 gowindows1 gowindows2 gowindows2
Note — You can also simply list the number of processors on the same line: gowindows1 4.
3. From a command prompt, navigate to your working directory. Run the following:
where x is the number of processors in your machines file (6 in this example).
On Linux running MPICH:
Note — These instructions are typically done one time by the system administrat-or. Individual users may not have the necessary privileges to complete all of these steps.
1. Edit the machines file. Navigate to the /ansys_inc/v90/ansys/mpich/ <plat-form>/share subdirectory. Open the file machines.LINUX in an editor. 2. In the machines.LINUX file, change machine1 to the master machine in your
Linux cluster. For example, in our cluster of two machines, the master machine is golinux1. List the machine name separately for each processor (CPU) on that
machine. For example, if golinux1 has four processors and golinux2 has two,
the machines.LINUX file would look like this: golinux1 golinux1 golinux1 golinux1 golinux2 golinux2
Delete any other machines listed.
Note — If you are running an SMP box, you will simply list the number of processors on the same line: golinux1 4.
3. Edit the mpitestmpich90 script to read np = x where x is the number of pro-cessors in your machines.LINUX file.
4. Navigate to your working directory. Run the following:
/ansys_inc/v90/ansys/bin/mpitestmpich90
On Linux running MPI/Pro:
1. Edit the machines file in the /etc subdirectory. Open the machines file in an ed-itor.
2. In the machines file, change machine1 to the master machine in your Linux
cluster. For example, in our cluster of two machines, the master machine is
machine. For example, if golinux1 has four processors and golinux2 has two,
the machines file would look like this: golinux1 golinux1 golinux1 golinux1 golinux2 golinux2
Delete any other machines listed.
3. Edit the mpitest90 script to read np = x where x is the number of processors in your machines file.
4. Navigate to your working directory. Run the following:
/ansys_inc/v90/ansys/bin/mpitest90
On UNIX machines running native MPI:
The process is the same as described for running MPICH on Linux machines (above), but you will need to contact your MPI vendor to find out where the appropriate machines
file resides and how to edit it. Once you have properly edited the machines file following your vendor's instructions, edit mpitest90 to read np = x where x is the number of pro-cessors in your machines file.
2.2. Other Considerations
Other factors can also affect your distributed analysis.
• Hardware: Low-end hardware, such as cables, can reduce the speed improvements you see in a distributed analysis. We typically recommend that you use a network cable with a communication speed of 160 megabits/second (20
mega-bytes/second) or higher.
• A single 64-bit machine with multiple processors running under shared memory typically works as well as a cluster (multiple machines).
• PCG considerations: Review the following guidelines if you will be using the PCG or DPCG solver. Note that these are not steadfast rules, but rather recommenda-tions to help you get started.
– Deploy 64-bit platforms such as Linux on Itanium or AMD chips. – Use the /3GB switch on 32-bit platforms on Windows systems.
– As a broad guideline, use the following formula to get a general idea of memory usage for the DPCG solver. In this formula, n is the total number of CPU pro-cessors used, and MDOF is million degrees of freedom.
Master machine (Machine 0): MDOF(maximum) = Machine(0) Memory(GB) / (0.1 +
1.0/No. of machines)
Slave machines (Machine 1 - n): MDOF(maximum) = Machines (1...n)Memory(GB)* n
For example, if you have a master machine that is a 32-bit Windows machine with 2.2 GB available RAM, using the /3GB switch, and a total of four machines in the cluster, you could solve a problem up to 6.3 MDOF:
MDOF = 2.2 GB / (0.1 + 1 / 4) = 6.3 MDOF
In this scenario, the slave machines must have 6.3 / 4 or 1.575 GB of available memory.
3. Running a Distributed Job
For information on running Distributed ANSYS after you have your environment con-figured, see the Distributed ANSYS Guide. For more information on using the distributed solvers in sequential ANSYS, see the discussion on Parallel Performance in ANSYS in the