Readiris 15
User Guide
Table of Contents
Readiris 15 ... 1
Introducing Readiris ... 1
What's new in Readiris 15 ... 3
Legal Notices ... 5
Section 1: Installation and Activation ... 7
System Requirements ... 7
Installing Readiris ... 7
Activating Readiris ... 8
Software Registration ... 9
Check for updates ... 10
Uninstalling Readiris ... 10
Technical Support ... 10
Section 2: Getting Started ... 11
Using Readiris for the first time ... 11
Exploring the interface ... 11
Customizing the interface ... 14
Changing the user interface language ... 16
Configuring your scanner ... 16
Section 3: Basic Document Processing ... 19
Saving the processing settings ... 20
Loading settings ... 21
Restoring factory settings ... 21
Using the Wizard ... 21
Section 4: Selecting the Recognition Options ... 23
Recognition Options... 23
The Main language ... 23
Other Recognition Options (Readiris Pro + Corporate) ... 23
Other Recognition Options (Readiris Corporate only) ... 24
Advanced Recognition Options ... 26
Acquire options ... 26
Font type and Character pitch ... 27
Barcodes ... 28
Document Processing ... 28
Training options ... 28
Language options ... 28
Training Mode ... 29
Readiris 15 - User Guide
Scanning Documents ... 33
Selecting the Scanner Settings ... 33
Scanning batches of documents ... 37
Opening Image Files ... 39
Opening options ... 40
Other ways of opening image files ... 41
Processing Batches of Image Files ... 41
Section 6: Adjusting the Image Quality ... 43
Section 7: Editing the Recognized Documents ... 47
Editing the Recognition Zones ... 49
Using Zoning templates ... 54
Using the Text Editor ... 55
Section 8: Saving Documents ... 57
Available Output Formats ... 59
Adding Properties to Documents ... 62
Saving Scanned Documents as Image Files ... 63
Selecting the Formatting Options ... 64
Layout Options ... 65
General Options ... 67
SpreadsheetML Options ... 68
Paper Size ... 69
Pictures ... 69
Selecting the PDF Options ... 70
Compressing PDF documents ... 73
Password-protecting PDF Documents ... 74
Digitally Signing PDF Documents ... 75
Selecting the XPS Options ... 76
Compressing XPS Documents ... 77
Section 9: Sending Documents to the Cloud ... 79
Configuring the Connectors ... 79
Sending Documents ... 80
Sending Indexed Documents to the Cloud ... 81
How to ... 83
How to configure your scanner in Readiris ... 83
How to improve the recognition results ... 84
How to scan multiple documents ... 85
How to process digital camera images ... 86
Tips for taking pictures with your digital camera ... 86
Table of Contents
How to separate document batches ... 88
How to separate batches of image files ... 90
How to recognize forms ... 91
Readiris 15
RI_15_dgi_24022015_05
Welcome to the Readiris documentation. The aim of this documentation is to help you get up to speed with using Readiris. It covers Readiris' installation and setup, the basic processing steps and the application's commands and working areas. At the end of the documentation you find an How to section in which particular questions are addressed.
The procedures described in this documentation are based on the Windows 7 operating system. This documentation is written with the assumption that you know how to work in a Microsoft Windows environment. Consult your Windows documentation if necessary, in case you are not familiar with menu commands, dialog boxes, drop-down lists, docking windows and so on. The information in this documentation is subject to change without prior notice.
For additional information about Readiris, open the Help menu. There, you have access to Getting Started videos, a Knowledge Base, I.R.I.S. support, etc.
Introducing Readiris
Readiris is I.R.I.S.' flagship document recognition software. With Readiris you can scan paper documents, open image files and digital camera images and turn them into fully editable text documents and text-searchable PDF documents you can save, share and send to the Cloud. Readiris supports a wide range of output formats, the most important ones being Microsoft Word, Microsoft Excel and PDF.
The documents Readiris generates can either be saved on your computer, directly sent via e-mail or exported to Cloud applications such as Evernote, Dropbox, Google Drive, box and OneDrive. With Readiris Corporate you can also send documents to Microsoft SharePoint, Therefore, IRISNext and FTP.
Readiris recognizes documents in 137 languages. All American and European languages, including the Central-European, Baltic and Cyrillic languages as well as Greek and Turkish are supported. Readiris also recognizes Arabic, Farsi and Hebrew, as well as four Asian languages: Japanese, Simplified and Traditional Chinese and Korean.
Besides text recognition, Readiris offers powerful compression features for PDF and XPS files, thanks to I.R.I.S.' compression technology iHQC.
What's new in Readiris 15
• New Interface
• Text Editor
• Training Mode
• New Output Formats: .epub and .wav
• Improved Asian Recognition
• Improved PDF input
• 3D Perspective Correction
• Dynamic Zoom on opened Pages
• Possibility to append PDF documents
New Interface
The Readiris interface has been updated to a Microsoft Office 2013 look.
Tip: to learn more about the new interface, see the topic Exploring the interface.
Text Editor
Readiris now has a Text Editor which allows you to edit the recognition results in your documents before you save or send them. In the Text Editor you compare the recognized text to the original scanned text and make the necessary changes.
Training Mode
In Training Mode you can train the recognition system on fonts and character shapes, and correct the OCR results if necessary. During the training process, any characters the recognition system isn't sure of are displayed in a preview window, in combination with the word in which they were spotted and the result suggested by Readiris.
Training can substantially enhance the accuracy of the recognition system and is particularly useful when recognizing distorted, defaced forms. Training can also be used to train Readiris on special symbols it is unable to recognize initially, such as mathematical and scientific symbols and dingbats.
New Output Formats: .epub and .wav
EPUB: is an open standard for electronic books and Web publishing. EPUB is the best format to view your documents on an eReader.
WAV: save your documents in .wav to have the text read out loud to you.
Improved Asian Recognition
A new engine is used, which leads to better OCR results when recognizing Simplified and Traditional Chinese, Japanese and Korean, and language combinations with those four Asian languages.
Improved PDF Input
A new and improved PDF input module is used.
This module also allows you to open encrypted PDF documents (provided you know the password).
3D Perspective Correction
Readiris is now able to apply 3D perspective correction on images that were scanned or
photographed under an incorrect angle. This function straightens the entire image in such a way the OCR can be done successfully.
Dynamic Zoom on opened Pages
You can now manually increase and decrease the size of the thumbnails in the Pages panel.
Possibility to append PDF documents
In Readiris 15 you can add pages to existing PDF documents. When you save new scans to a PDF document that already exists, you have the possibility to append the existing document with the new pages.
Legal Notices
Copyrights
Copyrights © 1987-2015 I.R.I.S. All Rights Reserved.
I.R.I.S. owns the copyrights to the Readiris software, to the online help system and to this publication.
The information contained in this document is the property of I.R.I.S. Its content is subject to change without notice and does not represent a commitment on the part of I.R.I.S. The software described in this document is furnished under a license agreement which states the terms of use of this product. The software may be used or copied only in accordance with the terms of that agreement. No part of this publication may be reproduced, transmitted, stored in a retrieval system, or
translated into another language without the prior written consent of I.R.I.S.
This documentation uses fictitious names as examples; references to actual persons, companies or organizations are strictly coincidental.
Trademarks
The Readiris logo and Readiris are trademarks of Image Recognition Integrated Systems S.A. OCR and barcode technology by I.R.I.S.
AutoFormat and Linguistic technology by I.R.I.S. BCR and field analysis technology by I.R.I.S. iHQC compression technology by I.R.I.S.
Windows is a registered trademark of Microsoft Corporation in the United States and other countries.
All other products mentioned in this documentation are trademarks or registered trademarks of their respective owners.
Patents
Section 1: Installation and Activation
System Requirements
The minimum system requirements to install and run Readiris are:
Component Requirement
Computer and processor
1GHz processor or higher. A Multi-Core processor is recommended.
Note: when your computer is equipped with a multi-core processor, Readiris uses the multiple cores to achieve faster processing.
Memory Minimum 1 GB RAM. 2 GB RAM is recommended.
Hard disk Minimum 300 MB free hard disk space. 1 GB free hard disk space is recommended. Operating System
Windows 8.1, Windows 8, Windows 7, Windows Vista, Windows XP (as of Service Pack 3). All 32 or 64 bit.
Windows 7 and higher is recommended. Other
CD-ROM drive or Internet connection.
Note that some scanner drivers may not work under the latest version(s) of Windows. See the documentation supplied with your scanner to find out which platforms are supported.
Installing Readiris
Before you try and install Readiris, make sure you have the necessary administrator rights to install applications on your computer.
To install Readiris:
• Insert the Readiris CD-ROM in the CD-ROM drive of your computer.
• When the AutoRun window appears, click Readiris to start the Installation Wizard. In case the AutoRun window does not appear (this depends on your Windows settings):
o Go to Computer > CD-ROM Drive.
o Double-click the CD-ROM Drive icon, and then double-click setup.exe to start the
Installation Wizard.
• Select the installation language and click OK.
• Accept the terms of the license agreement.
• A complete installation is selected by default.
In case you only want to install certain recognition languages:
• Select Custom and click Next.
• Click the down arrow in front of Languages and select This feature will not be available.
Readiris 15 - User Guide
• Now click the down arrow in front of the language(s) you want to install, and select This feature will be installed on local hard drive.
• Click Next and follow the on-screen instructions.
• Click Finish to complete the installation.
The submenu IRIS > Readiris in the Windows Programs list is created automatically by the installation program.
The installation program also creates a shortcut to the Readiris application on the Windows desktop.
Activating Readiris
Once you have installed Readiris you need to activate it.
Note: unactivated copies of Readiris allow you to convert a maximum of 100 pages during a period 10 days, with only 3 pages at a time.
To activate Readiris:
• Double-click the Readiris shortcut on the Desktop to start.
• You are prompted to activate Readiris. Click Yes to do so.
Note that an internet connection is required to activate Readiris.
• Enter the activation code you find on the label inside the DVD box.
Note: if you downloaded an ESD version, your activation code was sent to you by e-mail.
Section 1: Installation and Activation
Tip: if an error occurs during the activation process, note that you can also do a manual activation.
If errors keep occurring, you might need to deactivate your firewall and try again. Consult the Windows help file if necessary. To do so, press f1 on your keyboard while you're on the Desktop.
Software Registration
Once you've activated your software you can also register it.
Registering is required to get Technical Support. It also offers other benefits, such as free updates, free trial downloads, video tutorials, discount on new products, and so on.
To register Readiris:
• Click the Help tab.
• Click RegisterReadiris.
• Fill in the Registration form and click Register now. Note that an internet connection is required to register.
Check for updates
When you register your copy of Readiris you are entitled to free software updates.
To check if updates are available:
• Click the Help tab.
• Then click Search for updates.
Note: Readiris automatically checks for updates every 30 days.
Uninstalling Readiris
Should you want to remove Readiris from your computer, follow the procedure below.
To uninstall the application:
• Close Readiris.
• From the Windows Start menu, go to the Control Panel.
• Click Programs and Features.
• Then select Readiris from the list and click Uninstall.
Technical Support
If you register your copy of Readiris you are entitled to free technical support.
To access Technical Support:
• Click the Help tab.
• Click Product Support.
From the Help menu you can also access Getting Started videos and a Knowledge Base, ask us a question, etc.
Section 2: Getting Started
Using Readiris for the first time
To run Readiris:
• Double-click the Readiris icon on the Desktop.
Or start Readiris from the Windows Programs list:
• Click Start > All Programs > IRIS > Readiris.
Exploring the interface
Readiris 15 - User Guide
The interface consists of the following components and panels:
1. Ribbon
The Ribbon is by far the most important tool in Readiris. It contains all the commands you need to process your documents. The commands are classified per group. Groups, in turn, are collected under tabs.
Tip: it is recommended to set the Language settings before scanning or opening documents.
Tip: point the cursor to the different commands to display their tooltip. The tooltips describe what each command does.
Note: should you want to autohide the ribbon, select the corresponding option in the View
menu.
2. Pages panel
Each page you scan or open in Readiris has its thumbnail displayed in the Pages panel.
To change the order of the pages, drag a page from one location to another. You can also move pages up and down, or delete them by right-clicking them and selecting the corresponding action. The size of the thumbnails can be increased or decreased using the slider. This way the thumbnails can be displayed over more columns.
3. Activity panel
The Activity panel displays the tasks that Readiris is carrying out. In each field you see a description of the task, and on which page it is being carried out.
Note: the more cores your computer is equipped with, the greater the processing speed will be. Note however that Readiris is limited to 4 threads, so more then 4 cores does not offer an advantage.
4. Scanned image
When a document is scanned or opened into Readiris, its image is displayed. The different
recognition zones are displayed. To learn how to modify the recognition zones, see the topic Editing the Recognition Zones.
Note that the appearance of the components and panels described above can be customized to your liking.
Customizing the interface
The interface can be customized in several ways:
Autohiding the ribbon
To autohide the ribbon, select the corresponding option in the View menu.
Autohiding the panels
The panels can be auto-hidden to save space in the Readiris interface.
• Click the Auto-hide icon on a panel to hide it.
• When a panel is hidden, its name appears vertically in the left or right sidebar.
• Point the cursor to the name to make the panel appear. • To disable the Autohide function, click the Autohide icon again.
Hiding panels
In case you want to hide the panels completely:
• Click the View menu.
• Clear the Activity box if you want to hide the Activity panel.
Moving the panels around
The panels do not have fixed positions. They can be placed anywhere inside the Readiris interface.
To move a panel:
• Double-click its title bar.
• The panel appears in a reduced version in the middle of the interface.
• Now you can drag it to a different position, and expand it.
• To restore a panel to its initial position, double-click its title bar again.
Note: to undo any changes you made, you can restore the factory settings. To do so, click the Readiris button in the top left corner, and then click Restore Factory Settings.
Changing the user interface language
Readiris opens in the installation language by default. If you want to change the interface language:
• Click the Readiris button in the top left corner, then click UserInterface Language.
• In the Language window that opens, select the language of your choice, then click OK.
Note: If you selected an incorrect language by mistake, click Ctrl+U inside Readiris. The Language
dialog box opens and you can select another language from the list.
Configuring your scanner
In order to scan documents in Readiris, your scanner must be configured correctly.
Before you configure the scanner in Readiris:
1. Make sure your scanner is connected to your computer, and switched on.
Note: the scanner should be physically connected to your computer with a USB cable. An ethernet or wireless connection may also be used if the Twain driver supplied by the manufacturer has been engineered with that capability.
2. Make sure you have the latest available Twain driver installed for your scanner.
In general, drivers can be found on the website of your scanner manufacturer. They are not provided by I.R.I.S. Note that some scanner drivers may not work under the latest versions of Windows. See the documentation supplied with your scanner to find out which platforms are supported. If necessary, contact your scanner manufacturer.
Configuration
• Click the down arrow beneath Scan in the ribbon.
• Then click Settings.
• When you do this for the first time, the Scanner Model list appears automatically.
In this list you select your scanner profile. The scanner profile allows you to access features specific to your scanner. For example, duplex scanning.
Do not worry if you don't see your scanner in the list; not all scanners have specific scanner profiles.
Important note: in case you don't find the exact same profile, do not select a profile that resembles it. Instead, select a universal Twain profile. Different Twain profiles are available:
Select <Twain><OTHER MODELS> when you are using a regular, flatbed scanner. Select <Twain><OTHER MODELS>(User interface) if you want to use your scanner user interface to scan documents.
Select <Twain><OTHER MODELS with duplex feeder> when you are using a duplex scanner, which scans both the front and backside of a page.
Once you've selected a scanner model, you must configure you scanner driver.
• Click Configure to select your scanner driver.
If you do not see your scanner listed in the Select Source window, then your scanner driver has not been installed properly. Re-install your scanner driver before trying to configure it in Readiris. The scanner driver can usually be found on the website of your scanner
manufacturer.
Note: you can also configure the scanner driver directly on the main toolbar. Just click the down arrow beneath Scan and click Select Source.
Once the scanner has been configured you can start scanning, using the default scanner settings. For more information about the different scanner settings and how to change them, see the topic
Section 3: Basic Document Processing
Processing documents with Readiris is fairly straightforward when using a basic configuration. In this topic we discuss which steps to take when doing such a basic configuration. For detailed information about the all the configuration steps, see sections 4 to 9.
Before you begin:
Select the Maindocument language in the Languages group.
Selecting the right document language is essential to obtain good recognition results with Readiris. The default language is set to the language you selected during installation.
Note: you can always change the document language after opening a document, but know that Readiris then has to redo the recognition on the entire document. This of course slows down your process.
Processing documents
Step 1: Scan or Open your documents
• Click Scan to scan paper documents with your scanner.
In order to scan documents your scanner must be correctly configured. See the section
Configuring your scanner if necessary. or
• Click From File to open existing image files.
The images are displayed in the interface. If necessary you can modify the recognition zones, and also the recognized text. See the section Editing the Recognized Documents for detailed
Step 2: Select the Output Format
• Select one of your favorite output formats from the Output group. The 3 output formats you used most recently are displayed in this group.
• To modify the default settings of the selected format, click the down arrow beneath it, and then click its settings.
For detailed information about the different output formats and the different formatting options, see the sections Saving Documents and Selecting the Formatting Options.
• To select a different output format, click Other.
Step 3: Select the Destination
• Select one of your favorite destinations from the Target group. The 3 destinations you used most recently are displayed in this group.
• Select Save as File to save the documents locally to your computer or portable storage device.
• Select E-mail to send the documents by e-mail.
• Or select a Cloud application to send your documents to the Cloud.
Note that the connection to the Cloud applications must be configured correctly to be able to export. See the section Sending Documents to the Cloud to learn how to do so.
• To select a different output format, click Other.
When you've gone through these steps, click Start to start processing documents.
Tips:
In case you want more guidance while configuring Readiris, use the Wizard. The Wizard guides you through each step of the configuration. See the section Using the Wizard for more information about each step.
Saving the processing settings
Note that Readiris saves the processing settings automatically when closing the application. Next time you start Readiris it applies the same settings.
In case you want to save a specific settings profile:
• Click the Readiris button.
Loading settings
• Click the Readiris button.
• Then click Load Settings and select the settings file you saved.
Restoring factory settings
• Click the Readiris button.• Then click Restore Factory Settings.
Using the Wizard
The Wizard guides you step by step through the configuration process. Once you've gone through the steps, click Go to start the automatic Readiris process.
To start the Wizard:
• Click the Readiris button, then click Wizard.
Steps of the Wizard
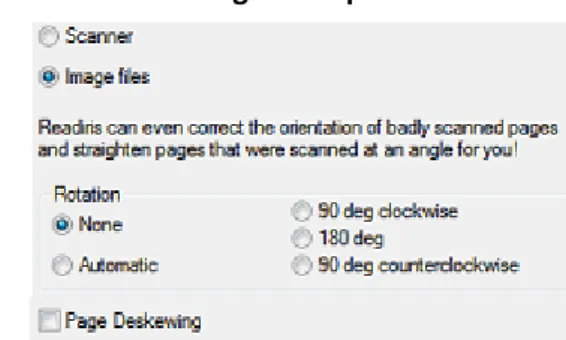
Step 1: Select the image source.
You can use your scanner to scan documents, or open image files you already have on your computer.
During this first step you can also apply rotation options.
Select Page Deskewing if your documents are scanned crooked and you want to straighten them.
Figure Step 1
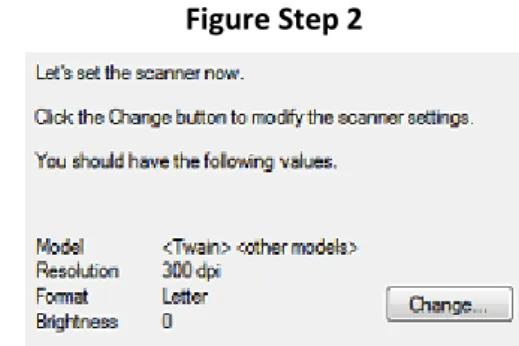
Step 2: Select your scanner
(Note: if you selected image files in the previous step, proceed to Step 3).
If you already configured your scanner, your scanner model is displayed here. If it is not, the
Scanner Model list is displayed. Select your exact same Scanner Model, then click Configure
to configure the driver.
For more information on how to configure the scanner, see Configuring your scanner. For more information about the scanner settings, see the topic Selecting the Scanner Settings.
Readiris 15 - User Guide
Figure Step 2
Step 3: Select the DocumentLanguage of your documents.
The default document language is set to the language you selected during installation. Click
Change to select a different language.
Note: selecting the correct language is extremely important in order to obtain good recognition results.
Figure Step 3
Step 4: Select the Output Format and (Cloud) Destination.
Your documents are saved as .docx files by default. Click Change to select a different output format or destination application.
For more information about the different output formats and their options, see the section
Saving Documents and Selecting the Formatting Options.
Figure Step 4
When you are done selecting the settings, click Next and then click Go to start processing documents.
Section 4: Selecting the Recognition Options
Recognition Options
Readiris converts scanned images, image files and PDF files into editable text documents and text-searchable PDF documents. In order for Readiris to recognize the text in your images, you need to activate the correct recognition options.
Tip: it is recommended to set the document recognition options before you scan or open any documents in Readiris. The reason for this is that Readiris carries out the document
recognition simultaneously while opening or scanning multiple pages. The recognition options are located in the Languages group.
Below you find an overview of the different options.
The Main language
The Main language is by far the most important recognition option. The quality of the document recognition depends a great deal on selecting the correct recognition language. The recognition language is set to the language you selected during installation.
To select a different language:
• Click the down arrow right of the Main list and select the language of your choice.
Other Recognition Options (Readiris Pro + Corporate)
Recognizing numeric documents
When you are processing documents that only contain numbers and almost or no text, then it is recommended to select the Numeric option.
When this option is selected Readiris only recognizes the numerals 0-9 and the following series of symbols: + plus sign * asterisk / slash % percentage sign , comma . period ( opening parenthesis ) closing parenthesis - hyphen = equation sign $ dollar sign £ pound sign € euro sign ¥ yen sign
Readiris 15 - User Guide
Recognizing Western words in Cyrillic and Slavic languages and in Greek
When you are processing Cyrillic, Slavic or Greek documents that also contain "Western" words written in the Latin alphabet - such as proper nouns, then it is recommended to select one of the available Language pairs.
Language pairs are always combined with the English language and are available for Russian, Byelorussian, Ukrainian, Serbian, Macedonian, Bulgarian and Greek.
To select a Language pair:
• Click the down arrow right of the Main list.
• Then select the required language pair.
Example
Speed vs. Accuracy
In Readiris you can choose whether to favor recognition speed over accuracy and the other way around.
Tip: when you are processing low-quality images, it is recommended to set this feature to accuracy. This yields markedly better results.
To access the Speed vs. Accuracy option:
• Click the expansion arrow in the Languages group.
• Move the slider to Speed for faster processing.
• Or move the slider to Accuracy for better recognition results.
Other Recognition Options (Readiris Corporate only)
Recognizing Secondary Languages inside a single document
When your documents contain text in multiple languages, it is recommended to select a main recognition language, combined with several Secondary languages. You may select up to 4 secondary languages:
• Click the down arrow right of the Secondary list and check the boxes of the required languages.
Section 4: Selecting the Recognition Options
• Secondary languages that are unavailable for the selected main language are grayed out.
Recognizing Arabic Documents
-When recognizing Arabic documents in Readiris Corporate, you can choose which recognition engine to use: omnifont or multifont.
By default, Readiris uses the omnifont engine, which recognizes all fonts. To obtain the best
recognition results it is recommended to use the multifont engine. This way, you can select the fonts used in your documents.
• Click the expansion arrow on the Languages group.
• Then select Arabic from the Main language list. The Fonts button now becomes available.
• Click the Fonts button, then select Use multifont engine.
• Select the fonts you want to recognize in the left column, and move them to the right column by clicking the right arrow.
Note: when the multifont engine is selected, Readiris actually uses both the onmifont and the multifont engine to do the recognition and then uses a voting mechanism to choose the best result. To favor the multifont engine, move the slider to the right. Note that when you move the slider to zero, the multifont engine will not be used.
Tip: should the recognition results be unsatisfactory, even though you selected the correct recognition options, then the image quality of your documents is probably insufficient. See the section Adjusting the Image Quality to solve this problem.
Advanced Recognition Options
Next to the document language, you can also configure other, advanced options that play an important role in the processing of documents, such as the Font type and Character pitch for instance.
To access the advanced recognition options, click Advanced Settings on the Home tab.
Note: you can also access the advanced recognition options in the following ways:
• Click the Readiris button and click Advanced Settings.
• Click the expansion arrow in the Languages group.
Acquire options
Before you scan or open any documents in Readiris you can set a number of Acquire options. These options help to improve the recognition results and are carried out during the scanning/opening of documents.
Rotation options
Readiris can rotate your documents 90° to the right, 180° and 90° to the left.
When you are processing a bunch of documents that do not have the same orientation, select
Automatic. In that case Readiris rotates the documents automatically in the right direction.
Note: make sure your documents are facing the right direction - meaning the text is facing the scanning surface. Otherwise Readiris will not be able to rotate them.
Page Deskewing
Select this option when you need to straighten documents that were scanned crookedly.
If the Acquire options you selected do not generate the results you were hoping for, you can change them manually after scanning/opening your documents. See Section 7: Editing the Recognized Documents to learn how to do so.
Font type and Character pitch
Font type
Readiris distinguishes between "regular" and dot matrix printed documents. Dot matrix printers are printers that create documents with text made up of isolated, separate dots.
Special segmentation and recognition techniques are required to recognize dot matrix documents and need to be activated.
To select the font type:
• Click the Readiris button, and then click Advanced Settings.
• Click the tab Font type.
• The font type is set to Automatic by default.
That way, Readiris recognizes "24 pin" or "NLQ" (Near Letter Quality) dot matrix, or other "normal" printing.
• To recognize only dot matrix printed documents, click Dot matrix. Readiris will recognize so-called "draft" or "9 pin" dot matrix printed documents.
Character pitch
The character pitch is the number of characters per inch in a particular font. The character pitch can either be fixed, in which case all characters have the same width, or proportional, in which case the characters have a different width.
To select the character pitch:
• Click the Readiris button, and then click Advanced Settings.
• Click the tab Font type.
• The character pitch is set to Automatic by default.
• Click Fixed if all characters of the font have the same width. This is often the case in old typewriter documents.
• Click Proportional if the characters of the font have a different width. Virtually all fonts in newspapers, magazines and books are proportional.
Readiris 15 - User Guide
Barcodes
How to process barcodes is explained in the corresponding How to section: How to recognize barcodes.
Document Processing
The Document Processing options are explained in the corresponding How to section: How to separate document batches.
Training options
The Training options are explained in the section below: Training Mode.
Language options
Training Mode
To improve the recognition results, you can use Readiris' Training Mode. By means of training you can train the recognition system on fonts and character shapes, and correct the OCR results if necessary. During the training process, any characters the recognition system isn't sure of are displayed in a preview window, in combination with the word in which they were spotted and the result suggested by Readiris.
1 A character Readiris isn't sure of.
2 The word in which the character was spotted. 3 The solution how Readiris suggests to recognize it.
Training can substantially enhance the accuracy of the recognition system and is particularly useful when recognizing distorted, defaced forms. Training can also be used to train Readiris on special symbols it is unable to recognize initially, such as mathematical and scientific symbols and dingbats.
ATTENTION: training occurs during recognition. The training results are temporarily stored in the computer memory, for the duration of the recognition. Readiris will no longer display the trained characters when OCRing the rest of the document. When a new document is OCRed, the training results are erased. To save training results permanently, use the Training Mode in combination with a font dictionary.
TIP: in case the recognition results still need to be edited afterwards, you can use the Text Editor. See the topic Editing the Recognized Documents for more information.
Accessing the Training Options
• Click Advanced Settings on the Home tab.
• Or click the expansion arrow in the Languages group.
• Click the Train tab.
• Select Training Mode.
Font Dictionaries
As stated above, it is recommended to use the Training Mode combined with a Font Dictionary, in order to store the training results permanently.
When you are using the Training Mode for the first time and you haven't created a Font Dictionary yet, select New Font Dictionary. Now enter a name for the dictionary in the window that opens, and click Open.
Note: do not modify the .dus extension of the dictionary.
Note: Font Dictionaries are limited to 500 shapes. You are recommended to create separate dictionaries for specific applications.
To use an existing Font Dictionary afterwards, either select Append Font Dictionary or Read Font Dictionary.
When you select Append Font Dictionary, make sure to enable the Training Mode. In this mode Readiris recognizes the characters shapes stored in the dictionary and adds the new training results.
Section 4: Selecting the Recognition Options When you select Read Font Dictionary, Readiris only recognizes the character shapes stored in the dictionary but doesn't add the new training results, even if the Training Mode is enabled. Note however that it can still be useful to use the Training Mode to check, and if necessary, correct the recognition results which are not saved in the font dictionary.
Caution: make sure you do not open an existing dictionary while the dictionary mode is set to New Dictionary. This will erase the contents of the existing dictionary and create a new one using the same name.
Using the Training Mode
• When you are done configuring the Training and Font Dictionary options, open or scan your documents.
• At the end of the recognition, Readiris enters the Training Mode. The characters the recognition system isn't sure of are displayed.
If the results are correct:
o Click the Train button to save the result as sure.
If you are not using a Font Dictionary, the training results are temporarily stored in the computer memory, for the duration of the recognition. When you scan a new document, you will have to go through the same steps again.
If you are using the New Font Dictionary option or Append Font Dictionary option, the results are saved in the dictionary and you won't have to go through the same steps again.
If the results are incorrect:
o Type in the correct characters and click the Train button.
or
o Click Don't train to save the result as unsure.
Use this command for damaged characters which could be confused with other characters if trained. For example, the number 1 and the letter I have an identical form in many fonts.
o Click Delete to delete characters from the output.
Use this button to prevent document noise from appearing in the output file.
o Click Undo to correct mistakes.
Readiris keeps track of the last 32 operations.
o Click Abort to abort the training.
All training results will be deleted. Next time you open or scan a document, the Training Mode will start again.
Section 5: Scanning and Opening Documents
Scanning Documents
Before you begin: make sure your scanner is connected to your computer and configured correctly. If necessary, see the topic Configuring your scanner.
Readiris is Twain compliant. It supports almost any flatbed and sheet-fed scanner, all-in-one device, digital camera and scanner currently available.
Selecting the Scanner Settings
This section gives an overview of all the available scanner settings in Readiris.
To access the scanner settings:
• Click the down arrow beneath the Scan button, then click Settings.
• The Scanner window is displayed.
Scanner model
Click Scanner Model to select your scanner profile from the list. The scanner profile allows you to access features specific to your scanner. For example, duplex scanning (ADF). Settings that are unavailable for your scanner are not displayed or grayed out.
Do not worry if you don't see your scanner in the list; not all scanners have specific scanner profiles. If you do not find your exact scanner in the list, do not select a similar profile. Instead, select a
universal Twain profile. Different Twain profiles are available:
Select <Twain><OTHER MODELS> when you are using a regular, flatbed scanner. Select <Twain><OTHER MODELS>(User interface) if you want to use your scanner user interface to scan documents.
Select <Twain><OTHER MODELS with duplex feeder> when you are using a duplex scanner, which scans both the front and backside of a page.
Configure
Click Configure to select your scanner driver. Selecting the correct scanner driver is required for Readiris to be able to communicate with the scanner.
If you do not see your scanner listed in the Select Source window, then your scanner driver has not been installed properly. Re-install your scanner driver before trying to configure it in Readiris. The scanner driver can usually be found on the website of your scanner manufacturer.
Note: you can also configure the scanner driver directly on the main toolbar. Just click the down arrow beneath Scan and click Select Source.
Contrast
When scanning low-quality documents, adjusting the Contrast level is sometimes required to obtain an optimal scan result.
Move the Contrast slider to the right to increase the contrast between the background and the text. Move it to the left to reduce the contrast.
Note: when the option Auto-exposure is selected, the Contrast slider is unavailable. The contrast settings are then adjusted automatically.
Brightness
When you are scanning dark, blurry images, or extremely light images, it may be necessary to adjust the Brightness settings.
Move the Brightness slider to the right to increase the brightness of your scans. Move the slider to the left to reduce the brightness.
Note: when the option Auto-exposure is selected, the Brightness slider is unavailable. The brightness settings are then adjusted automatically.
Optimize resolution for OCR
This option adjusts the resolution of images that were scanned with too much detail (over 600 dpi). When this option is activated Readiris reduces the resolution to a suitable level.
Note that this option doesn't increase the resolution of images scanned with too little detail.
Scan another page after
This option is useful when you are scanning multiple pages on a flatbed scanner. It allows you to determine after how many seconds Readiris scans another page. This way, you have the time to change the pages on the scanner while Readiris scans them automatically. You no longer need to go back to your Readiris application and click the Scan button every time you want to scan a new page. Use the up and down arrows to determine after how many seconds you want Readiris to scan a new page.
Format
Click the Format list to define the size of the documents you are scanning.
Tip: in the US Letter and Legal are the two most common formats. Internationally, A4 is the standard.
Resolution
Select in which resolution you want to scan images. A resolution of 300 dpi (dots per inch) is recommended. When you are scanning very small print or Asian languages, 400 dpi is recommended.
Color mode
Readiris can scan documents in color, black-and-white and grayscale. Note that grayscale and color images return the best OCR results.
Landscape
Select the Landscape option when scanning landscape-oriented documents instead of portrait-oriented documents.
When this option is selected, Readiris displays your documents as landscape-oriented documents in the interface.
Auto-exposure
With some scanners the Auto-exposure option is selected by default. This option adjusts the contrast and brightness settings automatically. A good contrast is required to obtain optimal recognition results.
Note: when this option is selected, the Contrast and Brightness sliders are unavailable.
ADF
ADF stands for Automatic Document Feeder. This option is available when your scanner is equipped with an automatic document feeder. Select this option when you want to scan stacks of documents all at once.
Invert
Sometimes Twain scanners display white text on a black background when scanning documents in black-and-white. To reverse the color of text/background on your documents, select the Invert
option.
Digital camera
When you are using a Twain compatible digital camera, you can use your camera directly as scan source. To do so, select the Digital camera option. Readiris will then use special recognition routines to process the digital camera images.
See the section How to process digital camera images for tips on using a camera as scan source.
Process as 300 dpi
Select the option Process as 300 dpi when you are processing images of an incorrect or unknown resolution. The images will be processed as if they had a 300 dpi resolution.
Section 5: Scanning and Opening Documents
Smoothen color images
This option is selected by default. It improves the appearance of color and grayscale images in your documents.
Note: with some scanners, image smoothening is required to recognize color and grayscale images successfully.
Duplex
When using a duplex scanner - a scanner that can scan both the front and the back side of documents - the Duplex scanning option is available. Select this option to have Readiris scan the front and back side of documents.
Fast Binarisation (Readiris Corporate only)
When you are using a high-speed scanner it is recommended to activate Fast Binarisation. This option increases the processing speed considerably.
Tip: avoid selecting this option when scanning very low-quality documents.
Scanning batches of documents
(This section applies to Readiris Corporate only)
If you need to scan entire batches of documents you can use Readiris' Watched Folder feature. This way, you can scan all your documents to specific folders that are being monitored by Readiris. Whenever Readiris spots a new document inside one of the Watched Folders, it processes it and exports it to a destination of your choice: in an output folder, in the Cloud or on an FTP server. Readiris supports up to 32 Watched Folders. Each watched folder can have a specific configuration. One watched folder configuration can for instance generate Compressed PDF documents and export them to Therefore. Another can generate RTF documents and export them to Google Drive, where they can be edited. While yet another one can also send documents to a different instance of Google Drive, using different credentials (user name and password) and settings (output folder, etc.).
Important notes:
• When using a Readiris Watched Folder, it is not possible to use Readiris as scanning application at the same time.
• When you already have documents open in Readiris, the Watched Folder option is
unavailable. Either process or delete the documents to access the Watched Folder option.
• Watched Folders can either use the Default settings - being the settings you configured in Readiris - or Specific settings. In the latter case, the settings you configure for a watched folder have nothing to do with the settings you configured inside Readiris itself.
To set up a Watched Folder configuration:
• Click the down arrow beneath the From File button.
• Then click Watched Folder.
Note that the Watched Folder option is only available when no documents are opened in Readiris.
• Click New watched configuration.
• Browse for the input folder to which you will scan the documents. Click OK to confirm.
• In case you want to apply the current Readiris configuration to the Watched Folder, keep the option Default settings selected.
Note that the option Select Output text folder is only available when the output is set to
Save as File in the current Readiris configuration.
The option Select output format is only available when using Specific settings.
• In case you want to apply specific settings to a Watched Folder configuration, select the option Specific settings.
• Now the Output settings screen appears.
Select the output format, destination and lay-outing options. For more information see
Section 8: Saving Documents and Section 9: Sending Documents to the Cloud.
• Click OK to confirm.
Tips:
o If you want Readiris to process the subfolders of a Watched Folder, then select
Process subfolders.
Note: when the Process subfolders feature is activated, it is not possible to use a subfolder of an existing watched folder as watched folder in a new watched folder configuration.
Example: in Configuration 1 you select Process subfolders and you use C:\Input as Watched Folder. C:\Input has a subfolder called Batch1. In that case C:\Input\Batch1 cannot be used as Watched Folder in Configuration 2.
Section 5: Scanning and Opening Documents
o When using multiple Watched Folders, it is very useful to use the feature Add time
stamp to filename.
This way, you avoid generating output files that have the same file name, which would be overwritten when using the same output destination. A time stamp looks as follows <filename>_YYYYMMDDHHMMSS and contains the year, month, date, hour, minutes and seconds of the creation time.
• When you are done, click OK to start monitoring the Watched Folder. Or click New watched configuration to configure another Watched Folder.
During monitoring, Readiris processes any images it spots inside the folder.
Tip: click Minimize to have Readiris run in the background.
To add documents to the Watched Folder while it is being monitored by Readiris:
• Scan documents using your scanner's interface, or
• Move existing image files to the Watched Folder.
Opening Image Files
Besides scanning documents, you can also open image files and PDF files with Readiris. Readiris supports the following image file formats.
Image file format File
extension
Adobe PDF *.pdf
DCX fax *.dcx
DjVu images *.djv, *.djvu JPEG images *.jpg, *.jpeg JPEG 2000 images *.j2c, *.j2k,
*.jp2 Portable Network Graphics *.png (Compressed and multipage) TIFF
images
uncompressed and LZW, PackBits, Group 3, Group 4 and JPEG compressed
*.tif, *.tiff
Windows bitmap *.bmp ZSoft Paintbrush images *.pcx
Readiris 15 - User Guide
To open existing image files:
• Click the From File button.
• Then select the images files you want to process, and click Open.
Note:
If your image file has been scanned in a low or unknown resolution, Readiris displays the following warning:
Click Open anyway to continue with your image. Tip: click the Help button for pointers on how to obtain the best possible results with low-resolution images.
Opening options
When opening image files, several options are available:
Load PDF documents in color
This option does exactly what it says: it opens PDF documents in color.
Deactivate his option if you want to open PDF documents in black-and-white, to speed up the opening process.
Smoothen color images
This option is selected by default. It improves the appearance of color and grayscale images in your documents.
Note: with some scanners, image smoothening is required to recognize color and grayscale images successfully.
Process as 300 dpi
Select Process as 300 dpi when you are processing images of an incorrect or unknown resolution. The images will be processed as if they had a 300 dpi resolution.
Section 5: Scanning and Opening Documents
Fast Binarisation (Readiris Corporate)
When you are opening many image files at the same time, it is recommended to activate Fast Binarisation. This option increases the processing speed considerably.
Tip: avoid selecting this option when scanning very low-quality documents.
Page range
Use this option when you only want to open a certain section of multipage TIFF or PDF files. Select All pages to open the entire document.
Or select Pages and indicate the page range.
Other ways of opening image files
Besides the From File button you can also open image files by dragging them to the Readiris interface.
Processing Batches of Image Files
(This section applies to Readiris Corporate only)
When you are processing entire batches of image files, you can use Readiris' Batch OCR folder.
• Click the down arrow beneath the From File button.
• Then click Batch OCR.
Note that the Batch OCR option is only available when no documents are opened in Readiris.
• Browse for the input folder, where your image files are located.
• Then select the processing options:
o Process subfolders processes any underlying folders of the input folder.
o Overwrite output text files overwrites any existing output files with the same name
in the output folder.
o Delete scans after recognition deletes your original input images once they have
been processed.
o Add time stamp to filename add the date and time to the filename of your
document.
This way, you avoid generating output files that have the same file name, which would be overwritten when using the same output destination. A time stamp looks as follows <filename>_YYYYMMDDHHMMSS and contains the year, month, date, hour, minutes and seconds of the creation time.
• Click the SelectOutput Format button to select the required output format and the formatting options.
Tip: see the topics Saving Documents and Selecting the Formatting Options for more information.
Section 6: Adjusting the Image Quality
The recognition results depend a great deal on the image quality of your documents. If you're scanning very low-quality documents, Readiris will not be able to recognize them properly. The reason for this is that Readiris works by converting pictures of text characters into actual text characters. If your documents are too dark, the characters fade into one another and create black spots. If your documents are too light, the text characters might be broken. Consequently, Readiris will not be able to recognize them.
Example 1: text is too dark
Here, the letter shapes begin to fill in and become fuzzy. Letters like a, e, and o are almost completely blurred.
Example 2: text is too bright
Here, the text characters start to show gaps and incomplete shapes.
To improve the recognition results:
• First make sure your documents have been scanned in a resolution of at least 300 dpi. If that's not the case, re-scan your documents using a proper resolution.
See the section Selecting the Scanner Settings if necessary.
• Click Adjust on the Home tab.
Readiris 15 - User Guide
Smoothen color image
This option is selected by default. It smoothens out differences in intensity, creating a greater contrast between the text and the background. Sometimes smoothening is the only way to separate text from a colored background.
Fast Binarisation (Readiris Corporate)
When you selected Fast Binarisation in the From File options or in the Scanner Settings, the same option is selected in the Adjust Image menu. This option is useful when scanning or opening many image files at the same time, as it increases the processing speed considerably.
When this option is selected, you cannot manually adjust the Brightness and Contrast options however. Clear this option to be able to adjust them manually.
Brightness
Move the slider to increase or decrease the brightness of your documents.
Example 1: image is too dark
The image below is too dark and results in a plain black image. There is no text to be recognized.
Example 2: image is too bright
The image below is too light and results in broken text characters. The text is hardy legible.
In this case you need to darken the image to obtain satisfactory results.
Contrast
Move the slider to increase or decrease the contrast between the text and the background.
Example
The image below results in broken text characters.
In this case you need to increase the contrast to obtain satisfactory results.
Despeckle
Sometimes documents contain a lot of "noise" - little black spots that occur when scanning low-quality documents or using bad scanner settings.
To remove these little black spots, use the Despeckle slider. The more you move it to the right, the larger the spots that will be removed.
When you are done adjusting the image quality:
• Click Apply to preview the results.
Section 7: Editing the Recognized Documents
The recognized documents can be edited in several ways in Readiris 15. Not only can you rotate and deskew the scanned pages, and edit their recognition zones like in the previous versions of Readiris, but you can also edit the recognized text in the Text Editor.
See the following sections for more information:
Modifying the Page Options Editing the Recognition Zones Using Zoning Templates Using the Text Editor
Modifying the Page Options
• In the Pages panel, select the page that needs to be changed.
• Then click the Page tab in the main toolbar.
Organize
Use the arrows in the Organize group to switch to other pages.
Tools
• Click Delete Blank Pages to delete any blank pages you have currently scanned / opened in Readiris.
Note: this option in not available if there are no blank pages among your documents. Move the slider to determine which pages must be considered blank. The more you move the slider to 'high', the faster a page will be considered as blank.
• Click Include All Pages to include all pages in the output file.
Readiris 15 - User Guide
Image Tools Deskew
Click Deskew to straighten a page that was scanned crookedly.
3D Correction
Click 3D correction to apply perspective correction on an image.
Note: obtaining the right perspective correction is essential to produce good recognition results. Readiris automatically searches for the page borders or text alignments to determine which perspective correction to apply.
Rotate
Click the down arrow and select how to rotate the page: left, right or upside down.
Adjust
The Adjust options allow you to adjust the image quality. See Section 6: Adjusting the Image Quality
for more information.
This command prints the selected page.
Save as Image
On the Page tab you can also save your pages as images. This is explained in the section Saving Documents as Image Files.
Tip:
If you want to modify the recognition zones, click the Zones tab. See the topic Editing the Recognition Zones for more information.
Editing the Recognition Zones
Introduction
When you scan a document or open an image file in Readiris, each page is divided automatically into
recognition zones. Readiris uses these zones to determine how each part of your documents must be converted. If your document does not contain any zones, it cannot be recognized.
In Readiris Pro there are 3 kinds of recognition zones. You have text zones, image zones and table
zones. In Readiris Corporate you can also have a fourth zone type, being barcode zones. Notice that each zone type has its own color.
Text zones Orange Image zones Purple Table zones Pink *Barcode zones Green *Readiris Corporate only.
The zones are also numbered; notice the number in the top left corner of each zone. The numbers run top-down and from left to right*. They indicate the order in which the zones are recognized.
*Note: when processing Arabic documents, the numbers run from right to left, if you select Arabic as main language.
Example of recognition zones
Modifying the automatic Page Analysis
The zones we discussed above are created automatically. Note however that this automatic page analysis is far from fixed. It can be modified in several ways. For instance, you can manually create new zones, change the zone of existing zones, expand and reduce zones in size, change the sort order, and so on.
To access the Editing and Layout options:
• Scan or open a document in Readiris.
• Click the Zones tab.
The Editing and Layout options
Below you find an overview of the editing and layout options in Readiris.
Note: when you make any modifications to the layout, Readiris redoes the recognition on the entire page.
Manually drawing zones
In case Readiris missed any recognition zones you can draw them manually. Note that barcode zones must always be drawn manually.
To draw zones:
• In the Editing group, click the zone type you want to create.
• Then click and hold the left mouse button and draw a frame around the section to want to recognize.
In the image below, we manually drew a new table zone (the pink frame).
Changing the zone type
When scanning bad quality documents, it may occur that Readiris does not determine the zone types correctly. If that happens, know that you can change the zone types manually:
• Right-click the zone you want to change.
Section 7: Editing the Recognized Documents
Important note: if you are processing bad quality images, Readiris will likely have problems recognizing them correctly. Refer to the section Adjusting the Image Quality to learn how you can avoid such issues.
Changing the zone type of multiple zones simultaneously
When scanning bad quality documents, it may occur that Readiris does not determine the zone types correctly. If that happens, know that you can change the zone types manually:
• Click Select zone on the Editing group.
• Press and hold the Shift key while clicking the zones you want to modify.
• Then, while still pressing the Shift key, right-click inside a selected zone, point to Zone >
Type and click the zone type of your choice.
Important note: if you are processing bad quality images, Readiris will likely have problems recognizing them correctly. Refer to the section Adjusting the Image Quality to learn how you can avoid such issues.
Expanding or reducing zones
• Click Select zone in the Editing group.
• Then click inside the zone you want to reduce or expand.
• Click and hold one of the bullets on the frame, then drag the frame in the desired direction to expand or reduce the zone.
Changing the sort order of zones
The order in which the zones are numbered determines in which order they will be included in the output documents. To change the order:
• Click Select zone in the Editing group.
• Then click the Sort button.
The numbers now disappear from the zones.
Readiris 15 - User Guide
Moving zones
• Click Select zone in the Editing group.
• Then click inside the zone you want to move, hold the left mouse button, and drag the frame to the position of your choice.
Connecting zones
Suppose you have two text zones that belong together, and you want to turn them into one single text zone. In that case:
• Select Text in the Editing group.
• Then draw a text zone between the two zones to connect them.
• The two zones are merged into one.
Deleting zones
In case you want to exclude zones from the recognition:
• Click Select zone in the Editing group.
• Then press and hold the shift key and select the zones you want to delete.
• Right-click one of the selected zones, point to Zone and click Delete.
Deleting small zones
Sometimes documents contain a lot of "noise" - little black spots that occur when scanning low-quality documents or using bad scanner settings. When that is the case, Readiris tends to mark them as recognition zones, even though they do not contain any useful content.
To exclude these zones from recognition:
• Click the option Delete small zones.
• This option erases all windows smaller than 0.5" and re-sorts the remaining zones.
Ignoring zones on borders
When your scanner generates black borders around your documents, Readiris tends to mark them as recognition zones, even though they do not contain any useful content.
In such cases it is recommended to use the option Do Not Detect Zones on borders. That way, the border zones will be excluded from the recognition.