Developing Mathematical Knowledge and Skills through the
Awareness Approach of Teaching and Learning
Abour H. Cherif, Ph.D.*
President Emeritus, American Association of University Administrators Associate Editor, Journal of Higher Education Management
728 W. Jachson Blvd., Unit 407. Chicago, Illinois, U.S.A. [email protected]
Stefanos Gialamas, Ph.D.
President, American Community Schools of Athens 129 Aghias Paraskevis. 15234 Halandri. Athens, Greece
[email protected] Angeliki Stamati, Ph.D.
Faculty of Mathematics, American Community Schools of Athens 129 Aghias Paraskevis. 15234 Halandri. Athens, Greece
[email protected] Abstract
Every object we think of or encounter, whether a natural or human-made, has a regular or irregular shape. In its own intrinsic conceptual design, it has elements of mathematics, science, engineering, and arts, etc., which are part of the object’s geometric shape, form and structure. Geometry is not only an important part of mathematics, but it is also an important part of daily life. However, geometry is challenging for some students, even high-achieving students. One way to help students understand geometry and its relevance in life is to engage students to discover them cognitively, then to research and identify them in real world examples and then to relate them to past, present, and future innovations that improved our way of thinking about ourselves and the world around us. This interdisciplinary activity uses the Developmental Awareness Approach of Teaching and Learning (DAATL) to help students discover principles, acquire knowledge, and learn mathematical concepts including surface area, volume, dimensions, regular and irregular plane figures, solid polygons (regular polygons and polyhedra), thinking design, and graph making, etc. It is designed to help students become acquainted with the most useful and familiar parts of mathematical geometry and its application in daily life through connections with disciplines such as science, engineering, art, design, and social studies. The Development Awareness Approach of Teaching and Learning (DAATL) capitalizes on student's natural curiosity, inclination to comprehend as well as students love of drawing, doodling, painting, thinking and talking. Throughout the learning process, students are engaged in authentic learning activities by real and concrete doing with clear purposes, thinking analytically, and evaluating their understanding of texts and ideas orally, in drawing, and in writing. This approach of teaching and learning has been tried and modified to ensure maximum effectiveness of acquiring understanding of the intended learning concepts. The activities can be used with students in elementary school up to 2-year college levels.
Keywords: Geometry, Learning Math, Developmental Discovery Approach, Active Learning, Student’s Active Engagement.
1.Introduction
This interdisciplinary activity is designed to help students discover and understand a range of mathematical concepts and skills capitalizing on their own personal experiences. It uses the Developmental Awareness Approach of Teaching and Learning (DAATL) to help students discover principles, acquire knowledge, and learn mathematical concepts including surface area, volume, dimensions, regular and irregular plane figures, solid polygons (regular polygons and polyhedra), thinking design, and graph making, etc. It is designed to help students become acquainted with the most useful and familiar parts of mathematical geometry and its application in daily life through connections with disciplines such as science, engineering, art, design, and social studies.
The Development Awareness Approach of Teaching and Learning (DAATL) capitalizes on student's natural curiosity, inclination to comprehend as well as students love of drawing, doodling, painting, thinking and talking. This is simply because “learners who can make connections between the subject matter and their own experiences struggle less with paying attention, making connections, completing tasks, taking tests, [and applying what they learn in different situations]” (Boyles and Contadino, 1998, p. 2). The DAATL allows students to make the connections and also lends itself naturally to combine with other subject areas such as
science, engineering, language arts, the fine arts, technology, and social issues. This approach of teaching and learning has been tried and modified to ensure maximum effectiveness of acquiring understanding of the intended learning concepts. The activities can be used with students in elementary school up to 2-year college levels. The approach also emphasizes the importance of shared vocabulary in the development of effective communication and the importance of writing in the learning process. In short, throughout the learning process, students are engaged in authentic learning activities by real and concrete doing with clear purposes, thinking analytically, and evaluating their understanding of texts and ideas orally, in drawing, and in writing.
Every object we think of or encounter, whether a natural or human-made, has a regular or irregular shape. In its own intrinsic conceptual design, it has elements of mathematics, science, engineering, and arts, etc., which are part of the object’s geometric shape, form and structure.
Geometry is not only an important part of mathematics, but it is also an important part of daily life. Furthermore, as James S. Tanton (2016b) indicated, its core skills of logic and reasoning are critical to success in school, work, and many other aspect of life. However, geometry is challenging for some students, even high-achieving students. One way to help students understand geometry and its relevance in life is to engage students to discover them cognitively, then to research and identify them in real world examples and then to relate them to past, present, and future innovations that improved our way of thinking about ourselves and the world around us. For example, geometric shapes are part of nature and can be seen in snowflakes, spider webs, diffraction ranges in water, diatoms (aquatic organisms), sunflowers, rainbows, many forms of minerals (salt and diamonds), as well as in buildings, parks, and gardens, to name a few. Furthermore, most of what humans design from pharmaceutical tablets and capsules to bicycles, cars and airplanes, to name a few, are determined by a mathematical formula involving geometry (Slater and Tobey, 1991).
By the end of successfully completing the planned activities, students will be able to define and describe regular and irregular plane figures as well as solid shapes and objects. They will also be able to verbalize what distinguishes one plane figure from another, and one solid object from another, and also be able to describe their characteristics using sides, corners, and angles for those figures which have them. They will also be able to distinguish between circles and Triangles, rectangles and squares, etc. and what similarities and differences they have. But most of all, they students will build confidence in their cognitive abilities by applying what they have learned from identifying the plane figures and solid shapes around them to the world in which they live.
They will understand how to use the sides, corners, angles, size, and surface areas as attributes for understanding and identifying plane figures and solid objects. For example, a side is a straight line that makes part of the shape and a corner is where two sides meet. An angle is the space or the amount of turn (usually measured in degrees) between two intersecting lines or surfaces at or close to the end point where they meet (the vertex). An area is defined as the number of square units that covers a closed figure, and the surface area of an object is calculated as the total area of the surface of a three-dimensional (3-D) object. The volume of an object, which is also known as capacity, is the amount of 3-dimensional space that a given object occupies. Shared vocabulary and meaning of things among students are essential for effective communication and meaningful learning.
2. Discovery-Guided Learning Activities: Using the Development Awareness Approach of Teaching and Learning
As seen in Figure 1 and Table 1, this set of related learning activities is divided to four main parts. Each part is divided into a number of stages.
• Part one is called Developing an Awareness of 2-Dimentioanl Plane Figures. • Part two is called Developing an Awareness of 3-Dimensional Solid Objects.
• Part three deals with discovering regular and solid geometry (regular polygons and polyhedra) in the living world around us.
• Part four deals with the assessment and the re-enforcement of students' understanding of the intended learning concepts both in the classroom and in daily life.
The activities and the exercises are purposely designed to start from simple to more challenging ones building on each other’s gained information and learned knowledge, skills, and understanding. Figure 1 describes the four parts depicted in the concept map and the pedagogical relationship between them.
Figure 1
Concept Map for Developing Geometrical Knowledge and Skills Through the Awareness Approach of Teaching
Table 1
Parts and Their Stages of the Learning Activities For Developing Geometrical Knowledge and Skills Through the Awareness Approach of Teaching
Part of the Learning Activities Stages of the Learning Activities
One
Developing an Awareness of 2-Dimensional Plane Figures
I Developing an Awareness of Plane Figures (regular polygons) Around You.
II Knowing Your Plane Figures (regular polygons) Better. II Discovering Patterns and Relationships Among Plane
Figures (regular polygons).
Two
Developing an Awareness of 3-Dimensional Solid Objects
I Developing an Awareness of 3-dimensional shapes (solid polygon known as polyhedra) Around You. II Knowing Your 3-dimensional shapes Figures (solid
polygon known as polyhedra) Better.
III Discovering Patterns and Relationships Among 3-dimensional shapes (solid polygon known as polyhedra).
Three
Discovering regular and solid geometry (regular polygons and polyhedra) in the living world around us.
I Developing Learning Skills of Constructing and Calculating Plane and Solid Diagrams.
II Regular and solid geometry (regular polygons and polyhedra) in The Living World Around Us.
Four
Assessment and the re-enforcement of students' understanding of the intended learning concepts both in the classroom and in daily life.
I It's Time For Geometry, Art & Fun
II General Questions for the Re-enforcement of Students' Understanding of the Intended Learning Concepts. 3. Part One: Developing an Awareness of 2-Dimensional Plane Figures Around You
3.1. Part One – Stage I: Developing an Awareness of Plane Figures Around You
In this stage of the activity, students will work mainly with regular plane figures. A plane figure is defined and described as a flat, closed figure or shape. It is a 2-dimensional shape with width and breadth, but no thickness. It can be made of straight lines, curved lines, or both straight and curved lines of a closed figure. On the other hand, a given plane figure with no sides or curves that are equal is called an irregular polygon or an irregular plane figure. Students will first construct a given closed plane figure using bending drinking straws or popsicle sticks, then draw and name the given figure as instructed by the procedures and/or their teacher. In the process, students develop shared vocabulary, skills, and understanding that is needed for meaningful learning.
Procedures: In this stage of the learning activity, students will first construct a given closed plane figure using bending drinking straws or popsicle sticks, then draw and name the given figure as instructed below. (Note that the examples that are provided in bold and between two parentheses are for teachers and not for students. Also the students need to be divided in a number of groups equal to the number of closed planes figures that will be explored. In the following procedure ten closed plane figures are explored, therefore at least, ten groups of students are required.)
Using bending drinking straws (or popsicle sticks), then one of the 8 1/2 X 11 inch papers (e.g. white paper) ask each member of:
1. Group one to first construct (using bending straws), and then draw and name a plane figure formed from three equal line segments (sides) so that each pair of two line segments shares an endpoint. (e.g., triangle).
2. Group two to first construct (using bending straws), and then draw and name a plane figure formed from four equal line segments (sides) so that each pair of two line segments share an endpoint. (e.g., quadrilateral).
3. Group three to first construct (using bending straws), and then draw and name a plane figure formed from five equal line segments (sides) so that each pair of two line segments share an endpoint. (e.g., pentagon). 4. Group four to first construct (using bending straws), and then draw and name a plane figure formed from six equal line segments (sides) so that each pair of two line segments share an endpoint. (e.g., hexagon). 5. Group five to first construct (using bending straws), and then draw and name a plane figure formed from
seven equal line segments (sides) so that each pair of two line segments share an endpoint. (e.g., heptagon).
6. Group six to first construct (using bending straws), and then draw and name a plane figure formed from eight equal line segments (sides) so that each pair of two line segments share an endpoint. (e.g., octagon). 7. Group seven to first construct (using bending straws), and then draw and name a plane figure formed from
nine equal line segments (sides) so that each pair of two line segments share an endpoint. (e.g., nonagon). 8. Group eight to first construct (using bending straws), and then draw and name a plane figure formed from ten equal line segments (sides) so that each pair of two line segments share an endpoint. (e.g., decagon). 9. Group nine to first construct (using bending straws), and then draw and name a plane figure formed from
more equal line segments (sides) than the one mentioned above, so that each pair of two line segments share an endpoint (e.g., polygon).
10. Group ten to first construct (using bending straws), and then draw and name a plane figure that is the set of points equidistant from a given point. (e.g., circle).
Give all the students extra 10-15 minutes to finish any kind of final touch they would like to add to their construction and/or drawing of a given plane figure and to look at each other’s constructions, drawings and the choice of geometrical shapes.
By now, each group of students has constructed, named and drawn a plane figure. Note however, if you don’t have enough students in your class to divide into ten groups, you can divide stage one into: Stage 1-A (steps 1-5) and stage 1-B (steps 6-10). In this way, each group of students will have the opportunity to work with two different plane figures instead of only one. Thus they will develop a better sense of the nature and the concept of plane figures and their characteristics, properties, and their application and implication in the environment around us.
3.2. Part One – Stage II: Knowing Your Own Chosen Plane Figure Better
Procedures: Stage two of this learning activity is divided into three integrated phases. In this stage of the activity, all the questions are directed to and must be answered by all the groups. Thus members of each group are going to work together collaboratively to answer the questions in both writing and in drawing form. Therefore, members of each group must take turns recording questions, writing answers, and making drawings. 3.2.1. Phase 1: Naming Your Chosen Plane Figure (Regular polygons):
Give each group of students a copy of Table 2, but without the information in the second column that is each figure’s name and ask the member of each group to:
1. Select a name for their chosen plane figure and justify their selection.
2. Provide a reasonable explanation for naming a given plane figure is important because students might chose to give a name to their figure that has no relationship to the shape and or the number of the sides, corners or points.
Furthermore, challenging students’ choice of names and their reasons behind them forces students to think of names that have a relationship to some aspect of the figure itself (see Table 1). To do so, they are forced not only to think but also to bring and integrate their own prior experiences as well as actual observations from their surrounding environment into the learning process.
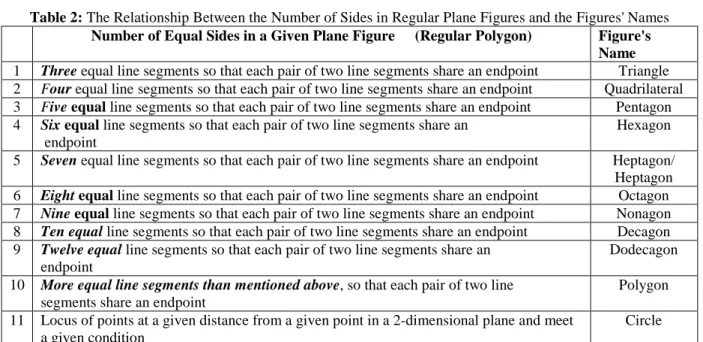
Table 2: The Relationship Between the Number of Sides in Regular Plane Figures and the Figures' Names Number of Equal Sides in a Given Plane Figure (Regular Polygon) Figure's
Name 1 Three equal line segments so that each pair of two line segments share an endpoint Triangle
2 Four equal line segments so that each pair of two line segments share an endpoint Quadrilateral
3 Five equal line segments so that each pair of two line segments share an endpoint Pentagon
4 Six equal line segments so that each pair of two line segments share an endpoint
Hexagon 5 Seven equal line segments so that each pair of two line segments share an endpoint Heptagon/
Heptagon 6 Eight equal line segments so that each pair of two line segments share an endpoint Octagon 7 Nine equal line segments so that each pair of two line segments share an endpoint Nonagon 8 Ten equal line segments so that each pair of two line segments share an endpoint Decagon 9 Twelve equal line segments so that each pair of two line segments share an
endpoint
Dodecagon 10 More equal line segments than mentioned above, so that each pair of two line
segments share an endpoint
Polygon 11 Locus of points at a given distance from a given point in a 2-dimensional plane and meet
a given condition
Circle
3.2.2. Phase 2: Defining and Describing Your Chosen Plane Figure (Regular polygons)
To define is to specify the essential nature, purpose, or basic qualities of something by placing it in a category and then distinguishing it from other members of that category. In other words, it is to exactly state the nature, scope, or meaning of something by giving the general meaning of that something. To describe is to give essential characteristics and features of something, in other words, to give a detailed account of something (Hasa, 2016). Distinguishing between the concepts of definition (to define) and description (to describe) always presents challenges to students of all educational levels. When students are asked to define a given object, quite often they come up with statements that reflect more of a description than a definition of that object (Cherif and Adams 2016). Because of this, students are asked to define and to describe their chosen figures in writing. In addition, writing is an effective way of learning, providing clarity of mind, and targeted focus on aims and purposes. With this in mind, give a copy of the following Table 3 to the members of each group, and ask the students:
1. Using Table 3, and in written words, define and describe your chosen plane figure using the least amount of words possible, but as accurate a description and definition as possible.
2. Discuss your definition and description of your figure with the whole class and modify them accordingly (if needed). If you made any changes, please enter them in the second row of table 2.
3. How do the definition and the description of your chosen figure differ?
4. Write one paragraph explaining what you have learned from actively engaging in this learning exercise. Table 3 Defining and Describing a Given Closed Plane Figure
Given Plane Figure
Definition Description
3.2.3. Phase 3: Knowing Your Plane Figure Better
The aim of this phase of stage one is for the students to gather and generate as much data and information as they can about their chosen plane figures. It is also useful for students to develop a shared vocabulary which is needed for students to develop successful communication and meaningful understanding. The phase is divided into four related learning parts.
Phase 3-A: How Well Do You Know Your Own Selected Plane Figure?
The questions in this phase are directed to and should be answered by the members of all the groups. Ask the members of each group to answer the following questions;
1. What name have you given to your own chosen plane figure?
2. What is the scientific or mathematical name of your chosen plane figure?
3. Is this name similar of different from the name that you have already selected for your chosen plane figure?
4. How many line segments (sides) does your plane figure consist of? 5. How many angles does your plane figure have?
6. What is the size of each angle and what is each angle called? 7. What is the total measurement of all the angles in your plane figure? 8. What is the length of each line segment (side) in your plane figure?
9. What is the total length of all the line segments (sides) of your plane figure? 10. What is the area of your plane figure?
11. Why do you think a plane figure like the one you drew is called a ‘Closed-plane Figure’? 12. Why do you think a plane figure like the one you drew is called a ‘Regular closed-plane Figure’? 13. What type of conclusion or relationship can you draw between the number of angles and the number of
straight line-segments (sides) of a given plane figure?
14. Write one paragraph describing what you have learned from actively engaging in this hands-on learning exercise.
Challenge Yourself:
A. Why a drawing that is made of only two lines (sides) cannot be considered as “a closed plane figure”? B. Can you draw your plane figure in such a way that the total sum of the angles will not be equal to the total
sum of angles in the original regular plane figure?
For example, Carl Friedrich Gauss (1777-1855) introduced the geometry of curved surface (non-Euclidean geometry) in which the sum of the angles of a triangle is less than 180 degrees.
Any closed figure with straight sides is called a polygon, as mentioned before. The number of angles in a polygon is the same as the number of sides. A polygon may be divided into triangles, each of which contains 180˚. To get the number of degrees in the sum of the angles of any polygon, take two less than the number of sides, and multiply by 180˚ i.e. , where stands for the number of sides of the polygon (Alder, 1960, p. 25).
The following Table 4 shows examples of the relationship between the figures’ names, the number of sides, and the sum of angles in regular plane figures and circles by using the previously mentioned formula.
Table 4
The Relationship Between the Regular Plane Figures' Names, the Number of Sides, and the Sum of Angles in Regular Plane Figures and Circles
Figure's Name Number of Sides , ≥
Number of Angles , ≥
Sum of Angles in Degrees
− °, ≥ 1 Triangle 3 3 1 X 180˚ = 180˚ 2 Quadrilateral 4 4 2 X 180˚ = 360˚ 3 Pentagon 5 5 3 X 180˚ = 540˚ 4 Hexagon 6 6 4 X 180˚ = 720˚ 5 Heptagon/Septagon 7 7 5 X 180˚ = 900˚ 6 Octagon 8 8 6 X 180˚ = 1080˚ 7 Nonagon 9 9 7 X 180˚ = 1260˚ 8 Decagon 10 10 8 X 180˚ = 1440˚ 9 Polygon N N (N-2) X 180˚ 10 Circle 1 0 360˚
Phase 3-B: Generating More Plane Figures from the Original Selected Plane Figure
For the following learning exercise, you need to give the members of each group three large drawings (copies) of
n
their original plane figure, colored pencils, or colored felt pens, and two 12 inch rulers. Ask the members of each group to answer the following questions:
1. What kind of closed plane figure shape(s) can you get by dividing your original plane figure into two areas (a) By drawing a straight line from one angle to the faced side (diagonal)?
(b) By drawing a straight line between two opposite sides (perpendicular bisector)?
For example, some students will get 2-triangles from one triangle, 1-triangle and 1- trapezoid from one triangle, 2-triangles or 2-rectangles from a square, 2-trapezoids from one hexagon, 2-pentagons from an octagon, to name a few. See Figure 2.
2. Draw straight lines directly from a one single angle or corner into each of the other corners or angles in your chosen closed plane figure. Using Table 5 below, answer the following questions:
a. How many straight sides and angles does your chosen closed figure have?
b. How many straight lines can be drawn from a single angle or corner into each of the other corners or angles in the same closed plane figure?
c. How many closed plane figures can be produced by drawing straight lines from one single angle or corner into each of the other corners or angles in the same closed plane figure (Poonen and Rubinstein 1998)
d. What types of closed plane figures are produced as a result of drawing straight lines from one single angle or corner into each of the other corners or angles in the same closed plane figure?
Figure 2
The kind of closed plane figure shape(s) generated by dividing a plane figure into two areas
3. What conclusion can you come up with as a result of analyzing your answers to the questions above and recorded data in Table 5 below?
4. What have you learned from actively engaging in this learning exercise? For example, the students will be able to figure out and conclude that:
1. With the exception to the triangle, the number of straight lines that can be drawn from a single angle or corner into each of the other corners or angles is always three less than the actual number of sides of the given plane figure. (Actual # of sides – 3); (See Figure 3 for an example).
2. The number of closed plane figures that resulted from drawing from a single angle or corner into each of the other corners or angles is always two less than the actual number of sides of the given plane figure. (Actual # of sides – 2); (See Figure 3 for an example).
3. The types of the plane figures that result from drawing from a single angle or corner into each of the other corners or angles is always one type – a triangle. (See Figure 3 for an example).
Table 5:
Students’ Predications and their Actual Findings in drawing straight lines from one single angle or corner into each of the other corners or angles
Name of closed plane figure
Number of sides, points or angles in
the closed plane figure , ≥ 3
Number of straight lines that can be drawn from a single angle or corner into each of the other corners or angles
(diagonals)
− 3, ≥ 3
Number of closed plane figures that resulted from taking
the action − 2, ≥ 3 Types of closed plane figures that can be made in a chosen plane figure 1 Triangle 3 0 1 Triangles
2 Square 4 1 2 Triangles 3 Pentagon 5 2 3 Triangles 4 Hexagon 6 3 4 Triangles 5 Heptagon/ Septagon 7 4 5 Triangles 6 Octagon 8 5 6 Triangles 7 Nonagon 9 6 7 Triangles 8 Decagon 10 7 8 Triangles 9 Hendecagon 11 8 9 Triangles 10 Dodecagon 12 9 10 Triangles 11 Octadecagon 18 15 16 Triangles 12 Icositetragon 24 21 22 Triangles 13 Triacontagon 30 27 28 Triangles 14 Tetracontagon 40 37 38 Triangles 15 Pentacontagon 50 47 48 Triangles Figure 3
Drawing straight lines from one single angle or corner into each of the other corners or angles and from each angle or corner into each of the other corners or angles
Regular Hexagons Regular Octagons
Challenging Activity: From Simplicity to Complexity
To ensure that the students understand and comprehend what they have learned so far, challenge them with the following question based on what the students learned, were able to do, and were able to conclude.
1. Ask the members of the group who worked with the triangle plane figure to imagine that they draw a straight line from each corner (angle) that is perpendicular to the opposite side in their chosen triangle (plane figure).
2. Ask the members of the rest of the groups to imagine drawing straight lines from each of the angles to each of the other angles in their chosen plane figure.
3. Give each group of students a copy of Table 7-(i), then ask the members of all the groups, based on your imagination and following the instructions you have been given above, predict and record your predictions in Table 7-(i):
A. How many straight lines can you draw in your chosen plane figure? B. How many closed plane figures can you make in your chosen plane figure?
C. How many different types of closed plane figures can you get into your chosen plane figure? 4. Using the large drawing (copies) of their original plane figure, colored pencils (or colored felt pens), and
rulers, ask the members of all the groups to test their predications by actually: A. Drawing the needed straight lines in their chosen plane figures.
B. Using the colored pencils or colored felt pens to color the newly created closed plane figures. C. Recording their findings in Table 7-(i).
6. What types of inference and or conclusion can you make from your obtained data and findings? 7. What have you learned from actively engaging in this hands-on learning exercise?
Table 7-(i)
Students’ Predications and Their Actual Findings in Generating More Plane Figures from their Original Closed Plane Figures
Predictions Actual Findings 1 How many different straight lines can you make from each angle in your
chosen plane figure?
2 As a result of making straight lines from each angle, how many closed plane figures can you make in your chosen plane figure?
3 As a result of making straight lines from each angle, how many different closed plane figures can you get in your chosen plane figure?
4 What have you learned from actively engaging in this learning exercise?
For teachers: Figure 3 and the following Table 7(ii) are resources for teachers to help them guide their students in the discovery process of Table 7-(i).
Table 7-(ii)
Notes and resource for teachers to help guide their students in the discovery process
Name of closed plane figure Number of sides, points, angles Number of straight lines emerging from a single angle − 3
A total of all the straight lines that can be made from each angle into the other angles in a chosen plane figure (diagonals)
− 3 2
Number of closed plane figures that can be made in a chosen plane figure
Different types of closed plane figures that can be made in a chosen plane figure
1 Triangle 3 0 0 0 Triangle
2 Square 4 1 2 4 Triangles
3 Pentagon 5 2 5 11 Triangles and pentagon
4 Hexagon 6 3 9 24 Triangles and
quadrilaterals 5 Heptagon/ Septagon 7 4 14 50 Triangles, quadrilaterals, pentagons and heptagon 6 Octagon 8 5 20 80 Triangles, quadrilaterals, pentagons, hexagons and nonagon 7 Nonagon 9 6 27 154 Triangles and
quadrilaterals
8 Decagon 10 7 35 220
Triangles, quadrilaterals and pentagon
Phase 3-C: Fun With Manipulating the Sides of the Original Closed Plane Figure Ask the members of each group to answer the following questions:
1. How many different types of closed plane figures can you get by changing the length of the equal sides of your original plane figure from equal sides to unequal sides? Draw and name these different types of figures that all still have the same number of line segments but they are all now in unequal lengths.
Example 1. An equilateral triangle has all its sides the same length, an isosceles triangle has two of the three of its sides the same length, and the scalene triangle has all of its three sides different lengths. See the following Figure 4.
Figure 4: All Triangles Have Three Line Segments that Share Endpoints
Example 2. All of the following quadrilaterals have four line segments that share endpoints: A trapezoid (has two parallel sides), an isosceles trapezoid (has congruent nonparallel sides), a kite (has two pairs of adjacent congruent sides), a parallelogram (has pairs of opposite sides parallel), a rectangle (has a right angle), a square (has a pair of adjacent congruent sides). See Figure 5.
Figure 5: All Quadrilaterals Have Four Line Segments that Share Endpoints
2. How many plane figures can you get by changing the sizes of the angles of your figure? Draw and name these different figures that all still have the same number of angles and the same total sum of the angles as your original plane figure.
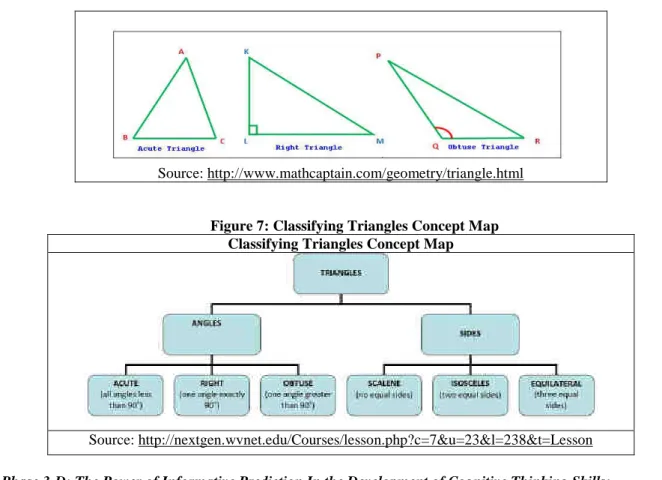
Example 3. The right triangle has one angle measuring 90˚, an obtuse triangle has one angle measuring more than 90˚ and the acute triangle has all its angles measuring less then 90˚. Yet, the total sum of the angles of each triangle is still the same. See Figure 6.
3. Knowing two angles in a given closed plane figure, how can you calculate the rest of the angles in the same figure? Illustrate your answer in writing and drawing.
4. Write one paragraph illustrating what you have learned from actively engaging in this learning hands-on exercise. Include in your writing a concept map on how many way you can classify Triangles, for example, students can classify triangles based on sides or angles (see figure 7 below).
Source: http://www.mathcaptain.com/geometry/triangle.html
Figure 7: Classifying Triangles Concept Map Classifying Triangles Concept Map
Source: http://nextgen.wvnet.edu/Courses/lesson.php?c=7&u=23&l=238&t=Lesson Phase 3-D: The Power of Informative Prediction In the Development of Cognitive Thinking Skills:
So far, in all parts of Phase III we worked with various plane figures that had an equal number of segments or sides. The questions are:
1. What do you think will happen if you change the length of one or two sides in your original selected plane figure? Write your predictions down. Explain.
2. What do you think will happen if you change the size of one or two angles in your original selected plane figure? Write your predictions down. Explain.
Phase 3-E: Testing Your Understanding by Playing with the Triangle
The following hands-on learning exercise is for all the students to do. A triangle is a polygon made up of three segments, or sides. However, based on the length of the sides and the size of the angles, triangles can be classified into six types as shown in Table 7. A triangle with sides A, B, C can be read and or consider as ΔABC. Using Table 7, the members of each group will follow the directions in the first column (in Table 7) to draw the corresponding closed plane figure in column three of the same table.
Table 7: Triangles, Types and Description
Description of Sides and or Angles Type of Triangles Draw the shape of this triangle 1 All sides are the same length Equilateral triangle
2 Two or more sides are the same Isosceles triangle 3 All sides are different lengths Scalene triangle 4 One angle is a right angle Right triangle 5 One angle is an obtuse angle Obtuse triangle 6 All three angles are acute Acute triangle Based on what you learned and the information in Table 7:
1. Identify which of the following statements are accurate or not and why: a. All equilateral triangles are also isosceles?
b. All isosceles triangles are equilateral?
2. A triangle is a polygon made of three straight segments, or sides and angles. Where do you see a real-world application of angles of various types?
3. An angle is a set of points consisting of two rays, or half-lines, with a common endpoint (known as the vertex). Where do you see a real-world application of angles of various types?
4. Since the sum of the angles of any triangle is 180˚, and if you know the measurement of two angles, how can you find out or calculate the third angle?
5. Knowing that the sum of the angles of any triangle is 180˚, and a triangle is a polygon made of three segments, or sides, how can you use this information to find out the sum of the angles of other types of regular plane figures (Regular Polygon). Demonstrate your explanation with actual illustrations. (Hint: If n = the number of sides of a given polygon, then it can be divided into n-2 triangles, each having 180˚ as the sum of its angles. Thus the sum of the angle is (n-2) X 180˚. For example, a five-sided figure (pentagon) can be divided into 5-2= 3 triangles. The sum of the angles of each triangle is 180˚. Thus the sum of the angle of the five-sided figure (polygon) is 3 X 180˚ = 3,540˚).
6. Your teacher will give you a copy of the map of the United States with its 50 unnamed states. Using this map of the United States:
a. Label as many U.S. states as you can. Talk with you classmates and or use an atlas if needed to finish labeling the states.
b. Select three states that you like and/ or would love to visit.
c. Match each of your three selected states to the closest shape of a given regular plane figure (polygon).
d. Which of your three selected state shapes can be easily matched to a shape of a given polygon? Explain.
e. Which of your three-selected state shape cannot easily be matched to a shape of a given polygon? Explain.
7. Re-draw the map of the U.S.A. using regular and irregular geometrical plane figures to illustrate the states.
8. Write one paragraph explaining what you have learned by engaging in this hands-on learning exercise. Activity: One Plane Figure - Multiple Names
Regular plane figures can be identified with more than one term. The table below lists plane figures in the first column.
1. Study the plane figures listed in the first column in Table 8. Then draw the figure in column two. 2. In column three, select and list all the term(s) that can also be used to identify the plane figure listed in
column one.
Table 8
Regular plane figures can be identified with more than one term Regular plane
figure
Draw the shape of the regular plane figure
Which of the following terms can also be used to identify this regular plane figure? (Hexagon, kite, parallelogram, quadrilateral, rectangle, regular polygon, rhombus, square,
trapezoid and triangle) 1 Square 2 Triangle 3 Kite 4 Rectangle 5 Parallelogram 6 Quadrilateral 7 Hexagon 8 Right triangles 9 Trapezoid 10 Rhombus 11 Circle
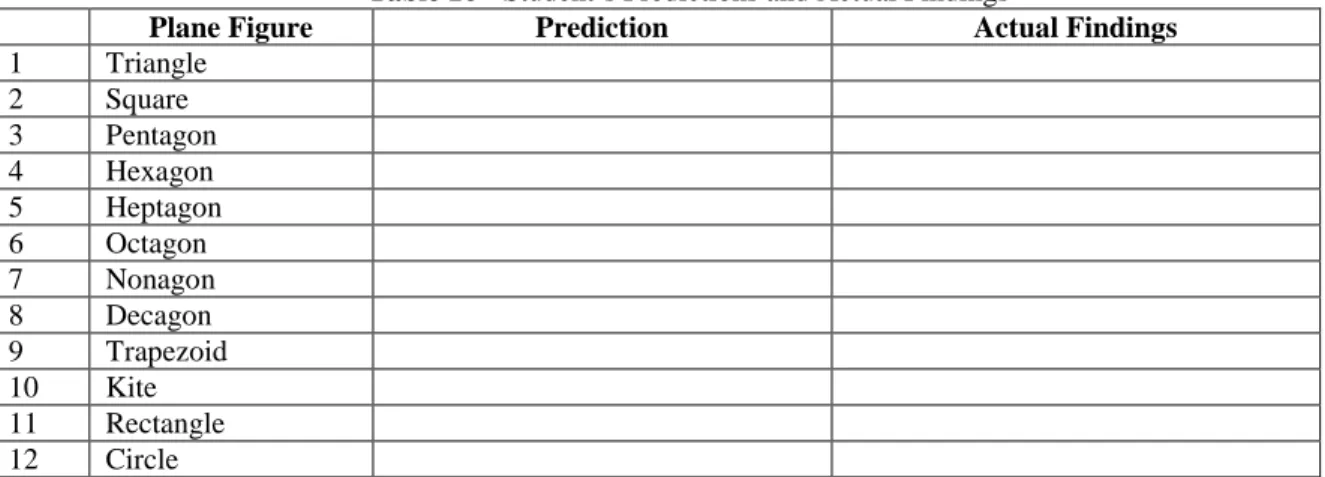
3.3. Part One– Stage III: Discovering Patterns and Relationships in Plane Figures (Regular Geometrical Shapes)
Procedures for Stage Three: As in all the previous stages, in this activity, all the questions are directed to and must be answered by all the groups in writing and in drawing.
1. Give each student a copy of Table 9. Then divide the blackboard or the whiteboard into two large sections and divide each section into three subsections as shown in Table 8.
2. Ask all the students to fill Table 8, using the information they have already generated. Then ask
representatives from each group to come and transfer the information from their own Table 8 onto the similar table on the blackboard.
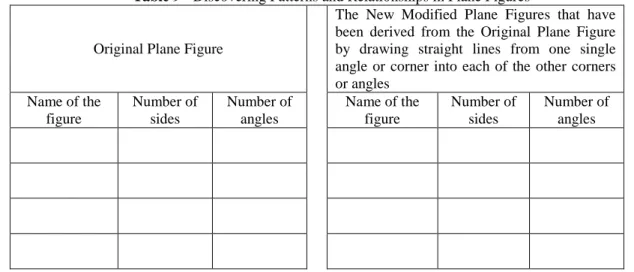
Table 9 - Discovering Patterns and Relationships in Plane Figures
Original Plane Figure
The New Modified Plane Figures that have been derived from the Original Plane Figure by drawing straight lines from one single angle or corner into each of the other corners or angles Name of the figure Number of sides Number of angles Name of the figure Number of sides Number of angles
3. Ask all the groups to study Table 9 by analyzing and comparing the number of sides and the number of angles in the plane figures. Then ask the following questions:
a. What kind of inference can you make about the relationship between the number of sides and the number of angles in a given plane figure (by using what you observed to explain what you discovered?) b. Can you predict how many angles a plane figure with 24 sides will have?
c. Can you predict how many sides a plane figure with 18 angles will have?
d. Can you find a relationship between the kind of angle and the number of angles, or the number of sides in a plane figure?
e. Can you predict which plane figure can or cannot be divided into two, three, or four equal parts when all the sides are equal? Use Table 10 to answer this question.
Table 10
Identifying Patterns and Relationships in Plane Figures Original
Plane Figure
A Figure Divided into 2 Equal Parts When All The
Sides are Equal
A Figure Divided into more than 2 Equal Parts When All The Sides are
Equal
A Figure that cannot be Divided into more than 2 Equal Parts When All The
Sides are Equal
4. Part Two: Developing an Awareness of Three - Dimensional (3-D) Solid Shapes 4.1.Description For Part Two:
In part 2 of the learning activities students will have the opportunity to transfer 2-dimensional plane figures into 3-dimensional shapes. In doing so, the students will learn to differentiate between 2-D and 3-D figures, identify the characteristics, properties, use, and implementation of the D shapes in real life, and how to construct 3-dimensional shapes using straws and or popsicle sticks. As in part one, part two is also divided into three stages of related learning activities.
A three dimensional (3D) shape or object is an object that has width, depth and height, and thus identified as solid geometry (the geometry of three-dimensional space). But unlike the 2-dimensional shape, the 3-dimensional shapes, by their nature, have an inside and an outside, separated by a surface.
There are two types of 3-dimensional figures: (a) those that have straight sides and are identified as polyhedrons, (based on polygons), and (b) those solids objects which have curved sides. Spheres, cubes, cones,
pyramids, rectangular prisms, and cylinders, are only a few of many examples of 3D-objects that we encounter on a daily basis. Solid objects (3-D) have special properties that distinguish them from regular plane figures such as volume and surface area, as well as the number of vertices (points), faces, and edges. Polyhedrons are defined as having straight edges, flat sides called faces, and corners, called vertices. They are differentiated by whether their faces are the same shape and/or size.
Like in Part 1, which dealt strictly with 2-dimensional plane figures, Part 2 consists of a number of stages that are designed so that what students discover and learn in one stage can be used for engaging students in the discovery and learning of the following stages.
4.2.Part Two – Stage I: Developing an Awareness of Three - Dimensional (3-D) Solid Shapes (Objects) Around You
In this stage of the activity all the questions will be directed to all the groups. Thus, ask members of each group to:
1. Draw and name your original plane figure as a 3- dimensional shape (solid object).
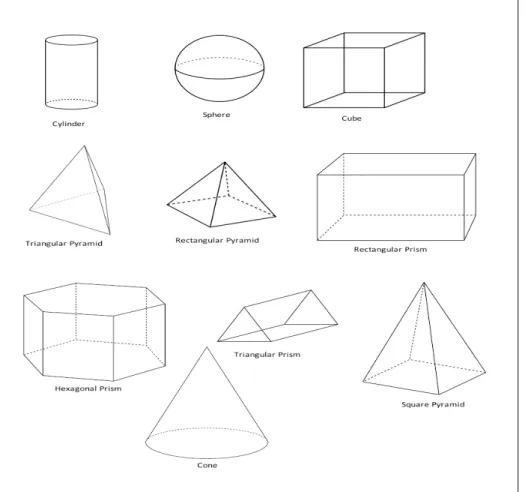
Example: cylinder, sphere, cube, triangular pyramid, rectangular pyramid, rectangular prism, hexagonal prism, triangular prism, square pyramid, or cone. See Figure 8.
There are a number of hands-on techniques that teachers can use to engage students to construct 3-dimensional shapes from 2-3-dimensional figures. The following is one way that we found to be helpful.
a. Draw a plane figure on graph paper using a dark marker. Then place a sheet of transparent or wax paper on top of the first paper and outline the plane figure you have already drawn, using a different color felt pen.
b. Move the transparency or wax paper in two directions at the same distance and perpendicular to each other.
c. Connect the symmetrical points of the two plane figures; each point in the first figure (black figure on the graphic paper) with its corresponding point in the second figure (the colored figure on the transparent sheet).
d. The result will be a three dimensional figure of your original plane figure on the sheet of transparent or wax paper.
After you give your student enough time to practice using this approach to create a 3-dimensional figure from their original plane figure (2-D), ask them:
1. Can you think of other ways or techniques that you could use to create a 3-dimensional shape from your original plane figure?
2. How many different 3-dimensional shapes can you make from your original plane figure?
3. What are the differences and similarities between all the 3-dimensional shapes that you created from your answers of step 2?
4. What are the differences and similarities between 2-dimensional plane figures and 3-dimensional shapes or objects?
5. Write down a one paragraph explanation of what you have learned from being actively engaged in this learning exercise.
4.3.Part Two – Stage II: Knowing Your Chosen 3-Dimensional Shapes Better
Procedures: In this stage of the activity all the questions are directed to, and must be answered, by all the groups. Thus, members of each group are going to work collaboratively to answer the questions in both written and in drawing form. Members of each group must take turns recording questions, writing answers, and making drawings. Ask all the groups to:
4.3.1. Phase – 1: 3-Dimensional Shapes (Solid Objects):
Phase – 1-A: Defining and Describing 3-Dimensional Shapes (Solid Objects):
1. In written words, define and describe your 3-Dimensional shape using as less words as possible, but as accurate a description as possible.
2. Discuss your definition and description of your 3-Dimensional shape with the whole class and modify it accordingly (if you have to).
Phase – I-B: Naming Your 3-Dimensional shapes:
Give each group a copy of the Table 11 but without the information in the third column. Then ask the member of each group to select a name for their 3-Dimensional shapes and to justify their selection. Providing a reasonable explanation for naming a given 3-D shapes or object is important because students might choose to name their 3-D shapes names that have no relationship to the width, depth and height, number of vertices (corner points), number of the faces (sides), and planes of the 3-D shapes. Furthermore, challenging students' choices of names and their reasons behind them force students to think of names that are relative to and have a relationship to some aspect of the 3-D shapes.
Table 11
Regular 3-Dimensional Solid Shapes
Number of Sides in a Given Three- Dimensional Figure Number of Flat Faces (sides)
Figure's Name
1
Four triangles with three of them at each corner. Each triangle with
three line segments that share endpoints and with all sides equal Four Tetrahedron 2
Six squares with three of them at each corner. Each square with
four line segments that share endpoints and with all sides equal. Six
Hexahedron (Cube) 3
Eight triangles with four of them at each corner. Each triangle with
three line segments that share endpoints and with all sides equal. Eight Octahedron 4
Twelve pentagons with three pentagons at each corner. Each pentagon with five line segments share endpoints and with all sides equal.
Twelve Dodecahedron
5
Twenty triangles with five triangles at each
corner. Each triangle with three line segments share endpoints and with all sides equal.
Twenty Icosahedrons
For teachers:
Using Euler’s Formula
or, in words: the number of vertices (V), minus the number of edges (E), plus the number of faces (F), is equal to two. It can be derived that
Meaning that if you add the number of corners to the number of faces of any one of these solids, you will get the
V
−
E
+
F
=
2
E
=
V
+
F
+
2
number of edges in the solid plus 2. Try it with a cube. There are eight corners, and six faces, so the sum of these numbers is 14. Now count the number of edges (Adler, 1960, p. 36-37).
How to Make a Solid Object with Flat Faces:
First make an equilateral triangle, a square, and a regular pentagon on cardboard, and cut them out. Then you can make each figure as many times as you have to, and in the right position, by tracing around the cardboard form. When a pattern is complete, cut it out, and make creases on the lines. After you fold it up, seal it by binding the edges with adhesive tape (Adler, 1960, p. 36-37).
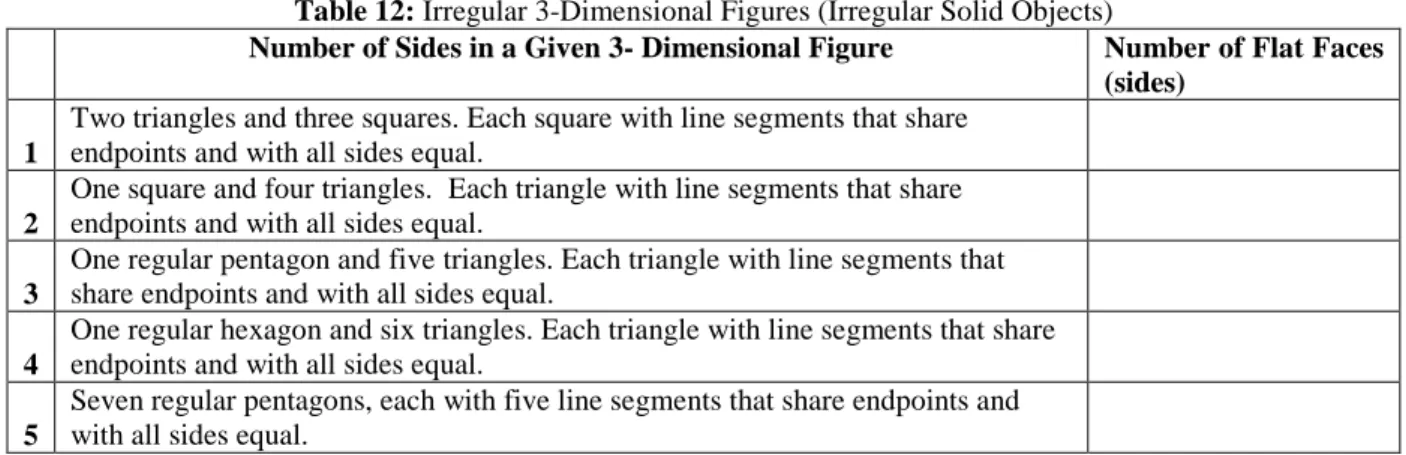
Table 12: Irregular 3-Dimensional Figures (Irregular Solid Objects)
Number of Sides in a Given 3- Dimensional Figure Number of Flat Faces (sides)
1
Two triangles and three squares. Each square with line segments that share endpoints and with all sides equal.
2
One square and four triangles. Each triangle with line segments that share endpoints and with all sides equal.
3
One regular pentagon and five triangles. Each triangle with line segments that share endpoints and with all sides equal.
4
One regular hexagon and six triangles. Each triangle with line segments that share endpoints and with all sides equal.
5
Seven regular pentagons, each with five line segments that share endpoints and with all sides equal.
4.3.2. Phase - 2: Knowing Your 3-Dimensional Shape (Solid Object) Better: Phase 2-A: How Well Do You Know Your New 3-Dimensional Shape (Solid Object)?
In this part students will be given the opportunity to deepen their understanding on 3-dimensional shapes by adding the two new notions of surface area and volume. The surface area of a solid object is a measure of the total area that the surface of the object occupies. Volume is the quantity of 3-Dimensional space enclosed by a closed surface.
All the questions in this section are directed to and must be answered by the members of each group. Students may use protractors for the measurement of angles and 12-inch rulers for the measurement of sides.
1. How many sides does your new 3-Dimensional shape have? 2. How many angles does your a new 3-Dimensional shape have? 3. What is the measurement of each angle and what is each angle called?
4. What is the total measurement of all the angles in your new 3-Dimensional shape? 5. What is the length of each line segment (side) in your new 3-Dimensional shape?
6. What is the total length of all the line segments (sides) of your new 3-Dimensional shape?
7. What do you think is needed from you to know in order to find the surface area of your 3-Dimensional shape?
8. What do you think is needed from you to know in order to find the volume of your 3-Dimensional shape?
9. Put all your answers for question 1-8 in written and paragraph form.
10. Write one or two paragraphs explaining what you have learned from actively engaging in this learning exercise about your 3-Dimensional (solid) shape.
Phase 2-B: Manipulating and Generating Various 3-Dimensional Shapes from Your Original 3-Dimensional Figure
All the questions in this section are directed to and must be answered by the members of each group.
1. How many Dimensional shapes can you get by changing the length of the sides of your original 3-Dimensional figure? Draw and name these different 3-3-Dimensional shapes.
2. How many 3-Dimensional shapes can you get by changing the sizes (measurement) of the angles of your original 3-Dimensional shape? Draw and name these different 3-Dimensional shapes.
3. Name five objects that have approximately the same shapes as your original 3-Dimensional shape. 4. Put all your answers for questions 1-3 in written and paragraph form.
5. What can you conclude or infer from your findings?
6. Write one paragraph explaining what you have learned from actively engaging in this learning exercise about your 3-Dimensional (solid) shape.
4.4.Part Two – Stage III: Discovering Patterns And Relationships in 3-Dimension Shapes (Solid Geometrical Objects)
Give each group of students one copy of Table 12. Then divide the blackboard or whiteboard into two large sections and divide each section into three subsections as shown in Table 12.
Procedures For Stage III: Like in all the previous stages, in this stage of the activity, all the questions are directed to and must be answered by all the groups in writing and in drawings.
1. Ask all the student to fill table 12 using the information they already have generated, then ask representatives from each group to come and transfer the information from their own table 12 onto the table on the blackboard.
2. Ask all the groups to study Table 13 by analyzing and comparing the number of sides and the number of angles in a given 3-Dimensional shape. Then ask the following questions:
Table 13
Discovering Patterns and Relationships in 3-Dimensional Shapes (Solid Geometrical Objects) Original 3- Dimensional Shapes
The New Modified 3-Dimensional Shapes that have been derived in Phase II-B Name of The Figures Number of Sides (Faces) Number of Angles (Vertices) Name of The Figures Number of Sides (Faces) Number of Angles (Vertices)
a. What kind of inference can you make about the relationship between the number of sides and the number of angles in a 3-Dimensional shape, by using what you have observed to explain what you discovered?
b. Can you predict how many angles a 3-Dimensional shape with 24 sides will have? c. Can you predict how many sides a 3-Dimensional shape with 18 angles will have?
d. Can you find a relationship between the kind of angle and the number of angles or the number of sides in a given 3-Dimensional shape?
e. Can you predict which one can or cannot be divided into two, three, and four equal parts when all the sides are equal?
f. What can you conclude or infer from your findings?
g. Write one paragraph explaining what you have learned from actively engaging in this learning exercise about 3-Dimensional (solid) shapes.
Making The Connection: Geometry and Human Societies
Geometry is not only an important part of mathematics, but it is also an important part of life. You might be surprised to discover that any physical item that you can touch is indeed a 3-Dimensional object. In the following activities, students will engage in active research finding and making sense of the real connection between geometry, life, and the world around us.
Ask all the students to:
1. Take their original plane figure and change it into a star shape with symmetrical points by drawing straight lines joining two opposite angles (diagonals).
2. Take their original 3-Dimensional shape and change it into a star shape with symmetrical points by drawing straight lines joining two opposite vertices (diagonals).
3. Try to associate a given star with a similar symbol that is used by a given human community, culture or society in our beautiful world.
4. Conduct a library search to discover if there is a society or culture that has been using the star you have created from your original plane figure and/or the 3-Dimensional shape as a cultural symbol.
5. Conduct library research to discover how many of the plane figures drawn in the class can be found in coins in this country and throughout the world.
6. Conduct marketing research to find out how many of all the plane figures and the 3-Dimensional shapes that have been drawn in the class can be seen in or are popular in jewelry making (gemstones etc.). 5. Part Three: Discovering Regular and Solid Geometry (regular polygons and polyhedra) In the Living
World Around Us
Part three is divided into two stages of related learning activities.
5.1. Part Three – Stage I: Developing Learning Skills of Constructing and Calculating Plane Figures and Solid Shapes
By now, the students have enough data and information that enable them to discover patterns and relationships between plane figures, 3-Dimensional solid shapes, and the relationships between the number of sides and angles in plane figures and 3-Dimensional shapes. Because of this, the students are ready to construct regular planes and solid shape diagrams and calculate their volume, surface areas, angles, etc. as well as to apply their understanding in real world solutions.
Procedures: In this stage of the activity, all the questions are directed to and must be answered by all the groups in writing and in drawing. Thus, ask all the groups to:
1. Describe a regular polyhedron.
2. According to your previous definition in question 1, describe an irregular 3-Dimensional shape. 3. A pyramid and a prism are both named by the shape of their what?
4. What kind of shapes can be fit together to make a regular polyhedron?
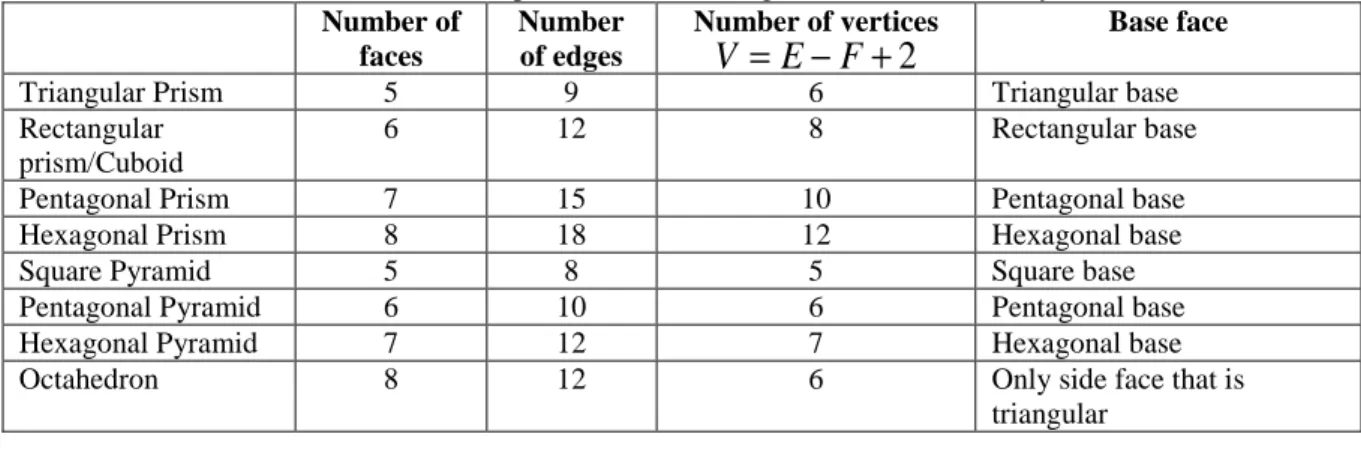
Table 14: Relationship between Faces, Edges and Vertices of Polyhedrons Number of faces Number of edges Number of vertices
V
=
E
−
F
+
2
Base faceTriangular Prism 5 9 6 Triangular base
Rectangular prism/Cuboid
6 12 8 Rectangular base
Pentagonal Prism 7 15 10 Pentagonal base
Hexagonal Prism 8 18 12 Hexagonal base
Square Pyramid 5 8 5 Square base
Pentagonal Pyramid 6 10 6 Pentagonal base
Hexagonal Pyramid 7 12 7 Hexagonal base
Octahedron 8 12 6 Only side face that is
triangular More challenging Topic:
Platonic solids are 3-Dimensional shapes where each face is the same regular polygon and the same number of polygons meets at each vertex. The platonic solids are only 5, tetrahedron, cube, octahedron, dodecahedron, and icosahedron. The Platonic solids were known to the ancient Greeks, and were described by Plato in his Timaeus ca. 350 BC. Why are there only 5 platonic solids? Students can use Table 15 to answer this question.
Table 15 - Platonic Solids
Name of Polyhedron Number of Faces Number of Edges Number of Vertices
Tetrahedron/Cube 4 6 4
Cube/Hexahedron 6 12 8
Octahedron 8 12 6
Dodecahedron 12 30 12
Icosahedron 20 30 20
Students’ answers may vary: some of them could be each vertex must be in contact with at least three sides; the sum of the angles at each vertex must be less than 360 degrees; the angles at all vertices must be equal; and the common face can only be a triangles, square, or pentagon, as faces with six or more sides have angles that are too great to be valid.
5.2. Part Three – Stage II: Plane and Solid Geometry in the Living World
1. Conduct a library and internet research to identify five examples of plane figures and 3-dimensional (solid) shapes in:
• Animals
• Microorganisms • Human-made objects • Natural made objects • Buildings and bridges • Parks and Gardens • Salt, Sugar and Minerals • Snowflake
• Grain of sand • Hive
2. Write one paragraph to describe each identified item and support your description with an illustration or drawing.
3. As a result of successfully completing this activity, what have you learned about plane and solid geometry in the living world?
5. Part Four: Assessment and Reinforcement of Students' Understanding of the Intended Learning Concepts
Part four is divided into two stages of related learning activities. 6.1. Part Four – Stage I: It's Time For Geometry, Art & Fun
A. We Have a Job for you! Geometry, Jobs, and Professional Careers: Procedures:
1. Read or provide the following statement to your students:
If you are an expert in geometry and design, we are looking for an experienced Garden Designer, Jewelry Designer, and Shopping-mall Designers to help us design public gardens and parks, jewelry, and public shopping malls. The main criteria in designing these three types of places are to use geometry and plane figures in the design as well as the associated areas.
We are looking for those with expertise in using geometrical plane figures and shapes to design intricately crafted artisan jewelry, to design highly inviting and entertaining shopping malls that appeal to all types of people of all ages, and extraordinary garden designs that can enhance the city’s urban landscapes and neighborhoods.
1. Ask each student which role he or she would like to assume and play in this activity. Then put the students into groups of 3-4 students with similar interests to work together on their selected profession. Remind the students that they are jewelry designers, park and garden designers, or shopping mall designers, and they must utilize geometrical figures, shapes, and properties in their designs.
2. Remind each group to submit their two copies of their final design as well as a written description of the design and rationale and justification behind their selection.
3. When all the groups are ready, ask the groups to present their designs in the classroom.
4. Provide the opportunity for the members of the other groups to ask questions at the end of each group’s presentation.
5. At the end, ask all the students to assign a grade level based on 1-to-10, with 10 for the best design. Each student must also explain the grade he or she gives to a given design.
B. Let Us Make Jewelry for Those Who We Love, Respect, and Admire
Jewelry is personal, durable ornamentation, such as necklaces, rings, brooches, earrings, and bracelets. They are typically made from or contain small decorative items such as jewels and precious metals, which are specifically designed with a goal and purpose in mind. In this sense, it is the design of the jewelry that first attracts and captures the attention of customers more than what a jewelry is made of. In this learning activity, all the students assume the role of jewelry designers who are asked to design jewelry based on geometrical shapes and forms with a highly creative visual appeal for those who like to wear jewelry.
In this learning activity students are working individually, thus ask each individual student to: 1. Select 1-3 different plane figures to work with.
2. Using the 1-3 selected plane figures, design 5 different pieces of jewelry.
3. Name each design, describe its designed structure, artistic appeal, and provide a rationale for why you created these particular designs.
4. Write two paragraphs to summarize your answers in question 1-3 in a letter to a friend that you think might be interested in your designs.
C. Artistic Mathematics of Perspective
Historically speaking, “humans have been having fun and games with mathematics for thousands of years. Along the way, they’ve discovered the amazing unity of this field – in [arts], science, engineering, finance, games of chance, and many other aspects of life [and living]” Albrecht Durer, the great German artist was widely cited by saying that “Geometry is the right foundation of painting.” As Alder (1960) explained:
To make a painting look real, the painter thinks of his canvas as a “window” through which he is looking at a scene that is beyond it. He reasons in this way: Each point of the scene sends a ray of light to the eye of the person looking at it. These rays of light pass through the “window” between the eye and the scene. The place where a ray crosses the window is the place where the point it comes from will appear in the picture. The collection of rays going from the scene to the eye is called a projection. The picture formed where the window crosses the projection is called a section. To figure out what the section will look like is a problem of perspective. The rules of perspective were worked out with the help of geometry.[Two rules of perspectives applied]. … The further away something is, the smaller it looks. Parallel lines that go off into the distance, like straight railroad tracks, look as though they come to a point. Mathematics helped art through the science of perspective. But then art repaid its debt. This is because the study of perspective led to the development of a new branch of mathematics called projective geometry. (Alder, 1960, p. 80)
1. Share the technique described above by Alder with the students.
2. Provide the students with copies of 3-4 different photos of plants, flowers, birds, dogs, and or horses. 3. Ask each student individually to select one photo and to try to follow the technique described above by
Alder to make a painting of their selected photo.
4. Ask each student to write 2 paragraphs descripting what they did and what they learned. D. Paying Loyalty and Respect to the Prince of Mathematics:
Carl Friedrich Gauss (1777-1855) has been described by many scholars as the prince of mathematics. Ask the students to individually:
1. Conduct library research on Carl Friedrich Gauss (1777-1855). Then prepare a presentation to introduce him to a group of visitors from outside our solar system.
2. In your presentation, talk about the significant contribution Gauss made in mathematics to humanity, and to understanding the world around us.
3. Conclude your presentation with a justification as to why he has been called “the prince of mathematics.”
4. Finally end your talk with your own perspective on what you think of Carl Friedrich Gauss and why all school children should learn about his life and contribution to our understanding of the world around us. E. Being a Well Known Artist:
Tell your students that each one of them is a recognized artist and people are coming from all over the world to look at his or her artwork. Then ask them to use one of their combinations of plane figures and or 3-dimensional figures to answer the following questions:
1. What type of geometrical shape and or form (plane figures and or 3-Dimensional figures) will you select to create an art project? Explain
2. What type of art will you choose to make? Explain
3. What have you learned from actively engaging in this authentic learning experience?
4. What informative advice would you give to someone who wants to start using geometrical shapes and forms for making art projects?
F. Fun and Challenge: How Many Coins Can You Fit in a Plane Figure?
Given that the surface areas of different types of plane figures are equal (the same), use Table 15 to predict which type of plane figure you think will hold the highest number of coins (pennies) that are placed inside? (Adapted from Cherif, Gialamas, and Adams 2003)
1. Identify how the surface area of each selected type of plane figure is measured and calculated. 2. Identify how the surface area of a circle is measured and calculated.
3. Identify how the surface area of a coin (a penny) is measured and calculated.
4. Write down your predications. Explain why you think your predication is more reasonable. 5. Explain how you are going to test your predictions to find out which type of plane figure holds the
highest number of pennies in comparison to the other types of plane figures that have the same surface areas.