Edition April 2012
EPOS Positioning Controllers
USB Driver Installation
maxon motor control
Positioning Controllers
USB Driver Installation
maxon motor control
A-2
Document ID: rel3137 EPOS Positioning ControllersEdition: April 2012 EPOS USB Driver Installation
© 2012 maxon motor. Subject to change without prior notice.
PLEASE READ THIS FIRST
The present document contains supplemental information to the «Getting Started» document of the respective EPOS Positioning Controller you are using.
We strongly stress the following facts:
• The present document does not replace any other documentation covering the basic installation and/ or parameterization described therein!
• Also, any aspect in regard to health and safety, as well as to secure and safe operation are not cov-ered in the present document – it is intended and must be understood as complimenting addition to those documents!
1
About this Document
5
2
Windows 7
7
3
Windows Vista
11
4
Windows XP
15
maxon motor control
A-4
Document ID: rel3137 EPOS Positioning ControllersEdition: April 2012 EPOS USB Driver Installation
© 2012 maxon motor. Subject to change without prior notice.
About this Document
1
About this Document
The present document provides information on the USB driver installation when connecting the EPOS Positioning Controller to the PC’s USB port for the first time.
It covers the respective routines for the following Microsoft® operation systems: • Windows 7
• Windows Vista • Windows XP, SP3
Note
Operating System Languages
Designation of program directories as well as menus and buttons may vary depending on the system language installed.
1.1
How to use
Take note of the following notations and codes which will be used throughout the document.
Table 1-1 Notations used in this Document
1.2
Trademarks and Brand Names
For easier legibility, registered brand names are listed below and will not be further tagged with their respective trademark. It must be understood that the brands (the below list is not necessarily conclud-ing) are protected by copyright and/or other intellectual property rights even if their legal trademarks are omitted in the later course of this document.
Table 1-2 Brand Names and Trademark Owners
Notation Explanation
«Abcd» indicating a title or a name (such as of document, product, mode, etc.)
¤Abcd¤
indicating an action to be performed using a software control element (such as folder, menu, drop-down menu, button, check box, etc.) or a hardware element (such as switch, DIP switch, etc.)
(n) referring to an item (such as order number, list item, etc.)
denotes “see”, “see also”, “take note of” or “go to”
The brand name(s) … … is/are a registered trademark(s) of … Windows Vista® © Microsoft Corporation, USA-Redmond, WA Windows® © Microsoft Corporation, USA-Redmond, WA
About this Document
© 2012 maxon motor. Subject to change without prior notice.
maxon motor control
1-6
Document ID: rel3137 EPOS Positioning ControllersEdition: April 2012 EPOS USB Driver Installation
1.3
Copyright
© 2012 maxon motor. All rights reserved.
The present document – including all parts thereof – is protected by copyright. Any use (including repro-duction, translation, microfilming and other means of electronic data processing) beyond the narrow restrictions of the copyright law without the prior approval of maxon motor ag, is not permitted and sub-ject to persecution under the applicable law.
maxon motor ag Brünigstrasse 220 P.O.Box 263 CH-6072 Sachseln Switzerland
Phone +41 (41) 666 15 00 Fax +41 (41) 666 16 50 www.maxonmotor.com
Windows 7
2
Windows 7
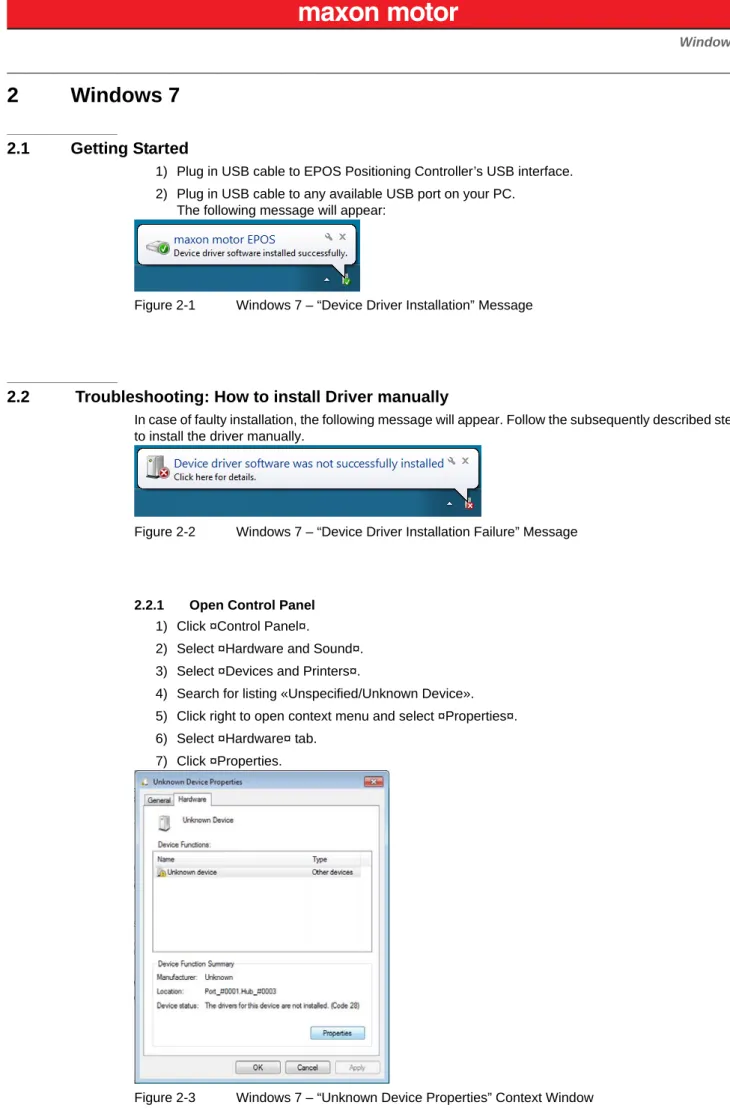
2.1
Getting Started
1) Plug in USB cable to EPOS Positioning Controller’s USB interface. 2) Plug in USB cable to any available USB port on your PC.
The following message will appear:
Figure 2-1 Windows 7 – “Device Driver Installation” Message
2.2
Troubleshooting: How to install Driver manually
In case of faulty installation, the following message will appear. Follow the subsequently described steps to install the driver manually.
Figure 2-2 Windows 7 – “Device Driver Installation Failure” Message
2.2.1 Open Control Panel 1) Click ¤Control Panel¤.
2) Select ¤Hardware and Sound¤. 3) Select ¤Devices and Printers¤.
4) Search for listing «Unspecified/Unknown Device». 5) Click right to open context menu and select ¤Properties¤. 6) Select ¤Hardware¤ tab.
7) Click ¤Properties.
Windows 7
© 2012 maxon motor. Subject to change without prior notice.
maxon motor control
2-8
Document ID: rel3137 EPOS Positioning ControllersEdition: April 2012 EPOS USB Driver Installation
8) Select ¤Change Settings¤.
Figure 2-4 Windows 7 – “Unknown Device Properties” Window
9) Click ¤Update Drivers¤.
The following screen will appear:
Figure 2-5 Windows 7 – “Update Driver Software” Screen 10) Click ¤Browse my computer for driver software¤.
Windows 7
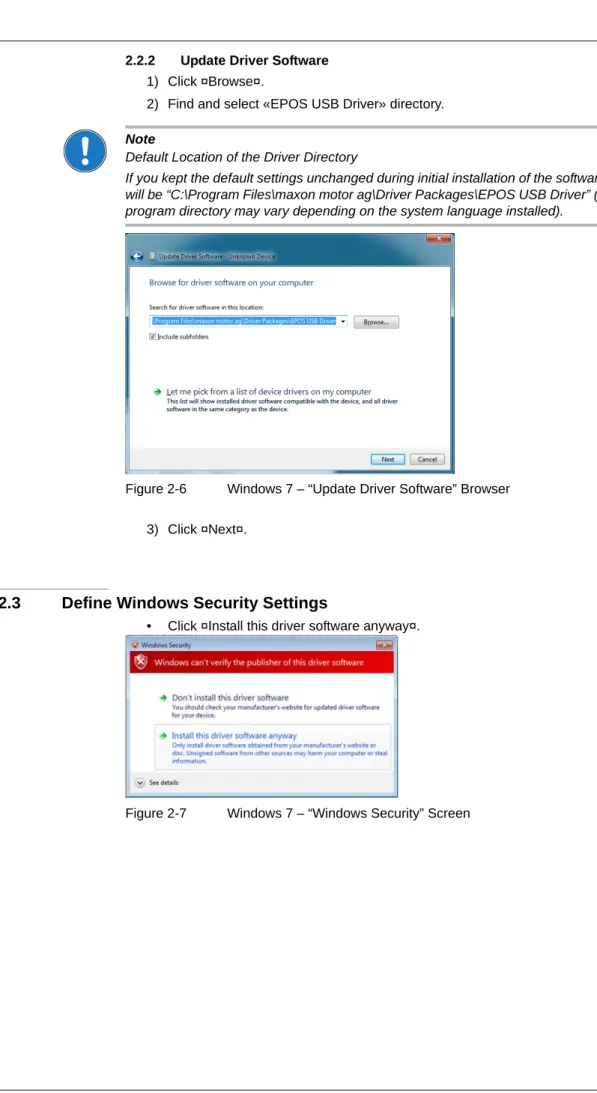
2.2.2 Update Driver Software 1) Click ¤Browse¤.
2) Find and select «EPOS USB Driver» directory.
Note
Default Location of the Driver Directory
If you kept the default settings unchanged during initial installation of the software, the working directory will be “C:\Program Files\maxon motor ag\Driver Packages\EPOS USB Driver” (note that designation of program directory may vary depending on the system language installed).
Figure 2-6 Windows 7 – “Update Driver Software” Browser
3) Click ¤Next¤.
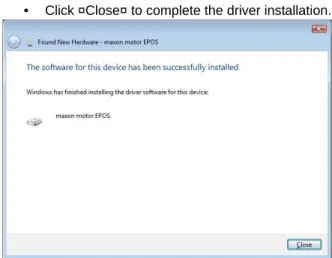
2.3
Define Windows Security Settings
• Click ¤Install this driver software anyway¤.
Windows 7
© 2012 maxon motor. Subject to change without prior notice.
maxon motor control
2-10
Document ID: rel3137 EPOS Positioning ControllersEdition: April 2012 EPOS USB Driver Installation
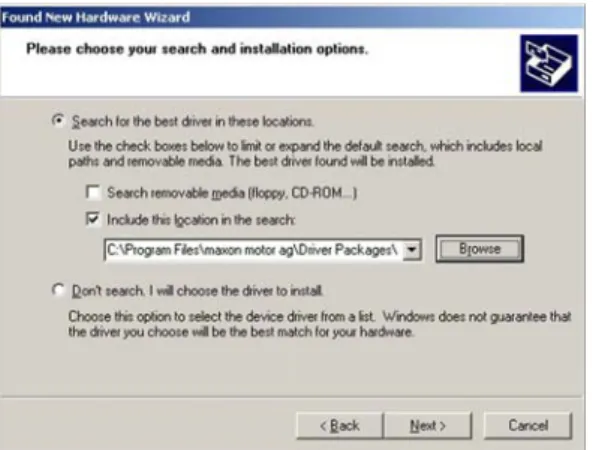
2.4
Complete Driver Installation
• Click ¤Close¤ to complete the installation.
Windows Vista
3
Windows Vista
3.1
Getting Started
1) Plug in USB cable to EPOS Positioning Controller’s USB interface. 2) Plug in USB cable to any available USB port on your PC.
The following message will appear:
Figure 3-9 Windows Vista – “Device Driver Installation” Message
3.2
Troubleshooting: How to install Driver manually
If the following message appears, follow the subsequently described steps to install the driver manually.
Figure 3-10 Windows Vista – “Found New Hardware” Screen 1) Click ¤I don't have the disc. Show me other options¤.
Windows Vista
© 2012 maxon motor. Subject to change without prior notice.
maxon motor control
3-12
Document ID: rel3137 EPOS Positioning ControllersEdition: April 2012 EPOS USB Driver Installation
2) Click ¤Browse my computer for driver software (advanced)¤.
Figure 3-12 Windows Vista – “Found New Hardware” Screen 3
3.3
Update Driver Software
1) Click ¤Browse¤.
2) Find and select «EPOS USB Driver» directory.
Note
Default Location of the Driver Directory
If you kept the default settings unchanged during initial installation of the software, the working directory will be “C:\Program Files\maxon motor ag\Driver Packages\EPOS USB Driver” (note that designation of program directory may vary depending on the system language installed).
Figure 3-13 Windows Vista – “Update Driver Software” Browser 3) Click ¤Next¤.
Windows Vista
3.4
Define Windows Security Settings
• Click ¤Install this driver software anyway¤.
Figure 3-14 Windows Vista – “Windows Security” Screen
3.5
Complete Driver Installation
• Click ¤Close¤ to complete the driver installation.
Windows Vista
© 2012 maxon motor. Subject to change without prior notice.
maxon motor control
3-14
Document ID: rel3137 EPOS Positioning ControllersEdition: April 2012 EPOS USB Driver Installation
Windows XP
4
Windows XP
4.1
Getting Started
1) Plug in USB cable to EPOS Positioning Controller’s USB interface. 2) Plug in USB cable to any available USB port on your PC.
The following message will appear:
Figure 4-16 Windows XP – “Found New Hardware Wizard” New Hardware found
3) Tick ¤No, not this time¤. 4) Click ¤Next¤.
Figure 4-17 Windows XP – “Found New Hardware Wizard” New Hardware found 2 5) Select ¤Install the software automatically (Recommended)¤.
Figure 4-18 Windows XP – “Found New Hardware Wizard” New Hardware found 3 6) Click ¤Finish¤.
Windows XP
© 2012 maxon motor. Subject to change without prior notice.
maxon motor control
4-16
Document ID: rel3137 EPOS Positioning ControllersEdition: April 2012 EPOS USB Driver Installation
4.2
Troubleshooting: How to install Driver manually
4.2.1 Install Driver
1) Select ¤Install from a list or specific location (Advanced)¤. 2) Click ¤Next¤.
Figure 4-19 Windows XP – “Found New Hardware Wizard” Installation Type
4.2.2 Update Driver Software 1) Click ¤Browse¤.
2) Find and select «EPOS USB Driver» directory. 3) Click ¤Next¤.
Note
Default Location of the Driver Directory
If you kept the default settings unchanged during initial installation of the software, the working directory will be “C:\Program Files\maxon motor ag\Driver Packages\EPOS USB Driver” (note that designation of program directory may vary depending on the system language installed).
Figure 4-20 Windows XP – “Found New Hardware Wizard” Browser
Windows XP
5) Click ¤Next¤.
Figure 4-21 Windows XP – “Found New Hardware Wizard” Copy & Setup
4.3
Complete Driver Installation
• Click ¤Finish¤ to complete the driver installation.
maxon motor control
Z-18
Document ID: rel3137 EPOS Positioning ControllersEdition: April 2012 EPOS USB Driver Installation
© 2012 maxon motor. Subject to change without prior notice.
Figure 2-1 Windows 7 – “Device Driver Installation” Message - - - 7
Figure 2-2 Windows 7 – “Device Driver Installation Failure” Message - - - 7
Figure 2-3 Windows 7 – “Unknown Device Properties” Context Window - - - 7
Figure 2-4 Windows 7 – “Unknown Device Properties” Window - - - 8
Figure 2-5 Windows 7 – “Update Driver Software” Screen - - - 8
Figure 2-6 Windows 7 – “Update Driver Software” Browser - - - 9
Figure 2-7 Windows 7 – “Windows Security” Screen - - - 9
Figure 2-8 Windows 7 – “Update Driver Software” Confirmation - - - 10
Figure 3-9 Windows Vista – “Device Driver Installation” Message- - - 11
Figure 3-10 Windows Vista – “Found New Hardware” Screen - - - 11
Figure 3-11 Windows Vista – “Found New Hardware” Screen 2 - - - 11
Figure 3-12 Windows Vista – “Found New Hardware” Screen 3 - - - 12
Figure 3-13 Windows Vista – “Update Driver Software” Browser - - - 12
Figure 3-14 Windows Vista – “Windows Security” Screen - - - 13
Figure 3-15 Windows Vista – “Update Driver Software” Confirmation - - - 13
Figure 4-16 Windows XP – “Found New Hardware Wizard” New Hardware found - - - 15
Figure 4-17 Windows XP – “Found New Hardware Wizard” New Hardware found 2- - - 15
Figure 4-18 Windows XP – “Found New Hardware Wizard” New Hardware found 3- - - 15
Figure 4-19 Windows XP – “Found New Hardware Wizard” Installation Type - - - 16
Figure 4-20 Windows XP – “Found New Hardware Wizard” Browser - - - 16
Figure 4-21 Windows XP – “Found New Hardware Wizard” Copy & Setup - - - 17
Figure 4-22 Windows XP – “Found New Hardware Wizard” Confirmation - - - 17
Table 1-1 Notations used in this Document - - - 5 Table 1-2 Brand Names and Trademark Owners - - - 5
maxon motor control
Z-20
Document ID: rel3137 EPOS Positioning ControllersEdition: April 2012 EPOS USB Driver Installation
© 2012 maxon motor. Subject to change without prior notice. © 2012 maxon motor. All rights reserved.
The present document – including all parts thereof – is protected by copyright. Any use (including reproduction, translation, microfilming and other means of electronic data processing) beyond the narrow restrictions of the copyright law without the prior approval of maxon motor ag, is not permitted and subject to persecution under the applicable law.
maxon motor ag Brünigstrasse 220 P.O.Box 263 CH-6072 Sachseln Switzerland
Phone +41 (41) 666 15 00 Fax +41 (41) 666 16 50 www.maxonmotor.com