EPay
Online Payment Services
EPay User Guide
Welcome to Explorer’s EPay Online payment services. We offer our payment services in partnership with Bank of America, and hope that you find EPay easy to use!
This guide provides an overview of the system, and describes the following:
Contents
EPay 1-Time Pay...2
Logging into EPay “1-Time Pay” ...3
Making a payment ...4
Printing a receipt ...5
EPay Automatic Payment Service...6
Enrolling into EPay “Automatic Payment Service” for the first time ...6
Completing your profile ...8
Adding your checking or credit card payment account ...9
Making a single payment ... 11
Setting up Recurring Automatic Payments ... 11
Deactivating Recurring Automatic Payments ... 12
EPay
Online Payment Services
EPay Overview
The EPay Online Payment Services is offered by Explorer, in partnership with Bank of America. It consists of 2 payment services that we offer free to our customers:
1. EPay Automatic Payment Service – Quick Enroll!
• Our automatic service allows you to self-enroll in just a few easy steps.
• You can setup credit card or checking information.
• Make instant payments quickly.
• Or, setup recurring payments, save on service fees, and relax! Let EPay manage your payment schedule for you.
• View your payment history, save payment reports, and more!
2. EPay 1-Time Pay
• If you are in a hurry and haven’t yet enrolled, this option is for you. You can skip the steps of enrolling until you have more time.
• View your current premium amount due.
EPay
Online Payment Services
EPay 1-Time Pay
Logging into EPay “1-Time Pay”
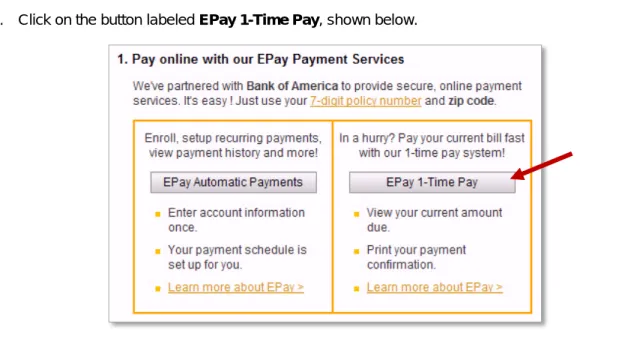
1. Go to www.explorer-insurance.com. 2. Click on Make a Payment.3. Click on the button labeled EPay 1-Time Pay, shown below.
Figure 1 - Select 1-Time Pay from the “Make a Payment” page on the www.explorer-insurance.com website.
4. The login screen will appear, shown below:
EPay
Online Payment Services
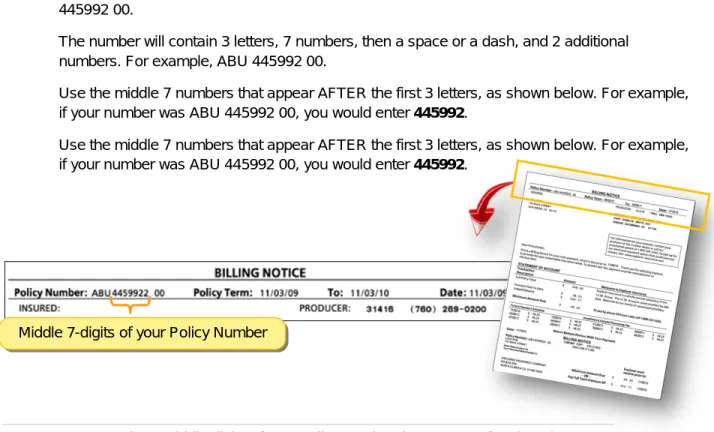
5. Type in your 7-digit Policy Number. This is the middle seven digits of the number, as described below.− You can find your policy number from your billing notice or policy packet. For example, ABU 445992 00.
− The number will contain 3 letters, 7 numbers, then a space or a dash, and 2 additional numbers. For example, ABU 445992 00.
− Use the middle 7 numbers that appear AFTER the first 3 letters, as shown below. For example, if your number was ABU 445992 00, you would enter 445992.
− Use the middle 7 numbers that appear AFTER the first 3 letters, as shown below. For example, if your number was ABU 445992 00, you would enter 445992.
Figure 3 - Use the 7 middle digits of your policy number that appear after the 3 letters, such as 445992 as shown.
6. Type in your Zip Code on your policy. 7. Click Submit.
Making a payment
1. Once logged in, click Make Payment.
2. Select Credit Card or Checking Account as your payment method. 3. Fill in the required information.
4. If you are paying by Checking account:
− Be sure to use the name on the account, as indicated below.
− Refer to this illustration for your Routing Number and Account Number. Middle 7-digits of your Policy Number
EPay
Online Payment Services
Figure 4 - The Account Name, Routing Number and Account Number are noted in the illustration above.
5. Follow the steps to submit your payment.
Printing a receipt
Once you have made a payment, you can print your receipt. 1. Click Print Payment Confirmation.
2. Continue through your printer screen as usual. John Doe
123 Main Street
San Diego, CA 92116 Name on Account
Bank Routing Number
Bank Account Number
EPay
Online Payment Services
EPay Automatic Payment Service
Enrolling into EPay “Automatic Payment Service” for the first time
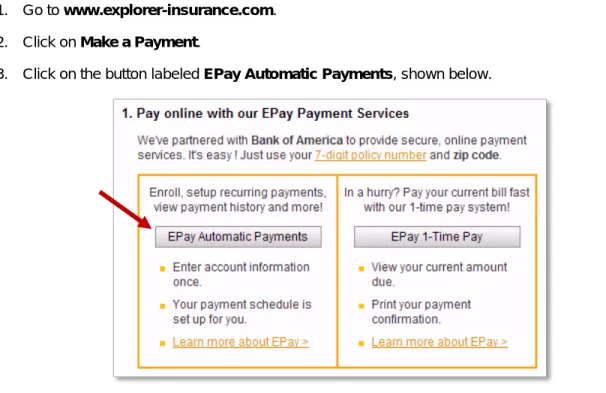
1. Go to www.explorer-insurance.com.2. Click on Make a Payment.
3. Click on the button labeled EPayAutomatic Payments, shown below.
Figure 5 - Select EPay Automatic Payments from the “Make a Payment” page on the www.explorer-insurance.com website.
4. The login screen will appear, shown below:
EPay
Online Payment Services
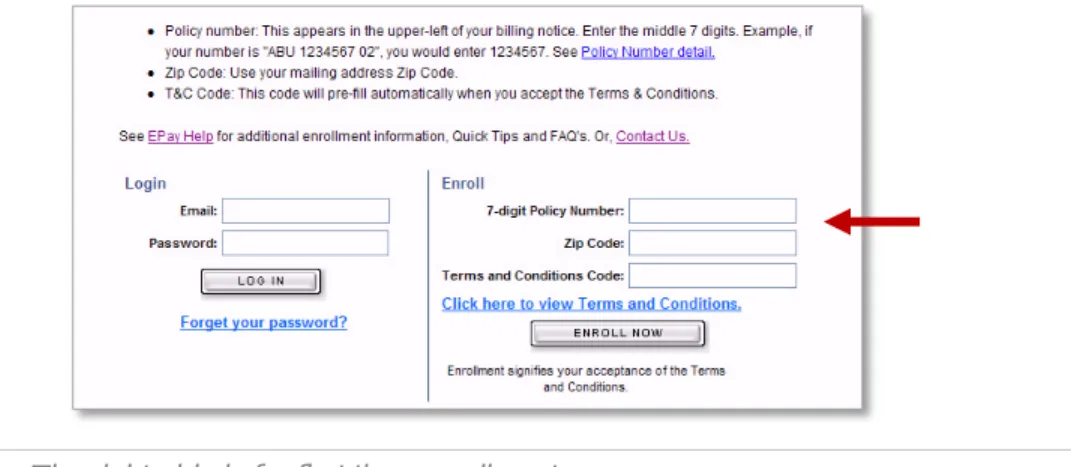
5. The right-side of this login screen is for first time enrollment.Figure 7 - The right-side is for first time enrollment.
6. Type in your 7-digit Policy Number. This is the middle seven digits of the number, as described below. − You can find your policy number from your billing notice or policy packet.
− The number will contain 3 letters, 7 numbers, then a space or a dash, and 2 additional numbers. For example, ABU 445992 00.
− Use the middle 7 numbers that appear AFTER the first 3 letters, as shown below. For example, if your number was ABU 445992 00, you would enter 445992.
Figure 8 - Use the 7 middle digits of your policy number that appear after the 3 letters, such as 445992 as shown.
7. Type in your Zip Code that is on your policy.
8. Click on Click here to view Terms and Conditions.
9. Click on I Agree button located at the bottom, after reading and agreeing to the terms. 10. The Terms and Conditions Code will automatically fill in.
EPay
Online Payment Services
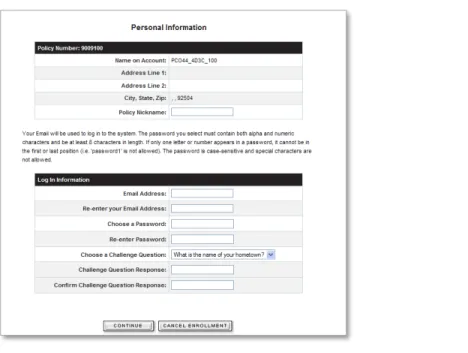
Figure 9 - The Personal Information screen allows you to create your user profile.
Completing your profile
1. Fill in the Policy Nickname. This will later appear on the main page when you log in next time. For example, you can call it “Explorer Auto Policy”.
2. Enter your Email Address. This is important – this will be the address that is used when you log in, if you forget your password or have payment receipts emailed.
3. Enter a Password. Make sure to create one that you will remember, AND it must be: At least 8 characters long.
Contain both alpha and numeric characters. That means at least 1 letter and 1 number. If there is only one letter or number, it can’t be located at the very beginning or end of your
password.
All passwords are case-sensitive, In other words, if you create it with a capital letter, you must always use it like that.
Here are some passwords that WON’T work (and the reason why): − 1mydoggy (One number is used at the very beginning) − 345678a (One letter is used at the very end)
− Bestfriend (Not a mix of letters and numbers) − mycat12 (Only 7 characters)
4. Choose a Challenge Question from the drop-down list. This will be used if you ever forget your password.
EPay
Online Payment Services
5. Enter the Challenge QuestionResponse – the answer to the question that you will always remember! 6. When you are done with this page, click Continue.− Note: If you have answered anything wrong, or skipped a step, an error message will appear in red at the top of the screen. This message will explain what you need to correct to continue. 7. The Enrollment Confirmation page will appear, as shown. If you wish to change something, you can
click Modify. Otherwise, click Complete Enrollment.
Figure 10 - The Enrollment Confirmation screen.
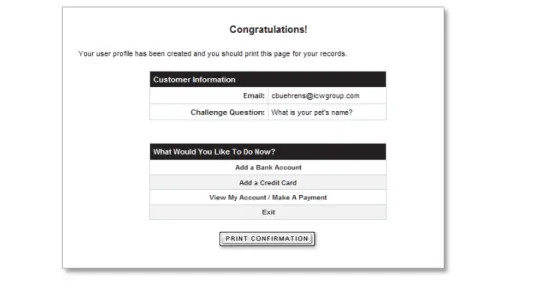
8. Now the Congratulations screen will appear, as shown. You may want to print this page for your records.
Figure 11 - You are offered Congratulations upon your successful enrollment!
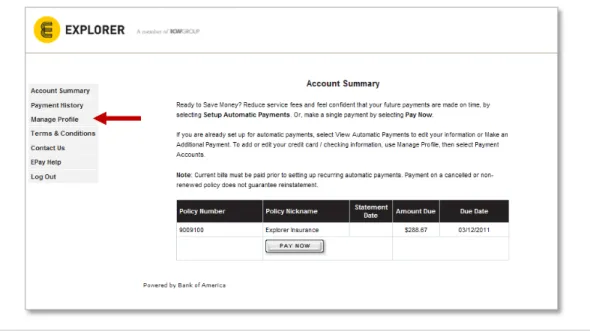
Adding your checking or credit card payment account
1. If you just finished Enrolling (as above), you can choose the Add a Bank Account or Add a Credit Card link provided and jump to step 7.
EPay
Online Payment Services
Figure 12 - When you log in, the “landing page” displays your Account Summary. 3. Click on Manage Profile from the left navigation bar.
4. Select BILLING ACCOUNTS, shown below.
Figure 13 - The Manage Profile page allows you to set up automatic payment and manage your payment accounts.
5. Click on Payment Accounts.
6. Click on CHECKING or CREDIT CARD from the “Add a Payment Account” box. 7. Enter the requested information.
8. If you are paying by Checking account:
− Retrieve your information from your check, as shown below. − Be sure to use the name on the account, as indicated.
EPay
Online Payment Services
Figure 14 - The Account Name, Routing Number and Account Number are noted in the illustration above.
9. Click CONTINUE. 10. Review and CONFIRM.
Making a single payment
1. If you have just completed enrolling, click on the View my Account / Make a Payment link. 2. If you are on the Accounts Summary page, click the PAY NOW button.
3. If needed, enter the Amount to Pay (see Amount Due for amount). 4. For Payment Date, select the date you want your account debited.
5. Select the Payment Account you want to pay from. For example, Joint Checking.
6. Note: If you haven’t set up a payment account, or you wish to add a new one, choose either New Bank Account or New Credit Card.
7. Click CONTINUE. Your information is displayed. If this is a new account, fill in the information. 8. Review and CONFIRM. Print this page for your records.
Setting up Recurring Automatic Payments
1. If you are in the Enrollment process, and you’ve already setup a payment account, select Setup Automatic Payments link and jump to step 4.
2. Select Manage Profile from the left navigation bar. 3. Click on BILLING ACCOUNTS.
4. Click ADD from the “Automatic Payment” box.
5. Select your Payment Account from the list. For example, Joint Checking.
6. Note: If you haven’t set up a payment account, or you wish to add a new one, choose either New Bank Account or New Credit Card.
John Doe 123 Main Street
San Diego, CA 92116 Name on Account
Bank Routing Number Bank Account Number
EPay
Online Payment Services
Deactivating Recurring Automatic Payments
1. Select VIEW AUTOMATIC PAYMENT from the Account Summary page. 2. Click on CANCEL AUTOMATIC PAYMENT.
3. Review and CONFIRM.
Check the status of payments
1. Select Payment History from the Account Summary page.
2. The payments you’ve made online will be displayed, along with any adjustments or credits that have occurred or payments pending.
3. Click View to view individual information about each payment.
4. Click on DOWNLOAD REPORT to save a report of your payments. This will create a “Tab Separated Values” (TSV) formatted text file. You can read this file in a text reader or bring into a spreadsheet application, such as MS Excel.