Quantitative Skills in
the
AP
®
Sciences
A REFERENCE GUIDE FOR STUDENTS IN:
AP BIOLOGY
AP CHEMISTRY
AP ENVIRONMENTAL SCIENCE
AP PHYSICS
About the College Board
The College Board is a mission-driven not-for-profit organization that connects students to college success and opportunity. Founded in 1900, the College Board was created to expand access to higher education. Today, the membership association is made up of over 6,000 of the world’s leading educational institutions and is dedicated to promoting excellence and equity in education. Each year, the College Board helps more than seven million students prepare for a successful transition to college through programs and services in college readiness and college success — including the SAT® and the Advanced Placement Program®.
The organization also serves the education community through research and advocacy on behalf of students, educators, and schools.
For further information, visit www.collegeboard.org.
AP
®
Equity and Access Policy
The College Board strongly encourages educators to make equitable access a guiding principle for their AP® programs by giving all willing and academically prepared students the
Table of Contents
vi Acknowledgments
1 Introduction
1 Quantitative Skills and the AP Science Courses 1 How to Use This Guide
2 Chapter 1: Collecting and Reporting Data
2 Types of Data 3 Measurement
3 Units: Use of Metric Prefixes
5 Dimensional Analysis: Unit Conversions 6 Significant Digits
8 Data Tables
8 Elements of Effective Data Tables 9 Graphs
9 Elements of Effective Graphs 10 Types of Graphs
19 Chapter 2: Data Analysis
19 Working with Data 20 Scientific Notation
22 Calculations Using Percentages 23 Rate Calculations
25 Linear Relationships and Curve Fitting 25 Graphing Data as a Straight Line 25 Linearizing Data
26 Curve Fitting 28 Descriptive Statistics
28 Mean, Standard Deviation, and Standard Error 32 Confidence Intervals
33 Accuracy, Precision, and Experimental Error 34 Chapter 3: Quantitative Skills in AP Biology
34 Surface Area and Volume 35 Water Potential
36 Hypothesis Testing
37 Chi-Square Goodness of Fit Test 39 Mathematical Modeling
39 Hardy–Weinberg Equilibrium 41 Population Growth
44 Chapter 4: Quantitative Skills in AP Chemistry
50 Raoult’s Law 51 Mass Relationships 51 Temperature 52 Density 52 Beer’s Law 53 Kinetics 56 Equilibrium
56 Chemical Equilibrium 57 Gas Equilibrium 58 Acids and Bases
59 pH
62 Thermochemistry/Electrochemistry 62 Specific Heat Capacity
62 Entropy 63 Enthalpy 64 Free Energy
67 Chapter 5: Quantitative Skills in AP Environmental Science
67 Primary Productivity in Ecosystems 68 Survivorship Curves
69 Populations 69 Population Growth
72 Calculation of Doubling Time
73 Calculation of Population Growth Rate 73 Interpretation of Age-Structure Diagrams 74 Energy Resources and Consumption 74 Determination of Half-Life 75 Pollution
75 Interpretation of Dose-Response Curves 77 Chapter 6: Quantitative Skills in AP Physics 1
77 Geometry and Trigonometry Review 83 AP Physics 1 Topics
83 Kinematics 83 Vectors
84 Velocity and Acceleration 86 Dynamics
86 Applying Newton’s Second Law 87 Friction
89 Hooke’s Law/Force Exerted by a Spring 90 Universal Law of Gravitation
90 Gravitational Field
95 Power
96 Spring Potential Energy 97 Momentum and Impulse 97 Momentum
97 Impulse 98 Rotational Motion
98 Angular Position and Angular Displacement
101 Angular Momentum
103 Rotational Kinetic Energy 104 Simple Harmonic Motion
105 Period of SHM
105 Period of Mass–Spring System in SHM 106 Period of a Pendulum
108 Chapter 7: Quantitative Skills in AP Physics 2
108 Wavelength
108 Index of Refraction
109 Snell’s Law
110 Mirror and/or Lens Equation
111 Magnification
112 Wave Interference 113 Double-Slit Interference 114 Fluids
114 Pressure
115 Pressure in a Fluid
115 Buoyant Force
118 Continuity Equation 119 Thermal Physics
119 Thermal Conduction
120 Ideal Gas Law
122 First Law of Thermodynamics 123 Modern Physics
123 Planck Relationship 124 Photoelectric Effect 126 de Broglie Equation 126 Mass–Energy Relationship
128 Chapter 8: Quantitative Skills and Advanced Calculus Topics in AP Physics C: Mechanics
128 Vector Products
128 Dot Product
129 Cross Product
138 Definition of Torque in AP Physics C
138 Definition of Angular Momentum of a Linearly Moving Point Object
141 Chapter 9: Calculus Relationships in AP Physics C: Electricity and Magnetism
141 Electrostatics: Electric Fields
141 Coulomb’s Law
142 Definition of Electric Field 142 General Definition of Flux 143 Electric Flux
143 Electric Flux and Gauss’s Law 144 Electrostatics: Electric Potential 144 Definition of Electric Potential
147 General Definition of Potential Difference 148 Differential Relationship
148 Capacitance
148 Definition of Capacitance
149 A Definition of a Parallel Plate Capacitor 150 Energy Stored in a Capacitor
150 Current, Resistance, and Circuits
150 Current
152 Resistance and Circuits
154 Ohm’s Law
155 Companion to Ohm’s Law: The Power Relationship 155 Adding Capacitors in Circuits
156 Series Arrangement
157 Parallel Arrangement 158 Magnetism
158 Moving Charge in a Magnetic Field
159 Current-Carrying Conductor (Wire) in a Magnetic Field
161 Biot–Savart Law
162 Ampere’s Law – An Analog to Gauss’s Law in Magnetism 164 Magnetic Field of an Ideal Solenoid
165 Induction and Inductance
165 Magnetic Flux
165 Faraday’s Law and Lenz’s Law
167 Inductance
169 Appendix A
Acknowledgments
AP Science Curriculum and Instruction Team
John R. Williamson, Vice President, AP Curriculum and Instruction Donna Hurrle, Senior Director, AP Instructional Design
Tanya Sharpe, Senior Director, AP Curriculum Development Trinna Johnson, Director, AP Curriculum Development
David Jones, Director, AP Physics Curriculum, Assessment, & Instructional Design Serena Magrogan, Senior Director, AP Curriculum Development
Audra Brown Ward, Director, AP Instructional Design Amy Johnson, Director, AP Instructional Design
Anna Bristow, Associate Director, AP Curricular Publications Michael Robinson, Associate Director, AP Content and Instruction
Contributors
Peggy Ann Bertrand, University of Tennessee, Knoxville, TN Elizabeth Carzoli, Castle Park High School, Chula Vista, CA
Thomas B. Cobb, Bowling Green State University, Bowling Green, OH Arthur Eisenkraft, University of Massachusetts Boston, Boston, MA Dolores Gende, Pine Crest School, Ft. Lauderdale, FL
Christina Haire, Owensboro High School, Owensboro, KY John Jungck, University of Delaware, Newark, DE Martha Lietz, Niles West High School, Skokie, IL
Paul Lulai, St. Anthony Village High School, Minneapolis, MN Paul Rodriguez, Troy High School, Fullerton, CA
Introduction
Quantitative Skills and the
AP Science Courses
Each AP science course (biology, chemistry, environmental science, and the four physics courses) focuses on the development of quantitative skills such as using measurements, gathering and evaluating data, using quantitative evidence to support claims, and connecting empirical information to scientific theory. In each AP science course you take, you will perform several hands-on college-level investigations and other activities that are designed not only to meet the learning objectives for the course but also to give you multiple
opportunities to acquire, develop, and apply these quantitative skills. By the end of a course,
you will be able to successfully organize and work with data so that you can effectively communicate your conclusions. You will be able to think and act like a scientist!
How to Use This Guide
This guide is designed to be used as a reference as you navigate various AP science courses; you can use it to refresh your memory on how to perform calculations on the Equations and Formulas sheet for your course as you are completing classroom or at-home assignments. It is not meant to be a comprehensive guide to quantitative analysis, a substitute for your textbook and/or classroom instruction, or a review for the AP Exam.
The first two chapters, Chapter 1: Collecting and Reporting Data and Chapter 2: Data Analysis, contain general information that is relevant to all AP science courses, along with examples. These chapters are followed by additional chapters that contain course-specific quantitative-skills information for AP Biology, AP Chemistry, AP Environmental Science, AP Physics 1, AP Physics 2, AP Physics C: Mechanics, and AP Physics C: Electricity and Magnetism.
CHAPTER 1
Collecting and Reporting Data
Types of Data
Data can be classified as qualitative or quantitative:
Qualitative data
Are observed rather than measured
Include written descriptions, videos, photographs, or live observations
Examples include observations of appearance, behaviors, smell, taste, etc.
Quantitative data
Are measured and recorded in numerical form
Examples include absorbance, size, time, height, and massQualitative data and quantitative data are both important and not always used completely separate from each other. Qualitative data can be coded or organized in a quantitative way for the purpose of interpretation or analysis. For instance, in the AP Biology Enzyme Catalysis lab, a color palette (figure 1.1) is used to qualitatively determine the amount of oxygen produced when hydrogen peroxide is degraded by the turnip peroxidase enzyme. By numbering the colors 1–10, the qualitative data obtained from the experiment can be converted to quantitative data. Alternately, quantitative data can be obtained from this
experiment by using a spectrophotometer to measure the absorbance or percent transmittance of the samples. The purpose or anticipated outcome of an experiment will determine which type of data you choose to collect and how to organize it.
Measurement
CHAPTER 1 Collecting and Reporting Data
Measurement
Units: Use of Metric Prefixes
There are two commonly used systems of measurement in the world, which differ in the units they use for length, mass, and time. The first is the United States Customary System (USCS, formerly called the English system) of feet, pounds, and seconds. The second is the metric system of meters, kilograms, and seconds. In 1960, the metric system was adopted by an international committee in Paris as the worldwide standard for science and is now referred to as the Système International or SI. A subset of the metric system is the centigram-second (cgs) system that is commonly used in atomic physics and chemistry. The meter-kilogram-second (mks) system is another subset commonly used in physics (specifically mechanics). In science, medicine, and government in the United States, the SI system is often used alongside the USCS system. In this guide, we will use the SI system of measurement, which is the preferred measurement system of science.
Fundamental Units
Most physical quantities, such as velocity, acceleration, force, momentum, and energy can ultimately be expressed in terms of three basic units of length, mass, and time. These three units are referred to as fundamental units because they can be used to define all other elements in a particular system of measurement.
Table 1.1 summarizes the fundamental units for the metric and USCS systems of measurement.
Table 1.1: Fundamental Units of Measurement
System Length Mass Time
SI (MKS) meter kilogram second
SI (CGS) centimeter gram second
USCS feet slug second
Measurement
CHAPTER 1 Collecting and Reporting Data
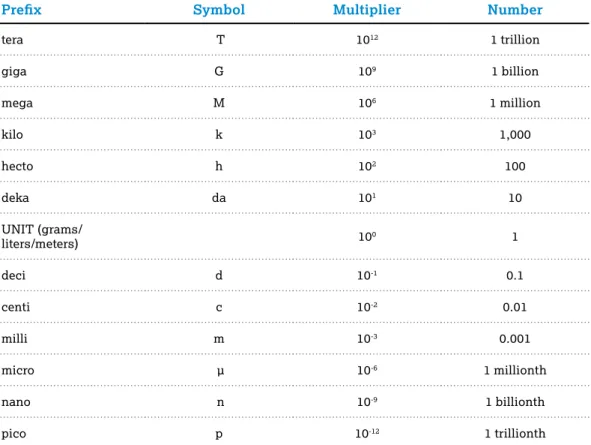
Table 1.2: Common SI Prefixes
Prefix Symbol Multiplier Number
tera T 1012 1 trillion
giga G 109 1 billion
mega M 106 1 million
kilo k 103 1,000
hecto h 102 100
deka da 101 10
UNIT (grams/
liters/meters) 100 1
deci d 10-1 0.1
centi c 10-2 0.01
milli m 10-3 0.001
micro µ 10-6 1 millionth
nano n 10-9 1 billionth
pico p 10-12 1 trillionth
Another way of thinking about this is to use a place-value representation:
Measurement
CHAPTER 1 Collecting and Reporting Data
0.00342 grams is equal to 0.342 centigrams, and moving the decimal point one place to the right shows that 0.00342 grams is equal to 0.0342 decigrams.
If you need further review of the metric system, try this tutorial:
Khan Academy: U.S. customary and metric units
Dimensional Analysis: Unit Conversions
In AP science courses you will frequently have to analyze relationships between physical quantities. This may require you to convert between units to describe equivalent amounts of the data you are reporting. In doing this, the amounts of data you are describing remain the same. You are only changing the way you report these amounts. Converting units is a type of
dimensional analysis for which the factor-label method is helpful. For example, let’s say we
want to convert 650 mL to liters.
We know that there are 1000 mL in one liter:
We first convert this equation to conversion factors:
Multiplying a quantity by these conversion factors changes the units, but leaves the quantity unchanged. We next choose a conversion factor that will convert our quantity, 650 mL, from units of mL to units of liters:
The conversion factor was chosen so that when units are cancelled out (the diagonal lines in the accompanying examples), the desired unit remains. In choosing the conversion factor, we put the mL in the denominator so that it cancels out, and we are left with L. By cancelling out mL, we converted from mL to L.
We can also multiply by a series of conversion factors. For example, consider converting from three miles to meters, given the conversion from miles to feet (there are 5280 feet in a mile) and the conversion from feet to meters (there are 3.28 feet in a meter).
There are 5280 feet in a mile, and 3.28 feet in a meter:
Measurement
CHAPTER 1 Collecting and Reporting Data
So the conversion would look like this:
You will often use this method to determine how to make solutions. For example, how many grams of sodium hydroxide (NaOH, molar mass = 40 g/mol) would we need if we wanted to make 500 mL of a 0.40 M (moles per liter) solution? In this case, the molar mass of NaOH (1 mol NaOH = 40 g NaOH) leads to the following conversion factors:
Similarly, our target concentration of 0.40 M gives us the following ratios:
To determine the mass of NaOH needed to make 500 mL of solution we start with 500 mL and multiply as follows:
These tutorials will help you refresh your memory on how to do unit conversions:
Khan Academy: Unit conversion within the metric system
Khan Academy: Converting within the metric system
Significant Digits
To ensure that you are reporting your data to the correct degree of precision, the data you record during an experiment should include only significant digits (also called significant
figures). These are:
The digits that are meaningful in a measurement or a calculation.
Determined by the measurement device used during the experiment.
If you use a digital device, record the measurement value exactly as it is shown on the screen.Measurement
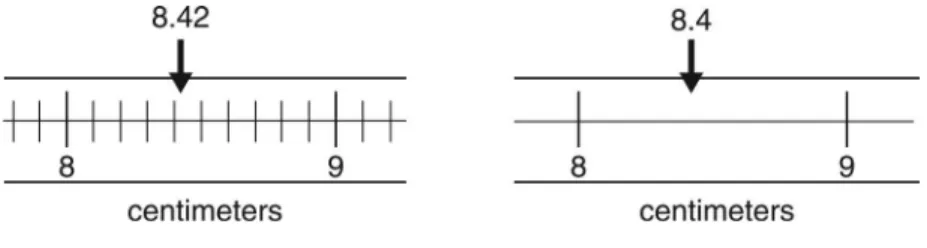
CHAPTER 1 Collecting and Reporting Data
The digit 2 is an estimate of how far the measurement is beyond 8.4, so that is the uncertain digit. This measurement (8.42 cm) has three significant digits. The scale on the right has markings at 8 and 9. The 8 is certain, but you must estimate how far the measurement is beyond 8, so 4 is the uncertain digit. This measurement is 8.4 cm. Even though the measurement on the right is the same as the measurement on the left, it has only two significant digits because the markings are farther apart, and thus there is less precision to the measurement being made.
Figure 1.2: Different Significant Digits from Different Scales
Uncertainties in measurements should always be rounded to one significant digit. When
measurements are made with devices that have a ruled scale, the uncertainty is half the value of the precision of the scale. The markings on the device will show the precision. Looking at the example shown in figure 1.2 above, the scale on the left has markings every 0.1 cm, so the uncertainty is half this, which is 0.05 cm. The correct way to report this measurement is 8.43 ± 0.05 cm. The scale on the right has markings every 1 cm, so the uncertainty is 0.5 cm. The correct way to report this measurement is 8.4 ± 0.5 cm.
Table 1.3 presents the rules you should follow in determining which digits in a number that represents a measured value are meaningful (in the sense described above) and therefore significant.
Table 1.3: Rules for Significant Figures
Rule Examples
Non-zero digits are always significant. 4,735 km has four significant digits. 573.274 in. has six significant digits.
Zeros before other digits are not significant. 0.38 m has two significant digits. 0.002 in. has one significant digit.
Zeros between other digits are significant. 42.907 km has five significant digits. 0.00706 in. has three significant digits. 8,005 km has four significant digits.
Zeros to the right of all other digits are significant if they are to the right of the decimal point.
975.3810 cm has seven significant digits. 471.0 m has four significant digits.
It is impossible to determine whether zeros to the right of all other digits are significant if the number has no decimal point.
8,700 km has at least two significant digits, but the exact number is unknown.
Data Tables
CHAPTER 1 Collecting and Reporting Data
Rule Examples
If a number is written with a decimal point, zeros
to the right of all other numbers are significant. 620.0 km has four significant digits.5,100.4 m has five significant digits. 670. in. has three significant digits.
All digits in the coefficient of a number
written in scientific notation are significant. 6.02×10
4 cm has three significant digits
Note that it is good scientific practice to use scientific notation (see chapter 2). If you use scientific notation, then all digits shown are always significant.
If you need additional review on significant figures, this tutorial can help:
Khan Academy: Intro to significant figures
Data Tables
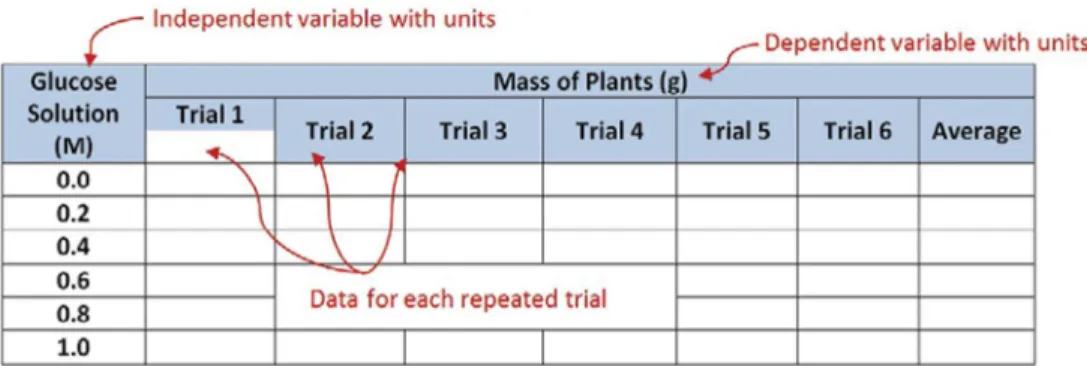
Data tables allow you to gather your data in one place so that it can be organized, compared, or analyzed in a meaningful way for interpretation. When constructing a data table you need to be sure to include both the independent and dependent variables.
Independent variable
Also called the explanatory or controlled variable
The variable that the researcher controls or manipulates
Not changed by the other variable(s) measured in the experiment
Examples: time, distance, velocity, acceleration, concentration, light intensity
Dependent variable
Also called the response or experimental variable.
The response to the independent variable — what is measured.
Example: population growth: The number of individuals in a population will change with time, so the growth of the population is a dependent variable since it is dependent on time (the independent variable).
Example: If you were interested in the velocity of an object as a function of time, then velocity could be a dependent variable, while time would be the independent variable. On the other hand, velocity could be an independent variable if you investigated acceleration as a function of velocity.Elements of Effective Data Tables
You may often use computer software to create data tables to communicate the results of an
Graphs
CHAPTER 1 Collecting and Reporting Data
2. Independent and dependent variables: These are typically with the independent variable on the left side of the data table and the dependent variables on the right.
3. Units: Be sure that units are clearly indicated for each variable.
4. Data: There should be data for each repeated trial.
Figure 1.3: Elements of Effective Data Tables
Graphs
One of the best ways to communicate the results of a scientific investigation is by creating a graph of the data that have been counted, measured, or calculated. Graphs can help you to easily see patterns more easily through a visual display of data and can also help you clearly see how two measured variables affect one another.
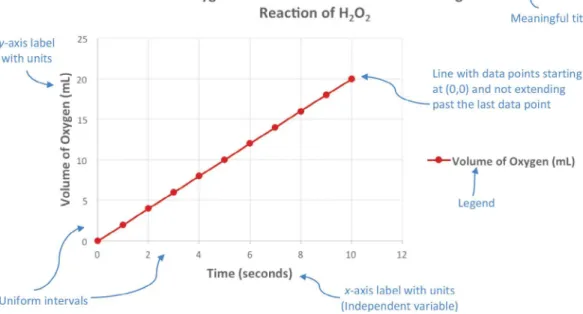
Elements of Effective Graphs
Just as with data tables you may use computer software to create your graphs. However, whether you are using software or graphing by hand, you should keep in mind the following elements required of nearly all effective graphs (illustrated in figure 1.4):
1. A meaningful title: This is a title that informs the reader about the experiment and exactly what is being measured.
2. Labeled axes with units:
The x-axis is the horizontal axis, and it usually denotes the independent variable.
The y-axis is the vertical axis, and it usually denotes the dependent variable.
Note that the axes do not always need to denote dependent versus independent variables. In physics, we often choose the axes for straight-line fitting so that the slope or y-intercept provides physical information. For example, for various satellites orbiting the Earth, we might choose to graph period squared (T 2) on the y-axis, andradius cubed (R 3) on the x-axis in order to see if the orbits obey Kepler’s third law.
Graphs
CHAPTER 1 Collecting and Reporting Data
5. Origin: The graph should clarify whether the data and any trend lines start at the origin (0,0) or not. A trend line should not be extended to the origin if the data do not start there. In addition, the line should not be extended beyond the last data point (extrapolation) unless a dashed line clearly indicates that this is a prediction about what may (or could) happen if additional data were to be obtained.
6. Error bars: For some of the labs you perform in class, you should consider the variability (or confidence) of your data in your analysis and use error bars on your graphical displays when appropriate (see the discussion of standard deviation and standard error later in this chapter).
Figure 1.4: Example of an Effective Graph
Types of Graphs
Line Graphs
Line graphs are plotted on x-y axes and offer a good visual representation of the relationship between two variables; in other words, how one variable is affected by the other as it increases or decreases. Line graphs can contain one line or multiple lines that represent the data. Clear trends in the data can be seen by the direction of the line(s) on a graph. Line graphs are advantageous because they can sometimes allow you to predict the results of data that have not yet been collected, since the line implies a continuous response of the dependent variable.
Graphs
CHAPTER 1 Collecting and Reporting Data
Figure 1.5: Example of a Line Graph with Several Sets of Data
If you need additional review on line graphs, try this tutorial:
Khan Academy: Introduction to line plots
Scatter Plots
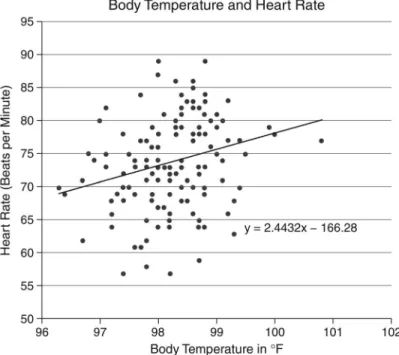
Scatter plots are plotted on x-y axes and are also used to compare two variables. However, in scatter plots, data are presented as an assortment of points that may or may not show one or more of the linear relationships between the two variables that are commonly presented in line graphs. In order to determine whether there is a linear relationship between the two variables, a linear regression (see the Curve Fitting section later in this chapter) can be calculated and plotted to help make the pattern clearer. Keep in mind that the data shown in scatter plots do not have to have a linear relationship.
Graphs
CHAPTER 1 Collecting and Reporting Data
Figure 1.6: A Scatterplot with a Linear Regression Line
To learn more about scatter plots, review these tutorials:
Khan Academy: Constructing a scatter plot
Khan Academy: Regression line example
Histograms
Graphs
CHAPTER 1 Collecting and Reporting Data
Figure 1.7: A Histogram Showing Nonparametric Data
You can use the tutorials below to review creating and interpreting histograms:
Khan Academy: Creating a histogram
Khan Academy: Interpreting a histogram
Bar Graphs
Graphs
CHAPTER 1 Collecting and Reporting Data
Figure 1.8: Example of a Bar Graph
The following tutorials can help you learn more about creating and reading
bar graphs:
Khan Academy: Creating a bar graph
Khan Academy: Reading bar graphs
Box and Whisker Plots
Box and whisker plots are plotted on x-y axes and are used to look at the range of data that has been measured. The advantages of box and whisker plots are that they give you a quick idea of the spread (variability) of your data, the skewness (the amount of skew, or asymmetric distribution), and how different it is from the other data. Box and whisker plots also provide a quick estimate for comparing data sets. A limitation is that you really need at least 10 data points per sample in order to construct an effective box and whisker plot.
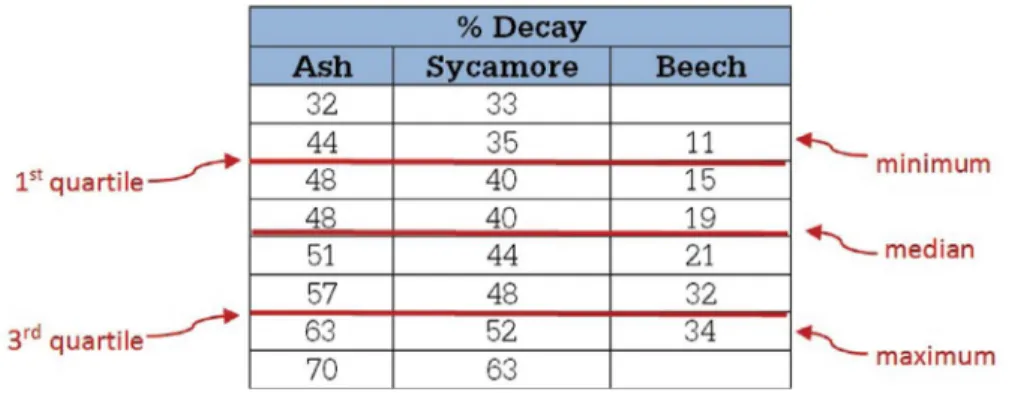
To construct a box and whisker plot, gather a five-number summary (or five statistical summary) of data: the (1) minimum, (2) maximum, (3) median, (4) first quartile, and (5) third quartile. You start by numerically ordering your data, and then determine the median, which is the number in the middle (or the average of the two middle numbers if the data set contains an even number of observations) of the ordered data set. Once this has been done, the data can be divided into quartiles then plotted on a graph.
Graphs
CHAPTER 1 Collecting and Reporting Data
Bag % Decay
Number Ash Sycamore Beech
1 51 40 34
2 63 33 15
3 44 26
4 52 21
5 48 48
6 32 35 11
7 70 44 19
8 48 63 32
9 57 40
First we numerically order each set of data from least to greatest. Then we find the median, which is the number in the middle of this ordered list:
In each case, since there is an even number of data points, the median is the average of the two middle points: 49.5 for the ash, 42 for the sycamore, and 20 for the beech. The minimum in each data set is the smallest number and the maximum is the largest number.
Graphs
CHAPTER 1 Collecting and Reporting Data
So, the five-number summary for this data is as follows:
% Decay: Five-Number Summary
Ash Sycamore Beech
Minimum 32 33 11
Quartile 1 46 37.5 13
Median 49.5 42 20
Quartile 3 60 50 33
Maximum 70 63 34
These five values are used to create a box and whisker plot representing the spread of values in a data set. The box and whisker plot for this data is shown in figure 1.9.
Figure 1.9: Example of a Box and Whisker Plot
Graphs
CHAPTER 1 Collecting and Reporting Data
The following tutorials can help you learn more about creating and reading
box and whisker plots:
Khan Academy: Constructing a box plot
Khan Academy: Reading box plots
Summary: Types of Graphs
We have covered several different types of graphs in this chapter. Table 1.4 summarizes all of them and the instances in which you would use each one.
Table 1.4: Types of Graphs and When to Use Them
Type of Graph Example Examples of When to Use
Line Graph
To track changes over time/ concentration, etc.
To compare changes over the same time period for multiple groups/ treatmentsScatterplot
To compare two variables that may or may not have a linear relationshipHistogram
To show how values in a data set are distributed across evenly spaced (or equal) intervals
To explore the relationship between two or more (in a three-dimensional plot) variablesBar Graph
To compare multiple groups/Graphs
CHAPTER 1 Collecting and Reporting Data
For more detailed information on using Microsoft Excel or Google Sheets for
graphing, watch the following tutorials:
Create a chart from start to finish
CHAPTER 2
Data Analysis
When you complete a laboratory investigation, it is important to make sense of your data by summarizing it, describing the distributions, and clarifying “messy” data. Analyzing your data will allow you to do this.
Working with Data
Data analysis may involve calculations, such as dividing mass by volume to determine density or subtracting the mass of a container from the total mass to determine the mass of the contents. Using the correct rules for significant digits during these calculations is important to avoid misleading or incorrect results.
When adding or subtracting quantities, the result should have the same number of decimal places (digits to the right of the decimal) as the fewest number of decimal places in any of the numbers that you are adding or subtracting.
Table 2.1 presents examples and explains how the proper results should be written.
Table 2.1: Writing Your Results When Adding or Subtracting
Example Explanation
3.7 cm + 4.6083 cm = 8.3 cm The result is written with one decimal place because the number 3.7 has only one significant digit to the right of the decimal.
48.3506 m – 6.28 m = 42.10 m The result is written with two decimal places because the number 6.28 has only two significant digits to the right of the decimal.
(8 km – 4.2 km) + 1.94 km = 6 km The result is written with zero decimal places because the number 8 has zero significant digits to the right of the decimal.
Notice that the result of adding and subtracting has the correct number of significant digits if you consider significant digits to the right of the decimal.
When multiplying and dividing a set of numbers, look for the number with the fewest
Working with Data
CHAPTER 2 Data Analysis
Scientific Notation
When manipulating data, there will be many times when the numbers that you calculate will be either too large or too small to be conveniently expressed as decimals. To make it easier to work with these very large or very small numbers, scientists use scientific notation. In scientific notation, a number is written as a coefficient multiplied by the base 10 raised to some exponent. Let’s look at Avogadro’s number to better understand the components:
Example
While performing the Millikan oil-drop experiment, you find that a drop of oil has an excess of three electrons. What is the total charge of the drop?
When determining the number of significant digits in the answer we ignore the number of electrons because it is an exact number.
Table 2.2: Writing Your Results When Multiplying or Dividing
Example Explanation
5.246 in. × 2.30 in. = 12.1 in. The result is written with three significant digits because 2.30 has three significant digits.
0.038 cm ÷ 5.273 cm = 0.0072 cm The result is written with two significant digits because 0.038 has two significant digits.
76.34 m × 2.8 m = 2.1×10² m
The result is written with two significant digits because 2.8 has two significant digits. [Note that scientific notation had to be used because writing the result as 210 would have an unclear number of significant digits.]
When calculations involve a combination of operations, you must retain one or two extra digits at each step to avoid any round-off errors; at the end of the calculation, you must round to the correct number of significant digits.
An exception to these rules occurs when a calculation involves count data, such as the number of times a ball bounces, or the number of waves that pass a point during a time interval. As shown in the following example, do not consider exact numbers when determining significant digits in a calculation.
coefficient
exponent
Working with Data
CHAPTER 2 Data Analysis
The coefficient must be between 1 and 10, and the exponent must be an integer. Very large numbers will have a positive exponent, while very small numbers will have a negative exponent; for example:
10000 = 1 × 10⁴
1000 = 1 × 10³
100 = 1 × 10²
10 = 1 × 101
1 = 100
1/10 = 0.1 = 1 × 10⁻¹
1/100 = 0.01 = 1 × 10⁻²
1/1000 = 0.001 = 1 × 10⁻³
1/10000 = 0.0001 = 1 × 10⁻⁴
So, a number such as 0.00000000000757 would be written in scientific notation as 7.57 x 10⁻¹²,
while a number like 218,000,000 would be written as 2.18 x 10⁸.
Another way of thinking about this is to use the following representation for the place values:
You can rewrite a number in scientific notation by simply using this representation to count how many decimal places to move the decimal point. If the number you are converting is greater than 10, then the decimal point is moved to the left on the line, while if it is less than 1, the decimal point is moved to the right. For instance, if you wanted to convert 0.000436 into scientific notation, you would start at the base unit — the 1 — then count the decimal places you would have to move until the coefficient is between 1 and 10, as shown below.
This tells us that we need to move the decimal point four places to the right:
So, 0.000436 would be written in scientific notation as 4.36 × 10⁻⁴.
For more detailed information on using scientific notation, watch the
following tutorial:
Working with Data
CHAPTER 2 Data Analysis
Calculations Using Percentages
Percent Change
When working with data, sometimes we need to compare unequal quantities or scales; in order to do this we normalize the data. One way to do this is to compare the percent change over time. We use the following formula to calculate percent change:
For example, in the AP Biology Diffusion and Osmosis lab investigation, dialysis bags are first filled with a sucrose solution and then placed in water for 30 minutes. We measure the mass of each bag before and after it sits in the water for 30 minutes, and report this as a percent change in mass. If the mass of a dialysis bag at the beginning of the experiment was 12.2 g and at the end of the experiment it was 16.7 g, the percent change is
Percent change can also be negative. What if in the previous example the mass at the beginning of the experiment was 16.7 g and the mass at the end of the experiment was 12.2 g? Let’s look at this new calculation:
In the first calculation the positive result indicates that the dialysis bags gained mass. However, in the second calculation the negative result indicates that the dialysis bag lost mass.
Percent Difference
There are times when you may need to calculate the percent difference between two
experimental results to see how they compare to each other. To calculate percent difference, we use the following formula:
Working with Data
CHAPTER 2 Data Analysis
Percent Error
Percent error is a calculation that is done when you want to compare your results to a known or predicted theoretical value. We use the following formula to calculate percent error:
Notice that we are using the absolute value of the difference between the experimental value and the theoretical value.
Example
There are two cars traveling at different speeds: one at 25 mph and the other at 33 mph. We want to know the percent difference between the speeds of the two cars. The calculation would be
This means that there is a 28% difference between the speeds of the two cars.
Example
Calculate the percent error of a titration of 3.0% hydrogen peroxide with potassium permanganate , as in AP Chemistry Investigation 8: Oxidation-Reduction
Titration. If we performed this investigation and calculated the concentration of in our sample to be 2.74%, our calculation would be:
This means that our titration yielded data that was in error by 8.67% relative to what was expected.
Rate Calculations
Working with Data
CHAPTER 2 Data Analysis
Example
Suppose you were doing an AP Physics lab and wanted to calculate the magnitude of the average velocity (speed) of an object. You would do this by calculating the displacement traveled during a particular period of time. So, if you pushed a toy car across the floor and it traveled in a straight line from 1.0 meter to 4.0 meters in 8 seconds, you would calculate the speed as follows:
Example
Suppose you are doing an AP Chemistry lab and needed to calculate the rate of the decompostion of from 60 to 120 seconds:
Time (seconds) [NO2] [NO] [O2]
0 0.0150 0 0
60 0.0085 0.0027 0.0018
120 0.0071 0.0041 0.0024
Note that the negative sign indicates that the is being consumed in the reaction. We could also calculate the rate using the one of the products:
Linear Relationships and Curve Fitting
CHAPTER 2 Data Analysis
The following tutorials can help you review how to do rate calculations:
Khan Academy: Intro to rates
Khan Academy: Introduction to average rate of change
Linear Relationships and Curve Fitting
Graphing Data as a Straight Line
When you plot data on x-y axes, a straight line is the simplest relationship that data might have. Graphing data points as a straight line is useful because you can easily see where data points belong on the line.
You can represent data as a straight line on a graph as long as you can identify its slope (m) and its y-intercept (b) in a linear equation: . The slope is a measure of how y varies with changes in . The y-intercept is where the line crosses the y-axis (where x = 0).
Linearizing Data
Even if the data you measure do not have an apparent linear relationship, you may be able to represent the data as a straight line by revising the form of the variables in your graph. One method is to transform the equation to represent the relationship so that it has the linear form of by substitution. For powers of x, the data would be in the form . To linearize this data, substitute xc for the x in the linear equation. Then you can plot
as a linear graph. For example, graphing kinetic energy, KE, and velocity, v, for the function
, yields a parabola, as shown in figure 2.1a. But if we set the horizontal axis variable
equal to v2 instead, the graph is linear, as shown in figure 2.1b, and the slope is equal to 1/2m
Linear Relationships and Curve Fitting
CHAPTER 2 Data Analysis
If the data is exponential, as in or is a power of x, as in, , taking the log of both sides of the equation will linearize them. For exponential data, the equation you obtain is
. The data will approximate a line with y-intercept ln(A) and slope b. Similarly, for an equation with a power of x, taking the log of both sides of results in
. If you plot log(y) versus log(x), the data will approximate a line with y-intercept log(a) and slope n, as shown in figures 2.2a and 2.2b.
a.
b.
Figure 2.2: Linear Graphs of Equations with a Power of x
Curve Fitting
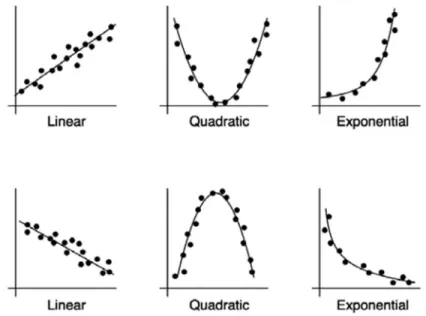
A useful way to analyze data is to determine whether it corresponds to a certain mathematical model. A mathematical relationship or function will allow you to make a prediction if you know the function and an initial condition. The first step is to plot the points and see if they follow a recognizable trend, such as a linear, quadratic, or exponential function. Figure 2.3 shows examples of each of these types.
Linear Relationships and Curve Fitting
CHAPTER 2 Data Analysis
The general equation of a linear function is , as noted above, in which m is slope and b is the y-intercept. For example, a linear function in physics is the time dependence of the velocity of an object undergoing constant acceleration, , where the acceleration,
a, is the slope and the initial velocity, , is the y-intercept. An example of a linear function
in biology is the amount of oxygen consumption by an endotherm over time at a constant temperature. In chemistry, an example of a linear function is the relationship between the concentration of a solution and the amount of light that is transmitted through the solution. The general equation of a quadratic function is , where a, b, and c are constants. An example of a quadratic function in physics is the potential energy of a spring, , where x is the distance the spring is stretched from equilibrium, k is the spring constant, and in this case the constants b and c are zero. Another example of a quadratic function is the position as a function of time for a constantly accelerating object, , where a is acceleration, is initial velocity, and is initial position.
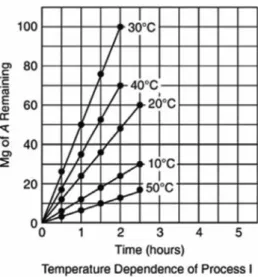
The general equation of an exponential function is , where A and b are arbitrary constants. An example of the exponential function in physics is the number of radioactive particles left after a certain time of radioactive decay: , where is the original number of particles, and is the decay rate. Population growth is an example of an exponential function in biology and environmental science (see the section on population growth later in this chapter).
If the pattern of the data is clearly linear, or if you can plot the data using linearization, you can use a straightedge to draw a best-fit line that has approximately the same number of data points above and below the line. You can then determine an equation of the line by identifying the slope and y-intercept of the best-fit line.
If a more exact equation is desired, or if the data do not clearly follow a linear pattern, you can use a graphing calculator or a computer to fit the data to a mathematical model. In this case, you input the data and choose the model that you think will best fit the data. This is called
regression analysis. Regression analysis is a common curve-fitting procedure. An analysis
using this procedure provides parameters for the equation you have chosen for the fit, as well as parameters that describe how well the data fit the model. Figure 2.4 shows the same data using a linear model and a quadratic model. The value r2 is the coefficient of determination.
It indicates how well the model fits the data. A value closer to 1 indicates a better fit. In the examples in figure 2.4, both models are a good fit for the data, but the r2 values show that the
Descriptive Statistics
CHAPTER 2 Data Analysis
For more detailed information on linear functions, watch the
following tutorial:
Khan Academy: Comparing linear functions word problem
Descriptive Statistics
Mean, Standard Deviation, and Standard Error
You can describe the uncertainty in data by calculating the mean and the standard deviation. The mean of a set of data is the sum of all the measurement values divided by the number of measurements. If your data is a sample of a population, then the mean you calculate is an estimate of the mean of a population. The mean, is determined using the formula
where x1, x2, etc. are the measurement values and n is the number of measurements.
Standard deviation is a measure of how spread out the data values are. If your measurements
have similar values, then the standard deviation is small: each value is close to the mean. If your measurements have a wide range of values, then the standard deviation is high: some values may be close to the mean, but others are far from it. In general, if you make a large number of measurements, then the majority of them are within one standard deviation above or below the mean. (See the section on confidence intervals for a graph of the standard deviation ranges later in this chapter.)
Since standard deviations are a measure of uncertainty, they should be standard using only one significant digit. Standard deviation is commonly represented by the letter s. You calculate sample standard deviation using this formula:
Descriptive Statistics
CHAPTER 2 Data Analysis
Example
Suppose you measure the following values for the temperature of a substance:
Trial 1 2 3 4
Temperature (°C) 20.5 22.0 19.3 23.0
The mean of the data is
The standard deviation of the data is
The SE is
Using one standard deviation, we would report the temperature of the substance as , meaning the typical temperature is in a range that is 2° above or 2° below the mean temperature. Since we only have a few data values, a standard deviation of 2°C shows that most of the data values were close to the mean. However, if we had taken a large number of measurements the standard deviation would show that the majority (specifically, 68%; see the Confidence Intervals section later in this chapter) of the data values were between 19.2°C and 23.2°C. Alternatively, the data could be reported using the standard error as . This tells us how our data compare to the true population mean with 95% confidence. In other words, because we took four measurements we have 95% confidence that the average temperature is within 0.8°C of 21.2°C. The standard error tells us how confident we are in our determination of the mean, while the standard deviation tells us how far we expect any individual measurement to be from the mean. A graph of your data showing the statistics can clearly summarize the data in a way that is easy to understand and interpret.
Example
Descriptive Statistics
CHAPTER 2 Data Analysis
Table 2.3: Leaf Measurement Data
Shady Leaves (in cm) Sunny Leaves (in cm)
3.7 3.2
5.2 3.5
5.4 4.1
5.7 4.3
5.8 4.4
5.8 4.6
6.0 5.0
6.1 5.0
6.5 5.2
6.5 5.2
6.6 5.3
6.8 5.4
7.0 5.6
7.3 5.7
7.3 5.7
7.4 5.8
7.7 6.0
7.9 6.0
8.0 6.4
8.1 6.5
8.1 6.7
8.2 6.7
8.3 7.1
8.9 7.1
9.0 7.1
Descriptive Statistics
CHAPTER 2 Data Analysis
Table 2.3: Leaf Measurement Data
(continued)
Shady Leaves (in cm) Sunny Leaves (in cm)
9.9 7.9
9.9 8.0
10.4 8.2
The statistics from each experimental group can be calculated and shown in a table such as table 2.4.
Table 2.4: Descriptive Statistics
Shady Leaves Sunny Leaves
Mean 7.43 5.88
Standard Deviation 1.63 1.32
N 30 30
Standard Error 0.30 0.24
Using this information, you can graph your data to visually compare the means of the two groups of leaves:
Figure 2.5: Comparison of Shady and Sunny Ivy Leaf Width
Descriptive Statistics
CHAPTER 2 Data Analysis
Confidence Intervals
A confidence interval is a range of values that the true value of the population has a probability of being within. If you measure a single quantity such as the mass of a certain isotope multiple times, you would expect a small standard deviation compared to the mean: the confidence intervals would be narrow. A wide confidence interval in this case would indicate the possibility of random errors in your measurements.
Confidence intervals can be presented in different ways. Figure 2.6 illustrates a commonly used method.
Figure 2.6: Confidence Intervals for a Normal Distribution
This method applies only to data that has a normal (bell-shaped) distribution. The mean lies at the peak of the distribution. Confidence intervals on either side of the peak describe multiples of the standard deviation from the mean. The percentage associated with each confidence interval (68%, 95%) has been determined by calculating the area under the curve.
A wide variety of data types in various subjects follow a normal distribution (i.e., a bell curve). In science, normal distributions apply to repeated measurements of a single value, such as multiple measurements of fluorescence decay time. A normal distribution is not appropriate when more than one central value is expected, or when only a few measurements are made.
If you need more information, the following tutorials can help to further
explain these concepts:
Khan Academy: Measures of spread: range, variance & standard deviation
Khan Academy: Standard error of the mean
Accuracy, Precision, and Experimental Error
CHAPTER 2 Data Analysis
Accuracy, Precision, and
Experimental Error
Communication of data is an important aspect of every experiment. You should strive to analyze and present data that is as accurate as possible. Keep in mind that in the laboratory neither the measuring instrument nor the measuring procedure is ever perfect. Every experiment is subject to experimental error. Data reports should describe the experimental error for all measured values.
Experimental error affects the accuracy and precision of data.
Accuracy: how close a measurement is to a known or accepted value. For example,suppose the mass of a sample is known to be 5.85 g. A measurement of 5.81 g would be more accurate than a measurement of 6.05 g because 5.81 g is closer to actual value of the measurement.
Precision: how close several measurements are to each other. The closer measuredvalues are to each other, the higher their precision.
Measurements can be precise even if they are not accurate. Consider again a sample with a known mass of 5.85 g. Suppose several students each measure the sample’s mass, and all of the measurements are close to 8.5 g. The measurements are precise because they are close to each other, but none of the measurements are accurate because they are all far from the known mass of the sample.
Systematic errors are errors that occur every time you make a certain measurement.
They result in measurements that can be inaccurate or incorrect by makingmeasurements that are consistently either higher or lower than they would be if there were no systematic errors.
Examples include errors due to the calibration of instruments and errors due to faulty procedures or assumptions; for example, using a balance that is not correctly calibrated.Random errors are errors that cannot be predicted.
This includes errors of judgment in reading a meter or a scale and errors due to fluctuating experimental conditions.
If the random errors in an experiment are small, the experiment is said to be precise.
For example, when having numerous groups of students making temperatureCHAPTER 3
Quantitative Skills in AP Biology
This chapter focuses on some of the quantitative skills that are important in your AP Biology course. These are not all of the skills that you will learn, practice, and apply during the year, but these are the skills you will most likely encounter as part of your laboratory investigations or classroom experiences, and potentially on the AP Biology exam.
Surface Area and Volume
Cells are small because a high surface area to volume ratio allows them to function more efficiently. As a cell increases in size, its volume increases faster than its surface area, which does not allow it to transport substances across the membrane fast enough to get rid of what is unnecessary or obtain substances that are needed. The transport of substances across the membrane is largely driven by diffusion, which puts the size limit on the cell. To accommodate this, cells have adaptations to increase the surface area to volume ratio, such as folding of the cell membrane (e.g., villi in the small intestine).
Example
To calculate the surface area to volume ratio for a spherical cell with a radius of 5 µm, first we calculate the surface area:
Next we calculate the volume:
Now that we know the surface area and the volume, we can calculate the ratio:
Water Potential
CHAPTER 3 Quantitative
Skills in AP Biology
If you need more information, the following tutorial can help to further
explain these concepts:
Khan Academy: Cell size
Water Potential
Water potential measures the tendency of water to move by osmosis from one area to another,
and is calculated from two major components, pressure potential and solute potential. The equation for water potential is
where is the water potential, is the solute potential, and is the pressure potential.
Water will always move from an area of high water potential to an area of low water potential. The value of water potential can be positive, zero, or negative.
The water potential of pure water in an open beaker is zero ( ) because both the solute potential and pressure potential are equal to zero ( and ). Increasing the amount of solute in water will increase solute potential, which in turn will decrease water potential. An increase in pressure potential (pushing) will increase water potential, while a decrease in pressure potential (pulling) will decrease water potential.
Example
To calculate the surface area to volume ratio of a cuboidal cell where each side is 5µm, again, let’s first calculate the surface area:
Then we’ll calculate the volume:
Now let’s calculate the surface area to volume ratio:
Hypothesis Testing
CHAPTER 3 Quantitative
Skills in AP Biology
If you need more information, the following tutorials can help to further
explain these concepts:
Khan Academy: Osmosis
Bozeman Science: Water potential
Hypothesis Testing
Hypothesis testing refers to procedures used by scientists to reject or fail to reject statistical hypotheses. It helps us attend to uncertainty and deal with random error in data collected during an investigation. There are two types of statistical hypotheses:
Example
Suppose you wanted to know whether water would go from an area where to an area where , or vice versa.
Because water flows from areas of high water potential to areas of low water potential,
water would go from an area where to an area where .
In an open system, the pressure potential is zero, so the water potential of a solution can be calculated from the solute potential, , using the following formula:
where i is the ionization constant, C is the molar concentration of the solution, R is the
pressure constant ( ), and T is the temperature in kelvins.
Example
Suppose you wanted to know what the water potential is of a 1.5M sucrose solution at 22oC
under standard atmospheric conditions. (Note: The ionization constant for sucrose is 1.0 because it does not ionize in water.)
First you would need to calculate the solute potential:
Since the pressure potential is zero, the water potential is equal to the solute potential.
Hypothesis Testing
CHAPTER 3 Quantitative
Skills in AP Biology
Alternative hypothesis (HA): one of several hypotheses that experimental observationsare the result of some nonrandom cause
Chi-Square Goodness of Fit Test
The chi-square test is a statistical method that is used to determine if there is a significant relationship between two groups of data: observed values are compared to expected (or theoretical) values to determine if any variance from the expected data could be due to chance. It is called a goodness of fit test because we are checking to see if our results match up to a known or theoretical outcome of proportions for multiple categories. The chi-square test tests the null hypothesis. The null hypothesis is the claim against which we are looking for evidence in an investigation, specifically that the population proportions are what we would expect given random chance. For example, if we were rolling a standard six-sided die, our null hypothesis would be that the proportion of 1’s, 2’s, 3’s, 4’s, 5’s, and 6’s would all be 1/6. The alternative hypothesis would be that at least one of these proportions is not equal to 1/6.
The formula for chi-square is
where o is the value of the observed data, and e is the value of the expected data. Sigma (∑) is an indication that the repeated calculations that follow it should be added together.
The chi-square test is used for count data (i.e., data that is not measured) and is often used to analyze the results of genetic crosses.
Example
If you crossed two pea plants that were heterozygous for yellow seed color (Y = yellow,
y = green), you would expect the phenotypic ratio of the offspring in the next generation to
be 3:1. This means that if you collected 100 seeds, you would expect 75 yellow seeds and 25 green seeds. This is our null hypothesis: that there is no difference between the phenotypic ratios in our cross and what is expected by Mendelian theory.
If you actually collected 69 yellow seeds and 31 green seeds, is that close enough to what is expected that you can say your results are consistent with the theory — that the deviation in your results is likely due to chance? What if you collected 65 yellow and 35 green seeds? We can calculate the chi-square value for these data to answer the question:
Categories o e (o−e)2/e
Yellow 69 75 0.48
Hypothesis Testing
CHAPTER 3 Quantitative
Skills in AP Biology
If you need more information, the following tutorial can help to further
explain this concept:
Khan Academy: Chi-square distribution introduction
Table 3.1: Critical Values of the Chi-Square Distribution
Probability (p)
Degrees of Freedom
1 2 3 4 5
0.05 3.84 5.99 7.82 9.49 11.1
0.01 6.64 9.21 11.3 13.2 15.1
0.001 10.8 13.8 16.3 18.5 20.5
If the chi-square value is lower than the critical value, we will fail to reject our null hypothesis: the data we observed fits well with the data we expected.
If the chi-square value is higher than the critical value, we will reject our null hypothesis: our observed data does not fit well with our expected data.
The probability, or p value, is used to tell us how often results like ours could occur under the null hypothesis if only chance is at play.In order to use the critical value table, we need to know our degrees of freedom, which is the number of categories minus one. For our example, we have 1 degree of freedom because we have two categories. Using the table, we find that the critical value for 1 degree of freedom at a p-value of 0.05 is 3.84. Our chi-square value of 1.92 is less than this critical value, so we fail to reject our null hypothesis. This means that our observed data for this cross is within a 3:1 phenotypic ratio.
We can follow the same logic for the second cross:
Categories o e (o –e)2/e
Yellow 65 75 1.33
Green 35 25 4
Mathematical Modeling
CHAPTER 3 Quantitative
Skills in AP Biology
Mathematical Modeling
Mathematical models can be used to investigate the relationships that occur in nature. The Hardy–Weinberg theorem helps us to understand the relationship between allele frequencies in populations of organisms and evolutionary change, specifically how populations can change over time and what might happen to a population in the future.
Hardy–Weinberg Equilibrium
The Hardy–Weinberg theorem states that the allele frequencies of a gene (at a specific locus) in a population will stay the same from one generation to the next as long as the following requirements are met:
No mutations occur.
No movement into or out of the population occurs.
The population is large.
Mating is random.
No natural selection occurs.This means the following factors can disrupt Hardy–Weinberg equilibrium:
Mutations
Gene flow
Genetic drift
Nonrandom mating
Natural selectionThe changes in the allele frequencies of a population over time can be studied
mathematically. Let’s start with a gene pool of A’s and a’s, where A is the dominant allele and
a is the recessive allele.
We can define p as the frequency of A and q as the frequency of a. Since the total frequencies of all alleles must equal 1, then p + q = 1. This means, for example, that if 60% of the alleles in a population are A, then the frequency of A is 0.6 and the frequency of a is 0.4.
The following are all the possible combinations of A and a in the population: AA, Aa, aA, aa. We can use a Punnett square to determine the frequencies of these combinations (i.e., the genotypes in the next generation):
A (p) a (q) A (p) AA (p2)
Aa (pq) a (q) aA (qp) Aa (q2)
Mathematical Modeling
CHAPTER 3 Quantitative
Skills in AP Biology
where p2 is the frequency of the dominant genotype, q2 is the frequency of the recessive
genotype, and 2pq is the frequency of the heterozygous genotype. This is the
Hardy–Weinberg equation.
Using the previous example, if 60% of the alleles in a population are A, we can calculate all of the genotypic frequencies:
Example
If we assume that a population is in Hardy–Weinberg equilibrium for a particular locus, we can apply the Hardy–Weinberg equation to other questions, such as, if an autosomal recessive disease affects three in 100 people of a population, what is the frequency of carriers in the population?
We know that three out of 100 people are affected by an autosomal recessive condition — this is the frequency of aa, which is q2:
If q2 is 0.03, then we can calculate the frequency of the recessive allele:
Since p + q = 1, we can now use this information to calculate the frequency of the dominant allele:
Mathematical Modeling
CHAPTER 3 Quantitative
Skills in AP Biology
If you need more information, the following tutorial can help to further
explain this concept:
Khan Academy: Allele frequency
Population Growth
Populations can experience unlimited growth when resources are abundant, but this is rarely the case in nature.
The change in the size of a population over a given amount of time mostly depends on the number of births and the number of deaths that occur within it. This can be written mathematically as
where ΔN is the change in the population, Δt is the change in time, B is the number of births, and D is the number of deaths.
In a given population, the per capita rate of increase, r, can be written as
The equation for the change in population size can now be written as
Two basic models of population growth are the exponential growth and the logistic growth model:
Exponential growth model: A population increases in size when r is constant andgreater than zero:
where rmax is the maximum per capita rate of increase and N is the size of the population. In other words, the population (usually a small one) grows at a fixed rate.
Logistic growth model: A population increases in size until r approaches zero as the size of the population reaches its carrying capacity:Mathematical Modeling
CHAPTER 3 Quantitative
Skills in AP Biology
Exponential growth example
Suppose a population of 100 bacteria is experiencing exponential growth: The current birth rate is 22 bacteria per day and the current death rate is 15 individuals per day. We want to calculate the growth of this population over 30 days.
First, let’s calculate the per capita rate of increase:
Now, let’s calculate the growth rate for day one:
This means that 70 bacteria are added the first day. So, for the second day, we start with 170 bacteria. Using this same equation, we can calculate the size of the population for the next day:
If we repeat this calculation until day 10, we will see the following for our population growth:
Day Number of Bacteria
0 100
1 170
2 289
3 491
4 835
5 1420
6 2414
7 4103
Mathematical Modeling
CHAPTER 3 Quantitative
Skills in AP Biology
If we continued this for the next 30 days, the growth of our population would look like this:
Figure 3.1: Exponential Growth of a Bacterial Population
If you need more information, the following tutorial can help to further
explain these concepts:
Khan Academy: Exponential and logistic growth in populations
Logistic growth example
Say that the same population of bacteria from the previous example is experiencing logistic growth at the same rate, but the carrying capacity of the environment is 2000 bacteria. Let’s calculate the growth rate of the population under these circumstances: