1.2 RAPID WEBSITE AND WEB INTERFACE... 1
1.3 CONTACT INFORMATION... 2
2 RAPID NETWORK INFRASTRUCTURE... 3
2.1 THE SECURE PORTAL... 3
2.2 CUSTOMER IT REQUIREMENTS... 3
2.3 RAPID NETWORK INFRASTRUCTURE WITH SUPPORT PC INSTALLED... 4
2.3.1 Network Connection Diagram... 4
2.3.2 Network Communication ... 4
2.3.3 Applications... 4
2.4 RAPID NETWORK INFRASTRUCTURE WITHOUT SUPPORT PC INSTALLED... 5
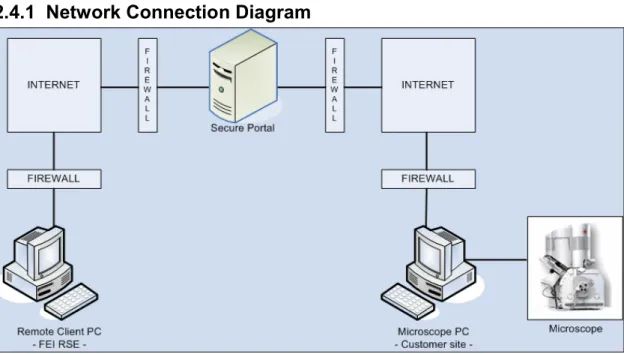
2.4.1 Network Connection Diagram... 5
2.4.2 Network Communication ... 5
2.4.3 Applications... 5
3 PERFORM RAPID INSTALLATION ... 6
4 PERFORM RAPID CONFIGURATION ... 9
4.1 SET UP DUAL SCREEN... 9
4.2 SET UP DISPLAY COMPATIBILITY FOR HELIOS... 10
4.3 SET UP NETWORK ACTIVE AUTAPF ... 11
5 CUSTOMER OPERATIONS (CUSTOMER SITE)... 13
5.1 RAPID WEB INTERFACE... 13
5.1.1 My Profile... 15
5.1.2 My Engineers... 15
5.1.3 Event log... 16
5.1.4 Logout... 17
5.2 CONNECT TO THE SECURE PORTAL THROUGH OPENVPN ... 17
5.3 START WINVNC ... 18
5.4 START WEBCAMVIEWER... 18
6 UNINSTALL ... 19
1 Introduction
The RAPID (Remote Access Program for Interactive Diagnostics) program allows FEI to remotely access customers’ microscopes. Its main goal is to achieve a better and quicker response from Field Service.
The RAPID program will enable your FEI support organization to remotely: • run service test software and diagnostics on your instrument;
• check and modify tool settings; • patch and upgrade software; • view microscope images.
Customers directly benefit from the RAPID program by enabling FEI to: • solve problems remotely without requiring an on-site service call;
• remotely diagnose problems and order parts prior to an on-site service visit; • give factory experts direct access to your instrument to more effectively provide
second and third-line support to your local Field Service Engineer; • enable FEI to provide remote user training and application support
(in the future).
1.1 Glossary
RAPID related terms and abbreviations are explained in the table below.
Term / Abbreviation Explanation
Microscope PC The PC that controls the Microscope
RAPID Remote Access Program for Interactive Diagnostics RAPID web interface Your own personal RAPID environment
Remote Client PC The PC/laptop a FEI remote service engineer uses to remotely control the customer’s Microscope PC
RSE Remote Service Engineer
Secure Portal A highly secure Linux server located outside the main FEI corporate network that manages all connections between customer instruments and FEI remote service engineers Support PC The PC located in between the customer’s LAN and the
Microscope PC
TARO Tecnai Advanced Remote Operation VNC Virtual Network Computing
VPN Virtual Private Network
RAPID Instrument Support: a list of microscopes that are eligible for remote support through the RAPID remote diagnostic program (not all FEI instruments are eligible), including supported operating systems and applications.
RAPID registration
RAPID Application Note, including Ultra VNC Source Code
Log on to the RAPID web interface (http://rapid.fei.com/) for your own personal RAPID environment:
Personal profile settings Personal log file
A list of RSE’s that have access to your microscope
1.3 Contact information
2 RAPID network infrastructure
Security is of paramount concern when enabling a network connection between FEI and a customer’s microscope. FEI has developed a highly-secure, encrypted, VPN-based approach for allowing connectivity between the customer’s microscope and FEI service. The RAPID network infrastructure is designed to prevent unwanted incoming
connections to the customer’s network. The customer is always in control of what access is allowed, when and by whom.
2.1 The Secure Portal
The FEI network contains a Secure Portal (Linux based server). This portal is reachable from outside the FEI network. Therefore it is secured with a firewall. HTTP traffic is possible on port 80 and 8080; OpenVPN traffic is possible on port 1194.
All data communication through OpenVPN is encrypted to guarantee confidentiality between client and portal.
2.2 Customer IT requirements
The customer needs an internet connection on the Microscope PC or on the Support PC to use the RAPID program. The customer needs an outgoing port 1194 to establish the connection with the Secure Portal. All communication will be transferred over this encrypted line.
The customer must meet the IT requirements below:
An internet connection speed of 30 kbps or higher (5 Mbit is recommended) Port 1194 must be opened for TCP/IP or for UDP/IP (outbound)
2.3 RAPID network infrastructure with Support PC installed
2.3.1 Network Connection DiagramFigure 2-1 RAPID Network Connection Diagram – with Support PC
2.3.2 Network Communication
Figure 2-2 Network communication – with a support PC
2.3.3 Applications
PC Application(s)
Secure Portal Open VPN
Remote Client PC (FEI site) Open VPN VNC Viewer Support PC (Customer site) Open VPN
Network AUTPF WinVNC (optional) Microscope PC (Customer site) WinVNC
Webcam (TEM systems only) Taro simple (TEM systems only)
2.4 RAPID network infrastructure without Support PC installed
2.4.1 Network Connection DiagramFigure 2-3 RAPID Network Connection Diagram – without Support PC
2.4.2 Network Communication
Figure 2-4 Network communication – without a support PC
2.4.3 Applications
PC Application(s)
Secure Portal Open VPN
Remote Client PC (FEI site) Open VPN VNC Viewer Microscope PC (Customer site) Open VPN
WinVNC
Webcam (TEM systems only) Taro simple (TEM systems only)
3 Perform RAPID installation
One installer is available. It will install the applications that are applicable to your situation. Refer to the tables in § 2.3.3 and § 2.4.3 to determine on which pc’s the applications need to be installed.
1. Double click on the Rapid installation icon.
The FEI Company logo appears for a short while.
The first installation window appears. 2. Click on Next.
A new window appears. 3. Select your status. 4. Click on Next.
A new window appears. 5. Click on Next.
A new window shows what applications are being installed.
A warning message MAY appear. 6. Click on Continue Anyway if this
warning message appears.
A new window shows the installation progress.
A new window appears. It states that Rapid has been successfully installed.
7. Click on Finish.
The last window appears.
8. Click on OK to complete the installation.
4 Perform RAPID configuration
4.1 Set up Dual Screen
1. Start WinVNC (if not running). 2. Right-click the WinVNC icon inthe system tray and click on Properties.
3. Click on the Check the Video Hook Driver button to see if the Video Hook Driver is present. 4. Check the checkbox Video Hook
Driver if the Video Hook Driver is present.
4.2 Set up display compatibility for Helios
1. Start WinVNC (if not running).2. Right-click the WinVNC icon in the system tray and click on Properties.
3. Uncheck the checkbox Video Hook Driver
4. Click on the OK button.
4.3 Set up Network Active AUTAPF
1. Start NetworkActive AUTAPFIf Network Active AUTAPF has not registered it self as being installed it will display this message.
2. Click Yes
3. Scroll down and click I Understand and agree to the entire above Legal Statement
4. Uncheck Create Start Menu Shortcut and Create Desktop Shortcut.
5. Check Run program when installation is complete.
6. Click on Install NetworkActive AUTAPF 1.0.
There is a preconfigured access rule installed. This should be modified for the network situation between the Support PC and Microscope PC.
7. Select the preconfigured access rule by clicking on it.
8. Click on Edit.
The local port should be set to 5905 and the Remote Host address should be set to the IP address of the Microscope PC of which it is communicating with the Support PC.
9. Fill out the two fields and click OK.
Finally, the access rule must be started. 10. Select the access rule and click
5 Customer operations (customer site)
In short, a customer needs to follow the steps below to make use of RAPID for a service issue:
1. Set up account and access settings through RAPID web interface (if you have not already done so) (refer to § 5.1).
2. Make sure the Support PC / Microscope PC is attached to a high-speed internet connection.
3. Connect to the Secure Portal through OpenVPN (refer to § 5.2). 4. Check the VPN connection.
5. Start WinVNC (if not already running) (refer to § 5.3). 6. Start Webcamviewer (if available) (refer to § 5.4). 7. Call FEI call center.
8. Request a remote service call.
9. Give instrument’s IP address and WinVNC password to the FEI RSE. 10. Ask RSE user name.
11. Log on to the RAPID web interface (https://rapid.fei.com).
12. Enter RSE user name in the remote list to enable RSE to connect to the system. 13. Wait for RSE to successfully establish a connection.
14. Assist with the debug process.
The customer is always responsible for starting and stopping Open VPN (on the Microscope or Support PC) and WinVNC (on the Microscope PC). FEI recommends closing the connection if there is no active remote session.
5.1 RAPID web interface
The RAPID web interface enables users to change their personal settings. The web interface is personalized so users need to log in to be able to access their options. Use the OpenVPN username and password to log on to the web interface.
5.1.1 My Profile
The profile page appears after logging on to the web interface. This page enables you to change organization, email address of the person responsible and password. The
microscope type and serial number can not be changed.
The correct settings for the two remaining fields are: VNC Port (Microscope)
VNC Port (Support PC) Microscope with Support PC 5905 5900
Microscope without Support PC 5900 0 5.1.2 My Engineers
The My Engineers page enables you to grant engineers remote access to the microscope. Enter the name of an engineer in the textbox. While doing so the available engineers appear in a dropdown list. This list may help you find the engineer you are looking for. Only engineers that you have granted access will be able to connect to the microscope and offer assistance remotely. The Remove button enables you to discontinue an engineer’s access to your microscope.
5.1.3 Event log
The event log helps monitor the user account and registers which engineers have connected to the system. This log can contribute to IT security policies.
5.1.4 Logout
• Click on the Continue logout button to end the current session and return to the login screen.
5.2 Connect to the Secure Portal through OpenVPN
1. Right click on the Open VPN iconin the system tray.
2. Hover over the connection type you want to use. (Names of the available connections may be different)
3. Click on Connect.
4. Fill out your Username and Password.
5. Click on OK.
A new window opens. A connection is established after some time. The last line in the window says Initialization
The system tray icon is green when connected.
5.3 Start WinVNC
1. Click on Programs > Rapid Tools >WinVNC in the start menu.
The WinVNC icon appears in the system tray.
5.4 Start Webcamviewer
1. Click on Programs > RAPID >Webcamviewer in the start menu.
A new system tray icon appears. 2. Right click the system tray icon
and click on Start (or double click the icon).
The webcam viewer is started. The RSE can remotely view the microscope image through WinVNC.
6 Uninstall
1. Click on Settings > Control Panel in the start menu.
The Control Panel window appears. 2. Double click on Add or Remove
Programs.
The Add or Remove Programs window appears.
3. Select the FEI Remote Software item.
Several windows appear showing the uninstall progress.
7 Troubleshooting
If overlay disappears after minimizing / maximizing the UI:
1. Open WinVNC properties window (of the Microscope PC). 2. Check System Hook.dll checkbox.