System Center
2012 R2
2 Copyright Information
© 2013 Microsoft Corporation. All rights reserved. This document is provided "as-is." Information and views expressed in this document, including URL and other Internet Web site references, may change without notice. Some examples depicted herein are provided for illustration only and are fictitious. No real association or connection is intended or should be inferred.
You bear the risk of using it. This document does not provide you with any legal rights to any intellectual property in any Microsoft product. You may copy and use this document for your internal, reference purposes. You may modify this document for your internal, reference purposes.
3
Table of Contents
Using This Guide ... 4
Introduction to System Center 2012 R2 ... 5
New Features and Highlights ... 6
Transforming Your Datacenter ... 7
System Center Architecture ... 7
System Center Installation ... 15
System Center Deployment ... 19
Capability Scenarios ... 39
System Center Experiences ... 39
Infrastructure Provisioning ... 40
Infrastructure Monitoring ... 56
Automation and Self-Service ... 60
Application Performance Monitoring ... 72
IT Service Management ... 81
Conclusion ... 85
System Center and the Datacenter ... 85
Appendix: Using the Evaluation Scripts ... 86
Introduction to the evaluation scripts ... 86
Download the prerequisites using evaluation script ... 87
Appendix: Advanced System Center Experiences ... 97
Automation and Self Service ... 97
Appendix: System Center Resources ... 102
Using This Guide 4
Using This Guide
This guide gives you the necessary information to experience the datacenter built on System Center 2012 R2 and powered by Windows Server 2012 R2. The objective is to help you build an evaluation environment within your own datacenter and walk through the real -world guided experiences described in this guide. In addition to the guided experiences, you’ll have the flexibility to expand on the product functionality and learn more based on your business
requirements. Where indicated, some of the experiences are interdependent and build on earlier experiences.
Architectural and installation guidance is provided with the minimum hardware requirements for the evaluation environment. It is also possible to follow this guide and change the scenario to your own environment and parameters. This guide is created using evaluation or prerelease software, which is not supported within a production environment.
Navigating the document on your terms
This document is designed to allow you to easily locate the information that is most relevant to you. You will see the following buttons throughout the guide, which enable you to link quickly to the Table of Contents or the top of the main section you are reviewing.
Table of Contents
Capability Scenarios
Introduction to System Center 2012 R2
–
New Features and Highlights 5Introduction to System Center
2012 R2
Information technology (IT) organizations need the ability to configure and manage an elastic, always- available, and highly scalable datacenter fabric that helps meet customers' needs. IT pros want to drive efficiency and reduce costs while delivering quality services and providing more value to customers.
Monitoring and managing your datacenter infrastructure grows less complex with System Center 2012 R2, which incorporates Microsoft’s experience building and operating a globally distributed datacenter.
System Center introduces features and capabilities that help you:
Reduce infrastructure cost and increase operational efficiencies.
Automate repeatable tasks to enable focus on strategic projects.
Benefit from a high level of cross-platform interoperability.
Build and deploy modern, self-service and highly available applications that can span datacenters.
System Center 2012 R2 enables at-scale management of major Windows Server 2012 R2 capabilities, including storage, networking and server virtualization innovations.
With this toolset, you can provision and monitor infrastructure resources for physical, virtual or cloud computing models across on-premises, service provider and Windows Azure environments. You gain application diagnostics and an overview of the performance and availability of
applications across the entire enterprise infrastructure.
The System Center management layer helps IT organizations automate routine tasks and empowers business application owners, resulting in freed-up resources that can be used to support high-impact projects. Organizations gain the ability to quickly offer new, value-add application services while maintaining focus on IT control and costs.
Introduction to System Center 2012 R2
–
New Features and Highlights 6New Features and Highlights
Here are some of the new and improved features in System Center 2012 R2:
New in System Center 2012 R2 New in System Center 2012
Support for site-to-site gateway Virtual machine live cloning
Shared virtual hard disk (VHDX) support Scale-Out File Server cluster deployment
from bare metal
Integration with differencing disks Auto-task resume after Virtual Machine
Manager failover
Improved Unix and Linux support
Windows Azure Pack for Infrastructure as a Service (IaaS) for on-premise
clouds
Windows Azure performance monitoring
Global Service Monitor
Application performance management
Service Provider Foundation (SPF)
Integration with Team Foundation Server (TFS)
Offloaded Data Transfer (ODX) support for faster virtual machine provisioning from templates
IP Address Management (IPAM) integration
Chargeback support
360° .NET Application Monitoring Dashboards
Microsoft System Center Advisor integration for workloads
Table of Contents
Capability Scenarios
Transforming Your Datacenter
–
System Center Architecture 7Transforming Your Datacenter
This guide walks you through the steps to build a datacenter footprint with virtual machines, along the way pointing you toward a rich set of resources available on the Microsoft TechNet website. The virtual machines you create can be used to explore System Center and evaluate the hands-on experiences that bring System Center capabilities to life.
As an option, you may choose to reduce the manual configuration effort by downloading a set of Windows PowerShell scripts. More information about these scripts is available in Appendix: Using the Evaluation Scripts.
System Center Architecture
System Center 2012 R2 supports enterprise-class scale and performance for datacenter
infrastructures built on Windows Server 2012 R2. As part of the evaluation process outlined in this guide, you will walk through experiences based upon a specific architecture and hardware
configuration. The following diagram in Figure 1 shows the logical topology of the System Center components used in this evaluation.
Transforming Your Datacenter
–
System Center Architecture 8System Center components
System Center components deliver a consistent management platform that spans Windows Server and Windows Azure environments. What follows is an overview of the capabilities that the
components enable.
Infrastructure provisioning — with System Center Virtual Machine Manager
When provisioning infrastructure for on-premises, service provider or Windows Azure environments, you need workload scale and performance, heterogeneity, multi-tenancy and chargeback support. Virtual Machine Manager (VMM) delivers virtual machine management and service deployment capabilities. VMM supports multi-hypervisor environments and enables you to define, create and manage the datacenter environment. The following table describes VMM components.
Components Description
VMM Management Server This is the server on which the Virtual Machine Manager service runs and which processes commands and controls communications with the VMM database, the library server, and virtual machine hosts. VMM Console The console is the user interface to your VMM environment. VMM Database The database stores all the Virtual Machine Manager configuration
and information regarding the hosts and virtual guests.
VMM Library Server The VMM Library Server is a catalog of resources containing all the ISO files, virtual hard disks, templates and profiles used to deploy virtual machines and services.
Enhanced capabilities:
System Center 2012 R2 Virtual Machine Manager
Support for network virtualization with support for using Dynamic Host Configuration Protocol (DHCP) to assign customer IP addresses.
Online VHDX resize with support for shared VHDX.
Support for file shares using Server Message Block (SMB) 3.0.
Transforming Your Datacenter
–
System Center Architecture 9Infrastructure monitoring — with System Center Operations Manager
Operations Manager (OpsMgr) provides a single toolset to monitor infrastructure resources for physical, virtual or cloud computing models across on-premises, service provider and Windows Azure environments. You gain application diagnostics and an overview of the performance and availability of your applications across the entire enterprise infrastructure. The following table describes OpsMgr components.
Components Description
Management Server The primary server is the focal point for administering the
management group and communicating with the database. When you open the operations console and connect to a management group, you connect to a management server for that management group. Depending on the size of your computing environment, a
management group can contain a single management server or multiple management servers.
Operations Console The console is the user interface that will give you the single view for monitoring your infrastructure resources.
Operations Manager Database
The database is where all the collected data-like performance and event data and alerts are stored.
Operations Manager Data Warehouse
The data warehouse is used for trending and forecast reporting. Operations Manager Web
Console
The web console provides a browser-based alternative to the server- based console.
Operations Manager Advisor The browser-based console provides deep insight in your .NET applications.
Gateway Server The gateway server is used to monitor untrusted environments, such as a perimeter network. Audit Collection Server (ACS) is used for collecting and auditing security events.
Enhanced capabilities:
System Center 2012 R2 Operations Manager
The diagnostic and monitoring capabilities have been expanded in R2. New features include:
Monitoring Windows Services built on the .NET Framework.
Automatic discovery of ASP.NET MVC3 and MVC Applications.
Enabled application performance monitoring (APM) of SharePoint 2010.
Integration with Team Foundation Server 2010 and 2012.
Automation and self-service — with Orchestrator, Service Manager and App
Controller
Transforming Your Datacenter
–
System Center Architecture 10 predictable, repeatable manner, maximizing both cost-effectiveness and IT control. Orchestrator is the workflow engine that helps automate IT processes through runbooks and WindowsPowerShell. App Controller provides self-service capabilities for application owners. Service Manager provides standardization of service offerings, request offerings and service templates through the service catalog.
System Center Orchestrator
As a workflow engine, Orchestrator works in conjunction with all the System Center components, delivering orchestration, integration and automation of IT processes. It also can also be used to automate components from third-party applications. See TechNet for a full list of Orchestrator 2012 R2 integration packs.
Included as a part of Orchestrator 2012 is the Service Provider Framework, which enables service providers to offer Infrastructure as a Service (IaaS). Service Provider Framework allows clients access to their resources on the hosting provider’s system, using the provider 's front-end portal, without any change to the portal. The following table describes Orchestrator components.
Components Description
Management Server The management server is the communication layer between the Runbook Designer and the orchestration database.
Runbook Server This is where an instance of a runbook runs. A runbook is a collection of actions bundled together that Orchestrator runs to perform various automated actions. Runbook servers communicate directly with the orchestration database. You can deploy multiple runbook servers per Orchestrator installation to increase capacity and redundancy.
Orchestration Database The database is a SQL database that contains all of the deployed runbooks, the status of running runbooks, log files, and configuration data for Orchestrator.
Runbook Designer The Runbook Designer is the tool used to build, edit, and manage Orchestrator runbooks. A single runbook or multiple runbooks form your workflow.
Runbook Tester This is a run-time tool used to test runbooks developed in the Runbook Designer. This tool allows you to test your runbooks before taking them into production.
Orchestration Console The console lets you start or stop runbooks and view real-time status on a web browser. This is a Microsoft Silverlight-based web console. Orchestrator Web Service The web service is a representational state transfer (REST)-based
service that enables custom applications to connect to Orchestrator to start and stop runbooks, and retrieve information about operations by using custom applications or scripts. The Orchestration console uses this web service to interact with Orchestrator.
Deployment Manager Deployment Manager is a tool used to deploy integration packs, runbook servers, and Runbook Designers.
Transforming Your Datacenter
–
System Center Architecture 11Components Description
Integration pack Integration packs are collections of custom activities specific to a product or technology. Microsoft and other companies provide integration packs with activities to interact with their product from an Orchestrator runbook.
Microsoft integration packs (full list here):
All System Center components
Windows Azure
SharePoint 2013
Active Directory
Exchange Admin and Exchange User
Representational State Transfer
FTP
Third-party created and Microsoft-supported integration packs:
HP iLO and OA
HP Service Manager
IBM Tivoli Netcool/OMNibus
VMware vSphere
Enhanced capabilities:
System Center 2012 R2 Orchestrator
Exchange Administrator Integration Pack for Orchestrator in 2012 R2.
Exchange Users Integration Pack for Orchestrator in 2012 R2.
Representational State Transfer Integration Pack Guide for Orchestrator in System Center 2012 R2.
System Center App Controller
Organizations using modern applications need the ability to connect with and manage services in other clouds through a single management experience within the datacenter.
App Controller offers a web-based Silverlight interface that allows you to manage, build, configure and deploy services both on the private and the public cloud. The interface provides a common self-service experience for application owners spanning different clouds. The following table describes App Controller components.
Components Description
App Controller Server The App Controller Server runs the web-based Silverlight application to manage, build, configure and deploy services both on your private cloud and the public cloud.
Database The database that contains the necessary information for the connection to your Azure subscriptions and your Virtual Machine Manager services.
Transforming Your Datacenter
–
System Center Architecture 12Components Description
Windows PowerShell Module
The Windows PowerShell module provides administrators with the ability to automate App Controller administration.
Enhanced capabilities:
System Center 2012 R2 App Controller
Upload a virtual hard disk or image to Windows Azure from a VMM library or network share.
Migrate a virtual machine from VMM to Windows Azure.
Add a Service Provider Framework (SPF) hosting provider connection. SPF enables service providers to offer IaaS to their clients
System Center Service Manager
Service Manager provides an integrated platform for automating and adapting your organization’s IT service management best practices, such as those found in Microsoft Operations Framework (MOF) and Information Technology Infrastructure Library (ITIL). Service Manager provides standardization of service offerings, request offerings and service templates through the service catalog. It provides built-in processes for incident and problem resolution, change management, and release management. The following table describes Service Manager components.
Components Description
Management Server The server contains the main software part of a Service Manager installation. You can use the Service Manager management server to manage incidents, changes, users, and tasks.
Database The database contains Service Manager configuration items from the enterprise; work items, such as incidents, change requests, and the configuration for the product itself. This is the Service Manager implementation of a Configuration Management Database (CMDB).
Data warehouse management server
The computer hosts the server piece of the data warehouse. Data warehouse databases These databases provide long-term storage of the business data that
Service Manager generates. These databases are also used for reporting.
Service Manager console The user interface piece that is used by both the help desk analyst and the help desk administrator to perform Service Manager functions, such as incidents, changes, and tasks. This part is installed automatically when you deploy a Service Manager management server. In addition, you can manually install the Service Manager console as a stand-alone part on a computer.
Transforming Your Datacenter
–
System Center Architecture 13Enhanced capabilities:
System Center 2012 R2 Service Manager
Chargeback support helps you apply cloud-based pricing to your Virtual Machine Manager fabric.
Improved Operations Manager Integration.
SQL Server 2012 Support.
Windows Server 2012 and Windows 8 Support.
Application Performance Monitoring —with Operations Manager
Application downtime and performance issues can disrupt operations, resulting in extra costs and lost revenue. Operations Manager ensures the datacenter organization can provide the nece ssary insight to deliver predictable service level agreements to application owners.
IT Service Management —with Service Manager
Service Manager helps deliver services in a flexible manner, enabling IT to apply unique policies while improving cost efficiency. System Center enables custom service request offerings, process and knowledge integration, and chargeback functionality, and supports incident management, change management, and release management.
Additional components for the cloud infrastructure
System Center also supports business continuity and data protection capabilities through its Data Protection Manager.
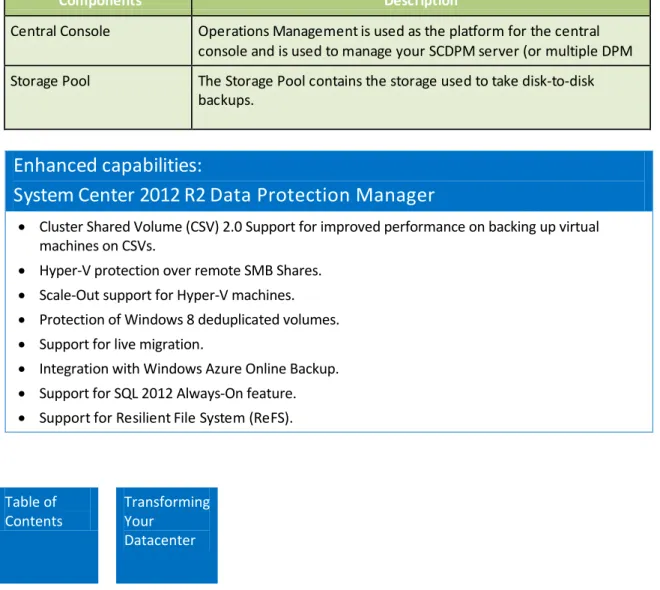
System Center Data Protection Manager
Data Protection Manager (DPM) enables disk-based and tape-based data protection and recovery for servers such as SQL Server, Exchange Server, SharePoint, virtual servers, file servers, and support for Windows desktops and laptops. DPM can also centrally manage system state and Bare Metal Recovery (BMR) which enables IT to protect servers that contain the virtualized
infrastructure. The following table describes DPM components.
Components Description
DPM server This server contains the program files of the Data Protection Manager installation. This server is responsible for all the protection and recovery jobs.
Database The database contains all the information of your Data Protection Manager environment. All protection group information, agent information and recovery points are stored here.
Transforming Your Datacenter
–
System Center Architecture 14Components Description
Central Console Operations Management is used as the platform for the central console and is used to manage your SCDPM server (or multiple DPM servers).
Storage Pool The Storage Pool contains the storage used to take disk-to-disk backups.
Enhanced capabilities:
System Center 2012 R2 Data Protection Manager
Cluster Shared Volume (CSV) 2.0 Support for improved performance on backing up virtual machines on CSVs.
Hyper-V protection over remote SMB Shares.
Scale-Out support for Hyper-V machines.
Protection of Windows 8 deduplicated volumes.
Support for live migration.
Integration with Windows Azure Online Backup.
Support for SQL 2012 Always-On feature.
Support for Resilient File System (ReFS).
Table of Contents
Transforming Your
Transforming Your Datacenter
–
System Center Installation 15System Center Installation
Before you can install System Center, complete the following tasks to properly prepare the host computers, using the Installation section in the Windows Server 2012 R2 Evaluation Guide.
Set up host computers.
Create and configure a virtual machine for the domain controller.
Configure the two hosts.
Create VHDX files.
If you already have host computers, a domain controller virtual machine, virtual switches, and other needed components, read this section to make sure that you have the correct environment requirements and to identify how your environment will vary.
This guide recommends two servers for your evaluation environment, with each component installed within a virtual machine. Figure 2 shows the virtual machine architecture recommended. If you have previously deployed the environment for the Windows Server 2012 R2 experiences, you will recognize the configuration.
Note: This evaluation guide and the included experiences are designed to run on an isolated network environment on an isolated domain infrastructure. It is not recommended to run the experiences on your production network.
Transforming Your Datacenter
–
System Center Installation 16 Figure 2: Evaluation environment for System Center 2012 R2Prerequisites for the physical infrastructure to support the evaluation experiences
Hardware
The recommended datacenter evaluation environment requires two host machines with at least two physical NICs on each machine. The environment also requires hardware to support seven virtual servers on Host1. (You can use Host2 for optional Windows Server 2012 R2 experiences or you may choose to balance the System Center virtual machines across the two hosts.)
Note: While two physical hosts are recommended, you may choose to set up one physical host and focus on System Center experiences.
Physical servers
Transforming Your Datacenter
–
System Center Installation 17 environment, including the System Center experiences. Environments may differ, but this is the minimum necessary to perform the tasks with decent performance.Name CPU Memory Disk NICs
HOST1 2 sockets with multiple cores per socket
48 GB 1TB divided into a 120GB C:drive with the remainder as D:drive
2 Physical NICs
HOST2 (optional)
2 sockets with multiple cores per socket
48 GB 1TB divided into a 120GB C:drive with the remainder as D:drive
2 Physical NICs
See the Installation section in the Windows Server 2012 R2 Evaluation Guide for more information.
Some important notes regarding the servers:
The servers need D:\ drives where the VMCreator.ps1 script will build the virtual machines.
Each host server must have Windows Server 2012 R2 with the Hyper-V role enabled and SQL Server 2012 SP1 installed on them.
Both hosts require static IPs.
Determine the primary network adapter settings based on the current external network environment.
Reserve the IP ranges 192.168.1.0–192.168.1.99 for the isolated networking environment.
For the evaluation environment, the secondary network adapter uses a crossover cable to direct- connect the two hosts on a private network. The subnet mask is 255.255.255.0. As an alternative, you can also connect the secondary network adapters of both hosts to an isolated switch
environment.
Note: This set up will require some reconfiguration when running some experiences.
Transforming Your Datacenter
–
System Center Installation 18Software
You will be downloading evaluation versions of System Center 2012 R2 onto a test environment. The evaluation software is not for production use. Following the evaluation period, you will need to replace the operating system on your test computer and reinstall all your programs and data. It is not possible to upgrade the evaluation to a licensed working version; a clean installation is required.
Download Software
System Center 2012 R2 http://technet.microsoft.com/en-us/evalcenter/dn205295.aspx SQL Server 2012 SP1 http://technet.microsoft.com/en-us/evalcenter/hh225126.aspx
T Table of Contents
Transforming Your
Transforming Your Datacenter – System Center Deployment 19
System Center Deployment
Follow the deployment steps to properly prepare and align your evaluation environment with the hands- on experiences in the Capability Scenarios section.
There are four steps:
1. Create virtual machines. 2. Download software. 3. Configure virtual machines. 4. Deploy System Center 2012 R2.
Create System Center virtual machines for evaluation experiences
First, you will build the virtual machine architecture to complete the evaluation process. To create the System Center virtual machines required for the experiences you have two options to choose from:
Option A: Run the evaluation script VMCreator.ps1 to create and configure the virtual machines.
Option B: Deploy the evaluation virtual machines through manual configuration. Instructions for each option follow.
Option A: Automate virtual machine creation
Introduction to the evaluation scripts
Scripts are available to help you through several steps in the deployment process. The scripts are optional and can save you time and effort.
As mentioned previously, you can download scripts from Microsoft to help set up a datacenter evaluation footprint. The scripts can be customized to fit your environment.
Note: You are ready to download the evaluation scripts once you have prepared the hosts and configured the virtual machine for the domain controller. The scripts work with Windows 8.1 and Windows Server 2012 R2 operating systems. See instructions to set up hosts with a Windows 2012 R2 operating environment in the Installation section in the Windows Server 2012 R2 Evaluation Guide. Here are the steps to prepare the scripts for use:
1. Download and run the Datacenter Evaluation Deployment Tool.msi file. The scripts will be installed in the C:/temp directory, unless you changed the target.
Note: If you are using the scripts, be sure to transfer the scripts to the Windows Server 2012 R2 host before using, referencing the instructions in the following step.
Transforming Your Datacenter – System Center Deployment 20 configure the virtual machines for the experiences. The folder includes:
VMCreator.ps1 is a script to build virtual machines
SysCenterVariable.xml contains settings used by the VMCreator.ps1 script to set up the virtual machines for the System Center experiences.
You will also see the following optional files:
An ExperiencesVariable.xml file that contains settings used to set up the virtual machines for Windows Server experiences. (This script works with the experiences in the Windows Server 2012 R2 Evaluation Guide.)
An ActiveDir folder with scripts to set up the domain controller as detailed in the Windows Server 2012 R2 Evaluation Guide.
Downloader.ps1 downloads the prerequisites needed to configure System Center. This script is optional and the steps to use are detailed in the Appendix: Using the Evaluation Scripts section.
Workflow.xml contains settings for the downloader script.
Customizing the scripts
The VMCreator script works with the SysCenterVariable.xml to perform four different tasks. The script does the following:
1. Creates all the virtual machines needed to evaluate System Center. 2. Installs the appropriate operating system on the virtual machines. 3. Sets virtual machine IP addresses.
4. Joins the virtual machines to the Contoso domain or the domain you are using.
If you plan to use the VMCreator.ps1 script to create the seven virtual machines for the experiences, first customize the SysCenterVariable.xml file included with the scripts to reflect your environment. Make sure that the host name reflects the actual host name and you join the virtual machines to the domain you are using.
You may also adjust the virtual machine IP addresses. The starting IP address is set in the
SysCenterVariable.xml and the VMCreator.ps1 script assigns each virtual machine a sequential IP address. When deploying the infrastructure and working through the different experiences, you may use your own IP addresses and better hardware.
The following is a section of the SysCenterVariable.xml. <VMs>
<Count>7</Count>-<Default> <Host>localhost</Host> <Folder>D:\VMs</VMFolder> <VHDFolder>D:\VMs</VHDFolder>
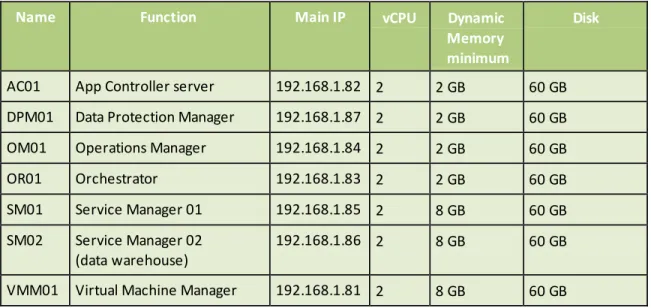
The VMCreator.ps1 script will create the virtual machines listed in the following table, which includes the minimum hardware requirements for each virtual server supporting the System Center evaluation
Transforming Your Datacenter – System Center Deployment 21 environment. The script sets startup RAM for the virtual machines to 2GB or 8 GB, based on minimum memory needs. Memory is configurable through the SysCenterVariable.xml to support dynamic RAM. System Center virtual machine specifications
Name Function Main IP vCPU Dynamic
Memory minimum
Disk
AC01 App Controller server 192.168.1.82 2 2 GB 60 GB DPM01 Data Protection Manager 192.168.1.87 2 2 GB 60 GB
OM01 Operations Manager 192.168.1.84 2 2 GB 60 GB
OR01 Orchestrator 192.168.1.83 2 2 GB 60 GB
SM01 Service Manager 01 192.168.1.85 2 8 GB 60 GB
SM02 Service Manager 02 (data warehouse)
192.168.1.86 2 8 GB 60 GB
VMM01 Virtual Machine Manager 192.168.1.81 2 8 GB 60 GB
Run the VMCreator.ps1 file
Once you have customized the script, you are ready to run it.
Find the VMCreator script in the C:\Temp\EvalScripts folder that you have downloaded and transferred to Host1. The script automates the virtual machine setup.
Open Windows PowerShell as Administrator, navigate to the following directory C:\Temp\EvalScripts and run the VMCreator.ps1 to create the virtual machines needed for the evaluation.
.\VMCreator –inputfile SysCenterVariable.xml
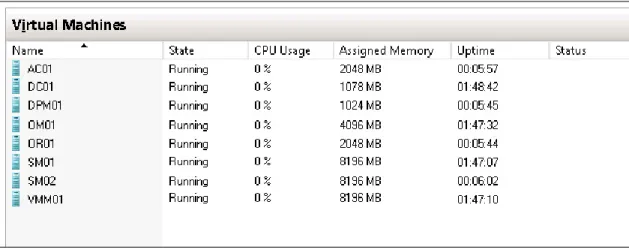
After the script runs successfully, you will see the newly created virtual machines listed in Hyper-V. Figure3 shows the virtual machines on Host1.
Transforming Your Datacenter – System Center Deployment 22
Figure 3: System Center Experience virtual machines
Option B: Manual virtual machine creation
Use the following steps to manually create each of the seven System Center virtual machines on Host1. Change the VM name and IP address for each virtual machine, using the specifications in Figure 3 above.
1. Name: VMM01 (or the name in the table).
2. Select the Store the virtual machine in a different location check box and set the location to D:\VMs.
3. For Specify Generation, select: Generation 1.
4. Set Startup memory at 2048 MB, select Use Dynamic Memory for this virtual machine and set the maximum value to 10 GB.
5. Connection: the Eval-Internal Virtual Switch created when configuring the hosts. 6. Under Connect Virtual Hard Disk, select create a virtual hard disk and name the disk
VMM01_ Disk0, using the default location, then click Next.
7. Install Options: Install an operating system from a boot CD/DVD-ROM and select Image File (.iso); then browse to D:\ISOs and select the ISO for Windows Server 2012 R2. 8. Start the Virtual Machine and Install Windows Server 2012 R2.
9. Once Windows is fully installed and running, open System Properties and rename the machine to VMM01.
10. Set the IP address to 192.168.1.81 (or the address in the table for the virtual machine). 11. Set the Subnet mask to 255.255.255.0.
12. Set the Gateway to 192.168.1.1. 13. Set the DNS to 192.168.1.2.
14. Join the machine to the Contoso domain, using your Contoso\Administrator credentials. After you have successfully created the seven virtual machines, you will see the virtual machines listed in Hyper-V on Host1, as shown in Figure 3.
Download software
After you create the necessary virtual machines and install the correct operating systems on the virtual machines, you are ready to prepare the virtual machines for a System Center install. Here are the steps:
Transforming Your Datacenter – System Center Deployment 23 Download software for System Center virtual machines to C:\temp on Host1.
To save time and automate the download process, you may choose to use the downloader script referenced in the Appendix: Using the Evaluation Scripts
section.
Windows Server 2012 R2 System Center 2012 R2
SQL Server 2012 SP1
Windows Assessment and Deployment Kit (Windows ADK)
Windows Deployment Tools
Windows Preinstallation Environment
Silverlight
WCF Data Services 5.0
System Center 2012 R2 Virtual Machine Manager Console
SQL Server 2008 R2 Management Tools
Report Viewer 2010 Redistributable
System Center 2012 R2 Orchestrator Component Add-Ons and Extensions
System_Center_2012_R2_Integration_Packs.EXE
System_Center_2012_R2_Orchestrator_Integration_ToolKit.exe
Configure virtual machines
This section lists the roles, features, and services to implement on each of the virtual machines and the software to install, including Windows, System Center, and SQL Server.
Follow these steps to install the prerequisite software on the virtual machines.
1. Copy all needed software for the virtual machine from the source location and paste in the virtual machine.
Note: The following tables indicate which software to install on each virtual machine.
2. Complete the software installation in the order identified in the following table.
3. Connect to each virtual machine and set the roles, features, and services according to the following table.
Transforming Your Datacenter – System Center Deployment 24
AC01 configuration
Roles Features Services
.NET Framework 3.51 .NET Framework 4.5
Web Server (IIS) Default Document Directory Browsing HTTP Errors
Static Content HTTP Logging Request Monitor
Static Content Compression Request Filtering
Basic Authentication Windows Authentication
Management Console ASP.NET 4.5 .NET Extensibility 3.5
.NET Extensibility 4.5 ISAPI Extensions ISAPI Filters IIS ASP.NET 4.5 DPM01 configuration
Roles Features Services
.NET Framework 3.51 .NET Framework 4.5
Web Server (IIS) Web Server Default Document Directory Browsing
HTTP Errors Static Content HTTP Logging Static Content Compression
Request Filtering Application Server .NET Framework 4.5
Transforming Your Datacenter – System Center Deployment 25
OM01 configuration
Roles Features Services
.NET Framework 3.51 .NET Framework 4.5 .NET HTTP Activation 4.5 Windows Process Activation Service
Process Model Configuration APIs
Web Server (IIS) Web Server Default Document Directory Browsing HTTP Errors
Static Content HTTP Logging Request Monitor
Static Content Compression Request Filtering
Windows Authentication .NET Extensibility 3.5 .NET Extensibility 4.5 IIS ASP.NET 3.5 IIS ASP.NET 4.5 ISAPI Extensions ISAPI Filters
Management Console ASP.NET 4.5
IIS 6 Metabase Compatibility Application Development Application Server .NET Framework 4.5 OR01 configuration
Roles Features Services
.NET Framework 3.51 .NET Framework 4.5
Web Server (IIS) Web Server Default Document Directory Browsing HTTP Errors
Static Content HTTP Logging
Static Content Compression Request Filtering
Transforming Your Datacenter
–
System Center Deployment 26SM01/SM02 configuration
Roles Features Services
.NET Framework 3.51 .NET Framework 4.5
Web Server (IIS) Web Server Default Document Directory Browsing HTTP Errors
Static Content HTTP Logging
Static Content Compression Request Filtering
Basic Authentication Windows Authentication IIS ASP.NET 4.5
ISAPI Extensions ISAPI Filters
Transforming Your Datacenter
–
System Center Deployment 27SP01 configuration
Roles Features Services
.NET Framework 3.51 .NET Framework 4.5
Web Server (IIS) Web Server Default Document Directory Browsing HTTP Errors
Static Content HTTP Logging
Static Content Compression Request Filtering
Basic Authentication Windows Authentication IIS ASP.NET 4.5
ISAPI Extensions ISAPI Filters
Management Console Request Monitor VMM01 configuration
Roles Features Services
.NET Framework 3.51 .NET Framework 4.5 RSAT Clustering Powershell
Application Server .NET Framework 4.5 Remote Access
Install System Center 2012 R2
Review this TechNet installation guidance before you install System Center 2012 R2 on the virtual machines.
Install the software on the virtual machines in this order using the guidance that follows for each component.
Virtual Machine Manager
Operations Manager
Service Manager
Transforming Your Datacenter
–
System Center Deployment 28 App Controller
Data Protection Manager
Prerequisites
The following steps will help you install Windows features. You will set up Host1 as a central file share to supply key operating system components to the virtual machines to prepare for prerequisite software installation.
Begin this step logged on to Host1 as Contoso\administrator with the password pass@word1 or the credentials for the domain you created.
1. Right-click and mount the Windows Server 2012 R2 installation ISO. Make note of the drive letter.
2. Share this drive in Windows.
a. Right-click on the Mounted Windows Server 2012 R2 installation ISO and select Share with→Advanced sharing.
b. On the drive properties, select Advanced Sharing.
c. Select the Share this folder check box and name the share Win2012R2. d. Click Permissions and validate that everyone has Read access, then click OK. e. Click OK to close the sharing properties dialog window.
f. Click Close to close the Drive properties dialog window.
Virtual Machine Manager
Add required Service Accounts and Service Account Groups
Begin this task logged on to DC01 as Contoso\administrator using the password pass@word1 or the credentials for the domain you created.
1. Open the Users and Computers MMC for Active Directory.
2. Expand the Contoso.com object, right-click Users and select New→User. 3. In the New Object – User dialog, enter the following information and click Next:
First name: SRV_VMM
User login name: SRV_VMM
4. For the password type pass@word1 or the credentials for the domain you created. Then de- select User must change password at next login, select the Password never expires check box, and click Next.
5. Click Finish.
Install Virtual Machine Manager
Begin this task logged on to VMM01 as Contoso\administrator using the password pass@word1 or the credentials for the domain you created.
Transforming Your Datacenter
–
System Center Deployment 29 1. Install .NET Framework 3.5 features:a. In the Windows Server Manager Dashboard, select Add roles and features. b. On the Before you Begin page, click Next.
c. On the Select installation type page, select Role-based or feature-based installation and click Next.
d. On the Select destination server page, select the local server VMM01 and click Next.
e. In the Select server roles page, make no changes and click Next.
f. On the Select features page, select the .NET Framework 3.5 Features and click Next.
g. On the Confirm installation selections page, select Specify an alternate source path.
h. Enter the following for your alternate source path: \\Host1\Win2012R2\Sources\SxS and click OK.
i. Click Install, and then close when installation has completed.
2. Install SQL Server 2012 SP1 on VMM01 using the installation instructions on TechNet. 3. Include the following SQL Server features:
SQL Server 2012 Management Tools
SQL Server 2012 Analysis Management Objects
SQL Server 2012 Command Line Utilities
Note: Make sure that you add the SRV_VMM Service account, Domain Admins, and yourself to the SQL Administrators groups when deploying SQL.
4. Copy the Virtual Machine Manager Installation file from C:\temp on Host1 to VMM01C:\. 5. Install the prerequisite software you downloaded earlier:
Windows Deployment Tools
Windows Preinstallation Environment
6. Install System Center 2012 R2 Virtual Machine Manager using the installation instructions found on TechNet.
Operations Manager
Add required Service Accounts and Service Account Groups
Begin this task logged on to DC01 as Contoso\administrator using the password pass@word1 or the credentials for the domain you created.
1. Open the Users and Computers MMC for Active Directory.
2. Expand the Contoso.com object, right-click Users and select New→User. 3. In the New Object – User dialog, enter the following information and click Next:
First name: SRV_OM
Transforming Your Datacenter
–
System Center Deployment 30 4. For the password type pass@word1 or the credentials for the domain you created. Then de- selectUser must change password at next login, select the Password never expires check box, and click Next.
5. Click Finish.
6. Right-click Users and select New→User.
7. In the New Object – User dialog, enter the following information and click Next.
First name: SRV_OMDA
User login name: SRV_OMDA
8. For the password type pass@word1 or the credentials for the domain you created. Then de- select User must change password at next login, select the Password never expires check box, and click Next.
9. Click Finish.
10. Right-click Users and select New→User.
11. In the New Object – User dialog, enter the following information and click Next:
First name: SRV_OMDataReader
User login name: SRV_OMDataReader
12. For the password type pass@word1 or the credentials for the domain you created. Then de- select User must change password at next login, select the Password never expires check box, and click Next.
13. Click Finish.
14. Right-click Users and select New→User.
15. In the New Object – User dialog, enter the following information and click Next:
First name: SRV_OMDataWriter
User login name: SRV_OMDataWriter
16. For the password type pass@word1 or the credentials for the domain you created. Then de- select User must change password at next login, select the Password never expires check box, and click Next.
17. Click Finish.
18. Right-click Users and select New→Group.
19. In the New Object – Group dialog, enter the following information and click OK:
First name: OMAdmins
Group Scope: Global
Group Type: Security 20. Click Finish.
21. In the Users list, right-click on OMAdmins and select Properties.
22. In the OMAdmins properties dialog, select the Members tab and click Add.
23. In the Select Users, Contact, Computer, Service Accounts or Groups dialog, enter SRV_OM; SRV_ OMDA; SRV_OMDataReader; SRV_OMDataWriter; Domain Admins and click OK.
Transforming Your Datacenter
–
System Center Deployment 31Install Operations Manager
Begin this task logged on to OM01 as Contoso\administrator using the password pass@word1 or the credentials for the domain you created.
1. Install .NET Framework 3.5 features:
a. In the Windows Server Manager Dashboard, select Add roles and features. b. On the Before you Begin page, click Next.
c. On the Select installation type page, select Role-based or feature-based installation and click Next.
d. On the Select destination server page, select the local server OM01 and click Next. e. On the Select server roles page, make no changes and click Next.
f. On the Select features page, select the .NET Framework 3.5 Features and click Next.
g. On the Confirm installation selections page, select Specify an alternate source path. h. Do one of the following steps:
i. Enter the following for your alternate source path: \\Host1\Win2012R2\Sources\SxS and click OK.
ii. Or, attach Windows Server 2012 R2 ISO and enter the alternative source path as drive:\Sources\SxS
i. Click Install, and then closewhen installation has completed.
2. Install SQL Server 2012 SP1 on OM01 using the installation instructions on TechNet. 3. Include the following SQL Server features:
SQL Server 2012 Management Tools
SQL Server 2012 Analysis Management Objects
SQL Server 2012 Command Line Utilities
4. Copy the Operations Manager installation file from C:\temp on Host1 to OM01 C:\. Note: Make sure that you add the SRV_OM, SRV_OMDA, SRV_OMDataReader, SRV_ OMDataWriter Service accounts; Domain admins, and yourself to the SQL Administrators groups when deploying SQL.
5. Install the prerequisite software you downloaded earlier:
a. Report Viewer 2010 Redistributable See this TechNet article: How to install the Microsoft Report Viewer Redistributable Security Update.
6. Install System Center 2012 R2 Operations Manager using the installation instructions on TechNet. 7. Download and install the following management packs by using one of two methods:
Option A–Recommended for the evaluation environment: Copy the downloaded MSI files from the links that follow to a directory on OM01 and then extract the files:
Windows Server Internet Information Services 2003, Windows Server 2008, Internet Information Services 7, Windows Server Internet Information Services Library
SQL Server Core Library
Transforming Your Datacenter
–
System Center Deployment 32 Windows Server 2012 R2 Management Packs for System Center 2012
Option B–Used in a production environment: If OM01 had Internet access; you would use the catalog option for importing a management pack in Operations Manager. 8. In Operations Manager console, click the Administration Workspace.
9. Click Management Packs item and select Import Management Packs. 10. Select Add→Add from Disk.
11. Choose all the packs extracted.
Note: Remove any management pack that fails to install due to a dependency. You can add it later.
12. Add Host1 to Operations Manager. 13. Click the Administration Workspace. 14. Click Discovery Wizard.
15. Select Windows Computers and click Next.
16. Select Automatic Computer Discovery and click Next. 17. Select Other user account.
18. In User name, type SRV_OM. 19. In Password, type pass@word1. 20. Select Host1 and click Next. 21. Click Finish.
Service Manager and Data Warehouse
Add required Service Accounts and Service Account Groups
Begin this task logged on to DC01 as Contoso\administrator using the password pass@word1 or the credentials for the domain you created.
1. Open the Users and Computers MMC for Active Directory.
2. Expand the Contoso.com object, right-click Users and select New→User. 3. In the New Object – User dialog, enter the following information and click Next:
First name: SRV_SM
User login name: SRV_SM
4. For the password type pass@word1 or the credentials for the domain you created. Then de- select User must change password at next login, select the Password never expires check box, and click Next.
5. Click Finish.
6. Right-click Users and select New→User.
7. In the New Object – User dialog, enter the following information and click Next.
Transforming Your Datacenter
–
System Center Deployment 33 User login name: SRV_SMWorkflow
8. For the password type pass@word1 or the credentials for the domain you created. Then de- select User must change password at next login, select the Password never expires check box, and click Next.
9. Click Finish.
10. Right-click Users and select New→User.
11. In the New Object – User dialog, enter the following information and click Next.
First name: SRV_SMReporting
User login name: SRV_SMReporting
12. For the password type pass@word1 or the credentials for the domain you created. Then de- select User must change password at next login, select the Password never expires check box, and click Next.
13. Click Finish.
14. Right-click Users and select New→User.
15. In the New Object – User dialog, enter the following information and click Next:
First name: SRV_SMAnalysis
User login name: SRV_SMAnalysis
16. For the password type pass@word1 or the credentials for the domain you created. Then de- select User must change password at next login, select the Password never expires check box, and click Next.
17. Click Finish.
18. Right-click Users and select New→User.
19. In the New Object – User dialog, enter the following information and click Next:
First name: SRV_SMPortal
User login name: SRV_SMPortal
20. For the password type pass@word1 or the credentials for the domain you created. Then de- select User must change password at next login, select the Password never expires check box, and click Next.
21. Click Finish.
22. Right-click Users and select New→Group.
23. In the New Object – User dialog, enter the following information and click OK:
First name: SMAdmins
Group Scope: Global
Group Type: Security 24. Click Finish.
25. In the Users list, right-click on SMAdmins and select Properties.
Transforming Your Datacenter
–
System Center Deployment 34 27. In the Select Users, Contact, Computer, Service Accounts or Groups dialog, enter SRV_SM; SRV_SMWorkflow; SRV_SMReporting; SRV_SMAnalysis; SRV_SMPortal; Domain Admins and click OK.
28. In the SMAdmins properties dialog, click OK to apply and close. 29. Right-click Users and select New→Group.
30. In the New Object – User dialog, enter the following information and click OK:
First name: SMDWAdmins
Group Scope: Global
Group Type: Security 31. Click Finish.
32. In the Users list, right-click on SMDWAdmins and select Properties.
33. In the SMDWAdmins properties dialog, select the Members tab and click Add.
34. In the Select Users, Contact, Computer, Service Accounts or Groups dialog, enter SMAdmins and click OK.
35. In the SMDWAdmins properties dialog, click OK to apply and close. Install Service Manager
Begin this task logged on to SM01 as Contoso\administrator using the password pass@word1 or the credentials for the domain you created.
1. Install .NET Framework 3.5 features:
a. In the Windows Server Manager Dashboard, select Add roles and features. b. On the Before you Begin page, click Next.
c. On the Select installation type page, select Role-based or feature-based installation and click Next.
d. On the Select destination server page, select the local server SM01 and then SM02 and click Next.
e. On the Select server roles page, make no changes and click Next.
f. On the Select features page, select the .NET Framework 3.5 Features and click Next. g. On the Confirm installation selections page, select Specify an alternate source path. h. Enter the following for your alternate source path: \\Host1\Win2012R2\Sources\SxS
and click OK.
i. Click Install, and then close when installation has completed.
2. Install SQL Server 2012 SP1 on SM01 using the installation instructions on TechNet. 3. Include the following SQL Server features:
SQL Server 2012 Management Tools
SQL Server 2012 Analysis Management Objects
SQL Server 2012 Command Line Utilities
4. Install SQL 2012 SP1 on SM02 using the same instructions.
Note: Make sure that you add the SRV_SM, SRV_SMWorkflow, SRV_SMReporting, SRV_SMAnalysis, and SRV_SMPortal Service accounts, Domain Admins, and
Transforming Your Datacenter
–
System Center Deployment 35 yourself to the SQL Administrators groups when deploying SQL on both machines.Note: Confirm the Database engine, Reporting Services, and Analysis Service are also installed with SQL Server 2012 SP1 on both machines.
5. Copy the Service Manager installation file from C:\temp on Host1 to SM01 and SM02 C:\. 6. Install the prerequisite software you downloaded earlier:
Report Viewer 2010 Redistributable See this TechNet article: How to Install the Microsoft Report Viewer Redistributable Security Update.
Silverlight
7. Install System Center 2012 R2 Service Manager as per the installation instructions on TechNet. Use the two-computer scenario.
8. Deploy the Self-Service Portal for System Center 2012 R2 Service Manager using the instructions on TechNet.
Orchestrator
Add required Service Accounts and Service Account Groups
Begin this task logged on to DC01 as Contoso\administrator using the password pass@word1 or the credentials for the domain you created.
1. Open the Users and Computers MMC for Active Directory.
2. Expand the Contoso.com object, right-click Users and select New→User. 3. In the New Object – User dialog, enter the following information and click Next:
First name: SRV_OR
User login name: SRV_OR
4. For the password type pass@word1 or the credentials for the domain you created. Then de- select User must change password at next login, select the Password never expires check box, and click Next.
5. Click Finish. Install Orchestrator
Begin this task logged on to OR01 as Contoso\administrator using the password pass@word1 or the credentials for the domain you created.
1. Install .NET Framework 3.5 features:
a. In the Windows Server Manager Dashboard, select Add roles and features. b. On the Before you Begin page, click Next.
c. On the Select installation type page, select Role-based or feature-based installation and click Next.
d. On the Select destination server page, select the local server OR01 and click Next. e. On the Select server roles page, make no changes and click Next.
Transforming Your Datacenter
–
System Center Deployment 36 f. On the Select features page, select the .NET Framework 3.5 Features and click Next. g. On the Confirm installation selections page, select Specify an alternate source path. h. Enter the following for your alternate source path:\\Host1\Win2012R2\Sources\SxS and click OK.
i. Click Install, and then close when installation has completed.
2. Install SQL Server 2012 SP1 on OR01 using the installation instructions on TechNet. 3. Include the fol1lowing SQL Server features:
SQL Server 2012 Management Tools
SQL Server 2012 Analysis Management Objects
SQL Server 2012 Command Line Utilities
Note: Confirm that you add the SRV_OR Service account, Domain Admins, and yourself to the SQL Administrators groups when deploying SQL on both machines. 4. Copy the Orchestrator installation file from C:\temp on Host1 to OR01 C:\. 5. Install the prerequisite software you downloaded earlier:
Report Viewer 2010 Redistributable See this TechNet article: How to Install the Microsoft Report Viewer Redistributable Security Update.
6. Install System Center 2012 R2 Orchestrator using the installation instructions on TechNet.
7. Install System Center 2012 R2 Orchestrator Component Add-Ons using the installation instructions on TechNet.
App Controller
Add required Service Accounts and Service Account Groups
Begin this task logged on to DC01 as Contoso\administrator using the password pass@word1 or the credentials for the domain you created.
1. Open the Users and Computers MMC for Active Directory.
2. Expand the Contoso.com object, right-click Users and select New→User. 3. In the New Object – User dialog, enter the following information and click Next:
First name: SRV_AC
User login name: SRV_AC
4. For the password type pass@word1 or the credentials for the domain you created. Then de- select User must change password at next login, select the Password never expires check box, and click Next.
5. Click Finish. Install App Controller
Begin this task logged on to AC01 as Contoso\administrator using the password pass@word1 or the credentials for the domain you created.
Transforming Your Datacenter
–
System Center Deployment 37 1. Install SQL Server 2012 SP1 on AC01 using the installation instructions on TechNet.Include the following SQL Server features:
SQL Server 2012 Management Tools
SQL Server 2012 Analysis Management Objects
SQL Server 2012 Command Line Utilities
2. Copy the App Controller installation file from C:\temp on Host1 to AC01 C:\. 3. Install the prerequisite software you downloaded earlier:
Silverlight
WCF Data Services 5.0
Windows Deployment Tools
System Center 2012 R2 Virtual Machine Manager Console
Windows Preinstallation Environment
4. Install System Center 2012 R2 App Controller using the installation instructions on TechNet.
Data Protection Manager
Add required Service Accounts and Service Account Groups
Begin this task logged on to DC01 as Contoso\administrator using the password pass@word1 or the credentials for the domain you created.
1. Open the Users and Computers MMC for Active Directory.
2. Expand the Contoso.com object, right-click Users and select New→User. 3. In the New Object – User dialog, enter the following information and click Next:
First name: SRV_DPM
User login name: SRV_DPM
4. For the password type pass@word1 or the credentials for the domain you created. Then de- select User must change password at next login, select the Password never expires check box, and click Next.
5. Click Finish. Install Data Protection Manager
Begin this task logged on to DPM01 as Contoso\administrator using the password pass@word1 or the credentials for the domain you created.
1. Install SQL Server 2012 SP1. When prompted during the installation of DPM as part of Step 2, select the DPM 2012 SQL instance, instead of using the bundled SQL.
Note: DPM includes SQL 2008 R2 as part of the product download and this will be installed during the install phase.
Transforming Your Datacenter
–
System Center Deployment 38 2. Copy the Data Protection Manager installation file from C:\temp on Host1 to DPM01C:\.
3. Install the following prerequisite software:
a. Report Viewer 2010 Redistributable See this TechNet article: How to Install the Microsoft Report Viewer Redistributable Security Update.
b. SQL Server 2008 R2 Management Tools Optional if you have already installed SQL Server 2012 SP1 on this virtual machine.
4. Install System Center 2012 R2 Data Protection Manager using the installation instructions on TechNet.
You are now ready to walk through the experiences found in the next section, Capability Scenarios. Table of
Contents
Capability Scenarios
Capability Scenarios
–
System Center Experiences 39Capability Scenarios
With this guide you can discover new capabilities through a series of experiences based on the day-to-day activities at a fictitious company, Contoso. Like other organizations, Contoso’s information
technology (IT) team is turning to a cloud datacenter environment to support the needs of its internal customers. Among the team members at Contoso are Richard and Michael, who are datacenter admins, and Sarani, a service admin. In the next pages, you’ll walk through a series of business challenges and resolutions.
These experiences require the virtual machines specified in the System Center Deployment section of this guide.
System Center Experiences
Infrastructure Provisioning
Experience: Provision your on-premises cloud infrastructure
Configure storage fabric.
Configure the network.
Prepare a private cloud.
Create a service template.
Infrastructure Monitoring
Experience: Monitor cloud performance and health
Prepare and connect the environment.
Showcase health report in Operations Manager.
Automation and Self-Service
Experience: Manage your service delivery and automation
Create and test a runbook.
Application Performance Monitoring
Experience: Using Application Performance Monitoring and Global Service Monitor
IT Service Management
Experience: Enable reporting insights with the chargeback feature Table of
Contents
Capability Scenarios
Capability Scenarios
–
Infrastructure Provisioning 40Infrastructure Provisioning
Manage the underlying fabric
Roles: Technology:
Infrastructure admin Microsoft System Center 2012 R2 Virtual Machine Manager
Service admin Windows Server 2012 R2
Features enabled in this capability
Dynamic Optimization
Service template deployment
Bare metal deployment
Multi-tenant networks
To benefit from cloud computing, organizations must learn how to effectively manage and provision the underlying fabric, which means handling not only computing, but storage and networking resources as well. IT organizations want to manage compute needs across the organization and seamlessly add or remove storage to the underlying infrastructure. IT organizations also wants to be able to create secure networks and protect isolated networks, managing cloud resources across groups without concern for conflicting network addresses and storage needs.
At Contoso, for example, secure networking is essential to the development of a new, innovative product. Richard, the infrastructure administrator, has been tasked with creating a development
Capability Scenarios
–
Infrastructure Provisioning 41 environment for a team spread across multiple locations. The product designers are in one office, the developers and testers are in a different city, and the prototyping organization is somewhere else. The environment must connect all locations securely, because of the proprietary nature of the new product.All of the Contoso locations are already connected on the Contoso network and use existing servers and storage. Rather than buying new server and storage hardware, Richard has decided to use Microsoft System Center 2012 R2 to create a private network on top of the existing Contoso network. Richard uses the provisioning and management capabilities of Windows Server 2012 R2 and System Center to accomplish the following:
Provision a multi-tenant network on the existing Contoso physical infrastructure. Using network virtualization, he creates a separate, secure network on the existing servers and storage for the new development team. The new, isolated network is protected from the larger Contoso organization. Others cannot see or use the network resources.
Optimize the new network dynamically; balancing the workloads of what is now a multi-tenant network across servers and managing storage as needed. The dynamic optimization used by System Center adjusts virtual machine distribution and automatically powers down servers when their resources are not used, reducing energy consumption.
Manage the Contoso clouds as if they were a single, physical network. Next, take a look at how you can provision your on-premises cloud infrastructure.
Experience: Provision your on-premises cloud infrastructure
Building a private cloud requires the ability to abstract needed physical resources (compute, storage, and networking) into pools that can be allocated to users who need capacity to run applications. In this experience, you will configure the fabric, which is an abstraction of the storage, server, and network resources, and other elements of the virtual infrastructure required to create a private cloud. You will also create a service template that allows you to deploy an application infrastructure onto this cloud, and then deploy an application onto your infrastructure.
Configure storage fabric
Configure the network
Prepare a private cloud
Create a service template
Reference Links
For additional guidance, see the following TechNet article: Data-tier Applications