VMware vSphere Backup and Replication on
EMC Celerra
Applied Technology
Abstract
NAS is a common storage platform for VMware vSphere environments. EMC® Celerra® can present storage to VMware ESX servers in the form of an NFS datastore, VMFS over iSCSI, and RDM over iSCSI. This white paper reviews the various Celerra technologies that can be utilized to perform backup and replication of the storage presented to the ESX servers.
Copyright © 2009 EMC Corporation. All rights reserved.
EMC believes the information in this publication is accurate as of its publication date. The information is subject to change without notice.
THE INFORMATION IN THIS PUBLICATION IS PROVIDED “AS IS.” EMC CORPORATION MAKES NO REPRESENTATIONS OR WARRANTIES OF ANY KIND WITH RESPECT TO THE INFORMATION IN THIS PUBLICATION, AND SPECIFICALLY DISCLAIMS IMPLIED
WARRANTIES OF MERCHANTABILITY OR FITNESS FOR A PARTICULAR PURPOSE. Use, copying, and distribution of any EMC software described in this publication requires an applicable software license.
For the most up-to-date listing of EMC product names, see EMC Corporation Trademarks on EMC.com All other trademarks used herein are the property of their respective owners.
Table of Contents
Executive summary ... 4
Introduction ... 4
Audience ... 5
Terminology ... 5
Technology overview ... 6
Celerra SnapSure ... 6
Celerra Replicator ... 6
NDMP on Celerra... 6
Replication Manager ... 6
Backup and recovery options... 7
NFS datastore ... 7
Logical backup and restore using Celerra Snapsure ... 7
Logical backup and restore using Replication Manager ... 9
Physical backup and restore using the nas_copy command ... 11
Physical backup and restore using Celerra NDMP and NetWorker... 11
Physical backup and restore using Celerra Replicator ... 13
Physical backup and restore using Replication Manager ... 13
VMFS over iSCSI ... 14
Logical backup and restore using Celerra iSCSI snapshots... 14
Logical backup and restore using Replication Manager ... 15
Physical backup and restore using Celerra Replicator ... 16
Physical backup and restore using Replication Manager ... 17
RDM over iSCSI... 17
VMware Consolidated Backup (VCB)... 18
VCB backup with EMC Avamar ... 21
VMware Data Recovery ... 22
Other file-level backup alternatives... 23
Single file restore ... 24
Replication ... 26
NFS datastore ... 26
Replication using Celerra Replicator ... 26
Replication using Replication Manager and Celerra Replicator... 28
VMFS over iSCSI ... 28
Replication using Celerra Replicator ... 28
Replication using Replication Manager and Celerra Replicator... 29
RDM over iSCSI... 29
VMware vCenter Site Recovery Manager ... 29
Data consistency ... 32
Summary ... 33
Conclusion ... 33
Executive summary
As more customers deploy VMware vSphere with NAS, it becomes increasingly important to provide cohesive and robust backup and replication solutions to help protect data in a VMware environment. NAS presents storage to ESX in the form of NFS datastores, VMFS over iSCSI, or RDM over iSCSI. A highly available storage environment with disaster recovery capabilities is critical to a virtualized server environment. Customers must choose among various options, including running traditional backup and replication applications on the ESX servers or guest virtual machines, utilizing VMware ESX features, and leveraging native storage array-based technologies.
EMC®
Celerra®
provides various features and technologies to perform backup and replication depending on the form of storage presented to the VMware ESX server. When storage is presented using NFS, Celerra SnapSure™ and Celerra Network Data Management Protocol (NDMP) enable image-level backup and recovery, and Celerra Replicator™ replicates file systems for disaster recovery purposes. When storage is presented using iSCSI, Celerra Replicator replicates or creates snaps and clones of iSCSI LUNs either on the same Celerra or on a remote Celerra. Additionally, EMC Replication Manager is an easy-to-use product to centrally manage copies of production data for Celerra iSCSI and NFS environments. It can be integrated with VMware environments to create VM consistent replicas.
This paper examines the different options available for backup and replication while achieving the shortest recovery time objective (RTO) and the best recovery point objective (RPO) possible when customers utilize EMC Celerra in their VMware vSphere environment. You can leverage the advanced features offered by Celerra to create robust solutions that meet your service level agreements effectively in your virtualized environment.
Introduction
VMware vSphere 4.0 enables customers to optimize the use of expensive server resources by virtualizing the hardware and allowing multiple operating systems to reside simultaneously on the same set of physical components. It supports NAS storage devices by using the NFS and iSCSI protocols. Celerra IP storage presents NFS exported file systems and iSCSI LUNs to a VMware ESX server to create datastores for virtual machines. Celerra offers great scalability and reliability, ease-of-use and ease-of-management characteristics, high availability, and advanced data protection mechanisms.
Business continuity and disaster recovery are essential to the success of a business. These demand the highest attention for the most reliable technologies for virtualized and physical environments. EMC Celerra offers many options to address these business requirements. The intent of this paper is to examine different technologies that exist in Celerra for backup and replication operations, and to describe the appropriate solutions when storage is presented to ESX servers either by using NFS or iSCSI. This paper also recommends some of the best practices when using the array-based technologies to perform backup and replication in vSphere 4.0 environments.
VMware Data Recovery (VDR), a disk-based backup and recovery solution released in vSphere 4.0, enables quick, simple, and complete data protection for VMs. This paper also explains the new backup capability of VDR and outlines how it works with Celerra storage. Furthermore, it also describes the single file restore capability from Celerra-based file system checkpoints or iSCSI snapshots by using the VMware Disk Development Kit
This paper provides recommendations to perform backup and replication operations with Celerra in vSphere 4.0 environments. Introduction to Using EMC Celerra with VMware vSphere 4—Applied Best Practices Guide, available on EMC Powerlink®, provides more information.
The solutions listed in this paper are generic and apply to almost all configurations regardless of the storage layout, RAID type, and volume and file system management on Celerra. Therefore, these storage design considerations are not discussed in the paper.
Audience
The information contained in this paper is intended for EMC customers, partners, and service personnel involved in planning, architecting, or administering a VMware environment with EMC Celerra as the storage and looking to implement backup and replication solutions. The readers are expected to have a working knowledge of ESX servers and Celerra systems.
Terminology
Celerra Block Management Application Programming Interface (CBMAPI)—A host utility to manage the snapshot and replication of Celerra iSCSI devices.
Celerra Block Management Command Line Interface (CBMCLI)—A software package that calls the CBMAPI to provide commands that can be run on a Linux host to manage snapshots of Celerra iSCSI LUNs and to manage local and remote replication of those snapshots.
Celerra Replicator—A Celerra feature that performs asynchronous replication over IP. It creates a consistent, point-in-time NAS file system or iSCSI LUN copy at a local or a remote site. It keeps the production data available during replication and sends only the changed data over the network. Datastore—A file system, either a VMFS or an NFS, which serves as a virtual representation of an underlying pool of physical storage resources. These physical storage resources can be comprised of SCSI disks from a local server, Fibre Channel, SAN disk arrays, iSCSI SAN disk arrays, or NAS storage arrays. Internet SCSI (iSCSI)—A protocol for sending SCSI packets over TCP/IP networks.
iSCSI LUN—A Celerra iSCSI software feature that processes SCSI commands such as reading from and writing to storage media.
Network Data Management Protocol (NDMP)—An open standard network protocol designed for enterprise-wide backup and recovery of heterogeneous network attached storage.
Network File System (NFS)—A distributed file system that provides transparent access to remote file systems. NFS allows all network systems to share a single copy of a directory.
Production Logical Unit (PLU)—An iSCSI LUN that serves as a primary storage device.
Raw Device Mapping (RDM)—RDM includes a combination of a pointer, which is a .vmdk file that resides on a VMFS volume, and a physical raw device that the .vmdk file points to. RDM can either be in the physical compatibility mode or in the virtual compatibility mode.
Snapshot (or iSCSI snapshot)—A point-in-time representation of the data stored on an iSCSI LUN. SnapSure—A Celerra feature that provides read-only point-in-time copies of a file system. They are also referred to as checkpoints.
VMware Consolidated Backup (VCB)—As part of the VMware VSphere suite of products, VCB offers a data protection solution for VMs. It enhances the ability of the backup software to take fast and efficient backups of the VMs by offloading the backup workload from production ESX server hosts to proxy servers.
Virtual Machine—A virtualized x86 PC on which a guest operating system and an associated application run. A VM is also a set of discrete files that primarily include a .vmx configuration file and one or many .vmdk virtual disk files.
Virtual Machine File System (VMFS)—A VMware proprietary file system installed on datastores and used by ESX servers to house virtual machines.
VMware Snapshot—A function provided by VMware to capture the entire state of a virtual machine at the time the snapshot is taken.
VMware Data Recovery (VDR)—A new backup and recovery product for VMware vSphere 4 environments that provides easy and complete data protection for virtual machines. It is a disk-based
solution that is easy to use and fast to backup and restore. It is built on the VMware vStorage APIs for data protection.
Technology overview
Celerra SnapSure
The Celerra SnapSure feature creates a read-only or read-writeable logical point-in-time image
(checkpoint) of a production file system (PFS). SnapSure can maintain up to 96 PFS read-only checkpoints and 16 read-writeable checkpoints for each file system while allowing PFS applications continued access to the realtime data. The principle of SnapSure is copy on first write. When a block within the PFS is
modified, a copy containing the block’s original content is saved to a separate volume called the SavVol. Subsequent changes made to the same block in the PFS are not copied into the SavVol. SnapSure reads the original blocks from the PFS (in the SavVol) and the unchanged PFS blocks (remaining in the PFS) according to a bitmap and blockmap data-tracking structure. These blocks combine to provide a complete point-in-time file system image called a checkpoint. Celerra version 5.6 and later support the creation of writeable checkpoints. A writeable checkpoint is always created from a baseline read-only checkpoint, and each baseline checkpoint can only have one writeable checkpoint associated with it at a time.
Celerra Replicator
Celerra Replicator produces a read-only, point-in-time copy of a source file system and periodically updates this copy, making it consistent with the source file system. This read-only copy can be used by a Data Mover in the same Celerra cabinet, or in a remote site. If the source file system becomes unavailable, usually as the result of a disaster, the destination file system can be made read/write for local or remote scenarios through a replication failover process. After the source site is available again, replication can be restored to become read/write at the source and read-only at the destination again through a process that resynchronizes the file systems and then reverses the direction of the replication. Celerra version 5.6 and later support the use of Celerra Replicator V2. This new version consolidates data replication and can be used to replicate both file systems and iSCSI LUNs with the same mechanism.
Celerra Replicator for iSCSI replicates production iSCSI LUNs by asynchronously distributing local snapshots (point-in-time copies of the LUNs) to the destination over an IP network. The feature provides a one-to-one relationship between the source and the destination. The destination LUN is protected as read-only, preventing the iSCSI initiator from writing to it. Celerra Replicator for iSCSI also provides the failover capability so that the replica on the destination becomes writeable and serves as the production LUN in case of a disaster at the source site. After the original production LUN is available, the replication relationship is re-established manually.
NDMP on Celerra
The NDMP allows you to control backup and recovery of an NDMP server through a network backup application, without installing third-party software on the server. With Celerra, the Data Mover functions as the NDMP server. NDMP-based backups are used for high-capacity backups and in environments where multiprotocol support is required. The protocol separates the control and data transfer components of a backup or restore. The actual backups are handled by the Data Mover, which minimizes network traffic.
Replication Manager
Replication Manager provides a simple interface to schedule, manipulate, and manage the disk-based replicas of file systems placed on Celerra and other platforms. For Celerra, replicas can be created with both Celerra SnapSure (local replication) and Celerra Replicator (remote replication). Replication Manager provides customers with a consistent way to manage replicas in varied environments (including different
Manager is ideal for VMware vSphere environments, application-consistent replicas within virtual machines, and replicas of NFS, VMFS, and RDM datastores that contain virtual machines.
Backup and recovery options
EMC Celerra and VMware vSphere combine to offer many possible ways to perform backup and recovery regardless of whether an ESX server uses the NFS datastore, VMFS over iSCSI, or RDM over iSCSI. It is critical to determine the customer RPO or RTO so that an appropriate method is used to meet the Service Level Agreements (SLAs) and minimize downtime.
At the storage layer, two types of backup are discussed in the context of this paper: logical backup and physical backup. A logical backup does not provide a physically independent copy of production data. It offers a view of the file system or iSCSI LUN as of a certain point in time. A logical backup can occur very rapidly, and requires very little space to store. Therefore, a logical backup can be taken very frequently. Restoring from a logical backup can be quick as well, depending on the data changes. This dramatically reduces the mean time to recovery. However, a logical backup cannot replace a physical backup. The logical backup protects against logical corruption of the file system or iSCSI LUN, accidental deletion of files, and other similar human errors. However, it does not protect the data from hardware failures. Also, loss of the PFS or iSCSI LUN would render the checkpoints or snapshots unusable. A physical backup takes a full and complete copy of the file system or iSCSI LUN to a different physical media. Although the backup and recovery time may be longer, a physical backup protects the data from hardware failure.
NFS datastore
The backup and recovery of virtual machines residing on NFS datastores can be performed in the following ways.
Logical backup and restore using Celerra Snapsure
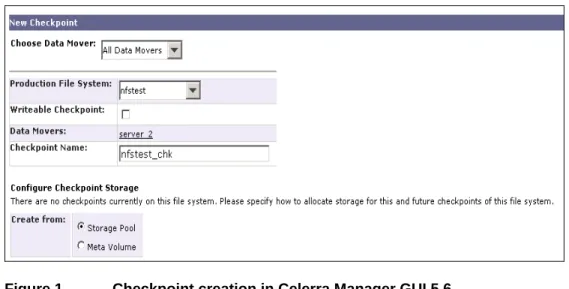
Celerra SnapSure can be used to create and even schedule logical backups of the file systems exported to an ESX server as NFS datastores. This is accomplished by using the Celerra Manager GUI (Figure 1 on page 7) or equivalent with the following Celerra command:
Figure 1 Checkpoint creation in Celerra Manager GUI 5.6
Use the following command to create and restore checkpoints with Celerra version 5.6:
# /nas/sbin/fs_ckpt <ESX file system> -name <checkpoint name> Create –readonly y # /nas/sbin/rootfs_ckpt <new checkpoint name> -Restore
# /nas/sbin/fs_ckpt <ESX file system> -name <checkpoint name> -Create
# /nas/sbin/rootfs_ckpt <checkpoint name> -name <new checkpoint name> -Restore
In general, this method works on a per-datastore basis. If multiple virtual machines share the same
datastore, you can back up and recover them simultaneously and consistently, in one operation. However, if you want to recover an individual virtual machine, follow these steps:
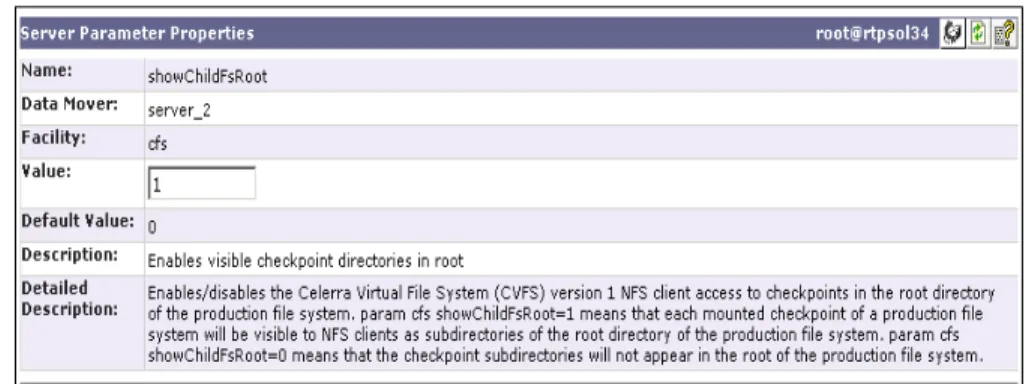
1. Change the Data Mover parameter cfs.showChildFsRoot from the default value of 0 to 1 as shown in Figure 2 on page 8.
NOTE: A virtual directory is created for each checkpoint that is created with Celerra SnapSure. By default, these directories will be under a virtual directory, which is named .ckpt. This virtual directory is located in the root of the file system. By default the .ckpt directory is hidden. Therefore, the datastore viewer in vCenter Server will not be able to view the .ckpt directory. Changing the Data Mover parameter enables each mounted checkpoint of a PFS to be visible to NFS clients as subdirectories of the root directory of the PFS as shown in Figure 3 on page 8.
Figure 2 Server Parameter Properties in Celerra Manager 5.6 GUI
Figure 3 Datastore Browser view
2. Power down the virtual machine.
3. Browse to the appropriate configuration and virtual disk files of the specific virtual machine as shown in Figure 3 on page 8.
4. Manually copy the files from the checkpoint and add it to the datastore under the directory /vmfs/volumes/<ESX filesystem>
Logical backup and restore using Replication Manager
Replication Manager can also be used to protect NFS datastores that reside on an ESX server managed by a VMware vCenter and attached to a Celerra system. It uses Celerra SnapSure to create local replicas of VMware NFS datastores. VMware snapshots are taken for all the VMs that are online and reside on the NFS datastore just prior to creating local replicas to ensure operating system consistency of the resulting replica. Operations are sent from a Linux proxy host that is either a physical host or a separate virtual host. The Replication Manager Job Wizard (Figure 4 on page 9) can be used to select the replica type and expiry options. Replication Manager version 5.2.2 must be installed for NFS datastores support.
Figure 4 Job Wizard
You can restore the entire NFS datastore by selecting the Restore option in Replication Manager as shown in Figure 5 on page 9.
Figure 5 Restoring the NFS datastore replica from Replication Manager
1. Power down the virtual machines that are hosted within the NFS datastore. 2. Remove those virtual machines from the vCenter Server inventory. 3. Restore the replica from Replication Manager.
4. After the restore is complete, add the VMs to the vCenter inventory.
5. Revert to the VMware snapshot taken by Replication Manager to obtain an operating system consistent replica and delete the snapshot.
6. Manually power up each virtual machine.
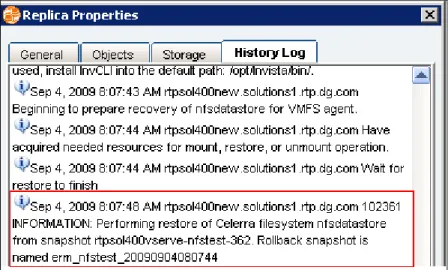
Replication Manager creates a rollback snapshot for every Celerra file system that has been restored. The name of each rollback snapshot can be found in the restore details as shown in Figure 6 on page 10. The rollback snapshot may be deleted manually after the contents of the restore have been verified and the rollback snapshot is no longer needed. Retaining these snapshots beyond their useful life can cause resource issues.
Figure 6 Replica Properties in Replication Manager
A single virtual machine can be restored by using the Mount option in Replication Manager. Using this option, it is possible to mount an NFS datastore replica to an ESX server as an NFS datastore read-only or read-write copy. Follow these steps to restore a single virtual machine:
1. Mount the read-only replica as an NFS datastore in the ESX server as shown in Figure 7 on page 11. 2. Power down your virtual machine residing in the production datastore.
3. Remove the virtual machine from the vCenter inventory. 4. Browse to the mounted datastore.
5. Copy the virtual machine files to the production datastore. 6. Add the virtual machine to the inventory again.
7. Revert to the VMware snapshot taken by Replication Manager to obtain an operating system consistent replica and delete the snapshot.
8. Unmount the replica through Replication Manager. 9. Power up your virtual machine.
Figure 7 Read-only copy of the datastore view in the vSphere client
Physical backup and restore using the nas_copy command
The Celerra command /nas/bin/nas_copy can be used for full or incremental physical backup. It can be typically used to back up a file system to a volume on the Celerra that consists of ATA drives or another Celerra. Although using nas_copy for backup is convenient, it has some limitations during recovery. You cannot use nas_copy to copy data back to the source file system directly. You will need to mount the destination and then manually copy files back to the source file system. This could unnecessarily prolong the recovery time. Therefore, using nas_copy to back up NFS datastores is not encouraged.
NOTE: Use the fs_copy command to perform a full physical backup in versions earlier than Celerra version 5.6.
Physical backup and restore using Celerra NDMP and NetWorker
One of the recommended ways of physical backup and recovery is to use NDMP by utilizing the Celerra Backup with Integrated Checkpoints feature and EMC NetWorker® or any other compatible backup software in the following manner:
1. Create a Virtual Tape Library Unit (VTLU) on Celerra if you want to improve the performance by backing up to disks instead of tapes.
2. Create a library in EMC NetWorker.
3. Configure NetWorker to create bootstrap configuration, backup group, backup client, and so on. 4. Run NetWorker Backup.
5. Execute NetWorker Recover.
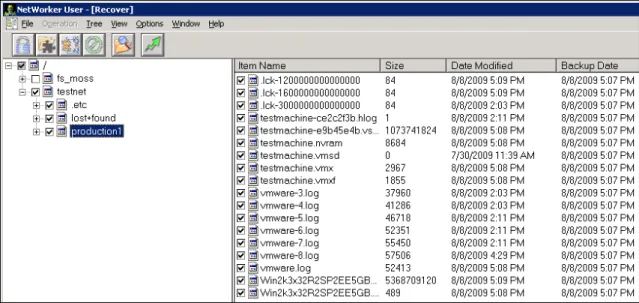
The entire NFS datastore or individual virtual machine can be selected for backup and recovery. Figure 8 on page 12 shows NetWorker during the process.
Figure 8 NDMP recovery using EMC NetWorker
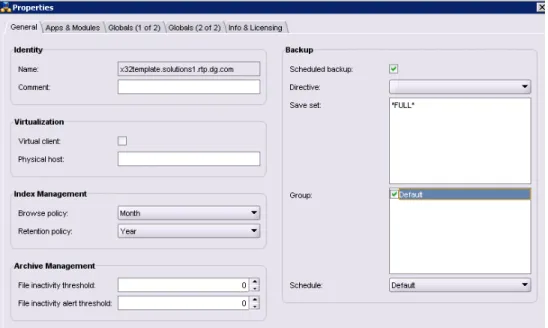
To utilize Celerra backup with integrated checkpoints, you must set the environment variable
SNAPSURE=y. This feature allows you to automate the checkpoint creation, management, and deletion activities by entering the environmental variable in the qualified vendor backup software. The setting of the SNAPSURE variable is illustrated in Figure 9 on page 12 when creating a backup client with EMC
NetWorker.
Figure 9 Backup with integrated checkpoint
When the variable is set in the backup software, each time you run a particular job, a checkpoint of the file system is automatically created (and mounted as read-only) before the NDMP backup starts. The
checkpoint is automatically used for the backup, allowing production activity to continue uninterrupted on the file system. During the backup process, the checkpoint is automatically managed (for example, SavVol is auto-extended if needed, and if space is available). When the backup completes, the checkpoint is
Physical backup and restore using Celerra Replicator
Celerra Replicator can be used for the physical backup of the file systems exported to ESX servers as NFS datastores. This is accomplished by using the Celerra /nas/bin/nas_replicate command or by using the Celerra Manager. Multiple virtual machines will be backed up together if they reside in the same datastore. If you require further granularity at an image level for an individual virtual machine, you can move the virtual machine in its own NFS datastore. The backup can either be local or remote. After the file system is completely backed up, stop the replication to make the target file system a stand-alone copy. If required, you can make this target file system read-writeable. After the target file system is attached to an ESX server, an individual virtual machine can be restored by copying its folder from the target file system to the PFS. If VMware snapshots already exist at the time of backup, the Snapshot Manager in the VI client might not report all VMware snapshots correctly after a VM restore. One way of updating the GUI information is to remove the VM from the inventory and add it again. If an entire NFS is to be recovered, a replication session can be established in the reverse direction from the target file system to the production file system with the nas_replicate command.
NOTE: For versions earlier than Celerra version 5.6, use /nas/bin/fs_replicate command for physical backup of NFS datastores.
Physical backup and restore using Replication Manager
Another method to take backups is to use Replication Manager to provide physical backup of your NFS datastores. Replication Manager uses Celerra Replicator technology to create remote replicas in this scenario. These replicas are actually snapshots that represent a crash-consistent replica of the entire NFS datastore. Before you can create replicas on a target Celerra, you must create a read-only file system on the target Celerra to which the data will be transferred, and create a Celerra Replicator session between the source and target file systems by using Celerra Manager. While creating a replication session, it is recommended to use a Time out of Sync value of 1 minute. VMware snapshots are taken for all VMs that are online and reside on the NFS datastore just prior to creating replicas to ensure the operating system consistency of the resulting replica.
You can restore the entire NFS datastore by selecting the Restore option in Replication Manager. Before restoring a crash-consistent NFS remote replica, you must perform the following steps. As mentioned, Replication Manager creates a rollback snapshot for a remote Celerra file system during restore. 1. Power down the virtual machines that are hosted within the NFS datastore.
2. Remove those virtual machines from the vCenter inventory. 3. Restore the remote replica from Replication Manager.
4. After the restore is complete, add the virtual machines into the vCenter inventory.
5. Revert to the VMware snapshot taken by Replication Manager to obtain an operating system consistent replica, and then delete the snapshot.
6. Manually power up each virtual machine.
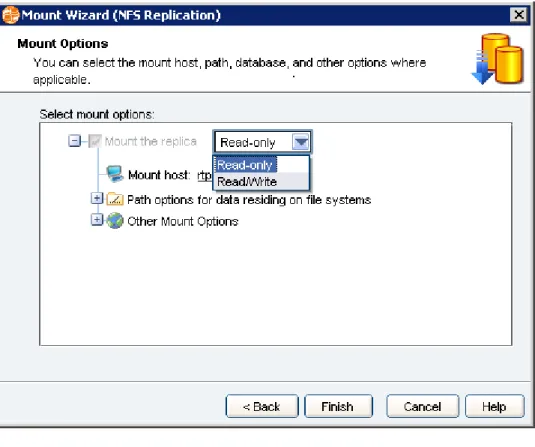
A single virtual machine can be restored by using the Mount option in the Replication Manager. Using this option, it is possible to mount an NFS datastore remote replica to an ESX server as an NFS datastore as shown in Figure 10 on page 14.
Figure 10 Mount Wizard
To restore a single virtual machine, follow these steps:
1. Mount the read-only remote replica as an NFS datastore in the ESX server. 2. Power down the virtual machine that resides in the production datastore. 3. Remove the virtual machine from the vCenter inventory.
4. Browse the mounted datastore.
5. Copy the virtual machine files to the production datastore.
6. Add the virtual machine to the inventory again to report the VMware snapshot taken by Replication Manager.
7. Revert to the VMware snapshot taken by Replication Manager to obtain an operating system consistent replica and delete the snapshot.
8. Unmount the replica by using Replication Manager. 9. Power up the virtual machine.
VMFS over iSCSI
The backup and recovery of virtual machines residing on VMFS datastores over iSCSI can be done in many ways. A brief description of the methods is given here.
Logical backup and restore using Celerra iSCSI snapshots
When using VMFS over iSCSI, a Celerra iSCSI LUN is presented to the ESX server and formatted as type VMFS. In this case, users can create iSCSI snapshots on the Celerra to offer point-in-time logical backup of the iSCSI LUN. Use the following command to create and manage iSCSI snaps directly on Celerra Control Station.
# server_iscsi <Data Mover> -snap –create –target <target_alias_name> -lun
NOTE: To create and manage iSCSI snapshots in versions earlier than Celerra 5.6, you must have a Linux host that contains the Celerra Block Management Command Line Interface (CBMCLI) package. The following command is used to create snapshots and restore data on the Linux host:
# cbm_iscsi --snap <ESX iSCSI LUN> --create
# cbm_iscsi --snap <ESX iSCSI LUN> --restore <snap_name>
In general, this method works on a per-VMFS basis, unless the VMFS spans multiple LUNs. If multiple virtual machines share the same VMFS, you can back up and recover them together in one operation. When multiple snapshots are created from the PLU, restoring an earlier snapshot will delete all newer snapshots. Furthermore, care should be taken to ensure that the file system that stores the PLU and its snapshots has enough free space to create and restore from a snapshot. An individual virtual machine can be restored from a snapshot when the snapshot is made read-writeable and attached to the ESX server. Select Assign a new signature (Figure 11 on page 15) to enable disk re-signature if the snapped LUN is attached to the same ESX server.
Figure 11 VMFS mount options to manage snapshots
When the snapped VMFS is accessible from the ESX server, you can copy the virtual machine files from the snapped VMFS to the original VMFS to recover the virtual machine.
Logical backup and restore using Replication Manager
Replication Manager protects the VMFS datastore over iSCSI that resides on an ESX server managed by a VMware vCenter and attached to a Celerra. It uses Celerra iSCSI snapshots to create replicas of VMFS datastores. VMware snapshots are taken for all virtual machines, which are online and reside on the VMFS datastore, just prior to creating local replicas in order to ensure operating system consistency of the resulting replica. Operations are sent from a Windows proxy host that is either a physical host or a separate virtual host. You can restore the entire VMFS datastore by choosing the Restore option in Replication Manager. Before restoring a crash-consistent VMFS replica, perform these steps:
1. Power down the virtual machines that are hosted within the VMFS datastore. 2. Remove those virtual machines from the vCenter inventory.
3. Restore the replica from the Replication Manager.
4. After the restore is completed, add the virtual machines to the vCenter inventory.
5. Revert to the VMware snapshot to obtain an operating system consistent replica, and delete the snapshots.
6. Manually power up each virtual machine.
A single virtual machine can be restored by using the Mount option in Replication Manager. Using this option, it is possible to mount a VMFS datastore replica to an ESX server as a VMFS datastore.
To restore a single virtual machine, follow these steps:
1. Mount the replica as a VMFS datastore in the ESX server.
2. Power down the virtual machine residing in your production datastore. 3. Remove the virtual machine from the vCenter inventory.
4. Browse for the mounted datastore.
5. Copy and paste the virtual machine files to the production datastore.
6. Add the virtual machine to the inventory again to report the VMware snapshot taken by Replication Manager.
7. Revert to the VMware snapshot taken by Replication Manager to obtain an operating system consistent replica and delete the snapshot.
8. Unmount the replica through Replication Manager. 9. Power up the virtual machine.
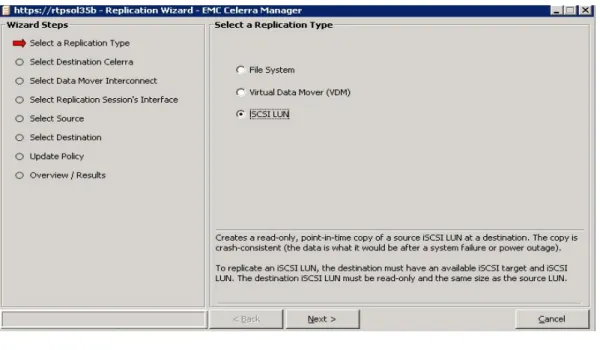
Physical backup and restore using Celerra Replicator
For a physical backup, use the nas_replicate command to create and manage iSCSI clones by using Celerra Replicator V2 from the CLI on the Control Station or from the Celerra Manager in Celerra version 5.6:
# nas_replicate –create <name> -source –lun <lUN Number> -target <targetIQN> -destination – lun <lUN Number> -target <targetIQN> -interconnect <name>
Figure 12 on page 16 shows the new Replication Wizard in the Celerra Manager that allows you to replicate an iSCSI LUN:
NOTE: To create a physical backup in versions earlier than Celerra version 5.6, the Celerra iSCSI
Replication-Based LUN Clone feature can be used. A target iSCSI LUN of the same size as the production LUN needs to be created on Fibre Channel or ATA disks to serve as the destination of a replication session initiated by the following command:
# cbm_replicate --dev <ESX iSCSI LUN> --session --create --alias <alias name> --dest_ip
<dest_dm_ip> --dest_name <cel_name> --label <sess_label>
The backup can either be local or remote. After the PLU is completely replicated, stop the replication session to make the target LUN a stand-alone copy. If required, you can make this target LUN read-writeable. The target LUN can be attached to the same or different ESX server. If the target LUN is attached to the same server, disk re-signature must be enabled.
After the target LUN is attached to an ESX server, an individual virtual machine can be restored by copying its folder from the target LUN to the PLU. If VMware snapshots already exist at the time of backup and VMware snapshots are added or deleted later, the Snapshot Manager in the VI client might not report all VMware snapshots correctly after a virtual machine restore. One way to update the GUI
information is to remove the virtual machine from the inventory and add it again.
If an entire VMFS must be recovered, a replication session can be established in the reverse direction from the target LUN back to the PLU with the cbm_replicate command or the nas_replicate command. Storage operations such as snapshot restore can cause the vSphere client GUI to be out of sync with the actual state of the ESX server. For example, if VMware snapshots already exist at the time of backup and VMware snapshots are added or deleted later, the Snapshot Manager in the vSphere client might not report all VMware snapshots correctly after a LUN restore. One way of updating the GUI information is to execute the following command in the service console to restart the ESX host agent:
# service mgmt-vmware restart
All VMware snapshots existing prior to the backup should be restored and refreshed when the Snapshot Manager is reopened. However, VMware snapshots taken after the backup would be lost following an iSCSI LUN restore.
Physical backup and restore using Replication Manager
Replication Manager also provides a physical backup of the VMFS datastore over iSCSI that resides on an ESX server managed by VMware vCenter and attached to a Celerra. It uses Celerra Replicator to create remote replicas of VMFS datastores. For a single VM recovery, you can use the Mount option in
Replication Manager. To restore the entire VMFS datastore, use the Restore option as described in “Logical backup and restore using Replication Manager” on page 15.
RDM over iSCSI
The iSCSI LUNs presented to an ESX server as RDM are normal raw devices just like they are in a non-virtualized environment. RDM provides some advantages of a virtual disk in the VMFS file system while retaining some advantages of direct access to physical devices. For example, you can take full advantage of storage array based data protection technologies regardless of whether the RDM is in a physical mode or virtual mode.
For logical backup and recovery, you can create point-in-time, Celerra-based iSCSI snapshots. To back up a RDM volume physically, you can use the Celerra iSCSI Replication-Based LUN Clone feature to create clones for versions earlier than Celerra version 5.6. When using RDM, it is recommended that an RDM volume is not shared among different virtual machines or different applications, except in the case of being used as the quorum disk of a clustered application.
With RDM, you can create snapshots or clones in one of the following ways:
Install the CBMCLI package and use the cbm_iscsi and cbm_replicate commands as described “VMFS over iSCSI” on page 14. For Celerra version 5.6, you can also use the nas_replicate command or the Celerra Manager Replication Wizard.
Install and use Replication Manager. Replication Manager offers customers a simple interface to manipulate and manage the disk-based snaps and replicas for Celerra and other platforms and integrate with Windows applications to provide application-level consistency.
NOTE:
Only RDM volumes in the physical compatibility mode are supported at this time.
Only RDM volumes formatted as NTFS can be recognized by Replication Manager. Therefore, Microsoft Windows guest machines can be backed up this way. Virtual machines of other OS types still require CBMCLI for crash-consistent backup.
VMware Consolidated Backup (VCB)
VMware Consolidated Backup (VCB) allows a virtual machine backup at any time by providing a centralized backup facility that leverages a centralized proxy server and reduces the load on production ESX server hosts. VCB integrates with existing backup tools and technologies to perform full and incremental file backups of virtual machines. VCB can perform full image-level backup for virtual machines running any OS, as well as file-level backups for virtual machines running Microsoft Windows without requiring a backup agent in the guest hosts. Figure 13 on page 18 illustrates how VCB works. In addition to the current LAN and SAN mode, VMware introduced the Hot-Add mode in the VCB 1.5 release. This mode allows you to leverage VCB for any datastore by setting up one of your virtual machines as a VCB proxy and use it to back up other virtual machines residing on storage visible to the ESX server that hosts the VCB proxy. VCB creates a snapshot of the virtual disk to be protected and hot adds the snapshot to the VCB proxy, allowing it to access VM disk data. The VCB proxy reads the data through the I/O stack of the ESX host. In contrast to the LAN mode, which uses the service console network to perform backups, the Hot-Add mode uses the hypervisor I/O stack. In the LAN mode, the IP network can potentially be saturated. The testing proved that the Hot-Add mode is more efficient than the LAN mode.
The Celerra array-based solutions for backup and recovery operate at the datastore level, or more granularly at the virtual machine image level. If you want to back up individual files residing inside a virtual machine, you will need other tools. VCB is a great tool for file-level and image-level backup. A VCB proxy must be configured on a Windows system that requires third-party backup software such as EMC NetWorker or EMC Avamar®, the VCB integration module for the backup software, and the VCB software itself. VMware provides the last two components that are downloadable at no cost. However, the VCB licenses need to be purchased and enabled on the ESX or vCenter Server. After all three components are installed, the configuration file config.js located in the directory <VCB installed path>\config must be modified before the first backup can be taken. This file contains comments that define each parameter. It is recommended to follow the README file in the integration module, which contains step-by-step instructions to prepare and complete the first VCB backup successfully. When a backup is initiated through EMC NetWorker, it triggers the scripts provided in the integration module, which in turn start the
executable vcbMounter.exe (included in the VCB software) to contact the vCenter Server or the ESX server directly to locate the virtual machine to be backed up. The arguments passed to vcbMounter.exe come from config.js and the Save set syntax in EMC NetWorker.
VCB image-level backup supports virtual machines that run any type of OS. For NetWorker versions earlier than 7.4.1, the Save set in EMC NetWorker must include the keyword FULL and the name or IP of the target virtual machine. Starting with release 7.4.1, each virtual machine to be backed up must be added as a client to NetWorker. Specify FULL in the Save set for full machine backup as shown in Figure 14 on page 19. VCB first retrieves the VM configuration files as well as its virtual disks in a local directory before NetWorker takes a backup of the directory. During a restore, NetWorker restores the directory on the VCB proxy. The administrator must take the final step to restore the virtual machine onto an ESX server using the vcbRestore command or VMware vCenter Converter tool. Because the command vcbRestore is unavailable in the VCB proxy, it must be run directly from the ESX service console. VCB file-level backup only supports the Windows guest OS. For versions earlier than NetWorker version 7.4.1, the Save set in EMC NetWorker must include the name or IP of the target virtual machine and a colon separated list of paths that must be backed up. Starting with the NetWorker release 7.4.1, each virtual machine that must be backed up must be added as a client to NetWorker. In the Save set, specify the colon separated list of the paths that must be backed up or ALLVMFS to backup all the files and directories on all drivers of the target machine. VCB first takes a VMware snapshot and uses mountvm.exe to mount the virtual disk on the VCB proxy before NetWorker backs up the list of paths provided in the Save set. During a restore, expose the target directory of the virtual machine as a CIFS share to the backup proxy. Use NetWorker User on the VCB proxy to restore the desired file to this network share.
While planning to use VCB with vSphere 4.0, consider the following guidelines and best practices: Ensure that all virtual machines you want to use with VCB have the latest version of VMware tools
installed. Without the latest version of VMware tools, the snapshots that VCB creates for backups are crash-consistent only. This means, no virtual machine-level file system consistency is performed. Image-level backup can be performed on virtual machines running any OS. File-level backup can be
done only on Windows virtual machines. RDM physical mode is not supported for VCB.
When an RDM disk in a virtual mode is backed up, it is converted to a standard virtual disk format. So when it is restored, it will no longer be in the RDM format.
When using the LAN mode, each virtual disk cannot exceed 1 TB.
The default backup mode is san. To perform LAN-based backup, modify TRANSPORT_MODE to either nbd or nbdssl or hotadd in file config.js.
Even though Hot-Add transport mode is efficient, it does not support backup of virtual disks belonging to different datastores.
vcbMounter and vcbRestore commands can be executed directly on the ESX server without the need for a VCB license. However, there will be a performance impact on the ESX server because additional resources are consumed during backup/restore.
vcbRestore is not available on VCB proxy. It has to be run directly on the ESX server or a VMware vCenter Converter must be installed to restore a VCB image backup.
Mountvm.exe on VCB proxy is a useful tool to mount a virtual disk that contains NTFS partitions. Before taking a file-level backup, VCB creates a VM snapshot named _VCB-BACKUP_. An EMC
NetWorker job will hang if the snapshot with the same name already exists. This default behavior can be modified by changing the parameter PREEXISTING_VCB_SNAPSHOT to delete in config.js. If a backup job fails, virtual machines can remain mounted in snapshot mode. Run vcbCleanup to
clean up snapshots and unmount virtual machines from the directory specified in BACKUPROOT of config.js.
Because VCB searches for the target virtual machines by IP address by default, the virtual machine has to be powered on the first time it is backed up so that VMware tools can relay the information to the ESX or VC server. This information is then cached locally on the VCB proxy after the first backup. A workaround is to switch to virtual machine lookup by name by setting
VM_LOOKUP_METHOD=”name” in config.js. Note that the backup would fail if there are duplicated VM names.
Beginning with release 7.4.1 of NetWorker, each virtual machine to be backed up must be added as a client to the NetWorker. However, installing the NetWorker client software on the virtual machine itself is not required. It is recommended that with NetWorker release 7.4.1 or later, the VCB method to find virtual machines should be based on the virtual machine IP address (default method).
If vcbMounter hangs, NetWorker will also hang waiting for it to complete. To troubleshoot this issue, download and run a copy of the Process Explorer utility from sysinternals.com, right-click the vcbMounter process, and select Properties. The Command line textbox on the Image tab displays the full syntax of the vcbMounter command. Copy the command, terminate the hung process, then paste and run the command manually in a DOS window to view the output and determine the cause. vcbRestore by default restores the image to its original location. An alternate location can be specified
by editing the paths listed in the catalog file.
When using Security Support Provider Interface (SSPI) authentication, ensure that the HOST in the config.js configuration file points to your vCenter Server. The NetWorker integration module that calls the VCB Framework must use the user credentials that reside on both the VCB and the vCenter Servers with identical passwords, or must use the domain account. The user account must have administrator privileges on the VCB proxy and at least VMware Consolidated Backup user privileges in the vCenter.
VCB backup with EMC Avamar
EMC Avamar is a backup and recovery software product. Avamar’s global data deduplication technology eliminates unnecessary network traffic and data duplication. By identifying redundant data at the source, this deduplication minimizes backup data before it is sent over the network, therefore slowing the pace of the data growth in the core data centers and at remote offices. Avamar is very effective in areas where traditional backup solutions are inadequate such as virtual machines, remote offices, and large LAN-attached file servers. Avamar solves traditional backup challenges by:
Reducing the size of backup data at the source.
Storing only a single copy of sub-file data segments across all sites and servers. Performing full backups that can be recovered in just one step.
Verifying backup data recoverability.
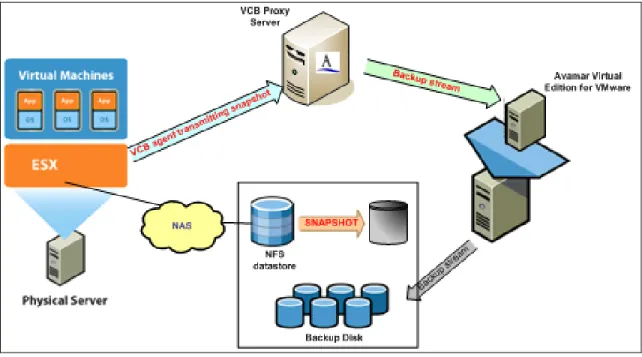
Avamar Virtual Edition for VMware integrates with VCB for virtual environments by using the Avamar VCB Interoperability Module (AVIM). The Avamar VCB Interoperability Module is a series of .bat wrapper scripts that leverage VCB scripts to snap/mount and unmount running virtual machines. These scripts are called before and after an Avamar backup job. There are some scripts for full VM backup (for all types of virtual machines) and some scripts for file level backup (for Windows virtual machines only). These scripts can be used regardless of whether an NFS datastore or VMFS over iSCSI is used.
Figure 15 on page 21 illustrates the full virtual machine backup and file level backup process:
Figure 15 VCB backup with EMC Avamar Virtual Edition
The Avamar agent, AVIM, and the VCB software must be installed on the VCB proxy server. After all three software components are installed, the VCB configuration file (config.js) that is located in the directory <VCB installed path>\config needs to be modified before the first backup can be taken. The VCB configuration file contains comments that define each parameter for Avamar backups. After initiating a backup job from Avamar, VCB retrieves configuration files as well as virtual disks to its local directory. Then Avamar copies the files to the backup destination. After the job is successful, Avamar removes the duplicate copy on the VCB proxy server. This type of backup can be performed on any guest OS and the deduplication occurs at the .vmdk level.
VCB file-level backup with Avamar is similar to the VCB image-level backup with Avamar. When a backup is initiated through Avamar, it triggers the scripts provided in the integration module, which in turn starts the executable vcbMounter.exe (included in the VCB software) to contact the vCenter Server or the ESX server directly to locate the VM to be backed up. The arguments passed to vcbMounter.exe come from config.js and the Dataset syntax in EMC Avamar. In this case, data deduplication happens at the file level. However, presently VCB file-level backup works only for VMs that run the Windows OS.
VMware Data Recovery
In the vSphere 4.0 release, VMware introduced VMware Data Recovery (VDR), which is a disk-based backup and recovery solution. It is built on the VMware vStorage API for data protection and uses a VM appliance and a client plug-in to manage and restore backups. It can be used to protect any kind of OS .It incorporates capabilities such as block-based data deduplication and performs only incremental backups after the first full backup to maximize storage efficiency. Celerra-based CIFS, NFS, and iSCSI storage can be used as destination storage for VMware Data Recovery. All backed up virtual machines are stored on a target disk in a deduplicated store.
Figure 16 VMware data recovery
During the backup, VDR takes a snapshot of the VM and mounts the snapshot directly to the VDR virtual appliance. After the snapshot is mounted, VDR begins streaming the blocks of data to the destination storage as shown in Figure 16 on page 22. During this process, VDR will deduplicate the stream of data blocks to ensure that the redundant data is eliminated prior to the backup data being written to the
destination disk. It uses the change tracking functionality on ESX hosts to obtain the changes since the last backup. The deduplicated store creates a virtual full backup based on the last backup image and applies the changes to it. When all the data is written, VDR dismounts the snapshot and takes the virtual disk out of the snapshot mode. VDR supports only full and incremental backups at the VM level and it does not support backups at file level.
Figure 17 on page 23 shows a sample backup screenshot.
Figure 17 VDR backup process
When using VDR, adhere to the following guidelines:
A VDR appliance can protect up to 100 virtual machines. It supports using only two backup
destinations simultaneously. If more than two backup destinations must be used, configure them to be used at different times. It is recommended that the backup destination size must not exceed 1 TB. NFS is only supported if the mount is presented by an ESX server and the VMDK is assigned to the
VDR appliance. NFS mounts cannot be mapped directly to the appliance.
VDR supports both RDM virtual and physical compatibility modes as backup destinations. When using RDM as a backup destination, it is recommended to use the virtual compatibility mode. Using this mode, you can take a VMware snapshot that can be leveraged together with the Celerra technologies to provide crash consistency and protection of the backed up data.
When creating VMFS over iSCSI as a backup destination, choose the block size that matches your storage requirements. Selecting the default 1 MB block size only allows for a maximum virtual disk size of 256 GB.
To realize increased space savings, ensure that similar virtual machines are backed up to the same destination. Because VDR performs data duplication within and across VMs, VMs with the same OS will have only one copy of the OS data stored.
The virtual machine must not have a snapshot named _data recovery_ prior to backup by using VDR. This is because VDR creates a snapshot named _data recovery_ as a part of its backup procedure. If the snapshot with the same name exists already, the VDR will delete and recreate it.
Backups of virtual machines with RDM can only be performed when the RDM is running in virtual compatibility mode.
VDR provides an experimental capability called File Level Restore (FLR) to restore the individual files without restoring the whole virtual machine for Windows machines.
Because VDR will only copy the state of the virtual machine at the time of backup, already existing snaps are not a part of the VDR backup process.
Other file-level backup alternatives
There are other alternatives to VCB for file-level backup. One traditional way of file-level backup is to install a backup agent on the virtual machine just like how it is done on a physical machine. This is normally called guest-based backup.
Another method of file-level backup is to use a Linux host to mount the .vmdk file and then access the files within the .vmdk directly by following these steps:
1. Download the Linux NTFS driver located at: http://linux-ntfs.org/doku.php, and install it on the Linux host.
2. Mount the file system being used as the NFS datastore on the Linux host. You now have access to the configuration and virtual disk files and can do image-level backup of a virtual machine.
# mount <IP of DM>:/<ESX file system> /mnt/esxfs
3. Mount the virtual disk file of the VM as a loopback mount. Specify the starting offset of 32256 and a NTFS file system type in the mount command line. After this, you can browse the mounted .vmdk, which can be viewed as an NTFS file system to view all the files in the virtual machine and back them up.
# mount /mnt/esxfs/<VM>/nfs-flat.vmdk /mnt/vmdk –o ro,loop=/dev/loop2,offset=32256 –t ntfs
The Linux method has the following advantages and disadvantages: The Linux method has been verified to work for NFS datastores only.
VCB only works for Windows virtual machines; this alternative may work for any guest OS type whose file system can be loopback mounted on a Linux host.
The offset for the loopback mount is not always the same. Determining the correct value might not be straight forward depending on the OS, partition, and so on.
This alternative works only when flat virtual disks are allocated as opposed to thin provisioned. Testing has shown that thinly provisioned virtual disks cannot be mounted using any offset. In contrast, VCB comes with a utility mountvm.exe that allows mounting both flat and thin provisioned virtual disks that contain NTFS partitions.
After a successful mount of the virtual disk file, the file backup is performed on a Linux system. Thus, Windows ACL is not maintained and will be lost after a restore.
File-level backup can also be performed for RDM devices in either the physical compatibility mode or the virtual compatibility mode by using the CBMCLI package. The following procedure demonstrates how this is accomplished:
1. Take an iSCSI snapshot of the RDM LUN.
2. Promote the snapshot and provide access to the backup server by using the following command: # cbm_iscsi --snap /dev/sdh --promote <LUN ID> --mask <initiator>
3. Connect the snapshot to the backup server. The files in the snapshot can now be backed up. 4. Demote and remove the snapshot when finished.
Single file restore
VMware has introduced the Virtual Disk Development Kit (VDDK) to create or access VMware virtual disk storage .The Disk Mount utility is a part of this tool kit, which allows you to mount a virtual disk as a separate drive or partition without requiring to connect to the virtual disk from within a virtual machine. This tool provides a way to mount your Celerra checkpoint- or snapshot-based virtual disks from which you can restore specific files to your production virtual machines. You cannot mount a virtual disk if any of its vmdk files have read-only permissions. Change these attributes to read-write before mounting the virtual disk.
Follow these steps to restore a single file for a Windows virtual machine residing on a Celerra-based file system read-only checkpoint:
1. Install VDDK either in the vCenter Server or in a virtual machine where the file has to be restored. 2. Identify the appropriate read-only checkpoint from the Celerra Manager GUI.
3. Create a CIFS share on the read-only checkpoint file system identified in step 2.
4. Map that CIFS share on to the vCenter Server or on to the virtual machine as mentioned in step 1. 5. Execute the following command syntax to mount your virtual disk from the mapped read-only
checkpoint:
vmware-mount <driveletter:> <path-to-vmdk> </m:n> </v:n> driveletter: Specifies the drive letter where you want to mount or unmount a virtual disk
/m:n Allows mounting of Celerra file system read-only checkpoint /v:n Mounts volume N of a virtual disk. N defaults to 1
The following example shows how to mount a virtual disk when the read-only checkpoint is mapped to the U: drive of vCenter as shown in Figure 18 on page 25.
Figure 18 Mapped CIFS share containing VM in the vCenter
From the command prompt, execute the following command to list the volume partitions:
vmware-mount "U:\NFSDEMO\NFSDEMO.vmdk" /p
From the command prompt, execute the following command to mount the virtual disk:
vmware-mount P: "U:\NFSDEMO\NFSDEMO.vmdk" /m:n
6. After the virtual disk has been mounted as a P: drive on the vCenter, the administrator must copy the individual files through CIFS to the corresponding production machine.
7. After the copy is completed, unmount the virtual disk using the following command: vmware-mount P: /d
To restore the Windows files from a vmdk residing on a VMFS datastore over iSCSI, follow these steps: 1. Identify the Celerra iSCSI snap from which the files have to be restored.
2. Execute the server_iscsi command from Celerra to promote the identified snap. 3. Create a new datastore and add a copy of the virtual machine to the vCenter inventory. 4. Install VDDK in vCenter Server and follow the syntax to mount the vmdk file:
vmware-mount <Drive letter> /v:N <Mount volume N of a virtual disk> /i:<Path to your datacenter>/vm/<VMpathname as read from inventory tree in VC client UI> "[datastorename] <VMname>/<VMname>.vmdk" /h:<ESX or
Vcenter server> /u:<user> /s:<password>
The following command mounts the vmdk of the testvm_copy machine in the Q: drive of the vCenter Server as shown in Figure 19 on page 26.
vmware-mount Q: /v:1 /i:"EMC/vm/testvm_copy" "[snap-63ac0294-iscsidatastore] testvm/testvm.vmdk" /h:10.6.119.201 /u:administrator /s:nasadmin
5. After it is mounted, the administrator must copy the files back to the production machine. After the restore has completed, demote the snap using the server_iscsi command from the Celerra Control Station.
Figure 19 Virtual machine view from the vSphere client
The virtual disk, which is in the RDM format, can also be mounted in a similar manner as the single file restore described in “Single file restore” on page 24.
Replication
For Disaster Recovery (DR) purposes, a remote replica of the PFS or an iSCSI LUN that is used to provide ESX server storage is required. Celerra offers advanced data replication technologies to help protect a file system or an iSCSI LUN. In case of a disaster, you can fail over to the destination side with minimum administrator intervention. The replication session has to be maintained and the snapshots need to be refreshed periodically. The update frequency is determined by the available WAN bandwidth and the RPO.
NFS datastore
Replication using Celerra Replicator
Celerra Replicator can be used to replicate the file systems exported to ESX servers as NFS datastores. This is done by using the Celerra /nas/bin/fs_replicate command, the Celerra 5.6 nas_replicate command, or by using Celerra Manager. The replication operates at a datastore level. Multiple virtual machines will be replicated together if they reside in the same datastore. If you require further granularity at an image level for an individual virtual machine, move the virtual machine in its own NFS datastore. However, consider that the maximum number of NFS mounts per ESX server is 64. Figure 20 on page 27 shows how to increase the number from the default 8.
Figure 20 Modification of maximum number of NFS mounts for each ESX server
After the failover operation to promote the replica, the destination file system can be mounted as an NFS datastore on the remote ESX server. When configuring the remote ESX server, you need to configure the network so that the replicated virtual machines will be accessible. virtual machines residing in the file system need to register with the new ESX server through the vSphere client. While browsing the NFS datastore, you can right-click a .vmx configuration file and select Add to Inventory to complete the registration as shown in Figure 21 on page 27.
Alternatively, the ESX service console command vmware-cmd can be used to automate the process if a large number of virtual machines need to be registered. Run the following shell script to do this:
for vm in `ls /vmfs/volumes/<datastore name>` do
/usr/bin/vmware-cmd –s register /vmfs/volumes/<datastore name>/$vm/*.vmx done
After registration, a virtual machine can be powered up. This may take a while to complete. During power up, a pop-up message box regarding msg.uuid.altered will appear. Select the I-movedit option to complete the power on procedure.
Replication using Replication Manager and Celerra Replicator
Replication Manager can replicate a Celerra NFS datastore that resides on an ESX server managed by the VMware vCenter Server. Replication Manager uses Celerra Replicator to create remote replicas of VMware NFS datastores. Because all operations are performed through the VMware vCenter Server, neither the Replication Manager nor its required software needs to be installed on a virtual machine or on the ESX server where the NFS datastore resides. Operations are sent from a proxy host that is either a Linux physical host or a separate virtual host. VMware snapshots are taken for all virtual machines, which are online and residing on the NFS datastore, just before the remote replication to ensure operating system consistency of the resulting replica. Figure 22 on page 28 shows the NFS datastore replica in the
Replication Manager. Ensure that the Linux proxy host is able to resolve the addresses of the Replication Manager server and mount the host and the Celerra Control Station by using DNS. After performing a failover operation, the destination file system can be mounted as an NFS datastore on the remote ESX server. When you mount an NFS datastore replica to an alternate ESX server, the Replication Manager performs all tasks necessary to make the NFS datastore visible to the ESX server. After that is complete, further administrative tasks such as restarting the virtual machines and the applications must be either completed by scripts or by manual intervention. Replication Manager version 5.2.2 supports NFS datastore replication.
Figure 22 NFS replication using Replication Manager
VMFS over iSCSI
Replication using Celerra Replicator
Celerra Replicator for iSCSI can be used to replicate the iSCSI LUNs exported to an ESX server as VMFS datastores. The cbm_replicate command of the CBMCLI package can be used to create and manage iSCSI
together if they reside on the same iSCSI LUN. If you require better granularity at an image level for an individual virtual machine, you can put the virtual machine on its own iSCSI LUN. However, when using this design, the maximum number of VMFS file systems per ESX server is 256. As in the case of NFS datastore, virtual machines need to be registered with the remote ESX server after a failover. A virtual machine registration can be done either through the datastore browser GUI interface or can be scripted by using the vmware-cmd command.
Replication using Replication Manager and Celerra Replicator
Replication Manager can replicate a VMFS that resides on an ESX server managed by the VMware vCenter Server and is attached to a Celerra system. Replication Manager uses Celerra Replicator
technology to create remote replicas. These replicas are actually snapshots that represent a crash-consistent replica of the entire VMFS. Because all operations are performed through the VMware vCenter Server, neither the Replication Manager nor its required software need to be installed on a VM or on the ESX server where the VMFS resides. Operations are sent from a proxy host that is either a windows physical host or a separate virtual host. Replication Manager proxy host can be the same physical or virtual host that serves as Replication Manager Server.In Celerra environments, the VMFS data may reside on more than one LUN. However, all LUNs must be from the same Celerra and must share the same target IQN.
VMware snapshots are taken for all VMs that are online and residing on the VMFS just prior to replication. When a disaster occurs, you can fail over this replica, allowing Replication Manager to make the clone LUN from the original production host's VMFS datastores on the remote ESX. Failover also makes the production storage read-only. After performing a failover operation, the destination LUN can be mounted as a VMFS datastore on the remote ESX server. After that is complete, further administrative tasks such as restarting the virtual machines and the applications must be either completed by scripts or by manual intervention. Figure 23 on page 29 shows the VMFS datastore replica in Replication Manager.
Figure 23 VMFS replication using Replication Manager
RDM over iSCSI
Replication of RDM volumes is similar to the physical backup of RDM volumes discussed in “RDM over iSCSI” on page 17. Celerra Replicator for iSCSI can be used to replicate the iSCSI LUNs presented to the ESX server as RDM volumes either by using the cbm_replicate command of the CBMCLI package, or the Celerra nas_replicate command in Celerra version 5.6, or Replication Manager. Replication Manager can only be used with a RDM volume that is formatted as NTFS and is in the physical compatibility mode.
VMware vCenter Site Recovery Manager
VMware vCenter Site Recovery Manager (SRM) is an integral component of the VMware vSphere that is installed within a vCenter-controlled VMware data center. The SRM leverages the data replication capability of the underlying storage array to create a workflow that will fail over selected virtual machines from a protected site to a recovery site and bring the virtual machines and their associated applications back into production at the recovery site as shown in Figure 24 on page 30. It supports both Celerra iSCSI and NFS-based replications. SRM accomplishes this by communicating with and controlling the underlying storage replication software through an SRM plug-in called Storage Replication Adapter (SRA). The SRA is a software provided by storage vendors that ensures integration of storage devices and replication with
VMware vCenter SRM. These vendor-specific scripts support array discovery, replicated LUN discovery, test failover, and actual failover.
Figure 24 VMware vCenter SRM
The EMC Celerra Replicator SRA for VMware SRM is a software package that allows SRM to implement disaster recovery for vSphere 4.0 virtual machines by using EMC Celerra systems running Celerra Replicator and Celerra SnapSure software. The SRA-specific scripts support array discovery, replicated LUN discovery, test failover, and actual failover. Disaster recovery plans can be implemented for virtual machines running on NFS, VMFS, and RDM. Figure 25 on page 31 shows a sample screenshot of an SRM configuration.