August 2013 202-11242-01
Extender WN3100RP
U s e r M a n u a l
Support
Thank you for selecting NETGEAR products.
After installing your device, locate the serial number on the label of your product and use it to register your product at https://my.netgear.com. You must register your product before you can use NETGEAR telephone support. NETGEAR recommends registering your product through the NETGEAR website. For product updates and web support, visit http://support.netgear.com.
Phone (US & Canada only): 1-888-NETGEAR.
Phone (Other Countries): Check the list of phone numbers at http://support.netgear.com/general/contact/default.aspx. Trademarks
NETGEAR, the NETGEAR logo, and Connect with Innovation are trademarks and/or registered trademarks of NETGEAR, Inc. and/or its subsidiaries in the United States and/or other countries. Information is subject to change without notice. © NETGEAR, Inc. All rights reserved.
Chapter 1
Getting Started
Get to Know the Extender . . . 6
How the Extender Works . . . 6
When to Use Your Extender . . . 7
Find the Best Location . . . 7
Use the Pass-Through Power Socket . . . 8
Hardware Features. . . 9
Front and Right Side View . . . 9
Rear and Left Side View . . . 11
Antennas . . . 12
Extender Port Connection . . . 12
Install the Extender. . . 14
Place the Extender and Power It On . . . 14
Connect the Extender to Your WiFi Network . . . 15
New Extender WiFi Network Name . . . 16
Join the Extender WiFi Network . . . 16
Monitor Extender Performance. . . 17
Log In to the Extender . . . 17
Use the Smart Wizard to Change the Settings . . . 18
When You Travel . . . 20
Restore Factory Settings . . . 22
Chapter 2
Extender Network Settings
Connect the Extender to an Existing Network . . . 24Use WPS to Add a Computer to the Extender’s Wireless Network . . . 25
Extender Wireless Settings . . . 27
Set Up WEP . . . 29
Set Up WPA, WPA2, or WPA + WPA2. . . 30
Extender IP Address Setup . . . 30
Status Screen . . . 31
Attached Devices . . . 33
Back Up and Manage Extender Settings . . . 34
Set the Password . . . 35
Update the Firmware . . . 36
Advanced Wireless Settings. . . 37
Joining Wireless Networks . . . 41
Appendix A
Supplemental Information
Factory Settings . . . 43 Technical Specifications . . . 43 Safety Information . . . 44
1
This chapter covers the following topics:• Get to Know the Extender
• Hardware Features
• Install the Extender
• Log In to the Extender
• Restore Factory Settings
For more information about the topics covered in this manual, visit the support website at
Get to Know the Extender
The Universal Pass Through WiFi Range Extender lets you extend WiFi coverage to locations outside the range of your wireless router or gateway.
• Arrow LEDs on the front of the extender help you find the best location for the extender.
• With the extender pass-through socket, you retain the use of a socket in your electrical outlet.
The appearance of the extender varies according to country or region.
France Germany
Figure 1. Extender appearance varies according to country or region
How the Extender Works
The extender works like a bridge between a wireless router or gateway and a computer or wireless device outside the wireless router’s or gateway’s range. To do this, the extender has two main jobs:
• The extender connects to a wireless network that is running.
When the extender connects wirelessly to a network, it acts as a network client. This is similar to how a computer connects to a network.
• The extender acts as an access point for computers.
The extender has its own wireless network called NETGEAR_EXT that wireless computers can join. In its role as an access point, the extender performs tasks that wireless routers or gateways do, such as broadcasting its network name (SSID).
The extender must do each of these jobs so that both ends of the bridge are in place.
When to Use Your Extender
NETGEAR recommends that you connect to the extender only when your home network connection is poor. Because data traffic routed through the extender is inherently slower than traffic routed directly from the network, the computer should stay on the network if the connection is good enough. NETGEAR recommends that you connect through the extender network only when the computer is in a “dead zone” where connection from the network is very poor or nonexistent.
Find the Best Location
WiFi router Client
Extender
Figure 2. Best location
When you install the extender and join the extender network, the arrow LEDs guide you to the best location to plug in the extender. If no arrow is lit, the location is good.
Blinking Left Arrow. The extender is too far away from the router or gateway.
Blinking Right Arrow. The extender is too far away from your computer or wireless client.
move the extender to a different location half-way between the computer and the router or gateway.
Use the Pass-Through Power Socket
The extender provides a pass-through power socket. After you have the extender positioned correctly, you can plug in the equipment that was previously plugged in the wall socket before you plugged in your extender.
Figure 3. Pass-through power socket use
Hardware Features
The extender has features to connect it to your network and show how it is working.
Front and Right Side View
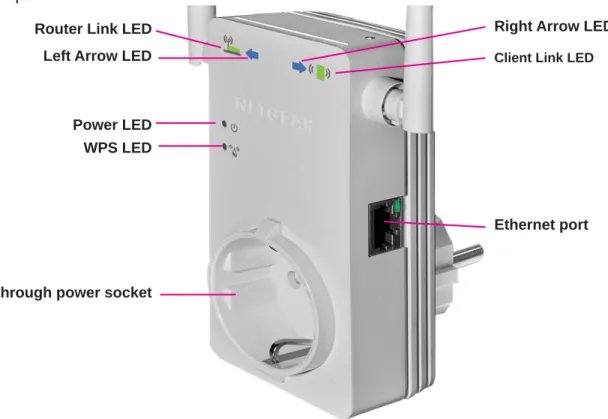
The front and right side of the extender have LEDs, the pass-through power socket, and an Ethernet port.
Router Link LED Left Arrow LED
Right Arrow LED
Client Link LED
Power LED WPS LED
Ethernet port
Pass-through power socket
Figure 4. Front and right side view
The LEDs on the front show how the extender is working:
• Router Link. This LED is lit when the extender is connected to the router or gateway.
- Green. The WiFi connection is good.
- Amber. The WiFi connection is fair.
- Red. The WiFi connection is weak.
• Left Arrow. This LED indicates the need to change the distance between the extender and the router or gateway.
- Blinking blue. Move the extender closer to the router or gateway.
- Off. The extender is close enough to the router or gateway.
- Blinking blue. Move the extender closer to the client.
- Off. The extender is close enough to the client.
• Client Link. This LED is lit when the extender is connected to the router or gateway.
- Green. The WiFi connection is good.
- Amber. The WiFi connection is fair.
- Red. The WiFi connection is weak.
• Power. This LED is lit when the extender is turned on.
- Green. The extender is on.
- Amber. The extender is powering up.
- Off. The extender is off.
• Secure WiFi. This LED indicates a secure wireless connection.
- Solid green. There is wireless security.
- Blinking green. The extender is establishing a WPS connection. The front and right side panel have the following features:
• Pass-through power socket: You can use this socket to power other equipment.
Rear and Left Side View
The rear and left side of the extender have the product label, power connector, and control buttons.
Factory Reset button WPS button
Device On/Off switch
Power connector Product label
Figure 5. Rear and left side view
The left side panel has the following features:
• Factory Reset button. To use this button, stick a paper clip into the reset hole and hold it until the Power LED flashes.
• WPS button. Press the WPS button to wirelessly connect the extender to your router, gateway, or wireless adapter.
• Device On/Off button. Turns the device on and off. The back has the following features:
• Power connector. To provide power to the extender, insert this connector into an AC wall socket.
• Product label. The product label provides access information, WPS PIN, serial number, and MAC address.
Default access information
WPS PIN Serial number MAC address
Antennas
For best performance, position the antennas pointing up.
Antennas
Figure 6. Proper antenna orientation
Extender Port Connection
Usually, you connect to the extender wirelessly, but you can connect equipment such as a computer, TV, Blu-ray player, or gaming console to the Ethernet port on the extender.
Note: Before you connect wired devices or computers, first install and set up your extender as described in the Universal Pass Through WiFi Range Extender WN3100RP Installation Guide that came in the package.
Wireless router
Access the Internet
Range extender
in a home office
in the family room
with a Blu-ray player Figure 7. Ethernet port connection
To connect a computer to the extender with an Ethernet cable: 1. Connect your computer to the extender with an Ethernet cable.
2. Plug the extender into an electrical outlet.
CAUTION:
Do not use Ethernet cable to connect the extender to a router or gateway. If you do so, the extender does not work because it is designed to use only a wireless connection to the router or gateway.
3. Log in to the extender.
For more information, see Log In to the Extender on page17. If you have trouble connecting:
• If you start your computer, connect the Ethernet cable to the extender, and launch your browser quickly, the computer might still need a couple of minutes to recognize the Ethernet LAN connection before you can connect.
• Make sure that your Ethernet cable is securely connected to the extender and to the computer. If the cable is not securely connected, reconnect the Ethernet cable and relaunch your Internet browser.
Install the Extender
Place the extender, apply power, and connect it to your WiFi network.
Place the Extender and Power It On
1. Place the extender halfway between your router or gateway and the location that has poor WiFi coverage.
If it is not possible to place the extender at the halfway point, move the extender closer to the location with poor coverage, but still within the wireless range of the router or
gateway.
2. Turn the On/Off switch on the side of the extender to the On position.
On/Off switch
3. Plug the extender into a power outlet and wait one minute until the extender starts. The Power LEDlights green.
4. Connect the extender to your WiFi network.
a. Connect the extender to your router or gateway.
For more information, see Connect the Extender to Your WiFi Network on page15.
b. Connect your clients to your extender.
Connect the Extender to Your WiFi Network
Do not cable the extender to the router or gateway. The extender connects to your wireless network only with WiFi. You can use the extender’s Wi-Fi Protected Setup (WPS) or the web browser method.
To connect using WPS:
1. Press the WPS button on the side of the extender.
The WPS LED blinks.
2. Within two minutes, press the WPS button on your wireless router or gateway. The Router Link LED lights.
The WPS LED lights green.
The extender network name changes. See New Extender WiFi Network Name on page16.
To connect with the web browser method:
1. On your computer or wireless device, find and join the NETGEAR_EXT WiFi network. The Client Link LED lights.
2. Open a web browser.
3. When prompted, select a language from the list. NETGEAR genie displays.
If the network is secure, the WPS LED lights green.
New Extender WiFi Network Name
The first time the extender connects to a WiFi network, the extender WiFi network name (SSID) changes to that network name, with _EXT at the end. For example:
• WiFi network name. MyNetworkName
• Extender network name. MyNetworkName_EXT
If the extender does not connect to the WiFi network, move the extender to a different location with a better WiFi signal. For example, you might need to move it closer to the router or gateway.
Join the Extender WiFi Network
After you install the extender, you can connect your clients to the extender WiFi network. To join the extender network:
1. Take your computer or wireless device to the location with poor WiFi coverage.
2. Find the new extender network name (MyNetworkName_EXT).
3. Select this network and enter the same WiFi password that you use for your home network.
4. Within two minutes, check the arrow LEDs on the extender.
• If no arrow is lit, the location is good.
• When the extender connects to a network and a client joins the extender network, a blinking arrow LED indicates whether the extender is too far away from the router or wireless client.
Blinking Left Arrow. The extender is too far away from the router or gateway.
Blinking Right Arrow. The extender is too far away from your computer or wireless client.
5. Use the LED colors to monitor and adjust your connection.
For more information, see Monitor Extender Performance on page17.
Note: If you are having trouble getting a good WiFi signal, try to create a better line of sight. For example, move the router or gateway up off the floor onto a table or desk, or move furniture that might be blocking the extender.
Monitor Extender Performance
The Router Link LED indicates performance between the router or gateway and the extender. If this LED is off, the extender is not connected to a WiFi network.
The Client Link LED indicates the performance between the extender and the client. If this LED is off, no computer or wireless device is connected to the extender network.
These LEDs display the following colors:
• Green indicates the best performance.
• Amber indicates a workable performance.
• Red indicates a poor connection or no connection.
Log In to the Extender
You can log in to the extender to use the Smart Wizard or to use the menu selections to view or change the extender’s settings.
To log in to the extender:
1. On your computer, launch an Internet browser such as Mozilla Firefox or Microsoft Internet Explorer.
2. In the address field of your browser, enter http://mywifiext.net. You are prompted to enter a user name and password:
If you do not see the login prompt, make sure to include http:// when you type http://mywifiext.net in your browser.
3. Type admin for the user name.
The default password is password. NETGEAR recommends that you set a more secure password after you log in (see Set the Password on page35).
• If your extender has an Internet connection, the Firmware Update screen displays (see Update the Firmware on page36), and the software automatically checks for new firmware at the NETGEAR website.
• The Status screen displays with the menu on the left. This screen shows what the current settings are for the extender:
Menu Status screen
Use the Smart Wizard to Change the Settings
The Smart Wizard can help you set up your extender to connect to a wireless network. For information about more configuration options, see Chapter 2, Extender Network Settings. The Universal Pass Through WiFi Range Extender WN3100RP Installation Guide (included in the package) explains how to install your extender. During installation, when you launch your Internet browser, the Smart Wizard automatically displays.
After installation, you can change the extender network settings if you want. For example, if you change your network name, you can log in to the extender and change its network name to match.
To use the Smart Wizard again after installation: 1. Log in to the extender.
For more information, see Log In to the Extender on page17.
Note: Once you begin using the Smart Wizard, you must complete all of its steps before you can exit.
A screen similar to the following displays:
This is the same Smart Wizard that displays during installation as described in the installation guide.
3. Select the network from the list that you want to connect to and click the Continue button.
4. A screen similar to the following displays:
5. Enter the passphrase for your wireless network and click the Continue button. A screen similar to the following displays:
The extender’s wireless network name (SSID) changes to the name of your wireless network with _EXT added to the end.
The extender connects to your existing wireless network. A screen similar to the following displays:
7. To use the same password to access the extender’s wireless network that you use for wireless access to your existing network, click the copy password button.
8. Connect your wireless device to the extender’s wireless network.
Use the wireless manager of your wireless device to find the wireless network name (SSID) of the extender’s network. The extender’s wireless network name is the name of your wireless network with _EXT added to the end.
9. Select the My wireless devices are connected to the Extender network. (Selecting this checkbox activates the Continue button.) check box and click the Continue button. A screen similar to the following displays:
10.Click the Finish button.
When You Travel
The extender makes it easy to connect your laptop, tablet, and smartphone to an Internet connection at a hotel or WiFi hotspot. At some hotels or hotspots, you might be prompted to enter the password for the Internet connection.
To connect the extender with WiFi:
1. Plug the extender into an electrical outlet.
2. Launch an Internet browser on your laptop, tablet, or smartphone.
3. Type http://mywifiext.net and log in to the extender (see Connect the Extender to an Existing Network on page24).
4. Select the Setup Wizard on the extender menu.
5. Follow the wizard steps to connect the extender to the local WiFi network, but leave its network name and security settings the same.
Because your wireless devices have connected to the extender network before, you can easily connect to that network again.
6. Use your wireless devices to find and join the extender network.
Restore Factory Settings
You can use the extender Factory Reset button to restore the factory settings. To restore the factory settings:
1. Insert a paper clip into the Factory Reset hole and hold it until the Power LED blinks amber.
2. Release the button.
All LEDs turn off for about 3 seconds.
The Power LED lights solid amber for about 30 seconds. The Power LED lights solid green.
2
To change settings, connect the extender to your computer and use your Internet browser to go to http://mywifiext.net as described in Extender Port Connection on page12.• Connect the Extender to an Existing Network
• Use WPS to Add a Computer to the Extender’s Wireless Network
• Extender Wireless Settings
• Extender IP Address Setup
• Status Screen
• Attached Devices
• Back Up and Manage Extender Settings
• Set the Password
• Update the Firmware
Connect the Extender to an Existing Network
You can connect the extender to your home network. Only a wireless connection is supported. The extender is not able to connect to your home network with a cable. To connect the extender to an existing network:
1. Select Setup > Connect to an Existing Network.
The extender scans for wireless networks and displays a list.
If your wireless network is not on the list and is running, see Place the Extender and Power It On on page14 for suggestions.
2. Select the radio button for your network and click the Continue button. A screen similar to the following displays:
3. Enter your network’s passphrase or key.
4. Click the Continue button.
The extender joins your wireless network. For information about how to monitor the quality of the connection, see Monitor Extender Performance on page17.
Use WPS to Add a Computer to the Extender’s Wireless
Network
Use WPS (Wi-Fi Protected Setup) to connect a computer or wireless device to the extender network without entering the wireless network passphrase or key. Instead, you use a WPS button or enter a PIN to connect.
WPS supports WPA and WPA2 wireless security. If your extender network is open and no wireless security is set, then WPS automatically sets WPA2 + WPA wireless security on the extender network.
You can connect with WPS by either of the following methods:
• Use the WPS button on the side of the extender.
• Log in to the extender and click the onscreen WPS button. To use the extender WPS button to connect:
1. Press the WPS button.
For two minutes, the extender attempts to add a wireless client (a computer or other wireless device) to its wireless network.
2. Within two minutes, press the WPS button on your wireless device, or follow the WPS instructions that came with your wireless device.
If your wireless device requests the WPS PIN of the extender, you can get it on the product label of the extender.
Your wireless device is now connected to the extender. To log in to the extender and use WPS to connect:
The following screen displays:
2. Click the Next button.
3. Select a radio button.
• Push Button (recommended). Either click the button or press the WPS
• PIN Number. Select the PIN number radio button and enter the client PIN in the field that displays.
The extender tries to find the wireless client (the computer) that is attempting to join the network. If you are using a WPS button, it tries for two minutes. If you are using a PIN, it tries for four minutes.
4. Use the WPS software on your wireless computer to connect to the extender.
The first time you add a WPS client, WPS automatically sets the extender’s wireless security to WPA2 + WPA with a random passphrase. You can view these settings in the Wireless Settings screen. For more information, see Extender Wireless Settings on page27.
Extender Wireless Settings
You can use the Wireless Settings screen to change the network name (SSID) for the extender’s network and to set up wireless security.
If you do not change these settings, the network name is NETGEAR_EXT and the network is open (no wireless security is set up).
Note: If you use a wireless computer to change the extender’s wireless settings, you are disconnected when you click the Apply button. To reconnect, you must select the new network name that you created, and enter the passphrase or wireless security key that you set up.
To change the wireless settings for the extender network: 1. Select Setup > Wireless Settings.
A screen similar to the following displays:
2. In the Name (SSID) field, type a new name to customize your extender network.
3. In the Region field, select the region where your extender operates.
4. In the Security Options field, select the type of wireless security that you want to use on your network:
• None. This is an open wireless network. Any wireless computer or device is allowed to join this network.
• WEP. WEP is an older standard, and is less secure than WPA or WPA2. WEP uses encryption keys and data encryption for data security. You can select 64-bit or 128-bit encryption. For more information, see Set Up WEP on page29.
• WPA-PSK [TKIP]. WPA is more secure than WEP. When using wireless computers or devices that support WPA, you can enter a passphrase to join the extender wireless network. For more information, see Set Up WPA, WPA2, or WPA + WPA2 on page30.
• WPA2-PSK [AES]. WPA2 is even more secure, but some older computers do not support this standard. When using wireless computers or devices that support WPA2, you can enter the passphrase to join the extender wireless network. For more
information, see Set Up WPA, WPA2, or WPA + WPA2 on page30.
• WPA-PSK [TKIP] + WPA2-PASK [AES]. When using wireless computers or devices that support either WPA or WPA2, you can enter the passphrase to join the extender wireless network.
For more information, see Set Up WPA, WPA2, or WPA + WPA2 on page30.
5. Click the Apply button. Your settings are saved.
6. Use your wireless computer to connect to the extender network with its new settings. The Smart Wizard guides you through this process.
Set Up WEP
1. Select Setup > Wireless Settings.
2. In the Security Options section, select the WEP radio button.
3. Select the authentication type: Automatic, Open System, or Shared Key. The default is Open System.
Note: The authentication is separate from the data encryption. You can select authentication that requires a shared key, but still leaves data transmissions unencrypted. Security is stronger if you use both the Shared Key and WEP encryption settings.
4. Select the encryption strength setting:
• WEP 64-bit encryption. Enter 10 hexadecimal digits (any combination of 0–9, a–f, or A–F).
• WEP 128-bit encryption. Enter 26 hexadecimal digits (any combination of 0–9, a–f, or A–F).
5. Enter the encryption keys.
You can manually or automatically program the four data encryption keys. These values must be identical on all computers and access points in your network:
• Passphrase. To use a passphrase to generate the keys, enter a passphrase, and click the Generate button. This automatically creates the keys. Wireless computers must use the passphrase or keys to access the extender.
Note: Not all wireless computers support passphrase key generation. If your computer does not support the passphrase, then you have to type the encryption key to join the wireless network.
• Key 1–Key 4. Manually enter the four data encryption keys. These values are not
case-sensitive. These values must be identical on all computers and access points in your network. Enter 10 hexadecimal digits (any combination of 0–9, a–f, or A–F).
6. Select which of the four keys is the default.
Data transmissions are always encrypted using the default key. The other keys can be used only to decrypt received data. The four entries are disabled if WPA-PSK or WPA authentication is selected.
Set Up WPA, WPA2, or WPA + WPA2
Both WPA and WPA2 provide strong data security. WPA with TKIP can be used on Windows systems with Service Pack 2 or later. WPA2 with AES is a hardware implementation; see your device documentation before implementing it.
To set up WPA or WPA2 in the extender: 1. Select Setup > Wireless Settings.
2. In the Security Options section, select the radio button for the WPA or WPA2 option of your choice.
3. The settings displayed on the screen depend on which security option you select.
4. For WPA-PSK or WPA2-PSK, enter the passphrase.
5. Click the Apply button. Your settings are saved.
Extender IP Address Setup
The IP Address Setup screen shows whether the extender is set to get its IP address dynamically from the router or gateway (this is the most common setting), or is set with a static IP address.
To view or change the extender IP address setup: 1. Select Maintenance > IP Address.
The following screen displays:
2. View or configure the following settings:
• Get Dynamically IP Address From Router. The wireless network router or gateway assigns an IP address when the extender connects to its wireless network. Most networks are set up so that the router or gateway automatically does this.
• Use Static IP Address. Specify a static IP address. This is not usually necessary. If you set this up, you should be technically experienced or have a technically
experienced person help you.
- IP Address. The static IP address.
- IP Subnet Mask. The subnet mask associated with the IP address.
- Gateway IP Address. The IP address for the gateway.
- Primary DNS. The primary domain name server (DNS).
- Secondary DNS. The secondary domain name server (DNS).
Status Screen
When you connect to http://mywifiext.net and after the extender does the automatic firmware check, the Status screen displays. You can also view the Status screen at any time.
To view the Status screen: 1. Select Maintenance > Status.
A screen similar to the following displays:
2. View the current settings and the status of your extender.
• Hardware and Firmware Version. The model of the hardware and the currently running firmware version.
• GUI Language Version. The currently selected language.
- Link Rate. The actual transmission (Tx) and receive (Rx) link rate in the current wireless connection.
- Connection Status. The status of your wireless connection (connected or disconnected).
• Extender IP Info:
- MAC Address. The physical address of the extender, as seen from the local area network (LAN).
- IP Address. The IP address of the extender. The default is 192.168.1.250.
- DHCP Client. The network DHCP client on the wireless network.
- IP Subnet Mask. The IP subnet mask associated with the LAN IP address of the extender. The default is 255.255.255.0.
- Gateway IP Address. The IP address of the wireless network gateway.
- Domain Name Server. The IP address of the Domain Name Server (DNS) of the wireless network.
• Extender Wireless Settings:
- Name (SSID). The name (SSID) of the wireless network.
- Region. The country where the extender is set up for use.
- Channel. The current channel, which determines the operating frequency.
- Wireless mode. The maximum data rate of the wireless connection.
- Wireless AP. Indicates if the access point (AP) feature is enabled.
- Broadcast Name. Indicates if the extender is configured to broadcast its SSID.
- Wi-Fi Protected Setup. Indicates whether Wi-Fi Protected Setup is configured. To view the statistics of your connections:
On the Status screen, click the Show Statistics button. A screen similar to the following displays:
Table 1. Show statistics fields
Field Description
LAN or WLAN (Port) The statistics for the LAN (local) and wireless LAN (WLAN) ports. Status The link status of the port.
TxPkts The number of packets transmitted on this port since reset or manual clear. RxPkts The number of packets received on this port since reset or manual clear. Collisions The number of collisions on this port since reset or manual clear.
Tx B/s The current line utilization—percentage of current bandwidth used on this port. Rx B/s The average line utilization for this port.
Up Time The time elapsed since the last power cycle or reset.
Poll Interval Specify the poll interval frequency. If you change this value, click the Set Interval
button so that your change takes effect.
Attached Devices
Use the Attached Devices screen to find out the devices that are connected to the extender. To view the devices that are attached to your extender:
Select Maintenance > Network Devices. A screen similar to the following displays:
Back Up and Manage Extender Settings
The Backup and Restore options in the Backup Settings screen let you save and retrieve a file containing your extender’s configuration settings.
Once you have your extender working correctly, back up the information to have it available if something goes wrong. When you back up the settings, they are saved as a file on your computer. You can restore the device’s settings from this file.
To manage extender settings:
1. Select Maintenance > Backup Settings. The following screen displays.
2. Do one of the following:
• To back up your settings, click the Backup button.
Your browser extracts the configuration file from the extender.
If you do not have your browser set up to save downloaded files automatically, locate where you want to save the file. You can give the file a meaningful name at this time, such as internet_adapter.cfg.
• To restore your settings, select the previously saved backup file and click the Restore
button.
A screen displays that lets you know the device has been successfully restored to the previous settings. The extender restarts. This procedure takes about one minute.
CAUTION:
Do not try to go online, turn off the extender, shut down the computer, or do anything else to the extender until it finishes restarting!
Under some circumstances (for example, if you have lost track of the changes that you made to the extender settings), you might want to erase the configuration. After an erase, the extender returns to its factory settings (see Factory Settings on page43).
CAUTION:
Do not try to go online, turn off the extender, shut down the computer, or do anything else to the extender until it finishes restarting!
Set the Password
The user name to access the extender is admin, and its default password is password. NETGEAR strongly recommends that you set a more secure password.
To set your password:
1. Select Maintenance > Set Password. The following screen displays:
2. Type the old password, and then type the new password twice.
A new Set Password screen displays.
4. Select the two questions and enter the answers.
5. Click the Apply button.
Update the Firmware
The extender checks for new firmware automatically at login. To check for firmware and upgrade if it is available:
1. Select Maintenance > Firmware Update. The following screen displays:
2. Click the Check button to see if new firmware is available.
If it is, follow the onscreen prompts to download the file onto your computer.
CAUTION:
Once you start the firmware upgrade, do not try to go online, turn off the extender, shut down the computer, or do anything else to the extender until it finishes restarting.
Advanced Wireless Settings
The extender is set up with the optimum settings. Do not alter these settings unless directed by NETGEAR support. Incorrect settings might disable the extender unexpectedly.
To view or change the advanced wireless settings: 1. Select Advanced > Wireless Settings.
The following screen displays:
2. View or configure the following settings:
• Enable Wireless Access Point. Select this check box to enable the extender to work as a wireless access point. If this check box is cleared, then computers or wireless devices cannot connect wirelessly to the extender.
• Enable SSID Broadcast. Select this check box to enable the extender to broadcast its wireless network name (SSID). If this check box is cleared, then the wireless network is hidden. To join a hidden wireless network, type the wireless name.
• Disable Device’s PIN. Select this check box to disable the extender’s PIN. The PIN can be used for a WPS wireless connection.
• Keep Existing Wireless Settings. Select this check box to keep the settings in the Wireless Settings screen unchanged when a wireless connection is made with WPS.
• Setup Access List. Specify a list of computers or wireless devices that are allowed to connect to the network.
If you use an access list, then computers that are not on the list are not allowed to join the wireless network. The computers that are allowed to join are identified by their MAC addresses.
To add a device to the wireless card access list: 3. Click the Setup Access List button.
A screen similar to the following displays:
4. Enter the device name and MAC address.
5. Click the Add button.
The device is added to the list.
6. On the Advanced Wireless Settings screen, click the Apply button. Your changes are saved.
3
This chapter covers the following topics:• Smart Wizard FAQs
• Connecting to http://mywifiext.net
Smart Wizard FAQs
1. When I connect to the network, Smart Wizard keeps asking me for my passphrase, and I am sure I’ve entered the correct passphrase. What can I do?
It is very likely that the extender is placed at the borderline of the range covered by the router or gateway. See Place the Extender and Power It On on page14.
2. I got an error message in the Review Settings screen in the Smart Wizard. What should I do?
Make sure that your computer is connected to the extender by using the SSID and the passphrase that you have just set up and clicking the Refresh button in your browser. This will return you to the Smart Wizard.
3. I connected to NETGEAR_EXT and launched a browser, but why can’t I see the Smart Wizard?
a. Make sure that your computer is set up to use DHCP. If you set up your computer to use a static IP address, you have to change the settings back so that it uses Dynamic Host Configuration Protocol (DHCP).
b. Make sure that the Client Link LED is green.
Move the extender closer to your computer if necessary. For more information, see
Find the Best Location on page7.
c. Relaunch the browser and enter http://mywifiext.net.
d. Check to make sure that your computer has an IP address in the IP Address Setup screen (see Extender IP Address Setup on page30).
Connecting to http://mywifiext.net
If you have trouble connecting, try to locate the source of the problem:
• For help with passwords, see Log In to the Extender on page17.
• If your browser displays an error page, make sure that you include http:// when you type this URL in the address field of your Internet browser. If you leave it out, you might not be able to connect.
• The extender LEDs can help you tell if the extender is correctly set up and working as it should.
- The Router Link LED indicates performance between the router or gateway and the extender. If this LED is off, the extender is not connected to a WiFi network.
- The Client Link LED indicates the performance between the extender and the client. If this LED is off, no computer or wireless device is connected to the extender network.
These LEDs display the following colors:
• Amber indicates a workable performance.
• Red indicates a poor connection or no connection.
If you cannot get a wireless connection working, you can use an Ethernet cable to connect your computer to the extender. See Extender Port Connection on page12.
Joining Wireless Networks
To join a wireless network you must know its network name (also called the SSID) so that you can select it. If the network is secure, you must know the passphrase or wireless key. If the extender does not connect to the network that you chose, the following message displays:
Connection was not established to the selected network.
If this happens it could be for one of these reasons:
• The network name, passphrase, or key might have been typed incorrectly. Click the
Cancel button, use the Smart Wizard to select the network from the list, and retype the passphrase or key. This is case-sensitive. PASSWORD25 is not the same as
Password25 or password25. See Use the Smart Wizard to Change the Settings on page18.
• If the Smart Wizard does not find your wireless network (it is not displayed in the Select the name of your existing network screen), check to see that the wireless network is still working properly. Make sure that the router or gateway is turned on. If possible, move the extender closer to the router or gateway and click the Try Again button.
• If the Router Link LED is red, this indicates a poor wireless connection. The best
connection is established when there is a clear line of sight between the extender and the router or gateway you are connecting to. Make sure that there are no physical obstacles between the extender and the router or gateway, and try to move the extender closer to the router or gateway.
If you use the Smart Wizard, and the extender cannot connect to the router or gateway or cannot get an IP address from the router or gateway, it displays the following message:
You are not able to connect to the Internet. Click Continue to run through set up again to connect to your network.
If you click the Continue button, the Smart Wizard starts again (see Use the Smart Wizard to Change the Settings on page18). If you click the Exit button, the Status screen displays with menu selections on the left (see Log In to the Extender on page17).
A
This appendix covers the following topics:
• Factory Settings
• Technical Specifications
Factory Settings
You can press and hold the Factory Settings button on the side panel for seven seconds. The extender resets and returns to its factory settings.
Factory Settings
Smart Wizard Enabled
Wireless Wireless communication Enabled Wireless Network Name (SSID) NETGEAR_EXT
Security Disabled
Transmission speed Auto1
1. Maximum wireless signal rate (IEEE Standard 802.11). Actual throughput will vary. Network conditions and environmental factors, including volume of network traffic, building materials and construction, and network overhead, lower actual data throughput rate.
Country/Region United States (varies by region) Operating mode 802.11n, 802.11g, 802.11b
Data rate Up to 300 Mbps
Technical Specifications
Technical Specifications
Network protocol and standards compatibility
Data and Routing Protocols: TCP/IP, DHCP server and client
AC input 100–240V, 0.3A (max)
Physical specifications • Dimensions: 114 x 55 x 32.5 mm • Weight: 175 g
Environmental • Operating temperature: 32° to 140°F (0° to 40°C)
• Operating humidity: 90% maximum relative humidity, noncondensing • Electromagnetic emissions:
Meets requirements of: EMC Directive 2004/108/EC. Interface • Local: 10BASE-T, 100BASE-Tx, RJ-45
Safety Information
Follow these safety guidelines to ensure your own personal safety and to help protect your system from potential damage.
• For national approvals (approval schemes other than CB), relevant national standards for plug, socket-outlet, and direct plug-in units (for example, US) shall also be consulted while you are testing and approving such products according to the national standards.
• Check the electrical current for any device plugged into the filtered AC socket. Do not exceed home and product outlet ratings and electrical requirements.
• The socket-outlet shall be installed near the equipment and be easily accessible.
• Only power cords are allowed to be inserted into the filtered AC socket; no other equipment with a direct plug-in is allowed. Power cords needs to be a maximum of 1 m long and have a minimum of 0.75 mm2 of cross-sectional area.
• Do not plug devices into the Universal Pass Through WiFi Range Extender WN3100RP filtered AC outlet that exceed the product ratings. The output voltage of the filtered AC outlet is the same as the power outlet that the Universal Pass Through WiFi Range Extender WN3100RP is plugged into. To help avoid damaging your system, be sure that the attached devices are electrically rated to operate with the power available in your location.
• If the input AC voltage is less than 100 VAC, the device plugged into the filtered AC socket of the Universal Pass Through WiFi Range Extender WN3100RP might not perform as well as expected.
• DO NOT PLUG MAJOR HOME APPLIANCES into the filtered AC socket or into an attached power strip. The device is not intended to be used with home appliances such as air conditioners, power tools, space heaters, fans, hair dryers, ovens, or refrigerators.
• Actual data throughput will vary. Network conditions and environmental factors, including volume of network traffic, building materials and construction, and network overhead, lower actual data throughput rate.
• Do not service any product except as explained in your system documentation.
• Opening or removing covers that are marked with the triangular symbol with a lightning bolt can expose you to electrical shock. Only a trained service technician should service components inside these compartments.
• Use the product only with approved equipment.
• Allow the product to cool before removing covers or touching internal components.
• To help avoid damaging your system, be sure that the voltage selection switch (if provided) on the power supply is set to match the power available at your location:
- 110 volts (V), 60 hertz (Hz) in most of North and South America and some Far Eastern countries such as South Korea and Taiwan
- 100V, 50 Hz in eastern Japan and 100V, 60 Hz in western Japan
• The peripheral power cables are equipped with three-prong plugs to help ensure proper grounding. Do not use adapter plugs or remove the grounding prong from a cable.
• Observe extension cable and power strip ratings. Make sure that the total ampere rating of all products plugged into the extension cable or power strip does not exceed 80 percent of the ampere ratings limit for the extension cable or power strip.
• To help protect your system from sudden, transient increases and decreases in electrical power, use a surge suppressor, line conditioner, or uninterruptible power supply (UPS).
B
N E T G E A R w i r e l e s s p o w e r l i n e p r o d u c t s
Safety Instructions and Precautions
WARNING:
Use the following safety guidelines to ensure your own personal safety and to help protect your product from potential damage. To reduce the risk of bodily injury, electrical shock, fire, and damage to the equipment, observe the following precautions.
• The socket-outlet shall be installed near the equipment and shall be easily accessible.
• Observe and follow service markings.
• If any of the following conditions occur, unplug the product from the electrical outlet and replace the part or contact your service provider/retailer:
- The power cable, extension cable, or plug is damaged.
- An object has fallen into the product.
- The product has been exposed to water.
- The product has been dropped or damaged.
- The product does not operate correctly when you follow the operating instructions.
• Keep your system away from radiators and heat sources. Also, do not block cooling vents.
• Do not spill food or liquids on your system components, and never operate the product in a wet environment.
• Do not push any objects into the openings of your system. Doing so can cause fire or electric shock by shorting out interior components.
• Operate the product only from the type of external power source indicated on the electrical ratings label.
• Also, be sure that attached devices are electrically rated to operate with the power available in your location.
• Use only approved power cables. If you have not been provided with a power cable for your system or for any AC-powered option intended for your system, purchase a power cable that is approved for use in your country. The power cable must be rated for the
The voltage and current rating of the cable should be greater than the ratings marked on the product.
• To help prevent electric shock, plug the system and peripheral power cables into properly grounded electrical outlets.
• Do not use adapter plugs. If you must use an extension cable, use a three-wire cable with properly grounded plugs.
• Observe extension cable and power strip ratings. Make sure that the total ampere rating of all products plugged into the extension cable or power strip does not exceed 80 percent of the ampere ratings limit for the extension cable or power strip.
• To help protect your system from sudden, transient increases and decreases in electrical power, use a surge suppressor, line conditioner, or uninterruptible power supply (UPS).
• Position system cables and power cables carefully; route cables so that they cannot be stepped on or tripped over. Be sure that nothing rests on any cables.
• Do not modify power cables or plugs.
• Always follow your local and national wiring rules.
Regulatory Compliance Information
This section includes user requirements for operating this product in accordance with National laws for usage of radio spectrum and operation of radio devices. Failure of the end-user to comply with the applicable requirements may result in unlawful operation and adverse action against the end-user by the applicable National regulatory authority.
This product’s firmware limits operation to only the channels allowed in a particular Region or Country. Therefore, all options described in this user's guide may not be available in your version of the product.
Europe – EU Declaration of Conformity
Products bearing the marking comply with the following EU directives: • EMC Directive 2004/108/EC
• Low Voltage Directive 2006/95/EC
If this product has telecommunications functionality, it also complies with the requirements of the following EU Directive:
• R&TTE Directive 1999/5/EC
Compliance with these directives implies conformity to harmonized European standards that are noted in the EU Declaration of Conformity.
For indoor use only. Valid in all EU member states, EFTA states, and Switzerland.
This device may not be used outdoors in France. For detailed information concerning installations in France, the user should contact the national spectrum authority in France (http://www.arcep.fr/).
Radiation Exposure: This equipment complies with radiation exposure limits set forth for an uncontrolled environment and meets radio frequency (RF) Exposure Guidelines. This equipment should be installed and operated keeping the product 20 cm or more away from a person’s body.