HP StorageWorks XP Performance Advisor
Software Installation Guide
This guide describes how to install and configure HP StorageWorks XP Performance Advisor Software (XP Performance Advisor). This guide is intended for users and HP service providers who have knowledge of the HP StorageWorks XP disk arrays hardware and software, and storage systems. For the latest release information on this product, see the HP StorageWorks XP Performance Advisor Software Release Notes.
Legal and notice information
© Copyright 2002, 2010 Hewlett-Packard Development Company, L.P.
Confidential computer software. Valid license from HP required for possession, use or copying. Consistent with FAR 12.211 and 12.212, Commercial Computer Software, Computer Software Documentation, and Technical Data for Commercial Items are licensed to the U.S. Government under vendor's standard commercial license.
The information contained herein is subject to change without notice. The only warranties for HP products and services are set forth in the express warranty statements accompanying such products and services. Nothing herein should be construed as constituting an additional warranty. HP shall not be liable for technical or editorial errors or omissions contained herein. Microsoft, Windows, Windows XP, and Windows NT are U.S. registered trademarks of Microsoft Corporation. Adobe is a trademark of Adobe Systems Incorporated.
Java is a US trademark of Sun Microsystems, Inc.
Oracle is a registered US trademark of Oracle Corporation, Redwood City, California. UNIX is a registered trademark of The Open Group.
Contents
1 Overview of XP Performance Advisor ... 9
XP Performance Advisor resources ... 9
Installation work flow ... 12
Upgrade work flow ... 13
2 Understanding the XP Performance Advisor installation prerequisites ... 15
Installation checklist for installing XP Performance Advisor ... 15
Initial XP Performance Advisor setup prerequisites ... 19
Designing the infrastructure ... 19
Determining the coexistence with other storage products ... 23
Management station prerequisites ... 23
Verifying the supported configurations for XP Performance Advisor ... 23
Getting the fully qualified domain name or IP address of your management station ... 25
Determining the authentication type for XP Performance Advisor ... 26
Creating 1 GB of free disk space ... 28
Choosing a system where Oracle is not installed ... 28
Configuring a Loopback Adapter or static IP address ... 29
Switching the IIS Admin service to manual start mode ... 29
Assigning port 80 for XP Performance Advisor ... 29
Disabling the UAC on a Windows Vista management station ... 30
Configuring firewall settings on a Windows XP Professional management station ... 30
Configuring the web browser proxy server settings ... 31
Assigning GUIDs for command devices on a Windows host ... 31
XP Performance Advisor host agent prerequisites ... 33
Verifying the supported configurations for XP Performance Advisor host agents ... 33
Configuring settings on Windows and UNIX hosts ... 34
Creating and presenting command devices to hosts ... 35
Mapping command devices from virtual servers ... 38
Verifying host connectivity to a command device ... 39
Configuring SSL settings for the XP Performance Advisor host agents ... 39
3 Installing XP Performance Advisor ... 45
Beginning the XP Performance Advisor installation ... 45
Launching the XP Performance Advisor checklist ... 47
Complying with the End User License Agreement ... 48
Retaining or selecting a different database location ... 48
Enabling IPv6 on your management station ... 49
Implementing the authentication method ... 50
XP Performance Advisor Native Authentication ... 51
Windows System Authentication ... 51
Windows Domain based Authentication ... 51
LDAP Authentication ... 52
Configuring the LDAP server and connection settings ... 53
RADIUS Authentication ... 56
Selecting complete or custom installation method ... 58
Selecting components to install (custom installation) ... 59
Completing the XP Performance Advisor installation and next steps ... 62
XP Performance Advisor post-installation steps ... 62
Confirming the XP Performance Advisor services ... 63
Configuring XP Performance Advisor related settings ... 64
Launching XP Performance Advisor ... 66
Viewing product license entitlement certificate for existing customers ... 67
4 Installing the XP Performance Advisor host agents ... 71
Downloading the XP Performance Advisor host agents and XPInfo software ... 71
Installing the XP Performance Advisor Windows host agents ... 73
Executing the Windows host agent installer ... 73
Enabling the Windows host agent for IPv6 ... 74
Testing validity and connectivity ... 74
Selecting complete or custom installation method ... 75
Completing the Windows host agent installation and next steps ... 77
Installing the XP Performance Advisor UNIX host agents ... 78
Executing the UNIX host agent installer ... 79
Enabling the UNIX host agent to use IPv6 ... 79
Completing the UNIX host agent installation and next steps ... 80
Verifying if the host agents appear in XP Performance Advisor ... 81
5 Understanding the XP Performance Advisor upgrade prerequisites ... 83
Upgrade checklist for upgrading XP Performance Advisor ... 83
Determining the current version of XP Performance Advisor ... 86
Using a pre-3.2 version of XP Performance Advisor ... 86
Using a pre-3.5 version of XP Performance Advisor ... 86
Using v3.5 or later version of XP Performance Advisor ... 87
Disabling UAC on a Windows Vista management station ... 87
6 Upgrading XP Performance Advisor ... 89
Beginning the XP Performance Advisor upgrade ... 89
Launching the XP Performance Advisor upgrade checklist ... 89
Upgrading XP Performance Advisor ... 89
Completing upgrade and next steps ... 89
Verify the XP Performance Advisor functionality for historic data ... 90
Reconfigure the email and alarm settings on your management station ... 91
7 Upgrading XP Performance Advisor host agents ... 95
Downloading the XP Performance Advisor host agents and XPInfo software ... 95
Upgrading the XP Performance Advisor Windows host agents ... 95
Upgrading the XP Performance Advisor UNIX host agents ... 96
Verifying the XP Performance Advisor host agents upgrade ... 96
8 Using XP Performance Advisor ... 97
Requesting host update ... 97
Collecting configuration data ... 98
Collecting performance data ... 100
10 Removing XP Performance Advisor ... 107
Removing the XP Performance Advisor host agent ... 107
Removing the XP Performance Advisor management station ... 108
Post removal instructions ... 109
11 Troubleshooting XP Performance Advisor installation related issues ... 111
Troubleshooting installation issues ... 111
XP Performance Advisor installation does not complete and rolls back ... 111
Management station installation stops with Data Execution Prevention Error for tar.exe error ... 112
XP Performance Advisor host agent Installation fails ... 112
Setting the JRE path for a XP Performance Advisor UNIX host agent ... 113
Troubleshooting configuration issues ... 113
Host agents are not seen in XP Performance Advisor after an install or upgrade ... 114
XP Performance Advisor is not collecting data after install or upgrade ... 115
Setting the heap size to view and collect data ... 116
Checking std*out.log file size ... 118
Unable to add users for XP Performance Advisor Native authentication ... 118
Troubleshooting web client issues ... 119
Unable to launch XP Performance Advisor ... 119
Starting the HP StorageWorks XP Performance Advisor Tomcat service ... 120
Adding trusted web sites ... 121
Clearing web browser's cache ... 121
Installation error messages ... 122
12 Support and other resources ... 125
Contacting HP ... 125
Subscription service ... 125
Documentation feedback ... 125
HP product documentation survey ... 125
Related information ... 126
Document Conventions and Symbols ... 127
A Installing a Loopback Adapter ... 129
Verifying if a Loopback Adapter is installed on your computer ... 129
Installing a Loopback Adapter on Windows 2000 ... 130
Installing a Loopback Adapter on Windows 2003, Windows Server 2003 R2, or Windows XP ... 131
Installing a Loopback Adapter on Windows Vista ... 132
Removing a Loopback Adapter ... 133
B Stopping and starting host agent services ... 135
Glossary ... 137
Figures
XP Performance Advisor setup ... 10 1
XP Performance Advisor installation work flow ... 12 2
XP Performance Advisor upgrade work flow ... 14 3
XPInfo –i command ... 32 4
Sample xpinfo -i output for Windows host agent ... 39 5
Sample xpinfo -z output for UNIX host agent ... 39 6
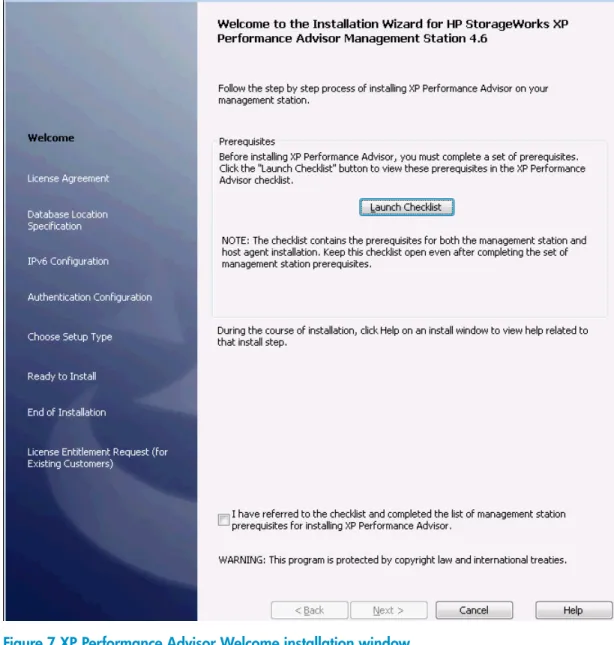
XP Performance Advisor Welcome installation window ... 47 7
Database Location Specification installation window ... 49 8
Configure LDAP Server and Authentication Settings installation window ... 53 9
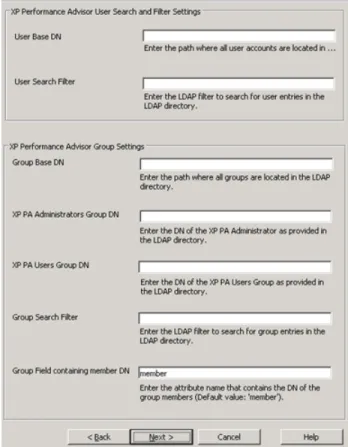
Configure LDAP Filter and Group Settings installation window ... 55 10
Configure RADIUS Authentication Settings installation window ... 57 11
Configure Custom Setup installation window ... 61 12
XP Performance Advisor Support screen - Downloading host agent software ... 72 13
XP Performance Advisor Windows host agent log file ... 77 14
Services dialog box - Confirming Windows host agent major services ... 78 15
Services dialog box - Manually starting Windows host agent major services ... 78 16
Command prompt window - Confirming UNIX host agent major services ... 80 17
Configuration Data Collection ... 99 18
Performance Data Collection ... 101 19
Tables
XP Performance Advisor utilities ... 13 1
HP StorageWorks XP Performance Advisor and host agents installation checklist ... 16 2
Large XP disk array configurations ... 21 3
LDAP server connection settings ... 53 4
LDAP server User Search and Filter, and Group settings ... 55 5
RADIUS server connection settings ... 57 6
HP StorageWorks XP Performance Advisor and host agents upgrade checklist ... 84 7
Installation error messages ... 122 8
Document conventions ... 127 9
Start, stop, and restart host agent services ... 135 10
1 Overview of XP Performance Advisor
The HP StorageWorks XP Performance Advisor Software (XP Performance Advisor) is a web-based application that collects, monitors, and displays the performance of your XP disk arrays. It includes performance data for individual resources such as:• Logical Device (LDEV)
• Client-Host Interface Processor (CHIP) or Channel Adapter (CHA)
• Array Control Processor (ACP) or Disk Adapter (DKA)
• Disk Controller (DKC)
XP Performance Advisor resources
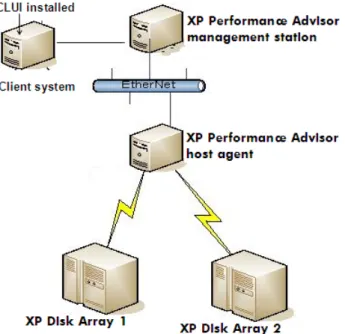
The following resources constitute an XP Performance Advisor setup:
• XP Performance Advisor: It is a web-based application tha t monitors the performance of XP disk arrays, and provides a visual representation of the collated data. It resides on a centralized server called the management station, manages data collection, and provides performance data of your XP disk arrays for your analysis. You can use the data to analyze and interpret the behavior of your XP disk arrays, and also forecast the utilization of a few components, such as XP Thin Provi-sioning belonging to the XP disk arrays.
• XP Performance Advisor host agents: XP Performance Advisor interacts with resources called host agents that collect data from the XP disk arrays. They are operating system specific, and reside on systems called the hosts. In a traditional setup, the host agents form the point of contact for the XP Performance Advisor to receive data from the XP disk arrays. However, XP Performance Advisor can also directly interact with the XP disk arrays. The host agents help XP Performance Advisor discover hosts and also communicate commands and data, back and forth between the hosts and the management station.
• Web clients: XP Performance Advisor can be locally accessed on the management station, or re-motely accessed from a client system. The web browser that allows the access to XP Performance Advisor is called the web client. Internet Explorer (IE) is the only supported web client for XP Per-formance Advisor.
• Command Line User Interface (CLUI): In addition to its GUI, XP Performance Advisor also provides a command-line utility called the CLUI to monitor real-time performance of XP disk arrays. The CLUI allows you to monitor performance, set alarms, and configure host information using commands and scripts. You can execute commands in the CLUI and view the same data that is displayed on the GUI. The CLUI utility is operating system specific, and can be installed locally on the manage-ment station, or remotely on a client system.
Figure 1on page 10 shows the XP Performance Advisor setup collecting data from two XP disk arrays through a host agent. The CLUI utility is installed on the remote client system that is connected to the management station, thereby enabling it to access the XP Performance Advisor.
Figure 1 XP Performance Advisor setup
.
Additionally, the XP Performance Advisor also provides XPWatch, XPSketch, and XPInfo. For a brief description of these tools, seeTable 1on page 13.
Installation work flow
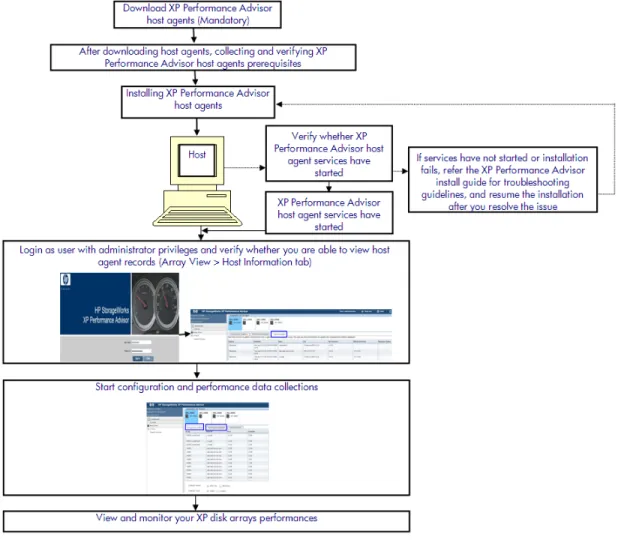
In a typical installation, you need to install XP Performance Advisor on the management station followed by the host agents on the respective hosts. To install XP Performance Advisor and the host agents, complete the following steps:
1. Complete the prerequisites to install XP Performance Advisor.
2. Install XP Performance Advisor on a management station.
3. Verify whether XP Performance Advisor services have started and you are able to login using your credentials.
4. Verify whether you have received the license entitlement certificate, generate, and add license in XP Performance Advisor.
5. Complete the prerequisites to install the XP Performance Advisor host agents.
6. Install the XP Performance Advisor host agents on the respective hosts.
7. Verify whether the XP Performance Advisor host agent services have started and you are able to view the host agent details in XP Performance Advisor GUI.
8. Verify whether you are able to perform configuration and performance data collections.
XP Performance Advisor provides a checklist that guides you through installation, initial configuration and performance data collection. Before proceeding with the installation, ensure that you have completed the appropriate prerequisites and tasks mentioned in the checklist. For more information, see “Installation checklist for installing XP Performance Advisor” on page 15.
Figure 2 XP Performance Advisor installation work flow
.
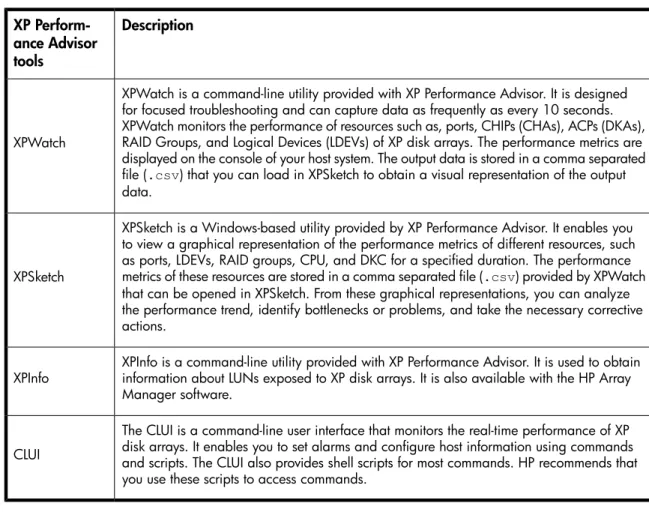
In “Installation work flow” on page 12, the CLUI, XPWatch, XPSketch, and XPInfo are additional utilities provided with XP Performance Advisor.Table 1on page 13 provides a brief description of these utilities. TheHP StorageWorks XP Performance Advisor Software Installation Guidecovers only the end-to-end installation or upgrade of the XP Performance Advisor, and host agents. For information on the installation and use of the CLUI, XPWatch, and XPSketch, see the respective documentation. For document download location, see “Related documentation” on page 126.
IMPORTANT:
The CLUI, XPWatch, XPSketch, and XPInfo are available in the Tools folder on XP Performance
Advisor Installation disk 2.
Table 1 XP Performance Advisor utilities
Description XP
Perform-ance Advisor tools
XPWatch is a command-line utility provided with XP Performance Advisor. It is designed for focused troubleshooting and can capture data as frequently as every 10 seconds. XPWatch monitors the performance of resources such as, ports, CHIPs (CHAs), ACPs (DKAs), RAID Groups, and Logical Devices (LDEVs) of XP disk arrays. The performance metrics are displayed on the console of your host system. The output data is stored in a comma separated file (.csv) that you can load in XPSketch to obtain a visual representation of the output
data. XPWatch
XPSketch is a Windows-based utility provided by XP Performance Advisor. It enables you to view a graphical representation of the performance metrics of different resources, such as ports, LDEVs, RAID groups, CPU, and DKC for a specified duration. The performance metrics of these resources are stored in a comma separated file (.csv) provided by XPWatch
that can be opened in XPSketch. From these graphical representations, you can analyze the performance trend, identify bottlenecks or problems, and take the necessary corrective actions.
XPSketch
XPInfo is a command-line utility provided with XP Performance Advisor. It is used to obtain information about LUNs exposed to XP disk arrays. It is also available with the HP Array Manager software.
XPInfo
The CLUI is a command-line user interface that monitors the real-time performance of XP disk arrays. It enables you to set alarms and configure host information using commands and scripts. The CLUI also provides shell scripts for most commands. HP recommends that you use these scripts to access commands.
CLUI
Upgrade work flow
To upgrade XP Performance Advisor and the host agents, complete the following steps:
1. Complete the prerequisites to upgrade XP Performance Advisor.
2. Upgrade XP Performance Advisor on a management station.
3. Verify whether XP Performance Advisor services have started and you are able to login using your credentials.
4. Verify whether you have received the license entitlement certificate.
5. Generate and add license in XP Performance Advisor.
6. Verify the XP Performance Advisor functionality for historic data by plotting charts, and see if you are able to view the previous set of collections.
7. Complete the prerequisites to upgrade the XP Performance Advisor host agents.
8. Upgrade the XP Performance Advisor host agents on the respective hosts.
9. Verify whether the XP Performance Advisor host agent services have started and you are able to view host agent details in the XP Performance Advisor GUI.
10. Verify whether you are able to perform configuration and performance data collections using the upgraded version of XP Performance Advisor.
In addition to an installation checklist, XP Performance Advisor also provides an upgrade checklist that guides you through the upgrade process. Before proceeding with the upgrade, ensure that you have completed the appropriate prerequisites and tasks mentioned in the checklist. For more information, see “Upgrade checklist for upgrading XP Performance Advisor” on page 83.
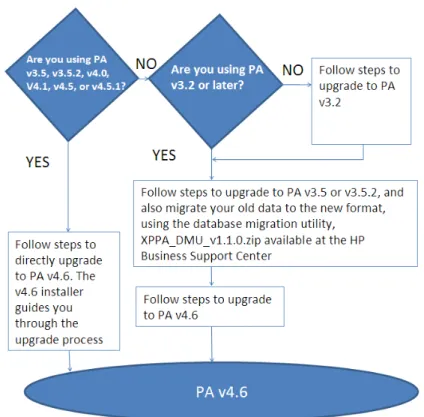
Figure 3on page 14 provides a high level understanding on how to upgrade to the latest version of XP Performance Advisor.
Figure 3 XP Performance Advisor upgrade work flow
2 Understanding the XP Performance
Advisor installation prerequisites
This chapter describes the prerequisites to install the XP Performance Advisor software and the host agents, and explains the installation checklist. For more information, seeTable 2on page 16. To upgrade an existing version of XP Performance Advisor, seeTable 7on page 84.
This chapter addresses the following topics:
• “Installation checklist for installing XP Performance Advisor” on page 15
• “Initial XP Performance Advisor setup prerequisites” on page 19
• “Management station prerequisites” on page 23
• “XP Performance Advisor host agent prerequisites” on page 33
Installation checklist for installing XP Performance Advisor
The XP Performance Advisor provides an installation checklist that guides you through the installation and initial collection of configuration, and performance data (seeTable 2on page 16). The installation checklist contains prerequisites and tasks that you must address before:
1. Installing the XP Performance Advisor on a management station.
2. Installing the XP Performance Advisor host agents on the respective hosts.
3. Logging into XP Performance Advisor and initiating configuration and performance data collections. This checklist is available when you begin installation. For more information, see “Launching the XP Performance Advisor checklist” on page 47.
NOTE:
• The installation checklist is available starting with XP Performance Advisor v4.6. Review the checklist and complete only those items that are applicable to your current Storage Area Networks setup. After you complete a particular item, select the adjacent check box to mark it complete to indicate that you have verified all the items and are ready to install, and use XP Performance Advisor. Keep the checklist open till you complete the installation and start using XP Performance Advisor.
• If you are installing the product for the first time, HP recommends that you follow the sequence of items mentioned in the checklist.
• Links to the related help topics are provided at the end of each checklist item. Click the link to view more information about the prerequisite or task.
• A copy of the installation checklist is also available in the <Installation drive>:\HPSS\ cs_help folder. You can also use %HPSS_HOME% at Start > Run to locate the HPSS folder. The HPSS_HOME environment variable must be configured on your management station.
Sections in the HP StorageWorks XP Performance Advisor and Host Agents
In-stallation Checklist
The prerequisites and tasks provided in the installation checklist are organized as follows:
• Before installing XP Performance Advisor: This section lists the tasks and prerequisites you must complete before starting the XP Performance Advisor installation process on your management station.
• Installing XP Performance Advisor: This section directs you to the XP Performance Advisor installation wizard.
• After installing XP Performance Advisor: This section lists the post-installation tasks and prerequisites that you must complete before installing the XP Performance Advisor host agents.
• Installing XP Performance Advisor host agents: This section directs you to the XP Performance Advisor host agents installation procedures for the host agents you want to install.
• After installing XP Performance Advisor host agents: This section lists the post-installation tasks and prerequisites that you must complete to login, and configure data collections in XP Performance Advisor.
• Using XP Performance Advisor: This section lists the procedures to collect configuration and per-formance data from your XP disk arrays.
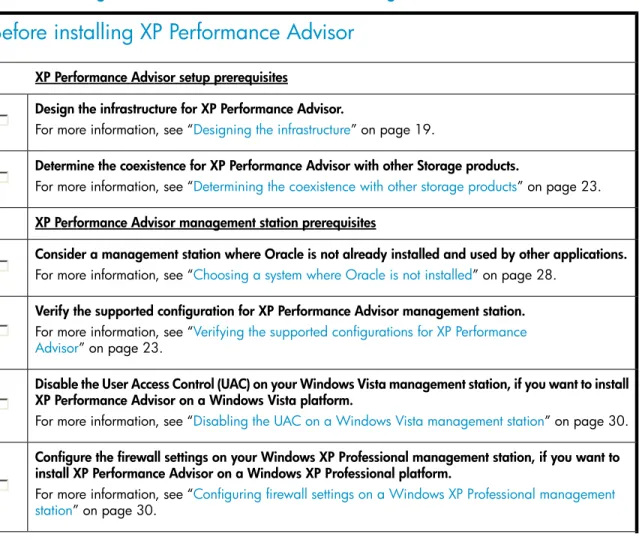
Table 2 HP StorageWorks XP Performance Advisor and host agents installation checklist
Before installing XP Performance Advisor
XP Performance Advisor setup prerequisites
Design the infrastructure for XP Performance Advisor.
For more information, see “Designing the infrastructure” on page 19.
Determine the coexistence for XP Performance Advisor with other Storage products.
For more information, see “Determining the coexistence with other storage products” on page 23. XP Performance Advisor management station prerequisites
Consider a management station where Oracle is not already installed and used by other applications. For more information, see “Choosing a system where Oracle is not installed” on page 28.
Verify the supported configuration for XP Performance Advisor management station. For more information, see “Verifying the supported configurations for XP Performance Advisor” on page 23.
Disable the User Access Control (UAC) on your Windows Vista management station, if you want to install XP Performance Advisor on a Windows Vista platform.
For more information, see “Disabling the UAC on a Windows Vista management station” on page 30. Configure the firewall settings on your Windows XP Professional management station, if you want to install XP Performance Advisor on a Windows XP Professional platform.
For more information, see “Configuring firewall settings on a Windows XP Professional management station” on page 30.
Verify if JRE v5.0 Update 14 (minimum) or later is installed (JRE v6.0 Update 18 is the maximum sup-ported), and the JAVA path is pointing to the installed location on your management station. For more information, see theSoftwaresection in “Verifying the supported configurations for XP Performance Advisor” on page 23.
Get the fully-qualified domain name or IP address of your management station.
For more information, see “Getting the fully qualified domain name or IP address of your management station” on page 25.
Determine the authentication type for your management station.
For more information, see “Determining the authentication type for XP Performance Advisor” on page 26. Create at least 1 GB of free disk space in your management station's TEMP folder, if you are opting for a complete installation.
For more information, see “Creating 1 GB of free disk space” on page 28.
Configure the Loopback Adapter or a static IP address for your management station.
For more information, see “Configuring a Loopback Adapter or static IP address” on page 29. Stop the IIS Admin service or set it to Manual start mode on your management station. For more information, see “Switching the IIS Admin service to manual start mode” on page 29. Assign port 80 on your management station for XP Performance Advisor.
For more information, see “Assigning port 80 for XP Performance Advisor” on page 29.
Get the administrative privilege for your account on the management station, where you will install XP Performance Advisor.
XP Performance Advisor host agent prerequisites
Verify the supported configuration required for installing the XP Performance Advisor host agents. For more information, see “Verifying the supported configurations for XP Performance Advisor host agents” on page 33.
Verify the following JRE versions:
• JRE v5.0 Update 14 (minimum) or later is installed (JRE v6.0 Update 18 is the maximum supported) on a Windows host agent
• JRE v5.0 Update 18 or later is installed on a UNIX host agent
• The JAVA path is pointing to the installed JRE location on your host
For more information, see theSoftwaresection in “Verifying the supported configurations for XP Performance Advisor host agents” on page 33.
Configure settings for installing the XP Performance Advisor host agents on the Windows and UNIX hosts.
For more information, see “Configuring settings on Windows and UNIX hosts” on page 34. Create the command devices on your XP disk arrays and present them to the hosts.
For more information, see “Creating and presenting command devices to hosts” on page 35. IMPORTANT:
If you are currently using the XP RAID Manager (XP Business Copy and XP Continuous Access), you already have command devices that can be used by XP Performance Advisor.
Map the command devices to the guest operating platforms, if these operating platforms are residing on the virtual servers.
For more information, see “Mapping command devices from virtual servers” on page 38. Configure your web browser to not use any web proxy servers.
For more information, see “Configuring the web browser proxy server settings” on page 31.
Installing XP Performance Advisor
Install XP Performance Advisor on your management station.
At this point, return to the XP Performance Advisor Installation Wizard Welcome window to proceed with the installation. For more information, see “Installing the XP Performance Advisor” on page 45. IMPORTANT:
After installing XP Performance Advisor, return to this checklist to complete the remaining prerequisites and tasks for downloading and installing the XP Performance Advisor host agents.
After installing XP Performance Advisor
Verify if you have received the product license entitlement certificate for XP Performance Advisor. For more information, see “Viewing product license entitlement certificate for existing
customers” on page 67.
Verify that the XP Performance Advisor services have started on the management station. For more information, see “Confirming the XP Performance Advisor services” on page 63.
For Windows System Authentication, add users, administrators, and grant them privileges on your management station.
For more information, see “Configuring XP Performance Advisor related settings” on page 64. Launch XP Performance Advisor and log in using your credentials.
IMPORTANT:
Install Adobe Flash Player on the system from where you will access XP Performance Advisor. Download Adobe Flash Player and Flash Player Plugin, v10.0.0 or later from the following location: http://get.adobe.com/flashplayer/.
For more information, see “Launching XP Performance Advisor” on page 66.
For Performance Advisor Native Authentication, add users and administrators and grant them privileges. For more information, see “Configuring XP Performance Advisor related settings” on page 64.
Download the XPInfo software and the host agent files (.tar) to the Windows and UNIX hosts from the XP Performance Advisor Support screen.
For more information, see “Downloading the XP Performance Advisor host agents and XPInfo software” on page 71.
Verify connectivity from the host to the command device using the XPInfo software. For more information, see “Verifying host connectivity to a command device” on page 39.
Installing the XP Performance Advisor host agents
Install the XP Performance Advisor host agents.
At this point, return to the respective XP Performance Advisor host agents installation procedures for the host agents you want to install. For more information, see “Installing XP Performance Advisor host agents” on page 71.
IMPORTANT:
After installing the XP Performance Advisor host agents, return to this checklist to complete the remaining prerequisites and tasks to use XP Performance Advisor.
After installing the XP Performance Advisor host agents
Verify the XP Performance Advisor host agent services have started on the respective hosts. For more information, see “Confirming the XP Performance Advisor services” on page 63.
Verify the respective host agent records are appearing in XP Performance Advisor on your management station.
For more information, see “Verifying if the host agents appear in XP Performance Advisor” on page 81. Create and assign the Windows Global Unique Identifier (\\?\Volume{GUID}) to command devices on Windows host, to overcome device renaming and device remapping issues during the data collections. For more information, see “Assigning GUIDs for command devices on a Windows host” on page 31. Configure SSL settings on your Windows or UNIX host.
For more information, see “Configuring SSL settings for the XP Performance Advisor host agents” on page 39.
Using XP Performance Advisor
If it is not running, launch XP Performance Advisor and log in using your credentials. For more information, see “Launching XP Performance Advisor” on page 66. Start collecting the configuration and performance data for your XP disk arrays. For more information, see “Using XP Performance Advisor” on page 97.
Initial XP Performance Advisor setup prerequisites
This section describes setup prerequisites:• “Designing the infrastructure” on page 19
• “Determining the coexistence with other storage products” on page 23
After you complete the prerequisites, perform the XP Performance Advisor management station prerequisites. For more information, see “Management station prerequisites” on page 23.
Designing the infrastructure
The following procedure helps you to estimate the number of management stations, hosts, and XP disk arrays required:
1. Collecting information about the XP disk arrays you will be monitoringon page 20
2. Determining the management station and host requirementson page 20
3. Preparing your XP disk arrays and determining their data collection scheduleson page 22
Collecting information about the XP disk arrays you will be monitoring
1. Determine the number of logical devices (LDEVs) for each of the XP disk arrays.
2. Determine how frequently you want to access data from the XP disk arrays.
IMPORTANT:
The rate of data collection can affect the loads seen by the management station and the XP disk arrays.
XP Performance Advisor provides the following types of data collection:
• Configuration data collection:
The frequency of configuration data collection depends on how often you change the configuration of an XP Disk Array. For example, if you add a LUN to an XP Disk Array every week, you may collect configuration data at least once a week to see the changes reflected in your XP Performance Advisor database.
• Performance data collection:
• For troubleshooting XP Disk Array performance issues, HP recommends a collection frequency of 1 to 3 minutes.
IMPORTANT:
Frequent collection increases the load on your management station and the XP disk arrays. For real-time troubleshooting, HP recommends using XPWatch, which is one of the utilities included in XP Performance Advisor to collect real-time performance data for troubleshooting purpose.
• For general monitoring and forecasting resource utilization, HP recommends a collection fre-quency of 5 - 30 minutes.
Determining the management station and host requirements
Follow these steps to determine your management station and host setup requirements:
1. Check the supported configuration for management station and host agent. For more information, see “Verifying the supported configurations for XP Performance Advisor” on page 23 and “Verifying the supported configurations for XP Performance Advisor host agents” on page 33.
2. Increase the management and host agent configuration based on the number of LDEVs you require and collection frequencies you want to set. The following items can help you estimate the configuration you will need.
• To estimate the number of XP disk arrays that can be supported with one management server and host agent:
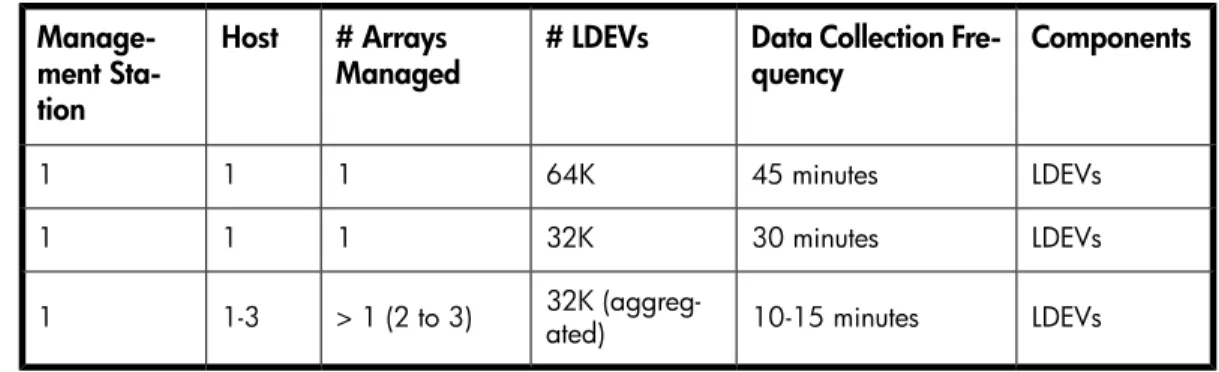
Table 3 Large XP disk array configurations
Components Data Collection
Fre-quency # LDEVs # Arrays Managed Host Manage-ment Sta-tion LDEVs 45 minutes 64K 1 1 1 LDEVs 30 minutes 32K 1 1 1 LDEVs 10-15 minutes 32K (aggreg-ated) > 1 (2 to 3)
1-3 1
For DKC and Ports, you must set the data collection frequency to 10 minutes.
• To estimate management server drive space required for the XP Performance Advisor database: • HP recommends that there be at least a week's historic data available when you are
forecasting using charts or alarms. • Determining disk space requirements:
Use the following formula to determine the disk space requirements for XP Performance Advisor on a daily basis. The factors that influence the output are the number of: XP disk arrays, LDEVs, ports, and DKC resources. Also, the performance data collection and fre-quency influence the output.
Free_Space (MB/day for one array) = [(SECONDS_PER_DAY / Ldev_Collection_frequency) * LDEVs * Ldev_Space ] +
[(SECONDS_PER_DAY / Port_Collection_ frequency) * PORTs * Port_Space] + [(SECONDS_PER_DAY/ Dkc_Collection_ frequency) * Dkc_Space]
where:
• Free_Space (MB/day) = Total free disk space (in MB) required for a day
• LDEVs = Total number of LDEVs of an array (includes journal volumes, pool volumes, external volumes, and so on)
• PORTs = Total number of ports for an XP Disk Array
• Ldev_Collection_frequency = Collection frequency for LDEVs (in seconds) • Port_Collection_frequency = Collection frequency for ports (in seconds) • Dkc_Collection_ frequency = Collection frequency for dkc (in seconds) • Ldev_Space ( per Ldev) = 0.0002 MB
• Port_Space (per port) = 0.00008 MB • Dkc_Space (per collection) = 0.0002 MB • SECONDS_PER_DAY = 86400
The consolidated free space that is available for XP Performance Advisor is the total sum of the free space available on all the XP disk arrays monitored by XP Performance Advisor.
Example 1. Determining the disk space requirements for XP Performance Advisor
Consider that XP disk arrays 10055 and 10090 are monitored by the XP Performance Advisor management station.
• 10055 XP Disk Array details: • LDEVs = 1703
• PORTs = 96
• Dkc_Collection_frequency = 300 seconds (5 * 60) • Ldev_Collection_frequency = 600 seconds (10 * 60) • Port_Collection_frequency = 600 seconds (10 * 60)
Free_Space on 10055 array =[(86400/600) *1703 * 0 .0002] + [(86400/ 600) * 96 * 0.00008] + [(86400/300) * 0.0002] = 49.04 + 1.1 + 0.05 = 50.19 MB
• 10090 XP Disk Array details: • LDEVs = 2554
• PORTs = 32
• Dkc_Collection_ frequency = 300 seconds (5 * 60) • Ldev_Collection_ frequency = 900 seconds (15 * 60) • Port_Collection_ frequency = 600 seconds (10 * 60)
Free_Space on 10090 array =[(86400/900) *2554 * 0 .0002] + [(86400/ 600 ) * 32 * 0.00008 ]+[(86400/300) * 0.0002] = 49.03 + 0.36 + 0.05 = 49.45 MB
Consolidated free space that is available for XP Performance Advisor (MB/day) =99.64 MB (50.19 MB + 49.45 MB)
Preparing your XP disk arrays and determining their data collection schedules
• To achieve the optimal CHIP port (MP) performance utilization, during performance data collection, HP recommends using two command devices that connect through two different ports (two different MPs). For more information, see “Creating and presenting command devices to hosts” on page 35.
• To collect performance data of RAID groups (RAID groups, snapshot, THP, External RAID groups) and journal components, HP recommends using a command device and port that are not shared with other critical applications. This is because collecting performance data for RAID groups is an intensive operation. You can create another schedule to collect performance data for the remaining set of components, through a different command device and port.
• Stagger schedule: If the data collection frequency is set to 15 minutes, performance data collection occurs at every quarter hour, irrespective of when the schedule is created. For example, if the schedule is created at 10:12 a.m., the first collection occurs immediately and the next collection occurs at the quarter of the hour, which is 10:15 a.m. Subsequent collections occur at 10:30 a.m., 10:45 a.m., and so on.
If you select theStagger Schedulecheck box, performance data collection occurs every 15 minutes from the time the schedule is created. For example, if the schedule is created at 10:12 a.m., the first collection occurs immediately and the next collection is 15 minutes later, which is at 10:27 a.m., and subsequent collections every 15 minutes after that. The Stagger schedule ensures that the load on Performance Advisor at any point in time is balanced because data collection occurs for all the XP disk arrays not every 15 minutes of the hour, but at varied points of time in the day.
Sample XP Performance Advisor configuration and performance data collection schedule
configurations
• Five host agents (three XP disk arrays per host)
• 15 XP disk arrays (2000 LDEVs per XP Disk Array)
• Collect performance data every 2 minutes for all the resources in your XP disk arrays • Collect configuration data every week, during the weekend
• Use stagger schedule – Yes
Determining the coexistence with other storage products
The following configurations are supported for XP Performance Advisor:• HP StorageWorks Command View XP Advanced Edition (Command View XP Advanced Edition or Command View XP AE)
• HP StorageWorks Command View EVA
For optimal performance, HP recommends that you install XP Performance Advisor as a standalone product. For more information on the supported versions, see the XP Performance Advisor streams document available athttp://h20272.www2.hp.com/Pages/spock2Html.aspx?htmlFile=
sw_array_xp.html. CAUTION:
HP recommends not to install any other array management application, such as the HP StorageWorks Command View XP, HP Systems Insight Manager, XP RAID Manager, and HP Storage Essentials on the management station, where XP Performance Advisor is installed.
Management station prerequisites
This section describes the prerequisites that you must complete for installing XP Performance Advisor on a management station.
After you complete the prerequisites, start the XP Performance Advisor installation. For more information, see “Installing the XP Performance Advisor” on page 45.
• “Verifying the supported configurations for XP Performance Advisor” on page 23
• “Getting the fully qualified domain name or IP address of your management station” on page 25
• “Determining the authentication type for XP Performance Advisor” on page 26
• “Creating 1 GB of free disk space” on page 28
• “Choosing a system where Oracle is not installed” on page 28
• “Configuring a Loopback Adapter or static IP address” on page 29
• “Switching the IIS Admin service to manual start mode” on page 29
• “Assigning port 80 for XP Performance Advisor” on page 29
• “Disabling the UAC on a Windows Vista management station” on page 30
• “Configuring firewall settings on a Windows XP Professional management station” on page 30
• “Configuring the web browser proxy server settings” on page 31
Verifying the supported configurations for XP Performance Advisor
To install XP Performance Advisor, verify that you have the supported configurations for:• Softwareon page 24
• Web browseron page 25
• Firmwareon page 25
Hardware
Your management station must meet the following hardware requirements:
• DVD drive
• 3 GHz CPU (minimum)
• 2 GB RAM (minimum), 4 GB RAM for complex configuration and multiple XP disk arrays, or multiple XP disk arrays
• 10 GB free space on hard drive (minimum), 32 GB free disk drive space (for cache swap space and database) (NTFS)
• Ethernet LAN card connected to the network
• VGA graphics display with 256 colors (21-inch SVGA graphics display with 32-bit graphics inter-face is recommended)
NOTE:
XP Performance Advisor installation is also supported on Quad-core servers.
Software
Your management station must meet the following software requirements:
• Windows operating system compatible with XP Performance Advisor.
• Microsoft .NET Framework v2.0 or later. If the installation wizard detects that the Microsoft .NET Framework v2.0 or later version does not exist, it displays a message that the required version is not available. ClickOKon the message dialog box for the installation wizard to install Microsoft .NET Framework v3.5 (recommended version) on your management station.
• The JRE version compatible with XP Performance Advisor.
XP Performance Advisor supports JRE v5.0 Update 14 (minimum) to JRE v6.0 Update 18 (maximum). HP recommends that you install JRE v6.0 Update 18 on your management station.
IMPORTANT:
• Only 32-bit (X86) JRE versions are supported on the 64-bit Windows platforms.
• The Path environment variable on your management station must also include the installed JRE
location.
To determine whether JRE v5.0 Update 14 or later is already installed on your management station, run the following command from the command prompt:
# java -version
You can expect an output similar to the following, which is shown for JRE v5.0 Update 18:
java version "1.5.0.18"
Java(TM) 2 Runtime Environment, Standard Edition (build 1.5.0.18-_25_feb_2009_02_25)
Java HotSpot(TM) Server VM (build 1.5.0.14 jinteg:07.25.08-11:41 IA64, mixed mode)
For the list of supported Windows operating systems and JRE versions, see theHP StorageWorks XP Performance Advisor Software OS Support Matrix. This document also specifies the Windows operating systems that are supported as guest operating platforms on the VMware ESX, Citrix XEN, and Microsoft Hyper-V virtual servers. Download this document from the HP Manuals site for XP Performance Advisor, following is the URL:
http://h20000.www2.hp.com/bizsupport/TechSupport/DocumentIndex.jsp?lang=en&cc=us& taskId=101&prodClassId=-1&contentType=SupportManual&docIndexId=64180&prodTypeId=18964& prodSeriesId=64823.
Web browser
XP Performance Advisor is supported on Microsoft Internet Explorer only. For the list of supported IE versions, see theHP StorageWorks XP Performance Advisor Software OS Support Matrix. For document download location, see “Related documentation” on page 126.
NOTE:
• You can access XP Performance Advisor locally on your management station or remotely from another system.
• Configure your IE browser to allow pop-ups, so that XP Performance Advisor functions properly.
Firmware
For the list of required and recommended firmware versions for all the supported XP Disk Array models, see theHP StorageWorks XP Performance Advisor Software Release Notesavailable at
http://h20000.www2.hp.com/bizsupport/TechSupport/DocumentIndex.jsp?lang=en&cc=us& taskId=101&prodClassId=-1&contentType=SupportManual&docIndexId=64180&prodTypeId=18964& prodSeriesId=64823.
Getting the fully qualified domain name or IP address of your management
station
The fully qualified domain name consists of ([servername].[domain name]).
To get the fully qualified domain name or the IP address of your management station:
1. Open the command prompt window on your management station.
2. Typeipconfig /allat the prompt.
In theWindows IP Configurationwindow, verify the following:
• TheHost Name(your management station's name) and thePrimary DNS Suffixtogether form the fully qualified domain name.
• The IP address, listed underEthernet adapter Local Area Connection, is the default IPv4 address. If IPv6 is enabled on your management station, the respective IP address is mentioned asIPv6 AddressunderTunnel adapter Local Area Connection. The following is a sample IPv6 address:
0000:a00:b000:a00:b000. To verify if IPv6 is enabled for your management station:
1. ClickStart>Run, and typencpa.cplin the command line.
Ensure that the check box forInternet Protocol Version 6 (TCP/IPv6)is selected under the Networkingtab.
Either IPv6 or IPv4 is used for communication between the management station and its host, based on whether you select IPv6 or IPv4 while installing the host agent.
Determining the authentication type for XP Performance Advisor
You must select an authentication type based on the current setup of your management station. The credentials that you use to log in to XP Performance Advisor change based on the type of authentication method you select. The following types of authentication are supported by XP Performance Advisor:
• Performance Advisor Native Authentication
• Windows System Authentication
• Windows Domain based Authentication
• LDAP Authentication
• RADIUS Server Authentication NOTE:
• To implement the Windows System Authentication or Windows Domain based Authentication on your management station, ensure that your management station is part of a domain.
• To implement the Windows Domain, LDAP, or RADIUS authentication type, you must complete the prerequisites that allow XP Performance Advisor to work with the selected authentication server to authenticate and authorize users. For more information, see Windows Domain based Authentication on page 27, LDAP Authentication on page 27, and RADIUS Authentica-tion on page 27.
Performance Advisor Native Authentication
The Performance Advisor Native Authentication is the simplest method to manage user accounts and is required if you want XP Performance Advisor to maintain its own set of user credentials. During installation, if the XP Performance Advisor installer detects that your management station is not configured to be part of a Windows domain or able to communicate with an LDAP, or RADIUS server, Performance Advisor Native Authenticationis implemented. There are no prerequisites associated with the Performance Advisor Native Authentication type.
Windows System Authentication
The Windows System Authentication is required in the following case:
1. Your management station belongs to a Windows domain.
2. Your XP Performance Advisor users are a combination of local system users and group of users belonging to the same, or different domains.
OR
Your XP Performance Advisor users are a combination of local system users or group of users belonging to the same, or different domains.
Windows Domain based Authentication
The Windows Domain based Authentication is required if you want to implement the domain-based authentication for administrators and user domain groups residing on the same or different domains. Only users belonging to the domain groups are given privileges to log in to XP Performance Advisor. By default, XP Performance Advisor refers to these groups asHP Storage AdminsandHP Storage Users.
To implement Windows Domain based Authentication, your domain or site administrator must create the two default domain groups, or the domain groups of choice on the domain controller.
LDAP Authentication
The LDAP Authentication is required if you want to implement the Lightweight Directory Access Protocol (LDAP) for centralized authentication, where the LDAP server authenticates and authorizes XP
Performance Advisor users. The following LDAP server implementations and authentication mechanism are supported by XP Performance Advisor v4.5 and later versions:
• OpenLDAP
• Microsoft Active Directory Supported LDAP server implementations
SIMPLE (clear-text password) mechanism Supported LDAP authentication mechanism
To implement the LDAP Authentication, complete the following prerequisites:
• Install LDAP v3 (RFC 4510) on a server with an established XP Performance Advisor connection.
• Create theStorageAdminsandStorageUsersgroups on the LDAP server, and add members
to these groups.
• For the SIMPLE (clear-text password) mechanism and a secure connection, enable SSL on both the LDAP server and XP Performance Advisor management station.
IMPORTANT:
• Note the LDAP Distinguished Names (DN)s for the StorageAdmins and StorageUsers
groups. An LDAP group used with XP Performance Advisor must have the DNs of the group members available in an attribute of the group.
• Note the UserBaseDN and GroupBaseDN required for XP Performance Advisor to allow
au-thentication and authorization of users.
• UserBaseDN is the location in the LDAP tree that contains all the user entries. XP Performance
Advisor uses UserBaseDN to search user entries in the LDAP directory when authenticating
users.
• GroupBaseDN is the location in the LDAP tree that contains all the group entries. XP
Perform-ance Advisor uses GroupBaseDN to search group entries in the LDAP directory when
author-izing users.
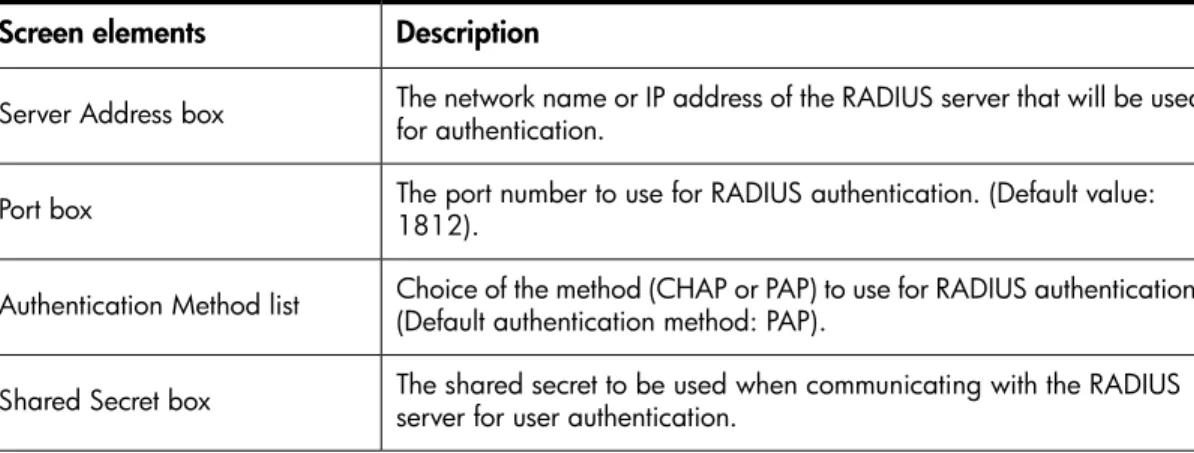
RADIUS Authentication
RADIUS Authentication is required if you want to implement RADIUS protocol for centralized
authentication, where the RADIUS server authenticates and authorizes XP Performance Advisor users. The following RADIUS server implementation and authentication mechanisms are supported by XP Performance Advisor v4.5 and later versions:
Microsoft Active Directory with Internet Authentication Service (IAS) for Windows platform
RADIUS server implementation
• PAP: Password Authentication Protocol
• CHAP: Challenge Handshake Authentication Protocol RADIUS authentication mechanisms
To implement RADIUS Authentication, your system administrator must add a RADIUS Vendor-Specific Attribute (VSA) to the user profile on the RADIUS server. The VSA is required for authorizing XP Performance Advisor and it must have an attribute type of 1, and a vendor ID of 11 that is assigned to Hewlett-Packard by IANA. Further, the VSA can have one or both of the following attribute values, depending on the role assigned to the user profile. In the following examples, a VSA attribute type and value is assigned to an XP Performance Advisor administrator and user:
Example 2. VSA added to User_1 profile in the XP PA administrators group:
Vendor_ID=11
SubAttributeType=1
Attribute Value= XPPA: role=administrator (For XP Performance Advisor administrators: XPPA: role=administrator)
Example 3. VSA added to User_2 profile in the XP PA users group:
Vendor_ID=11
SubAttributeType=1
Attribute Value= XPPA: role=user (For XP Performance Advisor users: XPPA: role=user)
For more information on implementing the above-mentioned types of authentication, see “Implementing the authentication method” on page 50.
Creating 1 GB of free disk space
At least 1 GB of free disk space in your management station’sTEMPfolder is required for a Complete
installation of XP Performance Advisor. In this context,TEMPfolder is the location mentioned in your
user or system environment variable namedTEMP.
The following components or program features are installed during a Complete installation:
• Operating platform-specific XP Performance Advisor host agents
• CLUI software
• Tools, XPWatch, XPSketch, and XPInfo
If you do not want to install all the associated components, select the custom installation method, and choose the associated components that you want installed. Each component that you choose displays the approximate disk space that it requires. For more information, see “Selecting components to install (custom installation)” on page 59.
Choosing a system where Oracle is not installed
XP Performance Advisor uses its own Oracle database. However, XP Performance Advisor can be installed on management station, where an Oracle database is already running.
Perform the following procedure before you install XP Performance Advisor, if the management station is running an Oracle database:
1. SelectStart>Runand typeservices.mscin the command line.
TheServicesdialog box appears.
2. Right-click the Oracle database services:Oracle PADB serviceandOracle Listener service, and selectStopfrom the drop down list.
3. SelectStart>Runand typeappwiz.cplin the command line.
4. RemoveOraclefrom the list of programs.
5. Go to<Installation drive>:\Program Filesand delete the folder for Oracle.
6. Reboot your management station, so that Oracle is completely removed.
Configuring a Loopback Adapter or static IP address
Configure a Loopback Adapter or static IP address on your management station. A Loopback Adapter is required if you want to install XP Performance Advisor on:
• A DHCP computer
• A non-networked computer and plan to connect the computer to a network after installation If you use a Loopback Adapter, ensure that it is assigned as the primary network adapter. For more information on Loopback Adapter, seeAppendix Aon page 129.
Switching the IIS Admin service to manual start mode
IMPORTANT:Ensure that your user account has administrative privileges to perform the following tasks. Perform this procedure only if IIS Admin service is active on the management station, where you want to install XP Performance Advisor.
Set the IIS Admin service toManualstart mode before installing XP Performance Advisor. If the IIS Admin service is running on your management station, the XP Performance Advisor installer will not proceed.
To switch the IIS Admin service to Manual start mode:
1. Go toStart>Runand typeServices.mscin the command line.
TheServiceswindow appears.
2. Double-clickIIS Admin service.
3. In theIIS Admin Servicewindow, select theStartup typeas Manual.
4. ClickApplyandOKto save the changes.
5. Close theServiceswindow.
Assigning port 80 for XP Performance Advisor
Assign port 80 on your management station for XP Performance Advisor because the HP StorageWorks XP Performance Advisor Tomcat service in XP Performance Advisor uses port 80 for all its
netstat -o -n -a | findstr 0.0:80
You can expect an outcome similar to the following:
TCP 0.0.0.0:80 0.0.0.0:0 LISTENING 804
The last column of the output from the above command is the process identifier (PID), denoted by <process_ID>. In the example output, the PID is 804.
If another application’s service is using port 80, XP Performance Advisor is installed but the HP StorageWorks XP Performance Advisor Tomcat service does not start. You can forcibly terminate this process to allow the HP StorageWorks XP Performance Advisor Tomcat service to start.
The command to terminate the task is:
TASKKILL /F /PID <Port 80 PID>
Where, <Port 80 PID> is replaced by the process identifier of the task currently using port 80.
Disabling the UAC on a Windows Vista management station
IMPORTANT:
Perform this procedure only if you want to install XP Performance Advisor on a Windows Vista management station.
User Access Control (UAC) controls the installation and removal of programs, and prevents programs from being added to the registry. Make sure UAC is disabled before installing or removing XP Performance Advisor on a Windows Vista management station. To disable UAC:
1. Go toStart>Run, typemsconfigin the command line, and pressEnter.
TheSystem Configurationwindow displays.
2. In theSystem Configurationwindow, click theToolstab.
3. SelectDisable UACand clickLaunch.
4. Reboot the system.
You can enable UAC after installing XP Performance Advisor. Repeat the previous procedure and selectEnable UACto activate UAC on your management station.
Configuring firewall settings on a Windows XP Professional management station
IMPORTANT:Perform this procedure only if you have installed XP Performance Advisor on a Windows XP Professional management station.
Configure the Windows XP Professional firewall settings to enable web browser clients to access XP Performance Advisor on your management station. To configure the firewall settings:
1. Open the control panel, and double-clickWindows Firewall.
2. Click theGeneraltab, and verify that theOn(recommended) button is selected and theDon’t allow exceptionsbox is not selected.
4. If you are using SSL Apache Server (HTTPS), clickAdd Port. If you are not using SSL Apache
Server, skip to step 8.
5. EnterHTTPSin theNametext box, enter443in thePort numbertext box, and clickTCP.
6. ClickOKto save changes and close the window.
7. Verify whether theHTTPSbox is checked on theExceptionstab.
IMPORTANT:
If the firewall is enabled during the XP Performance Advisor installation, the XP Performance Advisor installer adds port 80 and port 443 to the exception list of the firewall.
8. ClickOK.
Configuring the web browser proxy server settings
IMPORTANT:Perform this procedure after you complete installing the XP Performance Advisor.
Configure your IE browser to not use a proxy server for the IP address or fully qualified domain names. To configure the IE browser proxy server settings:
1. In a IE browser window, clickTools>Internet Options>Connections>LAN Settings.
2. In theLocal Area Network (LAN) Settingswindow, select theUse a proxy server for your LAN (These settings will not apply to dial-up or VPN connections)check box.
3. ClickAdvanced.
4. In theExceptionstext box, place your cursor at the end of the domain list.
5. Enter a semicolon and your IP address, and the fully-qualified domain name of the management station.
6. ClickOKto save changes.
Assigning GUIDs for command devices on a Windows host
To overcome device renaming and device remapping issues during data collection, HP recommends that you use the Windows GUID (\\?\Volume{GUID}) to perform configuration and performance
data collection instead of using the device file names. Complete the following steps to use the GUID:
1. Log in to the XP Performance Advisor host agent and stop the host agent.
For example,<install directory>:\Program Files\Hewlett-Packard\xppa\ hostagent\sbin> xppa stop
Following will be command, if you have installed the host agent in a different location, <In-stall_directory>:\hostagent\xppa stop
You can also clickStart>Run, typeservices.msc, and pressEnter. In the Services dialog
box, right-clickHP XP Performance Advisor Hostagent and selectStopfrom the drop down list. You can also stop theHP XP Performance Advisor Realtime Serverby following the above men-tioned steps.
2. From a command line, run theXPInfo –i, to display the list of all the command devices (see
Figure 4on page 32).
Figure 4 XPInfo –i command
.
3. Create a GUID on the command devices to perform data collection. Complete the following steps:
a. Log in to the XP Performance Advisor host agent as an administrator or as a member of the Administrators group.
b. Open the Computer Management console by clickingStart>Run>compmgmt.msc, and pressEnter.
c. UnderStoragein the left pane, selectDisk Management.
d. In the right pane, select a command device from the list of command devices displayed by the XPInfo command (seeFigure 4on page 32).
e. Right-click the command device and selectNew Partition. The New Partition Wizard appears.
f. ClickNext.
g. SelectPrimary partitionand clickNext.
h. Specify the size of the partition in thePartition size in MBbox, and clickNext.
i. ClickMount in the following NTFS Folder, and clickBrowse. Select theMount Pointand click Next.
j. SelectDo not format this partition, and clickNext.
k. ClickFinish.
The selected command device is partitioned and is assigned a GUID. For information on using Disk Management, seehttp://support.microsoft.com/kb/309000/en-us.
4. Restart the XP Performance Advisor host agent services.
For example,<install directory>:\Program Files\Hewlett-Packard\xppa\ hostagent\sbin> xppa restart
5. On the management station, launchXP Performance Advisorand clickArray Viewon the left pane.
6. In the Array View screen, select the host agent record in the Host Information table, and click Request Info.
7. After theStatuscolumn showsReceivedfor the selected host agent record, click theConfiguration CollectionorPerformance Collectiontab.
All the command devices on which the GUID is created are appended with GUID. The XP Per-formance Advisor configuration and perPer-formance data collection through the command device file names labeled with “(GUID)” string uses \\?\Volume {GUID}.
NOTE:
To ensure accurate performance data collection:
• The command device on which the GUID is created must always be mounted.
• When you create a GUID, you must request updated host agent information under the Host Information tab.
• If you delete a GUID partition and recreate it, you must request the updated host information under the Host Information tab.
• If GUID creation is successful and the command device is corrupted, the XP Performance Advisor configuration and performance data collection might fail.
XP Performance Advisor host agent prerequisites
This section describes the following host agent prerequisites that you must complete before installing the XP Performance Advisor host agents:
• “Verifying the supported configurations for XP Performance Advisor host agents” on page 33
• “Configuring settings on Windows and UNIX hosts” on page 34
• “Creating and presenting command devices to hosts” on page 35
• “Mapping command devices from virtual servers” on page 38
• “Verifying host connectivity to a command device” on page 39
• “Configuring SSL settings for the XP Performance Advisor host agents” on page 39
For more information on installing XP Performance Advisor host agents, see “Installing XP Performance Advisor host agents” on page 71.
Verifying the supported configurations for XP Performance Advisor host agents
To install the XP Performance Advisor host agents, verify that you have the supported configurations in the following categories:• Hardwareon page 33
• Softwareon page 34
Hardware
Your Windows or UNIX hosts must include the following respective hardware requirements:
• Microsoft Windows host: • DVD drive
• 2.5 GB free space on hard drive (NTFS) • Ethernet LAN card connected to the network
• HP-UX, Sun Solaris, IBM AIX, or Linux host:
• DVD drive/CD-ROM (read-only DVD drive is preferable) • Disk space:
• HP-UX (250 MB) • Sun Solaris (150 MB) • IBM AIX (72.5 MB)
• Linux (250 MB)
• Ethernet LAN card connected to the network
Software
For the list of supported Windows and UNIX operating platforms, see theHP StorageWorks XP Performance Advisor Software OS Support Matrix. For document download location, see “Related documentation” on page 126.
This document also specifies the supported JRE versions for the Windows and UNIX host agents, and the Windows operating systems that are supported as guest operating platforms on the VMware ESX, and Microsoft Hyper-V virtual servers. Download this document from the HP Manuals site for XP Performance Advisor.
IMPORTANT:
Before installing the host agents, ensure that you install the following JRE versions on your hosts:
• Windows host: JRE v5.0 Update 14 (minimum) or later up until JRE v6.0 Update 18 (maximum) HP recommends that you install JRE v6.0 Update 18.
• UNIX host: JRE v5.0 Update 18
Also, the Path environment variable on your host must point to the installed JRE location. To determine
the JRE version installed on your host, see the procedure under Software on page 24.
Configuring settings on Windows and UNIX hosts
You must configure the following settings on your Windows and UNIX hosts prior to installing the respective host agents:
• Getting administrator privileges on a Windows or UNIX hoston page 34
• Setting up the HP-UX, Solaris, and AIX hostson page 34
• Setting up a Linux hoston page 35
• Setting up a Red Hat Enterprise Linux 4.0 hoston page 35
Getting administrator privileges on a Windows or UNIX host
Administrative or root privileges on hosts is required before you can install the Windows or UNIX host agent. Verify and get the required privileges for your user account before installing the Windows or UNIX host agent.
Setting up the HP-UX, Solaris, and AIX hosts
Before installing the XP Performance Advisor host agent on an HP-UX, Solaris, or AIX host, ensure that the following prerequisites are completed:
1. You must haverootorsuperuseraccess to the host.
2. Telnet and FTP services are enabled (on HP-UX, Solaris, and AIX hosts, these services are enabled by default).
Setting up a Linux host
Before installing the XP Performance Advisor host agent on a Linux host, ensure that the following prerequisites are completed:
1. You must have a root or superuser access to the host.
2. Configure therootorsuperuseraccount to allow remote access via the FTP services by
completing the following steps:
a. Run the/usr/sbin/ntsysvcommand and enable wu-ftpd
b. Edit/etc/pam.d/ftpby commenting out the line with#: auth required /lib/se-curity/pam_listfile.so item=user sense=deny file=/etc/ftpusers onerr=succeed
c. Edit/etc/ftpusers by removing or commenting out the line with #: root
d. Edit/etc/ftpaccessas follows:
• Changeallow-uid ftptoallow-uid ftp root
• Changeallow-gid ftptoallow-gid ftp root
• Run the/sbin/service xinetdrestart command
Setting up a Red Hat Enterprise Linux 4.0 host
Before installing the XP Performance Advisor host agent on a Red Hat Enterprise Linux v4.0 host, ensure that the following prerequisites are completed:
1. You must have a root or superuser access to the host.
2. Install the Legacy Network Packages if the packages are not installed.
3. Edit/etc/xinetd.d/<service>to enable the service by default, where<service>is rexec, vsftpd, etc.
4. Edit/etc/securityby addingrexec, rlogin, vsftpd, andtelnet.
5. Edit/etc/pam.d/loginto comment out the line:
# auth required /lib/security/pam_securetty.so
6. Edit/etc/pam.d/rexecto comment out the line:
# auth required /lib/security/pam_securetty.so
7. Edit/etc/vsftpd.ftpusersto comment out the line: # root
8. Edit/etc/vsftpd.user_listto comment out the line: # root
9. Restart the service by entering/sbin/service xinetd restart.
10. Restartvsftpdby entering/sbin/service vsftpd restart. Make sure no otherftp
services are running (for example,tftp).
Creating and presenting command devices to hosts
If you are using XP RAID Manager (XP Business Copy and XP Continuous Access), you already have command devices that the XP Performance Advisor host agent can use. If XP RAID Manager is not being used, create a command device using the XP Remote Web Console (RWC) or the Remote Control applications. If you are using XP Command View Advanced Edition Device Manager (XP Command View AE Device Manager), you must launch XP Command View AE Device Manager, and then the XP RWC.
For the XP24000/XP20000/XP12000/XP10000 disk arrays, configure the command devices as SLPR0 to report full Storage Logical Partition (SLPR) data.
NOTE:
For further assistance, contact HP technical support.
Launching Command View XP AE
Complete the following steps before launching the XP RWC:
1. Launch the Command View XP AE Device Manager by typinghttp://<ip_address>:23015/ DeviceManager/into a browser window.
NOTE:
If you are using a secured connection, the port number will be different and the URL will be in the following format:
http://<ip_address>:23016/DeviceManager/
2. In theLoginwindow, enter the user name assystemand the password asmanager, and click
Login.
3. In theCommand View XP AE Device Managerwindow, click theResourcestab in the CV AE Device Manager Explorer navigation pane.
4. Click theSubsystemsnode and select the subsystem for which you want to create the command device. (The individual subsystems are displayed in the Subsystems navigation pane, which is on the right side of the Explorer navigation pane.)
5. ClickPhysical Viewto launch the XP RWC with administrator privileges (that is, administrator\ad-ministrator).
6. In theXP RWCwindow, clickGO>LUN Manager>LU Path and Security. A list of LDEVs appears.
7. Right-click the LDEV that you want to convert into a command device.
8. SelectEnable\Disablefrom the drop down list.
9. ClickApplyto save the changes and enable the selected LDEV as a command device.
Creating a command device using XP RWC for XP24000, XP20000, XP12000, and XP10000
disk arrays
Complete the following steps to create a command device:
1. Launch the XP RWC with administrator privileges (administrator\administrator).
2. In theXP RWCwindow, clickGO>LUN Manager>LU Path and Security. A list of LDEVs appears.
3. Right-click the LDEV that you want to convert into a command device.
4. SelectEnable\Disablefrom the drop down list.