HPE iLO 4 Scripting and Command
Line Guide
Abstract
This document describes the syntax and tools available for use with the HPE iLO firmware through the command line or a scripted interface. This document is for the person who installs, administers, and troubleshoots servers and storage systems. Hewlett Packard Enterprise assumes you are qualified in the servicing of computer equipment and trained in recognizing hazards in products with hazardous energy levels.
Use this guide for HPE iLO ProLiant servers and ProLiant BladeSystem server blades. For information about iLO for Integrity servers and server blades, see the Hewlett Packard Enterprise website athttp://www.hpe.com/info/integrityiLO.
Part Number: 684919-403 Published: April 2016 Edition: 1
©Copyright 2012, 2016 Hewlett Packard Enterprise Development LP
The information contained herein is subject to change without notice. The only warranties for Hewlett Packard Enterprise products and services are set forth in the express warranty statements accompanying such products and services. Nothing herein should be construed as constituting an additional warranty. Hewlett Packard Enterprise shall not be liable for technical or editorial errors or omissions contained herein.
Confidential computer software. Valid license from Hewlett Packard Enterprise required for possession, use, or copying. Consistent with FAR 12.211 and 12.212, Commercial Computer Software, Computer Software Documentation, and Technical Data for Commercial Items are licensed to the U.S. Government under vendor's standard commercial license.
Links to third-party websites take you outside the Hewlett Packard Enterprise website. Hewlett Packard Enterprise has no control over and is not responsible for information outside the Hewlett Packard Enterprise website.
Acknowledgments
Microsoft®, Windows®, and Windows Server®are trademarks of the Microsoft group of companies.
Intel®, Itanium®, Pentium®, Intel Inside®, and the Intel Inside logo are trademarks of Intel Corporation in the United States and other countries. Java®and Oracle®are registered trademarks of Oracle and/or its affiliates.
Contents
1 Introduction...14
Scripting and command line guide overview...14
Scripting and command line utilities...14
HPQLOCFG Utility...15
LOCFG.PL Script...15
HPONCFG Utility...15
SMASH CLP...16
IPMI...16
New in this version...16
HPE Insight Control server deployment...17
2 HPQLOCFG usage...18
Configuring for unauthenticated XML queries...18
Creating a system collection in HPE SIM...20
Launch applications with HPE SIM custom tools...21
Batch processing using HPQLOCFG...21
HPQLOCFG command line parameters...21
Using quote characters...21
Command line switches...22
Using variables and name value pairs with HPQLOCFG...23
3 LOCFG.PL usage...25
LOCFG.PL Utility...25
LOCFG.PL command line switches...25
4 HPONCFG online configuration utility...26
HPONCFG...26
HPONCFG supported operating systems...26
HPONCFG requirements...26
Installing HPONCFG...27
Windows server installation...27
Linux server installation ...27
VMware installation...27
HPONCFG utility...28
HPONCFG command line parameters...28
Using HPONCFG on Windows servers...29
Using HPONCFG on Linux servers...29
Obtaining the basic configuration...30
Obtaining a specific configuration...31
Setting a configuration...32
Using variable substitution...33
Capturing and restoring a configuration...33
5 SMASH CLP usage...35
SMASH CLP ...35
6 IPMI usage...36
The IPMI utility...36
Basic IPMI tool usage...36
Advanced IPMI tool usage on Linux...36
Advanced IPMIutil usage on Windows...37
7 SMASH CLP Scripting Language...38
SMASH CLP command line overview...38
Using the command line...38
Escape commands...39
Base commands...40
Using the NIC auto-selection feature...41
Specific commands...42
User commands...42
HPE SSO settings...43
Network commands...45
iLO 4 settings...47
iLO 4 embedded health settings...49
SNMP settings...51
License commands...52
Directory commands...53
Virtual Media commands...54
Start and Reset commands...57
Firmware commands...58
Non-iLO firmware commands...58
Eventlog commands...59
Blade commands...60
Boot commands...60
LED commands...63
System properties and targets...64
Other commands...67
8 RIBCL XML Scripting Language...68
Overview of the RIBCL...68
XML headers...68 Data types...69 String...69 Specific string...70 Boolean string...70 Response definitions...70 RIBCL...70 RIBCL parameters...70
RIBCL runtime errors...71
Combining multiple commands in one RIBCL script...71
LOGIN...72
LOGIN parameters...73
LOGIN runtime errors...73
USER_INFO...73
ADD_USER...73
ADD_USER parameters...74
ADD_USER runtime errors...75
DELETE_USER...75
DELETE_USER parameter...75
DELETE_USER runtime errors...75
DEL_USERS_SSH_KEY...75
DEL_SSH_KEY parameters...76
DEL_SSH_KEY runtime errors...76
GET_USER...76
GET_USER parameter...76
GET_USER runtime errors...76
GET_USER return messages...76
MOD_USER...77
MOD_USER runtime errors...78
GET_ALL_USERS...79
GET_ALL_USERS parameters...79
GET_ALL_USERS return messages...79
GET_ALL_USER_INFO...79
GET_ALL_USER_INFO parameters...80
GET_ALL_USER_INFO return messages...80
RIB_INFO...80
RESET_RIB...81
RESET_RIB parameters...81
RESET_RIB runtime errors...81
GET_EVENT_LOG...81
GET_EVENT_LOG parameters...82
GET_EVENT_LOG runtime errors...82
GET_EVENT_LOG return messages...82
GET_FEDERATION_MULTICAST...83
GET_FEDERATION_MULTICAST parameters...83
GET_FEDERATION_MULTICAST runtime errors...83
GET_FEDERATION_MULTICAST return messages...83
SET_FEDERATION_MULTICAST...83
SET_FEDERATION_MULTICAST parameters...84
SET_FEDERATION_MULTICAST runtime errors...84
GET_FEDERATION_ALL_GROUPS...84
GET_FEDERATION_ALL_GROUPS parameters...85
GET_FEDERATION_ALL_GROUPS runtime errors...85
GET_FEDERATION_ALL_GROUPS return messages...85
GET_FEDERATION_ALL_GROUPS_INFO...85
GET_FEDERATION_ALL_GROUPS_INFO parameters...85
GET_FEDERATION_ALL_GROUPS_INFO runtime errors...85
GET_FEDERATION_ALL_GROUPS_INFO return messages...86
GET_FEDERATION_GROUP...86
GET_FEDERATION_GROUP parameters...87
GET_FEDERATION_GROUP runtime errors...87
GET_FEDERATION_GROUP return messages...87
ADD_FEDERATION_GROUP...87
ADD_FEDERATION_GROUP parameters...88
ADD_FEDERATION_GROUP runtime errors...88
MOD_FEDERATION_GROUP...88
MOD_FEDERATION_GROUP parameters...89
MOD_FEDERATION_GROUP runtime errors...89
DELETE_FEDERATION_GROUP...89
DELETE_FEDERATION_GROUP parameters...90
DELETE_FEDERATION_GROUP runtime errors...90
CLEAR_EVENTLOG...90
CLEAR_EVENTLOG parameters...90
CLEAR_EVENTLOG runtime errors...90
COMPUTER_LOCK_CONFIG...90
COMPUTER_LOCK_CONFIG parameters...91
COMPUTER_LOCK_CONFIG runtime errors...91
GET_NETWORK_SETTINGS...91
GET_NETWORK_SETTINGS parameters...92
GET_NETWORK_SETTINGS runtime errors...92
GET_NETWORK_SETTINGS return messages...92
MOD_NETWORK_SETTINGS...94
MOD_NETWORK_SETTINGS parameters...97
GET_GLOBAL_SETTINGS...102
GET_GLOBAL_SETTINGS parameters...102
GET_GLOBAL_SETTINGS runtime errors...102
GET_GLOBAL_SETTINGS return messages...102
MOD_GLOBAL_SETTINGS...103
MOD_GLOBAL_SETTINGS parameters...104
MOD_GLOBAL_SETTINGS runtime errors...106
BROWNOUT_RECOVERY...107
BROWNOUT_RECOVERY parameters...107
BROWNOUT_RECOVERY runtime errors...107
GET_SNMP_IM_SETTINGS...107
GET_SNMP_IM_SETTINGS parameters...108
GET_SNMP_IM_SETTINGS runtime errors...108
GET_SNMP_IM_SETTINGS return messages...108
MOD_SNMP_IM_SETTINGS...109
MOD_SNMP_IM_SETTINGS parameters...110
MOD_SNMP_IM_SETTINGS runtime errors...111
SEND_SNMP_TEST_TRAP...112
SEND_SNMP_TEST_TRAP runtime errors...112
SEND_SNMP_TEST_TRAP return messages...112
MOD_ENCRYPT_SETTINGS...112
MOD_ENCRYPT_SETTINGS parameters...113
MOD_ENCRYPT_SETTINGS runtime errors...113
GET_ENCRYPT_SETTINGS...114
GET_ENCRYPT_SETTINGS parameters...114
GET_ENCRYPT_SETTINGS runtime errors...114
GET_ENCRYPT_SETTINGS return messages...114
UPDATE_RIB_FIRMWARE and UPDATE_FIRMWARE...114
UPDATE_FIRMWARE parameters...115
UPDATE_FIRMWARE runtime errors...115
UPDATE_LANG_PACK...116
UPDATE_LANG_PACK parameters...116
UPDATE_LANG_PACK runtime errors...116
GET_FW_VERSION...117
GET_FW_VERSION parameters...117
GET_FW_VERSION runtime errors...117
GET_FW_VERSION return messages...117
LICENSE...117
LICENSE parameters...118
LICENSE runtime errors...118
INSERT_VIRTUAL_MEDIA...118
INSERT_VIRTUAL_MEDIA parameters...118
INSERT_VIRTUAL_MEDIA runtime errors...119
EJECT_VIRTUAL_MEDIA...119
EJECT_VIRTUAL_MEDIA parameters...119
EJECT_VIRTUAL_MEDIA runtime errors...120
GET_VM_STATUS...120
GET_VM_STATUS parameters...120
GET_VM_STATUS runtime errors...120
GET_VM_STATUS return messages...120
SET_VM_STATUS...121
SET_VM_STATUS parameters...121
SET_VM_STATUS runtime errors...122
CERTIFICATE_SIGNING_REQUEST parameters (for custom CSR)...123 CERTIFICATE_SIGNING_REQUEST errors...123 IMPORT_CERTIFICATE...124 IMPORT_CERTIFICATE parameters...124 IMPORT_CERTIFICATE errors...124 AHS_CLEAR_DATA...124 AHS_CLEAR_DATA parameters...125
AHS_CLEAR_DATA runtime errors...125
GET_AHS_STATUS...125
GET_AHS_STATUS parameters...125
GET_AHS_STATUS runtime errors...125
SET_AHS_STATUS...125
SET_AHS_STATUS parameters...126
SET_AHS_STATUS runtime errors...126
TRIGGER_BB_DATA...126
TRIGGER_BB_DATA parameters...126
TRIGGER_BB_DATA runtime errors...126
DISABLE_ERS...126
DISABLE_ERS parameters...126
DISABLE_ERS runtime errors...127
GET_ERS_SETTINGS...127
GET_ERS_SETTINGS parameters...127
GET_ERS_SETTINGS runtime errors...127
SET_ERS_IRS_CONNECT...127
SET_ERS_IRS_CONNECT parameters...127
SET_ERS_IRS_CONNECT runtime errors...127
TRIGGER_L2_COLLECTION...127
TRIGGER_L2_COLLECTION parameters...128
TRIGGER_L2_COLLECTION runtime errors...128
TRIGGER_TEST_EVENT...128
TRIGGER_TEST_EVENT parameters...128
TRIGGER_TEST_EVENT runtime errors...128
SET_ERS_DIRECT_CONNECT...128
SET_ERS_DIRECT_CONNECT parameters...129
SET_ERS_DIRECT_CONNECT runtime errors...129
DC_REGISTRATION_COMPLETE...129
DC_REGISTRATION_COMPLETE parameters...129
DC_REGISTRATION_COMPLETE runtime errors...130
SET_ERS_WEB_PROXY...130
SET_ERS_WEB_PROXY parameters...130
SET_ERS_WEB_PROXY runtime errors...130
SET_LANGUAGE...130
SET_LANGUAGE parameters...131
SET_LANGUAGE runtime errors...131
GET_LANGUAGE...131
GET_LANGUAGE parameters...131
GET_LANGUAGE runtime errors...131
GET_ALL_LANGUAGES...131
GET_ALL_LANGUAGES parameters...131
GET_ALL_LANGUAGES runtime errors...131
GET_ASSET_TAG...132
GET_ASSET_TAG parameters...132
GET_ASSET_TAG runtime errors...132
SET_ASSET_TAG...132
SET_ASSET_TAG runtime errors...132
GET_SECURITY_MSG...133
GET_SECURITY_MSG parameters...133
GET_SECURITY_MSG return messages...133
GET_SECURITY_MSG runtime errors...133
SET_SECURITY_MSG...133
SET_SECURITY_MSG parameters...134
SET_SECURITY_MSG runtime errors...134
GET_SPATIAL...134
GET_SPATIAL parameters...134
GET_SPATIAL return messages...134
GET_SPATIAL runtime errors...135
HOTKEY_CONFIG...135
HOTKEY_CONFIG parameters...136
HOTKEY_CONFIG runtime errors...137
GET_HOTKEY_CONFIG...137
GET_HOTKEY_CONFIG parameters...137
GET_HOTKEY_CONFIG runtime errors...137
GET_HOTKEY_CONFIG return messages...137
PROFILE_APPLY...138
PROFILE_APPLY parameters...138
PROFILE_APPLY runtime errors...138
PROFILE_APPLY_GET_RESULTS...139
PROFILE_APPLY_GET_RESULTS parameters...139
PROFILE_APPLY_GET_RESULTS runtime errors...139
PROFILE_DELETE...140
PROFILE_DELETE parameters...140
PROFILE_DELETE runtime errors...140
PROFILE_LIST...141
PROFILE_LIST parameters...141
PROFILE_LIST runtime errors...141
PROFILE_DESC_DOWNLOAD...141
PROFILE_DESC_DOWNLOAD parameters...142
PROFILE_DESC_DOWNLOAD runtime errors...142
FIPS_ENABLE...143
FIPS_ENABLE parameters...143
FIPS_ENABLE runtime errors...143
GET_FIPS_STATUS...143
GET_FIPS_STATUS parameters...144
GET_FIPS_STATUS runtime errors...144
GET_FIPS_STATUS return messages...144
GET_ALL_LICENSES...144
GET_ALL_LICENSES parameters...144
GET_ALL_LICENSES runtime errors...144
GET_ALL_LICENSES return messages...144
FACTORY_DEFAULTS...145
FACTORY_DEFAULTS parameters...145
FACTORY_DEFAULTS runtime errors...145
IMPORT_SSH_KEY...145
IMPORT_SSH_KEY parameters...146
IMPORT_SSH_KEY runtime errors...146
DIR_INFO...146
GET_DIR_CONFIG...146
GET_DIR_CONFIG parameters...146
GET_DIR_CONFIG return messages...147
MOD_DIR_CONFIG...148
MOD_DIR_CONFIG parameters...151
MOD_DIR_CONFIG runtime errors...153
MOD_KERBEROS...153
START_DIR_TEST...153
START_DIR_TEST parameters...154
START_DIR_TEST runtime errors...154
ABORT_DIR_TEST...154
ABORT_DIR_TEST runtime errors...154
GET_DIR_TEST_RESULTS...154
GET_DIR_TEST_RESULTS runtime errors...155
RACK_INFO...155
GET_RACK_SETTINGS...155
GET_RACK_SETTINGS parameters...155
GET_RACK_SETTINGS runtime errors...156
GET_RACK_SETTINGS return messages...156
BLADESYSTEM_INFO...156
GET_OA_INFO...156
GET_OA_INFO parameters...157
GET_OA_INFO runtime errors...157
GET_OA_INFO return messages...157
SERVER_INFO...157
GET_TPM_STATUS...158
GET_TPM_STATUS parameters...158
GET_TPM_STATUS runtime errors...158
GET_TPM_STATUS return messages...158
GET_CURRENT_BOOT_MODE...158
GET_CURRENT_BOOT_MODE parameters...158
GET_CURRENT_BOOT_MODE runtime errors...159
GET_CURRENT_BOOT_MODE return messages...159
GET_PENDING_BOOT_MODE...159
GET_PENDING_BOOT_MODE parameters...159
GET_PENDING_BOOT_MODE runtime errors...159
GET_PENDING_BOOT_MODE return messages...159
SET_PENDING_BOOT_MODE...159
SET_PENDING_BOOT_MODE parameters...160
SET_PENDING_BOOT_MODE runtime errors...160
GET_PERSISTENT_BOOT...160
GET_PERSISTENT_BOOT return messages...160
SET_PERSISTENT_BOOT (Legacy)...161
SET_PERSISTENT_BOOT parameters...161
SET_PERSISTENT_BOOT runtime errors...162
SET_PERSISTENT_BOOT (UEFI)...162
SET_PERSISTENT_BOOT parameters...162
SET_PERSISTENT_BOOT runtime errors...163
GET_ONE_TIME_BOOT...163
GET_ONE_TIME_BOOT return messages...163
SET_ONE_TIME_BOOT...164
SET_ONE_TIME_BOOT parameters...164
SET_ONE_TIME_BOOT runtime errors...165
GET_SDCARD_STATUS...165
GET_SDCARD_STATUS return messages...166
GET_SUPPORTED_BOOT_MODE...166
GET_SUPPORTED_BOOT_MODE runtime errors...166
GET_SERVER_NAME...167
GET_SERVER_NAME return message...167
GET_SERVER_NAME runtime errors...167
SERVER_NAME...167
SERVER_NAME parameters...167
SERVER_NAME return message...168
SERVER_NAME runtime errors...168
GET_SERVER_FQDN/GET_SMH_FQDN...168
GET_SERVER_FQDN/GET_SMH_FQDN parameters...168
GET_SERVER_FQDN/GET_SMH_FQDN return messages...168
SERVER_FQDN/SMH_FQDN...168
SERVER_FQDN/SMH_FQDN parameters...169
SERVER_FQDN/SMH_FQDN return messages...169
SERVER_FQDN/SMH_FQDN runtime errors...169
GET_PRODUCT_NAME...169
GET_PRODUCT_NAME runtime errors...169
GET_PRODUCT_NAME return messages...169
GET_EMBEDDED_HEALTH...170
GET_EMBEDDED_HEALTH parameters...170
GET_EMBEDDED_HEALTH return messages...170
GET_POWER_READINGS...171
GET_POWER_READINGS parameters...171
GET_POWER_READINGS return messages...172
GET_PWREG...172
GET_PWREG parameters...172
GET_PWREG return messages...172
GET_PWREG runtime errors...173
SET_PWREG...173
SET_PWREG parameters...173
SET_PWREG runtime errors...174
GET_POWER_CAP...174
GET_POWER_CAP parameters...174
GET_POWER_CAP return messages...174
SET_POWER_CAP...174
SET_POWER_CAP parameters...175
SET_POWER_CAP runtime errors...175
SET_CRITICAL_TEMP_REMAIN_OFF...175
SET_CRITICAL_TEMP_REMAIN_OFF parameters...175
SET_CRITICAL_TEMP_REMAIN_OFF runtime errors...175
GET_CRITICAL_TEMP_REMAIN_OFF...175
GET_CRITICAL_TEMP_REMAIN_OFF return messages...176
GET_HOST_POWER_SAVER_STATUS...176
GET_HOST_POWER_SAVER_STATUS parameters...176
GET_HOST_POWER_SAVER_STATUS runtime errors...176
GET_HOST_POWER_SAVER_STATUS return messages...176
SET_HOST_POWER_SAVER...176
SET_HOST_POWER_SAVER parameters...177
SET_HOST_POWER_SAVER runtime errors...177
GET_HOST_POWER_STATUS...177
GET_HOST_POWER_STATUS parameters...177
GET_HOST_POWER_STATUS runtime errors...178
GET_HOST_POWER_STATUS Return Messages...178
SET_HOST_POWER...178
SET_HOST_POWER Runtime Errors...178
GET_HOST_PWR_MICRO_VER...178
GET_HOST_PWR_MICRO_VER parameters...179
GET_HOST_PWR_MICRO_VER runtime errors...179
GET_HOST_PWR_MICRO_VER return messages...179
RESET_SERVER...179
RESET_SERVER error messages...180
RESET_SERVER parameters...180
PRESS_PWR_BTN...180
PRESS_PWR_BTN parameters...180
PRESS_PWR_BTN runtime errors...180
HOLD_PWR_BTN...180
HOLD_PWR_BTN parameters...181
HOLD_PWR_BTN runtime errors...181
COLD_BOOT_SERVER...181
COLD_BOOT_SERVER parameters...181
COLD_BOOT_SERVER runtime errors...181
WARM_BOOT_SERVER...181
WARM_BOOT_SERVER parameters...182
WARM_BOOT_SERVER runtime errors...182
SERVER_AUTO_PWR...182
SERVER_AUTO_PWR parameters...182
SERVER_AUTO_PWR runtime errors...183
GET_SERVER_AUTO_PWR...183
GET_SERVER_AUTO_PWR parameters...183
GET_SERVER_AUTO_PWR return message...183
GET_UID_STATUS...183 GET_UID_STATUS parameters...184 GET_UID_STATUS response...184 UID_CONTROL...184 UID_CONTROL parameters...184 UID_CONTROL errors...184 SET_PERS_MOUSE_KEYBOARD_ENABLED...184 SET_PERS_MOUSE_KEYBOARD_ENABLED parameters...185
SET_PERS_MOUSE_KEYBOARD_ENABLED runtime errors...185
GET_PERS_MOUSE_KEYBOARD_ENABLED...185
GET_PERS_MOUSE_KEYBOARD_ENABLED parameters...185
GET_PERS_MOUSE_KEYBOARD_ENABLED return messages...185
GET_SERVER_POWER_ON_TIME...185
GET_SERVER_POWER_ON_TIME parameters...186
GET_SERVER_POWER_ON_TIME return message...186
CLEAR_SERVER_POWER_ON_TIME...186
CLEAR_SERVER_POWER_ON_TIME parameters...186
CLEAR_SERVER_POWER_ON_TIME return message...186
SSO_INFO...186
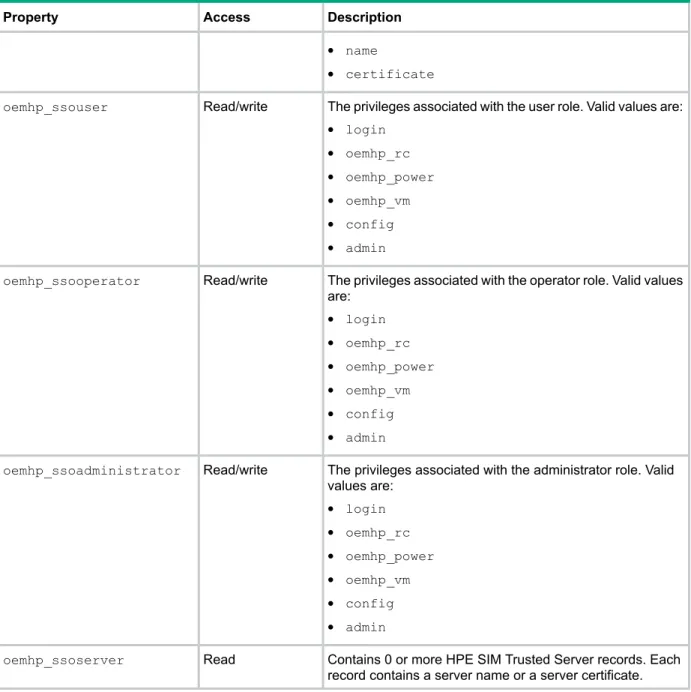
GET_SSO_SETTINGS...187
GET_SSO_SETTINGS parameters...187
GET_SSO_SETTINGS return messages...187
MOD_SSO_SETTINGS...188
MOD_SSO_SETTINGS parameters...188
MOD_SSO_SETTINGS runtime errors...189
SSO_SERVER...189
SSO_SERVER parameters...190
SSO_SERVER runtime errors...191
DELETE_SERVER parameters...191
DELETE_SERVER runtime errors...191
HARD_DRIVE_ZONE...191
ZONE_FACTORY_DEFAULTS...192
ZONE_FACTORY_DEFAULTS parameters...192
ZONE_FACTORY_DEFAULTS runtime errors...193
READ_BACKPLANE_INFO...193
READ_BACKPLANE_INFO parameters...193
READ_BACKPLANE_INFO runtime errors...193
READ_BACKPLANE_INFO return messages...193
READ_ZONE_TABLE...194
READ_ZONE_TABLE parameters...194
READ_ZONE_TABLE runtime errors...194
READ_ZONE_TABLE return messages...194
WRITE_ZONE_TABLE...195
WRITE_ZONE_TABLE parameters...196
WRITE_ZONE_TABLE runtime errors...197
9 Secure Shell...198
SSH overview...198
Supported SSH features...198
Using Secure Shell...198
SSH key authorization...199
Tool definition files...199
Mxagentconfig utility...200
Importing SSH keys from PuTTY...200
Importing SSH keys generated using ssh-keygen...202
10 PERL scripting...203
Using PERL with the XML scripting interface...203
XML enhancements...203
Opening an SSL connection...203
Sending the XML header and script body...204
11 iLO 4 ports...206
Enabling the Shared Network Port feature through XML scripting...206
Re-enabling the dedicated NIC management port...206
12 Support and other resources...208
Accessing Hewlett Packard Enterprise Support...208
Accessing updates...208
Security bulletin and alert policy for non-Hewlett Packard Enterprise owned software components...209
Registering for software technical support and update service...209
How to use your software technical support and update service...209
Websites...209
Customer self repair...210
Remote support...210
Documentation feedback...210
A Sample script and command reference...211
B Sample return for GET_EMBEDDED_HEALTH...216
C Examples for remapping drive bays in Apollo 2000 systems...228
Example 1...228
Read backplane information...228
Build a script...229
Example 2...231
Build the script...232
Verify the zone table...233
Error messages...235
Frequently asked questions...237
Glossary...239
1 Introduction
Scripting and command line guide overview
HPE iLO 4 provides multiple ways to configure, update, and operate HPE ProLiant servers remotely. The HPE iLO User Guide describes each feature and explains how to use these features with the browser-based interface and RBSU. For more information, see the iLO User Guide on the Hewlett Packard Enterprise website athttp://www.hpe.com/info/ilo/docs.
The HPE iLO Scripting and Command Line Guide describes the syntax and tools available to use iLO 4 through a command line or scripted interface.
Sample XML scripts downloaded from the Hewlett Packard Enterprise website contain commands for all iLO firmware. Unless otherwise specified, the examples in this guide are for iLO 4 firmware version 2.20 and later. Before using the sample scripts, review the firmware support information in each script to tailor the script for the intended firmware and version. Download the sample scripts from the Hewlett Packard Enterprise website athttp://www.hpe.com/info/ilo. ClickiLO Sample Scripts for WindowsorLights-Out XML scripting sample for Linuxon theResources tab, underSupport.
Throughout this manual, iLO 4 is referred to as iLO.
In addition to the GUI, the iLO firmware provides multiple ways to configure and control iLO and the server using scripts and command line instructions.
The scripting tools provide a method to configure multiple iLO systems, to incorporate a standard configuration into the deployment process, and to control servers and subsystems. Using the scripting tools enables you to:
• Change the Administrator password on all your iLO systems
• Configure LDAP directory service settings
• Control the server power state
• Attach a virtual media CD/DVD to the host server
• Update the iLO firmware
• Retrieve power consumption data
• Issue various configuration and control commands
The command line tools provide quick and easy methods to send commands to the iLO firmware and host servers.
Scripting and command line utilities
This section describes the following scripting and command line tools:
• HPQLOCFG.EXE
• LOCFG.PL
• HPONCFG.EXE
• SMASH CLP
• IPMI
Table 1 HPE iLO 4 2.40 scripting and command line utilities required versions Version notes for iLO 4 2.40
Version Utility
HPE Lights-Out Configuration Utility. This replaced the CPQLOCFG utility. 1.5.0 HPQLOCFG 4.80 HP Light-Out XML Scripting Sample 4.7.0.0 HPONCFG for Windows
4.6.0.0 HPONCFG for Linux
This utility is available in the HP Lights-Out XML Scripting Sample.
4.80 LOCFG.PL
Upgrade HPLOMIG before installing this version iLO 4. 4.80
HPLOMIG
NOTE: Upgrades are required only for the utilities you use. Continuing to use utilities without upgrading will cause the following message to appear:
Scripting utility should be updated to the latest version.
HPQLOCFG Utility
The Lights-Out Configuration Utility (HPQLOCFG.EXE) utility replaces the previously used CPQLOCFG.EXE utility. HPQLOCFG is a Windows command line utility that sends XML configuration and control scripts over the network to iLO. Run this utility manually from a Windows command prompt, or create a batch file to run the same script to many iLO devices.
The tool accepts properly formatted XML scripts containing commands and values; see the XML scripts in the iLO Sample Scripts for Windows or the HP Lights-Out XML Scripting Sample for Linux for examples of proper formatting. All available commands are detailed later in this guide. HPQLOCFG also integrates with HPE SIM for easy launching of the same script on multiple devices.
LOCFG.PL Script
The LOCFG.PL scripting utility is a PERL script that provides similar functionality as the
HPQLOCFG utility. Run this tool on any client that has a compatible PERL environment (including OpenSSL) installed. This tool uses the same XML scripts as HPQLOCFG input files.
HPONCFG Utility
Use the HPONCFG.EXE utility to send XML configuration and control scripts (the same scripts as HPQLOCFG) from the server host operating system to iLO. HPONCFG has both Windows and Linux versions. One common usage is to run an HPONCFG script to configure iLO to a standard configuration at the end of your server deployment process. HPONCFG integrates with HPE RDP and also runs at the end of an unattended OS installation.
When you run HPONCFG from the host operating system, you must be logged in to the host server using an Administrator or root level user account. An iLO user ID and password is not required.
Windows server operating systems also have the HPONCFG_GUI.EXE utility. This utility provides the same basic configuration capabilities as the iLO F8 ROM-RBSU during the server boot-up process.
SMASH CLP
SMASH CLP is the DMTF suite of specifications that deliver industry-standard protocols and profiles to unify the management of the data center. The SMASH CLP specification enables simple and intuitive management of heterogeneous servers in a data center.
SMASH CLP provides a standardized set of commands for configuration and control of
management processors (called Management Access Points) and host systems. On iLO, access SMASH CLP through the SSH port.
IPMI
The IPMI specification is a standard that defines a set of common interfaces to a computer system. System administrators can use IPMI to monitor system health and manage the system. IPMI 2.0 defines a mandatory system interface, and an optional LAN interface. The iLO processor supports both interfaces.
The IPMI specification defines a standardized interface for platform management. The IPMI specification defines the following types of platform management:
• Monitors the status of system information, such as fans, temperatures, and power supplies
• Recovery capabilities, such as system resets and power on/off operations
• Logging capabilities for abnormal events, such as over-temperature readings or fan failures
• Inventory capabilities, such as identifying failed hardware components
IPMI commands are sent to iLO using a third-party or open source utility, such as IPMITOOL, IPMIUTIL, OpenIPMI or FreeIPMI.
You must be familiar with IPMI specifications when issuing raw commands. For additional information, see the IPMI specification on the Intel website athttp://www.intel.com/design/ servers/ipmi/tools.htm.
New in this version
This guide reflects changes in the iLO 4 firmware. This guide covers iLO 4 firmware version 2.40 and later.
The following updates or additions were made:
• Added three new commands:
START_DIR_TEST
◦
◦
ABORT_DIR_TESTS◦
GET_DIR_TEST_RESULTS• Updated the sample return for GET_NETWORK_SETTINGS and the command MOD_NETWORK_SETTINGS to include these new parameters:
◦
ILO_NIC_AUTO_SNP_SCAN◦
ILO_NIC_AUTO_DELAY◦
ILO_NIC_FAIL_OVER◦
ILO_NIC_FAIL_OVER_DELAY• Added a note toUPDATE_FIRMWAREandUPDATE_LANG_PACKthat directs users to wait at least 60 seconds before trying to use the command again if an attempt failed.
• Added information to theGET_ENCRYPT_SETTINGScommand to explain the operations performed by the command before it displays information.
• Modified the explanation for two parameters of the MOD_ENCRYPT_SETTINGS command:
ESKM_PRIMARY_SERVER_ADDRESSandESKM_PRIMARY_SERVER_PORT. Leaving the entries blank will remove a previously configured address or port.
• Added a note to theSET_HOST_POWER_SAVER parametersto warn users to reboot if changing the setting to 1.
• Updated the sample return message forGET_TPM_STATUSto be more accurate.
• Fixed syntax errors in theXML script modification sampleincluded the “XML enhancements” section ofUsing PERL with the XML scripting interface.
• Fixed errors in theGET_FEDERATION_MULTICAST return messagessample.
• Updated thesample for GET_EMBEDDED_HEALTHbecause the HP_SMART_MEMORY value and type are now both in the same statement.
HPE Insight Control server deployment
HPE Insight Control server deployment integrates with iLO to enable the management of remote servers and to monitor the performance of remote console operations, regardless of the state of the operating system or hardware.
The deployment server provides the capability to use the power management features of iLO to power on, power off, or cycle power on the target server. Each time a server connects to the deployment server, the deployment server polls the target server to verify the presence of a LOM management device. If installed, the server gathers information, including the DNS name, IP address, and user login name. Security is maintained by requiring the user to enter the correct password for that user name.
For more information about the Insight Control server deployment, see the documentation that ships on the HPE Insight software DVD, or the Hewlett Packard Enterprise website athttp:// www.hpe.com/info/insightcontrol.
2 HPQLOCFG usage
The HPQLOCFG.EXE utility is a Windows-based utility that connects to iLO using a secure connection over the network. RIBCL scripts are passed to iLO over the secure connection to HPQLOCFG. This utility requires a valid user ID and password with the appropriate privileges. Launch the HPQLOCFG utility from SIM for Group Administration, or launch it independently from a command prompt for batch processing.
Download this utility from the Hewlett Packard Enterprise website at:http://www.hpe.com/ support/ilo4.
Version 1.0 or later of HPQLOCFG is required to support all features of iLO 4 v2.20.
SIM discovers iLO devices as management processors. HPQLOCFG sends a RIBCL file to a group of iLO devices to manage the user accounts for those iLO devices. The iLO devices then perform the action designated by the RIBCL file and send a response to the log file.
Use HPQLOCFG to execute RIBCL scripts on iLO. HPQLOCFG must reside on the same server as SIM. HPQLOCFG generates two types of error messages; runtime errors, and syntax errors.
• Runtime errors occur when an invalid action is requested. Runtime errors are logged to the following directory:
C:\Program Files\HP\Systems Insight Manager\
• Syntax errors occur when an invalid XML tag is encountered. When a syntax error occurs, HPQLOCFG stops running and logs the error in the runtime script and output log file. Syntax errors use the following format:
Syntax error: expected X but found Y. For example:
Syntax error: expected USER_LOGIN=userlogin but found USER_NAME=username
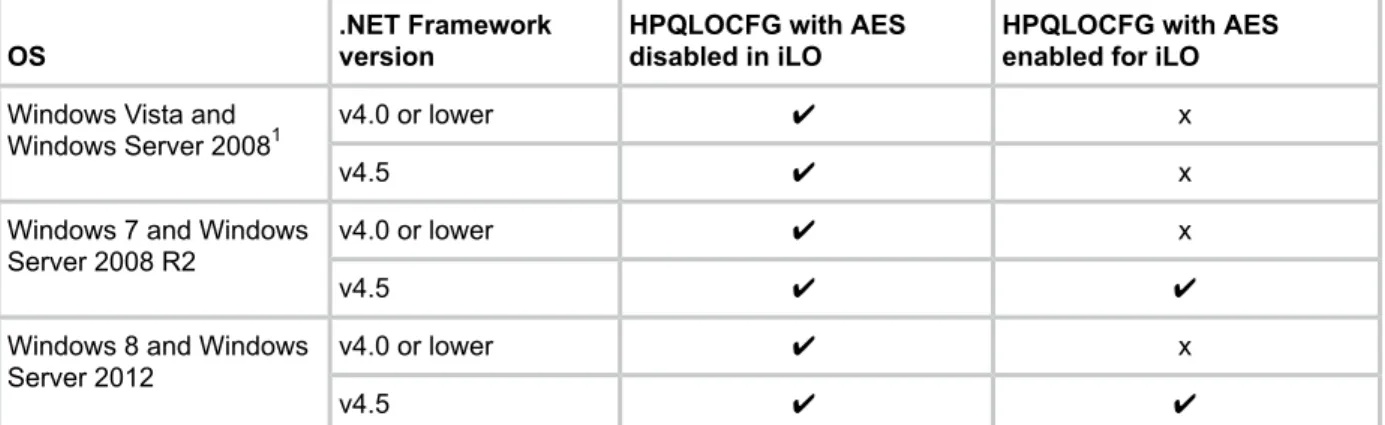
If Enhanced Security Mode is enabled in iLO (for example, FIPS or AES), you must upgrade your installation of Microsoft .NET Framework to v4.5. Additionally, verify that the OS supports enhanced security protocols like TLS v1.1 and TLS v1.2.
Table 2 Usage requirements
HPQLOCFG with AES enabled for iLO HPQLOCFG with AES
disabled in iLO .NET Framework version OS x ✔ v4.0 or lower Windows Vista and
Windows Server 20081 x ✔ v4.5 x ✔ v4.0 or lower Windows 7 and Windows
Server 2008 R2 ✔ ✔ v4.5 x ✔ v4.0 or lower Windows 8 and Windows
Server 2012
✔ ✔
v4.5
1
On certain operating systems, such as Windows Server 2008 and Windows Vista, even with .NET Framework v4.5 installed, TLS v1.1 and TLS v1.2 are not supported by the OS itself.
Configuring for unauthenticated XML queries
If configured to do so, the iLO device returns identifying information in response to an
unauthenticated XML query. By default, the iLO device is configured to return this information. To disable this feature, set theCIM_SECURITY_MASKin theMOD_SNMP_IM_SETTINGS
You can also disable the unauthenticated XML query information through the iLO web interface: 1. Go toAdministration→Management.
TheManagementpage appears.
2. Under theInsight Management Integrationheading, click the menu for theLevel of Data Returnedoption.
There are two options in the menu:
• 1) Enabled (iLO+Server Association Data)
• 2) Disabled (No Response to Request)
3. Select 2) Disabled (No Response to Request) to disable unauthenticated XML query return information
NOTE: You must have unauthenticated XML query enabled if you are performing device discoveries with SIM.
To obtain unauthenticated identifying information, enter the following command to the iLO web server port:
https://<iloaddress>/xmldata?item=all
Alternatively, you can select option1) Enabled (iLO+Server Association Data)from iLO. A typical response is:
<RIMP> <HSI> <SBSN>ABC12345678</SBSN> <SPN>ProLiant BL460c Gen8</SPN> <UUID>BL4608CN71320ZNN</UUID> <SP>0</SP> <cUUID>36344C42-4E43-3830-3731-33305A4E4E32</cUUID> <VIRTUAL> <STATE>Inactive</STATE> <VID> <BSN/> <cUUID/> </VID> </VIRTUAL> <PRODUCTID>BL4608-101</PRODUCTID> <NICS> <NIC> <PORT>1</PORT> <MACADDR>00:17:a4:77:08:02</MACADDR> </NIC> <NIC> <PORT>2</PORT> <MACADDR>00:17:a4:77:08:04</MACADDR> </NIC> <NIC> <PORT>3</PORT> <MACADDR>00:17:a4:77:08:00</MACADDR> </NIC> <NIC> <PORT>4</PORT> <MACADDR>9c:8e:99:13:20:cd</MACADDR> </NIC> <NIC> <PORT>5</PORT> <MACADDR>9c:8e:99:13:20:ca</MACADDR> </NIC> <NIC> <PORT>6</PORT>
<MACADDR>9c:8e:99:13:20:ce</MACADDR> </NIC> <NIC> <PORT>7</PORT> <MACADDR>9c:8e:99:13:20:cb</MACADDR> </NIC> <NIC> <PORT>8</PORT> <MACADDR>9c:8e:99:13:20:cf</MACADDR> </NIC> </NICS> </HSI> <MP> <ST>1</ST>
<PN>Integrated Lights-Out 4 (iLO 4)</PN> <FWRI>1.01</FWRI> <BBLK>08/30/2011</BBLK> <HWRI>ASIC: 16</HWRI> <SN>ILOABC12345678</SN> <UUID>ILOBL4608ABC12345678</UUID> <IPM>1</IPM> <SSO>0</SSO> <PWRM>3.0</PWRM> <ERS>0</ERS> <EALERT>1</EALERT> </MP> <BLADESYSTEM> <BAY>1</BAY> <MANAGER> <TYPE>Onboard Administrator</TYPE> <MGMTIPADDR>123.456.78.90</MGMTIPADDR> <RACK>TestRACK</RACK> <ENCL>TestRACKEnc-C</ENCL> <ST>2</ST> </MANAGER> </BLADESYSTEM> </RIMP>
Creating a system collection in HPE SIM
To quickly see all system management processors, login to SIM and in theSystem and Event Collectionspanel, scroll down to and selectAll Management Processors. TheAll Management Processorspage appears.
To create a custom group of all iLO devices (or by iLO version), create a system collection. 1. In theSystem and Event Collectionspanel, clickCustomize. TheCustomize Collections
page appears.
2. In theShow collections ofdropdown list, selectSystems. All available system or cluster collections appear.
3. ClickNew. The New Collection section appears. 4. SelectChoose members by attributes.
5. In theSearch fordropdown list, selectsystems.
6. In thewheredropdown, selectsystem sub type, and selectisfrom the inclusion/exclusion dropdown.
8. Click one of the following:
• View— to run the search and display results immediately.
• Save as Collection— to save the collection.
• Cancel— to close the New Collection section without saving any changes.
Launch applications with HPE SIM custom tools
Use custom tools in SIM to combine RIBCL, HPQLOCFG, and system collection to manage Group Administration of iLO devices. Custom tools are executed on the CMS and on target systems. You can create a remote tool that runs on selected target systems, and even schedule its execution.
For more information about custom tools, see the SIM help.
Batch processing using HPQLOCFG
Group Administration is also delivered to iLO through batch processing. The components needed for batch processing are HPQLOCFG, a RIBCL file, and a batch file.
The following example shows a sample batch file used to perform the Group Administration for iLO:
REM Updating the HP Integrated Lights-Out 3 board REM Repeat line for each board to be updated REM
HPQLOCFG -S RIB1 -F C:\...SCRIPT.XML -L RIB1LOG.TXT -V HPQLOCFG -S RIB2 -F C:\...SCRIPT.XML -L RIB2LOG.TXT -V HPQLOCFG -S RIB3 -F C:\...SCRIPT.XML -L RIB3LOG.TXT -V .
. .
RIBNLOG -S RIBN -F C:\...SCRIPT.XML -L LOGFILE.TXT -V
HPQLOCFG overwrites any existing log files.
HPQLOCFG command line parameters
For information on the syntax of the XML data files, see“RIBCL XML Scripting Language” (page 68).
Download sample XML scripts from the Hewlett Packard Enterprise website athttp:// www.hpe.com/info/ilo.
. ClickiLO Sample Scripts for WindowsorLights-Out XML scripting sample for Linuxon theResourcestab, underSupport.
Using quote characters
The restrictions for using single and double-quote characters are based on whether they are passed to HPQLOCFG inside an XML script or on the command line.
Quotes inside XML scripts
When using an XML script to enter the user name and password use the double-quote (") as delimiters. However, if you must use " inside the user name or password in the XML file (if the user name or password has double quotes in it), change the outside double-quote delimeters to single quotes (').
For example, consider a username with quotes in it:
Sample"simple"name
'Sample"simple"name'
NOTE: Support for Windows-specific smart-quotes (“ ” and ‘ ’) as content delimiters in XML is being phased out. Be sure to replace any smart-quote characters in your script with normal double or single quotes ("and').
Quotes on the command line
When using HPQLOCFG or LOCFG and entering the password or command on the command line with the-poption, you cannot normally use the double-quote special character ("), except when using an ampersand (&) or less-than (<) symbol. To enter a password or command that uses either of these special characters, use double-quotes.
For example:
• "admin&admin" • "admin<admin"
When using LOCFG and entering the password or command on the command line with the-i
option, do not include double-quotes around the password. For example:
admin&admin admin<admin
Passwords or commands delimited with double-quotes do not work on the LOCFG command line with the-ioption.
When using LOCFG, to enter a username or password containing the exclamation symbol (!) on the command line, use single quotes.
For example:
‘admin!admin’
Command line switches
The following command line switches are available to be used with HPQLOCFG.EXE: Table 3 HPQLOCFG command line switches
Effect Switch
Determines the iLO that is to be updated. This switch is followed by either the DNS name or IP address of the target server. When using IPv6 addresses, you can optionally add the port number preceded by a colon (<IPv6_address:port>).
NOTE: Do not use this switch if you are launching from SIM. SIM automatically provides the address of the iLO when you launch HPQLOCFG.
-S
Full path location and name of the RIBCL file that contains the actions to be performed. -F
User login name. Entering this at the command line overrides the user login name from the script.
-U
Password. Entering this at the command line overrides the password from the script. -P
Defines the log file name and file location. If this switch is omitted, a default log file with the DNS name or the IP address is created in the same directory used to launch -L1
HPQLOCFG. Ensure that HPQLOCFG is in a directory referenced by the PATH environment variable. Any log files generated are placed in the same directory as the HPQLOCFG executable.
This switch cannot designate an output log filename. The default filename is based on the DNS name or the IP address.
Table 3 HPQLOCFG command line switches (continued) Effect
Switch
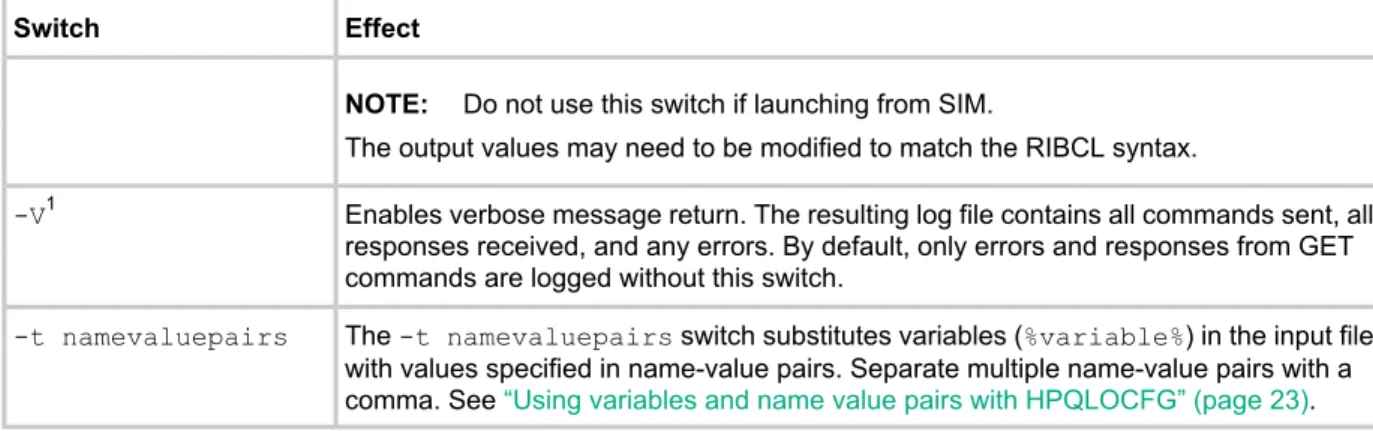
NOTE: Do not use this switch if launching from SIM.
The output values may need to be modified to match the RIBCL syntax.
Enables verbose message return. The resulting log file contains all commands sent, all responses received, and any errors. By default, only errors and responses from GET commands are logged without this switch.
-V1
The-t namevaluepairsswitch substitutes variables (%variable%) in the input file with values specified in name-value pairs. Separate multiple name-value pairs with a comma. See“Using variables and name value pairs with HPQLOCFG” (page 23). -t namevaluepairs
1
The-Land-Vswitches might or might not be set depending on the IT administrator preferences.
Using variables and name value pairs with HPQLOCFG
InExample 1 “Script prepared for variables (Get_Asset_Tag.xml)”you can see a sample script prepared for use with the-t namevaluepairsswitch.
Example 1 Script prepared for variables (Get_Asset_Tag.xml) <RIBCL VERSION="2.0">
<LOGIN USER_LOGIN="%user%" PASSWORD="%password%"> <SERVER_INFO MODE="read">
<GET_ASSET_TAG/> </SERVER_INFO> </LOGIN>
</RIBCL>
To execute this script correctly, use the-t namevaluepairsswitch on the command line:
hpqlocfg -f get_asset_tag.xml -s <serverip> -t user=Admin,password=pass
If the parameter contains multiple words, you must enclose the phrase within double quotes (" "). Up to 25 variables are supported in an XML file. The maximum length of a variable name is 48 characters.
Example 2 Web agent example (Mod_SNMP_IM_Settings.xml): <RIBCL VERSION="2.0">
<LOGIN USER_LOGIN="adminname" PASSWORD="password"> <RIB_INFO MODE="write"> <MOD_SNMP_IM_SETTINGS> <WEB_AGENT_IP_ADDRESS value=%WebAgent%/> </MOD_SNMP_IM_SETTINGS> </RIB_INFO> </LOGIN> </RIBCL>
To execute this script correctly, use the-t namevaluepairsswitch on the command line:
hpqlocfg –s <ipV4 addr> –f <filename> –u <username> –p <password> –t
<web_agent_IP_address>
• For IPv6, without specifying the port number, invoke the script using:
hpqlocfg –s [<ipV6 addr>] –f <filename> –u <username> –p <password>
–t <web_agent_IP_address> or
hpqlocfg –s <ipV6 addr> –f <filename> –u <username> –p <password>
–t <web_agent_IP_address>
• For IPv6, when specifying the port number, invoke the script using the following:
hpqlocfg –s [<ipV6 addr>]:<portnumber> –f <filename> –u <username>
–p <password> –t <web_agent_IP_address>
3 LOCFG.PL usage
LOCFG.PL Utility
To use the LOCFG.PL utility, you must have the following PERL modules:
• Net::SSLeay • IO::Socket::SSL
You must also have a valid iLO user account and password for each XML script to use LOCFG.PL. To process the request, your account must have the appropriate iLO privileges.
TheLOCFG.PLscript connects to iLO using an SSL connection. For example:
perl locfg.pl -s {servername|ipaddress}[:port] [-l logfilename]-f
input_filename [-u username -p password] [iLO 4]
LOCFG.PL command line switches
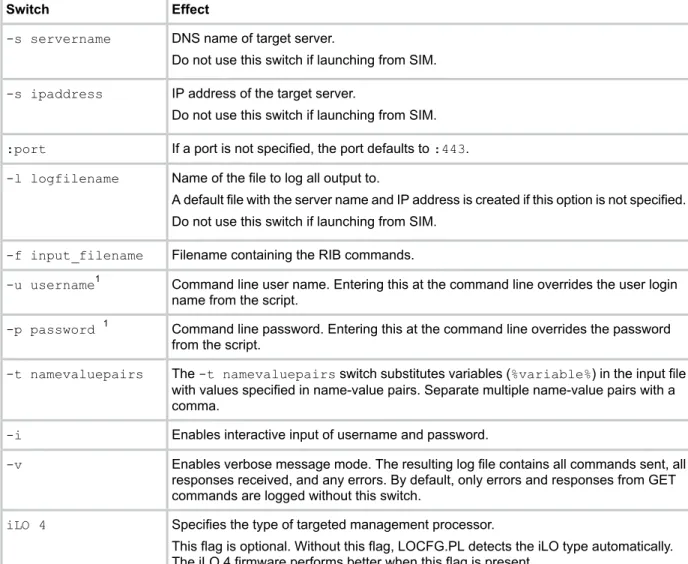
The following command line switches are available to be used with LOCFG.PL: Table 4 LOCFG.PL command line switches
Effect Switch
DNS name of target server. -s servername
Do not use this switch if launching from SIM.
IP address of the target server. -s ipaddress
Do not use this switch if launching from SIM.
If a port is not specified, the port defaults to:443. :port
Name of the file to log all output to. -l logfilename
A default file with the server name and IP address is created if this option is not specified. Do not use this switch if launching from SIM.
Filename containing the RIB commands. -f input_filename
Command line user name. Entering this at the command line overrides the user login name from the script.
-u username1
Command line password. Entering this at the command line overrides the password from the script.
-p password 1
The-t namevaluepairsswitch substitutes variables (%variable%) in the input file with values specified in name-value pairs. Separate multiple name-value pairs with a comma.
-t namevaluepairs
Enables interactive input of username and password. -i
Enables verbose message mode. The resulting log file contains all commands sent, all responses received, and any errors. By default, only errors and responses from GET commands are logged without this switch.
-v
Specifies the type of targeted management processor. iLO 4
This flag is optional. Without this flag, LOCFG.PL detects the iLO type automatically. The iLO 4 firmware performs better when this flag is present.
1
Use-uand-pwith caution, because command line options are visible on Linux systems.
4 HPONCFG online configuration utility
HPONCFG
The HPONCFG utility is an online configuration tool used to set up and configure iLO from within Windows and Linux operating systems without requiring a reboot of the server operating system. HPONCFG runs in a command line mode and must be executed from an operating system command line using an account with administrator or root access. HPONCFG provides a limited graphical interface for servers that use Windows operating systems.
HPONCFG supported operating systems
• HPONCFG Windows (32 and 64 bit)Windows Server 2008
◦
◦
Windows Server 2008 R2◦
Windows Server 2012◦
Windows Server 2012 Essentials• HPONCFG Linux 32 bit
Red Hat Enterprise Linux 6 Server (x86)
◦
◦
Red Hat Enterprise Linux 5 Server (x86)◦
SUSE LINUX Enterprise Server 11 (x86)◦
SUSE LINUX Enterprise Server 10 (x86)• HPONCFG Linux 64 bit
Red Hat Enterprise Linux 7 Server
◦
◦
Red Hat Enterprise Linux 6 Server (x86-64)◦
Red Hat Enterprise Linux 5 Server (x86-64)◦
SUSE Linux Enterprise Server 12◦
SUSE LINUX Enterprise Server 11 (AMD64/EM64T)◦
SUSE LINUX Enterprise Server 10 (AMD64/EM64T)• VMware
◦
VMware 5HPONCFG requirements
• Windows-based servers—The following channel interface and core driver installations must be loaded on the server:
◦
HP ProLiant iLO 3/4 Management Controller Driver Package for Windows◦
HP ProLiant iLO 3/4 Channel Interface Driver for WindowsThe management controller driver package provides server monitoring components and event logging. During execution, HPONCFG issues a warning if it cannot locate the channel
interface driver. Each Service Pack for ProLiant (SPP) includes the channel interface driver. The downloads are available from the Hewlett Packard Enterprise website at:http:// www.hpe.com/support/ilo4.
• Linux-based servers—TheHP ProLiant iLO Channel Interface(KMOD/KMP) must be loaded on the server, which includes a health driver package. Each SPP includes the necessary interface and health drivers, and the package is also available from the Hewlett Packard Enterprise website at:http://www.hpe.com/support/ilo4.
Installing HPONCFG
The HPONCFG utility is delivered in separate packages for Windows and Linux operating systems. For Windows operating systems, it is included as a smart component. For Linux operating systems, it is included as an RPM package file. HPONCFG packages are included in the Service Pack for ProLiant (SPP).
Download SPP athttp://www.hpe.com/servers/spp/download.
Windows server installation
HPONCFG installs automatically when the Service Pack for ProLiant is installed. To install HPONCFG manually, run the self-extracting executable.
HPONCFG creates a directory at:
%Program files%\HP\hponcfg.
Linux server installation
HPONCFG is installed automatically when Service Pack for ProLiant is installed. Download the HPONCFG RPM package for Linux distributions from the Hewlett Packard Enterprise website. Install the appropriate package using the RPM installation utility.
For example, for a package installation, install the HPONCFG RPM package on Red Hat Enterprise Linux 6 by entering the following command:
rpm -ivh hponcfg-4.x.x-x.linux.rpm
If you have an older version of the HPONCFG RPM package installed on the system, run the following command to remove the older version before installing the new version of HPONCFG:
rpm –e hponcfg
Thehp-ilorpm package and thehp-healthrpm package must be installed on the system before installing thehponcfg rpmpackage.
NOTE: Thehp-ilorpm package and thehp-healthrpm packages are included in the release of SLES 10 and RHEL 5.4 and above. For earlier OS versions, you must download and install these packages to run HPONCFG, or install the packages as part of an SPP.
After installation, the HPONCFG executable is located in the/sbindirectory. Be sure that the appropriate Management Interface Driver is loaded. For details about where to obtain this driver and file, see“HPONCFG requirements” (page 26).
VMware installation
HPONCFG is available for VMware (ESXi 5 only). HPONCFG is included with the Hewlett Packard Enterprise custom VMware ESXi 5 image. If you have the standard VMware ESXi image, HPONCFG can be downloaded fromhttp://www.hpe.comand installed as a VIB with the following command:
esxcli software vib install -v <path><filename.vib>
For VMware, thehpilodriver is already included in the image (either Hewlett Packard Enterprise custom or standard VMware).
HPONCFG utility
The HPONCFG configuration utility reads an XML input file, formatted according to the rules of the RIBCL language, and produces a log file containing the requested output. A few sample scripts are included in the HPONCFG delivery package.
A package containing various and comprehensive sample scripts is available for download on the Hewlett Packard Enterprise website at:http://www.hpe.com/info/ilo.
ClickiLO Sample Scripts for WindowsorLights-Out XML scripting sample for Linuxon the Resourcestab, underSupport.
Typical usage is to select a script that is similar to the desired functionality and modify it for your exact requirements. Although no authentication to iLO is required, the XML syntax requires that the USER_LOGIN and PASSWORD tags are present in the LOGIN tag, and that these fields contain data. To successfully execute HPONCFG, the utility must be invoked as Administrator on Windows servers and as root on Linux servers. HPONCFG returns an error message if you do not possess sufficient privileges.
HPONCFG command line parameters
HPONCFG accepts the following command line parameters: Table 5 HPONCFG command line parameters
Effect Parameter
Displays the help page /helpor?
Resets the iLO to factory default values /reset
Reboots the iLO without changing any settings. /iLO_reboot
Sets and receives the iLO configuration from the information given in the XML input file that has namefilename
/f filename
Sets and receives iLO configuration from XML input received through the standard input stream
/i filename
Writes the iLO configuration obtained from the device to the XML output file named filename
/w filename
Capture the complete configuration of iLO to a file. Must be used with /w command line parameter.
/a or /all
Logs replies to the text log file that has namefilename /l filename
Display all the responses from iLO. /v or /xmlverbose
Substitutes variables present in the input config file with values specified innamevaluepair /s namevaluepairor
/substitute namevaluepair
Receives the host information. Returns the server name and server serial number /get_hostinfo
Indicates the minimum firmware level that should be present in the management device to execute the RIBCL script. If at least this level of firmware is not present, HPONCFG returns an error without performing any additional action
/m
Configures the server for optimized mouse handling to improve graphical remote console performance. By default, it optimizes for remote console single cursor mode for the current /mouse
user. Thedualcursorcommand line option, along with the mouse option, optimizes mouse handling as suited for remote console dual-cursor mode. Thealluserscommand line option optimizes mouse handling for all users on the system. This option is available only for Windows
Configures Windows display parameters to optimize graphical remote console display performance
These parameters must be preceded by a slash (/) in Windows or a hyphen (-) in Linux as specified in the usage string.
For example, in Windows:
hponcfg /f add_user.xml /l log.txt > output.txt
Using HPONCFG on Windows servers
Start the HPONCFG configuration utility from the command line. When using Windows,cmd.exe
is available by selectingStart→Runand enteringcmd. HPONCFG displays a usage page if HPONCFG is entered with no parameters. HPONCFG accepts a correctly formatted XML script. HPONCFG sample scripts are included in the HPONCFG package.
For more information about formatting XML scripts, see“RIBCL XML Scripting Language” (page 68).
The command line format is:
hponcfg [ /help | /? | /m firmwarelevel | /reset [/m firmwarelevel] | /f filename [/l filename][/s namevaluepair]
[/xmlverbose or /v][/m firmwarelevel] | /i [/l filename][/s namevaluepair]
[/xmlverbose or /v][/m firmwarelevel] | [/a] /w filename [/m firmwarelevel]
| /get_hostinfo [/m firmwarelevel] | /mouse [/dualcursor][/allusers] | /display [/allusers]
For more information on using these parameters, see“HPONCFG command line parameters” (page 28).
Using HPONCFG on Linux servers
Invoke the HPONCFG configuration utility from the command line. HPONCFG displays a usage page if it is entered with no command line parameters.
The command line format is:
hponcfg -? hponcfg -h
hponcfg -m minFw
hponcfg -r [-m minFw ]
hponcfg [—a] w filename [-m minFw] hponcfg -g [-m minFw]
hponcfg -f filename [-l filename] [-s namevaluepair] [-v] [-m minFw] hponcfg -i [-l filename] [-s namevaluepair] [-v] [-m minFw]
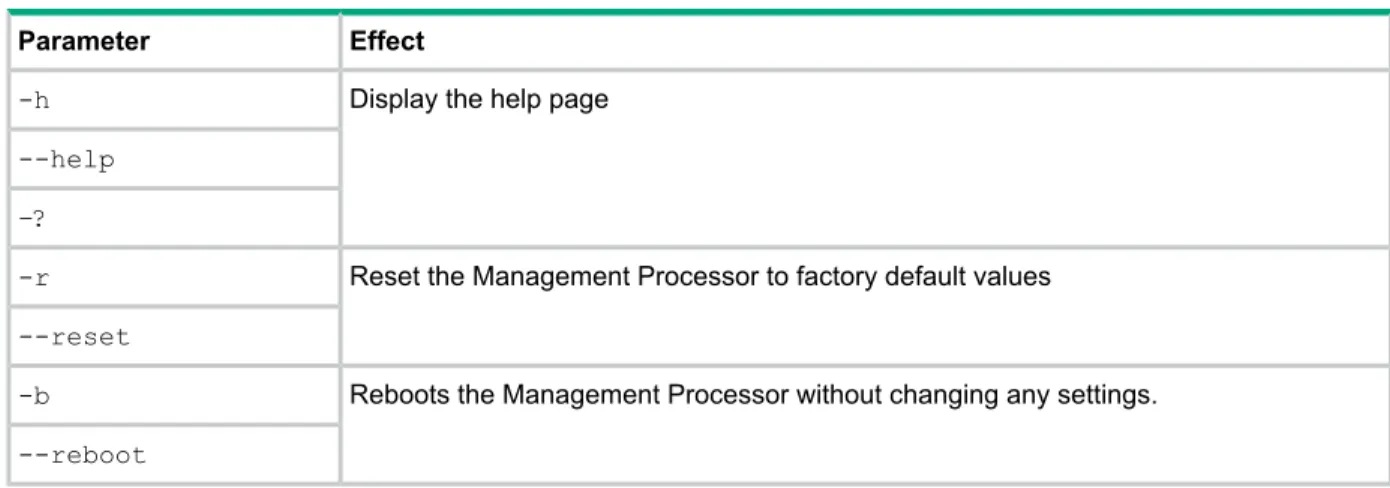
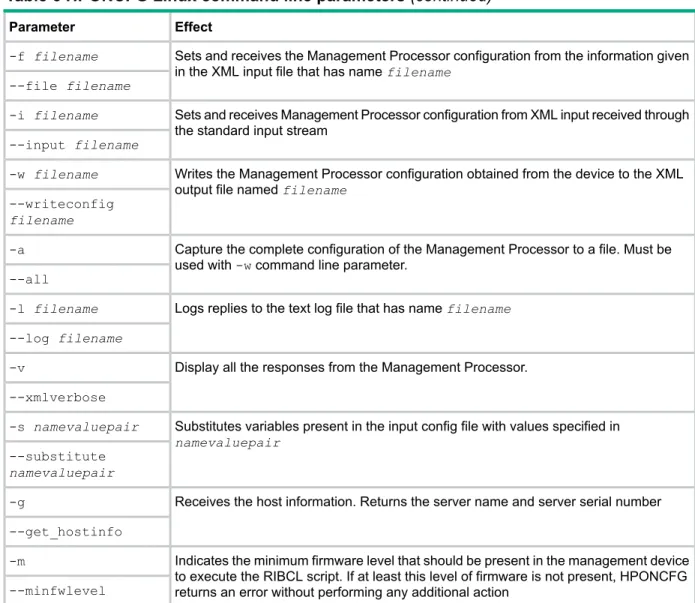
Table 6 HPONCFG Linux command line parameters Effect
Parameter
Display the help page -h
--help –?
Reset the Management Processor to factory default values -r
--reset
Reboots the Management Processor without changing any settings. -b
Table 6 HPONCFG Linux command line parameters (continued) Effect
Parameter
Sets and receives the Management Processor configuration from the information given in the XML input file that has namefilename
-f filename --file filename
Sets and receives Management Processor configuration from XML input received through the standard input stream
-i filename --input filename
Writes the Management Processor configuration obtained from the device to the XML output file namedfilename
-w filename --writeconfig filename
Capture the complete configuration of the Management Processor to a file. Must be used with-wcommand line parameter.
-a --all
Logs replies to the text log file that has namefilename -l filename
--log filename
Display all the responses from the Management Processor. -v
--xmlverbose
Substitutes variables present in the input config file with values specified in namevaluepair
-s namevaluepair --substitute namevaluepair
Receives the host information. Returns the server name and server serial number -g
--get_hostinfo
Indicates the minimum firmware level that should be present in the management device to execute the RIBCL script. If at least this level of firmware is not present, HPONCFG returns an error without performing any additional action
-m
--minfwlevel
Obtaining the basic configuration
Use HPONCFG to obtain a basic configuration from iLO 4 by executing the utility from the command line without specifying an input file. You must provide the name of the output file on the command line.
For example:
hponcfg /w config.xml
In this example, the utility indicates that it obtained the data successfully and wrote the data to the output file.
The following is an example of a typical output file:
<!-- HPONCFG VERSION = "4.2.0.0" --> <!-- Generated 08/20/13 20:14:12 --> <RIBCL VERSION="2.1">
<LOGIN USER_LOGIN="Administrator" PASSWORD="password"> <DIR_INFO MODE="write">
<MOD_DIR_CONFIG>
<DIR_AUTHENTICATION_ENABLED VALUE = "N"/> <DIR_LOCAL_USER_ACCT VALUE = "Y"/>
<DIR_SERVER_ADDRESS VALUE = ""/> <DIR_SERVER_PORT VALUE = "636"/> <DIR_OBJECT_DN VALUE = ""/>
<DIR_USER_CONTEXT_1 VALUE = ""/> <DIR_USER_CONTEXT_2 VALUE = ""/> <DIR_USER_CONTEXT_3 VALUE = ""/> </MOD_DIR_CONFIG> </DIR_INFO> <RIB_INFO MODE="write"> <MOD_NETWORK_SETTINGS>
<SPEED_AUTOSELECT VALUE = "Y"/> <NIC_SPEED VALUE = "10"/>
<FULL_DUPLEX VALUE = "N"/> <DHCP_ENABLE VALUE = "Y"/> <DHCP_GATEWAY VALUE = "Y"/> <DHCP_DNS_SERVER VALUE = "Y"/> <DHCP_STATIC_ROUTE VALUE = "Y"/> <DHCP_WINS_SERVER VALUE = "Y"/> <REG_WINS_SERVER VALUE = "Y"/> <IP_ADDRESS VALUE = "192.168.1.3"/> <SUBNET_MASK VALUE = "255.255.255.0"/> <GATEWAY_IP_ADDRESS VALUE = "192.168.1.1"/> <DNS_NAME VALUE = "ILODNSNAME"/>
<DOMAIN_NAME VALUE = "hp.com"/>
<PRIM_DNS_SERVER value = "192.168.1.2"/> <SEC_DNS_SERVER value = "0.0.0.0"/> <TER_DNS_SERVER value = "0.0.0.0"/> <PRIM_WINS_SERVER value = "0.0.0.0"/> <SEC_WINS_SERVER value = "0.0.0.0"/>
<STATIC_ROUTE_1 DEST = "0.0.0.0" GATEWAY = "0.0.0.0"/> <STATIC_ROUTE_2 DEST = "0.0.0.0" GATEWAY = "0.0.0.0"/> <STATIC_ROUTE_3 DEST = "0.0.0.0" GATEWAY = "0.0.0.0"/> </MOD_NETWORK_SETTINGS> </RIB_INFO> <USER_INFO MODE="write"> <ADD_USER USER_NAME = "admin" USER_LOGIN = "admin" PASSWORD = "%user_password%"> <ADMIN_PRIV value = "Y"/>
<REMOTE_CONS_PRIV value = "Y"/> <RESET_SERVER_PRIV value = "Y"/> <VIRTUAL_MEDIA_PRIV value = "Y"/> <CONFIG_ILO_PRIV value = "Y"/> </ADD_USER>
</USER_INFO> </LOGIN> </RIBCL>
NOTE: For security reasons, user passwords are not returned.
Obtaining a specific configuration
Obtain a specific configuration using the appropriate XML input file. For example, the following is the contents of a typical XML input file:
get_global.xml :
<!-- Sample file for Get Global command --> <RIBCL VERSION="2.0">
<LOGIN USER_LOGIN="x" PASSWORD="x"> <RIB_INFO MODE="read">
<GET_GLOBAL_SETTINGS /> </RIB_INFO>
</LOGIN> </RIBCL>
The XML commands are read from the input fileget_global.xmland are processed by the device:
hponcfg /f get_global.xml /l log.txt > output.txt
The requested information is returned in the log file, which, in this example, is namedlog.txt.
<GET_GLOBAL_SETTINGS>
<!-- A session timeout value of zero means that the timeout is set to infinite. --> <SESSION_TIMEOUT VALUE="0"/> <F8_PROMPT_ENABLED VALUE="Y"/> <F8_LOGIN_REQUIRED VALUE="N"/> <HTTPS_PORT VALUE="443"/> <HTTP_PORT VALUE="80"/> <REMOTE_CONSOLE_PORT VALUE="17990"/> <VIRTUAL_MEDIA_PORT VALUE="17988"/> <SNMP_ACCESS_ENABLED VALUE="Y"/> <SNMP_PORT VALUE="161"/> <SNMP_TRAP_PORT VALUE="162"/> <SSH_PORT VALUE="22"/> <SSH_STATUS VALUE="Y"/>
<SERIAL_CLI_STATUS VALUE="Enabled-Authentication Required"/> <SERIAL_CLI_SPEED VALUE="9600"/>
<VSP_LOG_ENABLE VALUE="N"/> <MIN_PASSWORD VALUE="8"/>
<AUTHENTICATION_FAILURE_LOGGING VALUE="Enabled-every 3rd failure"/> <RBSU_POST_IP VALUE="Y"/> <ENFORCE_AES VALUE="N"/> <IPMI_DCMI_OVER_LAN_ENABLED VALUE="Y"/> <REMOTE_SYSLOG_ENABLE VALUE="N"/> <REMOTE_SYSLOG_PORT VALUE="514"/> <REMOTE_SYSLOG_SERVER_ADDRESS VALUE="192.0.2.20"/> <ALERTMAIL_ENABLE VALUE="N"/> <ALERTMAIL_EMAIL_ADDRESS VALUE=""/> <ALERTMAIL_SENDER_DOMAIN VALUE=""/> <ALERTMAIL_SMTP_PORT VALUE="25"/> <ALERTMAIL_SMTP_SERVER VALUE=""/> <PROPAGATE_TIME_TO_HOST VALUE="Y"/> </GET_GLOBAL_SETTINGS>
Setting a configuration
Set a specific configuration by using the command format:
hponcfg /f add_user.xml /l log.txt
In this example, the input file has contents:
<RIBCL VERSION="2.0">
<LOGIN USER_LOGIN="x" PASSWORD="x"> <USER_INFO MODE="write">
<ADD_USER
USER_NAME="Landy9" USER_LOGIN="mandy8" PASSWORD="floppyshoes"> <ADMIN_PRIV value ="No"/>
<REMOTE_CONS_PRIV value ="Yes"/> <RESET_SERVER_PRIV value ="No"/> <VIRTUAL_MEDIA_PRIV value ="No"/> <CONFIG_ILO_PRIV value="Yes"/> </ADD_USER>
</USER_INFO> </LOGIN> </RIBCL>
Using variable substitution
HPONCFG enables you to specify variables in the XML RIBCL script and to assign values to those variables when you run HPONCFG. This feature helps to avoid rewriting the XML script file every time with different values. Anything enclosed by two percent sign (%) characters in the XML file is considered a variable.
In this example,%username%, %loginname%, and%password%are variables:
<!-- Add user with minimal privileges to test default setting of assigned privileges to 'N' -->
<RIBCL version="1.2">
<LOGIN USER_LOGIN="x" PASSWORD="x"> <USER_INFO MODE="write">
<ADD_USER USER_NAME="%username%" USER_LOGIN="%loginname%" PASSWORD="%password%"> <RESET_SERVER_PRIV value="Y" /> <ADMIN_PRIV value="Y" /> </ADD_USER> </USER_INFO> </LOGIN> </RIBCL>
Specify values for the variables when you run HPONCFG by using the substitute option. The argument must be a string or variable name and value pairs must be separated by a comma (,). The variable name and its value must be separated by an equal sign (=). For example:
hponcfg /f add_user.xml /s username=testuser,loginname=testlogin,password=testpasswd
In this example,%host_power%is a variable:
<RIBCL VERSION="2.0">
<LOGIN USER_LOGIN="adminname" PASSWORD="password"> <SERVER_INFO MODE="write">
<!-- Modify the HOST_POWER attribute to toggle power on the host server --> <!-- HOST_POWER="No" (Turns host server power off) -->
<!-- A graceful shutdown will be attempted for ACPI-aware -->
<!-- operating systems configured to support graceful shutdown. --> <!-- HOST_POWER="Yes" (Turns host server power on) -->
<SET_HOST_POWER HOST_POWER="%host_power%"/> </SERVER_INFO>
</LOGIN> </RIBCL>
• To power the system on, enter:
hponcfg /f Set_Host_Power.xml /s host_power=YES • To power the system off, enter:
hponcfg /f Set_Host_Power.xml /s host_power=NO
Capturing and restoring a configuration
Use HPONCFG to capture basic configuration information in an XML readable file format. Use this file to set or restore the iLO configuration. This feature is available with HPONCFG version 1.2 and later. HPONCFG writes the configuration information in the HPE RIBCL format.
• To capture a configuration, you must specify the name and location of the output file on the command line. See“Obtaining the basic configuration” (page 30)for details.
For example:
hponcfg /w config.xml
HPONCFG displays a message when it successfully writes the configuration information to the output file as requested. For security reasons, the default user administrator and user
passwords are not captured in the configuration file or returned in the response. A variable is provided in its place to use with thesubstituteoption to provide a default password for all users when restoring a configuration. Manually change the password before using the file to restore the configuration.
• To restore a configuration, the file must be sent to HPONCFG as input using the /f or
-f option. Add a default password for all users using the substitute orsoption. For example:
5 SMASH CLP usage
SMASH CLP
The DMTF SMASH initiative is a suite of specifications that deliver architectural semantics, industry standard protocols and profiles to unify the management of the data center. The SMASH CLP specification enables simple and intuitive management of heterogeneous servers in the data center.
6 IPMI usage
The IPMI utility
Use the Linux IPMI tool and Windows IPMI util applications to test the IPMI interfaces on server platforms. The Linux IPMI tool is used in environments where scripting is used as the base for platform monitoring.
The Windows IPMI util has a dependency on the IPMI driver if using "in-band" (or from a command prompt). The Windows IPMI driver is delivered in Windows Server 2008 R2. IPMI support might be available in later updates of Windows Server 2003 R2.
The Linux IPMI tool also requires the IPMI drivers (delivered in the distribution) to be enabled if utilized in-band. The IPMI device drivers are not typically enabled to automatically start when the Linux operating system is started. If you are logged on to a Linux console (command prompt) as a root user, use the following command to initiate the IPMI device drivers based on your Linux version:
• RHEL5, RHEL6, SLES10, SLES11, SLES12: service ipmi start
• RHEL7:
systemctl start ipmi.service
For more information, see the documentation provided by the specific Linux distribution.
The IPMI tool supports remote IPMI protocols that provide the capability to power the server on and off, and to remotely monitor the platform. The iLO firmware supports the IPMI 2.0 RMCP+ protocol for the highest level of authentication, encryption and integrity. The legacy IPMI 1.5 IPMI over LAN protocol is not supported.
Basic IPMI tool usage
The Linux IPMI tool is fully documented in the Linux MAN page. Theman ipmitoolcommand provides extended documentation beyond the scope of this guide. To use IPMI tool from the Linux operating system to locally monitor a system, the IPMI drivers must be enabled. Typical in-band commands include the following.
• To retrieve the iLO status, enter:
# ipmitool mc info
• To retrieve the status of iLO monitored sensors, enter:
# ipmitool sensor list
• To retrieve the contents of the IPMI SEL, enter:
# ipmitool sel list
Advanced IPMI tool usage on Linux
The Linux IPMI tool has the capability to securely communicate with iLO using the IPMI 2.0 RMCP+ protocol. This is theipmitool lanplusprotocol feature. For most commands, a valid