Copyright © Nasco 1994 HC18000028INM15
ONLINE: NascoHealthcare.com
E-MAIL: [email protected]
PHONE: 1.800.431.4310
ADDRESS: 901 Janesville Ave. Fort Atkinson, WI 53538
HEALTHCARE
HEALTHCARE
CR
i
S
is
™
System
Defibrillation Chest Skin
LF03652U
INSTRUCTION MANUAL
5-Year Warranty ACCESSORIES
LF03656U Physio Control Training Pad Adapters and Patient Simulator Adapters for LifePak 10 and LifePak 20
LF03657U Marquette Electronics Training Pad Adapters and Patient Simulator Adapters LF03658U Space Labs/Laerdal/ Heartstart/First Medic Training Pad Adapters
and Patient Simulator Adapters LF03961U Zoll Training Cables with Adapters
LF03962U Physio Control Training Cables with Adapters for LifePak 12
Note: If you need help selecting the training pad adapters that correspond to your AED unit, please feel free to call us at 1.800.558.9595 for assistance.
LF03656U LF03657U LF03658U
Other Available
Simulators
LF03616U Child CRiSis™ Manikin
LF03617U Deluxe Child CRiSis™ Manikin with Arrhythmia Tutor
LF03620U PALS Update Kit
LF03623U Infant Airway Management Trainer with Stand
LF03632U Child Intraosseous Infusion/ Femoral Access Leg on a Stand
LF03633U Child Airway Management Trainer Torso
ABOUT THE SIMULATOR
The CRiSis™ System Defibrillation Chest Skin has been designed to be placed on the CPARLENE®
brand of CPR manikins (full body “Airway Larry” manikins as well as Adult Airway Management Trainer Torso and both Advanced and “Airway Larry” Airway Management Torso Trainers) to enable you, the customer, to safely defibrillate.
The CRiSis™ System Defibrillation Chest Skin will enable you to practice defibrillation using man-ual, semiautomatic, and automatic external defibrillators (AEDs). When using any one of the above listed types of defibrillators in training, always follow the recommended operating procedures for that particular defibrillator. The Defibrillation Chest Skin has been designed to absorb a maximum of 360 joules of energy**. Although capable of absorbing 360 joules, we recommend that the smallest energy level possible be used while training with the skin. In addition, the Defibrillation Chest Skin also includes 4 ECG sites and the ability to connect to the Life/form® Interactive ECG
Simulator (LF03670U), sold separately. The Interactive ECG Simulator allows for pacing and wave form practice. The Interactive ECG Simulator products 17 adult/pediatric rhythms.
Note: Prior to removing the upper compression plate, you may need to disconnect the lung airway/ stomach system, depending on which Life/form® manikin you are updating.
LIST OF COMPONENTS
• Defibrillation ECG Chest Skin with Load Box
• Four Lead Snap Cable Connected
• Set of Large Thread Screws
• Set of Bolts with Washers
• Self-adhesive foam pieces
**Note: 360 joules is the maximum energy level that Nasco recommends administering to the defibrillation chest skin. Energy levels in excess of 360 joules may cause irreparable damage to the chest skin, circuitry, and patient simulator being used — thus voiding Nasco’s warranty and endan-gering your equipment. Nasco assumes no liability for damage or injury that may be caused by the use and/or misuse of this equipment. All normal safety precautions for defibrillation training should be followed and energy levels should be minimized. Nasco did not design nor intend this defibrilla-tion chest skin to be used as anything other than a training apparatus for defibrilladefibrilla-tion.
2
SET UP
The CRiSis™ System Defibrillation Chest Skin has been designed to replace the standard outer chest skin on Life/form® brand Full Body and Torso CPR and Airway Training manikins, thus
enabling you to safely defibrillate.
Please follow the setup procedures for the type of manikin (torso with or without legs) on which you wish to place the CRiSis™ System Defibrillation Chest Skin.
7
To change the age group, select the age group key, then the rhythm you want.
Note: At Power On the adult age group is automatically selected.
ADULT DEFIBRILLATION TRAINING • VF Ventricular Fibrillation
• VT fast Ventricular Tachycardia. Wide QRS. Rate: 185
• VT slow Ventricular Tachycardia. Wide QRS. Rate: 140
• VT poly Ventricular Tachycardia. Fluctuating QRS axis.
• AFIB Atrial Fibrillation. Ventricular rate: 120-160
• AFLTR Atrial Flutter (2:1). Ventricular rate: 150
• SVT SVT alternates with NSR, then remains in SVT. SVT rate: 216
• S TACH Sinus Tachycardia. Rate: 120
• NSR Normal Sinus Rhythm. Rate: 72
• ASYS Asystole
• SINUS PVC Sinus Rhythm with PVCs. Sinus rate: 72
•
ADULT EXTERNAL PACER TRAINING • S BRDY Sinus Bradycardia. Rate: 40
• J BRDY Junctional Bradycardia. Rate: 42
• 2ndI 2nd deg. type I AV Block (4:3). Atrial rate: 60
• 2ndII PVC 2nd deg. type II AV Block (4:3). PVCs. Wide QRS. Atrial rate: 60
• 2ndII 2nd deg. type II AV Block (4:3). Wide QRS. Atrial rate: 60
• 3rd 3rd deg. AV Block. Wide QRS. Ventricular rate: 37
•
PEDIATRIC DEFIBRILLATION TRAINING • VF Ventricular Fibrillation
• VT fast Ventricular Tachycardia. Wide QRS. Visable P wave, Rate: 180
• VT slow Ventricular Tachycardia. Wide QRS. Rate: 148
• VT poly Ventricular Tachycardia. Fluctuating QRS axis. Short runs.
• AFIB Atrial Fibrillation. Small R waves. Ventricular rate: 135-160
• AFLTR Atrial Flutter (2:1). Ventricular rate: 150
• SVT Supraventricular Tachycardia. Inverted P follows QRS. rate: 216
• S TACH Sinus Tachycardia. Rate: 165
• NSR Normal Sinus Rhythm. Rate: 90
• ASYS Asystole
• SINUS PVC Sinus Rhythm with PVCs. Sinus rate: 90
•
PEDIATRIC EXTERNAL PACER TRAINING • S BRDY Sinus Bradycardia. Rate: 50
• J BRDY Junctional Bradycardia. Rate: 60
• 2ndI 2nd deg. type I AV Block (5:4). Atrial rate: 60
• 2ndII PVC 2nd deg. type II AV Block (5:4) with PVCs. Atrial rate: 60
• 2ndII 2nd deg. type II AV Block (5:4). Atrial rate: 60
3
INSTALLATION INSTRUCTIONS
The load box for the CRiSis™ System Defibrillation Chest Skin is installed the same way in every version of Life/form® manikins, regardless of when you purchased it or the version you purchased.
REMOVING THE REGULAR CHEST SKIN
In order to install the Defibrillation Chest Skin, the outer chest skin currently in place on the manikin must be removed.
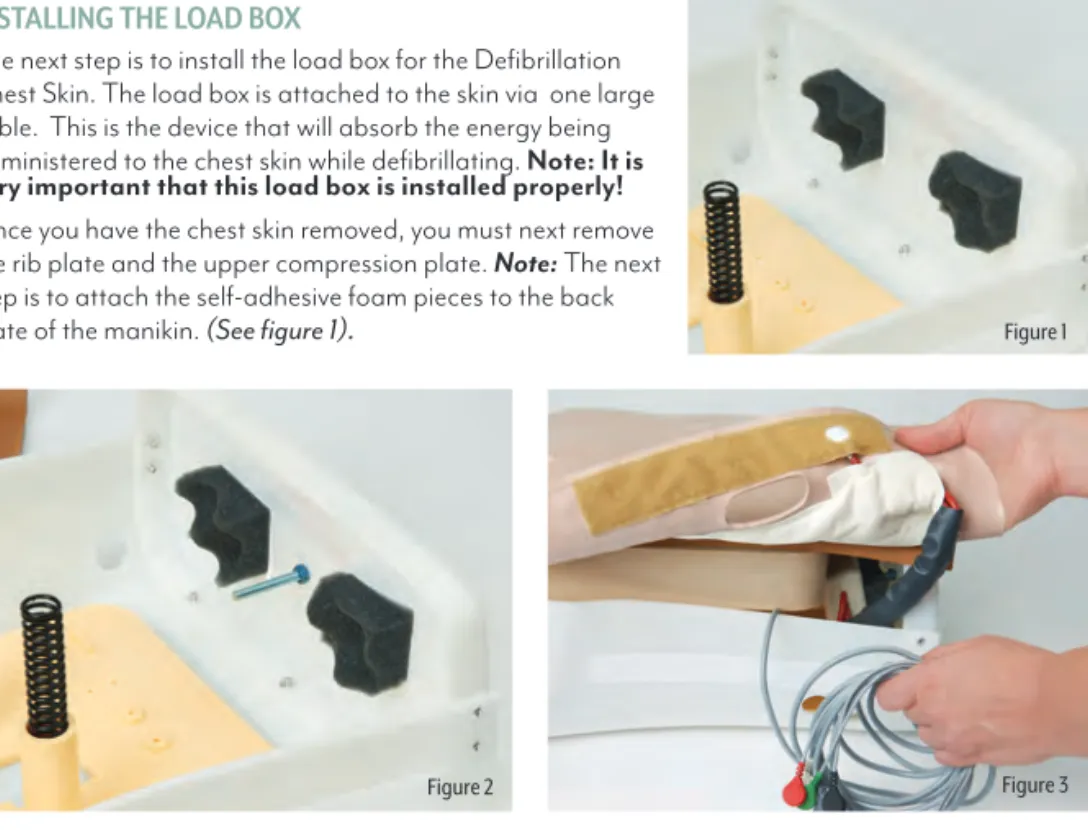
INSTALLING THE LOAD BOX
The next step is to install the load box for the Defibrillation Chest Skin. The load box is attached to the skin via one large cable.This is the device that will absorb the energy being administered to the chest skin while defibrillating. Note: It is very important that this load box is installed properly! Once you have the chest skin removed, you must next remove the rib plate and the upper compression plate. Note: The next step is to attach the self-adhesive foam pieces to the back
plate of the manikin. (See figure 1). Figure 1
6
If you have a manikin with legs attached to it, you will already have four screws with washers and wing nuts holding the legs on. To attach the load box in this situation, just adhere the self-adhesive foam pieces to the back plate inside.
Figure 2 Figure 3
SECURING THE LOAD BOX
Now that the foam pieces are in place, screw the load box onto the single screw. (See figure 2). REPLACING THE SKIN
Now that you have secured the load box, uncoil the smaller cable that has the four lead snaps attached. These four lead snaps will eventually be attached to your arrhythmia generator or patient simulator cable. For now, simply uncoil the cable and allow it to hang freely from the manikin. Next, replace the chest plates that you removed earlier and lay the CRiSis™ System Defibrillation Chest Skin on top of the chest of the manikin.
The hook-and-loop fastener has already been sewn onto the skin. Simply line up the hook-and-loop fastener and you are all set. (See figure 3).
2. Connect your defibrillator’s colored limb-lead snaps to the appropriate locations on the manikin’s chest skin. (See figure 10.)
3. You should now be able to select rhythms on the ECG Simulator and view them on your monitor.
4. Change rhythm selected from waiting rhythm to running rhythm automatically using the Convert button and applying a shock to the manikin.
Note: The running rhythm indicator light is solid while the waiting rhythm blinks on and off. After the shock is applied to the manikin, the blinking rhythm indicator light turns solid and the original solid light turns off.
5. Apply paddles, gel pads, defibrillator cables with adapter posts, or training cables to the appropriate defibrillation location on the manikin. (See figure 11.)
Figure 9
1. Snap the colored ends of the four-lead cable coming from the manikin to the appropriate locations on the ECG Simula-tor. (See figure 9.)
Defi brillator ECG cable ECG limb lead ECG limb lead Defi b location ECG limb lead ECG
simulator Color codedECG snap – from manikin to ECG Simulator Defi b location ECG limb lead pad pad Black ECG Green ECG White ECG Red ECG Defi brillator ECG cable Figure 10 Figure 11
Actual product may vary slightly from photo. Nasco reserves the right to change product color, materials, supplies, or function as needed.
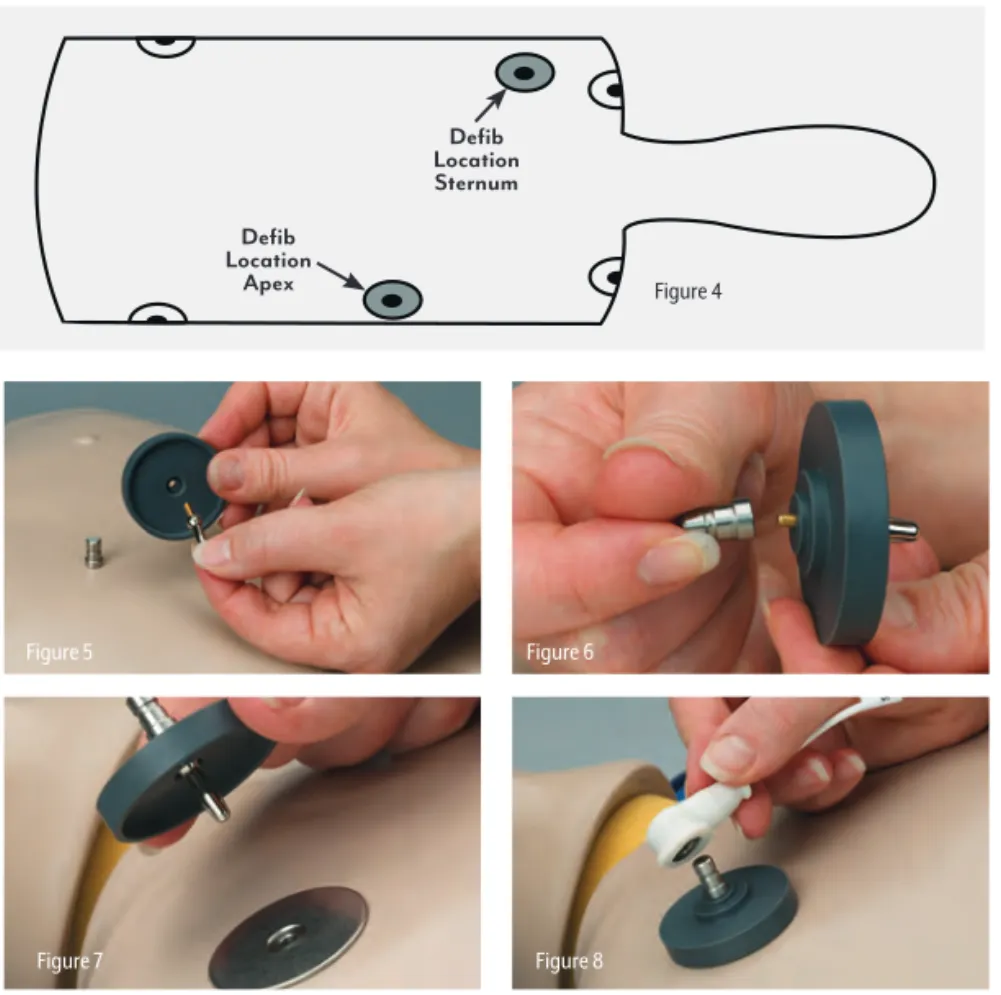
Defi b Location Sternum Defi b Location Apex Figure 4 4 5
DEFIBRILLATING THE MANIKIN
DEFIBRILLATING WITH PADDLES OR GEL PADS
1. Defibrillate the manikin by placing paddles or gel pads on the round, metal defibrillation sites on the manikin’s chest. (See figure 4.) As with a real patient, extreme care should be taken to make complete contact with the sternum and apex defibrillation site.
2. The equipment is now ready for defibrillation practice. Follow all normal safety precautions indicated for use and training.
Note: In an effort to help you save money, Nasco offers sets of defibrillation training cables and chest post adapters, sold separately, to be used in place of defibrillator paddles or gel pads. Nasco does not sell defibrillators or monitors.
DEFIBRILLATING WITH SNAP-ON CABLES
Adapter posts, sold separately, are available to fit a variety of defibrillator brands’ snap-on cable heads. Be sure to identify your brand of defibrillator before selecting an adapter post set. (See the Supplies and Replacement Parts section of this manual for more information.)
1. Feed the banana clip through the protective disc and screw the adapter post specific to your snap-on cable head to the banana clip. (See figures 5 & 6.)
2. Insert the banana clip end into the manikin’s chest skin defibrillation location and snap the cable to the adapter post. (See figures 7 & 8.)
Note: Cables must be placed in the appropriate defibrillation location, sternum, or apex.
3. The equipment is now ready for defibrillation practice. Follow all normal safety precautions indicated for use and training.
Figure 5 Figure 6
Figure 7 Figure 8
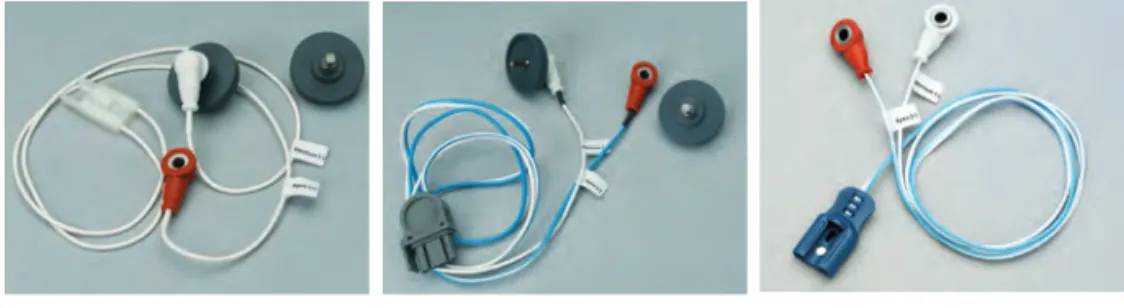
DEFIBRILLATING WITH TRAINING CABLES
Training cables purchased from Nasco have snap-on heads assembled with the standard Training Cable Defib Adapter Post shown. Brand specific adapter posts are only needed if you are using your own snap-on defib cables with unique heads. Nasco training cables have unique plug-ins for use with your own defibrillator’s specific brand. Custom training cables can be made for brands not seen below; contact Nasco for information. IMPORTANT: Training cables are NOT recommended for use with battery operated AEDs with non-rechargeable lithium batteries.
1. Insert the cable plug into your defibrillator.
2. Insert the banana clip end into the manikin defibrillation location.
3. The equipment is now ready for defibrillation practice. Follow all normal safety precautions indicated for use and training.
Note: The simulator can accept a maximum energy level of 360 joules. Nasco recommends admin-istering the lowest possible shock in order to extend the life of your simulator.
Zoll Training Cable with Assembled Training Cable Adapter Posts (LF03961U)
Physio Control Training Cable with Assem-bled Training Cable Adapter
Posts (LF03962U)
Phillips Training Cables (175-0-Z13U)
CONNECTING YOUR MANIKIN TO AN ARRHYTHMIA SIMULATOR, OR LIFE/FORM® INTERACTIVE ECG SIMULATOR (LF03670U) AND DEFIB/MONITOR (SOLD SEPARATELY)
• ON/OFF – Press to power on and off.
• LOW BAT – Red indicator illuminates when battery needs replacement.
• DEFIB DISCHG – Green indicator illuminates for two seconds when defi b discharge is sensed. If defi brillating Nasco manikin,set defi b to 2J or more. If defi brillating directly into ECG Simulator, set defi b to 50J or more.
• convert – Simulate cardioversion by activating convert feature. Simulator responds to defi b discharge.
• Adult Ped – Yellow indicators tell which rhythm set is being simulated – adult or pediatric.
• age group – Press to select adult or pediatric rhythm set.
• PACER PULSE – Green indicator fl ashes when exter-nal pacer pulse is sensed. (Captured beat is simulated too.) Sensing occurs when external pacer current set to 60mA – 70mA or more.
Defi b Location Sternum Defi b Location Apex Figure 4 4 5
DEFIBRILLATING THE MANIKIN
DEFIBRILLATING WITH PADDLES OR GEL PADS
1. Defibrillate the manikin by placing paddles or gel pads on the round, metal defibrillation sites on the manikin’s chest. (See figure 4.) As with a real patient, extreme care should be taken to make complete contact with the sternum and apex defibrillation site.
2. The equipment is now ready for defibrillation practice. Follow all normal safety precautions indicated for use and training.
Note: In an effort to help you save money, Nasco offers sets of defibrillation training cables and chest post adapters, sold separately, to be used in place of defibrillator paddles or gel pads. Nasco does not sell defibrillators or monitors.
DEFIBRILLATING WITH SNAP-ON CABLES
Adapter posts, sold separately, are available to fit a variety of defibrillator brands’ snap-on cable heads. Be sure to identify your brand of defibrillator before selecting an adapter post set. (See the Supplies and Replacement Parts section of this manual for more information.)
1. Feed the banana clip through the protective disc and screw the adapter post specific to your snap-on cable head to the banana clip. (See figures 5 & 6.)
2. Insert the banana clip end into the manikin’s chest skin defibrillation location and snap the cable to the adapter post. (See figures 7 & 8.)
Note: Cables must be placed in the appropriate defibrillation location, sternum, or apex.
3. The equipment is now ready for defibrillation practice. Follow all normal safety precautions indicated for use and training.
Figure 5 Figure 6
Figure 7 Figure 8
DEFIBRILLATING WITH TRAINING CABLES
Training cables purchased from Nasco have snap-on heads assembled with the standard Training Cable Defib Adapter Post shown. Brand specific adapter posts are only needed if you are using your own snap-on defib cables with unique heads. Nasco training cables have unique plug-ins for use with your own defibrillator’s specific brand. Custom training cables can be made for brands not seen below; contact Nasco for information. IMPORTANT: Training cables are NOT recommended for use with battery operated AEDs with non-rechargeable lithium batteries.
1. Insert the cable plug into your defibrillator.
2. Insert the banana clip end into the manikin defibrillation location.
3. The equipment is now ready for defibrillation practice. Follow all normal safety precautions indicated for use and training.
Note: The simulator can accept a maximum energy level of 360 joules. Nasco recommends admin-istering the lowest possible shock in order to extend the life of your simulator.
Zoll Training Cable with Assembled Training Cable Adapter Posts (LF03961U)
Physio Control Training Cable with Assem-bled Training Cable Adapter
Posts (LF03962U)
Phillips Training Cables (175-0-Z13U)
CONNECTING YOUR MANIKIN TO AN ARRHYTHMIA SIMULATOR, OR LIFE/FORM® INTERACTIVE ECG SIMULATOR (LF03670U) AND DEFIB/MONITOR (SOLD SEPARATELY)
• ON/OFF – Press to power on and off.
• LOW BAT – Red indicator illuminates when battery needs replacement.
• DEFIB DISCHG – Green indicator illuminates for two seconds when defi b discharge is sensed. If defi brillating Nasco manikin,set defi b to 2J or more. If defi brillating directly into ECG Simulator, set defi b to 50J or more.
• convert – Simulate cardioversion by activating convert feature. Simulator responds to defi b discharge.
• Adult Ped – Yellow indicators tell which rhythm set is being simulated – adult or pediatric.
• age group – Press to select adult or pediatric rhythm set.
• PACER PULSE – Green indicator fl ashes when exter-nal pacer pulse is sensed. (Captured beat is simulated too.) Sensing occurs when external pacer current set to 60mA – 70mA or more.
3
INSTALLATION INSTRUCTIONS
The load box for the CRiSis™ System Defibrillation Chest Skin is installed the same way in every version of Life/form® manikins, regardless of when you purchased it or the version you purchased.
REMOVING THE REGULAR CHEST SKIN
In order to install the Defibrillation Chest Skin, the outer chest skin currently in place on the manikin must be removed.
INSTALLING THE LOAD BOX
The next step is to install the load box for the Defibrillation Chest Skin. The load box is attached to the skin via one large cable.This is the device that will absorb the energy being administered to the chest skin while defibrillating. Note: It is very important that this load box is installed properly! Once you have the chest skin removed, you must next remove the rib plate and the upper compression plate. Note: The next step is to attach the self-adhesive foam pieces to the back
plate of the manikin. (See figure 1). Figure 1
6
If you have a manikin with legs attached to it, you will already have four screws with washers and wing nuts holding the legs on. To attach the load box in this situation, just adhere the self-adhesive foam pieces to the back plate inside.
Figure 2 Figure 3
SECURING THE LOAD BOX
Now that the foam pieces are in place, screw the load box onto the single screw. (See figure 2). REPLACING THE SKIN
Now that you have secured the load box, uncoil the smaller cable that has the four lead snaps attached. These four lead snaps will eventually be attached to your arrhythmia generator or patient simulator cable. For now, simply uncoil the cable and allow it to hang freely from the manikin. Next, replace the chest plates that you removed earlier and lay the CRiSis™ System Defibrillation Chest Skin on top of the chest of the manikin.
The hook-and-loop fastener has already been sewn onto the skin. Simply line up the hook-and-loop fastener and you are all set. (See figure 3).
2. Connect your defibrillator’s colored limb-lead snaps to the appropriate locations on the manikin’s chest skin. (See figure 10.)
3. You should now be able to select rhythms on the ECG Simulator and view them on your monitor.
4. Change rhythm selected from waiting rhythm to running rhythm automatically using the Convert button and applying a shock to the manikin.
Note: The running rhythm indicator light is solid while the waiting rhythm blinks on and off. After the shock is applied to the manikin, the blinking rhythm indicator light turns solid and the original solid light turns off.
5. Apply paddles, gel pads, defibrillator cables with adapter posts, or training cables to the appropriate defibrillation location on the manikin. (See figure 11.)
Figure 9
1. Snap the colored ends of the four-lead cable coming from the manikin to the appropriate locations on the ECG Simula-tor. (See figure 9.)
Defi brillator ECG cable ECG limb lead ECG limb lead Defi b location ECG limb lead ECG
simulator Color codedECG snap – from manikin to ECG Simulator Defi b location ECG limb lead pad pad Black ECG Green ECG White ECG Red ECG Defi brillator ECG cable Figure 10 Figure 11
Actual product may vary slightly from photo. Nasco reserves the right to change product color, materials, supplies, or function as needed.
ABOUT THE SIMULATOR
The CRiSis™ System Defibrillation Chest Skin has been designed to be placed on the CPARLENE®
brand of CPR manikins (full body “Airway Larry” manikins as well as Adult Airway Management Trainer Torso and both Advanced and “Airway Larry” Airway Management Torso Trainers) to enable you, the customer, to safely defibrillate.
The CRiSis™ System Defibrillation Chest Skin will enable you to practice defibrillation using man-ual, semiautomatic, and automatic external defibrillators (AEDs). When using any one of the above listed types of defibrillators in training, always follow the recommended operating procedures for that particular defibrillator. The Defibrillation Chest Skin has been designed to absorb a maximum of 360 joules of energy**. Although capable of absorbing 360 joules, we recommend that the smallest energy level possible be used while training with the skin. In addition, the Defibrillation Chest Skin also includes 4 ECG sites and the ability to connect to the Life/form® Interactive ECG
Simulator (LF03670U), sold separately. The Interactive ECG Simulator allows for pacing and wave form practice. The Interactive ECG Simulator products 17 adult/pediatric rhythms.
Note: Prior to removing the upper compression plate, you may need to disconnect the lung airway/ stomach system, depending on which Life/form® manikin you are updating.
LIST OF COMPONENTS
• Defibrillation ECG Chest Skin with Load Box
• Four Lead Snap Cable Connected
• Set of Large Thread Screws
• Set of Bolts with Washers
• Self-adhesive foam pieces
**Note: 360 joules is the maximum energy level that Nasco recommends administering to the defibrillation chest skin. Energy levels in excess of 360 joules may cause irreparable damage to the chest skin, circuitry, and patient simulator being used — thus voiding Nasco’s warranty and endan-gering your equipment. Nasco assumes no liability for damage or injury that may be caused by the use and/or misuse of this equipment. All normal safety precautions for defibrillation training should be followed and energy levels should be minimized. Nasco did not design nor intend this defibrilla-tion chest skin to be used as anything other than a training apparatus for defibrilladefibrilla-tion.
2
SET UP
The CRiSis™ System Defibrillation Chest Skin has been designed to replace the standard outer chest skin on Life/form® brand Full Body and Torso CPR and Airway Training manikins, thus
enabling you to safely defibrillate.
Please follow the setup procedures for the type of manikin (torso with or without legs) on which you wish to place the CRiSis™ System Defibrillation Chest Skin.
7
To change the age group, select the age group key, then the rhythm you want.
Note: At Power On the adult age group is automatically selected.
ADULT DEFIBRILLATION TRAINING • VF Ventricular Fibrillation
• VT fast Ventricular Tachycardia. Wide QRS. Rate: 185
• VT slow Ventricular Tachycardia. Wide QRS. Rate: 140
• VT poly Ventricular Tachycardia. Fluctuating QRS axis.
• AFIB Atrial Fibrillation. Ventricular rate: 120-160
• AFLTR Atrial Flutter (2:1). Ventricular rate: 150
• SVT SVT alternates with NSR, then remains in SVT. SVT rate: 216
• S TACH Sinus Tachycardia. Rate: 120
• NSR Normal Sinus Rhythm. Rate: 72
• ASYS Asystole
• SINUS PVC Sinus Rhythm with PVCs. Sinus rate: 72
•
ADULT EXTERNAL PACER TRAINING • S BRDY Sinus Bradycardia. Rate: 40
• J BRDY Junctional Bradycardia. Rate: 42
• 2ndI 2nd deg. type I AV Block (4:3). Atrial rate: 60
• 2ndII PVC 2nd deg. type II AV Block (4:3). PVCs. Wide QRS. Atrial rate: 60
• 2ndII 2nd deg. type II AV Block (4:3). Wide QRS. Atrial rate: 60
• 3rd 3rd deg. AV Block. Wide QRS. Ventricular rate: 37
•
PEDIATRIC DEFIBRILLATION TRAINING • VF Ventricular Fibrillation
• VT fast Ventricular Tachycardia. Wide QRS. Visable P wave, Rate: 180
• VT slow Ventricular Tachycardia. Wide QRS. Rate: 148
• VT poly Ventricular Tachycardia. Fluctuating QRS axis. Short runs.
• AFIB Atrial Fibrillation. Small R waves. Ventricular rate: 135-160
• AFLTR Atrial Flutter (2:1). Ventricular rate: 150
• SVT Supraventricular Tachycardia. Inverted P follows QRS. rate: 216
• S TACH Sinus Tachycardia. Rate: 165
• NSR Normal Sinus Rhythm. Rate: 90
• ASYS Asystole
• SINUS PVC Sinus Rhythm with PVCs. Sinus rate: 90
•
PEDIATRIC EXTERNAL PACER TRAINING • S BRDY Sinus Bradycardia. Rate: 50
• J BRDY Junctional Bradycardia. Rate: 60
• 2ndI 2nd deg. type I AV Block (5:4). Atrial rate: 60
• 2ndII PVC 2nd deg. type II AV Block (5:4) with PVCs. Atrial rate: 60
• 2ndII 2nd deg. type II AV Block (5:4). Atrial rate: 60
Copyright © Nasco 1994 HC18000028INM15
ONLINE: NascoHealthcare.com
E-MAIL: [email protected]
PHONE: 1.800.431.4310
ADDRESS: 901 Janesville Ave. Fort Atkinson, WI 53538
HEALTHCARE
HEALTHCARE
CR
i
S
is
™
System
Defibrillation Chest Skin
LF03652U
INSTRUCTION MANUAL
5-Year Warranty ACCESSORIES
LF03656U Physio Control Training Pad Adapters and Patient Simulator Adapters for LifePak 10 and LifePak 20
LF03657U Marquette Electronics Training Pad Adapters and Patient Simulator Adapters LF03658U Space Labs/Laerdal/ Heartstart/First Medic Training Pad Adapters
and Patient Simulator Adapters LF03961U Zoll Training Cables with Adapters
LF03962U Physio Control Training Cables with Adapters for LifePak 12
Note: If you need help selecting the training pad adapters that correspond to your AED unit, please feel free to call us at 1.800.558.9595 for assistance.
LF03656U LF03657U LF03658U
Other Available
Simulators
LF03616U Child CRiSis™ Manikin
LF03617U Deluxe Child CRiSis™ Manikin with Arrhythmia Tutor
LF03620U PALS Update Kit
LF03623U Infant Airway Management Trainer with Stand
LF03632U Child Intraosseous Infusion/ Femoral Access Leg on a Stand
LF03633U Child Airway Management Trainer Torso