Zebra® Real Time Clock
Guide
S
600,
Xi
II,
Xi
III,
Xi
IIIPlus, LP2844-Z,
TLP2844-Z, TLP3844-Z, Z4Mplus, Z6Mplus,
170
PAX,
170
PAX
2, 170
PAX
3, 170
PAX
4,
Customer Order # 47867L-001
Manufacturer Part # 47867L-001 Rev. A
© 2005 ZIH Corp.
The copyrights in this manual and the label print engine described therein are
owned by Zebra Technologies Corporation. Unauthorized reproduction of this
manual or the software in the label print engine may result in imprisonment of up
to one year and fines of up to $10,000 (17 U.S.C.506). Copyright violators may be
subject to civil liability.
This product may contain ZPL
®, ZPL II
®, and ZebraLink™ programs; Element
Energy Equalizer
®Circuit; E3
®; and AGFA fonts.
Software © ZIH Corp. All rights reserved worldwide.
ZebraLink and all product names and numbers are trademarks, and Zebra, the
Zebra logo, ZPL, ZPL II, Element Energy Equalizer Circuit, and E3 Circuit are
registered trademarks of ZIH Corp. All rights reserved worldwide.
CG Triumvirate is a trademark of AGFA Monotype Corporation. All rights
reserved worldwide. CG Triumvirate(tm) font © AGFA Monotype Corporation.
Intellifont
®portion © AGFA Monotype Corporation. All rights reserved
worldwide. UFST is a registered rademark of AGFA Monotype Corporation. All
rights reserved worldwide.
All other brand names, product names, or trademarks belong to their respective
holders.
Content
Contents
Document Scope . . . iv
Front Panel Programming . . . 1
Real Time Clock Parameters . . . 1
Idle Display . . . 2
RTC Time. . . 2
RTC Date . . . 2
RTC ZPL II Commands . . . 3
RTC General Information . . . 3
Time and Date Precision . . . 5
^KDa . . . 7
^FC. . . 8
^SL . . . 9
^SO . . . 10
^ST. . . 11
Content Document Scope
iv
Document Scope
This guide contains the information needed to install, program, and operate the Real Time Clock (RTC) option. This hardware option is available as both a factory installed or field installable option in specific printer products manufactured and sold by Zebra Technologies Corporation.
The Real Time Clock option is currently available for following printers • XiII, XiIII, and XiIIIPlus series
• S600
• LP2844-Z, TPL2844-Z, and TPL3844-Z • Z4Mplus and Z6Mplus
• 170 and 110PAX series print engines.
In addition to the hardware option, the Real Time Clock application also requires that one of the below listed firmware versions (or higher) be installed:
18.9.x Zebra 90XiII, 140XiII, 170XiII & 220XiII printers 28.10.3 Zebra S400 printer
27.10.3 Zebra S600 printer
29.9.x Zebra 170PAX & 170PAX2 print engines 31.9.x Zebra 170PAX & 170PAX2 print engines 32.8.4 Zebra DA402 & T402 printers
33.10.0 Zebra 90XiIII, 96XiIII, 140XiIII, 170XiIII & 220XiIII printers 34.10.x Zebra 110PAX3 print engine
35.10.x Zebra 110PAX3 print engine 37.10.x Zebra 170PAX3 print engine 38.10.x Zebra 170PAX3 print engine 49.11.3 Zebra 110PAX3 print engine 60.13.0.12 Zebra 110PAX4 print engine 60.13.0.12 Zebra 170PAX4 print engine
Front Panel Programming
X.9.x firmware has added new parameters to the Front Panel Configuration (XiII series printer and 170PAX/170PAX2 series print engine only). X.10.x firmware has these same parameters for the XiIII series and PAX3 series printers. X.13.x firmware has these same parameters for the XiIIIPlus series and PAX4 series printers.These parameters are located immediately following the LCD ADJUST prompt. (Refer to the printer/print engine User Guide for complete configuration information.)
Real Time Clock Parameters
The parameters listed on the following pages are added to the Front Panel Configuration prompts only when both the Real Time Clock hardware option and the following versions of firmware are installed:
• X.9.x or above firmware installed in the XiII series printers or the 170PAX/170PAX2 series print engines.
• X.10.x or above firmware installed in the XiIII series printers or the PAX3 series print engines.
• X.13.x or above firmware installed in the XiIIIPlus series printers or the PAX4 series print engines.
The RTC ZPL II Commands apply to all printers/print engines with the Real Time Clock hardware option and proper firmware (see Document Scope on page iv for printers/print engines and firmware versions).
Front Panel Programming Real Time Clock Parameters
2
Idle Display
Selects the printer/print engine Idle Display format and the method of displaying the time/date information. This parameter also affects the Configuration Label printout and the RTC DATE and RTC TIME formats.
Selections
FW VERSION, MM/DD/YY 24HR, MM/DD/YY 12HR, DD/MM/YY 24HR, DD/MM/YY 12HR
If FW VERSION is selected, the format on the Configuration Label and on the RTC DATE and RTC TIME parameters is MM/DD/YY 24HR.
RTC Time
Allows entry of the RTC time in the format selected by the IDLE DISPLAY parameter. Use the LEFT oval key to select the position to be adjusted; then use the RIGHT oval key to select the correct value for that position.
RTC Date
Allows entry of the RTC date in the format selected by the IDLE DISPLAY parameter. Use the LEFT oval key to select the position to be adjusted; then use the RIGHT oval key to select the correct value for that position.
RTC ZPL II Commands
RTC General Information
The Real Time Clock commands are only applicable if the Real Time Clock option is installed in the printer. For those printers with an LCD front panel display, additional front panel configuration parameters are also included.
The ZPL II Field Clock ^FC command is used to specify the clock-indicator character for the primary, secondary, and third clocks. This command must be included within each label field command string whenever the date or time clock values are required within the field. No date or time clock information can be printed in a label field unless this command is included. The
^FC command can now be combined with the ^SN command in V60.13.0.10 and above. A clock-indicator can be any printable character except the ZPL II Format Prefix, Control Prefix, or Delimiter characters. The default value for the primary clock-indicator is the percent sign %. The secondary and tertiary clock-indicators have no defaults and must be specified in order for that clock to be used.
The Field Data ^FD command has been expanded to recognize the clock-indicators and associated command characters, and to replace them during the printing process with the corresponding time or date parameter. For example, if the primary clock-indicator is the percent sign %, then during printing, the character sequence %H in the ^FD statement would be replaced by the 2-digit current hour.
The name of the day of the week, the name of the month, and the AM or PM designation can also be inserted in place of a specific clock-indicator/command character sequence. See Table 1 on page 4 for the list of command characters and their functions.
Note • If the Real Time Clock is not installed, or the ^FC command has not preceded the
^FD statement, no replacement would occur. In this case, the characters %H would print as text on the label.
RTC ZPL II Commands RTC General Information
4
The Set Offset ^SO command permits the printing of specific times and dates relative to the primary clock. The secondary (or third) clock is enabled when secondary (or tertiary) offsets are entered using this command. The secondary (or third) clock time and date are determined by adding the offsets to the current clock reading.
One ^SO command is required to set the secondary offset; an additional ^SO command is required for a tertiary offset. The offsets remain until changed or until the printer is either powered down or reset.
Table 1 • Command Characters Command
Character
Function
%a is replaced by the abbreviated weekday name
%A is replaced by the weekday name
%b is replaced by the abbreviated month name
%B is replaced by the month name
%d is replaced by the day of the month number, 01 to 31
%H is replaced by the hour of the day (military), 00 to 23
%I is replaced by the hour of the day (civilian), 01 to 12
%j is replaced by the day of the year, 001 to 366
%m is replaced by the month number, 01 to 12
%M is replaced by the minute, 00 to 59
%p is replaced by the AM or PM designation
%S is replaced by the seconds, 00 to 59
%U is replaced by the week# of the year, 00 to 53, Sunday is 1st day1
1. %U establishes Sunday as the first day of the year.
%W is replaced by the week# of the year, 00 to 53, Monday is 1st day2
2. %W establishes Monday as the first day of the year.
%w is replaced by the day# of the week, 00 (Sunday) to 06 (Saturday)
%y is replaced by the 2 digits of the year, 00 to 99
%Y is replaced by the full 4 digit year number—where% is the specified clock-indicator character
Note • Only dates from January 1, 1998 to December 31, 2097 are supported. Setting the offsets to values that result in dates outside this range is not recommended and may have unexpected results.
5
RTC ZPL II Commands RTC General InformationThe Set Mode/Language ^SL (see page 9) command is used to select the language the days of the week and the months are printed in. This command also sets the printing mode, which can be S for START TIME or T for TIME NOW. In START TIME mode, the time printed on the label is the time that is read from the Real Time Clock when the label formatting begins (when the ^XA command is received by the printer). In TIME NOW mode, the time printed on the label is the time that is read from the Real Time Clock when the label is placed in the queue to be printed.
Time and Date Precision
The time and date placed in a label field is determined at the time the label bitmap is created by the printer (start time mode). If a batch of labels is formatted, the date and time will be the same for all labels in the batch. If the printer is paused during the printing process and remains in that state for a period of time, when printing resumes, the time and date will still be the same as when the batch was first started.
Note • As of V60.13.0.1 firmware, the ^CO command is now ignored.
Note • For versions prior to V60, if more precise time and date stamps are required on the labels, the ^CO (Cache On) ZPL II command can be used to limit the memory available for label bitmaps and thus reduce the number of labels containing the same time and date stamp. To determine the value for the “b” parameter of the ^CO command, perform the steps shown below:
Please cycle the printer/print engine power Off (O) and On (l) to clear the memory before performing the steps below.
1. Print a Memory Usage Label (^XA^WD*:*.*^XZ) and note the following value: Available RAM (in BYTES)
(A) 2. Print a Configuration Label and
note these values:
Printer “Print Width” (in DOTS) (NOT the Label Width)
(B) Label Length (in DOTS) (C) 3. Determine the desired maximum
number of queued labels with the same Time and Date value.
(D)
Note • Increasing the number of queued labels will improve throughput performance, but Real Time Clock values will be less accurate. Two is usually a good compromise.
RTC ZPL II Commands RTC General Information
6
Example
This command string will cause 489 KBYTES to be set aside as Font Memory and make it unavailable as label format memory. The memory remaining will only allow two labels to be formatted at one time, and the time and date will be more precise for those two labels.
4. Substitute the values for B through D from the previous page into the following formula: The “label queue” memory required (in BYTES) (B x C x D)/8 =
(E) 5. Substitute the values for A and E
into the following formula: The ^CO command memory required (in KBYTES) (A-E)/1024)-5=
(F)
Note • If the value of (F) is less than zero, then no ^CO command is needed. If the value of (F) is greater than zero, use the integer portion in the ^CO command.
Available RAM (A) = 71478 BYTES Print Width (B) = 832 DOTS Label Length (C) = 1000 DOTS Max Labels Queued (D) = 2
Then —
The label queue memory required (E) = (B x C x D)/8 = 208000 BYTES And —
The ^CO command memory required (F) = (71478-208000)/1024)-5=489.87 KBYTES
Therefore, the correct ^CO command string to add to the label format would be:
^XA^COY,489^XZ
Note • For the Time 170PAX2 print engine, you must disable the Reprint Function for the Now Mode to function properly.
7
RTC ZPL II Commands^KDa
^KDa
Date/Time Format
Description The ^KD command selects the format that the Real-Time Clock’s date and time information presents as on a configuration label. This is also displayed on the Printer Idle LCD front panel display, and displayed while setting the date and time.
Format ^KDa
This table identifies the parameters for this format:
Parameters Details a = value of date and
time format
Accepted Values:
0 = normal, displays Version Number of firmware
1 = MM/DD/YY (24-hour clock)
2 = MM/DD/YY (12-hour clock)
3 = DD/MM/YY (24-hour clock)
4 = DD/MM/YY (12-hour clock)
Default Value: 0
Notes •
• If the Real Time Clock hardware is not present, the display mode will be set to Version Number.
• If Display Mode is set to 0 (Version Number) and the Real-Time Clock hardware is present, the date and time format on the front panel display and configuration label is presented in format 1.
RTC ZPL II Commands ^FC
8
^FC
Field Clock
Description The ^FC command is used to set the clock-indicators (delimiters) and the clock mode for use with the Real-Time Clock hardware. This command must be included within each label field command string each time the Real-Time Clock values are required within the field.
Format ^FCa,b,c
This table identifies the parameters for this format:
Parameters Details a = primary clock
indicator character
Accepted Values: any ASCII character
Default Value: %
b = secondary clock indicator character
Accepted Values: any ASCII character
Default Value: none—this value cannot be the same as a or c
b = tertiary clock indicator character
Accepted Values: any ASCII character
Default Value: none—this value cannot be the same as a or b
Notes •
• If no Real Time Clock hardware is present, this command is ignored. • As of V60.13.0.10 (^SN) functions with (^FC) capabilities.
Example • Entering these ZPL commands sets the primary clock indicator to %, the secondary clock indicator to {, and the tertiary clock indicator to #. The results are printed on a label with Primary, Secondary, and Tertiary as field data.
^XA ^FO10,100^A0N,50,50 ^FC% ^FDPrimary: %m/%d/%y^FS ^FO10,200^A0N,50,50 ^FC,{ ^FDSecondary: {m/{d/{y^FS ^FO10,300^A0N,50,50 ^FC,,# ^FDTertiary: #m/#d/#y^FS ^XZ
ZPL II CODE GENERATED LABEL
Primary: 05/06/01
Secondary: 0506/01
Third: 05/06/01
9
RTC ZPL II Commands^SL
^SL
Set Mode/Language
Description The ^SL command is used to specify the Real-Time Clock’s mode of operation and language for printing information.
Format ^SLa,b
This table identifies the parameters for this format: Notes •
• The ^SL command must be placed before the first ^FO command.
• As of V60.13.0.10 all supported printers have Enhanced Real Time Clock capabilities the RTC will not print time fields that are more than sixty seconds old, rather it will update the time prior to printing (^SLT or ^SL60). To control time with increments other than sixty seconds the ^SL command can be used with a numeric value (^SL30).
^SLS can keep times longer than sixty seconds.
Parameters Details
a = mode Accepted Values:
S = Start Time Mode. This is the time that is read from the Real Time Clock when label formatting begins (when ^XA is received). The first label has the same time placed on it as the last label.
T = Time Now Mode. This is the time that is read from the Real Time Clock when the label to be printed is placed in print queue. Time Now is similar to a serialized time or date field.
Numeric Value = With the Enhanced Real Time Clock (V60.13.0.10 and above) a time accuracy tolerance can be specified. Range = 1 to 999 seconds, 0 = one second tolerance
Example: SL30,1 = Accuracy tolerance of 30 seconds and use English.
Default Value: S
Important •
• Time is read when the image is created. If the image stays in the queue longer than the specified time the image will be recreated with a new time.
• There are incidents when the same time or a larger space of time may be printed on labels. This is due to the format complexity and print speed.
RTC ZPL II Commands ^SO
10
^SO
Set Offset
Description The ^SO command is used to set the secondary and the third offset from the primary Real-time Clock.
Format ^SOa,b,c,d,e,f,g
This table identifies the parameters for this format:
Parameters Details
a = clock set Accepted Values: 2 (secondary) or 3 (third)
Default Value: value must be specified
b = months offset Accepted Values: –32000 to 32000
Default Value: 0
c = days offset Accepted Values: –32000 to 32000
Default Value: 0
d = years offset1 Accepted Values: –32000 to 32000
Default Value: 0
e = hours offset Accepted Values: –32000 to 32000
Default Value: 0
f = minutes offset Accepted Values: –32000 to 32000
Default Value: 0
g = seconds offset Accepted Values: –32000 to 32000
Default Value: 0
11
RTC ZPL II Commands^ST
^ST
Set Date/Time
Description. The ^ST command sets the date and time of the Real-Time Clock. Format. ^STa,b,c,d,e,f,g
This table identifies the parameters for this format:
Parameters Details
a = month Fixed Value: 01 to 12
Default Value: current month
b = day Accepted Values: 01 to 31
Default Value: current day
c = year Accepted Values: 1998 to 2097
Default Value: current year
d = hour Accepted Values: 00 to 23
Default Value: current hour
e = minute Accepted Values: 00 to 59
Default Value: current minute
f = second Accepted Values: 00 to 59
Default Value: current second
g = format Accepted Values:
A = a.m.
P = p.m.
M = 24-hour military
RTC ZPL II Commands ZPL II Samples
12
ZPL II Samples
The ZPL II scripts shown on this page establish the initial settings for the date and time clock. The script below then references these settings to provide the output shown in Figure 1 on page 13.
Setting the date and time for the Real Time Clock only needs to be done once. The date and time are maintained by an on-board battery when the printer is reset or the printer is turned Off (O).
To set the date and time to April 23, 1999 at 2:30 PM, the following command string should be sent to the printer:
^XA
^ST04,23,1999,02,30,0,P^FS ^XZ
To initialize the Real Time Clock and set up two offset values (offset #2 set to 3 months and 1 hour in the future, offset #3 set to 1 year in the past), the following command sequence should be sent to the printer:
^XA ^SL
^SO2,3,0,0,1,0,0^FS ^SO3,0,0,-1,0,0,0^FS ^XZ
The above ZPL II scripts initialize the RTC date and time and must be sent to a printer to provide proper date and time parameters for the ZPL II script below.
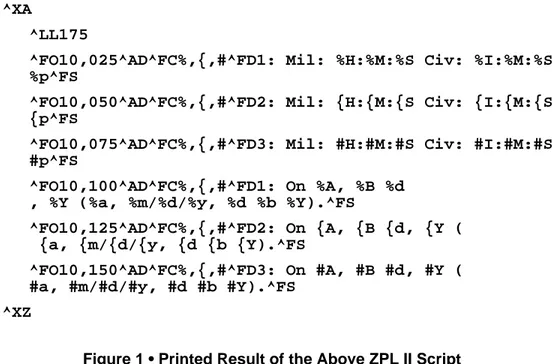
The following ZPL II script illustrates the various methods of printing the date and time initialized in the script above within separate fields on continuous media. Figure 1 on page 13 illustrates the printout of this script on a label.
13
RTC ZPL II CommandsZPL II Samples
For the below example, the ^FC command delimiters are:
% Primary clock indicator
{ Secondary clock indicator
# Tertiary clock indicator
^XA
^LL175
^FO10,025^AD^FC%,{,#^FD1: Mil: %H:%M:%S Civ: %I:%M:%S %p^FS
^FO10,050^AD^FC%,{,#^FD2: Mil: {H:{M:{S Civ: {I:{M:{S {p^FS
^FO10,075^AD^FC%,{,#^FD3: Mil: #H:#M:#S Civ: #I:#M:#S #p^FS
^FO10,100^AD^FC%,{,#^FD1: On %A, %B %d , %Y (%a, %m/%d/%y, %d %b %Y).^FS
^FO10,125^AD^FC%,{,#^FD2: On {A, {B {d, {Y ( {a, {m/{d/{y, {d {b {Y).^FS
^FO10,150^AD^FC%,{,#^FD3: On #A, #B #d, #Y ( #a, #m/#d/#y, #d #b #Y).^FS
^XZ
Figure 1 • Printed Result of the Above ZPL II Script 1: Mil: 14:30:00 Civ: 02:30:00 PM
2: Mil: 15:30:00 Civ: 03:30:00 PM 3: Mil: 14:30:00 Civ: 02:30:00 PM
1: On Wed, April 23, 2005 (Fri, 04/23/05, 23 Apr 2005) 2: On Saturday, July 23, 2005 (Fri, 07/23/05, 23 Jul 2005) 3: On Friday, April 23, 2004 (Fri, 04/23/04, 23 Apr 2004)
RTC ZPL II Commands ZPL II Samples
14
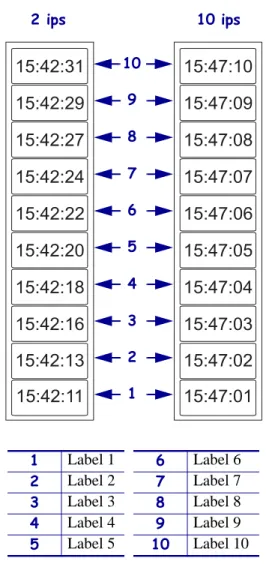
The following are examples of the time stamp using the ^SL1 and ^SL5 at 2 ips and 10 ips for the RTC enhanced.
^XA
^SL1^FS
^FO187,184^A0N,101,121^FC%^FD%H:%M:%S^FS ^PQ10
^XZ
Figure 2 • Example of ^SL1, 2 ips and 10 ips Note • They show the variation of time due to print speed and label complexity.
1 Label 1 6 Label 6 2 Label 2 7 Label 7 3 Label 3 8 Label 8 4 Label 4 9 Label 9 5 Label 5 10 Label 10
15:42:20
15:42:22
15:42:24
15:42:27
15:42:29
15:42:31
15:42:18
15:42:16
15:42:13
15:42:11
15:47:05
15:47:06
15:47:07
15:47:08
15:47:09
15:47:10
15:47:04
15:47:03
15:47:02
15:47:01
2 ips 10 10 ips 9 8 7 6 5 4 3 2 115
RTC ZPL II CommandsZPL II Samples
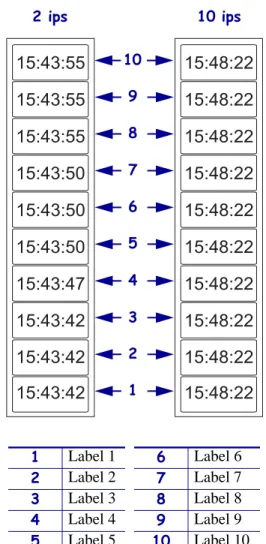
^XA
^SL5^FS
^FO187,184^A0N,101,121^FC%^FD%H:%M:%S^FS ^PQ10
^XZ
Figure 3 • Example of ^SL5, 2 ips and 10 ips
1 Label 1 6 Label 6 2 Label 2 7 Label 7 3 Label 3 8 Label 8 4 Label 4 9 Label 9 5 Label 5 10 Label 10
15:43:50
15:43:50
15:43:50
15:43:55
15:43:55
15:43:55
15:43:47
15:43:42
15:43:42
15:43:42
15:48:22
15:48:22
15:48:22
15:48:22
15:48:22
15:48:22
15:48:22
15:48:22
15:48:22
15:48:22
2 ips 10 ips
10 9 8 7 6 5 4 3 2 1
Zebra Technologies Corporation 333 Corporate Woods Parkway
Vernon Hills, Illinois 60061.3109 U.S.A. Telephone: +1 847.634.6700
Facsimile: +1 847.913.8766
Zebra Technologies Europe Limited Zebra House
The Valley Centre, Gordon Road High Wycombe
Buckinghamshire HP13 6EQ, UK Telephone: +44 (0) 1494 472872 Facsimile: +44 (0) 1494 450103