Generic 1, Generic 3, System 75, and Release 5
Voice Terminal Builder Guide
Notice Every effort was made to ensure that the information in this book was complete and accurate at the time of printing. However, information is subject to change.
Your Responsibility for Your System’s Security Toll fraud is the unauthorized use of your telecommunications system by an unauthorized party, for example, persons other than your company’s employees, agents, subcontractors, or persons working on your company’s behalf. Note that there may be a risk of toll fraud associated with your telecommunications system, and if toll fraud occurs, it can result in substantial additional charges for your telecommunications services.
You and your System Manager are responsible for the security of your system, such as programming and configuring your equipment to prevent unauthorized use. The System Manager is also responsible for reading all installation, instruction, and system administration documents provided with this product in order to fully understand the features that can introduce risk of toll fraud and the steps that can be taken to reduce that risk. Lucent Technologies does not warrant that this product is immune from or will prevent unauthorized use of common-carrier telecommunication services or facilities accessed through or connected to it. Lucent Technologies will not be responsible for any charges that result from such unauthorized use.
Lucent Technologies Fraud Intervention If you suspect you are being victimized by toll fraud and you need technical support or assistance, call Technical Service Center Toll Fraud Intervention Hotline at 1 800 643-2353.
Trademarks DEFINITY is a registered trademark of Lucent Technologies. AmiPro is a registered trademark of Lotus Development Corporation. Rich Text Format (RTF) is a trademark of Microsoft Corporation. Windows is a trademark of Microsoft Corporation. WordPerfect is a registered trademark of WordPerfect Corporation.
reasonable protection against harmful interference when the equipment is operated in a commercial environment. This equipment generates, uses, and can radiate radio-frequency energy and, if not installed and used in accordance with the instruction manual, may cause harmful interference to radio communications. Operation of this equipment in a residential area is likely to cause harmful interference, in which case the user will be required to correct the interference at his or her own expense.
Ordering Information
Call: Lucent Technologies Publications Center Voice 1 800 457-1235
Fax 1 800 457-1764
International Voice 1 317 361-5353 International Fax 1 317 361-5355 Write: Lucent Technologies Publications Center
P.O. Box 4100
Crawfordsville, IN 47933 Order: Document No. 555-230-755
Comcode 107869968 Issue 3, September 1996
You can be placed on a Standing Order list for this and other documents you may need. Standing Order will enable you to automatically receive updated versions of individual documents or document sets, billed to account information that you provide. For more information on Standing Orders, or to be put on a list to receive future issues of this document, please contact the Lucent Technologies Publications Center.
Voice Terminal Guide Builder
Congratulations on your purchase of the Lucent Technologies Voice Terminal Guide Builder. The Voice Terminal Guide Builder (VTGB) is a user-friendly software package that allows you to produce laser-printed documentation for specific voice terminals connected to a DEFINITY Communications System Generic 1 or Generic 3, a DEFINITY System 75, or a DEFINITY Enterprise Communications Server Release 5. All of this may be accomplished without cutting and pasting, and without file manipulation. VTGB also allows you to enhance the output through the use of interfaces to many word processing packages.
There are several ways of tailoring the VTGB for your individualized office needs.
■ Create a separate user’s guide and/or quick reference for each person,
focusing only on the features that appear on a person’s voice terminal.
■ Print a set of user’s guides and/or quick reference cards directed to those
employees whose voice terminals have the same features.
■ Put together a complete user’s guide including a table of contents,
conventions, tones, glossary, and all possible features and descriptions for each voice terminal connected to a particular switch. Keep this detailed guide in a central location where employees can refer to it when they have questions about a particular feature.
■ Select the features and then save the output to a file that can be
About This Manual
This user’s manual contains all the procedures necessary to work with your VTGB. It is organized by tasks, beginning with the selection of your System ID and Terminal, and ending with saving the output to a printed document or file.
The tasks described in this manual are also covered in the on-line help. You can access Help by selecting the Help button on the appropriate window.
Before You Begin
Before you begin using VTGB, check the contents of the package, confirm the requirements of your hardware and software, and install the software.
Contents of the Package
■ Voice Terminal Guide Builder User’s Manual
This manual describes the features, explains how to install the software, and provides detailed procedures on how to use the VTGB.
■ Voice Terminal Guide Builder installation diskette
There is one 3 1/2” installation diskette which contains the VTGB application software and voice terminal information needed to produce your documentation.
■ Registration card for notification of updates
Before You Begin
Hardware and Software Requirements
You can access Voice Terminal Guide Builder through Microsoft Windows. The following sections list the hardware and software requirements for Microsoft Windows. For additional information on your hardware and software, refer to the appropriate user’s guides. For information on installing the VTGB software, refer to ‘‘Installing the Software’’ on page 5.
Hardware Requirements
The hardware required is as follows:
■ 386 PC (mouse recommended)
■ 6 Mb of disk space minimum and 4 Mb RAM minimum
(8 Mb recommended)
■ Any printer supported by Microsoft Windows (capable of printing
graphics)
Software Requirements
The software required is as follows:
■ Microsoft Windows 3.1 or higher
Product Support
Conventions Used in this Guide
The conventions used in this manual are as follows:
■ A rectangular box, such as , represents a button to be selected
from a VTGB application window.
■ A rectangular box with an underlined down arrow is referred to as a label
box arrow.
■ Key names shown in small capital letters, such as ALT, RETURN, and F1
represent a key to be pressed on your PC keyboard. Note that the keys on your keyboard may not be labeled exactly as they are in this
document.
■ A keyboard equivalent is an alternate method of making a selection.
Pressing ALT and the underlined letter of the selection simultaneously on your PC keyboard allows you to make a selection. For example, pressing
ALT-V allows you to select the option on the Features window.
■ In the procedures, keyboard equivalents follow the menu, button, and
command names. For example: Select (ALT-F) from Program Choices.
■ You can use the mouse or the keyboard to accomplish all VTGB tasks.
Whenever possible procedures apply to both the mouse and the keyboard.
■ Information in bold italic characters, such as File, represents a menu or
command option on the Program Manager window.
■ Information in computer type characters, such as a:setup, represents commands or command options you can enter on your PC keyboard.
Features
View Item
Installing the Software
Installing the Software
Microsoft Windows must be installed on your computer before you can install VTGB. For information on installing Windows, refer to the appropriate user’s guides.
Hint:
Before you install the VTGB software, we recommend that you make a duplicate copy of the original installation diskette. Store the original diskette in a safe place, and use the duplicate as your working copy.
To install VTGB, use the following procedure:
1. Insert the Voice Terminal Guide Builder installation diskette in the appropriate drive. (This example uses drive a:).
2. Select the File (ALT-F) menu from the Program Manager. 3. Select the Run... (R) option.
■ The Run dialog box is displayed.
4. Type a:setup in the Command Line: (ALT-C). 5. Select (ENTER).
6. Read and respond to the messages as they are displayed on the screen. You can specify which directory will contain the new VTGB files, and the Program Manager group that will include your VTGB icon.
!
WARNING:
!
It is highly recommended that you use the default directory VTGB. Under no circumstances should you install this product in the root directory!
■ When installation is complete, the VTGB icon is displayed on the
Program Manager screen.
7. Remove the Voice Terminal Guide Builder installation diskette.
8. Double-click on the VTGB icon to start Voice Terminal Guide Builder.
■ The welcome banner is displayed briefly.
■ The main window is displayed.
You are now ready to use Voice Terminal Guide Builder!
Using On-Line Help
The VTGB contains context-sensitive on-line help. Help provides you with instructions on selecting the appropriate system, terminal, and features, customizing the system names, entering feature access codes, and printing a customized user’s guide and quick reference.
To get immediate, specific information on the function you are currently using, do one of the following:
■ Select on the appropriate window.
■ Press ALT-H simultaneously on your PC keyboard.
■ Press the F1 function key on your PC keyboard.
NOTE:
All movement can be accomplished with a mouse or the keyboard. Refer to ‘‘VTGB Basics’’ on page 8.
Related topics are linked with hypertext jumps. (A hypertext jump links a topic on one help screen to another help screen.) The text defining a jump to another topic appears in green with a single underline. When you move the cursor over a hypertext jump, the cursor changes to a pointing hand. Select the topic to display the related information.
You can use , , , , , and to move
through the Help topics.
■ (ALT-C) returns you to the main Help menu.
■ (ALT-S) displays all the Help topics. To select a topic, click on the topic, select Show Topics (ALT-S), and then select Go To (ALT-G).
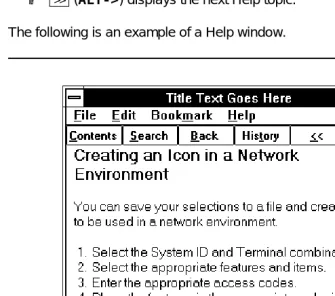
Help
Contents Search Back History << >>
Contents
Using On-Line Help
■ (ALT-B) displays the previously viewed Help topic.
■ (ALT-T) displays a list of the Help topics previously viewed.
■ (ALT-<) displays the previous Help topic.
■ (ALT->) displays the next Help topic.
The following is an example of a Help window.
Figure 1. On-line Help Window
Back
History
<<
VTGB Basics
Now that you have loaded the software, you are ready to navigate through the world of VTGB. This section explains the basic skills needed to use your VTGB.
You can use a mouse or keyboard to carry out any action in VTGB. If you are unfamiliar with using the mouse or keyboard to move around windows, selecting buttons, or selecting from a list, read the following sections.
Using the Mouse
To Make a Button Selection
Point to a button on a window and click on the left button of the mouse.
To Move Around a Window
Move the mouse to position the arrow over the desired area.
To Reposition Your Window
Drag the title bar on the window and move it to the desired location. This allows you to reposition the location of your window to a more convenient working location.
Using the Keyboard
To Make a Button Selection
Hold down the ALT key and press the underlined letter of the button. For example, pressing ALT-F allows you to select in the Program Choices section.
VTGB Basics
To Make A Label Box Arrow Selection
(The following examples use the Terminal label box arrow.)
1. Press TAB or ALT-T to move to the Terminal label box arrow.
■ The current terminal in the Terminal label box arrow is
highlighted.
2. Press ALT- to display the list of terminals associated with the selected System ID. (The slide bar indicates additional terminals.)
3. Press or to navigate through the list.
4. Press RETURN to select the desired terminal.
■ The selected terminal is displayed in the Terminal label box arrow.
An alternate method of the previous procedure is as follows:
1. Press TAB or ALT-T to move to the Terminal label box arrow.
■ The current terminal in the Terminal label box arrow is
highlighted.
2. Press or to navigate through the list of terminals. (This method toggles the fields and does not display a list of the terminals. The
Terminal label box displays a different terminal each time you press
or .
To Move Around a Window
■ Press TAB to move forward around each section of the entire window.
■ Press SHIFT-TAB simultaneously to move backwards around each section of the entire window.
How to Use Your VTGB
The VTGB software contains the following windows: Main, System List, System Entry, Access Codes, Features, and Print. It also contains various types of informational boxes to remind you to perform or confirm an action.
Starting VTGB
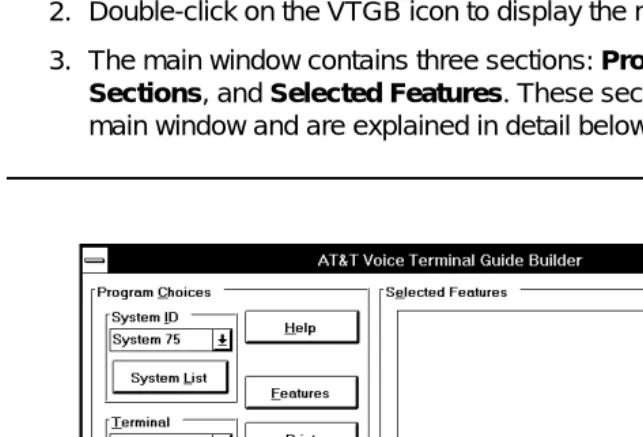
1. If Windows is not already running, type win at the command prompt. 2. Double-click on the VTGB icon to display the main window.
3. The main window contains three sections: Program Choices, Guide
Sections, and Selected Features. These sections are shown in the
main window and are explained in detail below.
How to Use Your VTGB
Program Choices — System ID
The System ID label box arrow allows you to select the Lucent Technologies switch to which your voice terminals are connected. The switch transmits and receives voice and data signals for all communications equipment in your network.
To Select A System ID
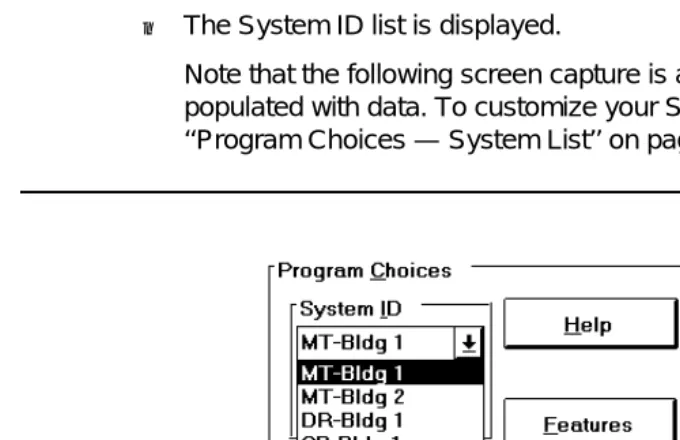
1. Select the System ID (ALT-I) label box arrow from Program Choices.
■ The System ID list is displayed.
Note that the following screen capture is an example of a window populated with data. To customize your System IDs, refer to ‘‘Program Choices — System List’’ on page 12.
Figure 3. System ID List
2. Select the desired System ID
■ The selected System ID is displayed in the System ID label box
Program Choices — System List
Selecting opens the System List window. This window allows you to customize your System IDs.
To Change a System Entry
1. Select (ALT-L) from Program Choices.
■ The System List window is displayed.
Note that the following screen capture is an example of a window populated with data.
Figure 4. System List Window
2. Select the system entry you want to edit.
■ The selected entry is highlighted.
System List
How to Use Your VTGB
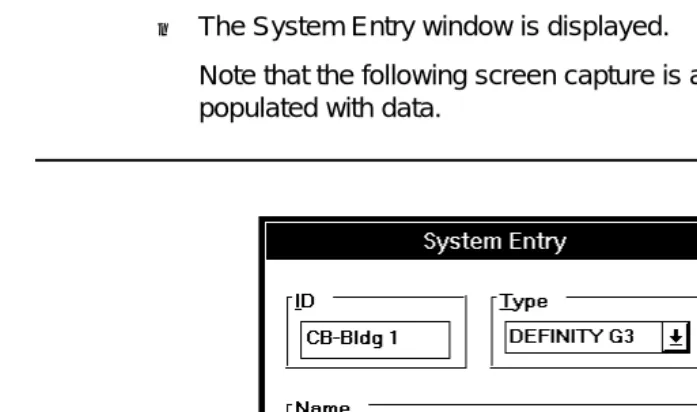
3. Select (ALT-R).
■ The System Entry window is displayed.
Note that the following screen capture is an example of a window populated with data.
Figure 5. System Entry Window
4. Enter the ID (ALT-I). The ID is a 13 character required field.
Use IDs that are meaningful for your organization. For example, if you are entering IDs for a university, you might want to enter the name of each campus on a particular switch. The ID you enter in this field will be displayed in the System ID (ALT-I) label box in Program Choices.
!
WARNING:
If you leave the ID blank, you will receive a message stating that all the feature access codes associated with this System ID will also be deleted. This has the same affect as selecting on the System List window. Refer to the section ‘‘To Delete a System Entry’’ on page 15.
Revise
NOTE:
If you change the ID, a warning message is displayed informing you that the new System ID retains the feature access codes of the old
System ID. Select if this is correct.
5. Select the Type (ALT-T). The Type is a required selection.
6. Enter the Name (ALT-N). The Name is a 52 character optional field.
NOTES:
■ The name you enter in this field will be displayed in the lower left
corner of the printed user’s guide and quick reference.
■ If you leave the Name field blank, it is automatically populated with
the System Type.
7. Repeat Steps 2 through 6 to change additional system entries.
8. Select (ALT-S).
■ The new entry is saved and displayed in the System List window.
9. Select (ALT-X).
To Add a System ID
1. Select (ALT-L) from Program Choices.
■ The System List window is displayed.
2. Select a blank line.
■ The blank line is highlighted.
3. Select (ALT-R).
■ The System Entry window is displayed.
4. Enter the ID (ALT-I). The ID is a 13 character required field.
Use IDs that are meaningful to your organization. For example, if you are entering IDs for a university, you might want to enter the name of each campus on a particular switch. The ID you enter in this field will be displayed in the System ID (ALT-I) label box in Program Choices.
OK
Save
Exit
System List
How to Use Your VTGB
NOTE:
If you change the ID, a warning message is displayed informing you that the new System ID retains the feature access codes of the old
System ID. Select if this is correct.
5. Select the Type (ALT-T). The Type is a required selection.
6. Enter the Name (ALT-N). The Name is a 52 character optional field.
NOTES:
■ The name you enter in this field will be displayed in the lower left
corner of the printed user’s guide and quick reference.
■ If you leave the Name field blank, it is automatically populated with
the System Type.
7. Repeat Steps 2 through 6 to change additional system entries.
8. Select (ALT-S).
■ The new entry is saved and displayed in the System List window.
9. Select (ALT-X).
To Delete a System Entry
1. Select (ALT-L) from Program Choices.
■ The System List window is displayed.
2. Select the entry you would like to delete.
■ The selected entry is highlighted.
3. Select (ALT-C).
■ A confirmation message is displayed.
NOTES:
■ When you delete a system entry, you will receive a message
stating that all the feature access codes associated with this System ID will also be deleted.
OK
Save
Exit
System List
■ If you attempt to clear the last remaining system entry, you will
receive a message stating that you cannot clear all System IDs. Select (ENTER) and either revise the current entry or add another entry before deleting this entry.
4. Select (ALT-Y) to clear the entry.
■ The System ID and Name are cleared and deleted.
5. Repeat Steps 2 through 4 to delete additional system entries.
6. Select (ALT-X).
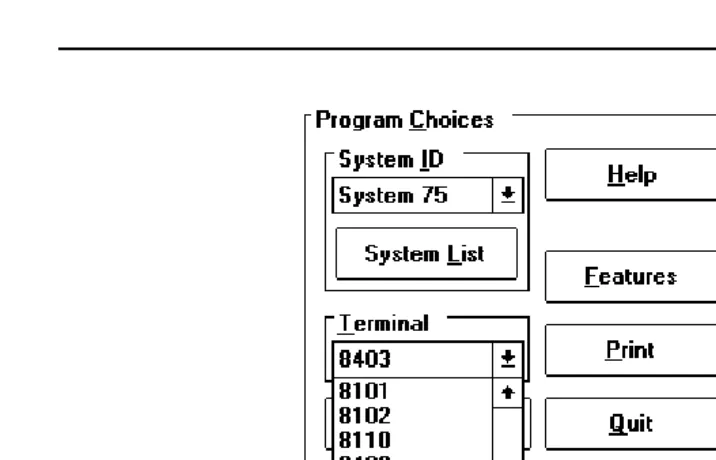
Program Choices — Terminal
The Terminal label box arrow allows you to select the appropriate terminal for the selected System ID.
To Select the Terminal
1. Select the Terminal (ALT-T) label box arrow from Program Choices.
■ A drop down list of terminals associated with the selected System
ID is displayed. (The slide bar indicates additional terminals.)
2. Select the appropriate terminal.
■ The selected terminal is displayed in the Terminal label box arrow.
Note that the following screen capture is an example of a window populated with data.
OK
Yes
How to Use Your VTGB
Figure 6. Terminal List
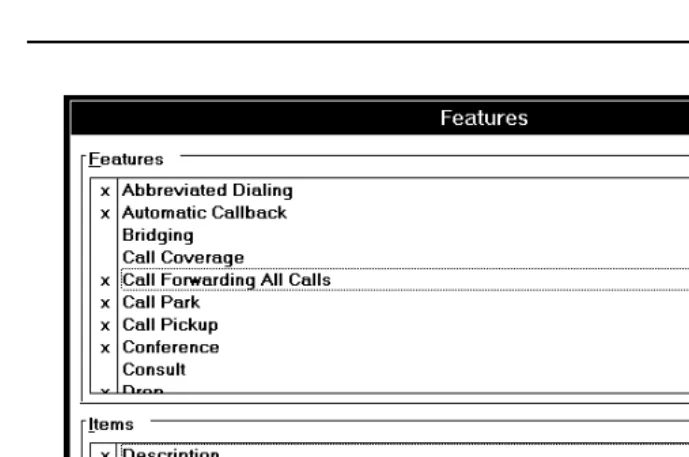
Program Choices — Features
Selecting from Program Choices opens the Features window. This window displays all the features and items specific to the selected System ID and Terminal combination. A dotted outline box surrounds the first feature in the Features selection. The description and procedure headings for the feature are listed below in the Items section. This window allows you to select the specific features and items you want included in your output.
To Select the Features
1. Select (ALT-F) from Program Choices.
■ The Features window is displayed.
Features
Figure 7. Features Window
2. The following options allow you to select the features and items to be incorporated in the output. Do one of the following:
■ Single-click on any feature listed to display the items associated
with that feature.
■ Double-click on any feature listed to display the items associated
with that feature, mark the feature, and mark all the items associated with that feature.
■ Double-click on any marked feature to unmark the feature and all
the items associated with that feature.
■ Double-click on any marked item to unmark that item. (If all
How to Use Your VTGB
3. Select (ALT-X).
■ The marked selections are saved to a file.
■ The marked selections are displayed in the Selected Features list.
If you are using the keyboard, do the following:
1. After you select the appropriate System ID and Terminal combination, press TAB or ALT-F from Program Choices.
■ The Features window is displayed.
2. Press or .
■ A dotted outline box surrounds the feature in the Features box.
The items corresponding to that feature are displayed in the items box.
3. Press the spacebar to select the feature. (x indicates the feature and all items for that feature are selected.)
NOTE:
If you do not want an item selected for that feature, press TAB or
ALT-I to move to the Items section, press to highlight the item you do not want selected, and press the spacebar.
4. Repeat Steps 1 through 3 to select additional features.
To Mark All Features and Items
1. Select (ALT-M) on the Features window.
■ All features and all items are marked with an x.
To Mark All Features and Only Descriptions
1. Select (ALT-D) on the Features window. (This allows you to create a document that describes only the features.)
■ All features and only descriptions are marked with an x.
Exit
Mark All
To Clear All Marked Items
1. Select (ALT-C) on the Features window.
■ All features and items are unselected.
To View an Item
1. Select a feature and an item associated with that feature on the Features window.
■ A dotted outline box surrounds the selected feature in the
Features section, and a dotted outline box surrounds the selected item in the Items section.
2. Select (ALT-V).
■ The procedure for the selected item is displayed.
3. Select (ALT-E) to close the window.
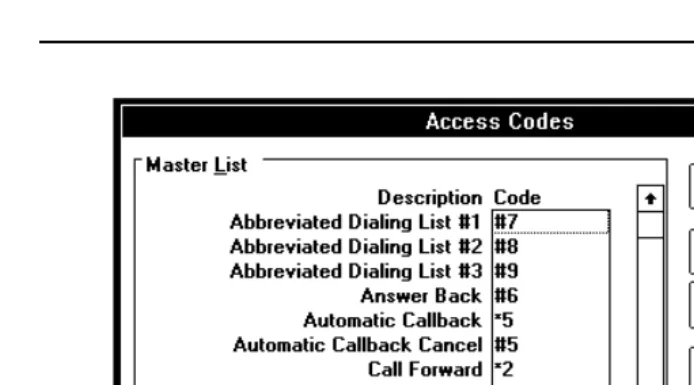
Program Choices — Access Codes
Selecting from Program Choices on the main window opens the Access Codes window. The Access Codes window lists all the features specific to the selected System ID and Terminal combination that can be accessed using feature access codes. This window allows you to customize the access codes for the selected System ID and Terminal combination.
To Enter, Edit, or Remove an Access Code
1. Select (ALT-A) from Program Choices.
■ The Access Codes window is displayed.
Note that the default access codes have been entered for your convenience.
Clear All
View Item
Exit
Access Codes
How to Use Your VTGB
Figure 8. Access Codes Window
2. Select the feature for which an access code is to be entered or changed.
■ A dotted outline box is displayed to the right of the feature.
3. Enter or edit the selected access code. Valid characters are 0 to 9, *, and #. Use the backspace key to delete any characters in the selected feature access code.
■ The access code is displayed to the right of the feature.
4. Repeat Steps 2 through 3 to enter additional access codes.
5. Select (ALT-S).
■ A confirmation message is displayed.
6. Select (ALT-Y) to save the access codes.
■ The access codes are saved. Note that once you save the access
codes, they remain saved for the selected System ID until you change them.
Save
If you are using the keyboard, do the following:
1. Press ALT-A from Program Choices.
■ The Access Codes window is displayed.
2. Press or to navigate through the list.
■ A dotted outline box is displayed to the right of the selected
feature.
3. Enter, edit, or delete the access code.
4. Press or to navigate to the next access code.
5. Repeat Steps 3 through 4 to edit additional access codes.
6. Select ALT-S to save the access codes.
■ A confirmation message is displayed.
7. Select ALT-Y.
■ The access codes are saved.
NOTES:
■ If you do not enter an access code for a selected feature, the
default will print ??? in the procedure section of the user’s guide, quick reference, rtf file, and view item screen.
■ If you do not enter an access code for a selected feature and you
select Access Codes in the Guide Sections, the feature will not appear in the Access Codes table when you print the user’s guide.
To Clear All Access Codes
1. Select (ALT-C) from the Access Codes window.
■ A confirmation message is displayed.
2. Select (ALT-Y) to clear all the access codes.
■ All access codes are removed.
3. Select (ALT-S).
Clear All
Yes
How to Use Your VTGB
■ A confirmation message is displayed.
4. Select (ALT-Y).
NOTE:
Selecting (ALT-A) after you select (ALT-C) will restore the default access codes.
To Apply the Default Access Codes
1. Select (ALT-A) from the Access Codes window.
■ A confirmation message is displayed.
2. Select (ALT-Y) to overwrite the current access codes with default access codes.
■ The default access codes are restored.
3. Select (ALT-S).
■ A confirmation message is displayed.
4. Select (ALT-Y).
■ The access codes are saved. Note that once you save the access
codes, they remain saved for the selected System ID until you change them.
NOTES:
■ Selecting (ALT-U) after you select will restore the access codes prior to the last save.
■ Selecting (ALT-C) after you select will clear the access codes.
Yes
Apply Defaults Clear All
Apply Defaults
Yes
Save
Yes
Undo Apply Defaults
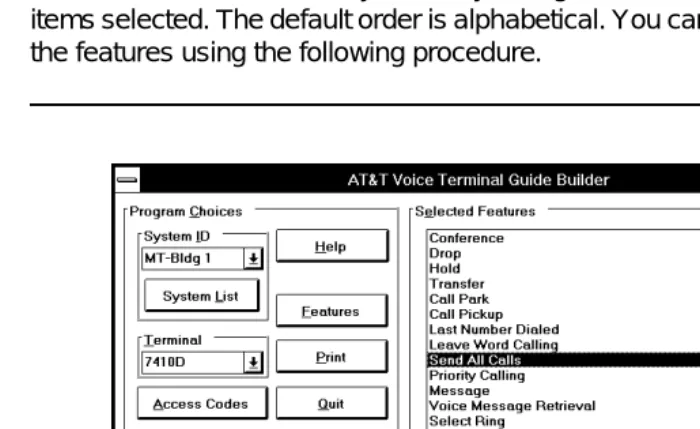
Selected Features
After you mark the features and items for System ID and Terminal combination, the Selected Features list dynamically changes to reflect only the features and items selected. The default order is alphabetical. You can rearrange the order of the features using the following procedure.
Figure 9. Selected Features on Main Window
To Rearrange the Order of the Features
1. Click and drag the selected feature from the Selected Features list.
■ The feature is highlighted and moved to the new location.
How to Use Your VTGB
If you are using the keyboard, do the following:
1. Press ALT-E on the main window.
■ A dotted outline box surrounds the first feature on the Selected
Features box.
2. Press or until you find the desired feature.
■ The feature is highlighted.
3. Press the spacebar.
4. Press or to move the feature to the desired sequence.
5. Press the spacebar again.
6. Repeat Steps 2 through 5 until all the features are in the desired sequence.
NOTE:
The features in the Selected Features list will return to alphabetical order if you do at least one of the following:
■ Select System ID (ALT-I) and select a different System ID.
■ Select (ALT-L).
■ Select (ALT-Q) to exit VTGB.
System List
Guide Sections
This section of the main window allows you to select what is to be incorporated in your user’s guide. You can select from the following:
■ 1. Contents and Cover (ALT-1) contains a table of contents, cover page, and legal page.
■ 2. Description of Terminal (ALT-2) contains a figure of the voice terminal along with a brief description of the buttons and features.
■ 3. Conventions (ALT-3) contains a list of the conventions used, and any special instructions.
■ 4. Features (ALT-4) contains the descriptions and features selected from the Features window.
■ 5. Tones (ALT-5) contains a list of handset tones and ringing tones specific to the selected System ID and Terminal combination.
■ 6. Troubleshooting (ALT-6) contains a list of problems and solutions.
■ 7. Glossary (ALT-7) contains definitions of terms associated with the System ID and Terminal combination.
■ 8. Access Codes (ALT-8) contains a list of the features with the associated access codes.
To Select from Guide Sections
1. Click on the selection, or press ALT and the number of the selection.
■ An x indicates the option is marked for selection.
NOTE:
How to Use Your VTGB
Program Choices — Print
Selecting from Program Choices on the main window opens the Print window. This window allows you to:
■ Print a user’s guide or quick reference.
■ Save your selections to a Rich Text Format™ (RTF) file for downloading
to a word processing package.
■ Preview a user’s guide or quick reference on the screen.
■ Create an icon in a network environment.
Figure 10. Print Window
To Create a Customized User’s Guide
You can create a complete detailed user’s guide consisting of all the guide sections and all the features, or you can create a customized user’s guide consisting of selected guide sections and selected features.
1. Select the System ID and Terminal combination.
2. Select the appropriate features and items.
3. Enter the appropriate access codes.
4. Place the features in the appropriate order in the Selected Features section.
5. Select the sections to be included in your user’s guide from Guide Sections.
NOTES:
■ You must select at least one section from Guide Sections when
printing a user’s guide.
■ Select Contents and Cover (ALT-1) from Guide Sections to print a cover page, legal page, and table of contents. (The cover page, table of contents, and legal page print at the end of the user’s guide.)
■ The table of contents contains page numbers for printed user’s
guides, but only headings for RTF file output.
6. Select (ALT-P) from Program Choices.
■ The Print window is displayed.
7. Select User’s Guide (ALT-U) from Guide Type. 8. Select Printer (ALT-N) from Output To.
9. Select (ALT-P) on the Print window.
■ A status message box is displayed.
10. Select (ALT-X) on the Print window.
How to Use Your VTGB
To Create a Customized Quick Reference
You can create a complete quick reference consisting of abbreviated
procedures for all the features, or you can create a customized quick reference consisting of abbreviated procedures for selected features.
1. Select the System ID and Terminal combination.
2. Select the appropriate features and items.
3. Enter the appropriate access codes.
4. Place the features in the appropriate order in the Selected Features section.
5. Select (ALT-P) from Program Choices.
■ The Print window is displayed.
6. Select Quick Reference (ALT-Q) from Guide Type. 7. Select Printer (ALT-N) from Output To.
8. Select (ALT-P) on the Print window.
■ A status message box is displayed.
9. Select (ALT-X) on the Print window.
To Preview Your Selections
You can preview your selections on the screen before printing a user’s guide or quick reference.
1. Select the System ID and Terminal combination.
2. Select the appropriate features and items.
3. Enter the appropriate access codes.
4. Place the features in the appropriate order in the Selected Features section.
5. Select the appropriate guide sections if you a previewing a user’s guide. (Ignore this step if you are previewing a quick reference.)
6. Select (ALT-P) from Program Choices.
■ The Print window is displayed.
7. Select either User’s Guide (ALT-U) or Quick Reference (ALT-Q) from Guide Type.
8. Select Printer (ALT-N) from Output To. 9. Select (ALT-S) on the Print window.
■ The user’s guide or quick reference is displayed on your screen.
10. Select (ALT-E) on the View Output window. 11. Select (ALT-X) on the Print window.
Screen
Exit
How to Use Your VTGB
To Save Selections to a File
You can make your selections and then save the selections to a file for future use. For example, you can save a file and then edit the file using your favorite word processing package.
1. Select the System ID and Terminal combination.
2. Select the appropriate features and items.
3. Enter the appropriate access codes.
4. Place the features in the appropriate order in the Selected Features section.
5. Select the appropriate guide sections if you are saving a user’s guide. (Ignore this step if you are saving a quick reference to a file.)
6. Select (ALT-P) from Program Choices.
■ The Print window is displayed.
7. Select either User’s Guide (ALT-U) or Quick Reference (ALT-Q) from Guide Type.
8. Select RTF File (ALT-R) from Output To.
■ The File Name (ALT-E) box is enabled.
9. Enter the drive, directory, and file name in the File Name (ALT-E) box using an .rtf extension. For example, enter c:\vtgb\8434dx.rtf in the file name box.
NOTE:
The first time you select RTF file output, the default is the c: drive and the root directory. The next time you select RTF file output, VTGB automatically populates the drive, directory, and file with the previously entered path.
You can also select the to the right of the File Name box.
■ The VTGB RTF File Name dialog box is displayed.
Figure 11. VTGB RTF File Name Dialog Box
Select the drive, directory, and enter the file name. Select (ENTER).
■ The drive, directory, name of the file, and .rtf extension are
displayed in the File Name (ALT-E) box. 10. Select (ALT-P) on the Print window.
■ A status message box is displayed.
■ Your selections are saved to an .rtf file.
11. Select (ALT-X) on the Print window.
12. You are now ready to download the .rtf file to a word processing package.
The following is a list of word processing packages that allow you to edit your VTGB files:
■ Microsoft Word Version 2.0 or higher
■ AmiPro® Version 3.0 or higher
■ WordPerfect® Version 6.0 or higher
OK
How to Use Your VTGB
NOTE:
When you download your selections to a word processing package, the changes you make using your word processing package will not affect the information in the VTGB database; the changes will affect your word processing file.
!
CAUTION:
If you download your selections to a word processing package and make changes to the information, you are responsible for any errors in the data of the downloaded file.
To Create an Icon in a Network Environment
You can save your selections to a file and create an icon to be used in a network environment.
1. Select the System ID and Terminal combination.
2. Select the appropriate features and items.
3. Enter the appropriate access codes.
4. Place the features in the appropriate order in the Selected Features section.
5. Select the appropriate guide sections if you are saving a user’s guide. (Ignore this step if you are saving a quick reference to a file.)
6. Select (ALT-P) from Program Choices.
■ The Print window is displayed.
7. Select either User’s Guide (ALT-U) or Quick Reference (ALT-Q) from Guide Type.
8. Select RTF File (ALT-R) from Output To.
■ The File Name (ALT-E) box is enabled.
9. Enter the drive, directory, and file name in the File Name (ALT-E) box using an .rtf extension. For example, enter c:\vtgb\8434dx.rtf in the file name box.
NOTE:
The first time you select RTF file output, the default is the c: drive and the root directory. The next time you select RTF file output, VTGB automatically populates the drive, directory, and file with the previously entered path.
You can also select the to the right of the File Name box.
■ The VTGB RTF File Name dialog box is displayed.
Select the drive, directory, and enter the file name. Select (ENTER).
■ The drive, directory, name of the file, and .rtf extension are
displayed in the File Name (ALT-E) box. 10. Select (ALT-P) on the Print window.
■ A status message box is displayed.
■ Your selections are saved to an .rtf file.
11. Select (ALT-X) on the Print window. 12. Select (ALT-Q) from Program Choices.
■ A confirmation message is displayed.
13. Select (ALT-Y).
14. Select the Accessories program group.
15. Select the File (ALT-F) menu from the Program Manager. 16. Select the New... (N) option.
■ The New Program Object dialog box is displayed.
17. Select the Program Item (ALT-I) radio button. 18. Select (ENTER).
■ The Program Item Properties dialog box is displayed.
?
OK
Exit
Quit
Yes
How to Use Your VTGB
19. Enter the following information:
■ Description (ALT-D) - Enter the title of your icon.
■ Command Line (ALT-C) - Enter c:\winword\winword.exe.
■ Working Directory (ALT-W) - Enter c:\<filename.rtf>. 20. Select (ENTER).
■ The icon is displayed in the Accessories program group.
Program Choices — Quit
To Exit VTGB
1. Select (ALT-Q).
■ A confirmation message is displayed.
2. Select (ALT-Y) to exit VTGB.
OK
Quit
access code
A dial code of 1, 2, or 3 digits used to activate or cancel the operation of a feature.
DEFINITY Communications System Generic 1 and Generic 3
The Lucent Technologies switch to which you may be connected. (Your voice terminal may be connected to System 75 or DEFINITY Enterprise Communications Server Release 5 instead.) DEFINITY Generic 1 and Generic 3 are communications systems which transmit and receive voice and data signals for all communications equipment in your network.
DEFINITY Enterprise Communications Server Release 5
The Lucent Technologies switch to which you may be connected. (Your voice terminal may be connected to System 75 or DEFINITY Communications System Generic 1 or Generic 3 instead.) DEFINITY Enterprise Communications Server Release 5 is a communications system which transmits and receives voice and data signals for all communications equipment in your network.
feature
A special function or service, such as Conference, Hold, Send All Calls, etc.
feature access code See access code.
switch
The device that makes connections for all voice and data calls for a network, and also contains software for features. Also known as a system, switching system, or ECS (Enterprise Communications Server). Your switch is either a Lucent Technologies DEFINITY Communications System Generic 1, Generic 3, System 75, or DEFINITY Enterprise Communications Server Release 5.
System 75
The Lucent Technologies switch to which you may be connected. (Your voice terminal may be connected to DEFINITY Communications System Generic 1 or Generic 3, or DEFINITY Enterprise Communications Server Release 5 instead.) System 75 is a communications system which transmits and receives voice and data signals for all communications equipment in your network.
Key Words to Know
system manager
The person responsible for specifying and managing the operation of features for all the voice and data equipment in your network.
voice terminal
IN
Index
Symbols
??? in place of access code, 22
Numerics
386 PC, 3
A
about this manual, 2 access codes
??? on output, 22 about, 20
Apply Defaults button, 23 Clear All button, 22 default, 23
editing, 20 entering, 20 guide section, 26 missing from table, 22 removing, 20
removing all, 22 Access Codes window, 20 Accessories program group, 34 adding System ID entry, 14 applying default access codes, 23
B
basics
using the keyboard, 8
using the mouse, 8
C
changing data responsibility, 33 changing System ID
entry, 12
warning message, 13 Clear All button, 20 clearing all
access codes, 22 marked items, 20 clearing System ID
entry, 15
warning message, 15 Contents and Cover, 26 contents of the package, 2 conventions
of this manual, 4
section in user’s guide, 26 Cover page, 26, 28
creating
customized quick reference, 29 customized user’s guide, 28 icon, 33
D
default access codes, 23 deleting System ID entry, 15 Description of Terminal, 26 Descriptions button
about, 19
features and descriptions, 19 disk space, 3
diskette, installation, 2
downloading to word processing package,
Index
E
editing access code, 20 entering access code, 20 exiting VTGB, 35
F
feature access codes applying default, 23 clearing all, 22 editing, 20 entering, 20 removing, 20 warning message, 15 features
available, 17 clearing, 20 marking, 19 rearranging, 24 selecting, 17
Features Guide Section, 26 Features window, 17
Clear All button, 20 Descriptions button, 19 Mark All button, 19 View Item button, 20
G
Glossary, 26 Guide Sections, 26
Cover page, 26
Description of Terminal, 26 Features, 26
Legal page, 26 Table of Contents, 26 Tones, 26
warning message, 28
H
hardware monitor, 3 mouse, 3
personal computer, 3 printer, 3
requirements, 3 help
available on-line, 6 example, 7
I
icon creation, 33 installation
diskette, 2 messages, 5 software, 5 introduction, 1
K
keyboard
navigation, 8 using, 6
L
M
Main window about, 10
Guide Sections, 10, 26 Program Choices, 10 Selected Features, 10, 24 Mark All button, 19
marking
all features and items, 19 using keyboard, 19 Microsoft Windows, 3 monitor, 3
mouse
navigation, 8
recommended hardware, 3 using, 6
N
name field blank, 14, 15 footer, 14, 15 navigation
keyboard, 8 mouse, 8
network environment, 33
New Program Object dialog box, 34
O
on-line help available, 6 example, 7 overview, 1
P
personal computer, 3 preview selections, 30 Print button, 27 Print window, 27
Exit button, 28 Print button, 28 Printer radio button, 28
Quick Reference radio button, 29 RTF file radio button, 27, 31 Screen button, 30
User’s Guide radio button, 28 printer
requirements, 3 supported, 3 product support, 3 Program Choices, 11
Access Codes button, 20 Features button, 17 Help button, 6 Main window, 10 Print button, 27 Quit button, 35 selecting features, 17 selecting system, 11 selecting terminal, 16 System ID list, 11 System List, 12, 14 System List button, 15, 25 Terminal list, 16
Program Item Properties dialog box, 34 purpose, 1
Q
Index
footer, 14, 15
R
rearranging order of features, 24 removing
all access codes, 22 one access code, 20
responsibility for data change, 33 Revise button, 13, 14
RTF (.rtf) file, 27, 32, 33, 34
S
saving selections to RTF output, 31 Screen button, 30
Selected Features
alphabetical order, 25 list, 24
Main window, 24 rearranging, 24 selecting
features, 17 guide sections, 26 system, 11 terminal, 16 software
creating duplicate copy, 5 Microsoft Windows, 3 requirements, 3 starting VTGB, 10 System Entry window
example, 13 name, 13 type, 13 System ID
Program Choices, 11 revising, 13
selecting, 11
warning message, 15 System List
adding System ID, 14 changing System ID, 12 clearing System ID, 15 deleting System ID, 15 selecting, 12
System List window about, 12 Clear button, 15 Revise button, 13, 14
T
Table of Contents, 26, 28 Terminal label box, 16 Terminal list, 17 Tones, 26
Troubleshooting, 26
U
user’s guide
??? on output, 22 access codes, 22 footer, 14, 15 using
mouse, 8 VTGB, 10
V
view item
VTGB basics, 8 icon, 5
W
warning message
automatically deleting feature access codes, 15
deleting system entry, 15 leaving System ID blank, 13 retaining old feature codes, 15 selecting guide sections, 28 word processing packages