by David D. Busch
Digital Photography
A L L - I N - O N E D E S K R E F E R E N C E
FOR
DUMmIES
‰by David D. Busch
Digital Photography
A L L - I N - O N E D E S K R E F E R E N C E
FOR
DUMmIES
‰About the Author
As a roving photojournalist for more than 20 years, David D. Buschillustrated his books, magazine articles, and newspaper reports with award-winning images. He’s operated his own commercial studio, suffocated in formal dress while shooting weddings-for-hire, and shot sports for a daily newspaper and Upstate New York college. His photos have been published in magazines as diverse as Scientific Americanand Petersen’s PhotoGraphic,and his articles have appeared in Popular Photography & Imaging, The Rangefinder, The Professional Photographer,and hundreds of other publications. He’s currently reviewing digital cameras for CNet and Computer Shopper.
When About.com named its top five books on Beginning Digital Photography, occupying the #1 and #2 slots were the last edition of this book, Digital Photography All-in-One Desk Reference For Dummies,and Busch’s Mastering Digital Photography.During the past year, he’s had as many as five of his books listed in the Top 20 of Amazon.com’s Digital Photography Best Seller list — simultaneously! Busch’s 90 other books published since 1983 include best-sellers like Digital SLR Cameras & Photography For Dummies,and four books in Wiley’s Digital Field Guide series, with topics ranging from travel photography to guidebooks for the Nikon D50, D70s, and D200 cameras.
Dedication
I dedicate this book, as always, to Cathy.
Author’s Acknowledgments
Thanks to Wiley Publishing for the continued innovation that has helped keep this book fresh and up-to-date, and, now, in full color at a price anyone can afford. Key personnel include Steve Hayes, Senior Acquisitions Editor; Kim Darosett, Project Editor; and Andy Hollandbeck, Copy Editor.
Technical Editor Michael D. Sullivan added a great deal to this book in addi-tion to checking all the text for technical accuracy. A veteran photographer (in the military sense of the word!), he began his photo career in high school where he first learned the craft and amazed his classmates by having Monday morning coverage of Saturday’s big game pictured on the school bulletin board. Sullivan pursued his interest in photography into the U.S. Navy, graduating in the top ten of his photo school class. Following Navy photo assignments in Bermuda and Arizona, he earned a BA degree from West Virginia Wesleyan College.
Publisher’s Acknowledgments
We’re proud of this book; please send us your comments through our online registration form located at www.dummies.com/register/.
Some of the people who helped bring this book to market include the following:
Acquisitions, Editorial, and Media Development
Project Editor:Kim Darosett
Senior Acquisitions Editor:Steve Hayes
Copy Editor:Andy Hollandbeck
Technical Editor:Michael Sullivan
Editorial Manager:Leah Cameron
Media Development Manager:
Laura VanWinkle
Editorial Assistant:Amanda Foxworth
Sr. Editorial Assistant:Cherie Case
Cartoons:Rich Tennant (www.the5thwave.com)
Composition Services
Project Coordinator: Jennifer Theriot
Layout and Graphics: Denny Hager, Barbara Moore, Melanee Prendergast, Heather Ryan, Ronald Terry
Proofreaders: John Greenough, Leeann Harney, Ethel M. Winslow
Indexer: Lynnzee Elze
Publishing and Editorial for Technology Dummies
Richard Swadley,Vice President and Executive Group Publisher
Andy Cummings,Vice President and Publisher
Mary Bednarek, Executive Acquisitions Director
Mary C. Corder,Editorial Director
Publishing for Consumer Dummies
Diane Graves Steele,Vice President and Publisher
Joyce Pepple,Acquisitions Director
Composition Services
Gerry Fahey,Vice President of Production Services
Contents at a Glance
Introduction ...1
Book I: Digital Photography Overview ...7
Chapter 1: The Essentials of Good Digital Photography ...9
Chapter 2: Basics of Equipment ...19
Chapter 3: Acquiring Your Digital Pictures ...33
Chapter 4: Editing or Restoring a Photo Electronically...39
Chapter 5: Storing and Organizing Your Digital Photos ...61
Chapter 6: Printing and Sharing Your Pictures...73
Book II: Building Your Digital Photography Studio...77
Chapter 1: Choosing the Right Camera ...79
Chapter 2: Setting Up a Computer for Digital Photography ...113
Chapter 3: Getting Your Pictures from the Camera to the Digital Darkroom ...129
Chapter 4: Adding a Printer and Scanner...147
Chapter 5: Picking Up Some Accessories ...163
Book III: Using Digital SLRs...181
Chapter 1: The Digital SLR Advantage ...183
Chapter 2: Mastering Digital SLR Controls...197
Chapter 3: Working with Lenses ...207
Book IV: Taking Great Pictures ...215
Chapter 1: Tools and Techniques of Composition ...217
Chapter 2: Close-Up Photography...241
Chapter 3: Photographing People ...265
Chapter 4: Shooting for Publication...311
Chapter 5: Sports and Action Photography...345
Chapter 6: Travel Photography ...377
Book V: Basics of Image Editing ...413
Chapter 1: What You Can and Can’t Do with Image Editing Tools ...415
Chapter 2: Common Editing Options ...449
Book VI: Editing with Photoshop
and Photoshop Elements...519
Chapter 1: Latest Features of Photoshop CS2 and Photoshop Elements 4.0 ...521
Chapter 2: Making Selections...525
Chapter 3: Brushing Away Problems with Digital Photos ...541
Chapter 4: Restoring Images ...551
Chapter 5: Correcting Faded, Funny, and Funky Colors ...571
Chapter 6: Enhancing Photos with Filters and Special Effects ...585
Book VII: Restoring Old Photos ...607
Chapter 1: Scanning Print Images ...609
Chapter 2: Restoring Images Captured from Slides, Negatives, and Other Formats...623
Chapter 3: Some Common Fixes for Vintage Photos ...637
Book VIII: Printing and Sharing Your Digital Images...653
Chapter 1: Printing Your Final Result...655
Chapter 2: Sharing Pictures on the Web...665
Glossary...675
Table of Contents
Introduction...1
About This Book...2
What’s in This Book ...2
Book I: Digital Photography Overview ...3
Book II: Building Your Digital Photography Studio ...3
Book III: Using Digital SLRs...4
Book IV: Taking Great Pictures ...4
Book V: Basics of Image Editing...4
Book VI: Editing with Photoshop and Photoshop Elements...4
Book VII: Restoring Old Photos ...5
Book VIII: Printing and Sharing Your Digital Images ...5
Conventions Used in This Book ...5
Icons Used in This Book...6
Where to Go from Here...6
Book I: Digital Photography Overview...7
Chapter 1: The Essentials of Good Digital Photography . . . .9
Knowing What Equipment You Need...10
Minimum and Maximum Specs ...12
Taking Great Digital Shots ...14
Understand how your camera works ...14
Know some photography fundamentals ...15
Find out how to use an image editor ...15
Master a scanner ...15
Making Any Photo Digital...16
Printing Your Final Pictures ...17
Chapter 2: Basics of Equipment . . . .19
Deciding What You Need...20
How much resolution do you need? ...20
Do you plan to manipulate your photos?...23
Are you a photo hobbyist? ...23
How often do you plan to upgrade? ...23
Defining Camera Categories...24
Web cams/phone cams ...24
Intermediate models ...26
Advanced consumer models ...26
Prosumer dSLR models ...27
Professional models ...28
Checking for Key Camera Features...30
Chapter 3: Acquiring Your Digital Pictures . . . .33
Transferring Images from Your Camera to Your PC...33
Grabbing Digital Images of Prints and Slides...35
Kinds of scanners ...35
What to look for in a scanner...36
Letting a Professional Do It...38
Chapter 4: Editing or Restoring a Photo Electronically . . . .39
Choosing an Image-Editing Program...40
Determining your needs ...41
Checking out different applications ...41
Performing Photographic Triage...44
Making Quick Fixes ...45
Fixing red-eye ...45
Removing dust spots ...47
Correcting color...50
Restoring, Replacing, and Removing Photographic Content ...52
Replacing missing or unwanted content ...53
Rearranging parts of the picture ...57
Getting rid of unwanted content ...59
Chapter 5: Storing and Organizing Your Digital Photos . . . .61
Organizing Your Photos...61
Using your computer’s file-management tools ...62
Using photo album software ...66
Using online galleries ...69
Archiving and Backing Up Photos...70
Backing up your best shots...70
Using CD-R and CD-RW ...71
DVD storage ...71
Offsite storage for maximum safety ...72
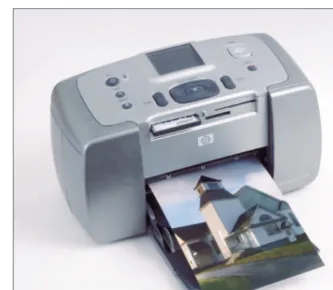
Chapter 6: Printing and Sharing Your Pictures . . . .73
Creating Prints on Demand...74
Getting the Most from Your Printer and Supplies...75
Chapter 3: Some Common Fixes for Vintage Photos . . . .637
Repairing Vintage Photos: The Basics...638 Replacing Depth and Detail ...640 Shedding light on the subject ...640 Don’t be afraid of dark shadows ...641 Creating focus by sharpening images...642 Correcting Faded Colors ...644 Adjusting color levels ...644 Increasing saturation ...645 Adding color adjustment layers ...645 Getting Nostalgic with Sepia Tones ...648 Evening out existing sepia tones ...648 Converting a black-and-white photo to sepia tone ...649 Rip! Replacing Torn or Missing Content...650Book VIII: Printing and Sharing Your Digital Images ...653
Chapter 1: Printing Your Final Result . . . .655
Why Do You Need Prints? ...655 Evaluating Your Printing Options...657 Inkjet printers ...657 Laser printers ...657 Dye-sublimation printers...658 Touring the Print Process ...658 Preventing surprises with Print Preview...659 Understanding your output options ...660 Printing your photos...660 Using Professional Printing Services ...661 Choosing a service bureau...662 Tell them what you want, what you really, really want ...662 Knowing when you need a service bureau ...663Chapter 2: Sharing Pictures on the Web . . . .665
Appreciating the Advantages of Web Sharing ...665 Sharing personal photos with family and friends ...667 Sharing images with business associates ...668 Choosing a Sharing System...669 Using commercial sharing sites and services...670 Displaying images on your own Web space ...671Glossary ...675
Introduction
T
he future of photography is in your hands, and it’s becoming all digital! Not since the 19th century, when photographers had to be artisan, craftsperson, artist, chemist, and public relations expert rolled into one, has so much of the photographic process been entirely in the control of the person taking the picture. Now you can compose and view the exact picture you’re going to take by using your camera’s full liquid crystal display (LCD) screen. Review the picture an instant after pressing the shutter. If your com-puter is nearby, you can upload it seconds later, view a super-large version on your display, crop it, enhance it, and then make your own sparkling full-color print — all within minutes!When you go digital, you never need to buy film or wait while your photos are processed in a lab. You decide which images to print and how large to make them. You can display your digital photographic work framed on your wall or displayed proudly over your fireplace. You can make wallet-size photos, send copies to friends in e-mail, or create an online gallery that can be viewed by relatives and colleagues over the Web.
And if alchemy is in your blood, you can transform the simplest picture into a digital masterpiece by using an image editor. Correct your photos, delete your ex-brother-in-law from a family portrait, or transplant the Eiffel Tower to the seashore.
Digital photography gives you the power to take pictures on a whim or to create careful professional-quality work that others might be willing to pay for. The choices are all yours, and digital photography puts all the power in your hands. All you need is a little information about how to choose and use your tools and how to put them to work. That’s what you’ll find within the pages of this thick, comprehensive, all-in-one guidebook.
Adobe Photoshop has bumped up the image editing ante with lots of new capabilities of interest to digital photographers, and even inexpensive appli-cations like Adobe Photoshop Elements have more features than you could find in the most powerful image editor four or five years ago. Your new hard-ware and softhard-ware tools make working with digital images easier while giving you important new capabilities.
About This Book
This book, now in its third edition and freshly enhanced with full-color images throughout, has been updated to include all the latest technology and gadgets available to the digital photographer. It is written for the person who has a good grasp of using a computer and navigating an operating system and has at least a cursory knowledge of the operation of a digital camera. It would help if you had some familiarity with an image editor, such as Corel Paint Shop Pro, Corel Photo Paint, or Adobe’s Photoshop or Photoshop Elements. It is intended to be a comprehensive reference book that you can read cover to cover or reach for when you’re looking for spe-cific information about a particular task.
Wherever I can, I sneak in a useful tip or an interesting technique to help you put digital photography to work for your project needs.
If you have some knowledge of conventional photography, this book will help you fine-tune your capabilities. If you know very little about photography, there’s help for you here, too. One large chunk of the book — Book IV — is devoted to tips on the most popular genres of photography, from close-up and sports photography to travel photography and shooting for publication. Check out the helpful section on getting the best composition. If you’re puz-zled over what equipment to buy, look to the sections on choosing cameras, photo accessories, and related equipment, such as printers and scanners.
There’s a new book in this edition especially for you digital single-lens reflex (dSLR) users, although you’ll find that another book of mine, Digital SLR Cameras & Photography For Dummies, goes into more detail on the special features of these more advanced cameras.
What’s in This Book
What’s in This Book
3
You can read the book from front to back, or you can dive right into the mini-book or chapter of your choice. Either way works just fine. Any time a con-cept is mentioned that isn’t covered in depth in that chapter, you’ll find a cross-reference to another book and chapter where you’ll find all the details. If you’re looking for something specific, check out either the Table of
Contents or the index.
The Cheat Sheet at the beginning of the book provides helpful information you’ll use often. Tear it out, tape it to your monitor, and don’t forget to say, “Thanks.” (You’re welcome.)
And finally, you get pictures. Lots of them. Many of these pictures illustrate good photo techniques as well as traps to avoid. You’ll find examples of the kinds of pictures you can take right away and maybe a few that you’ll want to strive to equal or exceed.
This book contains eight minibooks. The following sections offer a quick syn-opsis of what each book contains.
Book I: Digital Photography Overview
This section is your digital photography short course, providing all the infor-mation on a variety of topics that you really need to know to get started. Each of the six chapters is an overview of topics covered in depth later in the book. You’ll find the essentials of good digital photography, equipment basics, and how to acquire digital pictures. Buzz through the quickie introduction into some of the ways you can edit or restore a photo electronically and take a look at how you can store and organize your digital photos. Then, if you’re inter-ested in what’s involved in selecting a printer or scanner, you’ll find all the basic information summarized for you in an easy-to-understand way.
Book II: Building Your Digital Photography Studio
This book helps you choose the right camera, whether it’s your first digital camera or the one you’re dreaming about as a replacement for your current model. You’ll read all the facts on resolution, lens settings, storage, and acces-sories. One chapter shows you the requirements for setting up a PC for digital photography. The good news is that you probably already have everything you need in your computer. I’ll give you some advice on recommended upgrades that can make your system work even better with digital images.
Book III: Using Digital SLRs
This book provides a concise overview of the tools and capabilities you’ll find in the latest digital SLR cameras. You find out why these cameras can do things that their non-SLR counterparts cannot and how to use those features to improve your photography.
Book IV: Taking Great Pictures
This is the meat of the book for veteran and aspiring photographers alike. Each of the six chapters is devoted to a different kind of photography. You’ll see the basic rules for composing great photos — and when to break them. You’ll discover the secrets of close-up photography and how to make pleas-ing portraits of individuals and groups.
Whether shooting for publication is part of your job description or just a goal, you’ll find tips on how to take publishable photos and how to market them. I also include chapters on sports and action photography as well tips on travel photography.
Book V: Basics of Image Editing
This book is your introduction to image editing, providing general tips on what you can — and can’t — do with popular image editors such as Paint Shop Pro, Corel PhotoPaint, PhotoImpact, or Adobe Photoshop and Photoshop Elements. You’ll see the capabilities of these programs, discovering the full range of tools at your disposal.
The book winds up with a chapter that compares and contrasts the most popular image editors so you can choose which image editing program you really need (or whether you might even benefit from owning two!).
Book VI: Editing with Photoshop
and Photoshop Elements
This book goes into a little more detail on the use of the two most popular image editing programs: Adobe Photoshop (favored by professionals) and Adobe Photoshop Elements (an inexpensive younger sibling that has lots of power but is still easy to use). You discover the power of making selections, brush away problems in your digital photos, correct your colors, and apply special effects with filters.
Conventions Used in This Book
5
Book VII: Restoring Old Photos
Continue your study of Photoshop and Photoshop Elements with this book, which shows you how to restore old photos and make some common repairs to your digital images. Read chapters on scanning in print images, tips for working with slides and negatives, and some common fixes for vintage photos.
Book VIII: Printing and Sharing Your Digital Images
Your digital photos are going to be so good that you won’t be able to keep them to yourself. This book provides more information on printing your photos and shows you ways to share your pictures over the Internet. You’ll become more comfortable with your printer’s capabilities, discovering all the things that you can do with photos online, whether it’s showcasing your pictures among your friends and colleagues or making photo greeting cards, T-shirts, or other gift items.
Conventions Used in This Book
Digital photography knows no operating system limits. All digital cameras and many software applications work equally well on a PC and a Macintosh. To that end, this book is cross-platform. Understandably, some differences do crop up, particularly in the chapters that deal with image editing. In this book, Windows commands are given first, followed by Mac commands, like this:
Press Enter (or Return on the Mac) to begin a new line.
Occasionally, text will be specific to one platform or another. Commands listed often involve using the keyboard along with the mouse — for example, “Press Shift while dragging with the Rectangular Marquee tool to create a square,” or “Alt+click (Option+click) the eyeball to redisplay all layers.”
When you see a command arrow (➪) in the text, it indicates that you should select a command from the menu bar. For example, “Choose Edit➪Define Custom Shape” means to click the Edit menu and then choose the Define Custom Shape option.
Icons Used in This Book
While perusing this book, you’ll notice some icons in the margins beckoning you for your attention. Don’t ignore them; embrace them! These icons point out fun, useful, and memorable tidbits about digital photography, plus facts you’d be unwise to ignore.
This icon indicates information that will make your digital photography experience easier. It also gives you an icebreaker at your next cocktail party. Whipping out, “Did you know that many digital cameras can focus down to within an inch of an object?” is bound to make you the center of conversation.
This icon is a reminder of things that I want to gentlyre-emphasize. Or I might be pointing out things that I want you to take note of in your future digital photography excursions.
The little bomb icon is a red flag. Heed these warnings, or else your camera or image editor might show its ugly side.
This icon points out info you don’t necessarily need to know. If you’re interested in getting more technical, however, you’ll find such information interesting.
Where to Go from Here
If you want your voice to be heard, you can contact the publisher of the
For Dummies books by visiting www.dummies.com, by sending an e-mail to
[email protected], or by sending snail mail to Wiley Publishing, Inc., 10475 Crosspoint Boulevard, Indianapolis, IN 46256.
Book I
Digital
I
f you’re shifting your digital photographic pur-suits into high gear and want to hit the ground running, this minibook is your fast track to pixel proficiency. You can consider the six chapters in this overview both a quickie course in digital photography concepts as well as a preview of what you can discover in the rest of the book. All the basics are here, so you can begin taking, sharing, and printing great photos right away. When you want to find out more, you can follow the cross references in this book to discover the in-depth coverage you’ll find in the other sections.Chapter 1: The Essentials of Good
Digital Photography
In This Chapter
⻬Choosing equipment
⻬Making great digital photos
⻬Converting other photos to digital format
⻬Making hard-copy prints
I
n 1888, George Eastman began promoting the first hand-held Kodak camera with the slogan, “You press the button, we do the rest.” His idea was to make the film camera as convenient as the pencil. However, the film king’s dream didn’t really come true until the invention of the digital camera.Certainly, conventional photography has long been as simple as pressing a button, but the “we do the rest” part — taking the film to a photo lab, deciding what size and kind of prints to make, and then waiting for the results — is a lotless convenient than using a pencil.
Digital photography has finally put the entire process of making pictures in the hands of the person holding the camera. You press the button, and you can do as much of the rest yourself as you’re comfortable with. If all you want to do is point and shoot, you can do that. If you want to get more involved in the picture-taking and picture-making process, digital photography gives you the tools for that, too.
You don’t need to remember to stop and buy film. Your digital film is almost infinitely reusable. You don’t have to drop off your digital film for finishing: It’s “processed” instantly and ready for viewing or printing using your own inexpensive color printer. No more sifting through stacks of prints of mar-ginal images. Youdecide which images to print and whether to make them 4 x 6 inches or 5 x 7 inches or some other size. You can print them at home inexpensively or take a tiny digital memory card to a nearby retailer and have even more inexpensive prints made for you in minutes by an in-store digital print lab.
On the other hand, if you want to have full control over your photos, digital photography gives you that, too, to a degree that has never before been possible. Perhaps your images aren’t exactly right or could benefit from a little cropping or other improvements. You can fix bad color, remove your ex-brother-in-law from a family photo, or adjust the borders of an image to focus on the most interesting subject matter. All you need is an image editor, such as Photoshop or Photoshop Elements.
This chapter provides an overview of the sorts of things you find out how to do in this book. I cover each topic in more detail later on in a minibook and chapter of its own. I’ll keep the repetition to a minimum; the chapters in Book I are intended to offer an introduction to topics that are explored more deeply elsewhere in the book.
Knowing What Equipment You Need
I realize that you might not be curled up with this book in one hand and a digital camera in the other. You might already have a digital camera, and you purchased this book to find out exactly what you can do with it. You’ll find the tips and information you need throughout this volume.
However, I’m guessing that some of you haven’t taken the plunge yet. You’re ready to stop being a hold-out and want to join the digital camera revolution. So you bought this book to find out more about digital photography before spending your hard-earned money on the equipment you need. Good plan!
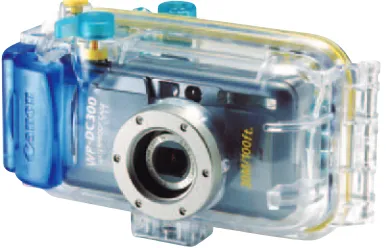
After all, there are so many choices available that it’s easy to buy a camera that’s not quite right for the kind of pictures you want to take. All digital cameras do a good job with general picture-taking for family activities, travel, informal portraits, and other kinds of shots. But some are better than others for taking close-up photos, sports action pictures, or photos indoors where a wide view is needed.
Figure 1-1:This waterproof case can take your digital photography to new depths!
Minimum and Maximum Specs
For most of this book, I assume you have a digital camera with at least 4 megapixels of resolution. (If you don’t understand resolution right now, see Book I, Chapter 2, for an explanation.) Such cameras are becoming harder to find; it’s likely that 5 and 6 megapixels will become the minimum resolution for new cameras introduced during the lifespan of this book.
A camera with a 4-megapixel sensor corresponds to about 2300 x 1700 pixels, which is enough detail to give you decent 6-x-8-inch prints or larger at 200 dpi printer resolution. A 4-megapixel camera also can capture enough information to allow some cropping, especially if you plan to use the image on a Web page, where high resolution isn’t necessary.
However, if you happen to have an older camera with less resolution, you can still do plenty of things. You can prepare images for dynamite Web pages and make sparkling 4-x-5-inch prints. One of my favorite cameras is an ancient 3.3 megapixel Nikon CoolPix 995 that is excellent for close-up photos, and I use it from time to time to take pictures for eBay auctions.
Figure 1-2:Digital SLR cameras allow you to remove one lens and replace it with another one with different capabilities.
Taking Great Digital Shots
So, when you have a camera in hand, what do you need to know to take great digital photos? In this section, I discuss the knowledge that needs to reside in your brain (or be otherwise available) to take great pictures.
Understand how your camera works
No digital photography book can tell you how to turn on your camera, how to adjust the auto-exposure settings, or how to use your model’s self-timer to take a picture with you in it (although Wiley Publishing’s Digital Field Guide
series does offer editions for specific camera models). Those are things best found in your camera’s instruction manual. Read it. I promise that the information you seek is in there; it may just be hard to find. The instructions for one of my own digital cameras were so cryptic that I found myself creat-ing a cheat sheet with lists of steps, such as, “To turn off the auto-sharpencreat-ing feature, press the Menu button, then. . . .”
exist only as prints or negatives, a scanner can help you convert them to digital format. A scanner also can be used for producing close-up images of relatively flat three-dimensional objects, such as coins. A scanner can grab pictures of very small objects (less than 1 x 1 inch) that are difficult to cap-ture with a digital camera.
The exact kind of scanner you have isn’t important, as long as it’s a flatbed model, like the one shown in Figure 1-3. I explain the differences between the major types of flatbeds and how their capabilities diverge (that is, some scanners can be used to scan three-dimensional objects, whereas others can’t) in Book II, Chapter 4.
Figure 1-3:This scanner’s novel design lets you view the photo through the glass while it is being scanned.
Making Any Photo Digital
Chapter 2: Basics of Equipment
In This Chapter
⻬Choosing the best camera
⻬Looking at resolution
⻬Examining camera categories
⻬Checking out basic camera features
C
hoosing a digital camera isn’t a once-in-a-lifetime thing any more than buying a car, choosing a computer system, or purchasing a television would be. Your goal should be to select the digital camera that can do the job you want today and for the foreseeable future but not for the rest of your life. Odds are, you’ll be making the decision all over again two or three years down the road, when prices have dropped even further and new fea-tures are available.So, you want to choose wisely now, while planning to make future upgrades. In that sense, purchasing a digital camera is more like buying a television than a computer system. Most computers can be easily upgraded to add features or improve performance. You can increase the amount of memory, substi-tute a DVD burner for an older CD-ROM drive, and perhaps even double or triple the speed with a new processor.
Digital cameras aren’t easily overhauled. You’re pretty much stuck with the sensor and storage system built into the camera on the day you purchased it. If you don’t have a digital SLR with
interchangeable lenses, you’re more or less married to the lens that comes attached to your camera. You can certainly
This chapter is an overview of what to look for when choosing the digital camera that’s best for you, whether you’re a well-heeled amateur who changes cameras as often as many of us change clothes, or you’re a frugal buyer who wants a camera that will do the job for two or three years. You find out the basics of the features that you need to evaluate before you lay down your cash. In Book II, I go into more detail as you build your digital studio, starting with a detailed look at cameras and features in Book II, Chapter 1.
Deciding What You Need
What’s the best car on the market? It’s hard to say without knowing your driv-ing plans, isn’t it? Will you be makdriv-ing a 40-mile commute on crowded freeways every day? You might find that a 40-miles-per-gallon econobox suits your needs. Do you have six kids to transport? Plan on driving off-road? Need to impress the country club set? Will you be running in road rallies during the weekends? You can see why the automotive world has so many options.
The same holds true in the digital camera realm. Some kinds of cameras do some kinds of things better or more easily. Although you can use workarounds to get great sports photos or close-ups with cameras that aren’t particularly suited to those situations, you’re better off carefully defining your expecta-tions before you purchase a camera.
Unfortunately, price isn’t the best indicator. If you want to take lots of different kinds of pictures, you can’t just buy the most expensive camera and figure that it has every feature you can possibly need. It’s more likely that you’ll end up with a camera that’s so complicated you’ll spend more time trying to figure out how to access a feature than actually taking the photo. I’ve used digital cameras that forced me to access a menu, press several buttons, and then turn a dial just to be able to manually focus.
In the following sections, I discuss some of the things you need to consider before you begin to narrow your choice to a particular category or brand of digital camera.
How much resolution do you need?
Book I Chapter 2
Basics of Equipment
Deciding What You Need
21
one camera offers 8000 pixels per $1.00, whereas this other one gives you 12,000 pixels per $1.00. The second one is clearly a better deal!
In practice, the resolution you require depends a lot on what you plan to do with the photos you take. Do you plan on making excellent 8-x-10-inch or larger prints? If so, you need a camera with a minimum of 5 to 6 megapixels. Is it likely you’ll crop a small section out of the center of an image and make a 5-x-7-inch print out of that? You’ll need one of those high-resolution cam-eras, too. You may be able to see the difference between the left photo in Figure 2-1, taken with a 6-megapixel camera, and the version to the right, taken seconds later at a 3.3 megapixel resolution. (Both images have been cropped so you can see fine detail in the brickwork of the structure.). But, given the loss of detail that occurs any time a photo is reproduced for the printed page, you might notsee much difference. In that case, wouldn’t the 6-megapixel camera be overkill?
Figure 2-1:A 6-megapixel image (left) provides more detail than the 3.3 megapixel version (right) — or does it?
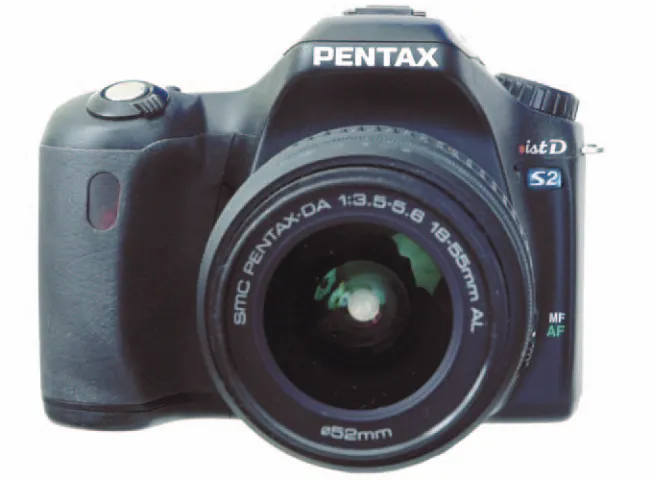
Perhaps you’ll be taking pictures of things you plan to sell on eBay. Figure 2-2 shows a photo I took for an eBay auction when I began unloading my
beloved older film cameras so I could buy new digital equipment. This photo was resized to 600 pixels wide so that people who viewed the auction page could download the photo quickly, so virtually any digital camera, from 2 megapixels on up, would have done the job. Or, you might be setting up a Web page of your own with lots of individual photos. A camera with as few as 4 to 5 megapixels might have plenty of resolution for that application. You can find tiny digital cameras in this range that slip in a pocket and are always available for a quick snapshot. There really are times when less is more.
Figure 2-2:Photos used in eBay auctions, such as this one of a classic film camera, rarely need to be wider than 600 pixels, so the lowest resolution digital cameras can do the job.
Believe it or not, you can purchase a digital camera for the long term if you opt for more than a basic model. For example, you can use a 6- to 7-megapixel digital camera with a zoom lens and a standard removable storage system, such as CompactFlash, for most applications for a long time to come. Such a camera has enough resolution for good-looking 5-x-7-inch and 8-x-10-inch photos and is versatile enough to take a broad range of pictures. Unless your needs change drastically, a good digital camera in that range can serve you well for two or more years.
If you find yourself yearning to take different kinds of photos and are con-stantly upgrading your expectations, however, you’ll probably want to upgrade cameras more frequently. Digital cameras are adding features at reduced prices at an amazing rate. When I wrote my first digital photography book in 1995, a 6-megapixel SLR digital camera could cost as much as a new car. By the turn of the century, 6-megapixel dSLRs were available for $5,000; today, they cost $800 or less.
If you can afford it, you might want to upgrade every year or two. Even if you can do that, it’s wise to take your upgrade plans into account when buying today. You’ll want to use the accessories you buy now with your new camera. Or, if your pocketbook has restrictions, you might want to scale back your expectations today so that you can afford to dump your current camera when you upgrade.
Defining Camera Categories
Digital cameras fall into several overlapping categories, which are usually defined by the number of pixels they can capture plus some other features, such as lens type, availability of manual controls, add-on accessories, and other features. Specifications that define a category change over time. Point-and-shoot cameras once had 640 x 480 to 1024 x 768 resolution (less than a megapixel). Today, even the most basic cameras have 4 megapixels or more of resolution. However, the categories themselves have remained fairly constant in terms of types of snap-shooters or photographers they attract.
Web cams/phone cams
This book more or less ignores Web cams and cell phone cameras. They’re not toys, but they’re not digital cameras within the scope of this book. Web cams are low-cost (often less than $30) TV cameras that can supply low-resolution (640-x-480 or 320-x-200/240-pixel), full-motion images that can be transmitted over the Internet, put on Web pages, or attached to e-mails. Most can also capture low-resolution still images.
Book I Chapter 2
Basics of Equipment
Defining Camera Categories
25
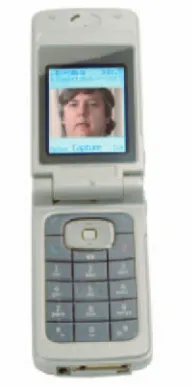
digital camera, but today that function is more likely to be found in the cell phones that virtu-ally every person in the country seems to carry constantly. I have one in my Nokia cell phone, shown in Figure 2-3, and I find it useful for sending photos to family members along with a text message on the order of “Is this what you wanted me to pick up on the way home?” They can also be handy for note-taking (say, to docu-ment the various steps of a science experidocu-ment). However, most Web and phone cams aren’t flexi-ble enough for serious digital photography. That may change during the life of this book, how-ever; at least one vendor has introduced a cell phone camera with 10 megapixels of resolution.
Point-and-shoot models
Point-and-shoot digital cameras cost about $200 and can do anything a simple film camera can do. Most have 4- to 6-megapixel resolution, a built-in flash, some sort of removable storage (although the memory card is probably an optional
pur-chase), and a 3:1 zoom that provides a little magnification. Expect automatic exposure and no manual controls. Figure 2-4 shows an innovative two-lens point-and-shoot model.
Figure 2-4:A typical point-and-shoot camera will have basic features, including a 3X zoom lens — and a few have two lenses, like this model.
Intermediate models
Intermediate digital cameras are priced in the $200 to $500 range, and cameras in this category are the most widely used. As such, they have the best compromise of features to suit most consumer needs.
Look for 6- to 10-megapixel resolution; a 5:1 zoom lens; and at least a few special options, such as different exposure modes, close-up focusing, or manual controls. Figure 2-5 shows a selection of intermediate-level digital cameras.
Figure 2-5:Intermediate digital cameras offer more features, such as longer zoom lenses or ultra-compact size.
Advanced consumer models
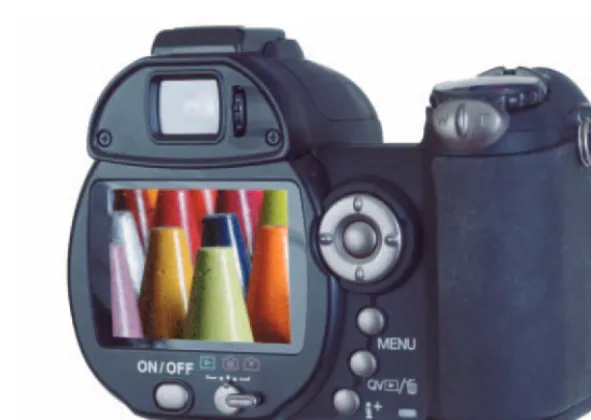
In the $500 to $600 price range, you can find digital cameras aimed at those who want some special features, extra resolution, or a longer zoom lens. Many of these, like the one shown in Figure 2-6, provide two LCD viewfinders: the traditional back panel display and a second, “electronic viewfinder” (or EVF) inside the camera that provides a dimmer, but still SLR-like view. These are 6- to 10-megapixel models with 6:1 to 12:1 zooms (or better) and plenty of add-on accessories, such as wide-angle and telephoto attachments, filters, external flash units, and more.
Book I Chapter 2
Basics of Equipment
Defining Camera Categories
27
Figure 2-6:Advanced consumer models may offer both a back-panel LCD and a second EVF display seen through a viewing window.
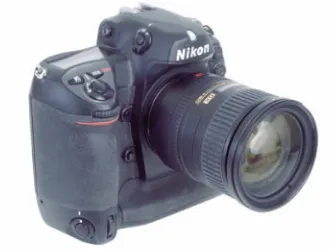
Prosumer dSLR models
Prosumerdigital SLR cameras (see Figure 2-7) are the models that photo buffs and even a few professional photographers favor. The avid photographer doesn’t countenance much in the way of compromises and is willing to spend the $600 to $1,800 sticker price for these cameras in order to get the advanced features. Pros find them useful as backup cameras, even if most aren’t quite rugged enough to take the beating that professional equipment is subjected to.
Prosumer dSLR cameras feature interchangeable lenses and are prized for their ultra-fast response. Such cameras have virtually no shutter lag (the delay between when you press the shutter release all the way and when the picture is actually taken) and can crank out 3 to 5 pictures per second for action sequence photography. They can be purchased just as a camera body alone (in case you already own compatible lenses, perhaps for an older film camera) or in a kit that includes an inexpensive but serviceable zoom in the 18mm–55mm or 18mm–70mm range.
want them. The key differences between high-priced prosumer digital SLR cameras and professional digital SLR cameras is resolution (pro models have 12 to 16 megapixels or more), speed (pro cameras can usually snap off digital pictures at a 5 to 8 pictures-per-second clip; prosumer models may be limited to 3 pictures per second), and ruggedness.
Figure 2-7:Prosumer digital SLR cameras offer interchangeable lenses and other advanced features.
Professional models
Pro digital cameras still cost $3,000 and up and have both the pedigree and features to match. These high-end models are the equal of their film camera counterparts in every way, and, indeed, some vendors are already phasing out their film camera production. If you can’t do it with one of these, it can’t be done.
Book I Chapter 2
Basics of Equipment
Defining Camera Categories
29
With lesser cameras, there is often a tiny time lag while the autofocus system locks in; with pro cameras, this interval is hard to detect.
With a pro camera, such as the one shown in Figure 2-8, you can usually snap off pictures as quickly as you can press the shutter release, or else trigger the
motor drivecontinuous shot mode. You may be able to snap off 5 to 8 pictures per second for as long as you like, or at least until the storage media fills up. That can be a long time, because pro digital cameras usually accept humon-gous storage options, such as 4GB (or larger) memory cards.
Some pro dSLR cameras (as well as prosumer models) with interchangeable lenses boost the effective magnification of your lenses as well, because the sensors are smaller than the nominal 24-x-36mm 35mm film frame. A 35mm lens or zoom setting has the same field of view as a normal lens on a film camera. A 105mm portrait lens becomes a longer telephoto. However, some of the latest professional cameras have a true 24-x-36mm sensor and can use lenses at their marked focal lengths.
You can read more about the advantages and challenges of using a digital SLR in Book III.
Book I Chapter 2
Basics of Equipment
Checking for Key Camera Features
31
✦ Exposure controls:Except for the least expensive models, all digital cameras include automatic exposure controls that adjust the amount of light reaching the sensor based on the lighting conditions of your sub-ject. If the illumination is low, an autoexposure system uses a wider lens f-stop or exposes the sensor for a longer period of time. If there is a lot of light, the exposure system reduces the amount of light reaching the sensor. Cameras with more versatile automatic exposure controls let you specify what type of exposure to use.
For example, when shooting action, it’s often preferable to use the short-est shutter speed possible to freeze the motion and to adjust the size of the lens opening instead. Conversely, if you want a lot of your image to be in sharp focus (say, objects very close to the camera and very far are both important), you may be able to choose an exposure mode that favors maximum depth of field. You probably want a digital camera that can handle several different exposure modes and lets you set exposure yourself. I explain more about these modes in Book II, Chapter 1.
✦ Focus controls:Most digital cameras also have an automated system for sharply focusing your images. Some are more versatile than others, and many cameras also let you focus manually to ensure that the subject matter you want to emphasize is the sharpest.
✦ Viewfinders:Digital cameras generally have four ways to let you preview and compose your images prior to exposure. The color LCD panel on the back of the camera shows you the same image that the sensor is captur-ing. The LCD is often hard to view in bright light, so digital cameras also may have optical viewfinders that let you see a nonelectronic version of the frame. More-advanced cameras might include a second LCD (EVF) in the camera, where it is shielded from the glare of the surrounding light. Single lens reflexes (SLRs) let you see an optical version of the picture through the same lens used to take the photo. I explain more about your viewfinder options in Book II, Chapter 1.
✦ Other equipment, other features:Finally, as you choose your digital photography gear, think about accessories, such as tripods, filters, add-on lenses, external electronic flash units, scanners, printers, and additional stuff. Even the storage media you use to archive your photos, such as CDs or DVDs, can all be important.
Chapter 3: Acquiring Your
Digital Pictures
In This Chapter
⻬Transferring from your camera to your computer
⻬Scanning images
⻬Getting photos online or on Photo CD from a photo lab
H
ow do you acquire digital photos? The quick answer is, “With a digital camera!” However, the digital photography process involves more than simply snapping a picture. Indeed, you can use other ways of acquiring a digital picture that don’t even involve a digital camera. Scanners, for exam-ple, can convert any printed image into a digital image. Some scanners, such as those with slide scanning attachments or dedicated slide scanners, can even capture color transparencies or negatives.This chapter provides an overview of all the ways you can acquire digital pictures and points you to chapters that explore these topics in more detail.
Transferring Images from Your
Camera to Your PC
The first challenge you have to face is getting your digital images from your camera into your computer so that you can edit them (if necessary), store them on some archival medium (such as CD or DVD), and make prints.
Today, transferring images to your computer is a fairly painless
Even at a prehistoric resolution of 640 x 480 pixels, I had roughly 2.5 million bits (307 kilobytes) to move per picture.So at best, I spent a minimum of 40 seconds transferring onephoto. It seemed longer.
To make things worse, this was back in the days when PCs didn’t share peripheral ports very well, so my computer really had only two functional serial ports. I used one for my mouse, and the other for both a modem and my camera’s serial cord. I had to unplug one to use the other. This may seem bizarre in these days of USB (Universal Serial Bus) ports, which enable you to connect a mouse and dozens of other peripherals at once, and FireWire connections, which speed files between computers.
Today, you have multiple options for transferring your images. I can plug a USB cable directly into my favorite camera and transfer multi-megapixel images in a few seconds. I also have a card reader that accepts memory cards and lets me move images between the card and my hard drive as if the memory card were another disk drive.
Card readers are so inexpensive these days that they are often built right into computers or printers, as you can see in Figure 3-1, which shows the slots of a reader included below the DVD drive in a Windows PC. Usually, such a reader will be your best choice for transferring photos. Compared to transferring using a cable connection, the reader is faster and uses less juice from your digital camera’s battery.
Figure 3-1:Card readers built into computers allow transferring photos quickly without the need for a cable.
Book I Chapter 3
Acquiring Y
our
Digital Pictures
Grabbing Digital Images of Prints and Slides
37
✦ Resolution:Scanners generally have a lot more resolution than you need, measured in samples per inch (spi). You’ll also see the terms dots per inch
and pixels per inchapplied to scanners, even though scanners don’t have dots (printers do) or pixels (monitors do). Scanner resolution varies from 600 x 600 spi to 2400 x 2400 spi or higher. Unless you’re scanning tiny, very high-resolution originals (such as postage stamps), anything more than 300 or 600 spi is overkill. I explain why in Book II, Chapter 4. The difference between 300 spi and 2400 spi resolution is shown in Figure 3-4.
Figure 3-4:A 300 spi scan of a small, detailed object (left) isn’t sharp enough. The 2400 spi scan (right) looks much better.
✦ Color depth:This is the number of colors a scanner can capture. The color depth is measured using something called bit depth. For example, a 24-bit scanner can capture 16.8 million different colors; a 30-bit scanner can grab a billion colors; and a 36-bit or 48-bit scanner can differentiate between . . . zillions of colors. You’ll never have an original with that many different hues, however. In practice, the extra colors simply pro-vide the scanner with an extended range (called dynamic range) so that the scanner can capture detail in very dark areas of the image as well as in very light areas.
✦ Convenience:So-called “one-touch” scanners have buttons mounted on the front panel so that you can trigger the scanner to make a copy (that’s sent to your printer), scan to a file, route a scan to e-mail, capture text with optical character recognition (OCR), or perform other functions.
✦ Bundled software:The best scanners are furnished with an easy stand-alone software interface plus a more professional scanning program that gives you total control over every scanning function. You also get drivers that let you access these interfaces from within programs, such as Photoshop. You may even get Photoshop Elements bundled with the scanner, plus software to create panoramas, build Web pages, manage documents, and do other fun stuff.
✦ Accessories:Some scanners include sheet feeders (for scanning a stack of documents) or can be fitted with them as an option. Others have slide-scanning attachments or built-in slide-slide-scanning tools. Depending on the kind of work you do, these accessories can be a perk or a necessity.
Letting a Professional Do It
Sometimes you don’t need to convert an image to digital format yourself. Professional services can do that for you. These range from stand-alone kiosks at your local department store (with a built-in scanner and printer) to services that your local photofinisher offers. When you take in your film for processing, your local lab can give you the same set of prints or slides that you have always received or return your images already scanned onto a Kodak Photo CD or Picture CD. Some mail-order firms offer the same service.
Chapter 4: Editing or Restoring
a Photo Electronically
In This Chapter
⻬Deciding what can be done to restore and improve digital photos
⻬Choosing which repairs to make first
⻬Picking the right software for your image editing needs
⻬Solving common photo problems quickly and easily
R
emember when getting free double prints of your photos was a big deal? It was so convenient to have a spare copy of every photo on the roll. With the advent of digital cameras and scanners, however, the excitement of double prints has worn off. Today, it’s routine for your local digital print lab to offer double prints of every shot you took withyour digital camera, along with an index print or CD with all your images on it. In addition, you can make as many prints as you want at home with your own printer.
Today, the most exciting part of photography is that you no longer need to put up with images that don’t look exactly like you want them to. While a retail digital print lab can make many fixes to your images, you can apply these adjustments in your own computer with an image editor. Why put up with damaged images or photos that are too dark or too light if you can fix them electronically?
With digital photography and a good image editor, you have the power to reproduce and repair your own photos or the photos others have taken, whether they originated digitally or were scanned from prints or slides. This chapter is an
In this chapter, I also explain how you can improve the image quality and content of your photos by removing the tell-tale signs of age, poor photo-graphy, or bad lighting. (I even show you how to remove unwanted people or things — ex-boyfriends/girlfriends and the like — from the picture.) If the last remaining photo of a long-departed relative is looking shabby or has faded with time, there’s no need for alarm or regret. Just open your favorite image-editing application (some programs to consider are discussed later in this chapter) and add color, remove spots, improve contrast, and in general make the image look like new. For example, Figure 4-1 shows before and after versions that illustrate how you can spruce up an old photo.
You can also remove unwanted content — that dumpster that nobody noticed when the picture was taken or the brother-in-law you really don’t miss — and replace it with more desirable stuff, such as a hedge, a pet, or an extension of the background. You can make the photo look as though the item was never there in the first place.
Figure 4-1:Here’s an old photo that’s faded and scratched (left) and spruced up in an image editor (right).
Choosing an Image-Editing Program
Book I Chapter 4
Editing or Restoring
a Photo
Electronically
Choosing an Image-Editing Program
41
Determining your needs
If you’re using a powerful application, such as Photoshop Elements, the repairs and improvements you can make are almost unlimited:
✦ You can use a flexible and powerful set of selection tools to control where the edits and repairs take place, preventing changes to areas of the photo that are just fine as they are.
✦ You have access to a nearly unlimited set of brush tools for painting, drawing, and erasing anything you want.
✦ You can use filters to blur and sharpen images.
✦ You can work with a vast assortment of color, brightness, and contrast-adjustment tools (see Figure 4-2) to fix the results of an overachieving flash, a cloudy day, or old photo paper that allowed images to fade and colors to change with time.
Figure 4-2:Tinker with color, brightness, and contrast to bring images back to life.
If you’re using Photoshop Elements, the tools at your disposal are virtually the same set of tools found in the full version of Photoshop. Some of the fea-tures that only hardcore professional photographers use have been weeded out in Elements, but the basic set of tools and features is still there.
Checking out different applications
and general quality before sending them to friends via e-mail, these packages may be just what you need. If you really want to restore and edit photographs for prints or Web pages, you’ll probably be happier with one of the more powerful (and pricier) applications.
Want to find freeware and shareware for photo editing? Search for “Photo Editing”at www.hotfiles.comor www.tucows.com. A search of either site’s software libraries will yield a long list of downloadable freeware and share-ware applications. Note that shareshare-ware is not free. If you keep and use the product, be sure to pay its author or manufacturer — it’s the right (and legal) thing to do.
Performing Photographic Triage
How do you decide what needs to be done to a given image? Well, some problems are obvious. A torn photo (where the tear shows in the scanned version) is in definite need of plastic surgery. A photo with a row of red-eye-plagued children needn’t look like a lineup of demons. You can remove the red-eye and return the little darlings to their normal states.
Some photos, however, have several problems, and you may not be sure which problems to tackle first. There may be fading from age, scratches and scuffs from improper storage, yellowing, stains, or maybe the picture was too dark or too light from the start. If your photo suffers from two or more problems, solving one might solve another if you attack them in the right order. Here’s a series of tips to help you do a little image triage:
✦ Handle structural problems first. If there’s a torn corner or a rip or hole in the photo, scan the image and repair the tear first in your image editor so that you’re working with an intact “canvas” as you continue to fix other problems.
✦ Adjust light and dark problems before tinkering with color. Why? Because if you add color to an image and then adjust brightness and contrast, the color added with the software can become too bright or too dark or can change to a color you don’t want.
Book I Chapter 4
Editing or Restoring
a Photo
Electronically
Making Quick Fixes
45
Making Quick Fixes
For the purposes of this portion of the book, I use Photoshop Elements to demonstrate some quick fixes, or simple, fast techniques for solving the most common photographic problems. You can find similar techniques in other applications, assuming the applications can perform these tasks to begin with. If you’re still up in the air about which photo-editing program to use, the inability to perform some of these quick fixes would be a good reason to take one or more of your alternatives out of the running!
Fixing red-eye
Red-eye results from the camera flash reflecting off a subject’s retina. We’ve all had it happen, especially when taking pictures of children who get too close to the camera and of pets, whose pupils are quite large, letting in a lot more light. So what do you do when your niece’s eyes look like two red marbles? You can use tools designed specifically to get rid of red-eye (see Figure 4-3), or you can use conventional editing tools to exorcise the demons that have possessed your image.
To use the Photoshop Elements new-and-improved red-eye tool, follow these steps:
1. Click the Red Eye Removal tool; it’s about halfway down the Tool Palette when it’s docked (or press Y to select it).
2. Go to the Options bar that runs just above the document window and make sure the Pupil Size and Darken Amount are both set to 50%. 3. Drag a rectangle around one eye, as shown in Figure 4-4 (or just click
in the area of the pupil and let Elements locate the red-eye unassisted).
You don’t have to be too precise. When you release the mouse button, the Red Eye tool locates the red pupil, removes the red coloration, and darkens it. (It works only with red pupils; the yellow or green pupils found in animals are not affected.)
Figure 4-4:Drag a rectangle around the eye. You don’t have to be precise.
4. If the pupil is too dark, press Ctrl/Ô+Z to reverse the action and then change the Darken Amount to a lower value and try again.
Your results should look like Figure 4-5.
Book I Chapter 4
Editing or Restoring
a Photo
Electronically
Making Quick Fixes
47
Figure 4-5:The Red Eye tool removes the red coloration from the pupil.
If your image editing software doesn’t have a red-eye tool, you can still get rid of red eyes. Doing so just requires a few more steps and tools:
1. Set your application’s paintbrush tool to a size that matches the diameter of the red eye.
2. Manually choose a color to replace the red.
Choose a color that’s darker than the person’s real eye color so that the colorization looks natural.
3. Zoom in tight on the eye so that you can apply the color to the right spot.
4. Click with the brush to fill the red area.
This step should require just one click if your brush is set to the right size.
Removing dust spots
Dust spots and scratches are common problems for old photos or photos that have been stored in desk drawers or shoeboxes or were tucked inside a book or a wallet. If the front of a photo has been rubbing up against other stuff — other photos, papers, pens and pencils — chances are that the photo has highly visible scratches. Dust can collect in these scratches, compounding the problem, or you may simply have scanned the photo without dusting it off first. Mold, things spilled on the photo, or just places where the emulsion has cracked and come off the photo can also create small, unpleasant blemishes.
chapter) is useful for touching up dust, if the background is a solid color, you can use your software’s Paintbrush tool instead, along with color selec-tion tools, to correct the problem by following these steps:
1. Use your program’s Eye Dropper tool to sample the color near the scratch, spot, or stain. If you’re using Photoshop Elements, skip to Step 2.
Most applications have an Eye Dropper tool for selecting a color in the image and setting it as the paint color. You’ll use the color you choose to paint over your blemish.
2. Click the Paintbrush in the tool palette to activate it, and if possible, set the size of the brush so that you control how much color is applied. (If you’re using Elements, hold down the Alt/Option key while clicking near the dust spot to sample the color; you don’t need to access the Eye Dropper tool directly.)
Be sure to use a very small brush so you don’t paint over nonblemished areas — to do so can leave obvious signs of the touch-up.
3. Zoom in on the area you want to touch up and then click and drag in the image to paint that color over the blemish, as shown in Figure 4-6.
Correcting color
Colors on printed photos can fade, and scanning a photo can magnify this problem. If you take a picture with a digital camera, you can lose color accu-racy and depth, depending on the quality of the camera, the lighting at the time, and the file format and quality you choose when you save the captured image to your computer. No matter what the cause, though, your image-editing software should offer at least one or two options for fixing the color in a photo. These options are either automatic correction tools that do an all-over sweep for bad color or manually controlled tools that allow you to increase or decrease tones in your image.
In Photoshop Elements, the quickest fix is the Auto Levels command, which you can employ by using the following steps:
1. Issue the Auto Levels command by choosing Enhance➪Auto Levels.
After it’s issued, the Auto Levels command goes over your entire image (or a portion thereof if you made a selection first) and adjusts the color levels.
2. You can repeat the process for further adjustments or press Ctrl+Z (Ô+D on the Mac) to undo it if you don’t like the results.
Figures 4-8 and 4-9 show before and after views of the same photo.
Book I Chapter 4
Editing or Restoring
a Photo
Electronically
Making Quick Fixes
51
Figure 4-9:. . . producing results that look like this.
Typically, even the lower-end image editing applications offer a similar tool for correcting color quickly. If your application doesn’t offer this tool or doesn’t do what you want, you can switch to
a more effective application.
Photoshop Elements offers a handful of commands (each with its own dialog box) that allow you to adjust brightness, contrast, tones, hues, and color casts. You can find these tools on the Enhance menu, under the Color and Brightness and Contrast submenus. Figure 4-10 shows the dialog box that appears if you choose Enhance➪Adjust Color➪ Hue/Saturation. The box’s three sliders are for adjusting Hue (color),
Saturation (amount of color), and Lightness (amount of white in the colors). To use this and similar dialog boxes, simply drag the sliders for whatever levels you are able to adjust (Hue, Saturation, and Lightness in this case) and watch the Preview. When you like what you see, click OK to apply the changes to your image. You can find out more about these specific tools in various chapters in Book VI, which focuses on Photoshop and Photoshop Elements.
Restoring, Replacing, and Removing
Photographic Content
When my aunt was a child, she liked to draw on photos, especially those that included pictures of my mom. So we have a lot of old pictures with crayon and pencil strokes on them, and many of those strokes run through people’s faces and parts of the picture that you couldn’t crop away without losing the charm of the image. Other photos in our family’s collection are torn or ripped, bear deep scratches, and generally look tattered. I’ve sal-vaged many battered photos by using Photoshop and Photoshop Elements to replace the missing content. Various tools in these applications enable you to take content from another spot in the photo and use that content to rebuild what’s missing. For example, in the photo shown in Figure 4-11, rough handling resulted in a tear, and an unfortunate fold cost this photo its corner. Figure 4-12 shows the image after I repaired it.
Figure 4-11:A photo with tears and lost content.
Book I Chapter 4
Editing or Restoring
a Photo
Electronically
Restoring, Replacing, and Removing Photographic Content
53
even a few shrubs that may not really exist. You can do the same thing to get rid of people in a picture or to add people (or pets!) to a photo when they weren’t there the day the picture was taken. How do you think the tabloids make it look like two people who haven’t really even met went to a party together? Is that really Elvis in the background of Lisa Marie’s wedding? It’s all a matter of taking existing content, placing it in the image, and leaving unwanted or unimportant content in its wake.
Figure 4-12:I restored the missing parts by using other content in the image.
Replacing missing or unwanted content
So you want to replace a missing corner, which was lost to a big rip or deep scratch, or you want to cover up something that’s undesirable in the photo. You can use a variety of tools, and most of the more powerful image editing applications let you take content from one spot in the image and repeat it in another spot. To finish the job, you may need tools to make the pasted con-tent blend in, and those tools are normally available even in midrange image editing applications.
The tools you use to replace the missing content or cover up the unwanted content depend on the size of the area being filled. To cover a thin seam (such as a deep scratch) or fix a tiny corner, you can use the Clone Stamp in Photoshop or Photoshop Elements (other higher-end applications have their own versions). If the missing or unwanted content represents a large area of the ima