Exploring PowerShell Automation
Selections by Richard Siddaway
Manning Author Picks
Copyright 2016 Manning Publications
www.manning.com. The publisher offers discounts on these books when ordered in quantity.
For more information, please contact
Special Sales Department Manning Publications Co. 20 Baldwin Road
PO Box 761
Shelter Island, NY 11964 Email: [email protected]
©2016 by Manning Publications Co. All rights reserved.
No part of this publication may be reproduced, stored in a retrieval system, or transmitted, in any form or by means electronic, mechanical, photocopying, or otherwise, without prior written permission of the publisher.
Many of the designations used by manufacturers and sellers to distinguish their products are claimed as trademarks. Where those designations appear in the book, and Manning
Publications was aware of a trademark claim, the designations have been printed in initial caps or all caps.
Recognizing the importance of preserving what has been written, it is Manning’s policy to have the books we publish printed on acid-free paper, and we exert our best efforts to that end. Recognizing also our responsibility to conserve the resources of our planet, Manning books are printed on paper that is at least 15 percent recycled and processed without the use of elemental chlorine.
Manning Publications Co. 20 Baldwin Road Technical PO Box 761
Shelter Island, NY 11964
Cover designer: Leslie Haimes
ISBN 9781617294525
iii
contents
introduction iv
I
NTRODUCTION
TO
P
OWER
S
HELL
1
Welcome to PowerShell
Chapter 1
from Windows PowerShell in Action, Third Edition
by Bruce Payette and Richard Siddaway 2
P
OWER
S
HELL
R
EMOTING
47
PowerShell Remoting
Chapter 10
from PowerShell in Depth, Second Edition
by Don Jones, Jeffrey Hicks, and Richard Siddaway 48
P
OWER
S
HELL
AND
SQL S
ERVER
85
PowerShell and the SQL Server provider
Chapter 23
from PowerShell Deep Dives edited by Jeffrey Hicks,
Richard Siddaway, Oisin Grehan, and Aleksander Nikolic 86
IIS A
DMINISTRATION
97
Provisioning IIS web servers and sites with PowerShell
Chapter 27
from PowerShell Deep Dives edited by Jeffrey Hicks,
Richard Siddaway, Oisin Grehan, and Aleksander Nikolic 98
AD A
DMINISTRATION
113
User accounts
Chapter 5
from PowerShell in Practice by Richard Siddaway 114
iv
introduction
PowerShell is ten years old in November 2016. Over that decade a significant, and continually increasing, percentage of Windows administrators have learned that Pow-erShell enables them to be more productive. They’ve realised that PowPow-erShell enables them to perform administrative tasks across a wide range of technologies from Micro-soft and third party vendors. The time taken to develop PowerShell scripts is paid back multiple times– by automating repetitive tasks and reducing errors through the use of repeatable, reliable processes.
When PowerShell was first introduced there were only a small number of com-mands available. You had to learn to script if you wanted to perform any complex administration. Over time, particularly with the release of Windows 8 / Server 2012, the number of commands has greatly increased, to the point that all major compo-nents in Windows, or major Microsoft products, have PowerShell support available. The range of third party vendors with PowerShell support is staggering – VMWare, NetApp, IBM, Cisco and EMC to name a few. It’s even possible to administer Linux machines using PowerShell through CIM and Desired State Configuration!
This ebook gives you an overview of using PowerShell to administer your environ-ment. I’ve been involved in the production of all of these chapters either as an author or an editor, and I’ve chosen them specifically to represent the breadth of possibilities for administering your systems through PowerShell. The first two chapters provide an overview of PowerShell and PowerShell remoting. The remaining three chapters pro-vide examples of using PowerShell to administer SQL Server, IIS and Active Directory – three components that’ll be found in practically any Windows environment.
INTRODUCTION v
Reading suggestions
If you’re new to PowerShell this suggested list of books provides a good learning path. I’d suggest reading the following in this order:
Learn PowerShell in a Month of Lunches
PowerShell in Depth, second edition
PowerShell Deep Dives
Once you’ve learned the PowerShell basics it’s time to put that knowledge into prac-tice. These books show you how to administer a number of common technologies using PowerShell:
PowerShell in Practice
PowerShell and WMI
Learn Active Directory Management in a Month of Lunches
Learn Windows IIS in a Month of Lunches
Learn Windows Server in a Month of Lunches
Learn Hyper-V in a Month of Lunches
If you want to learn how the PowerShell language works and why it works the way it does you need to read:
I
’ve included this chapter for two reasons. Firstly, the chapter is co-authored by Bruce Payette (one half of the team that designed the PowerShell language) who has been a leading developer on the PowerShell team since its inception. Who better to introduce you to PowerShell? Secondly, the chapter provides an excellent introduction to PowerShell fundamentals, including pipelines, format-ting of output, and PowerShell’s elastic syntax.2
Third Edition
by Bruce Payette and Richard
Siddaway
Welcome to PowerShell
Vizzini: Inconceivable!
Inigo: You keep on using that word. I do not think it means what you think it means.
—William Goldman,The Princess Bride
It may seem strange for us to start by welcoming you to PowerShell when Power-Shell is nine years old (at the time of writing), is on its fifth version, and this is the third edition of this book. In reality the adoption of PowerShell is only now achiev-ing significant momentum, meanachiev-ing that to many users PowerShell is a new
tech-This chapter covers
Core concepts
Aliases and elastic systems
Parsing and PowerShell
Pipelines
3
nology and the three versions of PowerShell subsequent to the book’s second edition contain many new features. Welcome to PowerShell.
NOTE This book’s written using PowerShell 5.0. It’ll be noted in the text where earlier versions are different, or work in a different manner. We’ll also document when various features were introduced to PowerShell or signifi-cantly modified between versions.
Windows PowerShell is the command and scripting language from Microsoft built into all versions of Windows since Windows Server 2008. Although PowerShell is new and different (or has new features you haven’t explored yet), it’s been designed to make use of what you already know, making it easy to learn. It’s also designed to allow you to learn a bit at a time.
Starting at the beginning, here’s the traditional “Hello world” program in PowerShell:
’Hello world.’
But “Hello world” itself isn’t interesting. Here’s something a bit more complicated:
dir $env:windir\*.log | Select-String -List error | Format-Table path,linenumber –AutoSize
Although this is more complex, you can probably still figure out what it does. It searches all the log files in the Windows directory, looking for the string “error”, and then prints the full name of the matching file and the matching line number. “Useful, but not special,” you might think, because you can easily do this using cmd.exe on Windows or bash on UNIX. What about the “big, really big” thing? Well, how about this example?
([xml] [System.Net.WebClient]::new().
DownloadString('http://blogs.msdn.com/powershell/rss.aspx')). RSS.Channel.Item |
Format-Table title,link
Running PowerShell commands
You have two choices for running the examples provided in this book. First choice is to use the PowerShell console. This provides a command line interface – based on the same console used for cmd.exe. It is the tool of choice for interactive work.
The second choice is the PowerShell Integrated Scripting Environment (ISE). The ISE supplies an editing pane plus a combined output and interactive pane. The ISE is the tool of choice when developing scripts, functions, and other advanced functionality.
The examples in the book will be written in a way that allows pasting directly into either tool.
Now we’re getting somewhere. This script downloads the RSS feed from the Power-Shell team blog and then displays the title and a link for each blog entry. By the way, you weren’t expected to figure out this example yet. If you did, you can move to the head of the class!
Finally, one last example:
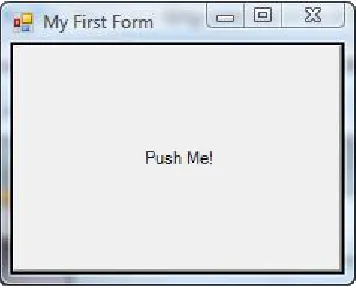
using assembly System.Windows.Forms using namespace System.Windows.Forms $form = [Form] @{
Text = 'My First Form' }
$button = [Button] @{ Text = 'Push Me!' Dock = 'Fill' }
$button.add_Click{ $form.Close() }
$form.Controls.Add($button) $form.ShowDialog())
This script uses the Windows Forms library (WinForms) to build a graphical user interface (GUI) that has a single button displaying the text “Push Me!” The window this script creates is shown in figure 1.1.
Figure 1.1 When you run the code from the example, this window will be displayed.
When you click the button, it closes the form and exits the script. With this you go from "Hello world" to a GUI application in less than two pages.
5 What is PowerShell?
the codename for this project was Monad. The name Monad comes from The Monadol-ogy by Gottfried Wilhelm Leibniz, one of the inventors of calculus. Here’s how Leibniz defined the Monad:
The Monad, of which we shall here speak, is nothing but a simple substance, which enters into compounds. By “simple” is meant “without parts.”
—From The Monadology by Gottfried Wilhelm Leibniz (translated by Robert Latta)
In The Monadology, Leibniz described a world of irreducible components from which all things could be composed. This captures the spirit of the project: to create a toolkit of simple pieces that you compose to create complex solutions.
1.1
What is PowerShell?
More specifically, what is PowerShell, and what can you do with it? Ask a group of Pow-erShell users and you’ll get different answers:
PowerShell is a command-line shell
PowerShell is a scripting environment
PowerShell is an automation engine
These are all part of the answer. We prefer to say that PowerShell is a tool you can use to manage your Microsoft based machines and applications, that programs consis-tency into your management process. The tool is attractive to administrators and developers in that it can span the range of command line, simple and advanced scripts, to real programs.
NOTE If you take this to mean that PowerShell is the ideal devops tool for the Microsoft platform then congratulations – you’ve got it in one.
PowerShell draws heavily from existing command-line shell and scripting languages, but the language, runtime and subsequent additions, such as PowerShell Workflows and Desired State Configuration, were designed from scratch to be an optimal envi-ronment for the modern Windows operating system.
Most people are introduced to PowerShell through its interactive aspects. Let’s refine our definitions of shell and scripting.
1.1.1 Shells, command lines, and scripting languages
In the previous section, we called PowerShell a command-line shell. You may be ask-ing, what’s a shell? And how is that different from a command interpreter? What about scripting languages? If you can script in a shell language, doesn’t that make it a scripting language? In answering these questions, let’s start with shells.
Historically, the term shell describes the piece of software that sits over an operat-ing system’s core functionality. This core functionality is known as the operating system kernel (shell…kernel…get it?). A shell is the piece of software that lets you access the functionality provided by the operating system – for our purposes we’re more inter-ested in the traditional text-based environment where the user types a command and receives a response. Put another way, it is a shell is a command-line interpreter. The two terms can be used for the most part interchangeably.
SCRIPTINGLANGUAGESVS. SHELLS
If this is the case, what is scripting and why are scripting languages not shells? To some extent, there’s no difference. Many scripting languages have a mode in which they take commands from the user and then execute those commands to return results. This mode of operation is called a Read-Evaluate-Print loop, or REPL. In what way is a scripting language with a Read-Evaluate-Print loop not a shell? The difference is mainly in the user experience. A proper command-line shell is also a proper user interface. As such, a command line has to provide a number of features to make the user’s experience pleasant and customizable, including aliases (shortcuts for hard-to-type commands), wildcard matching to avoid having to hard-to-type out full names, and the ability to start other programs easily. Finally, command-line shells provide mechanisms for examining, editing, and re-executing previously typed commands. These mecha-nisms are called command history.
If scripting languages can be shells, can shells be scripting languages? The answer is, emphatically, yes. With each generation the UNIX shell languages have grown increasingly powerful. It’s entirely possible to write substantial applications in a modern shell language, such as bash or zsh. Scripting languages characteristically have an advantage over shell languages, in that they provide mechanisms to help you develop larger scripts by letting you break a script into components, or modules. Scripting languages typically provide more sophisticated features for debugging your scripts. Next, scripting language runtimes are implemented in a way that makes their code execution more efficient, and scripts written in these languages execute more quickly than they’d in the corresponding shell script runtime. Finally, script-ing language syntax is oriented more toward writscript-ing an application than toward interactively issuing commands.
In the end, there’s no hard-and-fast distinction between a shell language and a scripting language. Because Power-Shell’s goal is to be both a good scripting language and a good interactive shell, balancing the trade-offs between user-experience and script authoring was one of the major language design challenges.
MANAGING WINDOWSTHROUGHOBJECTS
7 PowerShell example code
collection of management objects is known internally at Microsoft as the Windows manage-ment surface.
NOTE Microsoft wasn’t the only company that was running into issues caused by increased complexity. Most people in the industry were having this prob-lem. This led to the Distributed Management Task Force (dmtf.org), an industry organization, creating a standard for management objects called the Common Information Model (CIM). Microsoft’s implementation of this stan-dard is called the Windows Management Instrumentation (WMI).
Although this factoring addressed overall complexity and worked well for graphical interfaces, it made it much harder to work with using a traditional text-based shell environment.
Windows is an API driven operating system compared to Unix and its derivatives, which are document (or text) driven. You can administer Unix by changing configu-ration files. In Windows you need to use the API which means accessing properties and using methods on the appropriate object.
Finally, as the power of the PC increased, Windows began to move off the desktop and into the corporate datacenter. In the corporate datacenter we had a large number of servers to manage, and the graphical point-and-click management approach didn’t scale. All these elements combined to make it clear that Microsoft could no longer ignore the command line.
Now that you grasp the environmental forces that led to the creation of Power-Shell—the need for command-line automation in a distributed object-based operat-ing environment—let’s look at the form the solution took.
1.2
PowerShell example code
We’ve said PowerShell is for solving problems that involve writing code. By now you’re probably asking “Dude! Where’s my code?” Enough talk, let’s see some example code! First, we’ll revisit the dir example. This time, instead of displaying the directory listing, you’ll save it into a file using output redirection like in other shell environments. In the following example, you’ll use dir to get information about a file named somefile.txt in the root of the C: drive. Using redirection, you direct the output into a new file, c:\foo.txt, and then use the type command to display what was saved. Here’s what this looks like:
dir c:\somefile.txt > c:\foo.txt type c:\foo.txt
Directory: C:\
Mode LastWriteTime Length Name - --
---a--- 11/07/2015 14:49 0 somefile.txt
NOTE Okay, on your system choose any file that does exist and the example will work fine, though obviously the output will be different.
Let’s go over some other things that should be familiar to you.
1.2.1 Navigation and basic operations
The PowerShell commands for working with the file system should be pretty familiar to most users. You navigate around the file system with the cd command. Files are cop-ied with the copy or cp commands, moved with the move and mv commands, and removed with the del or rm commands. Why two of each command, you might ask? One set of names is familiar to cmd.exe/DOS users and the other is familiar to UNIX users. In practice they’re aliases for the same command, designed to make it easy for people to get going with PowerShell. One thing to keep in mind is that, although the commands are similar they’re not exactly the same as either of the other two systems. You can use the Get-Helpcommand to get help about these commands. Here’s the output of Get-Help for the dir command:
PS> Get-Help dir
NAME
Get-ChildItem
SYNOPSIS
Gets the items and child items in one or more specified locations.
SYNTAX
Get-ChildItem [[-Path] <String[]>] [[-Filter] <String>] [-Exclude <String[]>] [-Force] [-Include <String[]>]
[-Name] [-Recurse] [-UseTransaction [<SwitchParameter>]] [<CommonParameters>]
Get-ChildItem [Filter] <String>] Exclude <String[]>] Force] [-Include <String[]>] [-Name] [-Recurse]
-LiteralPath <String[]> [-UseTransaction [<SwitchParameter>]] [<CommonParameters>]
DESCRIPTION
The Get-ChildItem cmdlet gets the items in one or more specified locations. If the item is a container, it gets
the items inside the container, known as child items. You can use the Recurse parameter to get items in all child
containers.
A location can be a file system location, such as a directory, or a location exposed by a different Windows
9 PowerShell example code
RELATED LINKS
Online Version: http://go.microsoft.com/fwlink/p/?linkid=290488
Get-Alias Get-Item Get-Location Get-Process about_Providers
REMARKS
To see the examples, type: "get-help Get-ChildItem -examples". For more information, type: "get-help Get-ChildItem -detailed". For technical information, type: "get-help Get-ChildItem -full". For online help, type: "get-help Get-ChildItem -online"
1.2.2 Basic expressions and variables
In addition to running commands, PowerShell can evaluate expressions. In effect, it operates as a kind of calculator. Let’s evaluate a simple expression:
2+2 4
Notice that as soon as you typed the expression, the result was calculated and dis-played. It wasn’t necessary to use any kind of print statement to display the result. It’s important to remember that whenever an expression is evaluated, the result of the expression is output, not discarded. PowerShell supports most of the basic arithmetic operations you’d expect, including floating point.
You can save the output of an expression to a file by using the redirection operator:
(2+2)*3/7 > c:\foo.txt type c:\foo.txt 1.71428571428571
PowerShell help system
The PowerShell help subsystem contains information about all of the commands pro-vided with the system and is a great way to explore what’s available.
In PowerShell 3.0, and later, help files aren’t installed by default. Help has become updatable and you need to install the latest versions yourself. See Get-Help about_Updatable_Help.
You can even use wildcard characters to search through the help topics (v2 and later). This is the simple text output. The PowerShell ISE also includes help in the richer Windows format and will even let you select an item and then press F1 to view the help for the item. Finally, by using the –Online option to Get-Help, you can view the help text for a command or topic using a web browser.
Saving expressions into files is useful; saving them in variables is more useful:
$n = (2+2)*3 $n
12 $n / 7
1.71428571428571
Variables can also be used to store the output of commands:
$files = dir $files[1]
Directory: Microsoft.PowerShell.Core\FileSystem::C:\Document s and Settings\brucepay
Directory: C:\Users\Richard\Documents
Mode LastWriteTime Length Name - --
----d---- 18/08/2014 20:11 Custom Office Templates
In this example, you extracted the second element of the collection of file informa-tion objects returned by the dir command. You were able to do this because you saved the output of the dir command as an array of objects in the $files variable.
NOTE Collections in PowerShell start at 0, not 1. This is a characteristic we’ve inherited from .NET. This is why $files[1] is extracting the second ele-ment, not the first.
Given that PowerShell is all about objects, the basic operators need to work on more than numbers. Chapters three and four cover these features in detail.
1.2.3 Processing data
As you’ve seen in the preceding sections, you can run commands to get information, perform some basic operations on this information using the PowerShell operators, and then store the results in files and variables. Let’s look at additional ways you can process this data. First you’ll see how to sort objects and how to extract properties from those objects. Then we’ll look at using the PowerShell flow-control statements to write scripts that use conditionals and loops to do more sophisticated processing.
SORTINGOBJECTS
Sort the list of file information objects returned by dir. Because you’re sorting objects, the command you’ll use is Sort-Object. For convenience you’ll use the shorter alias sort in these examples. Start by looking at the default output, which shows the files sorted by name:
cd c:\files dir
11 PowerShell example code
Directory: C:\files
Mode LastWriteTime Length Name - -- ---a--- 21/01/2015 18:10 9 File 1.txt -a--- 11/07/2015 15:14 15986 File 2.txt -a--- 21/01/2015 18:10 9 File 3.txt -a--- 21/01/2015 18:10 9 File 4.txt
The output shows the basic properties on the file system objects, sorted by the name of the file. Let’s sort by name in descending order:
dir | sort -Descending
Directory: C:\files
Mode LastWriteTime Length Name - -- ---a--- 21/01/2015 18:10 9 File 4.txt -a--- 21/01/2015 18:10 9 File 3.txt -a--- 11/07/2015 15:14 15986 File 2.txt -a--- 21/01/2015 18:10 9 File 1.txt
There you have it—files sorted by name in reverse order. Now let’s sort by something other than the name of the file: file length.
NOTE In many examples in this book we’ll be using aliases (shortcuts) rather than the full cmdlet name. This is for brevity and to ensure the code fits neatly in the page.
In PowerShell, when you use the Sort-Object cmdlet, you don’t have to tell it to sort numerically—it already knows the type of the field, and you can specify the sort key by property name instead of a numeric field offset. The result looks like this:
dir | sort -Property length Directory: C:\files
Mode LastWriteTime Length Name - -- ---a--- 21/01/2015 18:10 9 File 3.txt -a--- 21/01/2015 18:10 9 File 4.txt -a--- 21/01/2015 18:10 9 File 1.txt -a--- 11/07/2015 15:14 15986 File 2.txt
This illustrates what working with pipelines of objects gives you:
You have the ability to access data elements by name instead of using substring indexes or field numbers.
By having the original type of the element preserved, operations execute cor-rectly without you having to provide additional information.
SELECTINGPROPERTIESFROMANOBJECT
In this section, we’ll introduce another cmdlet for working with objects: Select-Object. This cmdlet allows you to select a subrange of the objects piped into it and to specify a subset of the properties on those objects.
Say you want to get the largest file in a directory and put it into a variable:
$a = dir | sort -Property length -Descending | Select-Object -First 1
$a
Directory: C:\files
Mode LastWriteTime Length Name - -- ---a--- 11/07/2015 15:14 15986 File 2.txt
NOTE You’ll notice the secondary prompt >> when you copy the previous example into a PowerShell console. The first line of the command ended in a pipe symbol. The PowerShell interpreter noticed this, saw that the command was incomplete, and prompted for additional text to complete the command. Once the command is complete, you type a second blank line to send the command to the interpreter. If you want to cancel the command, you can press Ctrl-C at any time to return to the normal prompt.
Now say you want only the name of the directory containing the file and not all the other properties of the object. You can also do this with Select-Object. As with the Sort-Object cmdlet, Select-Object takes a -Property parameter (you’ll see this frequently in the PowerShell environment—commands are consistent in their use of parameters):
$a = dir | sort -Property length -Descending | Select-Object -First 1 -Property directory $a
Directory ---C:\files
You now have an object with a single property.
PROCESSINGWITHTHE FOREACH-OBJECTCMDLET
The final simplification is to get the value itself. We’ll introduce a new cmdlet that lets you do arbitrary processing on each object in a pipeline. The ForEach-Object cmd-let executes a block of statements for each object in the pipeline. You can get an arbi-trary property out of an object and then do arbiarbi-trary processing on that information using the ForEach-Object command. Here’s an example that adds up the lengths of all the objects in a directory:
$total = 0
dir | ForEach-Object {$total += $_.length } $total
13 PowerShell example code
In this example you initialize the variable$totalto 0, and then add to it the length of each file returned by the dir command and finally display the total (you’ll get a dif-ferent total on your system).
PROCESSINGOTHERKINDSOFDATA
One of the great strengths of the PowerShell approach is that once you learn a pattern for solving a problem, you can use this same pattern over and over again. For exam-ple, say you want to find the largest three files in a directory. The command line might look like this:
dir | sort -Descending length | select -First 3
Here, the dir command retrieved the list of file information objects, sorted them in descending order by length, and then selected the first three results to get the three largest files.
Now let’s tackle a different problem. You want to find the three processes on the system with the largest working set size. Here’s what this command line looks like:
Get-Process | sort -Descending ws | select -First 3
Handles NPM(K) PM(K) WS(K) VM(M) CPU(s) Id ProcessName --- --- --- --- --- --- -- 1337 1916 235360 287852 1048 63.23 2440 WWAHost 962 55 94460 176008 692 340.25 6632 WINWORD 635 40 136040 140088 783 6.42 2564 powershell
This time you run Get-Processto get data about the processes on this computer, and sort on the working set instead of the file size. Otherwise, the pattern is identical to the previous example. This command pattern can be applied over and over again.
NOTE Because of this ability to apply a command pattern over and over, most of the examples in this book are deliberately generic. The intent is to high-light the pattern of the solution rather than show a specific example. Once you understand the basic patterns, you can effectively adapt them to solve a multitude of other problems.
1.2.4 Flow-control statements
Pipelines are great, but sometimes you need more control over the flow of your script. PowerShell has the usual script flow-control statements found in most programming languages. These include the basicifstatements, a powerful switchstatement, and various loops like a whileloop,forandforeachloops, and so on. Here’s an exam-ple showing use of the while and if statements:
$i=0
while ($i++ -lt 10) { if ($i % 2) {"$i is odd"}} 1 is odd
This example uses the whileloop to count through a range of numbers, printing out only the odd numbers. In the body of thewhile loop is an ifstatement that tests to see whether the current number is odd, and then writes out a message if it is. You can do the same thing using the foreach statement and the range operator (..), but much more succinctly:
foreach ($i in 1..10) { if ($i % 2) {"$i is odd"}}
The foreachstatement iterates over a collection of objects, and the range operator is a way to generate a sequence of numbers. The two combine to make looping over a sequence of numbers clean.
Because the range operator generates a sequence of numbers, and numbers are objects like everything else in PowerShell, you can implement this using pipelines and theForEach-Objectcmdlet:
1..10 | foreach { if ($_ % 2) {"$_ is odd"}}
These examples only scratch the surface of what you can do with the PowerShell flow-control statements (wait until you see the switch statement!). The complete set of control structures is covered in detail in chapter 5 with lots of examples.
1.2.5 Scripts and functions
What good is a scripting language if you can’t package commands into scripts? Power-Shell lets you do this by putting your commands into a text file with a .ps1 extension and then running that command. You can even have parameters in your scripts. Put the following text into a file called hello.ps1:
param($name = 'bub') "Hello $name, how are you?"
Notice that the param keyword is used to define a parameter called $name. The parameter is given a default value of ’bub’. Now you can run this script from the Pow-erShell prompt by typing the name as .\hello. You need the.\to tell PowerShell to get the command from the current directory.
NOTE Before you can run scripts on a machine in the default configuration, you’ll have to change the PowerShell execution policy to allow scripts to run. See Get-Help –Online for_ detailed instructions on execution_policies .
The default settings change between Windows versions, so be careful to check the execution policy setting.
The first time you run this script, you won’t specify any arguments:
.\hello
Hello bub, how are you?
You see that the default value was used in the response. Run it again, but this time specify an argument:
.\hello Bruce
15 PowerShell example code
Now the argument is in the output instead of the default value. Sometimes you want to have subroutines in your code. PowerShell addresses this need through functions. Let’s turn the hello script into a function. Here’s what it looks like:
function hello { param($name = "bub") "Hello $name, how are you" }
The body of the function is exactly the same as the script. The only thing added is the function keyword, the name of the function, and braces around the body of the function. Now run it, first with no arguments as you did with the script:
hello
Hello bub, how are you
and then with an argument:
hello Bruce
Hello Bruce, how are you
Obviously the function operates in the same way as the script, except that PowerShell didn’t have to load it from a disk file, making it a bit faster to call. Scripts and func-tions are covered in detail in chapter six.
1.2.6 Remote administration
In the previous sections, you’ve seen the kinds of things you can do with PowerShell on a single computer, but the computing industry has long since moved beyond a one-computer world. Being able to manage groups of one-computers, without having to physi-cally visit each one, is critical in the modern cloud-orientated IT world where your server may easily be on another continent. To address this, PowerShell has built-in remote execution capabilities (remoting) and an execution model that ensures that if a command works locally it should also work remotely.
NOTE Remoting was introduced in PowerShell 2.0. It isn’t available in Power-Shell 1.0
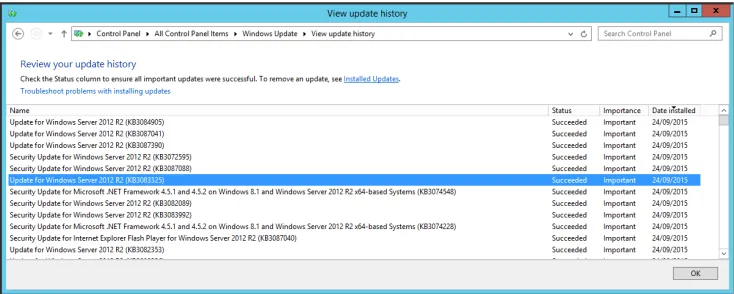
Figure 1.2 Viewing the installed updates on the local machine.
Alternatively, you can use the Get-Hotfix cmdlet:
Get-HotFix -Id KB3083325
Source Description HotFixID InstalledBy InstalledOn --- --- ---SERVER02 Update KB3083325 NT AUTHORITY\SYSTEM
This shows you that the hotfix is installed on the local machine. But what about all of your other machines? Connecting to each one individually and using the control panel or running the Get-Hotfix cmdlet is tedious. You need a method of running the cmd-let on remote machines and having the results returned to your local machine.
Invoke-Command is used to wrap the previous command:
Invoke-Command -ScriptBlock {Get-HotFix -Id KB3083325} ` -ComputerName W12R2SCDC01
Source Description HotFixID InstalledBy InstalledOn --- --- ---W12R2SCDC01 Update KB3083325 NT AUTHORITY\SYSTEM 9/24/2015
NOTE Get-Hotfix has a –ComputerName parameter, and, like many cmdlets, is capable of working directly with remote machines. Cmdlet based remoting often uses protocols other than WSMAN. Using Invoke-Command, as in a PowerShell remoting session, is more efficient, as you’ll see in chapter eleven.
You have many machines that need testing. Typing in the computer names one at a time is still too tedious. You can create a list of computers – either from a text file or in your code, and test them all:
$computers = 'W12R2SCDC01', 'W12R2SUS'
17 PowerShell example code
Source Description HotFixID InstalledBy InstalledOn --- --- ---W12R2SCDC01 Update KB3083325 NT AUTHORITY\SYSTEM 9/24/2015 W12R2SUS Update KB3083325 NT AUTHORITY\SYSTEM 9/24/2015
What happens if a machine doesn’t have the hotfix installed:
Invoke-Command -ScriptBlock {Get-HotFix -Id KB3080042} ` -ComputerName $computers
Cannot find the requested hotfix on the 'localhost' computer. Verify the input and run the command again.
+ CategoryInfo : ObjectNotFound: (:) [Get-HotFix], ArgumentException
+ FullyQualifiedErrorId :
GetHotFixNoEntriesFound,Microsoft.PowerShell.Commands.GetHotFixCommand + PSComputerName : W12R2SCDC01
Source Description HotFixID InstalledBy InstalledOn --- --- --- --- --- W12R2SUS Update KB3080042 NT AUTHORITY\SYSTEM 9/24/2015
An error is generated on a computer that doesn’t have the patch installed, and results appear on the computers that do.
NOTE In a production script you’d put error handling in place to catch the error and report that the patch wasn’t installed. This will be covered in chap-ter fourteen.
The Invoke-Command command is the way to programmatically execute PowerShell commands on a remote machine. When you want to connect to a machine to interact with it on a one-to-one basis, you use the Enter-PSSession command. This com-mand allows you to start an interactive one-to-one session with a remote computer. Running Enter-PSSession looks like this:
Enter-PSSession -ComputerName W12R2SUS [W12R2SUS]: > Get-HotFix -Id KB3080042
Source Description HotFixID InstalledBy --- --- --- --- W12R2SUS Update KB3080042 NT AUTHORITY\SYSTEM
[W12R2SUS]: > Get-Date
28 September 2015 15:57:53
[W12R2SUS]: > Exit-PSSession
exit the remote session with the Exit-PSSessioncommand, which returns you to the local session. This brief introduction covers some powerful techniques, but we’ve only begun to cover all the things remoting lets you do.
At this point, we’ll end our “Cook’s tour” of PowerShell. We’ve only breezed over the features and capabilities of the environment. Many other areas of PowerShell aren’t covered here. In upcoming chapters, we’ll explore each of the elements dis-cussed here in detail and a whole lot more.
1.3
Core concepts
The core PowerShell language is based on the mature IEEE standard POSIX 1003.2 grammar for the Korn shell, which has a long history as a successful basis for modern shells like bash and zsh. The language design team (Jim Truher and Bruce Payette) deviated from this standard where necessary to address the specific needs of an object-based shell and to make it easier to write sophisticated scripts.
PowerShell syntax is aligned with C#. The major value this brings is that Power-Shell code can be migrated to C#, when necessary for performance improvements, and, more importantly, C# examples can be easily converted to PowerShell — the more examples you have in a language, the better off you are.
1.3.1 Command concepts and terminology
Much of the terminology used in PowerShell will be familiar if you’ve used other shells in the Linux or Windows world. Because PowerShell is a new kind of shell, there are a number of terms that are different and a few new terms to learn. In this section, we’ll go over the PowerShell-specific concepts and terminology for command types and command syntax.
1.3.2 Commands and cmdlets
Commands are the fundamental part of any shell language; they’re what you type to get things done. A simple command looks like this:
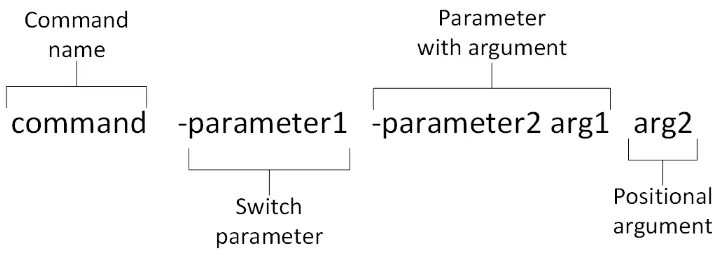
command –parameter1 –parameter2 argument1 argument2
A more detailed illustration of the anatomy of this command is shown in figure 1.3. This figure calls out all the individual elements of the command.
All commands are broken down into the command name, the parameters specified to the command, and the arguments to those parameters. You can think of a parameter as the receiver of a piece of information and the argument as the information itself.
NOTE The distinction between parameter and argument may seem a bit strange from a programmer’s perspective. If you’re used to languages such as Python and Visual Basic, which allow for keyword parameters, PowerShell parameters correspond to the keywords, and arguments correspond to the values.
Figure 1.3 The anatomy of a basic command. It begins with the name of the command, followed by parameters. These may be switch parameters that take no arguments, regular parameters that do take arguments, or positional parameters, where the matching parameter is inferred by the argument’s position on the command line.
19 Core concepts
and also which kind of command to run. In PowerShell there are a number of catego-ries of commands: cmdlets, shell function commands, script commands, workflow commands, and native Windows commands. Following the command name come zero or more parameters and/or arguments. A parameter starts with a dash, followed by the name of the parameter. An argument, on the other hand, is the value that’ll be associated with, or bound to, a specific parameter. Let’s look at an example:
PS (1) > Write-Output -InputObject Hello Hello
In this example, the command is Write-Output, the parameter is -InputObject, and the argument is Hello.
What about the positional parameters? When a PowerShell command is created, the author of that command specifies information that allows PowerShell to deter-mine which parameter to bind an argument to, even if the parameter name itself is missing. For example, the Write-Output command has been defined such that the first parameter is -InputObject. This lets you write
PS (2) > Write-Output Hello Hello
The piece of the PowerShell interpreter that figures all of this out is called the parame-ter binder. The parameter binder is smart—it doesn’t require that you specify the full name of a parameter as long as you specify enough for it to uniquely distinguish what you mean.
What else does the parameter binder do? It’s in charge of determining how to match the types of arguments to the types of parameters. Remember that PowerShell is an object-based shell. Everything in PowerShell has a type. PowerShell uses a fairly complex type-conversion system to correctly put things together. When you type a command at the command line, you’re typing strings. What happens if the command requires a dif-ferent type of object? The parameter binder uses the type converter to try to convert that string into the correct type for the parameter. If you use a value that can’t be con-verted to the correct type you get an error message explaining that the type conversion failed. We discuss this in more detail in chapter two, when we talk about types.
What happens if the argument you want to pass to the command starts with a dash? This is where the quotes come in. Let’s use Write-Output to print out the string “-InputObject”:
PS (1) > Write-Output -InputObject "-InputObject" -InputObject
And it works as desired. Alternatively, you could type this:
PS (2) > Write-Output "-InputObject" -InputObject
The quotes keep the parameter binder from treating the quoted string as a parameter. Another, less frequently used way of doing this is by using the special “end-of-parameters” parameter, which is two hyphens back to back (--). Everything after this sequence will be treated as an argument, even if it looks like a parameter. For exam-ple, using -- you can also write out the string -InputObject without using quotes:
PS (3) > Write-Output -- -InputObject -InputObject
This is a convention standardized in the POSIX Shell and Utilities specification. The final element of the basic command pattern is the switchparameter. These are parameters that don’t require an argument. They’re usually either present or absent (obviously they can’t be positional). A good example of this is the -Recurse parame-ter on the dir command. This switch tells the dir command to display files from a specified directory as well as all its subdirectories:
PS (1) > dir -Recurse -Filter c*d.exe c:\windows Directory: C:\windows\system32
Mode LastWriteTime Length Name - --
---a--- 29/10/2014 00:37 141824 CloudStorageWizard.exe -a--- 29/10/2014 01:28 357376 cmd.exe
21 Core concepts
NOTE Although it’s almost always the case that switch parameters don’t take arguments, it’s possible to specify arguments to them. We’ll save discussion of when and why you might do this for chapter seven, which focuses on scripts (shell functions and scripts are the only time you need this particular feature, and we’ll keep you in suspense for the time being).
Now that we’ve covered the basic anatomy of the command line, let’s go over the types of commands that PowerShell supports.
1.3.3 Command categories
As we mentioned earlier, there are four categories of commands in PowerShell: cmd-lets, functions, scripts, and native Win32 executables.
CMDLETS
The first category of command is a cmdlet (pronounced “command-let”). Cmdlet is a term that’s specific to the PowerShell environment. A cmdlet is implemented by a .NET class that derives from the Cmdlet base class in the PowerShell Software Devel-opers Kit (SDK).
NOTE Building cmdlets is a developer task and requires the PowerShell SDK. This SDK is freely available for download from Microsoft and includes exten-sive documentation along with many code samples. Our goal is to coach you to effectively use and script in the PowerShell environment, and we’re not going to do much more than mention the SDK in this book.
This category of command is compiled into a dynamic link library (DLL) and then loaded into the PowerShell process, usually when the shell starts up. Because the com-piled code is loaded into the process, it’s the most efficient category of command to execute.
Cmdlets always have names of the form Verb-Noun, where the verb specifies the action and the noun specifies the object on which to operate. In traditional shells, cmdlets correspond most closely to what’s usually called a built-in command. In Power-Shell, though, anybody can add a cmdlet to the runtime, and there isn’t any special class of built-in commands.
FUNCTIONS
The next type of command is a function. This is a named piece of PowerShell script code that lives in memory as the interpreter is running, and is discarded on exit. Func-tions consist of user-defined code that’s parsed when defined. This parsed representa-tion is preserved in order that it doesn’t have to be reparsed every time it’s used.
PowerShell workflows were introduced in PowerShell 3.0. Their syntax is similar to that of a function. When the workflow is first loaded in memory a PowerShell function is created that can be viewed through the function: PowerShell drive. Workflows are covered in chapter twelve.
SCRIPTS
A script command is a piece of PowerShell code that lives in a text file with a .ps1 exten-sion. These script files are loaded and parsed every time they’re run, making them somewhat slower than functions to start (although once started, they run at the same speed). In terms of parameter capabilities, shell function commands and script com-mands are identical.
NATIVECOMMANDS (APPLICATIONS)
The last type of command is called a native command. These are external programs (typically executables) that can be executed by the operating system. Because running a native command involves creating a whole new process for the command, native commands are the slowest of the command types. Also, native commands do their own parameter processing and don’t necessarily match the syntax of the other types of commands.
Native commands cover anything that can be run on a Windows computer, and you get a wide variety of behaviors. One of the biggest issues is when PowerShell waits for a command to finish but it keeps on going. For example, say you’re starting a text document at the command line:
PS (1) > .\foo.txt PS (2) >
You get the prompt back more or less immediately, and your default text editor will pop up (probably notepad.exe because that’s the default). The program to launch is deter-mined by the file associations that are defined as part of the Windows -environment.
NOTE In PowerShell, unlike in cmd.exe, you have to prefix a command with ./ or .\ if you want to run it out of the current directory. This is part of Power-Shell’s “Secure by Design” philosophy. This particular security feature was adopted to prevent Trojan horse attacks where the user is lured into a directory and then told to run an innocuous command such as notepad.exe. Instead of running the system notepad.exe, they end up running a hostile program that the attacker has placed in that directory and named notepad.exe.
What if you specify the editor explicitly?
PS (2) > notepad foo.txt PS (3) >
The same thing happens—the command returns immediately. What if you run the command in the middle of a pipeline?
PS (3) > notepad foo.txt | sort-object <exit notepad>
23 Core concepts
This time PowerShell waits for the command to exit before giving you back the prompt. This can be handy when you want to insert something such as a graphical form editor in the middle of a script to do some processing. This is also the easiest way to make Power-Shell wait for a process to exit. As you can see, the behavior of native commands depends on the type of native command, as well as where it appears in the pipeline.
A useful thing to remember is that the PowerShell interpreter itself is a native com-mand: powershell.exe. This means you can call PowerShell from within PowerShell. When you do this, a second PowerShell process is created. In practice there’s nothing unusual about this—that’s how all shells work. PowerShell doesn’t have to do it often, making it much faster than conventional shell languages.
The ability to run a child PowerShell process is particularly useful if you want to have isolation in portions of your script. A separate process means that the child script can’t impact the caller’s environment. This feature is useful enough that PowerShell has special handling for this case, allowing you to embed the script to run inline. If you want to run a fragment of script in a child process, you can do this by passing the block of script to the child process delimited by braces. Here’s an example:
PS {1) > powershell { Get-Process *ss } | Format-Table name, handles
Name Handles ---- ---csrss 1077 lsass 1272 smss 28
Two things should be noted in this example; the script code in the braces can be any PowerShell code, and it’ll be passed through to the new PowerShell process. The spe-cial handling takes care of encoding the script in such a way that it’s passed properly to the child process. The other thing to note is that, when PowerShell is executed this way, the output of the process is serialized objects—the basic structure of the output is preserved—and can be passed into other commands. We’ll look at this serialization in detail when we cover remoting—the ability to run PowerShell scripts on a remote com-puter—in chapter twelve.
DESIRED STATE CONFIGURATION
Desired State Configuration (DSC) is a management platform in Windows Power-Shell. It enables the deployment and management of configuration data for software services and the environment on which these services run. A configuration is created using PowerShell like syntax. The configuration is used to create a MOF (Managed Object Format) file which is passed to the remote machine on which the configura-tion will be applied. DSC is covered in chapter eighteen.
allows you to expand and collapse how much you need to type to suit your purpose. We’ll see how this works in the next section.
1.3.4 Aliases and elastic syntax
We haven’t talked about aliases yet or how they’re used to achieve an elastic syntax in PowerShell. Because this concept is important in the PowerShell environment, we need to spend some time on it.
The cmdlet Verb-Noun syntax, while regular, is, as we noted, also verbose. You may have noticed that in most of the examples we’re using commands such as dir and type. The trick behind all this is aliases. The dir command is Get-ChildItem, and the
type command is Get-Content. You can see this by using the Get-Command command:
PS (1) > Get-Command dir
CommandType Name ModuleName - ---- ---Alias dir -> Get-ChildItem
This tells you that the command is an alias for Get-ChildItem. To get information about the Get-ChildItem command, you then do this
PS (2) > Get-Command Get-ChildItem CommandType Name ModuleName - ----
---Cmdlet Get-ChildItem Microsoft.PowerShell.Management
To see all the information, pipe the output of Get-Command into fl. This shows you the full detailed information about this cmdlet. But wait—what’s the fl command? Again you can use Get-Command to find out:
PS (4) > Get-Command fl
CommandType Name ModuleName - ---- ---Alias fl -> Format-List
PowerShell comes with a large set of predefined aliases. Two basic categories of aliases exist—transitional aliases and convenience aliases. By transitional aliases, we mean a set of aliases that map PowerShell commands to commands that people are accustomed to using in other shells, specifically cmd.exe and the UNIX shells. For the cmd.exe user, PowerShell defines dir, type, copy, and so on. For the UNIX user, PowerShell defines ls, cat, cp, and so forth. These aliases allow a basic level of functionality for new users
right away.
25 Core concepts
NOTE Aliases in PowerShell are limited to aliasing the command name only. Unlike in other systems such as ksh, bash, and zsh, PowerShell aliases can’t include parameters. If you need to do something more sophisticated than sim-ple command-name translations, you’ll have to use shell functions or scripts.
This is all well and good, but what does it have to do with elastics? Glad you asked! The idea is that PowerShell can be terse when needed and descriptive when appropriate. The syntax is concise for simple cases and can be stretched like an elastic band for larger problems. This is important in a language that’s both a command-line tool and a script-ing language. Many “scripts” that you’ll write in PowerShell will be no more than a few lines long. There’ll be a string of commands that you’ll type on the command line and then never use again. To be effective in this environment, the syntax needs to be con-cise. This is where aliases like fl come in—they allow you to write concise command lines. When you’re scripting, though, it’s best to use the long name of the command. Sooner or later, you’ll have to read the script you wrote (or—worse—someone else will). Would you rather read something that looks like this
gcm|?{$_.parametersets.Count -gt 3}|fl name
or this?
Get-Command |
Where-Object {$_.parametersets.count -gt 3} | Format-List name
We’d certainly rather read the latter. (As always, we’ll cover the details of these exam-ples later in the book.)
There’s a second type of alias used in PowerShell: parameter aliases. Unlike com-mand aliases, which can be created by end users, parameter aliases are created by the author of a cmdlet, script, or function. (You’ll see how to do this when we look at advanced function creation in chapter seven.)
A parameter alias is a shorter name for a parameter. Wait a second, earlier we said that you needed enough of the parameter name to distinguish it from other com-mand parameters. Isn’t this enough for convenience and elasticity? Why do you need parameter aliases? The reason you need these aliases has to do with script versioning. The easiest way to understand versioning is to look at an example.
Say you have a script that calls a cmdlet Process-Message. This cmdlet has a parameter -Reply. You write your script specifying
Process-Message -Re
Run the script, and it works fine. A few months later, you install an enhanced version of the Process-Message command. This new version introduces a new parameter: -receive. only specifying -Re is no longer sufficient. If you run the old script with the
partial match. By providing parameter aliases, you can achieve pithiness without also making scripts subject to versioning issues. We recommend always using the full parameter name for production scripts or scripts you want to share. Readability is always more important in that scenario.
Now that we’ve covered the core concepts of how commands are processed, let’s step back a bit and look at PowerShell language processing overall. PowerShell has a small number of important syntactic rules you should learn. When you understand these rules, your ability to read, write, and debug PowerShell scripts will increase tre-mendously.
1.4
Parsing the PowerShell language
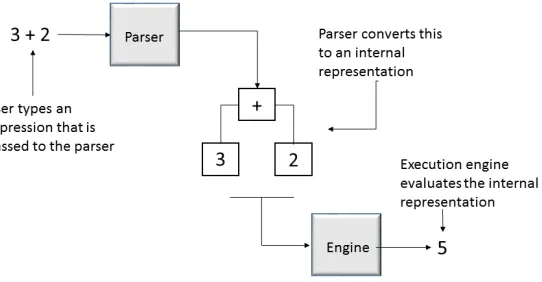
In this section, we’ll cover the details of how PowerShell scripts are parsed. Before the PowerShell interpreter can execute the commands you type, it first has to parse the command text and turn it into something the computer can execute, as shown in fig-ure 1.4.
Figure 1.4 The flow of processing in the PowerShell interpreter, where an expression is transformed and then executed to produce a result
More formally, parsing is the process of turning human-readable source code into a form the computer understands. A piece of script text is broken up into tokens by the tokenizer (or lexical analyzer, if you want to be more technical). A token is a particu-lar type of symbol in the programming language, such as a number, a keyword, or a variable. Once the raw text has been broken into a stream of tokens, these tokens are processed into structures in the language through syntactic analysis.
In syntactic analysis, the stream of tokens is processed according to the grammati-cal rules of the language. In normal programming languages, this process is straight-forward—a token always has the same meaning. A sequence of digits is always a number; an expression is always an expression, and so on. For example, the sequence
27 Parsing the PowerShell language
would always be an addition expression, and “Hello world” would always be a constant string. Unfortunately, this isn’t the case in shell languages. Sometimes you can’t tell what a token is except through its context.
NOTE More information on this and the inner workings of PowerShell is available in the PowerShell language specification at http://www.micro-soft.com/en-us/download/details.aspx?id=36389. The specification is cur-rently only available up to version 3.0 of the PowerShell language.
In the next section, we go into more detail on why this is, and how the PowerShell interpreter parses a script.
1.4.1 How PowerShell parses
For PowerShell to be successful as a shell, it can’t require that everything be quoted. PowerShell would fail if it required people to continually type
cd ".."
or
copy "foo.txt" "bar.txt"
On the other hand, people have a strong idea of how expressions should work:
2
This is the number 2, not a string “2”. Consequently, PowerShell has some rather com-plicated parsing rules. The next three sections will cover these rules. We’ll discuss how quoting is handled, the two major parsing modes, and the special rules for newlines and statement termination.
1.4.2 Quoting
Quoting is the mechanism used to turn a token that has special meaning to the Power-Shell interpreter into a simple string value. For example, the Write-Output cmdlet has a parameter -InputObject. But what if you want to use the string “-InputObject” as an argument? To do this, you have to quote it; you surround it with single or double quotes. The result looks like this:
PS (2) > Write-Output '-InputObject' -inputobject
If you hadn’t put the argument in quotes an error message is produced indicating that an argument to the parameter -InputObject is required.
PS (4) > cd 'c:\program files' PS (5) > pwd
Path
----C:\Program Files
When you don’t use the quotes, you receive an error complaining about an unex-pected parameter in the command because "c:\program" and "files" are treated as two separate tokens.
NOTE Notice that the error message reports the name of the cmdlet, not the alias that was used. This way you know what is being executed. The position message shows you the text that was entered in order that you can see an alias was used.
One problem with using matching quotes as we did in the previous examples is that you have to remember to start the token with an opening quote. This raises an issue when you want to quote a single character. You can use the backquote (`) character to do this (the backquote is usually the upper-leftmost key, below Esc):
PS (6) > cd c:\program` files PS (7) > pwd
Path
----C:\Program Files
The backquote, or backtick, as it tends to be called, has other uses that we’ll explore later in this section. Now let’s look at the other form of matching quote: double quotes. You’d think it works pretty much like the example with single quotes; what’s the difference? In double quotes, variables are expanded. If the string contains a vari-able reference starting with a $, it’ll be replaced by the string representation of the value stored in the variable. Let’s look at an example. First assign the string “files” to the variable $v:
PS (10) > $v = 'files'
Now reference that variable in a string with double quotes:
PS (11) > cd "c:\program $v" PS (12) > pwd
Path
----C:\Program Files
The cd succeeded and the current directory was set as you expected.
NOTE Variable expansion only occurs with double quotes. A common begin-ner error is to use single quotes and expect variable expansion to work.
29 Parsing the PowerShell language
backtick. It can be used to quote or escape the dollar sign in a double-quoted string to suppress expansion. Let’s try it:
PS (16) > Write-Output "`$v is $v" $v is files
Here’s one final tweak to this example—if $v contained spaces, you’d want to make clear what part of the output was the value. Because single quotes can contain double quotes and double quotes can contain single quotes, this is straightforward:
PS (17) > Write-Output "`$v is '$v'" $v is 'files'
PS (18) >
Now, suppose you want to display the value of $v on another line instead of in quotes. Here’s another situation where you can use the backtick as an escape character. The sequence `n in a double-quoted string will be replaced by a newline character. You can write the example with the value of $v on a separate line as follows:
PS (19) > "The value of `$v is:`n$v" The value of $v is:
Files
The list special characters that can be generated using backtick (also called escape) sequences can be found using Get-Help about_Escape_Characters. Note that escape sequence processing, like variable expansion, is only done in double-quoted strings. In single-quoted strings, what you see is what you get. This is particularly important when writing a string to pass to a subsystem that does additional levels of quote processing.
1.4.3 Expression-mode and command-mode parsing
As mentioned earlier, because PowerShell is a shell, it has to deal with some parsing issues not found in other languages. PowerShell simplifies parsing considerably, trim-ming the number of modes down to two: expression mode and command mode.
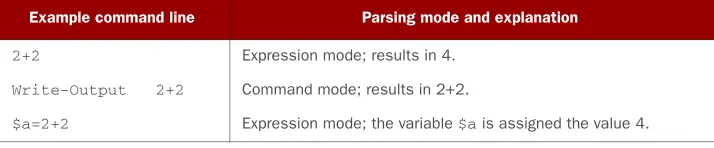
In expression mode, the parsing is conventional: strings must be quoted, numbers are always numbers, and so on. In command mode, numbers are treated as numbers but all other arguments are treated as strings unless they start with $, @, ', ", or (. When an argument begins with one of these special characters, the rest of the argu-ment is parsed as a value expression. (There’s also special treatargu-ment for leading vari-able references in a string, which we’ll discuss later.) Tvari-able 1.1 shows some examples that illustrate how items are parsed in each mode.
Table 1.1 Parsing mode examples
Example command line Parsing mode and explanation
2+2 Expression mode; results in 4.
Write-Output 2+2 Command mode; results in 2+2.
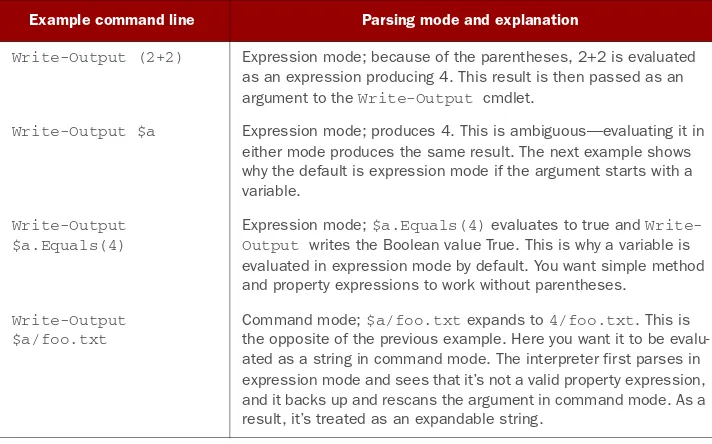
Notice that in the Write-Output (2+2) case, the open parenthesis causes the inter-preter to enter a new level of interpretation where the parsing mode is once again established by the first token. This means the sequence 2+2 is parsed in expression mode, not command mode, and the result of the expression (4) is emitted. Also, the last example in the table illustrates the exception mentioned previously for a leading variable reference in a string. A variable itself is treated as an expression, but a vari-able followed by arbitrary text is treated as though the whole thing were in double quotes. This allows you to write
cd $HOME/scripts
instead of
cd "$HOME/scripts"
As mentioned earlier, quoted and unquoted strings are recognized as different tokens by the parser. This is why
Invoke-MyCmdlet -Parm arg
treats -Parm as a parameter and
Invoke-MyCmdlet "-Parm" arg
treats "-Parm" as an argument. There’s an additional wrinkle in the parameter bind-ing. If an unquoted parameter like -NotAparameter isn’t a parameter on Invoke-MyC-mdlet, it’ll be treated as an argument. This lets you say
Write-Host -this -is -a parameter
without requiring quoting.
Write-Output (2+2) Expression mode; because of the parentheses, 2+2 is evaluated as an expression producing 4. This result is then passed as an argument to the Write-Output cmdlet.
Write-Output $a Expression mode; produces 4. This is ambiguous—evaluating it in either mode produces the same result. The next example shows why the default is expression mode if the argument starts with a variable.
Write-Output $a.Equals(4)
Expression mode; $a.Equals(4) evaluates to true and Write-Output writes the Boolean value True. This is why a variable is evaluated in expression mode by default. You want simple method and property expressions to work without parentheses.
Write-Output $a/foo.txt
Command mode; $a/foo.txt expands to 4/foo.txt. This is the opposite of the previous example. Here you want it to be evalu-ated as a string in command mode. The interpreter first parses in expression mode and sees that it’s not a valid property expression, and it backs up and rescans the argument in command mode. As a result, it’s treated as an expandable string.
Table 1.1 Parsing mode examples (continued)
31 Parsing the PowerShell language
This finishes our coverage of the basics of parsing modes, quoting, and commands. Commands can take arbitrary lists of arguments, and knowing when the statement ends is important. We’ll cover this in the next section.
1.4.4 Statement termination
In PowerShell, there are two statement terminator characters: the semicolon (;) and (sometimes) the newline. Why is a newline a statement separator only sometimes? The rule is that if the previous text is a syntactically complete statement, a newline is con-sidered to be a statement termination. If it isn’t complete, the newline is treated like any other whitespace. This is how the interpreter can determine when a command or expression crosses multiple lines. For example, in the following
PS (1) > 2 + >> 2
>> 4
PS (2) >
the sequence 2+ is incomplete, and the interpreter prompts you to enter more text. (This is indicated by the nest prompt characters, >>.) On the other hand, in the next sequence
PS (2) > 2 2
PS (3) > + 2 2
PS (4) >
the number 2 by itself is a complete expression, and the interpreter goes ahead and evaluates it. Likewise, + 2 is a complete expression and is also evaluated (+ in this case is treated as the unary plus operator). From this, you can see that if the newline comes after the + operator, the interpreter will treat the two lines as a single expression. If the newline comes before the + operator, it’ll treat the two lines as two individual expressions.
Most of the time, this mechanism works the way you expect, but sometimes you can receive some unanticipated results. Take a look at the following example:
PS (22) > $b = ( 2 >> + 2 )
>>
Missing closing ')' in expression. At line:2 char:1
+ + <<<< 2 ) PS (23) >
Consider the following text:
> $b = (2 + > 2)
It’s parsed as $b = (2 + 2) because a trailing + operator is only valid as part of a binary operator expression. The sequence $b = ( 2 + can’t be a syntactically com-plete statement, and the newline is treated as whitespace. On the other hand, con-sider the text
> $b = (2 > + 2)
In this case, 2 is a syntactically complete statement, and the newline is now treated as a line terminator. In effect, the sequence is parsed like $b = (2 ; + 2 ); two complete statements. Because the syntax for a parenthetical expression is
( <expr> )
you get a syntax error—the interpreter is looking for a closing parenthesis as soon as it has a complete expression. Contrast this with using a subexpression instead of the parentheses alone:
>> $b = $( >> 2 >> +2 >> ) >>
PS (24) > $b 2
2
Here the expression is valid because the syntax for subexpressions is
$( <statementList> )
How do you extend a line that isn’t extensible by itself? This is another situation where you can use the backtick escape character. If the last character in the line is a backtick, then the newline will be treated as a simple breaking space instead of a newline:
PS (1) > Write-Output ` >> -inputobject ` >> "Hello world" >>
Hello world PS (2) >
Finally, one thing that surprises some people is that strings aren’t terminated by a new-line character. Strings can carry over multiple new-lines until a matching, closing quote is encountered:
PS (1) > Write-Output "Hello >> there