-L
WY-35/ES
Programmer's
TRADEMARKS
DISCLAIMER
RESTRICTED RIGHTS LEGEND
RELATED PUBLICATIONS
copyrighted by Wyse Thchnology Inc. You may not reproduce, transmit, transcribe, store in a retrieval system, or translate into any language or computer language, in any form or by any means, electronic,
mechanical, magnetic, optical, chemical, manual, or otherwise, any part of this publication without the express written permission of Wyse Technology Inc.
WYSE is a registered trademark of Wyse Technology Inc. WY -35, WY-35ES, and WY-30+ are trademarks ofWyse Technology Inc. ADDS Viewpoint A2 is a trademark of Applied Digital Data Systems, Inc. Tele Video is a registered trademark of Tele Video Systems, Inc. TeleVideo 905, 910+, and 925 are trademarks of TeleVideo Systems, Inc.
All other trademarks are the property of their respective companies.
Wyse Technology Inc. makes no representations or warranties
regarding the contents of this document. We reserve the right to revise this document or make changes in the specifications of the product described within it at any time without notice and without obligation to notify any person of such revision or change.
Use, duplication, or disclosure by the Government is subject to restrictions as set forth in subparagraph (c)(l)(ii) ofthe Rights in Thchnical Data and Computer Software clause at 252.277-7013.
The following publications can be ordered from Wyse Technology:
WY-35/ES User's Guide
WY-35/ES Maintenance Manual
For availability, pricing, and ordering information in the United States and Canada, call1-800-GET-WYSE (1-800-438-9973). In all other countries, contact your sales representative.
Contents
Preface
About this Guide ... vii
Organization and Content . . . .. vii
Syntax Notation ... , vii
Notation Conventions. . . .. ix
1 Programming the Terminal
Setup Parameters ... 1-1 Programming Languages ... 1-1 Screen Areas ... 1-1 ASCII Control Codes ... 1-2 Escape Sequences . . . .. 1-3
2 Communicating with the Computer
Sending Data in Block Mode ... 2-9 Sending One Character . . . .. 2-9 Sending a Line. . . .. 2-9 Sending a Page ... 2-10 Sending a Marked Block of Data ... 2-10 Interrupting a Transmission. . . .. 2-11 Identifying the Terminal ... 2-11 Page Print Functions ... 2-11 Nulls Suppression ... , 2-11 Printing a Formatted Page. . . .. 2-11 Printing an Unformatted Page ... 2-12 Print Modes ... 2-12
3 Controlling the Keyboard
Key Codes ... 3-1 The Funct Key ... 3-3 The Programmable Keys . . . .. . .. .. . .. . . . .. .. . . . .. . . .. . . .. 3-3 Default Codes ... 3-3 Redefining a Key from the Computer ... 3-5 Redefining a Key from the Keyboard . . . .. 3-7 Saving the Key Definitions ... 3-7 Locking the Keyboard ... 3-7 Local Keyboard Commands . . . .. .. . . .. .. . . .. . . . .. 3-8 Controlling Bell and Keyclick ... 3-9 Controlling Key Repeat ... 3-9 Controlling Caps Lock ... 3-9 Character Set . . . .. 3-10 Graphics Mode ... 3-10 Monitor Mode ... 3-11
4 Controlling the Screen Display
Displaying the Message Fields ... 4-1 Programming the Message Fields. . .. . . .. .. . . .. . . .. . . .. 4-2
Contents iii
Controlling General Display Features. . . .. 4-6 Controlling Screen and Cursor Display ... 4-6 Displaying the Status Line ... " 4-7 Selecting Character Cell Size ... " 4-7 Split Screen ... 4-8 Splitting the Screen. . . .. 4-8 Activating a Data Segment ... 4-9 Restoring a Full Screen Format ... 4-10 Scrolling ... 4-10 Autoscrolling Mode ... , 4-11 Cursor Modes ... 4-12 Display Attributes ... 4-12 Assigning Display Attributes to a Message Field ... 4-13 Assigning Character Display Attributes ... 4-14 Addressing and Reading the Cursor ... , 4-14 Addressing the Cursor .. . . .. 4-15 Reading the Cursor Address ... 4-18 Moving the Cursor. . . .. 4-19 Tab Stops ... 4-19 Setting a Tab Stop ... ; .. 4-19 Tabulating ... 4-20 Creating Protected Forms .. . . .. 4-20 Writing Data to be Protected . . . .. 4-20 Protecting Data ... 4-21 Protecting a Column ... " 4-21 Creating a Protected Form ... 4-21 Working with Protected Characters . . . .. 4-22 Assigning Display Attributes to Write-Protected Characters 4-22 Editing the Cursor Line ... 4-23 Controlling Insert Mode ... 4-23 Inserting Space Characters ... 4-23 Deleting Characters ... 4-24 Editing the Screen. . . .. 4-24 Clearing the Screen ... 4-24 Clearing Unprotected Data ... 4-25
A Escape Sequences
C Command Summary
Introduction ... C-1 Variable Values for Table C-1 ... C-11
D Character Sets
E ASCII Code Conversion
F Terminal Status Messages
Index
List of Figures
1-1 Screen Areas . . . .. 1-2 1-2 Split Screen ... 1-2 2-1 Communication Modes .. . . .. 2-2 3-1 Keyboard Layout.. . .. .. . .. . . . .. . . .. . . . .. . . . .. . . .. 3-1 4-1 Display Areas. . . .. 4-2 4-2 Split Screen Format ... .. . . . .. .. .. . . .. . .. 4-8 D-1 ASCII Character Set ... ," . .. .. . . .. .. . ... D-1
List of Tables
3-1 Editing and Special Key Codes ... 3-2 3-2 Default Key Codes for Programmable Terminal Control
Contents
v
ABOUT THIS GUIDE
ORGANIZATION AND CONTENT
Preface
This guide provides the information you need to take advantage of the terminal's programmable features in your computer programs. These features include
• Compatibility with the WY -30 terminal
• TeleVideo 910+, TeleVideo 925, ADDS Viewpoint A2, Wyse 35, and Tele Video 905 personalities (compatible modes)
• 41 fully programmable keys and key combinations • Editing functions programmed into the numeric keypad • 16 special graphics characters for creating line drawings and
diagrams
• Split screen capability
This guide supplements the User's Guide, which tells you how to install and set up the terminal. It provides the following information:
• Chapter 1, "Programming the Terminal," introduces the terminal features and explains how to enter control codes and escape sequences
• Chapter 2, "Communicating with the Computer," describes the commands that control how the terminal communicates with the computer
• Chapter 3, "Controlling the Keyboard," describes commands that control keyboard functions
• Chapter 4, "Controlling the Screen Display," describe!; commands that control the screen display
• Appendix A, "Escape Sequences," lists the escape sequences supported by the terminal in the native personality mode
SYNTAX NOTATION
• Appendix C, "Command Summary," summarizes the commands supported by the terminal in each terminal personality
• Appendix D, "Character Sets," shows the ASCII character set • Appendix E, '~CII Code Conversion," provides an ASCII
code-conversion table
• Appendix F, "Terminal Status Messages," lists the status messages that can appear on the terminal
An index is included.
In this guide, escape sequences are shown with a space between each character, for example,
ESC' A
This is done only to make the command easier to read. Do not enter the spaces. For this example, you would enter
ESC'A
ESC (1B in hexadecimal) is immediately followed by the grave accent character' (60 in hexadecimal) and the uppercase A (41 in
hexadecimal).
When a space character is part of a command sequence, it's explicitly specified, for example
ESC SPACE
When you enter escape sequences, you must enter uppercase or lowercase characters as shown (uppercase A or lowercase a for example). Also, be sure to distinguish between the characters 1 and I (numeral one and lowercase L), the characters 0 and 0 (numeral zero and uppercase 0), and the characters' and' (apostrophe and grave accent).
Variables within an escape sequence are shown in italics. For example, the format for the ESC G command sequence is
ESC G aftr
where
attr represents a character display attribute such as dim or underline.
Preface
NOTATION CONVENTIONS The following notation conventions are used in this guide.
Notation Conventions
Typeface or Symbol
Initial caps
Italics
Courier
Courier bold
Swiss bold
1 Keyname 1
Description
Menu names Variables Screen display
User input and selections in text
User input including escape sequences
A key on the keyboard
Example
Action menu
The cursor is on line Ill, column ccc.
Save to Memory
Select Screen Alignment to adjust screen display.
Enter or send ESC U to turn monitor mode on.
Press 1 Enter I.
SETUP PARAMETERS
PROGRAMMING LANGUAGES
SCREEN AREAS
Programming the Terminal
You can control the terminal with ASCII control codes and escape sequences. This chapter provides a brief overview of using these command sequences to program the terminal.
When you turn on power or perform a hard reset by pressing
I
Ctrlll
ShiftII
SetUpI,
the terminal is automatically configured to the setup parameters stored in battery-backed memory.Refer to Chapter 2 of the User's Guide for a complete listing of the setup parameters, and for instructions on how you can change the parameters to select new operating defaults for the terminal.
Your programming language determines how ASCII control codes and escape sequences are sent to the terminal. Refer to your programming language documentation for information on incorporating terminal command sequences into your programs.
o
Note The command sequences and definitions in Chapters 1 through 4 apply to the terminal's native personality only. Table C-llistscommands supported by other terminal personalities.
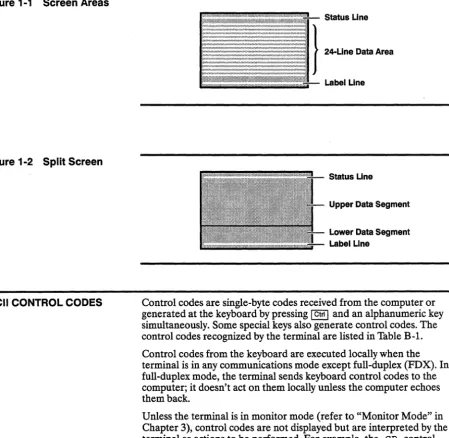
The screen has three main areas (Figure 1-1): the status line, the 24-line data area, and the label line.
• The status line displays terminal status messages on the left and computer messages on the right.
• The data area can display data in one large format (24 lines by 80 columns) or in two areas of a horizontally split screen (Figure 1-2). Each data area on a split screen is called a data segment.
Figure 1-1 Screen Areas
Figure 1-2 Split Screen
ASCII CONTROL CODES
,.,.,.,.".,.,.".,.,.".,.,.,.".,.,,,"-- Status Une
} 24-Uoe Data ....
Label Une
Status Une
Upper Data Segment Lower Data Segment Label Line
Control codes are single-byte codes received from the computer or generated at the keyboard by pressing I Ctrll and an alphanumeric key simultaneously. Some special keys also generate control codes. The control codes recognized by the terminal are listed in Table B-lo Control codes from the keyboard are executed locally when the terminal is in any communications mode except full-duplex (FDX). In full-duplex mode, the terminal sends keyboard control codes to the computer; it doesn't act on them locally unless the computer echoes them back.
ESCAPE SEQUENCES
Programming the Terminal 1-3
Escape sequences are command sequences that begin with the ASCII ESC character. When the terminal receives an escape code, it initiates an action. Often a multiple code sequence follows the escape code to specify a number of variables for a particular feature.
Depending on the current communication mode of the terminal, escape sequences from the keyboard are executed locally, sent to the computer, or both.
The terminal always executes escape sequences received from the computer unless the terminal is in monitor mode or setup mode. In monitor mode, the terminal displays symbolic representations of received codes without acting on them. In setup mode, the terminal ignores all received codes.
To send an escape sequence from the computer, send 27 (decimal) or lB (hexadecimal) followed by the sequence. To generate an escape sequence from the keyboard, press
lEse
I (or I
Ctrll[II )
followed by the sequence.Some escape sequences change the terminal's operating parameters. These changes remain in effect only until the terminal is reset or turned off unless you save them in battery-backed memory.
To save the changes as new setup parameters, 10 Press @§J ~ to display the setup screen.
11 Press I Spacebar
I
to change the Save? parameter to Yes. 12 PressI!!J
to exit the setup screen and save the changes tobattery-backed memory.
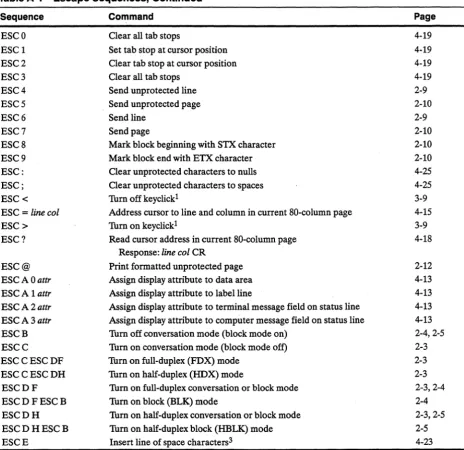
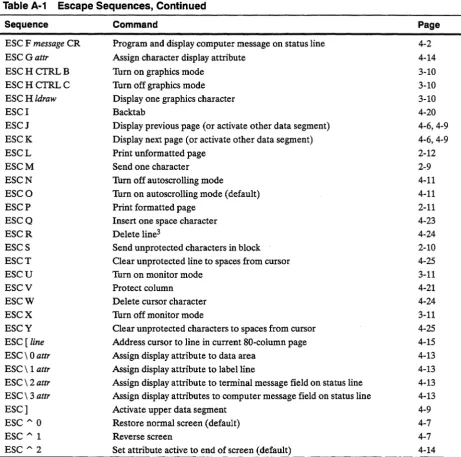
Table A-I lists, in ASCII order, the escape sequences recognized by the terminal in native personality.
Table C-Ilists the escape sequences and control codes under functional categories and includes the commands recognized by other
COMMUNICATION MODES
Communicating with the
Computer
This chapter describes the commands that control how the terminal communicates with the computer. It includes information on commands that set the communication mode, handshaking protocol and personality, as well as commands that send data to the MODEM and AUX ports.
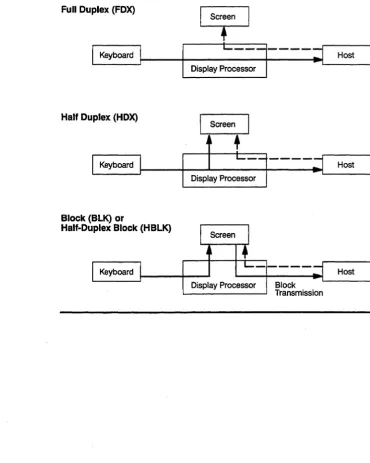
The terminal can operate in any of four communication modes, • Full duplex (FDX)
• Half duplex (HDX) • Block (BLK)
• Half-duplex block (HBLK)
o
Note A fifth mode, Local (LCL), is available but can only be selected from the setup-mode Kpd4 Comm menu.The term conversational mode is often used generically to refer to the FDX and HDX modes. The term block mode is used similarly to refer to the BLK and HBLK modes.
The communication modes control how the terminal handles data and interacts with the computer. Data entered from the keyboard can be sent to the computer, to the terminal and the computer, or to the terminal only (see Figure 2-1).
You select a communication mode by
• Sending one of the escape sequences described in the following sections to the terminal
Figure 2-1 Modes
Communication
Full Duplex (FOX)
~
L---I----~
_H_ost_1I
KeyboardI---~I--D-is-p:-Ia-y~p:ro:c:es:s:o~r
i----,-Half Duplex (HDX)
Block (BLI K) :[OCk (HBLK) Half-Dup ex
I Screen
I
Assigning the Host Port
Full-Duplex Mode
Half-Duplex Mode
Communicating with the Computer 2-3
Assign MODEM port as host port (default) Assign AUX port as host port
ESCe8 ESCe9 These commands determine whether the MODEM port or the AUX port is configured as the host port.
Tum on full-duplex (FDX) mode ESCCESCDF This sequence has two parts. ESC C selects the conversational mode and ESC D F selects full-duplex communications.
In full-duplex mode,
• The terminal operates as a completely conversational device that can send and receive data simultaneously
• Keyboard data and command sequences are sent to the computer only; they are not displayed or acted on by the terminal unless echoed back by the computer
• The Request-to-Send (RTS) signal line (pin 4 on the MODEM port connector) is always high (ready)
• The message FDX appears on the status line
Tum on half-duplex (HDX) mode ESCCESCDH This sequence has two parts. ESC C selects the conversational mode and ESC D H selects half-duplex communications.
In half-duplex mode,
• Keyboard data and command sequences are simultaneously sent to the computer and displayed or acted on by the terminal
• The RTS signal line (pin 4 on the MODEM port connector) goes high (ready) with each character
Block Mode Turn on block (BLK) mode ESCDFESCB This sequence has two parts. ESC 0 F selects full-duplex
communications and ESC B selects the block mode.
Block mode lets the user enter and edit data as though the terminal were a buffered, off-line device. In block mode,
• Keyboard data is displayed on the screen and stored in the terminal's display memory until sent to the computer as a block (see "Sending Data in Block Mode").
• Computer overhead and communication line (e.g., phone line) hookup time is reduced.
• Block transmissions are governed by the following rules: - Null characters are not transmitted.
- Display attributes are sent as space characters.
- If protect mode is on, graphics characters are sent as spaces. • The RTS signal line (pin 4 on the MODEM port connector) is always
high (ready).
• The message BLK appears on the status line.
• Keyboard command sequences are acted on locally by the terminal. The only key codes transmitted directly to the computer are those generated by
- I
BreakI
- I
Functl- any of the function keys ~ through ~ that have the
Direction? parameter (setup-mode Kpd9 Fkeys menu) set to Remote
Refer to "Key Codes" and "The Programmable Keys" in Chapter 3 of this guide for detailed information on key codes and and programmable keys.
Half-Duplex Block Mode
SELECTING A PERSONALITY
ENHANCE MODE
Communicating with the Computer 2-5
Tum on half-duplex block (HBLK) mode ESCDHESCB This sequence has two parts. ESC D H selects half-duplex
communications and ESC B selects the block mode.
Half-duplex block mode is the same as block mode except that the terminal requires an RTS/CTS handshake (pins 4 and 5 on the MODEM port connector) before sending data to the computer. In half-duplex block mode,
• The terminal sets the RTS line high when an escape sequence tells it to send data to the computer.
• After setting RTS high, the terminal checks the CTS line. If this line is high, the terminal sends the data immediately. If not, the terminal waits for the computer to set CTS high before sending the data. • After sending the data, the terminal resets the RTS line low. The message HBLK appears on the status line when the terminal is in the half-duplex block mode.
Select a terminal personality ESC - pers
pers Personality
" Wyse35
# TVI910+
$ TVI925
% ADDSA2
b TVI905
You can check the current selection by viewing the Personality parameter (setup-mode Kpd9 Genrl menu).
Tum on enhance mode ESC - !
Tum off enhance mode ESC - SPACE
In enhance mode, the terminal supports additional features in
EDITING MODES
MODEM PORT
HANDSHAKING PROTOCOL
Thm on local edit mode, duplex edit mode off ESCk Thm on duplex edit mode, local edit mode off ESC I
Editing modes modify the way the terminal sends key codes from the editing keys to the computer. The terminal is always in either duplex edit mode (default) or local edit mode.
• In the duplex edit mode, key codes from the editing keys are processed according to the communications mode that the terminal is in.
- When the terminal is in the full-duplex mode, key codes are sent only to the computer; they are not acted on locally unless the computer echoes them back
- When the terminal is in the half-duplex mode, key codes are both sent to the computer and acted on locally
• In local edit mode, key codes from the editing keys are not sent to the computer but are acted on only by the terminal.
When the Keypad parameter is set to Application (setup-mode Kpd 3 Keybd menu), the numeric keypad accounting keys ( @] through
[!J,
[J,
IJ, 0,
and I EnterI
)perform the editing functions shown on the legend above the keypad (unless the keys have been redefined). When the Keypad parameter is set to Numeric, (default) these keys perform the same editing functions when pressed withI CtrII.
The handshaking protocol for the MODEM port can be selected from the setup-mode Kpd4 Comm menu. The protocol chosen should ensure against loss of data by enabling data transfers only when the computer or terminal is ready to accept the data.
The choices for the receive mode are
• Mdm Rev Hsk=XON/XOFF, DTR, Both, or None (default) • Mdrn Rcv Hsk Level=64, 128, or 192 (default)
Modem XON/XOFF Receive Handshaking
Modem Data Terminal Ready (DTR) Receive Handshaking
Communicating with the Computer 2-7
The choices for the transmit mode are
• Mdm Xmt Hsk=XON/XOFF or None (default)
• XmtLimit=35eps, 60eps, 150eps, or None (default) The transmit limit parameter sets the maximum transmit baud rate of the terminal. Refer to the following sections for specific descriptions of the handshaking protocols.
o
Note MODEM port connector pin assignments are shown in Appendix A of the User's Guide.To enable XON/XOFF receive handshaking, set the Mdm Rev Rsk parameter (setup-mode Kpd4 Comm menu) to XON/XOFF or Both.
To disable XON/XOFF receive handshaking, set the Mdm Rev Rsk parameter to DTR or None.
This function provides a software protocol to indicate terminal data-ready status.
• When the terminal is ready to accept data (receive buffer at low limit), it sends an XON character (DC1) to the computer.
• When the terminal cannot accept any more data (receive buffer at high limit), it sends an XOFF character (DC3) to the computer.
To enable DTR receive handshaking, set the Mdm Rev Rsk parameter (setup-mode Kpd4 Comm menu) to DTR or Both.
To disable DTR receive handshaking, set Mdm Rev Rsk parameter to
XON/XOFF or None.
This function provides a hardware protocol to indicate terminal data-ready status. The DTR line (pin 20 on the MODEM port connector) goes low (-3 to -12 volts) for busy, and high (+3 to + 12 volts) for ready.
• When the terminal is ready to accept data (receive buffer at low limit), it sets the DTR line high.
Modem Transmit Handshaking
AUX (PRINTER) PORT HANDSHAKING PROTOCOL
To specify software and hardware handshaking, set the Mdm Xmt Hsk parameter (setup-mode Kpd4 Comm menu) to XON/XOFF.
To specify hardware handshaking only, set the Mdm Xmt Hsk parameter to None.
When Mdm Xmt Hsk is set to XON/XOFF, the terminal uses both software and hardware protocols to detect computer data-ready status. • The computer informs the terminal that it is ready to receive data by
setting the DSR line (pin 6 on the MODEM port connector) high and sending an XON character (DCl) to the terminal.
• The computer informs the terminal that it is not ready to receive data by setting the DSR line (pin 6 on the MODEM port connector) low, or by sending an XOFF character (DC3) to the terminal. When Mdm Xmt Hsk is set to None, the terminal uses a hardware protocol only to detect computer data-ready status.
• The computer informs the terminal that it is ready to receive data by setting the DSR line (pin 6 on the MODEM port connector) high. • The computer informs the terminal that it is not ready to receive
data by setting the DSR line (pin 6 on the MODEM port connector) low.
The AUX port handshaking protocols are similar to the MODEM port protocols described previously. The one exception is that receive handshaking uses the DSR line instead of the DTR line.
You can use the setup-mode Kpd4 Comm menu to specify transmit and receive handshaking protocols for the AUX port. The default values are AUX xmt Hsk=None and Aux Rev Hsk=None.
SENDING DATA IN BLOCK MODE
Sending One Character
Sending a Line
Communicating with the Computer 2-9
In full-duplex or half-duplex mode, keyboard data is sent to the computer immediately. In either of the block modes, you must
explicitly send data to the computer. The computer can request data by sending one of the escape sequences described in the following
sections. The user can send all characters from home through the cursor by pressing I Send
I or by entering the required escape sequence.
With escape sequences, you can send a character, line, screen of data, or block of data marked by STX (Start-of-Text) and ETX (End-of-Text) characters that you place at the start and end of the text. (See "Sending a Marked Block of Data" for information on using STX and ETX codes.)The terminal automatically includes delimiters after each line or block of data. You specify which linelblock delimiter pair is used (US/CR or CRLF/ETX) by setting the Blk End parameter (setup-mode
Kpd6 Mise menu) to the desired value. The default value is uS/eR.
o
Note Many of the send commands affect protected and unprotected characters differently. To protect characters, see "Creating Protected Forms" in Chapter 4.Send one character ESCM
Sends the character at the cursor position (one byte) to the computer.
Send line ESC 6
Sends all characters (including protected characters) to the computer, from the start of the line up to and including the character at the cursor location.
Send unprotected line ESC 4
Sending a Page
Sending a Marked Block of Data
Send page ESC7
Sends all characters (including protected characters) to the computer, from the home position up to and including the cursor character. If you've split the screen horizontally, only characters from the active data segment are sent. (To define a horizontally split screen, see "Split Screen" in Chapter 4.)
Send unprotected page ESC 5
Sends all unprotected characters to the computer, from the home position up to and including the cursor character. If you've split the screen horizontally, characters are sent only from the active data segment.
To send a block of data,
1 Mark the beginning and end of the block with STX and ETX characters.
2 Send the block to the computer
Mark block beginning with STX character Mark block end with ETX character
ESC 8 ESC 9 These sequences place a visible STX or ETX character at the cursor location.
o
Note STX is the ASCII CTRL B character, while ETX is an ASCII CTRL C. Each occupies a character position.Send a block ESC s
Send unprotected characters in block ESC S These commands send data between the first STX character left of the cursor and the first ETX character. (The STX and ETX characters added with the ESC 8 or ESC 9 sequence are visible and are not sent; the ETX character that can be selected as the transmission terminator in setup mode is an invisible character, however, and is always sent if selected.
When both unprotected and protected characters are sent, protected fields are bracketed with the ESC) code (write-protect on) and the ESC ( code (write-protect off).
INTERRUPTING A TRANSMISSION
Communicating with the Computer 2-11
Pressing I Break
I
sends a break signal of 250 milliseconds to thecomputer. The break signal is repeated continuously as long as I Break
I is
held down.o
Note The break signal brings the transmit line to a space condition. Space is a positive voltage (binary 0). Mark, the normal condition, is a negative voltage (binary 1).IDENTIFYING THE TERMINAL Send terminal identifier ESC SPACE
PAGE PRINT FUNCTIONS
Nulls Suppression
Printing a Formatted Page
When the terminal receives this sequence, it identifies itself by transmitting the following three-byte string to the computer:
35CR or, in hexadecimal,
33H 35H ODH
You can send displayed data directly to a serial printer or other output device through the terminal's AUX port.
o
Note The terminal must be in block mode if print codes are entered from the keyboard.The printed copy can duplicate the format seen on the screen
(formatted page) or the page can be unformatted, i.e., a string of data.
Thm on nulls suppress Thm off nulls suppress
ESCeR ESCeS
When receiving data from the host to be passed to the printer port, the terminal
• Strips incoming null characters when nulls suppress is on • Processes null characters as valid data when nulls suppress is off
Print formatted page ESCP
Print formatted unprotected page ESC@ This command sends all unprotected characters from the home position through the cursor position to the AUX port.
If protect mode is on (see "Protecting Data" in Chapter 4), protected characters, graphics characters, and display attributes are sent as space characters. .
If protect mode is off, graphics characters are sent as their
corresponding control codes, and display attributes are sent as space characters. Each line is terminated with CR, LF, and a null character.
Printing an Unformatted Page Print unformatted page ESCp
PRINT MODES
orESCL Either of these sequences sends all characters from the home position through the cursor position to the AUX port. Display attributes are sent as space characters (the status of protect mode is ignored). Line terminators are not sent.
The terminal recognizes two print modes: copy print (sometimes called auxiliary print or extension print) and transparent print. Data bits, stop bits, parity, and baud rate for the AUX port are the same as those selected for the MODEM port. Refer to Table 2-5 in the User's Guide.
The terminal must be in block mode if these codes are entered from the keyboard.
Copy print mode on Copy print mode otT Transparent print mode on Transparent print mode otT
CTRLR CTRLT CTRLX CTRLT While copy print mode is on, all data received from the computer is displayed on the screen and sent to the AUX port.
When transparent print mode is on, all data received from the computer is sent directly to the AUX port without being displayed on the screen.
Figure 3-1 Keyboard Layout
KEY CODES
Controlling the Keyboard
This chapter describes commands that control keyboard functions, including key codes, escape sequences that redefine the programmable keys, and local keyboard commands. It also covers keyboard lock, bell and keyclick features, the terminal's character set, and line-drawing graphics characters.
Figure 3-1 shows the keyboard layout.
Table 3-1 Editing and Special Key Codes
Key1 Native Code2 Hex Value ADDSVPCode
I Back Space I CfRLH 08 CTRLH
ICI, Une I ESCT 1B54 ESCK
I Shift II CI, Line I ESCt IB74 ESCK
ICI, Pagel ESCY 1B59 ESCk
I Shift II CI, Page I ESCy IB79 ESCk
~ CTRLK OB CTRLZ
[!] CTRLJ3 OA CTRL]
IE
CTRLL OC CTRLF~ CTRLH 08 CTRLU
I Del Cha, I ESCW 1B57 ESCW
I Del line I ESCR IB52 ESCl
I Enter 14 CTRLM OD CTRLM
I Esc I CTRL[ 1B CTRL[
I Home I CTRL" IE CTRLA
I shntll Home I ESC { IB7B CTRLA
I Insert I ESCq IBn ESCq
I Ins Char I ESCQ IB5I ESCQ
pns Une I ESCE IB45 ESCM
I .... Page I ESCK IB4B ESC]
ITPagel ESC] 1B4A ESC]
I Replace I ESCr IBn ESCr
I Return I CTRLM OD CTRLM
!2§] CTRLI 09 CTRLI
I SMt
II
Tab I ESC I 1B49 ESC!1. Unless otherwise noted, the shifted key sends the same code as the unshifted key. 2. These codes also recognized in TV! 905, TV! 910+, and TV! 925 personalities. 3. CTRL V in TV! 925 personality. CTRL J or CTRL V in TV! 905 personality,
depending on the setting of the Down Key parameter (setup-mode Kpd3 Keybd menu).
THE FUNCT KEY
THE PROGRAMMABLE KEYS
Default Codes
Controlling the Keyboard 3-3
I Funct 1 Transmits a three-byte sequence to the computer when it's
pressed simultaneously with an alphanumeric key. The sequence sent is SOH keyCR
where
key is the alphanumeric key's ASCII code. For example, pressing
1
Funct10
transmits the sequenceSOHAeR or, in hexadecimal,
014100
The terminal contains 41 keys and key combinations that can be redefined to send several characters with a single keystroke. You can program these keys from the computer or, in setup mode, from the keyboard (refer to Chapter 2 of the User's Guide). The programmable keys include,
• Most ofthe terminal control keys (Table 3-2)
• The accounting keys (Table 3-2) when the Keypad parameter (setup-mode Kpd3 Keybd menu) is set to Application • The function keys (Table 3-3)
Table 3·2 Default Key Codes for Programmable Terminal Control and Accounting Keys
Key ASCII Code Key ASCII Code
I Esc I ESC EJkpd - (hyphen)
[i§l HT I Enter I CR
I
Back SpaceI
BS I!]kpd 0~ DEL QJkpd 1
I
Reluml CR [!Jkpd 2I
Une FeedI
LF [!]kpd 3III
VT or SUBI 0kpd 4III
LF2 or SYN2,3 @]kpd 5~ BSorNAKl [!]kpd 6
IE
FForACKl IIIkpd 7I
HomeI
RSorsoHl
[!]kpd 8GJkpd , (comma) [!)kpd 9
Okpd . (period)
1. In ADDS VP personality.
2. In TV! 905 personality, LFwhen Down Key parameter (setup-mode
Kpd3 Keybd menu) is set to CTllL J and SYN when Down Key parameter is set to CTllL v;
Redefining a Key from the Computer
Controlling the Keyboard 3-5
Table 3-3 Default Codes for Function Keys
code code
Key Unshlfted Shifted
I!Il
SOH@CR SOH \ CRI!!] SOHACR SOHaCR
~ SOHBCR SOHbCR
~ SOHCCR SOHcCR
~1 SOHDCR SOHdCR
~2 SOHECR SOHeCR
~3 SOHFCR SOHfCR
~4 SOHGCR SOHgCR
1. ~ is equivalent to ~ I!D; I Shift I ~ is equivalent to ~ I Shift II!D.
2. I!!] is equivalent to ~ (!KJ; I Shift II!!] is equivalent to ~ I Shift I (!KJ .
3. [!!J is equivalent to @!!] ~; I Shift I [!!J is equivalent to ~ I Shift I ~ .
4. [!!l is equivalent to ~ IE]; I Shift I [!!l is equivalent to ~ I Shift lIE].
Program a programmable key Clear a programmable key
ESC z key sequence DEL
ESC zkey DEL where
- key is a value from Table 3-4.
- sequence is up to 64 bytes of data to be loaded in that key. This data can be any combination of alphanumeric characters, escape
sequences, and control codes.
For example, to program the shifted ~ key to set a tab stop whenever the key is pressed, send
ESC z c ESC 1 DEL where
- c is the value of the shifted ~ key from Table 3-4.
- ESC 1 is the sequence that sets a tab stop at the cursor position (see "Setting a Tab Stop" in Chapter 4).
or, in hexadecimal,
Table 3-4 Programmable Key Values
Key
Key
Key
Key
Key Unshlfted Shifted Key Unshlfted Shifted
I Esc I SPACE I!]kpd V
I Tab I [!]kpd W
I
Back SpaceI
"
[!]kpd X~ # [!]kpd y
I
Return I $ I!Ikpd zI
Une FeedI
% [!]kpd {[i]
+
I!1kpd[!J f!]kpd }
~
IE
I!D
@I
HomeI
/ ~ A aGJkpd p ~ B b
[Ikpd q
I!!I
c
cDkpd r
I!!l
D dI
EnterI
S [!!] E e@]kpd t
I!!J
F fRedefining a Key from the Keyboard
Saving the Key Definitions
LOCKING THE KEYBOARD
Controlling the Keyboard 3-7
You can use the setup-mode Kpd9 Fkeys menu options to enter definitions for the programmable keys and specify how the keys function (i.e., local, remote, or normal). Refer to Chapter 2 of the User's Guide for detailed information on redefining the programmable keys.
In TVI 910, TVI 925, ADDS A2, and native personalities, key definitions are stored in temporary memory. To save them in
battery-backed memory, select Yes for the Save option when you exit setup mode. In TVI 905 personality, key definitions are
automatically saved in battery-backed memory.
Each key can be programmed to send up to 64 characters. Temporary and non-volatile memory both hold up to 1024 characters total for all programmable keys.
Lock keyboard
Unlock keyboard
ESC # or CTRL 0 or CTRL D
ESC" orCTRLN orCTRLB
o
Note CTRL D and CTRL B are recognized only if enhance mode is on(refer to "Enhance Mode" in Chapter 2).
The keyboard lock feature prevents input from the keyboard. When the keyboard is locked,
• The message LOCK appears on the status line • All keys are ignored except
- I
SetUpI,
which unlocks the keyboardLOCAL KEYBOARD COMMANDS
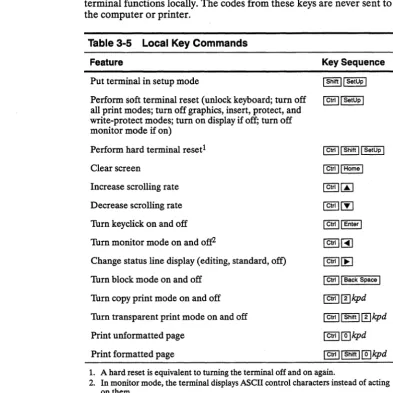
You can use the key sequences listed in Table 3-5 to control some terminal functions locally. The codes from these keys are never sent to the computer or printer.
Table 3-5 Local Key Commands
Feature Key Sequence
Put terminal in setup mode I Shift II SetUp I
Perform soft terminal reset (unlock keyboard; turn off I ctrlll SetUp I
. all print modes; turn off graphics, insert, protect, and write-protect modes; turn on display if off; turn off monitor mode if on)
Perform hard terminal reset! I Ctrt II Shift II SetUp I Clear screen I Ctrl II Home I
Increase scrolling rate I Ctrt
100
Decrease scrolling rate I Ctrl I [y] Turn keyclick on and off I Ctrlll Enter I
Thrn monitor mode on and off2 I ctrll ~
Change status line display (editing, standard, off) I Ctrl I [E) Turn block mode on and off I Ctrl II Back Space I
Turn copy print mode on and off I Ctrlll!lkpd
Thrn transparent print mode on and off I Ctrlll Shift Il!Ikpd
Print unformatted page I Ctrll@]kpd
Print formatted page ~ ~@]kpd
1. A hard reset is equivalent to turning the terminal off and on again.
CONTROLLING BELL AND KEYCLICK
CONTROLLING KEY REPEAT
CONTROLLING CAPS LOCK
Controlling the Keyboard
Sound bell 'fum otT keyclick
'fum on keyclick
3-9
CTRLG ESCe$ or ESC
<
ESCe% or ESC>
These commands control the terminal's bell and keyclick feature. When keyclick is on, the keys make a muted beeping sound when pressed.D
Note The ESC< and
ESC>
commands are recognized only when enhance mode is on (refer to "Enhance Mode" in Chapter 2).You can also toggle keyclick on and off from the keyboard .
• When the Keypad parameter is set to Numeric (setup mode Kpd3 Keybd menu), pressing I Ctrlll Enter
I
or I Ctrlll ShiftII
EnterI
toggles keyclick on and off .• When the Keypad parameter is set to Application pressing
I
ShiftII
EnterI, I
Ctrlll EnterI, or I
CtrlII
ShiftII
EnterI
toggles keyclick on and off.'fum otT key repeat
'fum on key repeat (default)
ESCe,
ESCe-When key repeat is off, the keys do not repeat when held down.
'fum on CAPS LOCK
'fum otT CAPS LOCK (default) Define Caps Lock key as caps (default) Define CAPS LOCK as reverse
Define CAPS LOCK as shift
ESCe& ESCe' ESCeT ESCeU ESCeV When CAPS LOCK is on, the word CAPS is displayed on the status line and, by default (the I CapsLock
I
key defined as caps), alphabetical keys are shifted to uppercase; numerical keys and their shifted mathematical and punctuation symbols are not affected.CHARACTER SET
Graphics Mode
The terminal's character set, illustrated in Figure D-1, contains • Thirty-two ASCII control characters (0 through 31 decimal,
o
through 1F hexadecimal). The control characters recognized by the terminal are listed in Table B-l.• Sixteen line-drawing graphics characters (16 through 31 decimal, 10 through 1F hexadecimal) available when graphics mode is on (see the next section).
• Eighty ASCII alphanumeric characters (32 through 127 decimal, 20 through 7F hexadecimal).
Turn on graphics mode
Tum ott graphics mode
Display one graphics character
where
ESCHCTRLB
ESC H CTRLC ESC Hldraw
ldraw is a value from Table 3-6 (or the corresponding numeric or punctuation key).
The terminal's character set contains 16 line-drawing graphics characters. You can control these characters as a group in graphics mode, or individually with an escape sequence that sends the characters one at a time in the normal operating mode.
When graphics mode is on, sending an Idraw value listed in Table 3-6 displays the corresponding graphics character. You can't send normal alphanumeric text in graphics mode, but you can execute control codes and other commands. When protect mode is on, graphics characters are automatically protected (refer to "Protecting Data" in Chapter 4). When graphics mode is off, you can display a single graphics character from Table 3-6 by entering ESC H and the ldraw value.
Controlling the Keyboard 3-11
Table 3-6 Graphics Character Codes Graphics
Idraw Character Idraw
a
T
41
L
52
r
63
1
7MONITOR MODE
Graphics Graphics
Character Idraw Character
~
8t
J
91
I
I
I
10m on monitor mode 10m otT monitor mode
Idraw
<
=
> ?
Graphics Character
-..1.
II
I
ESCU ESCu or ESC X Monitor mode helps you debug programs. When monitor mode is on, the terminal displays symbolic representations of received codes (including control codes) without acting on them. For example, a carriage return control code is displayed as CR, and no carriage return is executed. Table B-1 lists the symbols for the control codes.
When monitor mode is on,
*
(asterisk) appears on the status line.D
Note You can turn monitor mode on and off from the keyboard byDISPLAYING THE MESSAGE FIELDS
Controlling the Screen
Display
This chapter describes the commands that control the terminal's screen display, cursor movement, and editing functions.
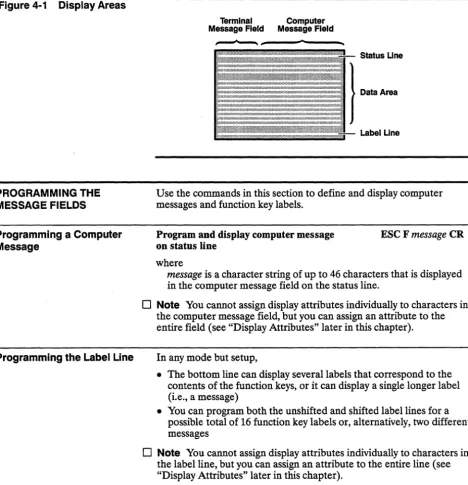
The screen has three main areas (Figure 4-1): the status line, the 24-line data area, and the label line.
• The status line displays terminal status messages on the left and computer messages on the right.
• The data area can display data in one large format (24 lines by 80 columns) or in two areas of a horizontally split screen (Figure 4-2). Each data area on a split screen is called a data segment.
• You can program the label line to display function key labels or messages in the normal operating mode.
The status line can display computer messages, terminal status messages, or both.
• The computer message field can display a message, such as a warning or a prompt, from the computer. The escape sequence for displaying a computer message is explained in the following section.
• The terminal message field displays the current communication mode as well as any editing or keyboard modes in effect. These terminal status messages appear automatically.
Figure 4·1 Display Areas
PROGRAMMING THE MESSAGE FIELDS
Programming a Computer Message
Programming the Label Line
Terminal Computer
Message Field Message Field
Status Une
j--Label Line
Use the commands in this section to define and display computer messages and function key labels.
Program and display computer message on status line
where
ESC F message CR
message is a character string of up to 46 characters that is displayed in the computer message field on the status line.
o
Note You cannot assign display attributes individually to characters in the computer message field, but you can assign an attribute to the entire field (see "Display Attributes" later in this chapter).In any mode but setup,
• The bottom line can display several labels that correspond to the contents of the function keys, or it can display a single longer label (i.e., a message)
• You can program both the unshifted and shifted label lines for a possible total of 16 function key labels or, alternatively, two different messages
Controlling the Screen Display 4-3
Programming a Message
When you program a label line message, the entire bottom line becomes one field. The following commands apply:
Program and display computer message on label line
Program and display computer message on unshifted label line
Program and display computer message on shifted label line
where
text is a character string of up to 78 characters.
ESC ftext CR
ESC z ( text CR
ESC z ) text CR
The ESC f command programs and displays the message on both the shifted and unshifted label line. With the ESC z command you can program separate messages on the unshifted and shifted label lines; the shifted label line message is displayed when I Shift
I is pressed.
The following commands control the display of the label line:
Tum off shifted label line display ESC z DEL Tum on shifted and unshifted label line display ESC g Tum off shifted and unshifted label line display ESCh
o
Note The ESC g and ESC h commands are recognized only when enhance mode is on (see "Enhance Mode" in Chapter 2).The following commands clear the label line message:
Clear unshifted label line ESCz (CR
Programming a Function Key Label
Program and display a function key label
Clear function key label where
ESC z field label CR
ESC z field CR
- field is a field code from Table 4-1. You can label up to eight fields (shiftable to 16)
- label is a character string of up to eight characters
You can label each field (one field at a time) to correspond to a function key's contents. The unshifted function key label is displayed automatically. The shifted function key label is displayed when I Shift
I
is pressed.Table 4-1 Function Key Field Codes
field field field field
Key Unshlfted Shifted Key Unshlfted Shifted
~ Oor8 PorX [!!] 4or< Tor\
IT!] lor9 QorY ~ 50r= Vorl
~ 2or: RorZ [!!] 6or> Vor A
Defining the Data Area
Controlling the Screen Display 4-5
You can change the line and column display either in setup mode or from the computer. (Refer to Chapter 2 of the User's Guide for information about using setup mode.) The display that you select also determines the maximum number of pages that the terminal's memory can hold (see the next section, "Displaying a Page").
Changing the Number of Displayed Columns
Before you change the number of displayed columns, clear the function key labels (see the previous section). You can program them again for the new display width.
Select SO-column display (default) Select 132-column display
ESC' . ESC' ;
Allow for a delay of 150 milliseconds before sending data to the terminal.
Unless width-change-clear mode is on, the screen isn't cleared when the terminal executes these commands. The commands are ignored when economy 80-column mode is on.
aO/132 Width-Change-Clear Mode
Tum off 80/132 width-change-c1earmode (default) Tum on 80/132 width-change-c1ear mode
ESCe. ESCe/
• Caution When width-change-clear mode is on, the terminal clears the screen when executing a command to change the number of columns.
When entering or leaving economy 80-column mode, the terminal clears the screen regardless ofthe status of width-change-clear mode.
Economy aO-Column Mode
Tum otT economy SO-column mode (default) Tum on economy SO-column mode
ESCeF ESCeG
• Caution When executing these commands, the terminal clears the entire display memory, including the status line.
Displaying a Page
CONTROLLING GENERAL DISPLAY FEATURES
Controlling Screen and Cursor Display
Commands to display pages take effect only when multiple page mode is on. The terminal's memory can hold
• Three pages when the normal 80-column or 132-column display is selected
• Six pages when the economy 80-column mode is selected Turn otT multiple-page mode (default)
Turn on multiple-page mode
ESCex ESCey When multiple page mode is off, the terminal ignores commands to display the pages. If multiple page mode is turned on by an escape sequence or in setup mode (Kpd1 Disp menu), the terminal executes commands to display pages.
Display previous page
Display next page
ESCwB or ESC J
ESCwC orESCK
o
Note If the screen is split, the ESC J and ESC K commands activatethe page in the alternate window.
Display specific page ESC w page
where
page is a single digit value that specifies the page number (0-2 for normal80/132-column display or 0-5 for 80-column economy mode).
General display features include the appearance of the screen and the configuration of the three screen areas: the status line, the label line, and the data area. (Figure 4-1 shows the screen areas.)
Turn otT screen display
Turn on screen display (default)
ESC' 8 or ESC 0
ESC' 9 or ESC n These commands control the visibility of the screen display.
o
Note The ESC 0 and ESC n commands are recognized only when enhance mode is on (see "Enhance Mode" in Chapter 2).Turn otT screen saver Turn on screen saver
Displaying the Status Line
Selecting Character Cell Size
Controlling the Screen Display 4-7
When screen saver is on, the screen goes temporarily blank after the terminal is inactive for 15 minutes. Press I Shift
I
to redisplay the data.Reverse screen ESC A 1
Restore normal screen (default) ESC A 0
A normal screen displays light characters on a dark background. A reversed screen displays dark characters on a light background. Set cursor display features ESC \ cursor
where
cursor defines whether or not the cursor is displayed, or in what form it is displayed.
cursor Cursor Display
o
Off1 On (default) 2 Steady block 3 Blinking line 4 Steady line
5 Blinking block (default)
Tum cursor display ofT CTRLW
When enhance mode is on, this command turns off the cursor display.
Tum on editing status line
Tum on standard status line (default) Tum ofT status line display
ESC' a ESC' b ESC ' c The standard status line displays the cursor line and column indicators. The editing status line displays editing status messages (see Table F-l). Computer messages can be displayed on either the standard or editing status line.
D
Note From the keyboard, press I CtrlI
[E] to change the status line display from standard to off to editing.Select 10x13 character cell (80 Hz)
Select lOx15 character cell (70 Hz, default)
ESCe? ESCez The 80 Hz refresh rate (10x13 character cell) minimizes background flicker when the screen is reversed (light background).
SPLIT SCREEN
Figure 4-2 Split Screen Format
Splitting the Screen
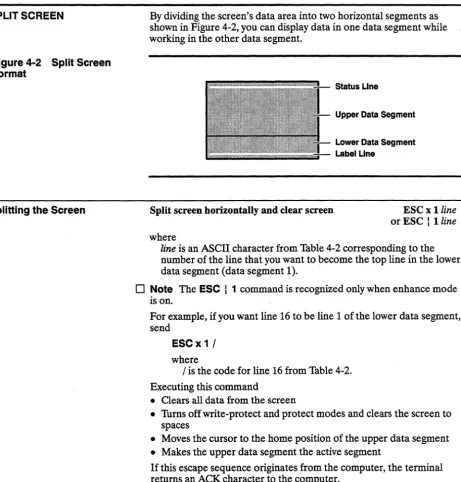
By dividing the screen's data area into two horizontal segments as shown in Figure 4-2, you can display data in one data segment while working in the other data segment.
Split screen horizontally and clear screen
where
Status Line
Upper Data Segment
Lower Data Segment Label Line
ESC x lline or ESC : lline
line is an ASCII character from Table 4-2 corresponding to the number of the line that you want to become the top line in the lower data segment (data segment 1).
o
Note The ESC : 1 command is recognized only when enhance mode is on.For example, if you want line 16 to be line 1 of the lower data segment, send
ESC x 1/ where
/ is the code for line 16 from Table 4-2. Executing this command
• Clears all data from the screen
.• Turns off write-protect and protect modes and clears the screen to spaces
• Moves the cursor to the home position of the upper data segment • Makes the upper data segment the active segment
Activating a Data Segment
Controlling the Screen Display 4-9
Table 4-2 ASCII Line Codes
line line line line
Line Natlve1 ADDSA22 Line Natlve1 ADDSA22
1 SP CTRL@ 13 CTRLL
2 CTRLA 14 CTRLM
3
"
CTRLB 15 CTRLN4 # CTRLC 16 / CTRLO
5 $ CTRLD 17 0 CTRLP
6 % CTRLE 18 1 CTRLQ
7 & CTRLF 19 2 CTRLR
8 CTRLG 20 3 CTRLS
9 ( CTRLH 21 4 CTRLT
10 ) CTRLI 22 5 CTRLU
11
*
CTRLJ 23 6 CTRLV12
+
CTRLK 24 7 CTRLW1. These codes are also recognized in TV! 910+ and TV! 925 personalities and in ADDS A2 personality absolute cursor addressing.
2. Vertical addressing (CI'RL K).
Activate other data segment
Activate upper data segment
Activate lower data segment
ESCJ orESCK ESC] orESCc
ESC} Executing any of these commands returns the cursor to its previous position within the active data segment.
Restoring a Full Screen Format
SCROLLING
Redefine screen as one data segment and clear screen ESCxO or ESC : 0
o
Note The ESC : 0 command is recognized only when enhance mode is on (refer to "Enhance Mode" in Chapter 2).Executing this command returns a split screen to a full screen format and
• Clears all data from the screen
• Resets the display, turning off write-protect and protect modes and clearing the screen to spaces
• Homes the cursor
If this escape sequence originates from the computer, the terminal returns an ACK character to the computer.
Set scrolling speed and type ESC 'scroll
where
scroll is the scrolling type and speed in lines per second (Ips).
scroll Scrolling Type Speed (Ips)
@ Jump scroll (default)
< Smooth scroll 1 Smooth scroll 2 > Smooth scroll 4
? Smooth scroll 8
H Smooth scroll 15
I Smooth scroll 20
Jump scrolling means that the terminal displays characters as fast as it receives them. Smooth scrolling permits you to control the scrolling speed.
AutoscrOlling Mode
Controlling the Screen Display
'fum off autoscrolling mode
'fum on autoscrolling mode (default)
4-11
ESCN
ESC 0
When autoscrolling mode is on, entering a linefeed command while the cursor is on the bottom line or entering a character on the bottom line at the last column position
• Scrolls the data up one line • Inserts a line of space characters
• Moves the cursor to the first position of that line
The line that scrolls off the top of the screen is lost. A reverse linefeed command (I Esc
1
m)
while the cursor is on the top line scrolls the data down one line and inserts a new line of space characters. The line that scrolls off the bottom of the screen is lost.When autoscrolling mode is off,
• Entering a character on the bottom line at the last column position wraps the cursor to the home position (or the first unprotected position)
• Entering a linefeed on the last line wraps the cursor to the same column in the first line
Cursor Modes
DISPLAY ATTRIBUTES
Received CR mode
=
CR (default) Received CR mode=
CRLFESCe4 ESCe5 These commands determine how the terminal responds to a received ASCII CR character-by executing a carriage return (CR) that moves the cursor to the start of the current line, or by executing a linefeed and a carriage return (CRLF) that moves the cursor to the start of the next line.
Tum on autopage mode ESC v
Autopage mode controls whether or not a new page is displayed when the terminal receives a command to move the cursor beyond the top or bottom of the current page. The default state is Autopage=Off (setup-mode Kpdl Disp menu).
When autopage mode is on, a command to move the cursor beyond the top line of the page moves the cursor to the bottom line of the previous page and displays the new page. A command to move the cursor past the bottom line of the page moves the cursor to the top line of the next page and displays the new page.
D
Note If autopage mode is on when only one page is defined, the cursor wraps to the top or bottom of the page and the display adjustsaccordingly.
Display attributes are visual properties that change the way data appears on the screen. The terminal has five display attributes that can be assigned either individually or in combination to characters or to areas of the screen. You can also assign attributes specifically to protected characters. The display attributes are
• Dim • Reverse • Underline • Blink
Assigning Display Attributes to a Message Field
Controlling the Screen Display
Assign display attribute to a message field
where
4-13
ESC Amfattr
or
ESC \ mf attr- mf defines what area of the screen is assigned the display attribute
mf Screen Area
o
Data area 1 Label line2 Terminal message field on status line 3 Computer message field on status line
- attr is a display attribute value from Table 4-3.
Table 4·3 Display Attribute Values aftr SP
o
1 2 3 4 5 6 7 8 9 <=
> ? Display Attribute Space character NormalBlank (no display) Blink
Blink, blank Reverse
Reverse and blank Reverse and blink Reverse, blink, blank Underline
Underline and blank Underline and blink Underline, blink, blank Underline and reverse Underline, reverse, blank Underline, reverse, blink Underline, reverse, blink, blank
aftr Display Attribute
p Dim
q Dim and blank r Dim and blink s Dim, blink, blank t Dim and reverse u Dim, reverse, blank v Dim, reverse, blink w Dim, reverse, blink, blank x Dim and underline y Dim, underline, blank z Dim, underline, blink
{ Dim, underline, blink, blank Dim, underline, reverse } Dim, underline, reverse, blank
Assigning Character Display Attributes
ADDRESSING AND READING THE CURSOR
Assign character display attribute
where
attr is a display attribute value from Table 4-3.
ESC Gattr
The attribute is not hidden, i.e., it occupies the current cursor location, appearing on the screen as a space character.
This sequence assigns display attributes to characters within the data area. The attribute extends to all positions to the right and below the cursor to the end of the screen or line (depending on the attribute mode) or until another attribute is encountered.
The following sequences set the attribute mode:
Set attribute active to end of screen (default)
-Set attribute active to end of line
ESC A 2
ESC A 3
The following sequence clears unprotected characters to a display attribute (Table 4-3).
Clear unprotected characters to display attribute ESC! attr
The same attribute is assigned to every unprotected character position. This makes it easy to create forms that display primarily one kind of attribute for all fields. You can also clear the entire screen to the normal attribute (Esc I 0) to eliminate flashing when generating a form (that is, the attribute will not flash onto the screen to the right of the cUrsor but will display only where data is entered).
o
Note If you have Cleared unprotected characters to any attribute except the normal attribute, avoid entering data in the first screen position (line 1, column 1) or the attribute won't take effect in the top line.The following rules apply to cursor movement commands:
• If the screen is split, the cursor can move only within the active data segment unless you include a specific command to move it outside that area
Addressing the Cursor
Controlling the Screen Display 4-15
Address cursor in current SO/132- column page ESC a II R ccc C or ESC d 11 R ccc C where
- II is the one- or two-digit decimal value of the line relative to home
- ccc is the one-, two- or three-digit decimal value of the column relative to home
This sequence moves the cursor relative to the home position. If the screen is split horizontally, the cursor is positioned relative to the first line of the active data segment.
For example, the sequence ESC a 10R 12 C
positions the cursor at line 10, column 12 of a full screen. If the screen is split, the sequence positions the cursor at column 12 on the tenth line of the active data segment.
When the screen is not split, the sequence ESC a 1 R 1 C
positions the cursor at the home position (line 1, column 1). When the screen is split, the sequence positions the cursor at column 1 on the top line of the active data segment.
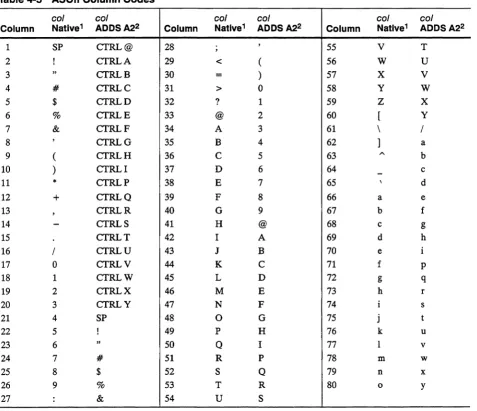
Address cursor to line in current SO-column page Address cursor to column in current SO-column page
Address cursor to line and column in current SO-column page
where
ESC [line
ESC col
or CTRL
P
colESC
=
line col- line is a line code from Table 4-4 that corresponds to the line where you want the cursor to be positioned
- col is a column code from Table 4-5 that corresponds to the column where you want the cursor to be positioned
o
Note CTRL P is recognized only when enhance mode is on (see "Enhance Mode" in Chapter 2).Address cursor in specific SO-column
where
- seg defines the data segment where the cursor will be moved
seg/page Page or seg/page Page or
Data Segment Data Segment
o
Page 0 or upper segment 3 Page 3 1 Page 1 or lower segment 4 Page 42 Page 2 5 Page 5
- line is the line code from Table 4-4 that corresponds to the line where you want the cursor to be positioned
- col is a column code from Table 4-5 that corresponds to the column where you want the cursor to be positioned
Home cursor ESC {
orCTRL A
These commands home the cursor, either on a full screen or within the active data segment of a split screen.
Table 4-4 ASCII Line Codes
line
Line Native 1
1 2 3 4 5 6 7 8 9 10 11 12 SP # $ % & ( ) * + line ADDSA22 CTRL@ CTRLA CTRLB CTRLC CTRLD CTRLE CTRLF CTRLG CTRLH CTRLI CTRLJ CTRLK Line 13 14 15 16 17 18 19 20 21 22 23 24 line Natlve1 /
o
1 2 3 4 5 6 7 line ADDSA22 CTRLL CTRLM CTRLN CTRLO CTRLP CTRLQ CTRLR CTRLS CTRLT CTRLU CTRLV CTRLW 1. These codes are also recognized in TVI 910+ and TV! 925 personalities and in ADDSControlling the Screen Display 4-17
Table 4-5 ASCII Column Codes
col col col col col col
Column Natlve1 ADDSA22 Column Natlve1 ADDS A22 Column Natlve1 ADDSA22
1 SP CTRL@ 28 , , 55 V T
2 ! CTRLA 29 < ( 56 W U
3 " CTRLB 30
=
) 57 X V4 # CTRLC 31 > 0 58 Y W
5 $ CTRLD 32 ? 1 59 Z X
6 % CTRLE 33 @ 2 60 [ Y
7 & CTRLF 34 A 3 61 \ /
8 , CTRLG 35 B 4 62 ] a
9 ( CTRLH 36 C 5 63 '" b
10 ) CTRLI 37 D 6 64
-
c11 * CTRLP 38 E 7 65 \ d
12 + CTRLQ 39 F 8 66 a e
13 , CTRLR 40 G 9 67 b f
14
-
CTRLS 41 H @ 68 c g15 CTRLT 42 I A 69 d h
16 / CTRLU 43 J B 70 e i
17 0 CTRLV 44 K C 71 f P
18 1 CTRLW 45 L D 72 g q
19 2 CTRLX 46 M E 73 h r
20 3 CTRLY 47 N F 74 i s
21 4 SP 48 0 G 75 j t
22 5 ! 49 P H 76 k u
23 6 " 50 Q I 77 1 v
24 7 # 51 R P 78 m w
25 8 $ 52 S Q 79 n x
26 9 % 53 T R 80 0 Y
27 : & 54 U S
Reading the Cursor Address The terminal responds to the following escape sequences by sending the screen coordinates of the cursor position to the computer. The response to the ESC? command is in the form of line and column . codes; the response to the ESC b command is in decimal values
relative to home.
Read cursor address in current SO-column page ESC?
The terminal returns a three-byte address in the format line col CR
where
line is the line code (Table 4-4) and col is the column code (Table 4-5).
--For example, if the cursor is at line 10, column 8, the terminal sends ) • CR or, in hexadecimal, 29H 27H OOH.
Read cursor address in current SO/132-column page
The terminal returns a seven-byte address in the format IIRcccC
where
ESCb
- 11 is the one- or two-digit decimal value of the line relative to home
- ccc is the one-, two, or three-digit decimal value (with a leading zero) of the column relative to home.
For example, if the cursor is on line 10, column 8, the terminal sends 10R008C
o
Note A CR character is not sent after the coordinates.Read SO-column data segment/page number
and cursor address ESC /
The terminal returns the number of the active data segment and the cursor address in the format
seg/page line col CR where
- seg/page is the data segment or page number (0 = page
°
or upper segment; 1 = page 1 or lower segment; 2-5=pages 2-5)-line
is the line code (Table 4-4)MOVING THE CURSOR
TAB STOPS
Setting a Tab Stop
Controlling the Screen Display
Move cursor to start of line
Move cursor to start of next line; scroll Move cursor right one column
Move cursor right one column (enhance mode on) Move cursor left one column (backspace)
Move cursor left one column (backspace) (enhance mode on)
Move cursor down one line in current column; scroll (linefeed)
Move cursor down one line in current column; no scroll Move cursor up one line in current column; wrap Move cursor up one line in current column; scroll (reverse linefeed)
4-19
CTRLM CTRL CTRLL CTRLF
CTRLH
CTRLU
CTRLJ
CTRLV CTRLK ESCj
These commands move the cursor within the data area. What happens when the cursor moves past the last character position on the bottom line, or the first character position on the top line, depends on whether the command calls for the cursor to scroll or wrap or neither.
• Scroll-A new line is inserted, the cursor moves onto it, and a line at the opposite end of the screen (top or bottom) scrolls off the screen. Data on the scrolled-off line is lost.
o
Note Protected data cannot be scrolled off the screen.• Wrap-The cursor simply wraps from top to bottom (or bottom to top) of the screen (or active data segment). No new line is added and no data is lost.
• No Scroll or Wrap-The cursor does not move beyond the top or bottom line; characters in the last position on the line are
overwritten.
These commands let you set tab stops, move the cursor to those stops, and clear the tab stops either individually or as a group.
Set tab stop at cursor position Clear tab stop at cursor position Clear all tab stops
Tabulating
CREATING PROTECTED FORMS
Writing Data to be Protected
Tabulate cursor ESCi
orCTRLI This sequence moves the cursor to the next tab stop. If the current line doesn't contain any more tab stops, the cursor wraps around to the next line to find another tab stop. If the tab stop is on a protected position, the cursor moves to the next unprotected position.
Backtab ESC I
This sequence moves the cursor to the previous tab stop. If the current line doesn't contain any more tab stops, the cursor wraps back to the previousline to find another tab stop. If the tab stop is on a protected position, the cursor moves to the previous unprotected